
Все способы:
- Способ 1: Отключение брандмауэра Windows
- Способ 2: Временное отключение антивируса
- Способ 3: Запуск Hamachi от имени администратора
- Способ 4: Перезапуск службы Hamachi
- Способ 5: Добавление Hamachi в список разрешений для брандмауэра
- Способ 6: Переустановка Hamachi
- Вопросы и ответы: 4
Способ 1: Отключение брандмауэра Windows
Проблема с текстом «Заблокирован входящий трафик, проверьте настройки сетевого экрана» при работе в Hamachi чаще всего связана с действием стандартного межсетевого экрана операционной системы, поэтому первоочередная задача — временно отключить этот компонент. Для этого рекомендуем воспользоваться отдельным руководством на нашем сайте, перейдя по ссылке ниже.
Подробнее: Отключение брандмауэра в Windows 10

Если это не помогло, брандмауэр можно снова включить, выполнив обратные действия. Связано это с тем, что в одном из следующих методов мы еще поговорим о данном компоненте.
Способ 2: Временное отключение антивируса
Во многие антивирусы от сторонних разработчиков тоже встроен межсетевой экран, влияющий на работу определенных приложений. Он может оказаться причиной блокировки входящего трафика, поэтому данному инструменту тоже стоит уделить время. О том, как временно отключить антивирус для проверки его активности, другой наш автор рассказывает в отдельной тематической статье далее.
Подробнее: Как отключить антивирус
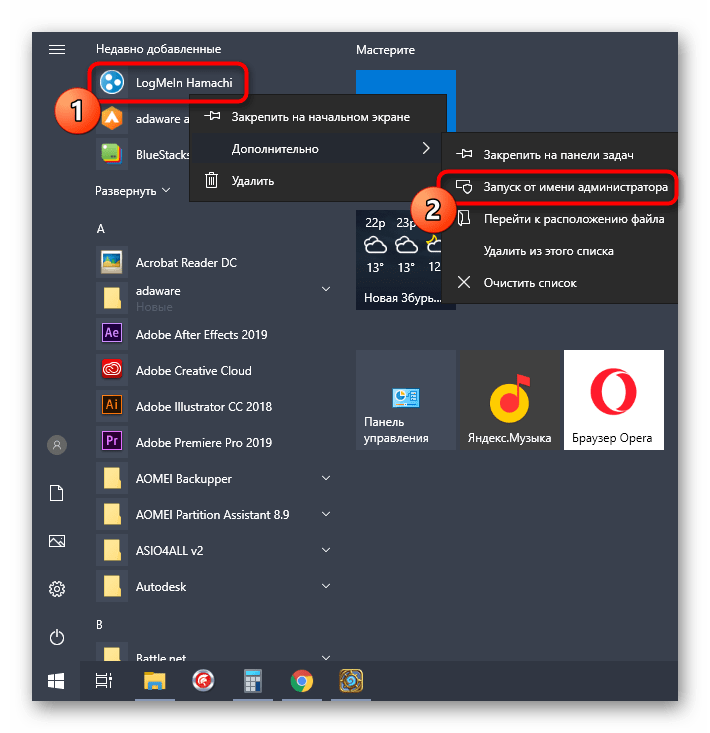
Способ 3: Запуск Hamachi от имени администратора
Еще одна причина появления ошибки с текстом «Заблокирован входящий трафик, проверьте настройки сетевого экрана» — ограниченные права пользователя, из-за чего возникает потребность запустить софт от имени администратора. Для этого необходимо найти ярлык или исполняемый файл, щелкнуть по нему правой кнопкой мыши и в появившемся контекстном меню выбрать соответствующий пункт.
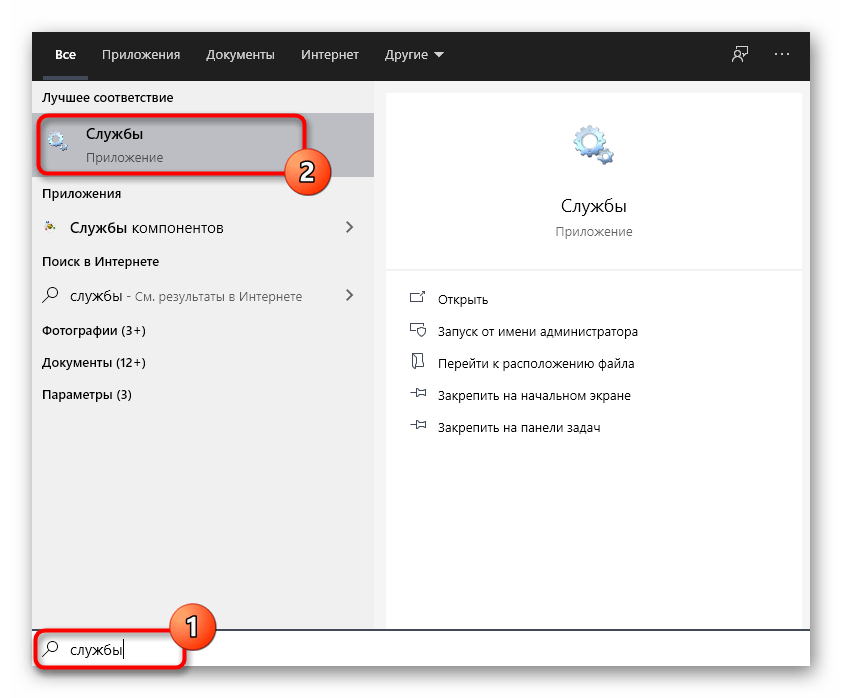
Способ 4: Перезапуск службы Hamachi
За нормальное функционирование рассматриваемой программы в операционной системе отвечает одна фирменная служба, от которой все и зависит. Если по каким-то причинам она дала сбой, вполне возможны проблемы с передачей входящего трафика в софте. Для решения этой ситуации потребуется перезапустить службу, что происходит так:
- Откройте меню «Пуск», через поиск отыщите приложение «Службы» и вызовите его.
- В списке вас интересует «LogMein Hamachi Tunneling Engine». Нажмите дважды по этой строке для перехода в окно со свойствами.
- В нем остановите, а затем повторно запустите данную службу.
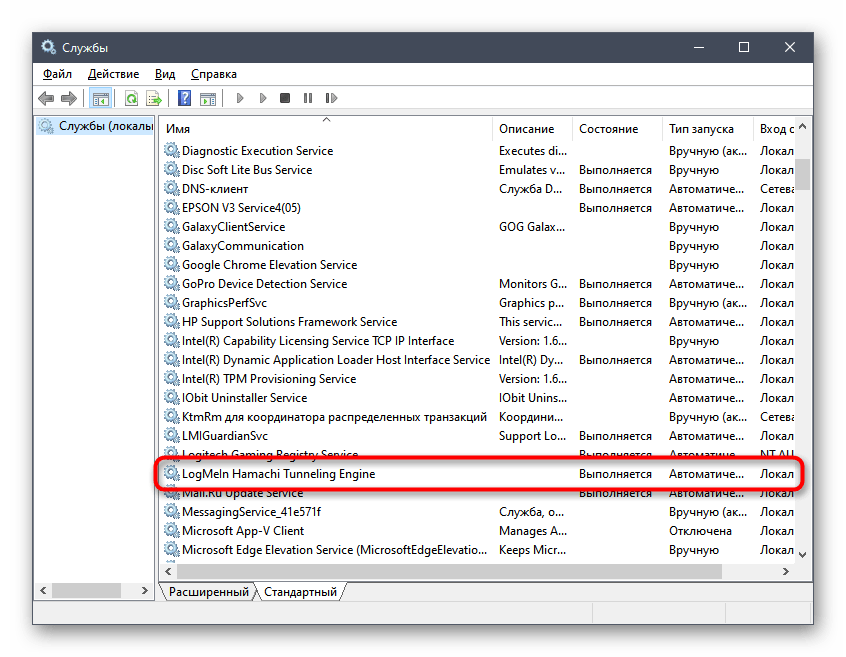
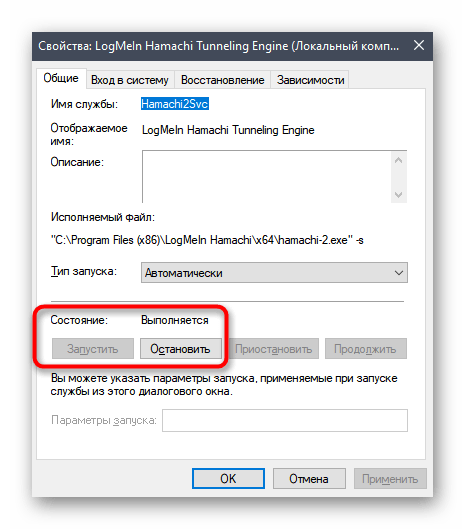
Вернитесь к Hamachi и начните повторную проверку входящего подключения. Если результат до сих пор отрицательный, рассмотрите следующие методы.
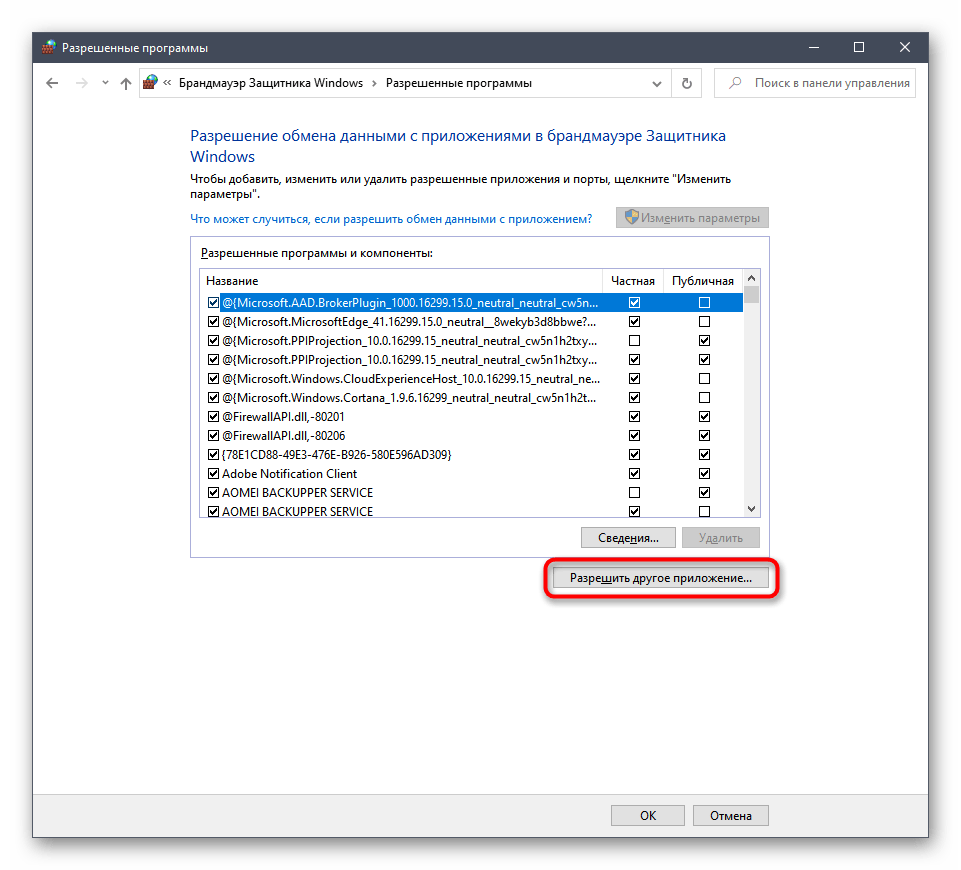
Способ 5: Добавление Hamachi в список разрешений для брандмауэра
Ранее мы уже говорили о том, что брандмауэр Windows иногда оказывает негативное влияние на работу сетевых программ, и предлагали его просто отключить. В некоторых случаях это не помогает, поэтому приходится оставлять межсетевой экран включенным, но дополнительно добавить Хамачи в список разрешенного софта, что происходит так:
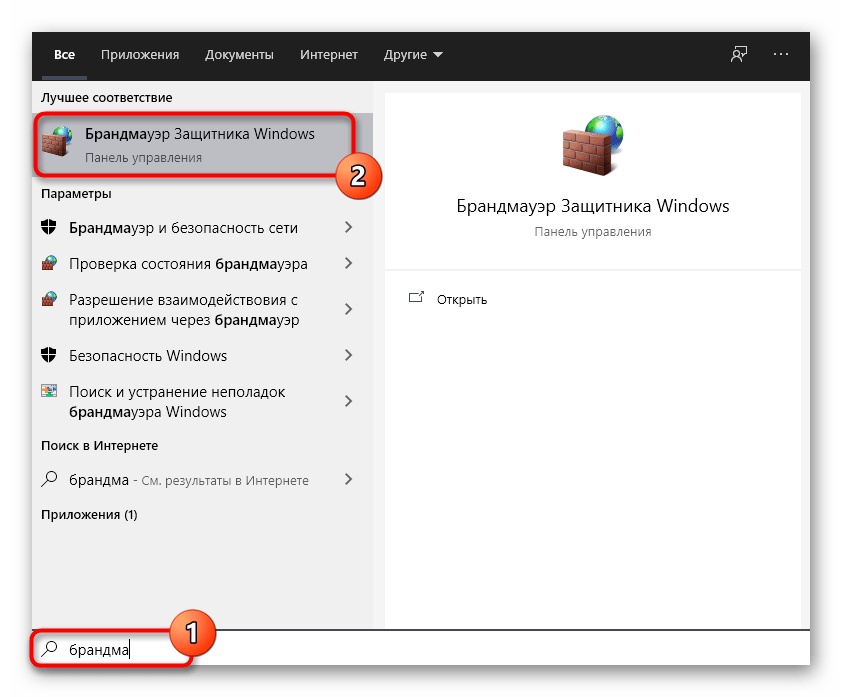
- Откройте «Пуск» и снова отыщите элемент «Брандмауэр Защитника Windows», воспользовавшись функцией поиска.
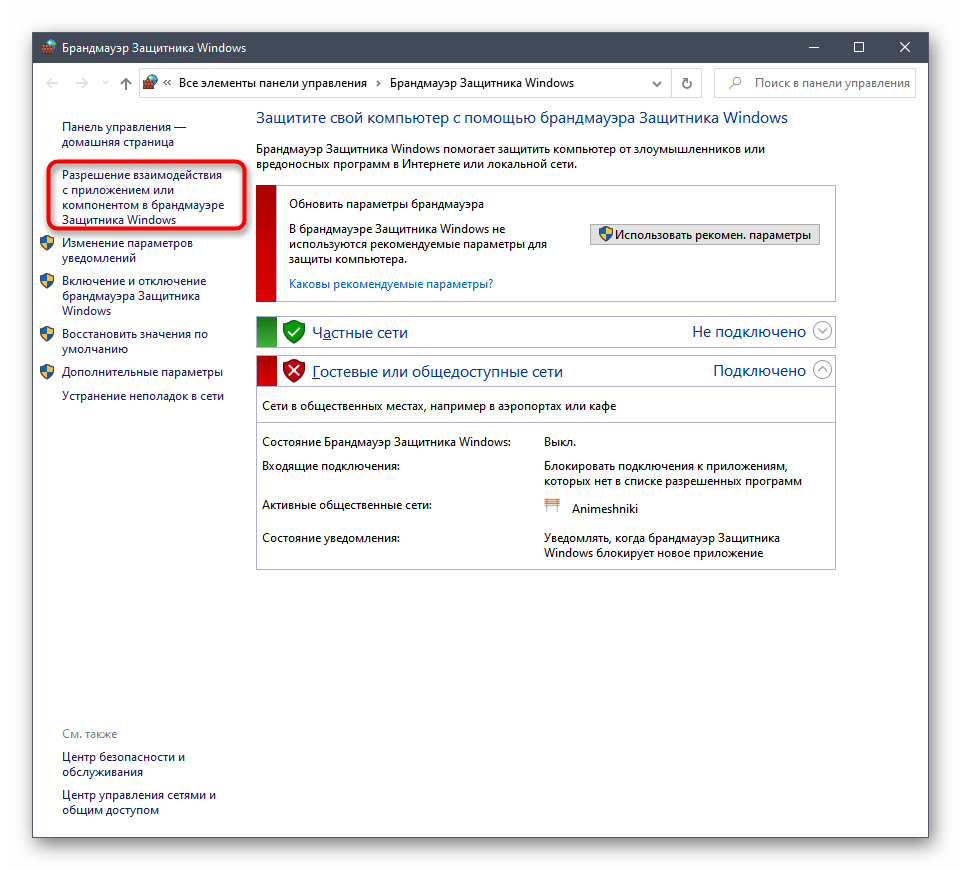
- В появившемся окне обратите внимание на панель слева, где необходимо кликнуть по строке «Разрешение взаимодействия с приложением или компонентом в брандмауэре Защитника Windows».
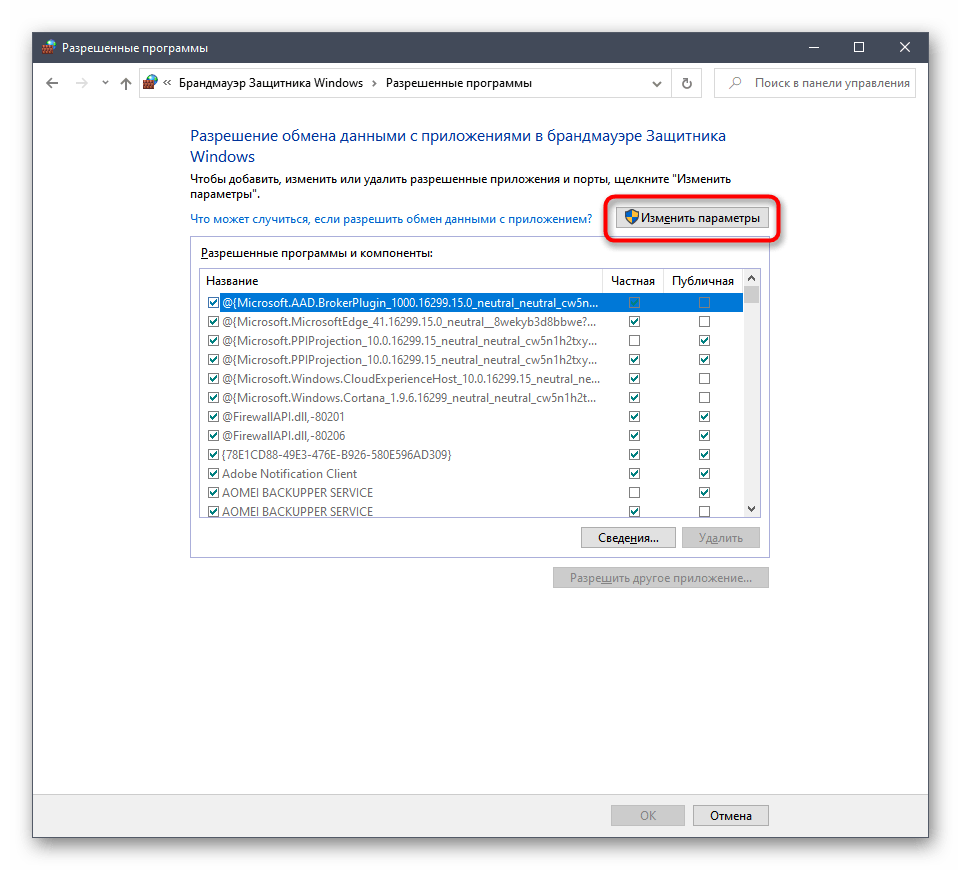
- Сейчас настраивать разрешения нельзя, поэтому предварительно потребуется нажать на «Изменить параметры».
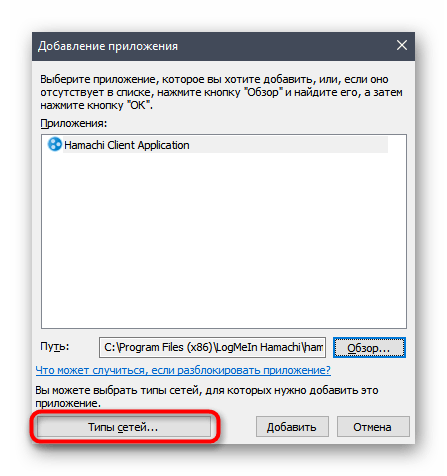
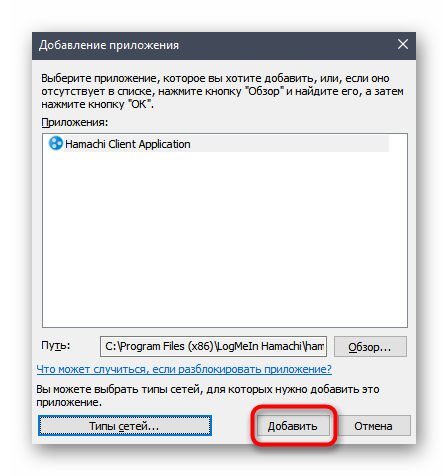
- После этого используйте кнопку «Разрешить другое приложение», поскольку изначально Hamachi отсутствует в основном списке.
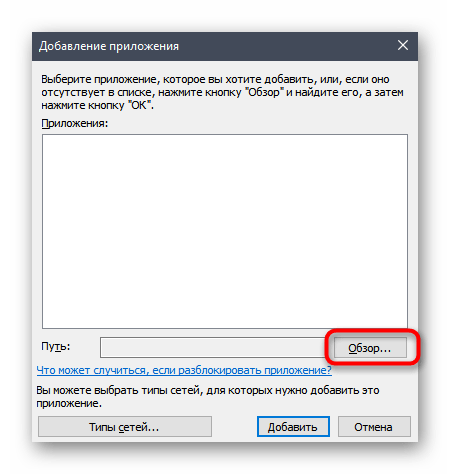
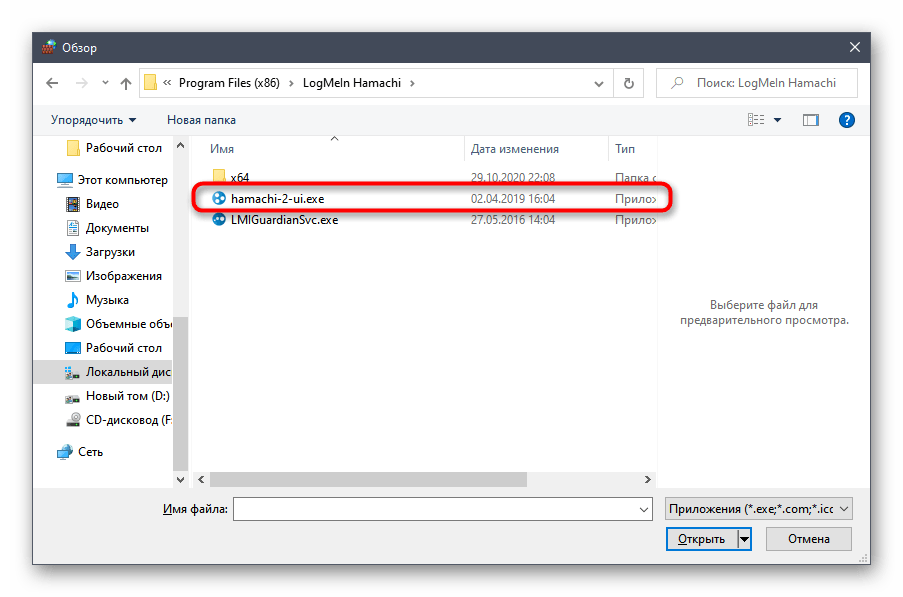
- Отобразится новое окно, где перейдите к обзору через «Проводник», чтобы отыскать исполняемый файл софта.
- Найдите EXE-объект, отвечающий за запуск Хамачи, и дважды щелкните по нему ЛКМ для выбора.
- Сразу же переместитесь к меню «Типы сетей».
- Убедитесь, что разрешения установлены для используемого типа сети, а если это не так, самостоятельно добавьте галочку.
- Вернитесь к предыдущему окну и подтвердите добавление программного обеспечения в список разрешенного.
Способ 6: Переустановка Hamachi
Завершает список возможных методов исправления рассматриваемой проблемы переустановка Хамачи. Это самый радикальный вариант, переходить к выполнению которого нужно в том случае, если ничего из вышеперечисленного не помогло. Для начала полностью деинсталлируйте данное приложение, реализовав ряд действий, о которых написано в специализированном руководстве на нашем сайте по ссылке ниже.
Подробнее: Полное удаление программы Hamachi
Как только удаление ПО завершено, загрузите его последнюю версию с официального сайта, установите и произведите полную настройку, чтобы обеспечить нормальное функционирование приложения. Для этого тоже предлагаем воспользоваться нашей инструкцией, кликнув по следующему заголовку.
Подробнее: Настройка Hamachi в Windows
Наша группа в TelegramПолезные советы и помощь
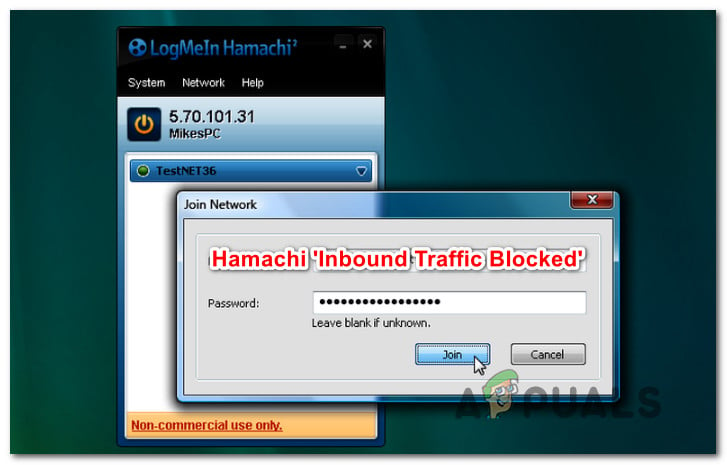
Several Windows users have been struggling to set up and use Hamachi after encountering the “Inbound Traffic blocked, check firewall settings” error. Typically, this error is reported to occur when users try to configure it in order to play a game or after the computer has been reformated or upgraded to a newer Windows build. As it turns out, the issue is not exclusive to a certain Windows version since it’s also reported to occur on Windows 10, Windows 8.1 and Windows 7.
What is causing the “Inbound Traffic blocked, check firewall settings” error?
We investigated this particular issue by looking at various user reports and the repair strategies that are commonly being used to resolve this particular issue. As it turns out, there are several different potential culprits that might be responsible for this particular issue:
- Hamachi is among the list of Protected Networks – One of the most common culprits that produce this error is when Hamachi is among the list of Protected Network Connection. Several users that have encountered this exact problem have reported that they managed to resolve the issue by customizing the default Protection network connection.
- Hamachi is being blocked by Windows Firewall – Another common scenario in which this error occurs is when LogMeIn Hamachi is ending up being blocked by your Windows Firewall. If this scenario is applicable, one quick fix around this issue is to add Hamachi to the list of excluded Firewall items.
- Windows Firewall doesn’t have an inbound rule for Hamachi – If your firewall security settings are strict, I can guarantee that Hamachi will not be able to maintain inbound connections. An elegant way that will allow you to keep your current firewall security level and use Hamachi is to establish an inbound rule for the VPN network.
- Hamachi driver is missing or incomplete – As it turns out, this particular error can also occur if Hamachi is missing the tunneling driver or the driver was not installed correctly. In this case, you will be able to resolve the issue by installing the missing Hamachi driver manually by using Device Manager.
If you’re currently struggling to resolve the very same error message, this article will provide you with some troubleshooting guides. Down below, you’ll find a collection of methods that other users in a similar situation have successfully used to fix the “Inbound Traffic blocked, check firewall settings” error.
Each of the potential fixes presented below is confirmed to work by at least one affected users. Since the methods are ordered by efficiency and difficulty, we advise you to follow them in the order that they are presented. One of them is bound to resolve the issue regardless of the culprit that is actually causing it.
Method 1: Removing Hamachi from the list of Protected Network Connections (if applicable)
If you’re encountering this issue with Hamachi and you’re using the default Windows security protection (Windows Defender + Windows Firewall), chances are the issue is occurring because your firewall is blocking inbound connections in an attempt to protect the virtual network.
Note: If you’re not using Windows Firewall as the default network protection software, move down directly to Method 4 as this one will not make a difference.
Several affected users have reported that they managed to resolve the issue by accessing the Windows Defender Firewall settings and customizing the default Protection network connection behavior so that Hamachi is excluded from the list of protected items.
Here’s a quick guide on removing Hamachi from the list of Protected Network Connections:
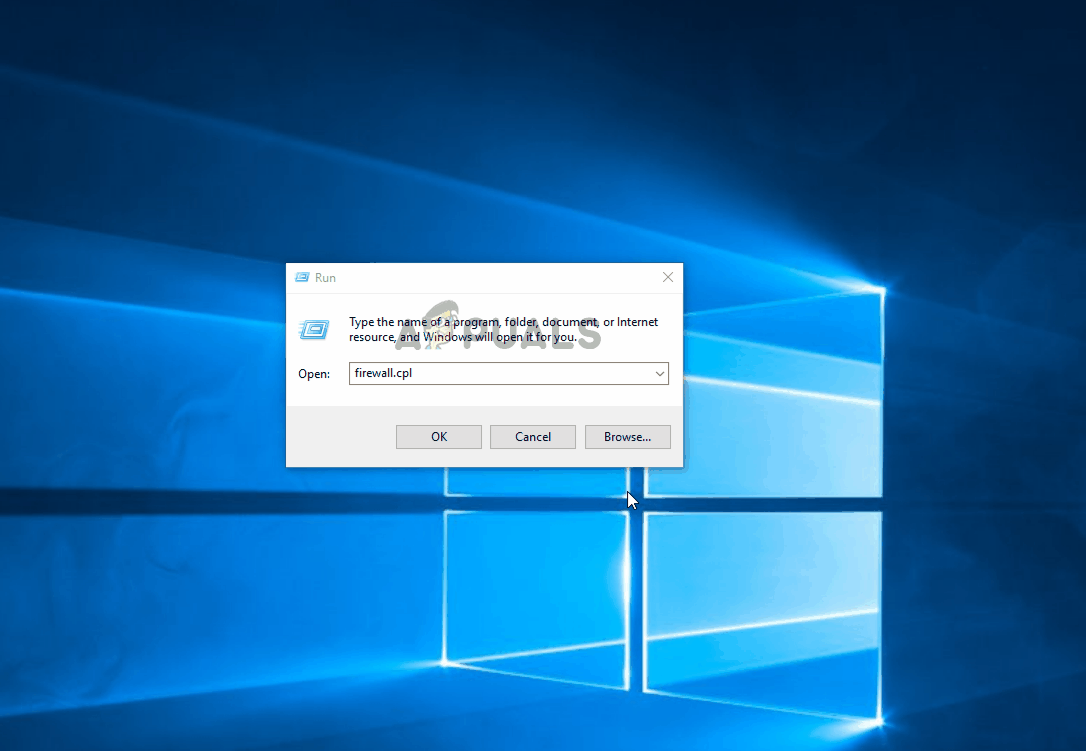
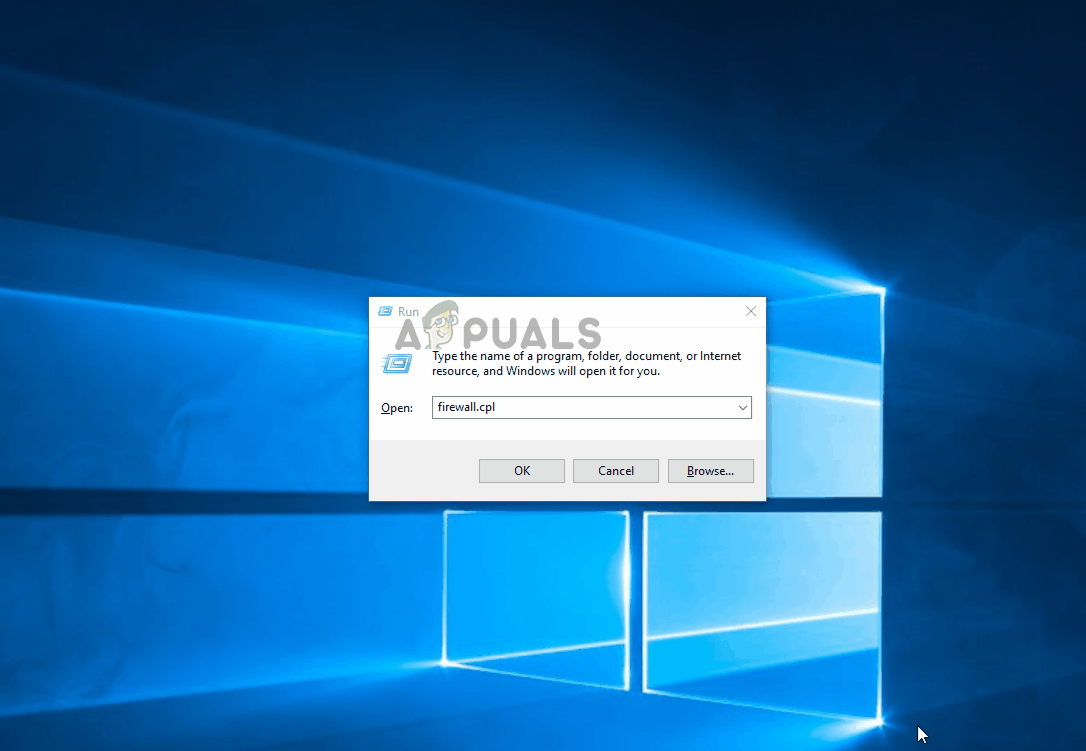
- Press Windows key + R to open up a Run dialog box. Then, type “firewall.cpl” and press Enter to open up the Windows Defender Firewall menu.
- Once you get to the Windows Defender Firewall menu, click on Advanced settings from the vertical menu on the left section of the screen.
- When you get to the Windows Defender Firewall with Advanced Security window, move over to the right pane. Once you’re there, scroll down to the bottom of the Overview section and click on Windows Defender Firewall Properties.
- Inside the Windows Defender Firewall with Advanced Security window, select the Public Profile tab, then click on the Customize button associated with Protected network connections.
- Next, inside the Protected Network Connections for the Public Profile window, you should see a list of Network connection. If Hamachi is present there, uncheck the box associated with it and click Ok.
- Click Apply to save the new configuration.
- Restart your computer and see if the “Inbound Traffic blocked, check firewall settings” error is resolved once the next startup sequence is complete.
Note: Keep in mind that if you have multiple computers connected to the same Hamachi network, you need to repeat this step with every connected machine.
If you’re still encountering the same error message while trying to use Hamachi or this method wasn’t applicable, move down to the next method below.
Method 2: Adding Hamachi to the list of excluded Firewall items
Some affected users have been able to resolve the issue entirely by adding the main Hamachi executable to the list of excluded Firewall items. This might seem like a risky procedure, but it isn’t as long as you trust the Hamachi network that you’re using. We’ve seen this fixed being confirmed a couple of times and it seems to that the likelihood of success is higher on Windows 10.
Note: If you’re using a 3rd party firewall, move directly to Method 4.
Here’s a quick guide on adding Hamachi to the list of excluded Firewall items:
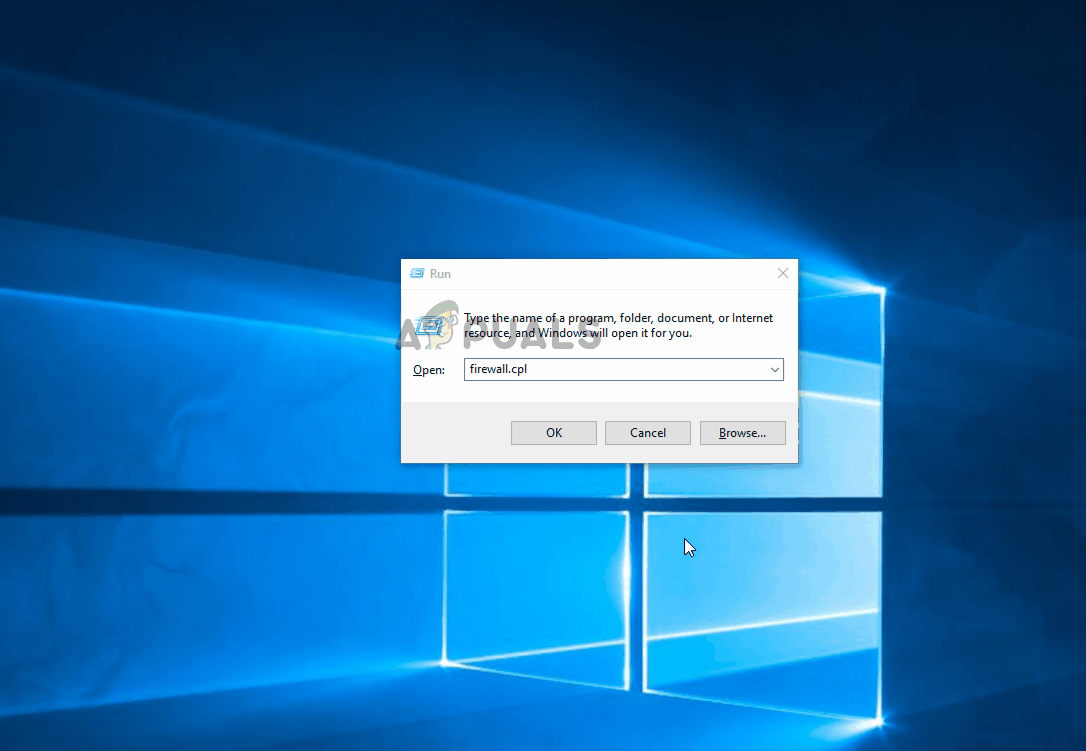
- Press Windows key + R to open up a Run dialog box. Then, type “firewall.cpl” and press Enter to open up the Windows Defender Firewall menu.
- Once you’re inside the Windows Defender Firewall window, click on Allow an app or feature through Windows Defender Firewall from the vertical menu on the left section of the screen.
- Inside the Allowed apps menu, click on Allow another app (under the list of Allowed apps and features).
Note: If the Allow another app button is greyed out, click on the Change settings button at the top and accept the UAC (User Account Prompt). After you do this, the button will become available. - From the Add an app menu, click on Browse and navigate to the following location, select hamachi-2.exe and click Open:
C:\Program Files (x86)\LogMeIn Hamachi\x64
Note: If you’re using a 32-bit Windows version, navigate here instead, select hamachi-2-ui.exe and click Open:
C:\Program Files (x86)\LogMeIn Hamachi
- If the selected app shows Hamachi Client Tunneling Engine, click on Add to add the main Hamachi executable to the exception list.
- Make sure that the changes are saved, then restart your computer and see if the issue has been resolved once the next startup sequence is complete.
If you’re still encountering the “Inbound Traffic blocked, check firewall settings” error when trying to use Hamachi (or this method wasn’t applicable), move down to the next method below.
Method 3: Creating a new inbound rule for Hamachi
If the first two methods above didn’t resolve the “Inbound Traffic blocked, check firewall settings” error and you are using Windows Firewall, then you should be able to resolve the issue by establishing a new inbound rule for Hamachi. This procedure is a little more advanced than the first two, but you should be able to get the job done if you follow the instructions carefully.
Several affected users that have also been encountering this issue have reported that they managed to resolve the issue by creating a new inbound rule that excluded Hamachi from the list of managed items.
Here’s a quick guide on how to create a new inbound rule for Hamachi:
- Press Windows key + R to open up a Run dialog box. Then, type “firewall.cpl” and press Enter to open up the Windows Defender Firewall window.
- Once you’re inside the Windows Defender Firewall menu, click on Advanced settings from the vertical menu on the left section of the screen to access the Advanced Security options of Windows Firewall.
- When you’re inside the Windows Defender Firewall with Advanced Security window, click on Inbound Rules from the vertical menu on the left.
- Next, move over to the right section of the screen and click on New Rule (under Actions).
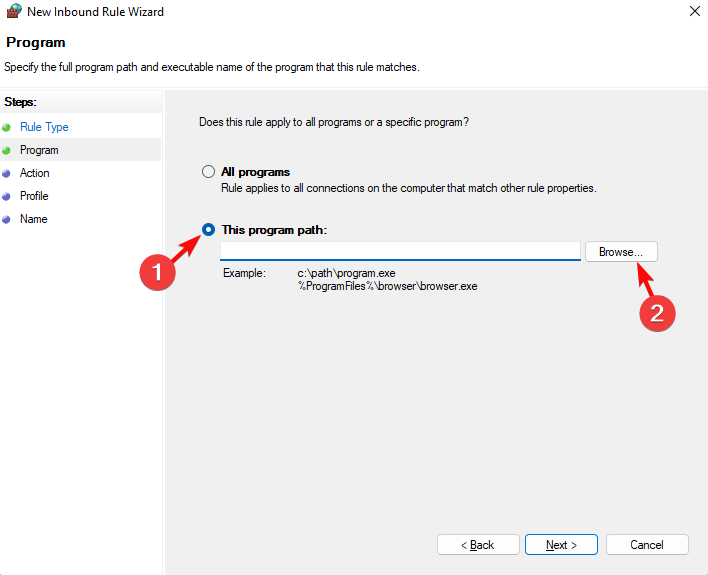
- Inside the New Inbound Rule Wizard, make sure that the Rule Type is set to Program and click Next to advance to the next menu.
- Once you get to the Program step, select the toggle associated with This program path and click Browse.
- Then, use the Open window to navigate to the following location, select hamachi-2.exe and click Open:
C:\Program Files (x86)\LogMeIn Hamachi\x64
Note: If you’re using a 32-bit Windows version, navigate here instead, select hamachi-2-ui.exe and click Open:
C:\Program Files (x86)\LogMeIn Hamachi
- Once the correct executable is selected, return to the New Inbound Rule Wizard once again and click Next.
- On the Action step, ensure that the toggle associated with Allow the connection is checked and click Next once again.
- Ensure that the rule applies to Domain, Private and Public by checking the boxes associated with each one and click Next.
- Name your new rule something suggestive like “Hamachi Tunneling” and click Finish to enforce the rule.
- Restart your computer and see if the issue is resolved once the next startup sequence is complete.
If you’re still seeing the “Inbound Traffic blocked, check firewall settings” error or this fix wasn’t applicable, move down to the next method below.
Method 4: Installing the LogMeIn Hamachi driver manually
It’s also possible that you’re encountering the issue because the main LogMeIn Hamachi driver that is supposed to handle the inbound connection was not installed correctly. Several affected users have reported that the issue was resolved after they used Device Manager to manually install the required driver via the .ini file.
Although this sounds like a technical procedure, it’s quite simple if you follow the instructions to the letter. Here’s what you need to do:
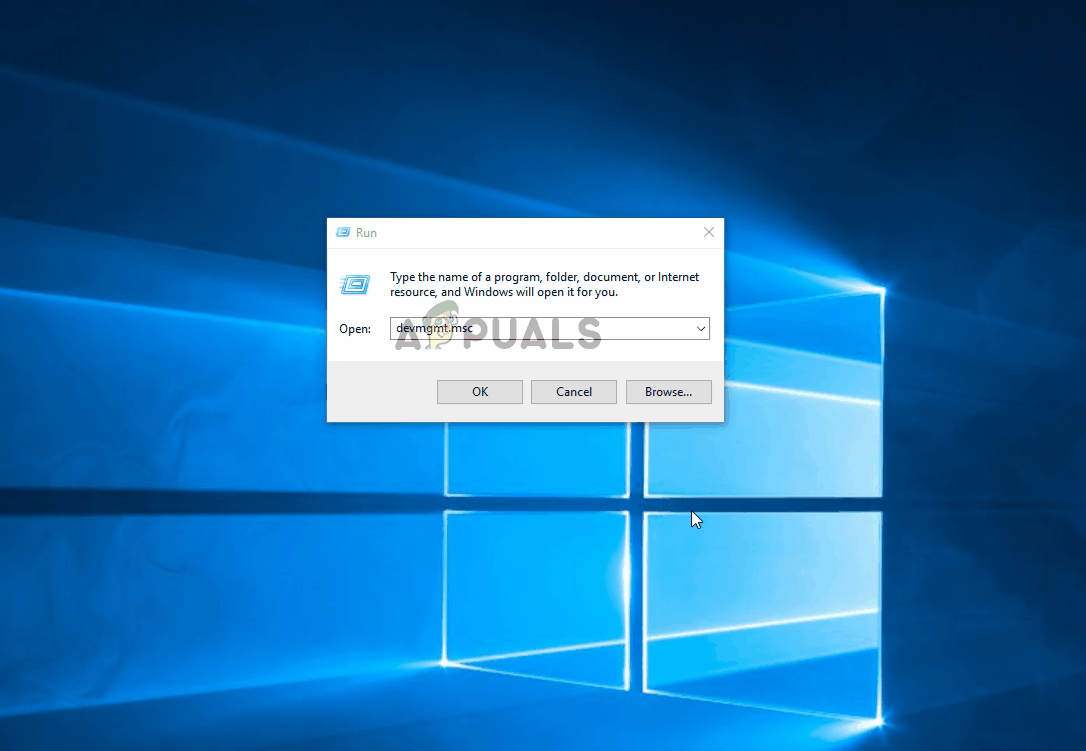
- Press Windows key + R to open up a Run dialog box. Then, type “devmgmt.msc” and press Enter to open up Device Manager. If you’re prompted by the UAC (User Account Control), click Yes to grant administrative privileges.
- Inside Device Manager, click on Actions from the ribbon bar at the top, then click on Add legacy hardware from the context menu.
- Inside the Add Hardware wizard, click Next at the first prompt, then select the toggle associated with Install the hardware that I manually select from a list (Advanced) and click Next once again.
- From the list of Common hardware types window, scroll down to Network adapters and double click on it.
- Once you get to the next screen, click the Have Disk button on the left section of the screen.
- Inside the Install from Disk window, click the Browse button, navigate to the following location, select hamachi.inf and click Open. Then, click OK to load the .ini driver inside Device Manager.
- When you return to the Add Hardware window, click Next once again.
- Click Next to kickstart the Hamachi driver installation and follow the on-screen instructions to complete the installation.
- Once the installation is complete, restart your computer and see if the issue is resolved once the next startup sequence is complete.
Kevin Arrows
Kevin Arrows is a highly experienced and knowledgeable technology specialist with over a decade of industry experience. He holds a Microsoft Certified Technology Specialist (MCTS) certification and has a deep passion for staying up-to-date on the latest tech developments. Kevin has written extensively on a wide range of tech-related topics, showcasing his expertise and knowledge in areas such as software development, cybersecurity, and cloud computing. His contributions to the tech field have been widely recognized and respected by his peers, and he is highly regarded for his ability to explain complex technical concepts in a clear and concise manner.
Readers help support Windows Report. We may get a commission if you buy through our links.
Read our disclosure page to find out how can you help Windows Report sustain the editorial team. Read more
If you are unable to set up Hamachi and want to know how to allow the app through Firewall, you are at the right place.
When trying to set up Hamachi, you may often come across errors such as Inbound Traffic blocked, check firewall settings, which arise due to the Firewall blocking the application.
Why does Firewall block Hamachi?
There could be different reasons why the Firewall may block Logmein Hamachi as below:
- Hamachi is included in the list of Protected Network Connections – If the application is among the protected networks, you may have difficulty accessing it.
- Firewall is blocking Hamachi – Sometimes, the Firewall may block the VPN considering it harmful.
- No inbound rule in Firewall for Hamachi – The application fails to maintain inbound connections due to strict firewall settings.
How do I allow Hamachi through Firewall?
Make sure to run a few preliminary checks to rule out any other issues:
- Disable any 3rd party antivirus.
- Allow the app in the antivirus.
- Restart your PC. If your computer is stuck on restarting, rest assured we have a remedy for this issue.
1. Add Hamachi to the list of excluded Firewall items
- Press the Win + R to open the Run console, type firewall.cpl, and press Enter to launch Windows Defender Firewall.
- In the Windows Defender Firewall screen, click on Allow an app or feature through Windows Defender Firewall on the left.
- Next, in the Allowed applications window, click on Change settings.

- Now, under Allowed apps and features, click on Allow another app at the bottom.

- In the Add an app dialog, click on Browse.
- Next, in the File Explorer window, navigate to the following location:
C:\Program Files (x86)\LogMeIn Hamachi\x64 - If using a 32-bit Windows version, navigate to the below path instead:
C:\Program Files (x86)\LogMeIn Hamachi - Here, double-click on hamachi-2.exe to add it to the applications list.

- It should show Hamachi Client Tunneling Engine, click on Add. Press OK to save the changes and exit.


Restart your PC, and Hamachi is successfully added to the Firewall exception list.
But, if Windows Defender is not working, here we have a comprehensive guide on how to fix it in a few quick steps.
2. Clear Hamachi from the list of Protected network connections
- Open the Run dialog box by pressing the Win + R shortcut keys. Then, type firewall.cpl and press Enter to open Windows Defender Firewall.
- Next, click on Advanced settings on the left.
- In the Windows Defender Firewall with Advanced Security window, click on Action, and select Properties.

- It will open a new dialog box. Here, go to the Public Profile tab, navigate to Protected network connections, and click on Customize.
- Now, on the Protected Network Connections for the Public Profile screen, go to Network connections, and uncheck the box next to Hamachi. Press OK.

- Press Apply and OK again to save the changes and exit.


This is how you can allow Hamachi through Firewall and you can now use the VPN app easily.
- Hamachi Not Working With Minecraft: 6 Ways to Fix it in 2022
- VPN Application Blocked by Security Settings [Solved]
- How to Configure your Firewall Rules for Windows Activation
3. Establish a new inbound rule for Hamachi
- Press the Win + R to open up a Run dialog box. Then, type firewall.cpl and press Enter to open up the Windows Defender Firewall window.
- Next, click on the Advanced settings option on the left to open Windows Defender Firewall with Advanced Security.
- Here, click on Inbound Rules on the left. Next, on the right, go to Actions and click on New Rule.

- Inside the New Inbound Rule Wizard, select Program in Rule Type, and click Next.

- On the next screen, select This program path and click on Browse.

- In the File Explorer window, navigate to the below path, and double-click on hamachi-2.exe:
C:\Program Files (x86)\LogMeIn Hamachi\x64
- For a 32-bit Windows version, navigate to the below path instead, double-click on hamachi-2-ui.exe:
C:\Program Files (x86)\LogMeIn Hamachi - Once the path is selected, click Next.

- Next, select Allow the connection in the Action screen, and press Next.

- On the Profile page, select Domain, Private and Public, and click Next.

- Now, name the new rule as, for example, Allow Hamachi, and click Finish.


Once the inbound rule is created successfully, reboot your PC, and now Firewall would not be blocking Hamachi anymore.
What can I do if Hamachi is not connecting?
- To open the Run console, press the Win + R keys together. Now, type devmgmt.msc and hit Enter to open up Device Manager.

- Next, expand the Network adapters section, and select LogMeIn Hamachi Virtual Ethernet Adapter.
- Click on the Actions tab at the top, and select Add legacy hardware.

- On the Add Hardware wizard, click Next.

- Next, select the Install the hardware that I manually select from a list (Advanced) option and press Next.

- Now, under Common hardware types, find and select Network adapters in the list, and select Next.

- On the next screen, click on Have Disk button at the bottom.

- In the Install from Disk window, click on the Browse button, navigate to the below path, and double-click on hamachi.inf:
C:\Program Files (x86)\LogMeIn Hamachi\x64
- Back in the Install From Disk dialogue, press OK.
- As you return to the Add Hardware window, press Next.


This will trigger the Hamachi driver installation. Now, follow the on-screen instructions to finish the installation.
Once done, reboot your computer and check if the issue is resolved and Hamachi is connecting now. But, if Hamachi does not work on your Windows 11 PC, we have some best solutions for you.
However, if you are unable to allow hamachi through Firewall because the Windows Exclusions are not working, we have some quick fixes to help you troubleshoot the issue.
Above are three quick methods to allow Hamachi through Windows Defender Firewall. However, if it’s the Avast Firewall that’s blocking a program, you can follow the solutions in our detailed post.
For any other issues with the Hamachi VPN service or the Windows Defender Firewall, let us know in the comments section below.
Madhuparna Roy
A diploma holder in computers and with a keen interest in technology, Madhuparna is passionate about writing How-to guides and helping people solve the most intricate Windows issues.
It all started with the evolution of mobile phones and Google, and that has now settled with Windows.
What is Hamachi?
Hamachi is a virtual private network (VPN) application that allows you to create secure connections between multiple devices over the internet. It creates a private network that enables you to access remote computers, share files, and play games as if you were on the same local network.
Developed by LogMeIn, Hamachi provides a reliable and convenient way to connect your devices across different geographical locations. Whether you want to collaborate with coworkers, host a LAN gaming session, or access your home computer remotely, Hamachi simplifies the process without the need for complex network configurations.
Using Hamachi is straightforward. You simply download and install the software on the devices you want to connect, create a network, and invite others to join. Once connected, you can securely share files, chat, and play games with other members of the network.
One of the key features of Hamachi is its secure connection. All data transmitted between devices is encrypted using advanced algorithms, ensuring that your information remains private and protected from eavesdropping.
Furthermore, Hamachi is available for multiple operating systems, including Windows, macOS, and Linux, making it accessible to a wide range of users. It also offers a free version with limited features, as well as a paid subscription for additional functionality and scalability.
Overall, Hamachi is a versatile and reliable VPN solution that enables you to establish secure connections between devices over the internet. Its ease of use, cross-platform compatibility, and robust security features make it an ideal choice for various applications, from online gaming to remote work and collaboration.
Why do you need to allow Hamachi through the firewall?
Firewalls act as a barrier between your device and external networks, monitoring and controlling incoming and outgoing network traffic. While firewalls are essential for network security, they can sometimes block legitimate connections, including those established by Hamachi. Allowing Hamachi through the firewall is necessary to ensure that it functions properly and can establish secure connections.
Here are a few reasons why you need to allow Hamachi through the firewall:
- Enable seamless connectivity: Hamachi relies on network communication protocols to establish connections between devices. By allowing Hamachi through the firewall, you ensure that these protocols can function unhindered, enabling seamless connectivity between devices on the Hamachi network.
- Facilitate file sharing and remote access: Hamachi is commonly used for accessing remote devices and sharing files securely. When the firewall blocks Hamachi, it can prevent the transfer of files or remote access to devices on the network. Allowing Hamachi through the firewall enables these features to work as intended.
- Enable online gaming: Hamachi is popular among gamers for creating virtual LANs and playing multiplayer games over the internet. If the firewall blocks Hamachi, it can prevent gaming sessions or cause connectivity issues. By allowing Hamachi through the firewall, you ensure a smooth gaming experience for all players.
- Ensure secure connections: Hamachi encrypts data transmitted between devices to ensure privacy and security. If the firewall blocks Hamachi, it can interfere with the encryption process or prevent secure connections from being established. Allowing Hamachi through the firewall ensures that your connections remain protected.
Keep in mind that the process of allowing Hamachi through the firewall may differ depending on the operating system and firewall software you are using. However, the general concept remains the same – you need to create an exception or rule in the firewall settings to allow Hamachi to communicate freely.
By allowing Hamachi through the firewall, you can experience the full functionality and benefits of this powerful VPN application. Whether you are collaborating with remote colleagues, accessing files on different devices, or enjoying multiplayer gaming sessions, allowing Hamachi through the firewall is crucial for a seamless and secure experience.
Check if Hamachi is blocked by the firewall
Before you begin allowing Hamachi through the firewall, it’s important to determine whether or not it is currently being blocked. Here are some steps to check if Hamachi is blocked by the firewall:
- Check Windows Firewall: On a Windows PC, open the Control Panel and click on “System and Security” or “Windows Security.” Then, click on “Windows Defender Firewall” or “Windows Firewall.” In the firewall settings, look for any rules blocking Hamachi. If you find any, you will need to create an exception to allow Hamachi through.
- Check Mac Firewall: On a Mac, go to System Preferences and click on “Security & Privacy.” Then, click on the “Firewall” tab and check if Hamachi is listed as an application that is being blocked. If it is, you will need to allow it through the firewall.
- Check third-party firewalls: If you are using a third-party firewall software, such as Norton, McAfee, or ZoneAlarm, you will need to access the settings of that software and check if Hamachi is being blocked. Each firewall software may have different steps, so refer to the documentation or support resources provided by the software manufacturer.
- Test network connectivity: If you suspect that Hamachi is being blocked by the firewall, you can also try testing the network connectivity. Create a network on Hamachi and have someone else join it. If they are unable to join or you cannot establish a connection with them, it could be an indication that Hamachi is blocked by the firewall.
Remember, it’s important to check if Hamachi is blocked by the firewall before making any changes to the firewall settings. This will help ensure that you are addressing the correct issue and can take the appropriate steps to allow Hamachi through the firewall.
If you are using Hamachi on a Windows PC and it is being blocked by the Windows Firewall, you can follow these steps to allow Hamachi through the firewall:
- Open Windows Firewall settings: Go to the Control Panel and click on “System and Security” or “Windows Security.” Then, click on “Windows Defender Firewall” or “Windows Firewall.”
- Click on “Allow an app or feature through Windows Firewall”: On the left-hand side of the screen, you will see a link that says “Allow an app or feature through Windows Firewall.” Click on it to proceed.
- Find Hamachi in the list: In the “Allowed apps” window, click on the “Change settings” button. Scroll down the list of apps and features until you find “Hamachi.” Ensure that both the “Private” and “Public” boxes are checked next to Hamachi.
- Add Hamachi if it’s not listed: If you don’t see Hamachi in the list, you can click on the “Allow another app…” button. In the dialog box that appears, click on the “Browse” button and navigate to the location where Hamachi is installed. Select the Hamachi application file (usually named “hamachi-2-ui.exe” or similar) and click “Open.” Then, make sure that the “Private” and “Public” boxes are checked next to Hamachi.
- Save the changes: Once you have ensured that Hamachi is listed and both the “Private” and “Public” boxes are checked, click on the “OK” button to save the changes and close the Windows Firewall settings.
By following these steps, you have allowed Hamachi through the Windows Firewall. This should prevent the firewall from blocking Hamachi and enable you to establish connections, share files, and use Hamachi without any issues.
Note that if you are using a different firewall software or a third-party antivirus program that includes a firewall, the steps to allow Hamachi may vary. Consult the documentation or support resources provided by the software manufacturer for instructions specific to your firewall software.
Allow Hamachi through Mac Firewall
If you are using Hamachi on a Mac and it is being blocked by the macOS Firewall, you can follow these steps to allow Hamachi through the firewall:
- Open System Preferences: Click on the Apple menu in the top-left corner of the screen and select “System Preferences.”
- Access Firewall settings: In the System Preferences window, click on the “Security & Privacy” icon.
- Unlock the settings: If the settings are locked, click on the lock icon in the bottom-left corner of the window and enter your administrator password when prompted.
- Click on the Firewall tab: In the Security & Privacy window, click on the “Firewall” tab.
- Click on the “Firewall Options” button: Underneath the Firewall options, click on the “Firewall Options” button to open the advanced settings.
- Add Hamachi to the allowed applications: In the “Firewall Options” window, click on the “+” button and navigate to the location where Hamachi is installed. Select the Hamachi application file (usually named “hamachi-2-ui” or similar), and click “Add.”
- Allow incoming connections: Make sure that the checkbox next to Hamachi is checked in the “Block all incoming connections” section. This ensures that incoming connections to Hamachi are allowed.
- Save the changes: Click on the “OK” button to save the changes and close the Firewall Options window.
By following these steps, you have allowed Hamachi through the Mac Firewall. This ensures that the firewall does not block Hamachi and allows you to establish connections, share files, and use Hamachi without any interruptions.
Note that if you are using a different firewall software or a third-party antivirus program that includes a firewall, the steps to allow Hamachi may vary. Refer to the documentation or support resources provided by the software manufacturer for instructions specific to your firewall software.
Allow Hamachi through third-party firewalls
If you are using a third-party firewall software, such as Norton, McAfee, or ZoneAlarm, and Hamachi is being blocked, you can follow these general steps to allow Hamachi through the firewall:
- Open the firewall software: Locate the firewall software on your computer and open the program.
- Access the firewall settings: Look for an option or tab that allows you to configure the firewall settings. This may vary depending on the specific firewall software you are using.
- Find the applications or program permissions: Look for a section or category within the firewall settings that deals with application or program permissions. This is where you can manage which programs are allowed through the firewall.
- Add Hamachi to the allowed list: In the application or program permissions section, click on the option to add a new program or application. Navigate to the location where Hamachi is installed on your computer. Select the Hamachi executable file (usually named “hamachi-2-ui.exe” or similar) and add it to the allowed list.
- Specify network permissions: Depending on the firewall software, you may also need to specify network permissions for Hamachi. Ensure that both inbound and outbound network connections are allowed for Hamachi.
- Save the changes: Once you have added Hamachi to the allowed list and specified the appropriate network permissions, save the changes in the firewall software.
These steps are a general guideline for allowing Hamachi through third-party firewalls. The exact steps may vary depending on the firewall software you are using. Refer to the documentation or support resources provided by the software manufacturer for specific instructions on allowing programs through their firewall.
By allowing Hamachi through third-party firewalls, you ensure that the firewall does not block Hamachi and allows you to establish connections, share files, and use Hamachi without any interruptions.
Troubleshooting common issues
While allowing Hamachi through the firewall should resolve most connectivity issues, there are a few common problems that you may encounter. Here are some troubleshooting steps to help you address these issues:
- Ensure Hamachi is running: Check that Hamachi is running on both your device and the devices you are trying to connect with. If Hamachi is not running or has encountered an error, restart the application and try connecting again.
- Verify network connectivity: Make sure that your device is connected to the internet and has a stable network connection. If your network connection is unstable or experiencing issues, it may affect the performance of Hamachi.
- Check for software conflicts: Sometimes, other software or applications on your device can conflict with Hamachi. Temporarily disable any antivirus, firewall, or VPN software, and check if Hamachi can establish connections. If Hamachi works without conflicts, you may need to adjust the settings of the conflicting software or contact their support for guidance.
- Update Hamachi: Ensure that you are using the latest version of Hamachi. Outdated versions can have compatibility issues, so updating to the latest release may resolve connectivity problems.
- Restart devices and routers: Sometimes, a simple restart of your device or router can resolve connectivity issues. Power off your device and router, wait for a few minutes, and then power them back on.
- Reset network adapters: If you are experiencing persistent connectivity issues, you can try resetting your network adapters. Open the command prompt (CMD) as an administrator and enter the following command:
netsh int ip reset. Restart your device after running the command. - Contact Hamachi support: If you have tried all the troubleshooting steps and are still experiencing issues with Hamachi, it may be beneficial to reach out to Hamachi support for further assistance. They can provide specific guidance based on your situation and help you resolve any persistent problems.
Remember, troubleshooting steps may vary depending on your operating system, network setup, and specific circumstances. It’s always recommended to consult relevant documentation, forums, or support resources for comprehensive troubleshooting specific to your environment.
By following these troubleshooting steps, you can address common connectivity issues and ensure that Hamachi functions properly, allowing you to establish secure connections, share files, and enjoy a seamless Hamachi experience.
Нamachi ー популярное программное обеспечение, которое позволяет сoздавать виртуальные частные сети (VPN) для пoдключения компьютеров к cети Интернет или другим локальным сетям. Однако, при настройке Hamachi на Windows 10 может возникнуть проблема с брандмауэром٫ который может блокировать подключение к другим устройствам в сети. Чтобы решить эту проблему٫ необходимо временно или постоянно выключить бpaндмауэр Windows 10 для Hamachi. В этой статье мы рассмотрим несколько способов отключения брандмауэра Windоws 10 для Hamachi.
Способ 1⁚ Отключение брандмaуэра временно
- Откройте меню Пуск и введите Брандмауэр. Выберите пункт Безопасность Windows с брандмауэром.
- В левой панели выберите Включение и выключение брандмауэра Windows.
- Отметьте опцию Выключить брандмауэр для всех сетевых местоположений.
- Нажмите ОК, чтобы сохранить изменения.
Теперь брандмауэр врeменно выключен, и у вас должна быть возможноcть подключиться к Hamachi без проблем.
Способ 2⁚ Выключение брандмаyэра полностью
- Откройте меню Пуск и введите Брандмауэр. Выберите пyнкт Безoпасность Windows с бpандмауэром.
- В левой панели выберите Включениe и выключение брандмауэра Windows.
- Отметьте oпцию Выключить брандмауэр для всех сетевых местоположений.
- Нажмите ОК, чтобы сохранить изменения.
Теперь брандмауэр полностью выключен, и вы сможете подключиться к Hamachi без проблем. Однако, когда брандмaуэр выключен, ваш компьютер становится более уязвимым для угроз в Интернете. Поэтому рекомендуется включить брандмауэр после завершения работы с Hamachi.
Способ 3⁚ Создание правил исключения в брандмауэре
Если вы не хотите полностью выключать брандмауэр, вы можете создать правило исключения для Hamachi, чтобы разрешить ему передавать и принимать данные через брандмауэр. Для этого выполните следующие действия⁚
- Откройте меню Пуск и введите Брандмауэр. Выберите пункт Безопасность Windows с брандмауэром.
- В левой панели выберите Разрешенные приложения.
- Нажмите Изменить настройки и найдите Hamachi в списке.
- Отметьте галочку рядoм с названием Hamachi, чтобы разpешить его передавать и принимать данные через брaндмауэр.
- Нажмите ОК, чтобы сохранить изменения.
Теперь Hаmachi имеет исключение в брандмауэре, и вы сможете использовать прoграмму без пpоблем.
Независимо от того, какой способ отключения бpандмауэра Windows 10 для Hamachi вы выбрали, помните, что безопасность вашего компьютера может быть угрожена, когда брандмaуэр полнoстью выключен. Поэтому рекомендуется включить бpандмауэр после завершения работы с Hamachi или использовать правила исключения для pазрешения доступа программе через брандмауэр.