
Secure Boot is a safety feature that only allows your system to boot with trusted software. It is only available for Windows 8 or above. Secure Boot can protect your system from viruses or malware by booting it with trusted firmware.
In this article, you will learn how to turn off secure boot Windows 11 if you face any problems. The methods described in this guide apply to all PC brands.
Part 1: What is Secure Boot?
Secure Boot is a security tool that only permits verified programs to run on startup. It also stops unofficial programs, like malicious rootkits, from running. This feature is very important to install the latest Windows version, i.e., Windows 11, as it is a BIOS/UEFI prerequisite.
How Does Secure Boot Work?
Secure Boot works on startup as it is a protocol within the UEFI/BIOS. This works with the TPM (Trusted Platform Module) and is mandatory for installing Windows 11. The TPM is responsible for hardware-based security, whereas Secure Boot handles software-based security. This process prevents the system from booting up if faulty hardware or unauthorized programs exist. It serves as an extra layer of data security and protection that allows only the digitally signed and certified programs to run.
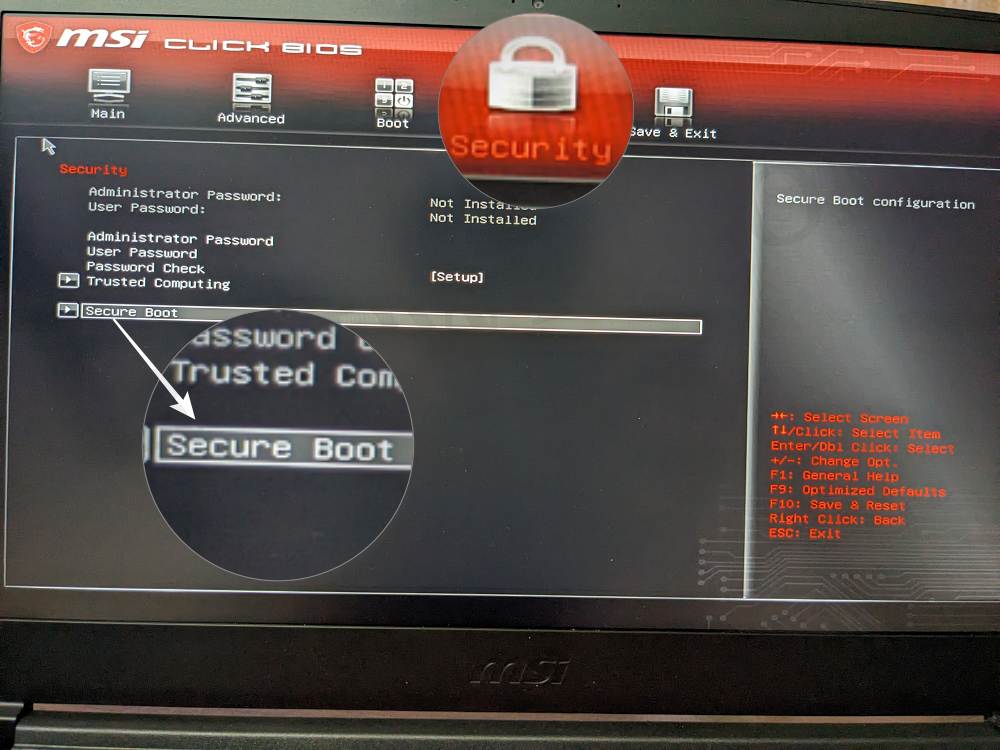
Part 2. How to Check the Secure Boot State?
Before you know how to disable secure boot in Dell laptop, check the state of Secure Boot as follows:
Before you proceed to disable Secure Boot, please note the following:
- You may be unable to re-enable the Secure Boot after installing new hardware or software on your system without restoring it.
- Be mindful when changing BIOS settings, as these settings are for advanced users and can lead to permanent data loss if misconfigured.
Now that you know the possible consequences of turning it off, here is how to disable secure boot Lenovo:
How to Disable Secure Boot Windows 11 in BIOS
You can disable the Secure Boot Windows 11 in BIOS by following the instructions below:
- Go to Settings Update and Security.
- Under Windows Update, check for anything to install or download.
- Now, switch to Recovery and click Restart under the Advanced Startup option.
- Choose Troubleshoot Advanced options UEFI Firmware Settings. You will enter the BIOS mode.
- Disable it using arrow keys once you have located it.
- Lastly, Save changes and Exit to restart your PC.
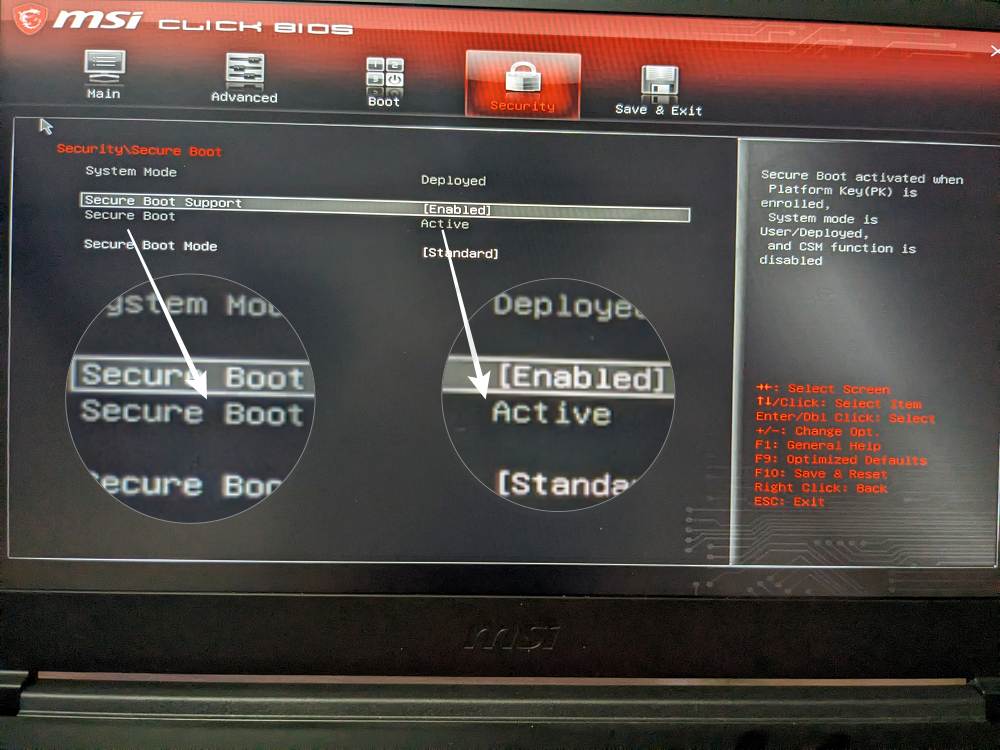
The secure boot option is specific for each manufacturer, but you can find it under Security, Boot/ or Authentication tabs.
How to Disable Secure Boot Windows 11 Without BIOS
You can use the Registry Editor or PowerShell to disable ASUS secure boot without BIOS. Before proceeding, please ensure the following:
- Your computer firmware supports Secure boot.
- There must be a valid Secure Boot certificate installed on your system.
- You have Windows 8 or above.
- An up-to-date BIOS..
- The boot mode is UEFI instead of Legacy.
Now, here is how to turn off Secure Boot without BIOS:
Using Registry Editor
Using Windows PowerShell
- Press Windows key, type PowerShell in Search box and choose Run as Administrator.
- Now, type “Set-SecureBootUEFI-Disable” and press Enter button to execute the command.
- In the end, Restart the system to apply to changes.
Extra Tips: How to Fix a Computer When Suffering from a Boot Issue?
When you disable Secure Boot, there is a major possibility of boot issues on your system. The boot issues prevent your computer from starting up normally and can appear as blue screen or black screen, elongated loading time, restart loops, etc.
In such a case, you can use PassFab FixUWin – a comprehensive tool that automatically resolves Windows problems with its Smart Repair feature. It simply scans your pc, detects the problem, and then resolves it. It boasts a user-friendly interface to simplify error resolution.
FAQs:
1.Can I turn off Secure Boot Windows 11?
You can turn off secure boot Windows 11 because it’s not mandatory. It only depends upon your requirement, and operating system can work smoothly with or without it.
2.How do I turn off Secure Boot?
You can disable the secure Boot with or without the BIOS menu. If you want to turn it off with the BIOS menu, go to the Secure Boot setting in BIOS and disable it. Otherwise, you can also deactivate it using Windows PowerShell or Registry Editor.
3.How to Boot Windows 11 without Secure Boot?
You can boot Windows 11 normally after turning off the Secure Boot.
4.What is the disadvantage of Secure Boot?
Secure Boot is only available for Windows 8 or above. It also blocks unlicensed software or dual-booting. It can also stop the system from accepting graphics cards, so you may face an error in running games and professional software.
RELATED ARTICLES
- [Easy and Quick!]6 Fixes For BOOTMGR Image is Corrupted Error
- Fix PC won’t Boot to BIOS Black Screen Error Windows 11/10/8/7
- [100 works!] Proven Fixes for Computer Stuck On Getting Windows Ready
COMMENT
In this guide, we will show you the steps to disable Secure Boot on your Windows 11 PC. With the launch of the eleventh iteration of the OS, the Redmond giant has further upped the security measures. It now requires you to have both the Trusted Platform Module TPM 2.0 and Secure Boot enabled in the BIOS. If we talk about the latter one, then it prevents you from installing digitally unauthorized software which in turn prevents your PC from being part of malware and virus attacks.
While many not be in sync with my statement, but I still believe that, at least for advanced users, they are the best judge for their system and hence they should have a say in that as well, rather than being completely dependent on what BIOS has to offer. For instance, recently I had to install a Qualcomm EDL Drivers, which even though are legitimate, but their origin source is still up for debate.
As a result, the PC refused to let my device booted to EDL mode have any interaction with the system. So I had two options in hand- either to go to the service center and shell out hefty bucks or simply disable Secure Boot on my Windows 11 PC and get this job done myself, absolutely free [there are no brownie points in guessing which one I chose]! So in this guide, we will show you how to do just that. So without any further ado, let’s get started.
If you are unable to install a digitally unsigned driver, then in some cases, simply disabling Driver Signature Enforcement might get this job done. So before opting for the extreme approach of disabling secure boot, it is recommended that you try disabling the driver signature. But if that doesn’t work out, then you have no choice but to disable secure boot.
Moreover, once you are done installing the software, it is recommended that you re-enable Secure Boot. Regarding this, some users have reported that they had to factory reset their PC to their default state before they were able to re-activate Secure Boot. So make sure to keep this point in mind before carrying out the below steps.
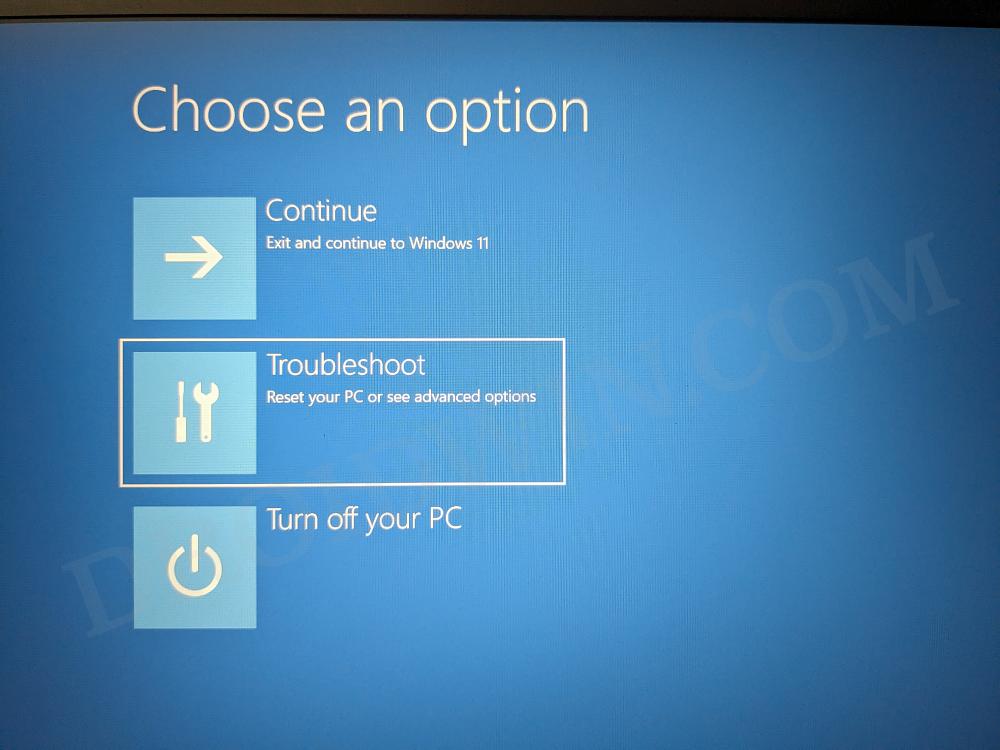
- Press and hold the Shift key and while doing so, click Restart.
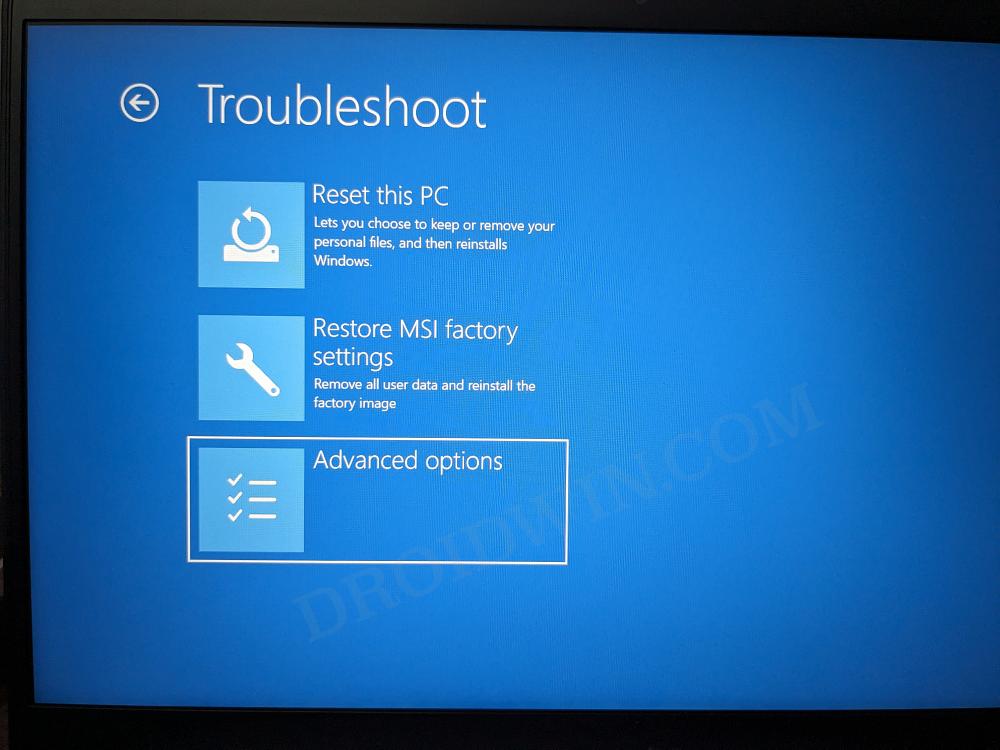
- Then select Troubleshoot.

- After that, choose Advanced Options.
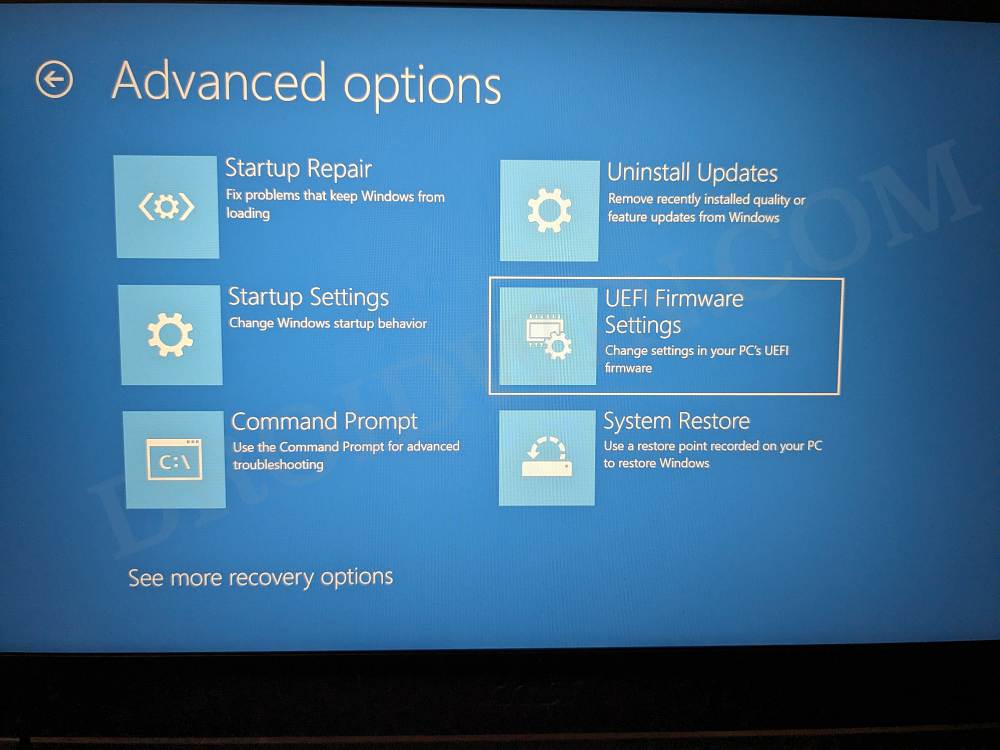
- Now select UEFI Firmware Settings and hit Restart. Your PC will boot to the BIOS.
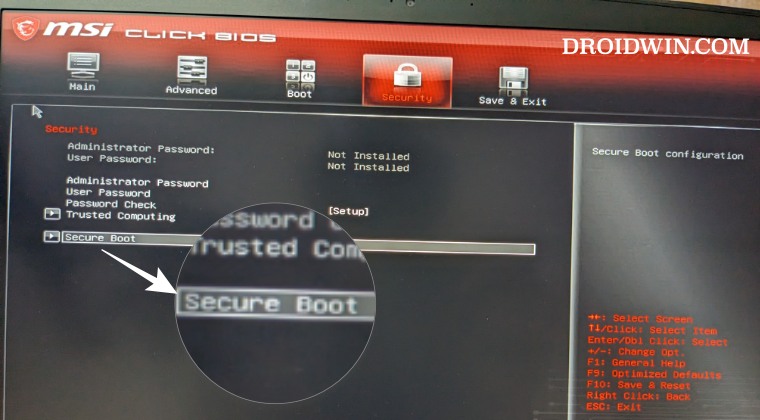
- Depending on the OEM, Secure Boot could be found under Security, Boot, or Authentication tab.
- So select Secure Boot and set it to Disabled. Then save changes and exit BIOS. Your PC will now boot to the OS.
- That’s it. Secure Boot is now disabled on your Windows 11 PC and you can install the desired drivers.

NOTE: Some OEMs [especially MSI] might not allow you to disable Secure Boot and the option will be greyed out. While there exists a few workarounds that might help you still get this job done, however, we wouldn’t recommend doing so as we have seen reports of PCs getting bricked when users tried to un-grey that option and disable secure boot.
How to Re-Enable Secure Boot in Windows 11
Once you are done carrying out the desired tweaks, it is recommended that you re-enable Secure Boot on your Windows 11 PC. Here’s how it could be done:
- Press and hold the Shift key and while doing so, click Restart.
- Then select Troubleshoot > Advanced Options > UEFI Firmware Settings. Your PC will now boot to the BIOS.
- Depending on the OEM, Secure Boot could be found under Security, Boot, or Authentication tab.
- Select Secure Boot and set it to Enable. Then save changes and exit BIOS. Your PC will now boot to the OS.
- Secure Boot is now enabled on your Windows 11 PC and you can install the desired drivers.
That’s it. These were the steps to disable and re-enable Secure Boot on your Windows 11 PC. If you have any queries concerning the aforementioned steps, do let us know in the comments. We will get back to you with a solution at the earliest.
- How to Reset TPM in Windows 11 [3 Methods]
- How to Check the TPM Version in Windows
- Cannot Boot Windows PC after enabling secure boot [Fixed]
- How to Bypass TPM 2.0 Requirement and Install Windows 11
- Check Secure Boot on Windows 11
- Enable Secure Boot on Windows 11
- Disable Secure Boot on Windows 11
On Windows 11, you can enable Secure Boot to enhance the security of the boot process of your computer, and in this guide, I’ll explain the steps to complete this configuration.
Although Microsoft recommends using Secure Boot on Windows 11, it’s not a requirement to run the operating system. As a result, the feature may be enabled or disabled on your computer.
What’s Secure Boot?
Secure Boot is a security feature available in the Unified Extensible Firmware Interface (UEFI) firmware that prevents unauthorized modifications to critical system files during startup. As a result, it ensures that a device boots using only software trusted by the manufacturer.
It establishes a “root of trust” during the computer startup process. It accomplishes this by checking the digital signature of the bootloader, operating system, and UEFI drivers before they are allowed to run on the device.
In short, Secure Boot helps protect against low-level malware, such as bootkits and rootkits, that can infect the boot process and gain control of your system before Windows 11 and your antivirus software even load.
In rare cases, enabling Secure Boot might interfere with older hardware or non-Windows operating systems. You might need to disable it temporarily in such scenarios. However, for optimal security with Windows 11, it’s generally recommended to keep it enabled.
In this guide, I will teach you the steps to check and enable (or disable) Secure Boot on Windows 11.
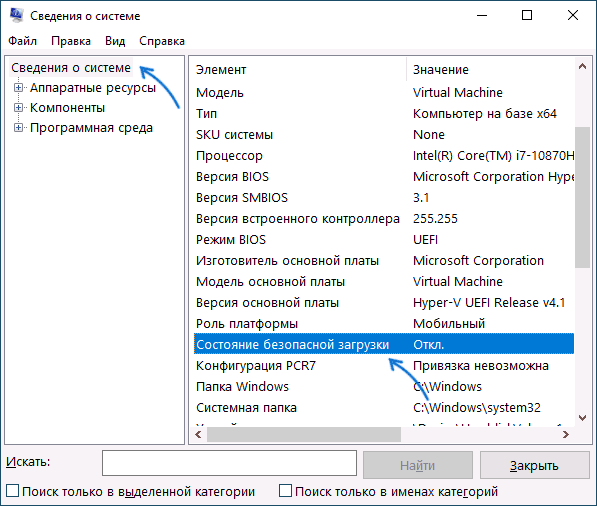
To determine whether Secure Boot is enabled on the computer, use these steps:
-
Open Start.
-
Search for System Information and click the top result to open the app.
-
Click on System Summary on the left pane.
-
Check the “Secure Boot State” information and confirm the feature is turned “On.” (If not, you need to enable the option manually.)


Once you complete the steps, you can continue with the Windows 11 installation if the security feature is enabled. Otherwise, you must follow the steps below to enable it inside the UEFI firmware.
Enable Secure Boot on Windows 11
To enable Secure Boot in the BIOS firmware, use these steps:
-
Open Settings.
-
Click on System.
-
Click the Recovery page.
-
Click the Restart now button under the “Advanced startup” section.

-
Click the Restart now button one more time.
-
Click on Troubleshoot.
-
Click on Advanced options.
-
Click the “UEFI Firmware settings” option.

-
Click the Restart button.
-
Open the advanced, security, or boot settings page, depending on the motherboard.
-
Select the “Secure Boot” option and choose the Enabled option.


Once you complete the steps, Secure Boot will be enabled on the computer.
Disable Secure Boot on Windows 11
To disable Secure Boot on Windows 11, use these steps:
-
Open Settings.
-
Click on System.
-
Click the Recovery page.
-
Click the Restart now button under the “Advanced startup” section.
-
Click on Troubleshoot.
-
Click on Advanced options.
-
Click the “UEFI Firmware settings” option.
-
Click the Restart button.
-
Open the advanced, security, or boot settings page, depending on the motherboard.
-
Select the “Secure Boot” option and choose the Disabled option.
After you complete the steps, Secure Boot will be disabled on the device.
Why You Can Trust Pureinfotech
The author combines expert insights with user-centric guidance, rigorously researching and testing to ensure you receive trustworthy, easy-to-follow tech guides. Review the publishing process.
Disabling Secure Boot in Windows 11 might sound a bit techy, but it’s fairly straightforward. You’ll be diving into your computer’s BIOS settings, and with a few clicks, you’ll have Secure Boot turned off. This process is handy if you need to install other operating systems or certain hardware that isn’t compatible with Secure Boot.
In this section, we’ll guide you through the steps to disable Secure Boot on your Windows 11 machine. The instructions will help you access your BIOS, navigate to the Secure Boot settings, and turn it off.
Step 1: Enter BIOS/UEFI
Restart your computer and press the designated key (often F2, F12, Delete, or Esc) to enter the BIOS/UEFI settings.
The specific key to access BIOS varies by manufacturer, so watch for the prompt during startup, usually something like “Press F2 for BIOS settings.”
Step 2: Find Secure Boot Option
Navigate to the “Boot” or “Security” tab using your keyboard’s arrow keys.
The location of the Secure Boot setting can vary, so take your time to look through the tabs. It’s usually under the Boot or Security sections.
Step 3: Disable Secure Boot
Select the Secure Boot option and change its value to “Disabled.”
Once you find it, use the Enter key or the appropriate on-screen instructions to turn off Secure Boot.
Step 4: Save Changes and Exit
Press the designated key (often F10) to save your changes and exit the BIOS/UEFI.
Ensure you save your changes; otherwise, your adjustments won’t take effect, and you’ll need to repeat the process.
Step 5: Reboot Your Computer
Allow your computer to reboot normally.
Your system should now start without Secure Boot enabled, letting you proceed with your desired tasks.
After completing these steps, your computer will no longer enforce Secure Boot, allowing you to install different operating systems or use hardware that wasn’t previously compatible.
Tips for Disabling Secure Boot in Windows 11
- Make sure to back up important data before changing BIOS settings.
- Check your motherboard’s manual for specific instructions related to BIOS/UEFI.
- Be cautious when navigating BIOS; incorrect changes can impact system performance.
- If unsure, take photos of current settings before altering them.
- Consult online forums or support for your specific computer model if you encounter issues.
Frequently Asked Questions
What is Secure Boot?
Secure Boot is a security feature designed to ensure that your PC boots using only software that is trusted by the PC manufacturer.
Why would I need to disable Secure Boot?
You might need to disable it to install a different operating system or certain hardware components that aren’t compatible with Secure Boot.
Will disabling Secure Boot affect my computer’s performance?
No, it won’t impact the performance, but it may reduce the security of your system during the boot process.
Can I re-enable Secure Boot later?
Yes, you can always go back into the BIOS settings and re-enable Secure Boot by reversing the steps provided.
Is disabling Secure Boot safe?
It’s generally safe if you know what you’re doing, but it can make your system more vulnerable to malware during the boot process.
Summary
- Restart your computer and enter BIOS/UEFI.
- Navigate to the Boot or Security tab.
- Disable Secure Boot.
- Save changes and exit BIOS/UEFI.
- Reboot your computer.
Conclusion
Disabling Secure Boot in Windows 11 can open up new possibilities for your computing experience, such as installing different operating systems or using specific hardware. While the process might seem a bit daunting, following the steps outlined above makes it quite manageable. Just remember to tread carefully in the BIOS/UEFI settings, as changes there can affect your system.
If you’re looking into tinkering more with your system, consider researching further or joining online communities where enthusiasts share their experiences. Disabling Secure Boot is just one step in customizing your computer; there’s a whole world of possibilities out there. So, go ahead, dive in, and explore the full potential of your machine!
Matthew Burleigh has been writing tech tutorials since 2008. His writing has appeared on dozens of different websites and been read over 50 million times.
After receiving his Bachelor’s and Master’s degrees in Computer Science he spent several years working in IT management for small businesses. However, he now works full time writing content online and creating websites.
His main writing topics include iPhones, Microsoft Office, Google Apps, Android, and Photoshop, but he has also written about many other tech topics as well.
Read his full bio here.
Если установщик Windows 11, а возможно и какая-то программа или игра (такое тоже возможно) сообщает о том, что его не устраивает состояние безопасной загрузки и её необходимо включить — сделать это сравнительно легко, но возможны нюансы.
В этой инструкции подробно о способах включить безопасную загрузку на вашем компьютере или ноутбуке, при условии, что это возможно. Обратите внимание, если задача — установка Windows 11, существуют возможности запуска установки и без включенной безопасной загрузки (Secure Boot), например — создание загрузочной флешки в Rufus с отключением проверки совместимости при чистой установке, или обновление с обходом требований для установки.
Проверка состояния безопасной загрузки, особенности работы после включения
Прежде чем начать, о том, где вы можете проверить текущее состояние безопасной загрузки в Windows 11 или Windows 10:
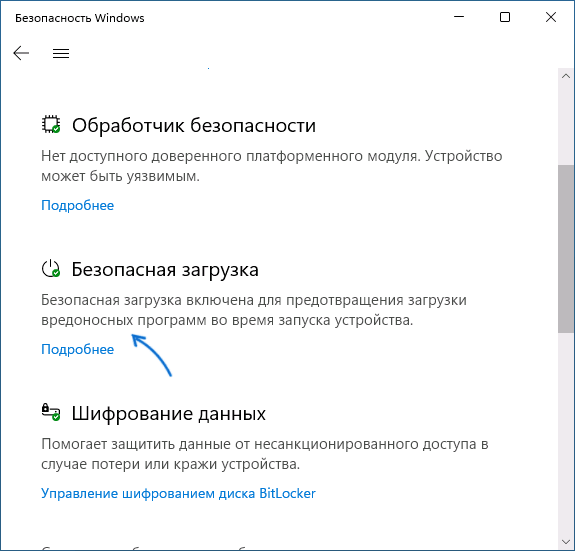
- Нажмите правой кнопкой мыши по кнопке «Пуск», выберите пункт «Выполнить», введите msinfo32 и нажмите Enter. В разделе «Сведения о системе» вы увидите пункт «Состояние безопасной загрузки» с её текущим статусом.

- Можно зайти в окно «Безопасность Windows», например, с помощью значка в области уведомлений и открыть раздел «Безопасность устройства». Если вы наблюдаете там пункт «Безопасная загрузка» с зеленой отметкой, она включена. Иначе — нет.

Ещё один важный момент: загрузка с включенной безопасной загрузкой возможна только для систем, установленных в UEFI-режиме на GPT диск.
Если, к примеру, у вас Windows 10 и установлена в Legacy-режиме на диск MBR, после включения Secure Boot она перестанет загружаться. Возможные варианты действий: конвертировать диск в GPT с помощью mbr2gpt.exe и включить UEFI-загрузку, либо использовать вариант с чистой установкой с флешки и обходом требований Windows 11, как было указано в начале статьи.
Включение безопасной загрузки Secure Boot в БИОС/UEFI
Само включение безопасной загрузки или Secure Boot выполняется не в Windows 11/10, а в БИОС/UEFI вашего компьютера или ноутбука. Для того, чтобы включить её, необходимо:
- Зайти в БИОС при включении/перезагрузке устройства. На ноутбуках для этого обычно используется клавиша F2 (или сочетание Fn+F2), которую необходимо ритмично нажимать сразу после появления заставки производителя (но бывают и другие варианты клавиши), на ПК как правило используется клавиша Delete. Более подробно: Как зайти в БИОС/UEFI на компьютере или ноутбуке.
- Найти раздел БИОС, на котором доступна опция включения (установка в Enabled) функции Secure Boot. Учитывайте, что на очень старых компьютерах такой настройки может и не быть. Как правило, она располагается где-то в разделе Security, Boot, System Configuration, иногда — Advanced Settings. Несколько примеров расположения будут приведены далее.
- Сменить состояние Secure Boot на Enabled (если ранее выполнялась очистка ключей Secure Boot, восстановить их), сохранить настройки БИОС/UEFI (обычно выполняется клавишей F10 или на вкладке Exit) и перезагрузиться обратно в систему.
Примеры расположения опции для включения безопасной загрузки (Secure Boot)
Ниже — несколько примеров, где можно найти опцию включения безопасной загрузки на разных материнских платах и ноутбуках. У вас может отличаться, но логика везде одна и та же.
Ещё раз отмечу: включить безопасную загрузку можно только в случае, если у вас включен режим загрузки UEFI, а режим Legacy/CSM отключен, иначе опция будет недоступна. В некоторых вариантах БИОС переключение в режим загрузки UEFI выполняется путем выбора типа операционной системы (OS Type) между Windows 11/10/8 и «Other OS» (нужно выбрать Windows).
ASUS
На разных версиях материнских плат и ноутбуков включение Secure Boot реализовано слегка по-разному. Обычно пункт «Secure Boot» можно найти на вкладке «Boot» или «Security». При этом для OS Type может потребоваться выставить Windows UEFI Mode (параметр может и отсутствовать).
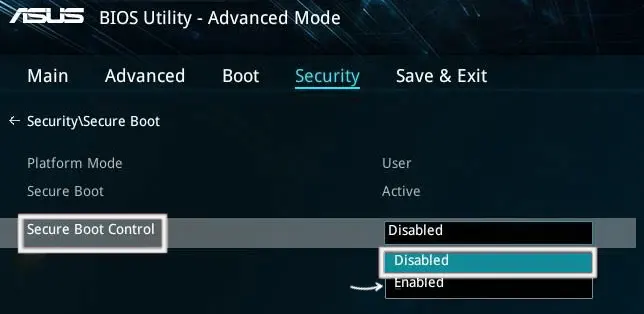
Также, для доступности пункта настройки безопасной загрузки в БИОС может потребоваться перейти в Advanced Mode, обычно — по клавише F7.
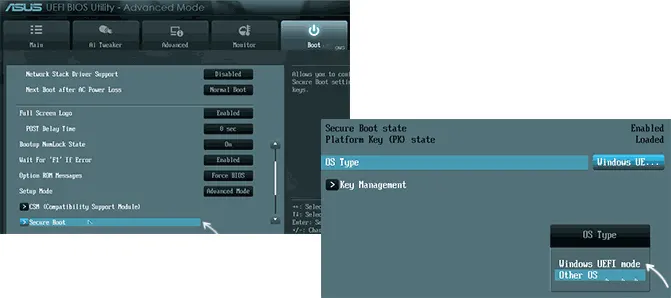
В некоторых случаях может потребоваться восстановление ключей безопасной загрузки, обычно выполняется следующим образом: в Advanced Mode в BIOS на вкладке Boot или в Secure Boot — Key Management выбираем Load Default PK и подтверждаем загрузку ключей по умолчанию.
AsRock
Настройка для включения безопасной загрузки на материнских платах AsRock обычно находится в разделе «Security».

Зайдя в раздел необходимо будет установить значение Secure Boot в Enabled, а если выбор недоступен, включить стандартный Secure Boot Mode и установить ключи по умолчанию (Install default Secure Boot keys).

Acer
Как правило, опция включения Secure Boot на ноутбуках Acer находится либо в разделе Advanced — System Configuration, либо в Boot или Authentication.
Также помните, о том, что должен быть включен режим загрузки UEFI, а не Legacy/CSM для возможности изменения состояния безопасной загрузки на Enabled.
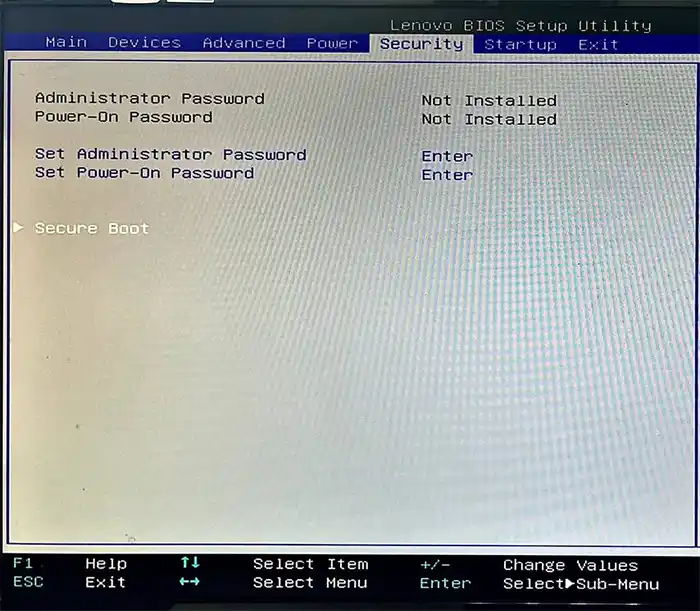
Lenovo
ПК и ноутбуки Lenovo имеют разные варианты интерфейса БИОС, но обычно нужная опция находится на вкладке Security, как на фото ниже:

Ещё один пример с ноутбука Lenovo:
Gigabyte
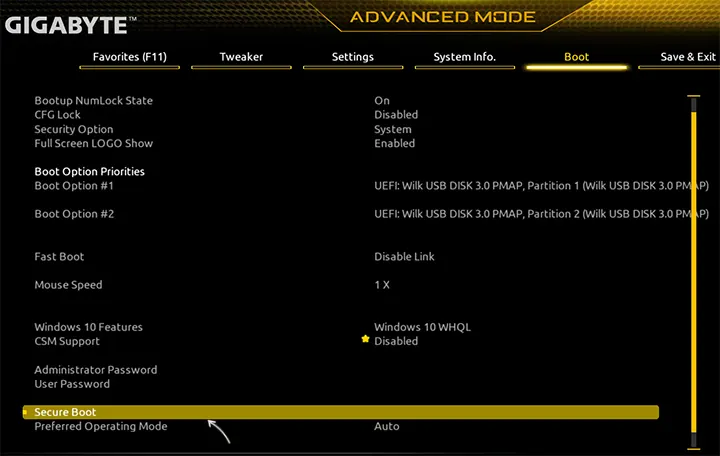
Варианты отключения Secure Boot на материнских платах и ноутбуках Gigabyte могут отличаться, обычно порядок действий следующий:
- На вкладке Boot или BIOS отключить CSM Support, и выбрать тип операционной системы или установить пункт Windows 8/10 Features в, соответственно, Windows 8/10, а не Other OS.
- После этого должен появиться пункт Secure Boot, в который необходимо зайти, чтобы включить безопасную загрузку.
Несколько дополнительных мест расположения опции включения Secure Boot (устанавливаем в Enabled) на старых Dell, Gigabyte, HP:

Также, если в вашем интерфейсе БИОС предусмотрен поиск, можно использовать его:

В случае, если вы не нашли способа включить безопасную загрузку на вашей материнской плате, либо её не удается перевести в Enabled, укажите её марку и модель в комментариях, я постараюсь подсказать, где именно требуется включать этот параметр. Кстати, часто достаточно просто сбросить настройки БИОС (Load Defaults на вкладке Exit), чтобы включить безопасную загрузку, так как на большинстве современных материнских плат она по умолчанию включена.