
RAM, or random access memory, is used to allow programs to boot more quickly and carry out tasks in a fraction of the time it would take if the program had to load from your hard drive. RAM is vital to performance in any program that needs to access a tremendous amount of data.
For example, a word processing program won’t rely heavily on RAM due to the low performance requirements. A detailed Excel spreadsheet or Photoshop, however, needs as much RAM as you can spare it. So do games. In many cases, you need to allocate extra RAM to gaming, especially if you’re using a lot of mods.

This is true in titles like Minecraft, as do games like Shadow of Mordor which needs a whopping 8.3 GB of VRAM. The good news is that you can allocate more RAM to specific apps to help improve their performance.
What is RAM?
RAM is an acronym for random access memory, and it is one of the most important parts of your computer. RAM is necessary for programs to run. Without it, you will be unable to run most applications, and those that you can run will perform at a seriously reduced level.
Think of RAM as short-term memory for your computer. It allows your system to access data far more quickly than it can through even the SSD. If you have multiple applications running at the same time, you will need more RAM than if you are only using a few at a time.
In modern computers, RAM is typically found in multiples of 4. Motherboards often use something called dual-channel memory, which means you want RAM of the same type–either sticks of 4, sticks of 8, or sticks of 16. There is no upper limit to the amount of RAM you can have except what your motherboard can support, although there is a limit to how much you can reasonably ever use.
The easiest way to improve performance across the board is to allow Windows to use as much RAM as necessary to ensure performance. Find the This PC application and right-click the icon, then select Properties. Select Advanced system settings > Settings. Under the Visual Effects tab, there are four options. Select the Adjust for best performance option.

After you do this, click Apply. The changes will take effect after you restart your PC. This setting allows Windows to allocate RAM as needed to ensure programs run as smoothly as possible.
Prioritize RAM Usage
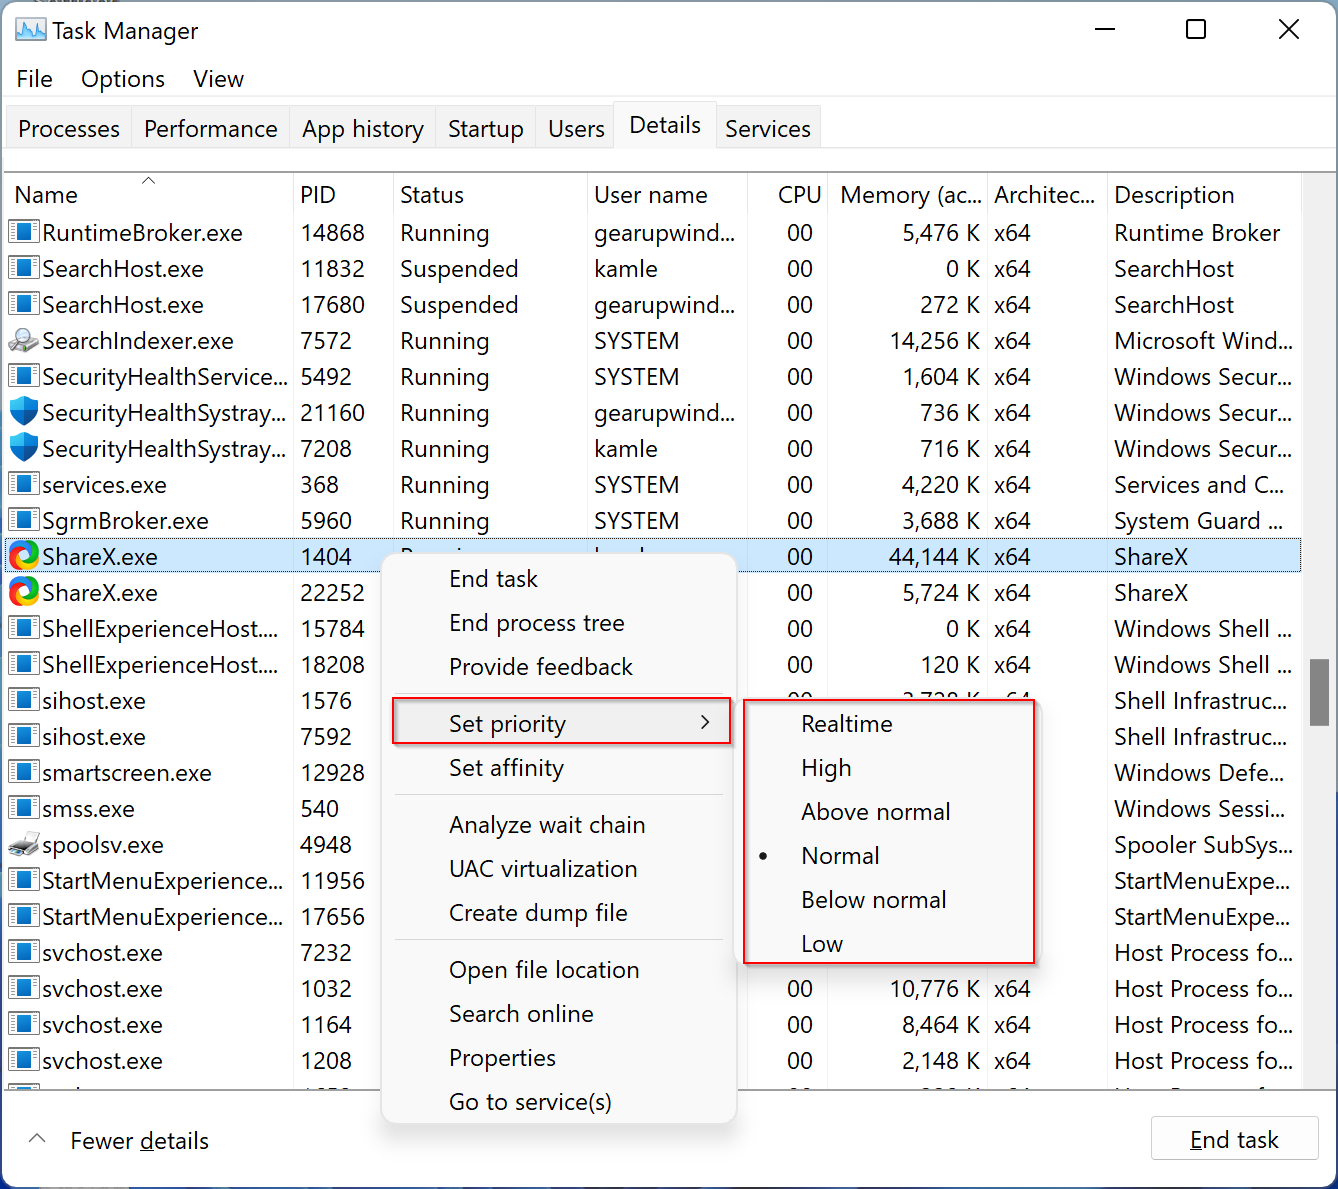
Another way you can ensure specific programs have more than enough RAM, particularly if you are running multiple applications at once, is to prioritize RAM usage within the Task Manager. Open Task Manager and right-click the application you want to prioritize, then select Go to details.

This opens the Details tab of the Task Manager. Right-click the process and choose Set priority. From here, you can designate what priority the program receives: Realtime, High, Above Normal, Normal, Below Normal, or Low.
Designate RAM Usage Within Specific Programs
Another option–and arguably the best choice–is to allocate more RAM within the settings of a given program. This holds especially true in games like Minecraft that are often played with mods. Many modpacks will not run correctly without more than the default amount of RAM.
Bear in mind that the exact process for doing this varies from program to program. Even among Minecraft, the process for allocating RAM depends on the launcher you use. As a brief example, you can select the Installations tab in the default launcher and click New > More Options and change the text under JVM Argument from Xmx2G to XmX2n, where n is the amount of RAM you want to use.

If you are looking for a more in-depth explanation, here is another article than can help.
Each game and program will have a different method for allocating more RAM, if it is even possible. Many applications are coded to use a specific amount of RAM based on your operating system, regardless of how much you have available. For example, Microsoft Excel on 32-bit operating systems is restricted to 2GB of RAM.
Risks of Using Too Much RAM
For the most part, RAM is harmless. You aren’t likely to cause catastrophic damage to your system because you use too much RAM on an application–the worst that happens is that a program will crash or background programs might behave in odd ways.
However, there are times when it can cause more serious damage. Anyone that has ever worked in coding has experienced a stack overflow error–a problem that happens when the call stack memory is exceeded. This error results in a crash. A similar type of problem often happens when a program throws the “Not Responding” error message within Windows.
This happens when it exceeds its allotted amount of RAM and can no longer operate properly. Waiting for the memory to clear can sometimes resolve the problem, but the go-to method is to force quit a program by using the Task Manager.
Related Posts
- How to Fix a “This file does not have an app associated with it” Error on Windows
- How to Fix an Update Error 0x800705b4 on Windows
- How to Resolve “A JavaScript error occured in the main process” Error on Windows
- How to Fix the Network Discovery Is Turned Off Error on Windows
- How to Check Steam Games Storage Use in Windows 11
Some games need a lot of RAM to run well. If your PC doesn’t have enough, you might see the game lag or even crash. This guide will show you how to give more RAM to a game on Windows 11 or Windows 10, so you can play the game more smoothly and without any trouble like insufficient memory.
Also see: How to Fix Game Stuttering on Windows 11

How does RAM allocation work?
RAM, or Random Access Memory, is super important for your computer. It keeps the data that your games and apps need to run. Giving more RAM to a game means it can use more of your computer’s memory, which makes the game run smoother, with less lag and quicker loading times.
But, you’ve got to make sure you don’t give all your RAM to just one game. Your other apps and the system itself need some to work well too.
Useful tip: How to Clear RAM Cache in Windows 11
Also, giving a game more RAM than it needs doesn’t always make it run better. Every game needs a certain amount of RAM, and if you give it too much, it won’t really use it. This could even make things worse, as other apps might not get the memory they need.
Relevant concern: Why is My Memory Usage So High When Nothing is Running?
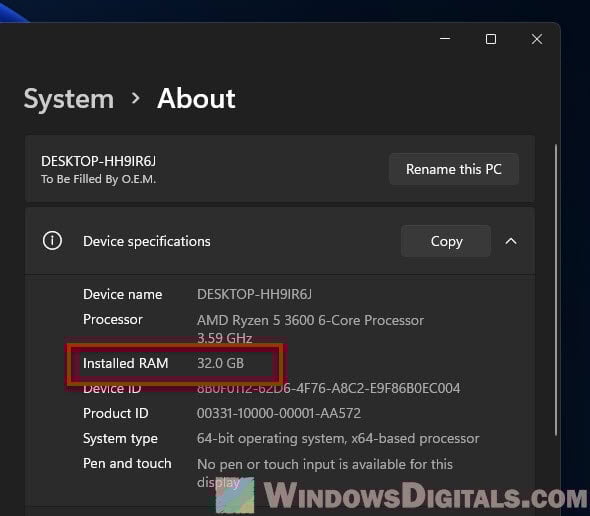
Check your system’s RAM
Before you start, check how much RAM your computer has and how much it’s using.
- Right-click on the Start button and choose System.
- Look under the Device specifications section, and you’ll see how much RAM you have next to Installed RAM.

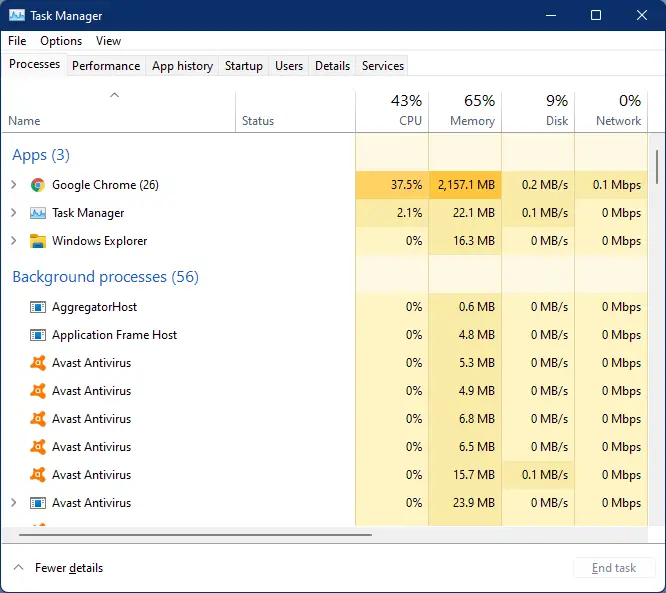
- Press Ctrl + Shift + Esc to open the Task Manager.
- Click on the Performance tab and then on Memory. Here, you’ll see the total RAM and how much is currently being used.

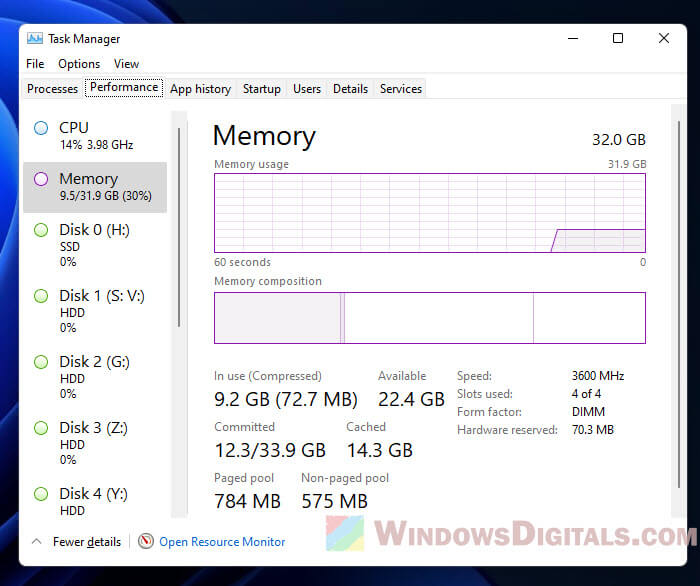
Make sure there’s enough free RAM before giving more to a game, so you don’t slow down other apps.
Handy hint: How to Reduce Hardware Reserved Memory in Windows 11/10
Allocate more RAM to a game by setting its priority
One way to give a game more RAM is by changing its priority in the Task Manager. This tells your computer to focus on the game more than other stuff.
- Start the game you want to give more RAM to.
- Press Ctrl + Shift + Esc to open the Task Manager.
- Click on the Details tab.
- Find the game in the list, right-click it, and choose Set priority.
- Select High or Above Normal to give more resources to the game.
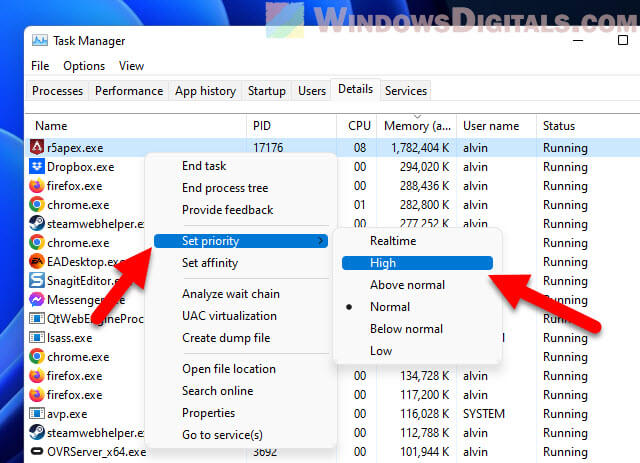
Note: If you set the game’s priority too high, it might affect other apps.
Related issue: Game Lag When Watching YouTube or Twitch on Chrome
How to give more RAM to a Steam game with “heapsize”
If you play games on Steam, there’s a trick called “heapsize” that lets you give more RAM to your games. The “heapsize” thing is a command that tells the game how much memory (in kilobytes) it can use for keeping game stuff like assets and data. Here’s how you do it:
- Start the Steam app and head to your Library.
- Find the game you want to boost, right-click it, and choose Properties.

- Hit Set Launch Options.
- Type
-heapsize [value], but swap[value]with how much memory you want in kilobytes. Like, for 2 GB of RAM, punch in-heapsize 2097152(since 1 GB = 1024 * 1024 KB).
- Click OK and shut the Properties window.
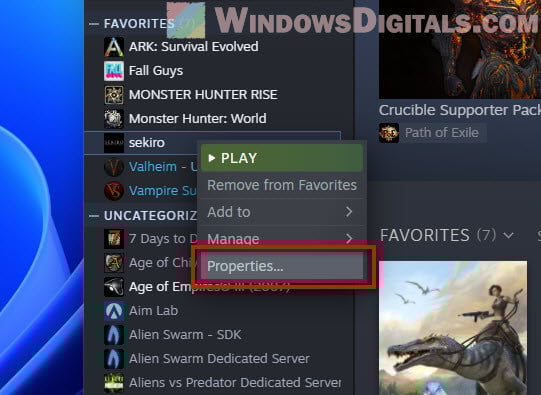
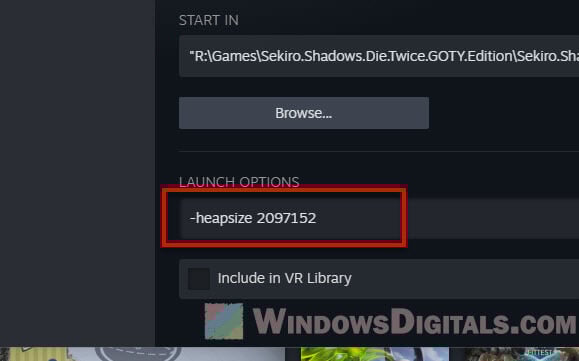
Now, when you start the game, Steam will use the RAM amount you set.
Other similar issue: 16GB RAM Installed Only 8GB Usable in Windows 11
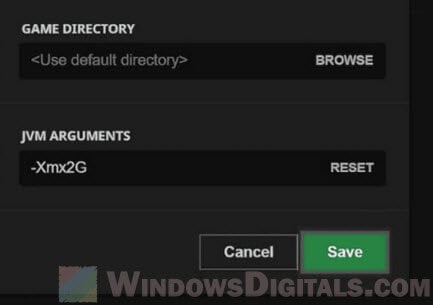
Giving more RAM to Minecraft (Example)
Minecraft is a game where you can also give it more RAM. This time, you use something called JVM arguments in the Minecraft Launcher. Here’s how:
- Open the Minecraft Launcher and hit Installations.
- Mouse over the setup you want to tweak, click the three dots, and pick Edit.
- Tap on More Options.
- Find the JVM Arguments box. There’s a part that says
-Xmx2G, which means it’s set to use up to 2 GB of RAM. - Change the number after
-Xmxto how much RAM you want. Like, for 4 GB, switch-Xmx2Gto-Xmx4G. - Hit Save and start the game with your new setup.
Other games might have their own ways to get more RAM, so it’s good to look up how to do it for each game.
How to tweak virtual memory
Virtual memory is like extra RAM but on your hard drive. Windows uses it when you run out of real RAM. Changing virtual memory won’t make games run better, but it can stop some errors from happening. Here’s how to adjust it in Windows 11/10:
- Right-click the Start button and choose System.
- Click Advanced system settings.
- Under Performance, hit Settings.
- Go to the Advanced tab and click Change in the Virtual memory area.
- Uncheck Automatically manage paging file size for all drives.
- Pick the drive with your game and choose Custom size.
- Set initial and max sizes for the paging file in MB. The tip is to make the max size 1.5 to 3 times your RAM.
- Press Set, then OK.
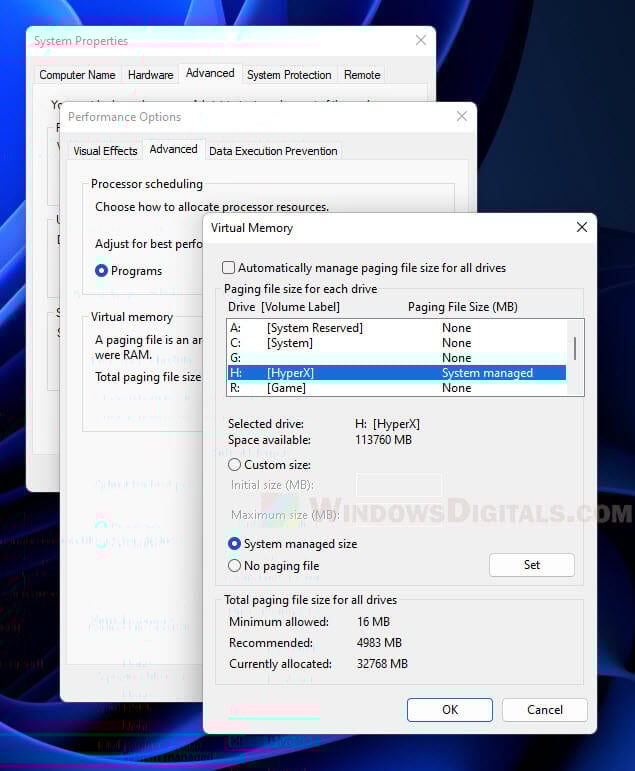
Adding more virtual memory uses more disk space and might slow down other apps, so keep an eye on your computer’s speed and change things if needed.
Recommended tip: 30+ Windows 11 Services to Disable for Better Gaming Performance
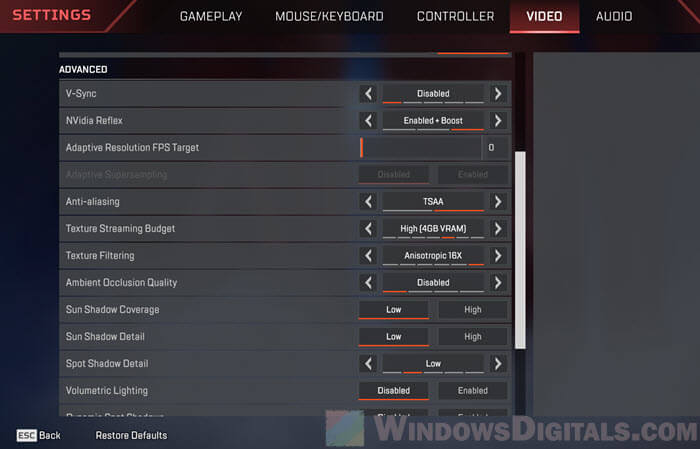
Make your game run smoother by adjusting settings
Besides giving games more RAM, tweaking their settings can also make them run better. Lots of games let you change things like:
- How sharp the picture is
- How detailed things look
- Shadows
- Smooth edges (Anti-aliasing)
- Light and shadow effects (Ambient occlusion)
- How far you can see (Draw distance)
Play around with these settings to see what works best on your computer. Lowering them can make the game run smoother without needing so much RAM or other resources.
Some final words
In the end, RAM is not about “more is good”. An app or game only needs what it needs. Allocating more RAM than a game needs will not improve your FPS or anything at all when you play the game. The task manager’s priority settings should do the job just fine for you when it comes to allocating resources for your games. Also, instead of RAM, you should focus more on other resources that the game can use, such as CPU and GPU. Those are the things that can really improve your FPS and overall smoothness.
More RAM (Random Access Memory) allows programs to boot more quickly and carry out tasks in a fraction of the time. A specific application on your computer may need more RAM to work properly, and some may not. For instance, a word processing program doesn’t require heavy RAM due to the low-performance requirements. But, a detailed Excel spreadsheet or Photoshop app needs as much RAM as you can spare it. The same goes for games like Minecraft; in many cases, you need to allocate extra RAM to gaming.
If you want to prioritize one program over another in Windows to perform better, you need to allow more RAM to the specific app. RAM Allocation for particular programs is a means of prioritizing and allocating more RAM to a program than other apps.
What is RAM?
RAM is an acronym for random access memory. It is one of the essential parts of your computer. It is necessary to boot your computer and run the programs. Without sufficient RAM, you can’t run most applications. In other words, RAM is a short-term memory in your computer that allows your system to access data far more quickly than it can through even the SSD. If you run multiple applications simultaneously, you will need more RAM than if you only use a few at a time. It can be upgraded or changed if you need it.
How to Allow Windows 11/10 to Allocate More RAM?
The easiest way to improve overall performance across the system is to allow Windows to use as much RAM as necessary. For that, open Control Panel and search the “Performance” word.
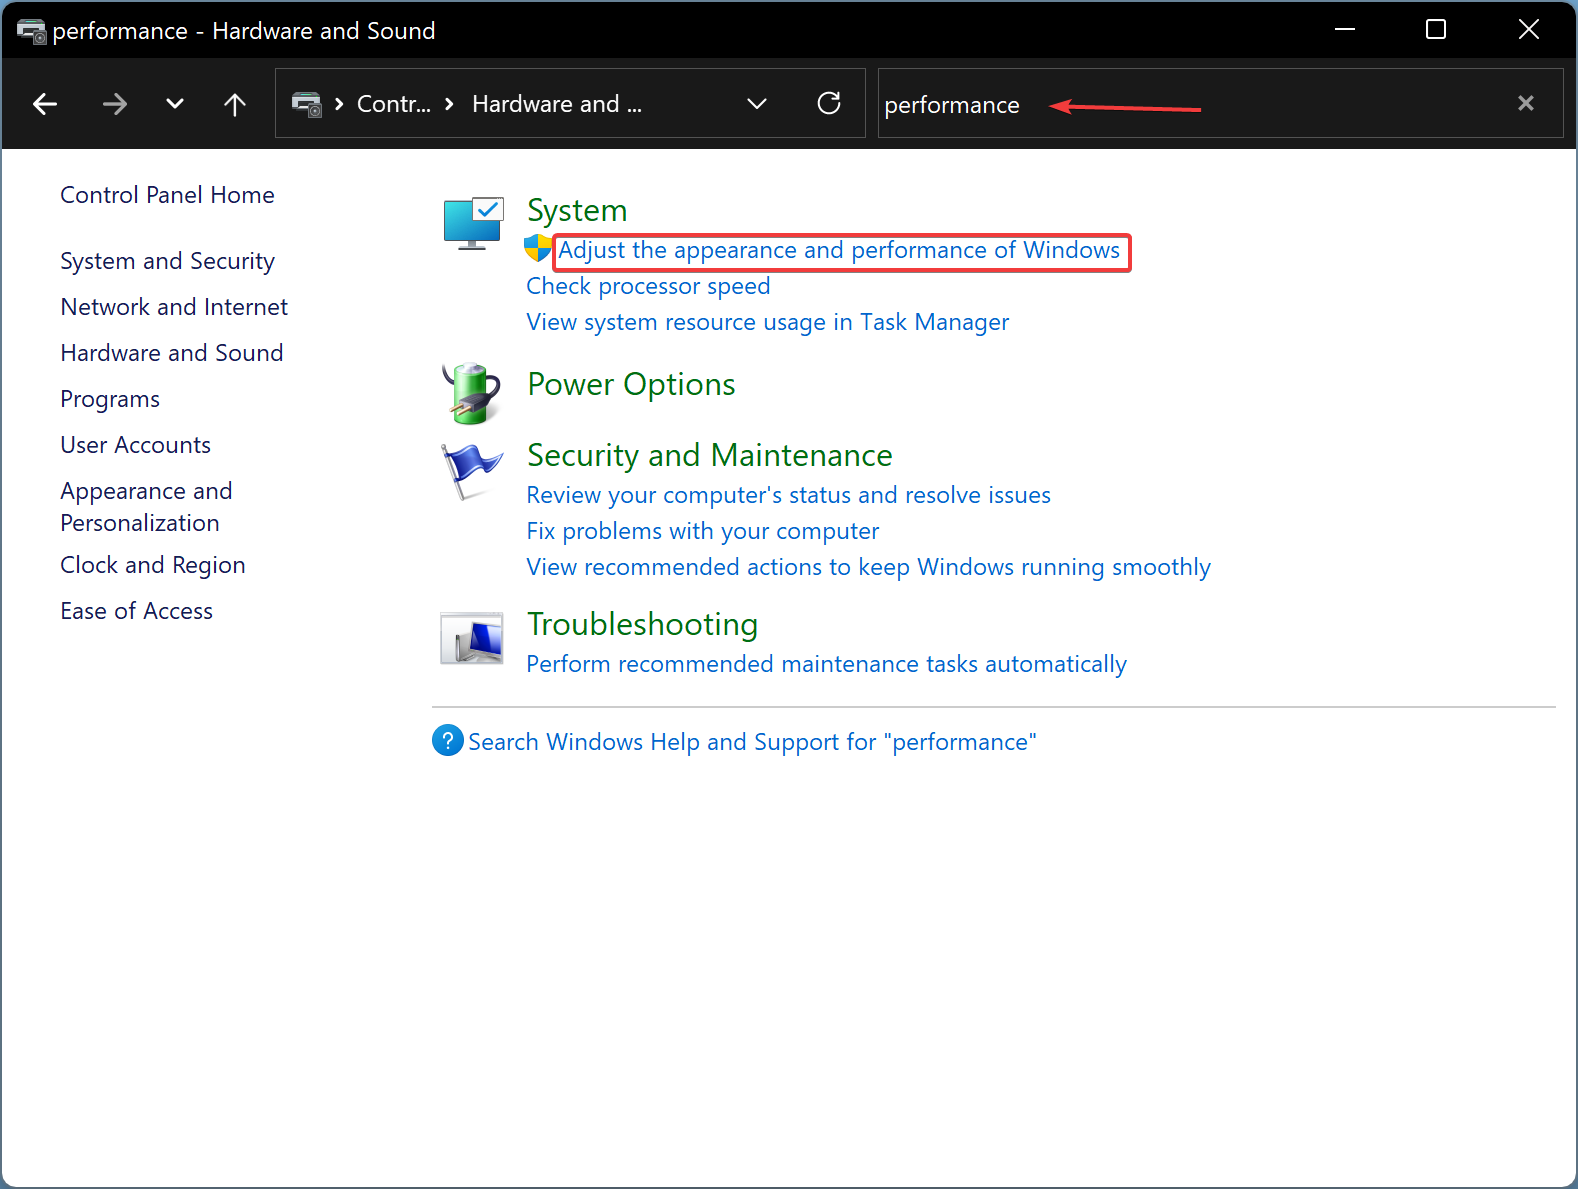
After that, click the link “Adjust the appearance and performance of Windows” to open the “Performance Options” dialog. Select the Visual Effects tab and then choose the option “Adjust for best performance” option.
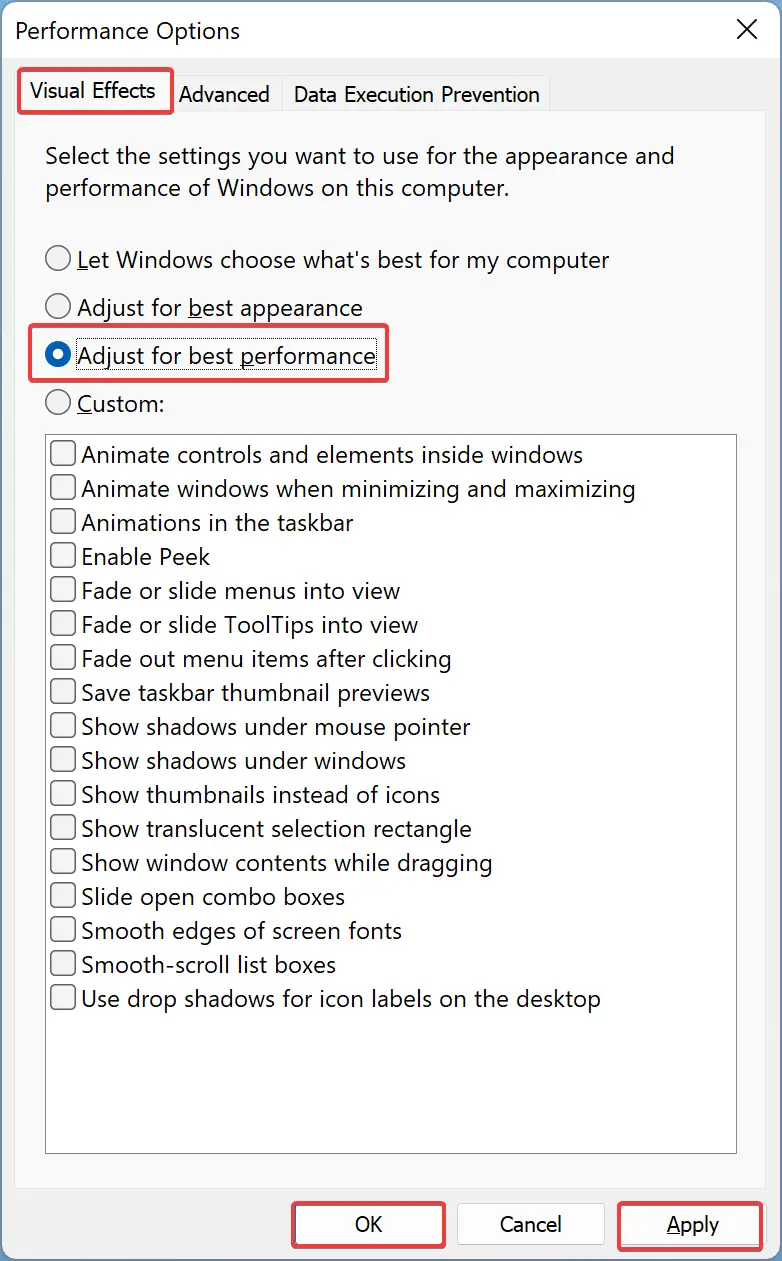
Finally, hit the Apply/OK button. This will disable unnecessary animations and other visual effects, resulting in performance improvement.
How to Allocate More RAM to Specific Apps in Windows 11/10?
Before you proceed further, please note that the increase in RAM usage varies depending on the program, and to allocate more RAM to a program, you must repeat the methods below each time you launch the software.
To prioritize one program above another in Windows 11/10 to get better performance, do the following:-
Step 1. Open the Task Manager from the Start Menu or press the Ctrl + Shift + Esc keys combination on the keyboard.
Step 2. Choose the Details tab when the Task Manager window opens.
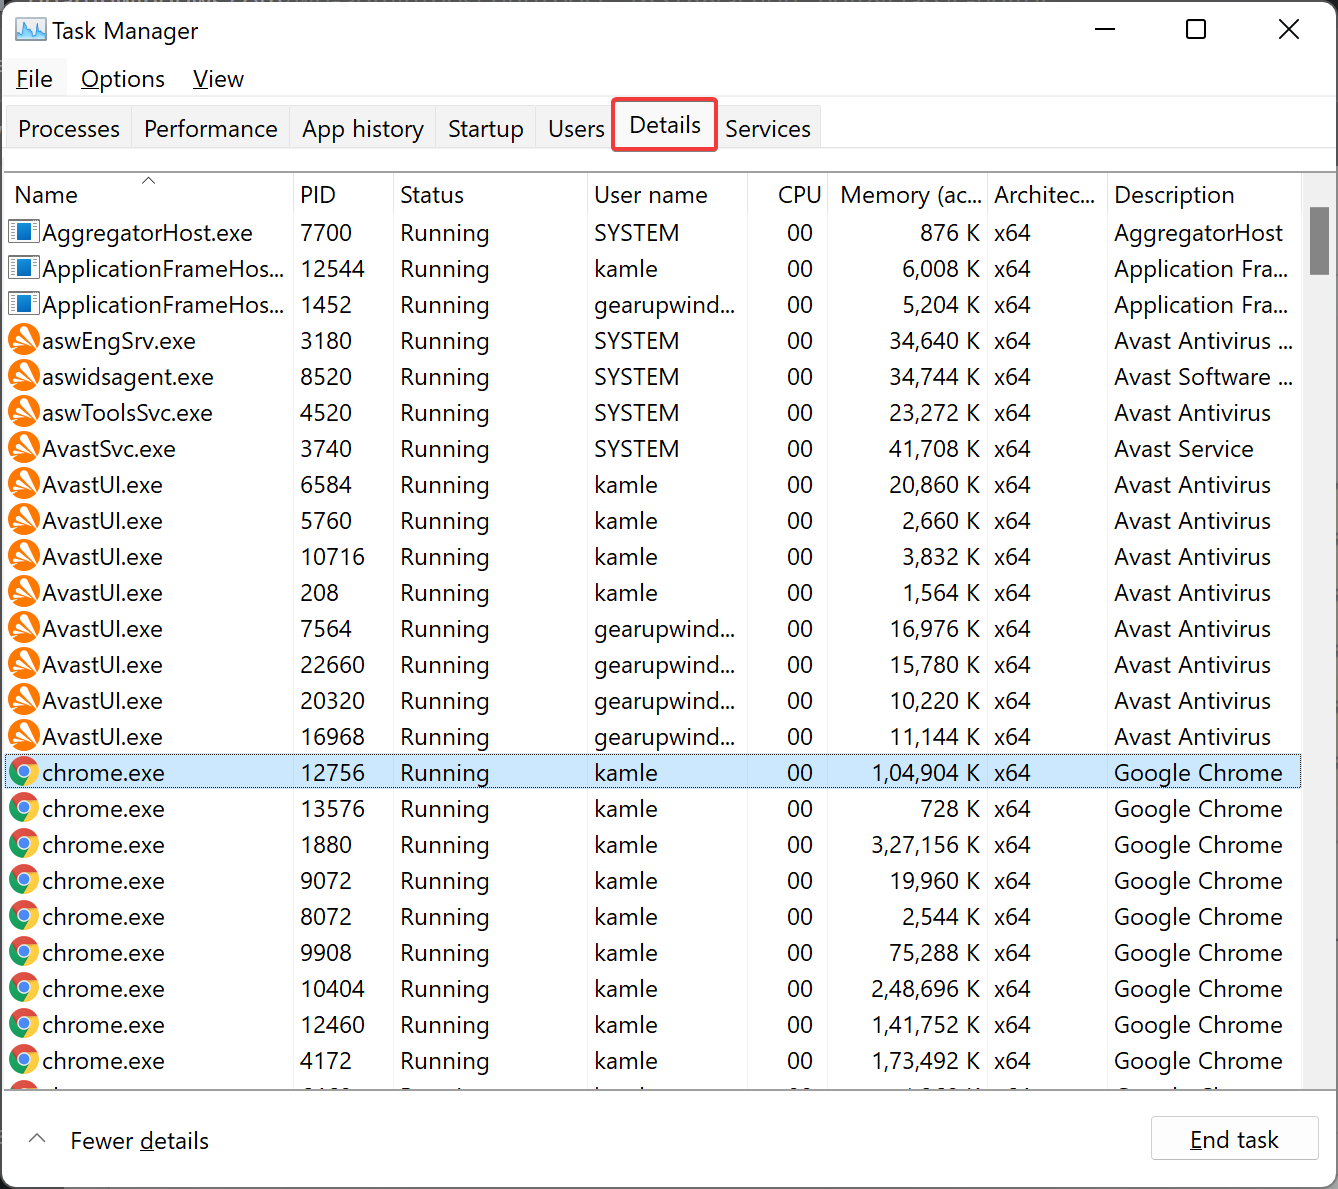
Step 3. After that, select the app you want to prioritize the RAM and then right-click it. Next, choose the Set Priority option to see the current priority settings.
Step 4. Then, select the desired Priority settings you want to assign to the app. You can choose from the following options:-
- Realtime
- High
- Above normal
- Normal
- Below normal
- Low
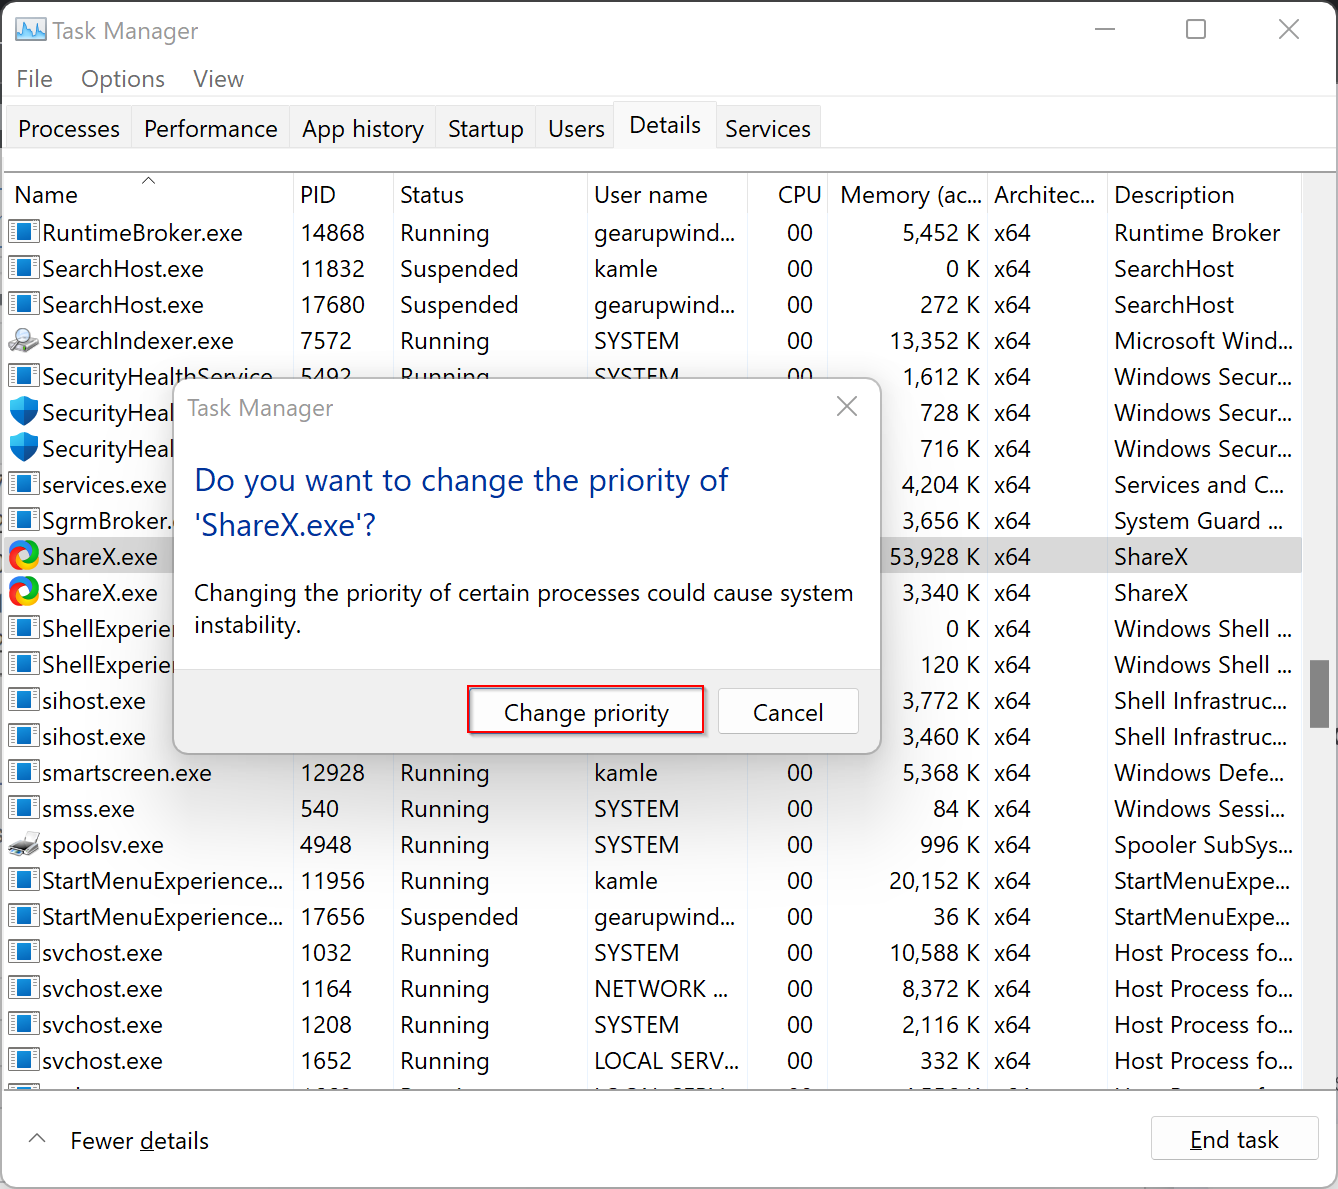
Step 5. When the pop-up window opens, click the Change priority button.
How to Allocate More Graphics to Specific App in Windows 11 using Settings app?
If you want to assign furthermore graphics to a specific program, do the following:-
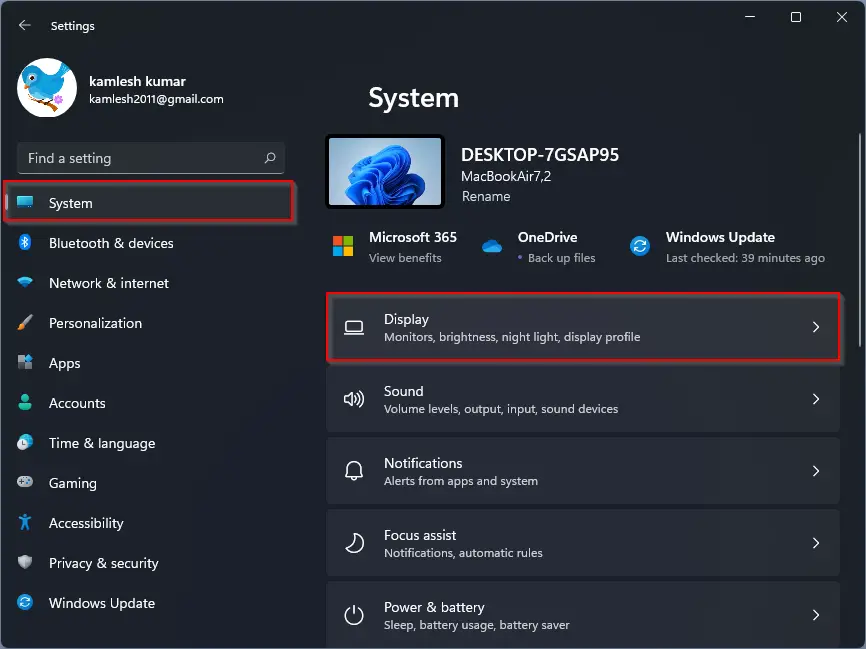
Step 1. First, open the Settings app by pressing the Windows + I keys.

Step 2. Then, select the System category in the left sidebar of Windows Settings.
Step 3. After that, hit the Display tab on the right sidebar.
Step 4. Now, scroll down and select Graphics settings on the right-side pane.
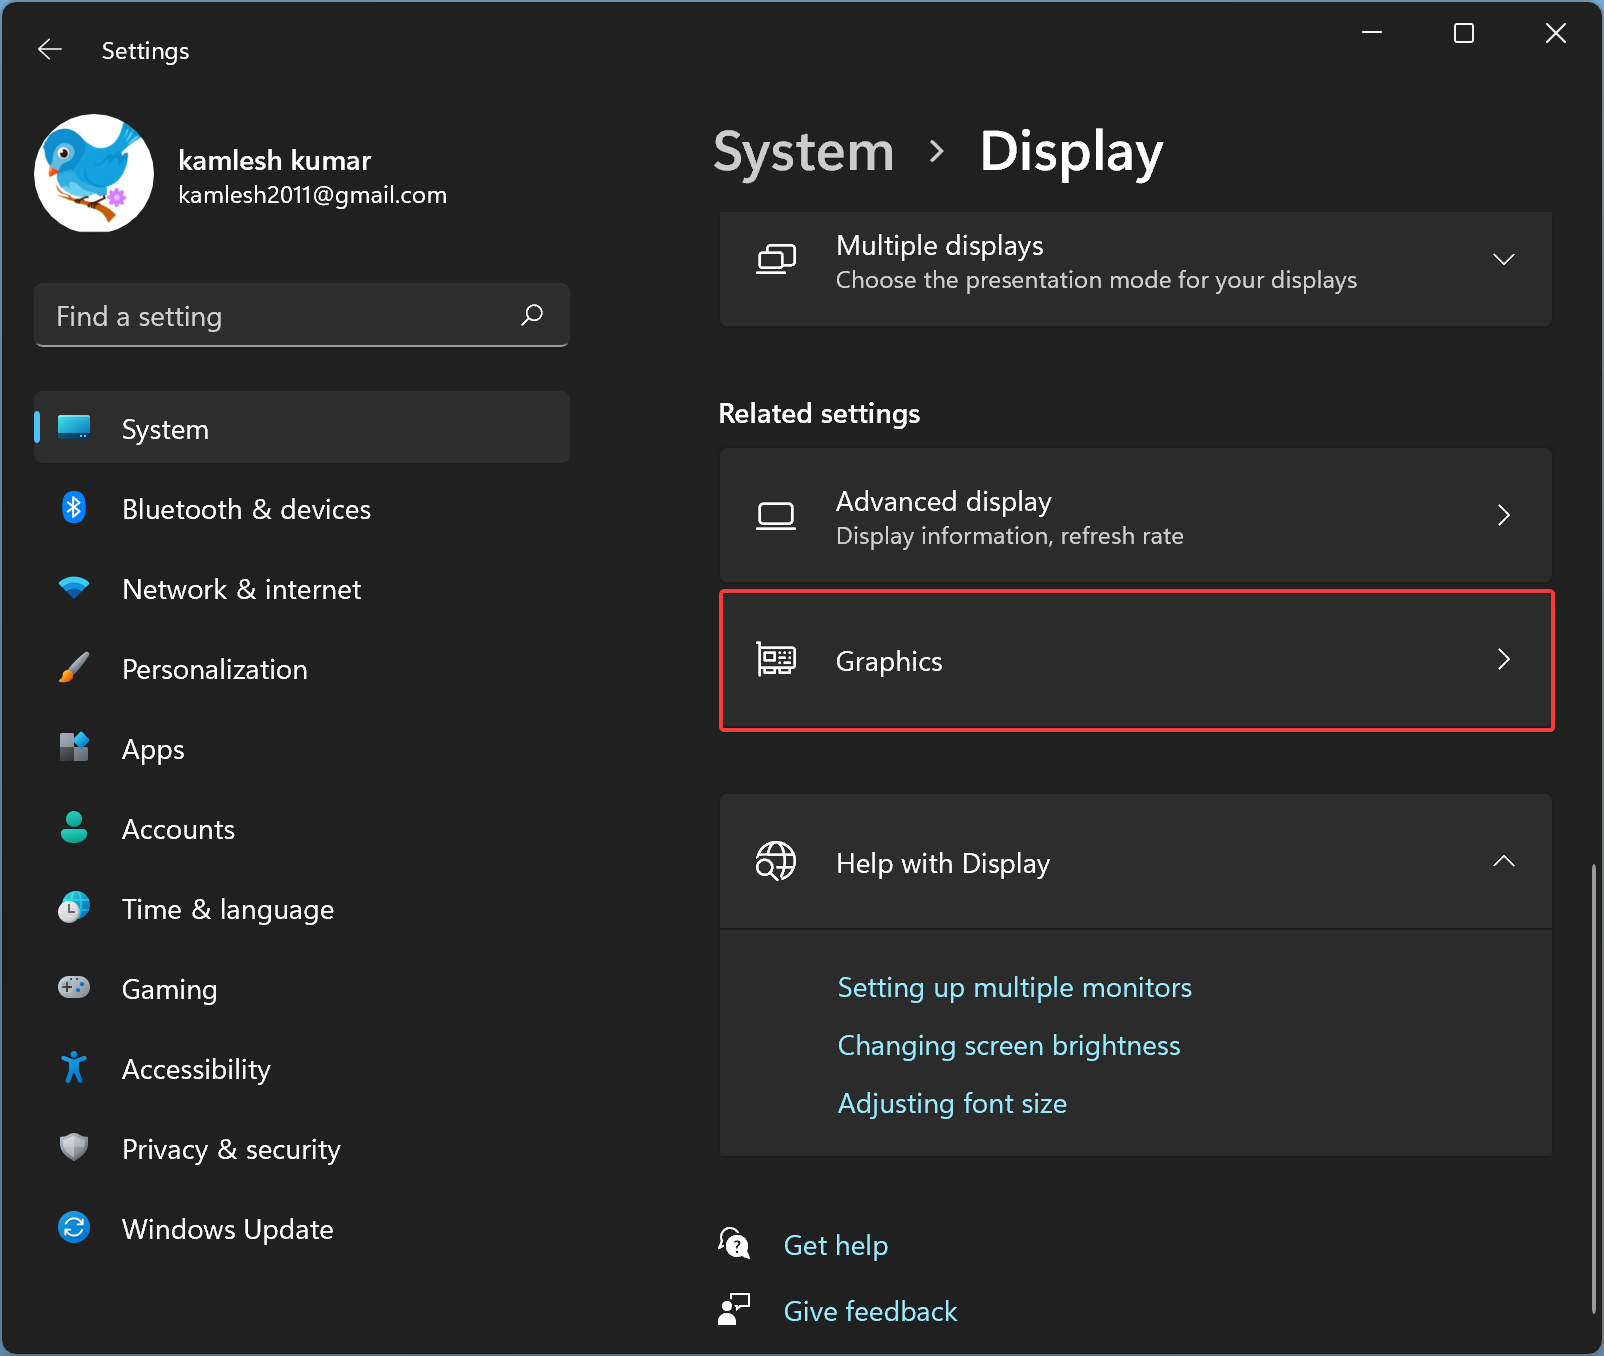
Step 5. Next, choose the Desktop app option from the drop-down menu of “Add an app.”
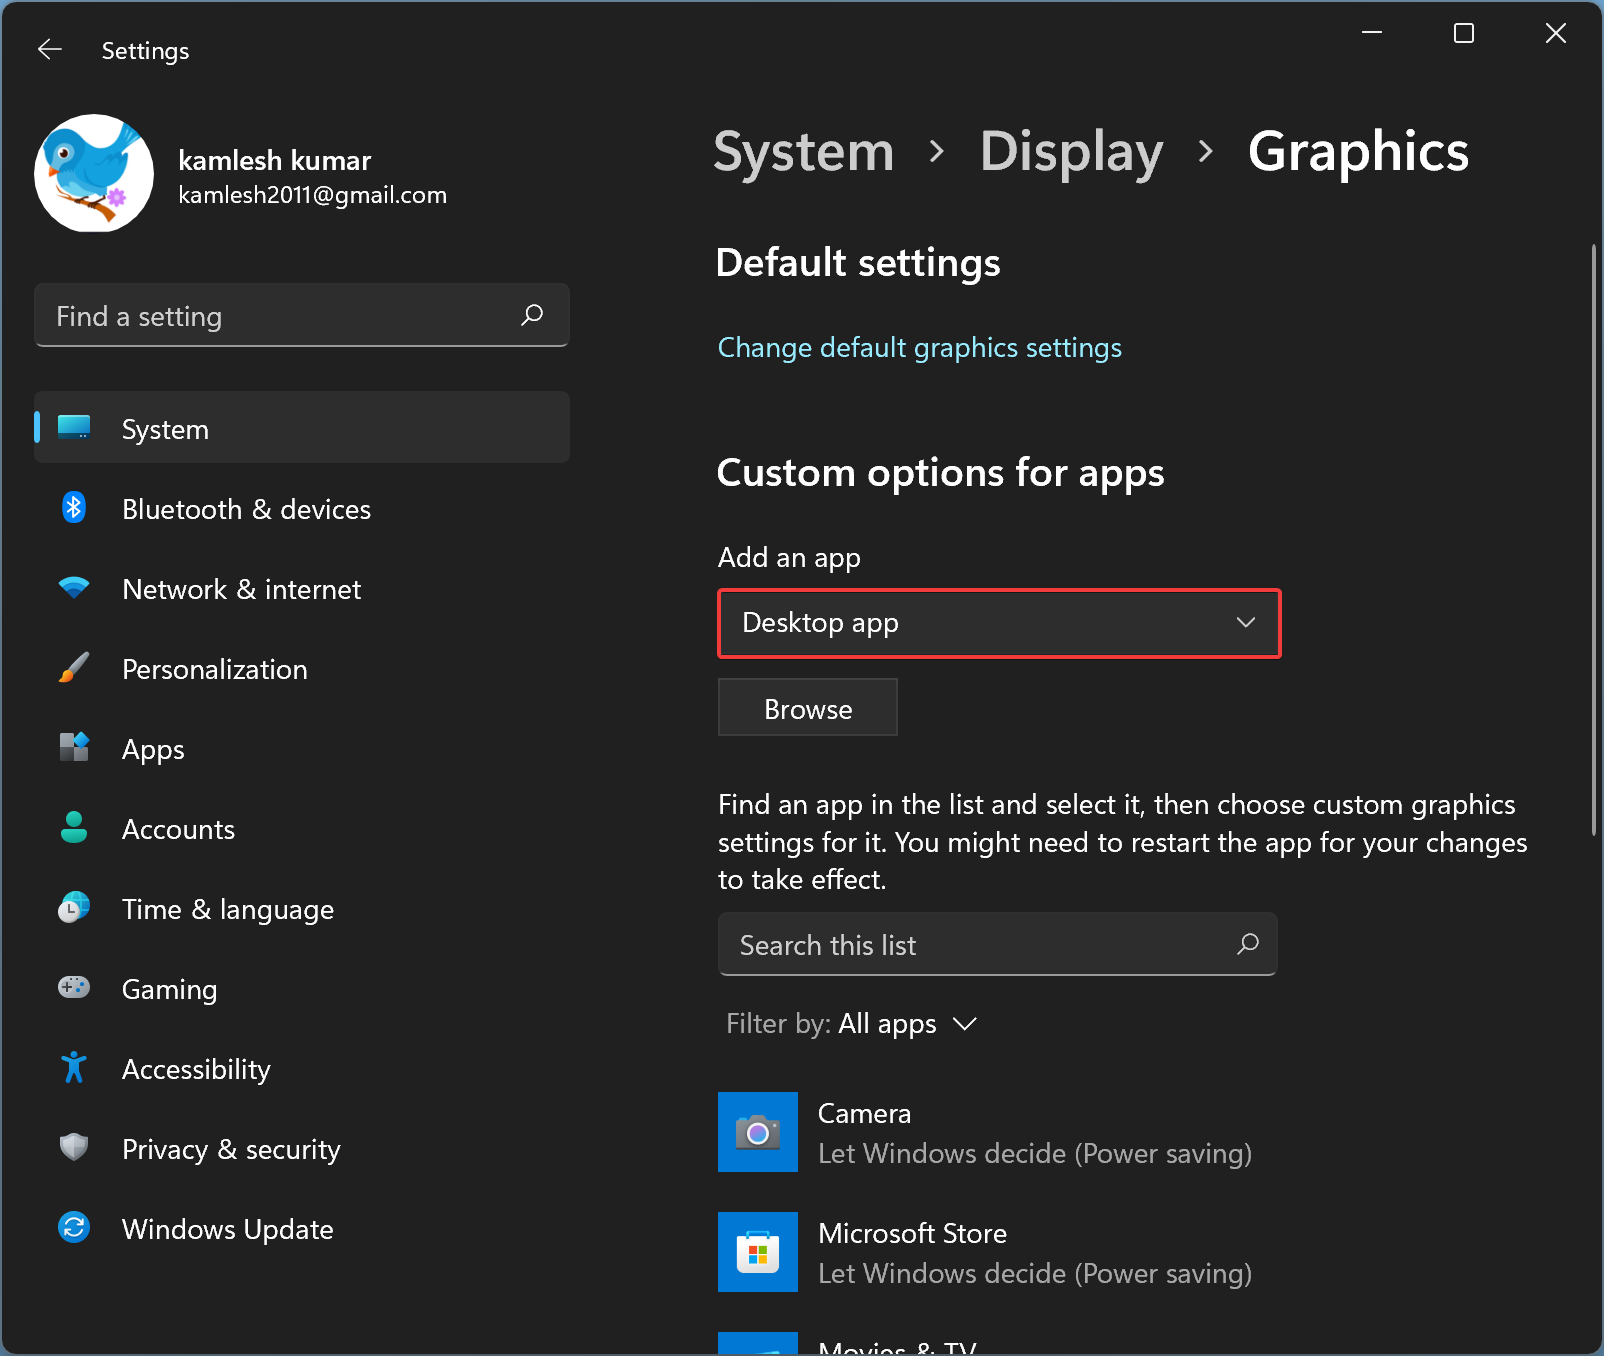
Step 6. Hit the Browse button.
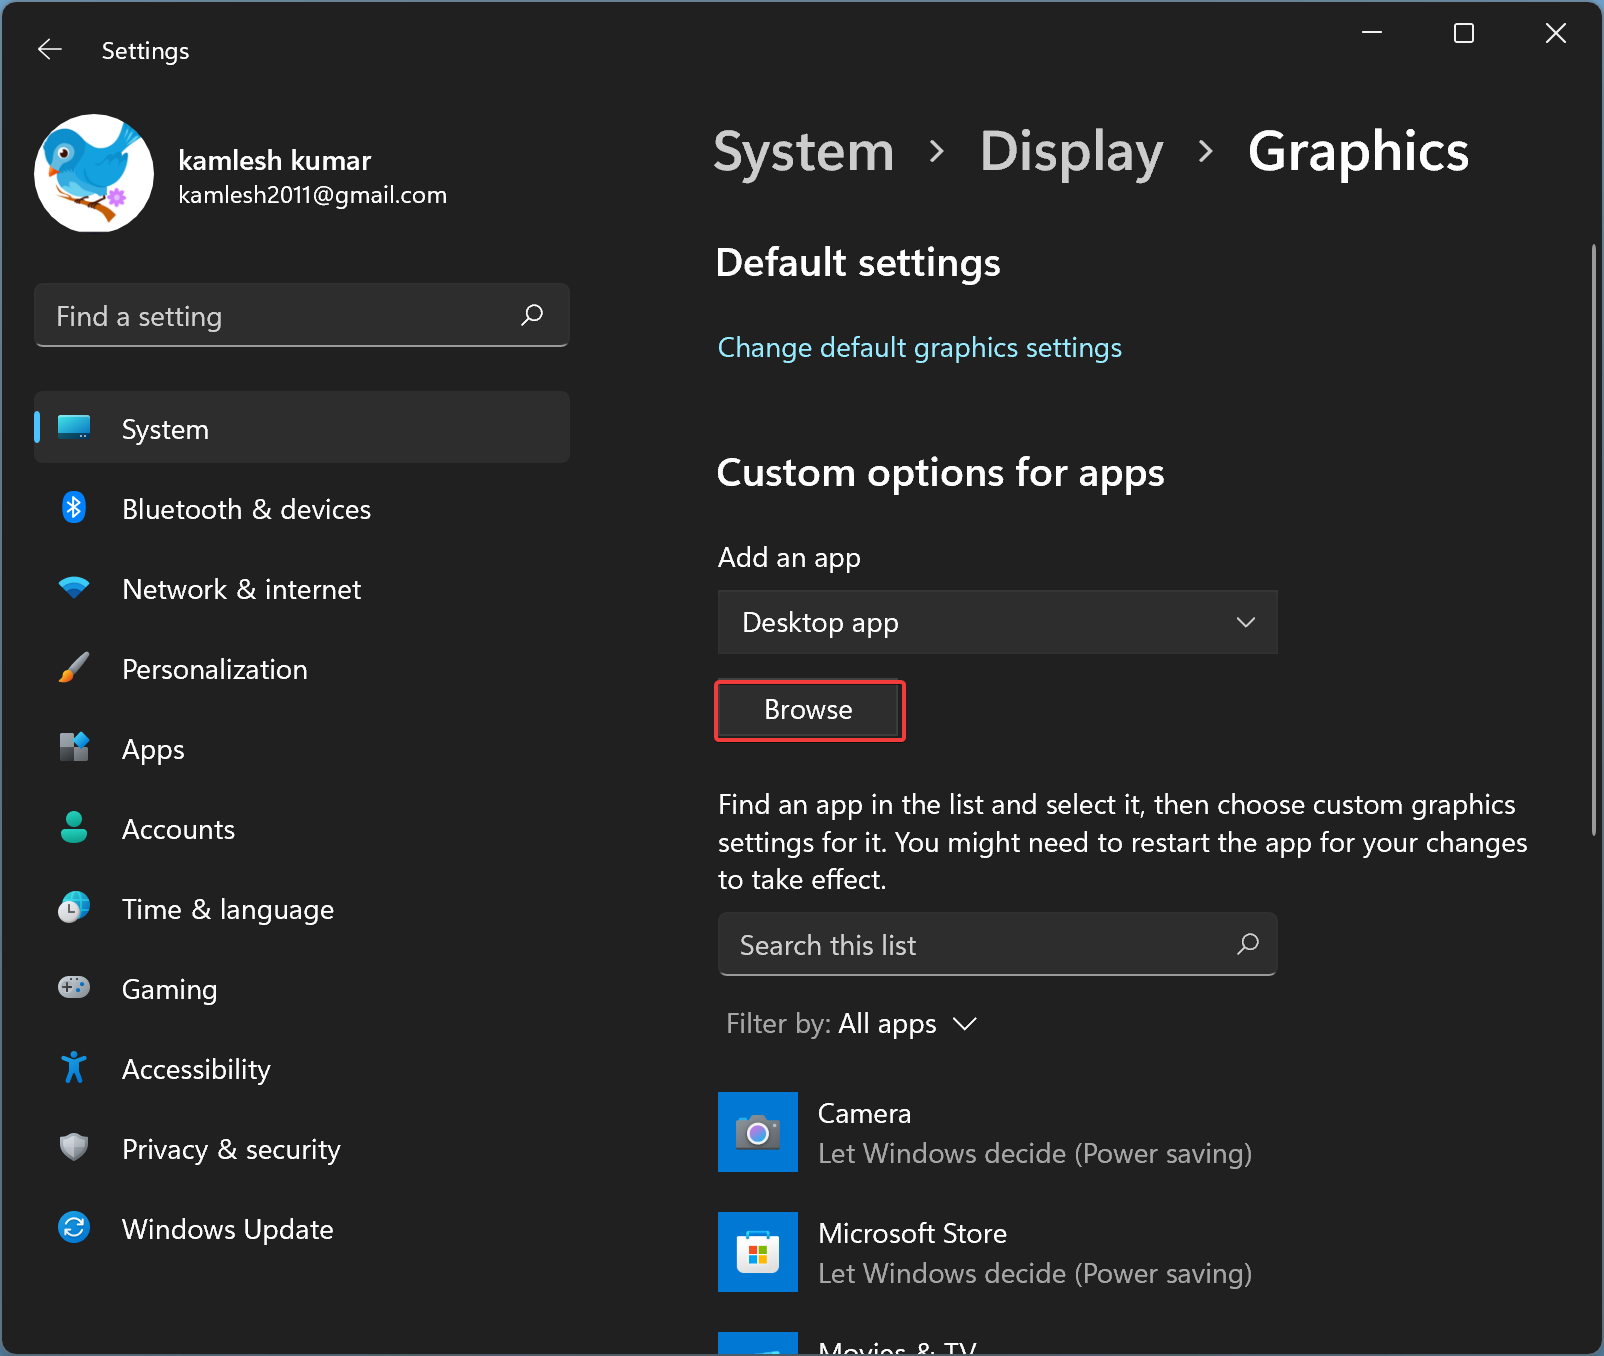
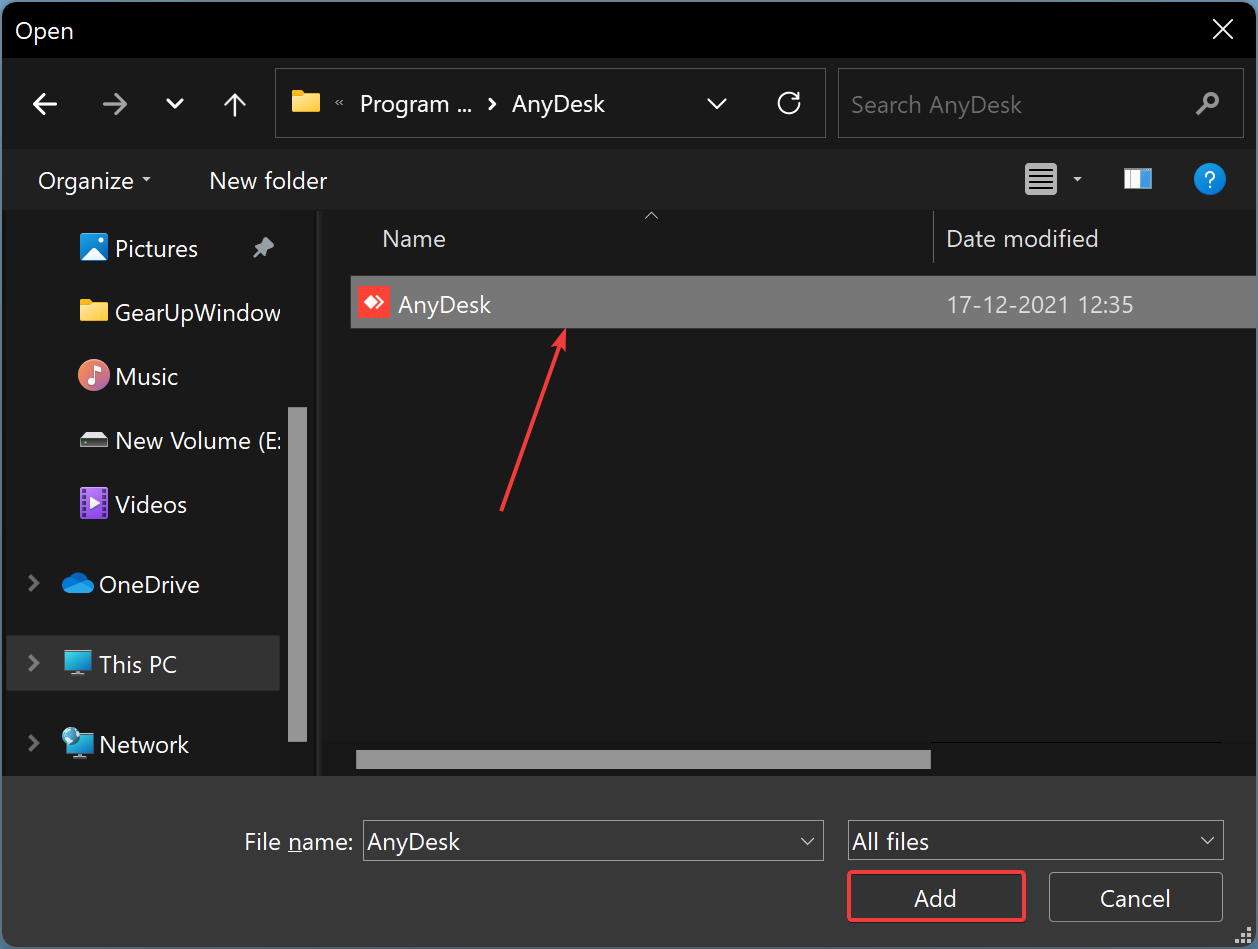
Step 7. Now, the File Explorer window will open. Locate the executable file to which you want to allocate more memory and select it. Then, click the Add button.
Step 8. After that, click the Options button on the Graphics settings page.
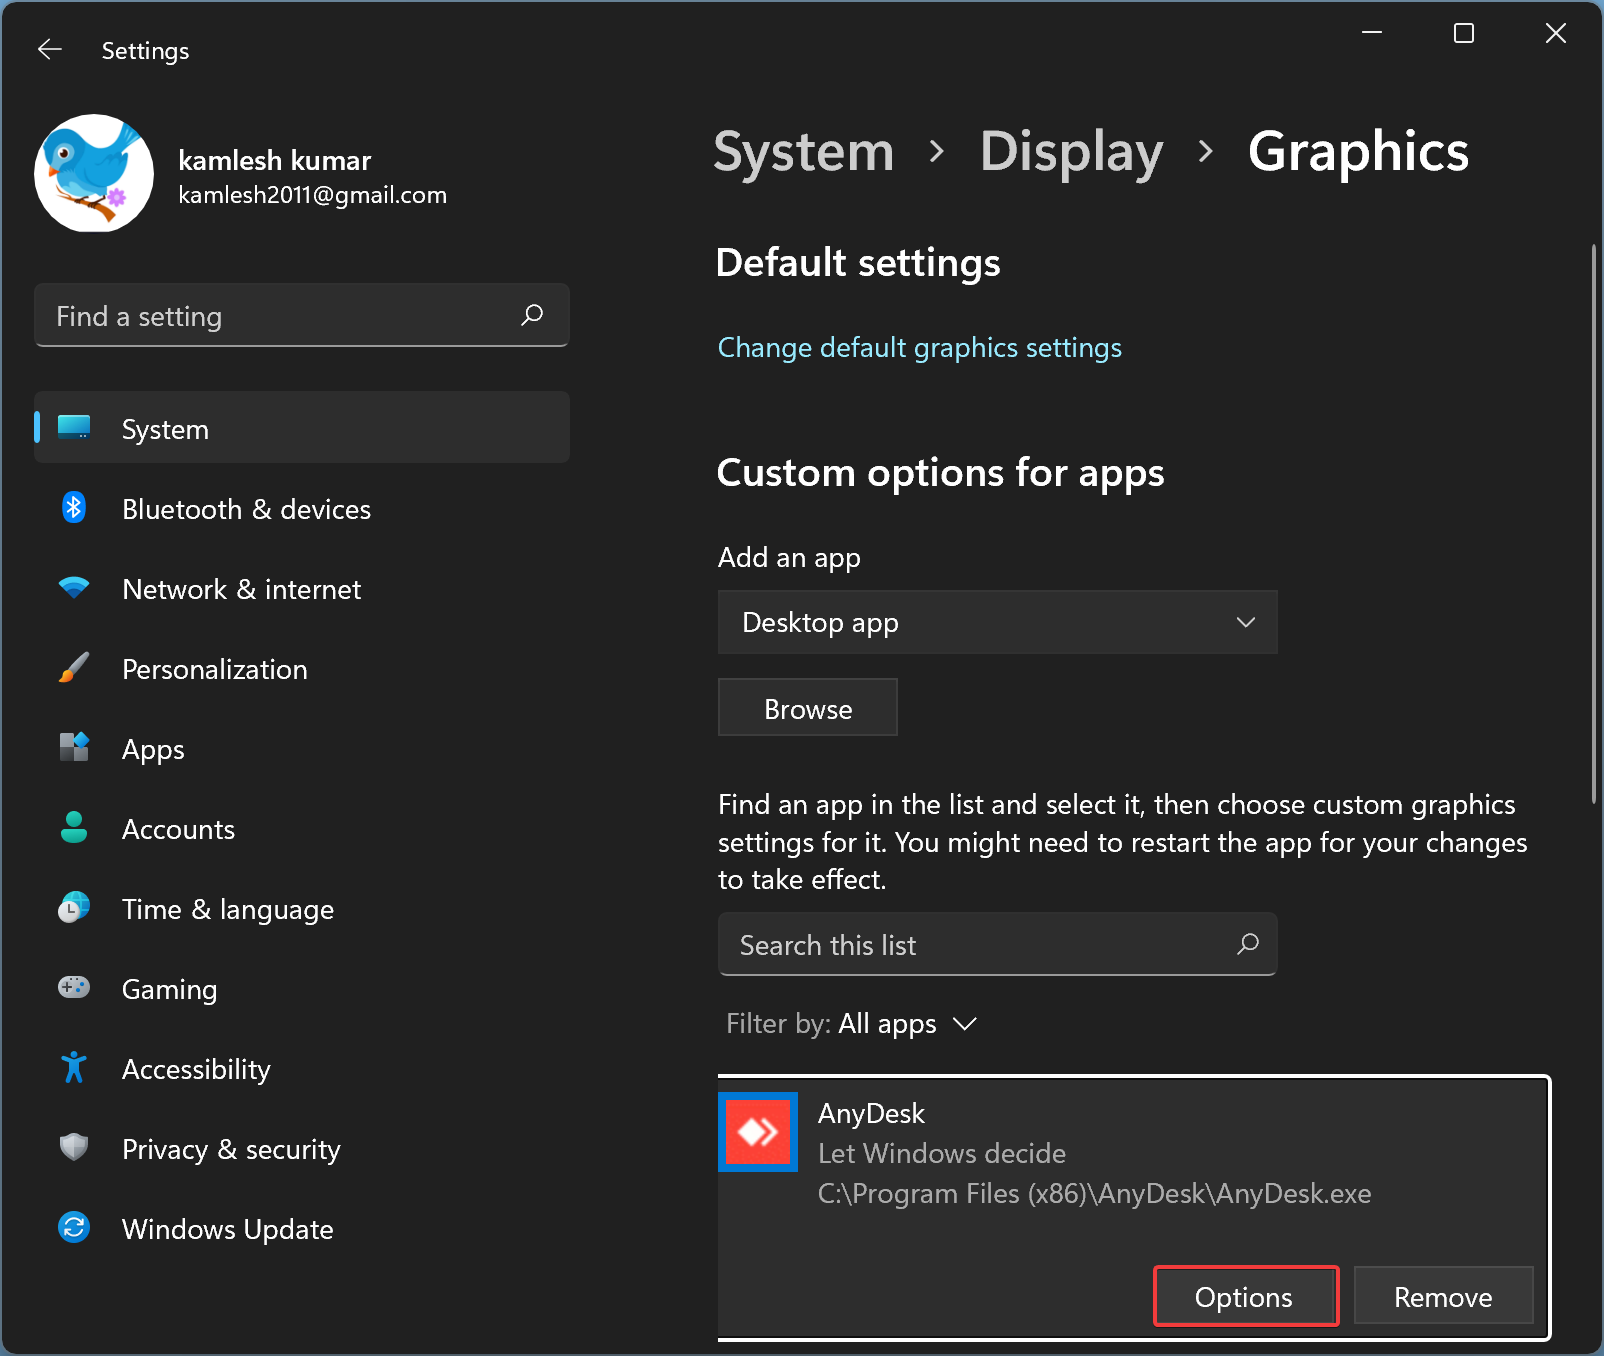
Sep 9. Now a tiny pop-up window will open. By default “Let Windows decide” option will be selected. Select the “High Performance” option to allocate more memory. You can also set the “Power saving” option if the app behaves abnormally.
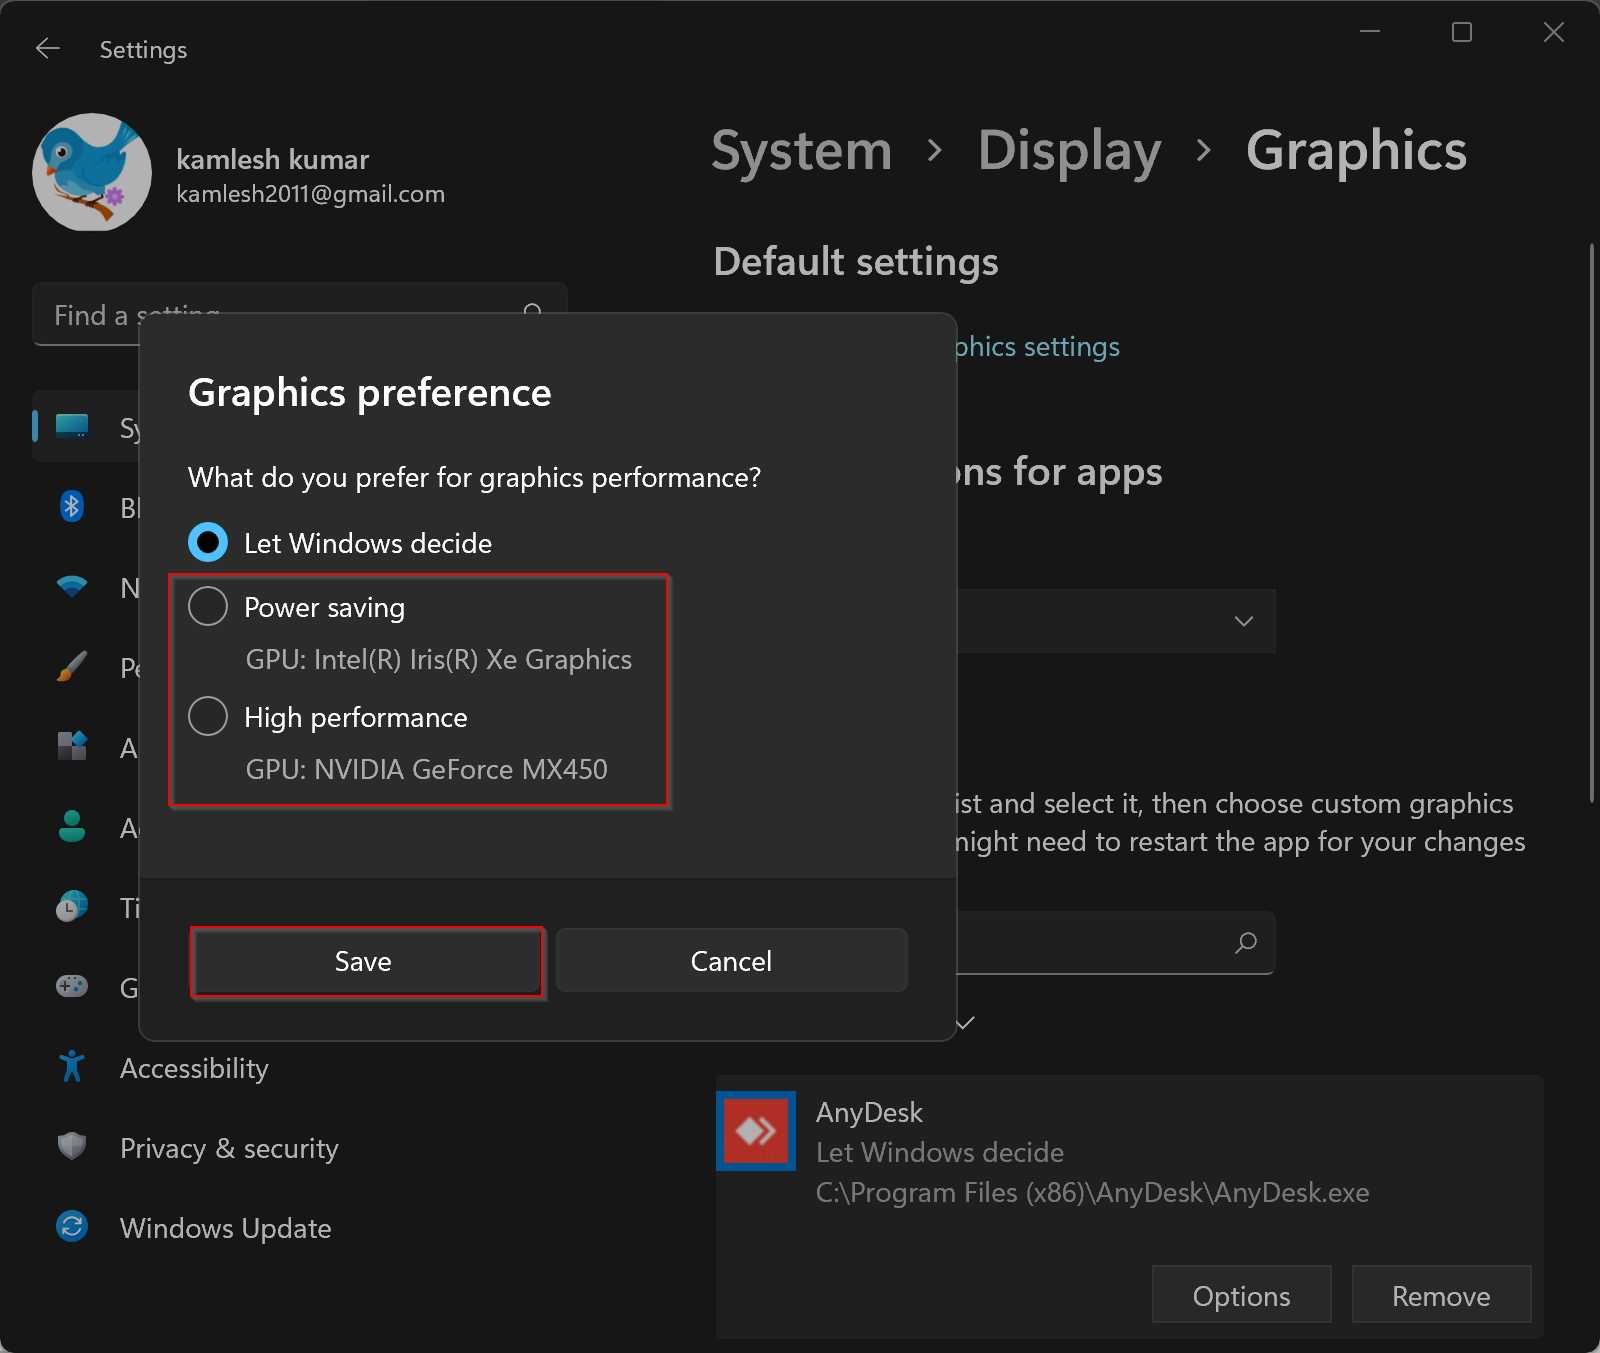
Step 10. When you’re done, click the Save button.
Conclusion
In conclusion, allocating more RAM to specific apps can help prioritize and improve their performance, especially for memory-intensive programs like photo editing or gaming. However, it’s essential to note that increasing RAM usage for a particular program may not always result in significant improvements, and you may need to repeat the process each time you launch the software. Additionally, allowing Windows to use more RAM, in general, can also improve system performance, and disabling unnecessary visual effects can help achieve this. By following the steps outlined in this article, you can allocate more RAM to specific apps and optimize your system for better performance.

Image via TeamGroup
Allocating RAM can help optimize performance.
|
Published: Oct 19, 2023 08:20 am
Some applications in Windows require more RAM to run than others. Games need far more random access memory (RAM), or operative memory, to run than word processing apps because they have intense graphics requirements.
Windows 10 typically allocates RAM automatically to each program, with a limit on how much they can use. While this system is adequate for most apps, some games may suffer slow performance or long load times because of RAM limitations. The best way to rectify this issue is by allocating more RAM to the game to increase performance.
What is RAM?
RAM is the operating memory used by programs to run. Instead of storing data permanently, like a hard disk drive (HDD) or solid-state drive (SSD), it stores temporary information required to run a program. When a user opens a game, the RAM keeps it running because the process would be too slow if it had to run from the drive. When the game is closed, the RAM stores no permanent data and can be allocated to other programs.
The more RAM a PC has, the more processes it can run. Since PCs process tasks sequentially, having lower RAM means it has limited processing power and will take longer to complete each one. More RAM allows the PC to process more tasks faster.
RAM chips with the same memory size often operate at different speeds. It’s best to get the highest frequency possible while considering the motherboard’s capabilities. There’s debate about whether it’s best to have a higher quantity of RAM or lower RAM with higher speeds. In most cases, it’s best to have more RAM, but it’s a gray area and depends on factors such as CPU type and the motherboard’s capabilities.
How to allocate more RAM to a game in Windows
To allocate more RAM to a game, you must change the program’s priority in Task Manager. Setting the priority to high will give more RAM to that game specifically.
Listed below is a step-by-step process on how to allocate more RAM.
Allocating more RAM to a game can increase its performance and loading times. On the other hand, if the PC has limited RAM, it might affect other programs’ performance and lead to crashes. It’s advisable to monitor your system and change the settings to what they were if you experience any problems.
Dot Esports is supported by our audience. When you purchase through links on our site, we may earn a small affiliate commission. Learn more about our Affiliate Policy
На чтение6 мин
Опубликовано
Обновлено
В Windows 10 имеется возможность выделить дополнительную память для запуска приложений. Благодаря этой функции можно повысить производительность и улучшить общую работу программ. Как это сделать и какие полезные советы помогут вам оптимизировать использование памяти, мы рассмотрим в этой статье.
1. Один из способов выделения памяти — расширение виртуальной памяти. В Windows 10 это можно сделать следующим образом: откройте «Системные настройки» и перейдите в раздел «Дополнительные параметры системы». В открывшемся окне перейдите на вкладку «Дополнительно» и нажмите на кнопку «Изменить» в разделе «Виртуальная память». Здесь можно настроить размер виртуальной памяти вручную или выбрать опцию «Управление объемом файлов подкачки системой».
2. Еще один полезный совет — использование приоритетов приложений. Для этого откройте «Диспетчер задач» и перейдите на вкладку «Подробности». Щелкните правой кнопкой мыши на приложении, для которого нужно выделить больше памяти, и выберите пункт «Установить приоритет». Здесь можно выбрать высокий или реального времени приоритет для более быстрой работы выбранного приложения.
3. Режим «Высокая производительность» также может помочь выделить больше памяти для приложений. Перейдите в «Параметры питания» и выберите данный режим. Однако стоит учитывать, что это может сказаться на энергопотреблении устройства, поэтому при использовании ноутбука рекомендуется использовать подключение к сети.
Следуя этим полезным советам, вы сможете выделить больше памяти для запуска приложений в Windows 10 и улучшить общую производительность вашего устройства. Не стесняйтесь экспериментировать и настраивать параметры под свои потребности!
Как распределить память приложения в Windows 10: 3 полезных совета
Распределение памяти приложения в операционной системе Windows 10 может оказаться критически важным для его производительности и стабильности. Правильное управление памятью может помочь ускорить работу приложения, уменьшить вероятность сбоев и обеспечить более эффективное использование ресурсов компьютера. В этой статье мы рассмотрим 3 полезных совета по распределению памяти приложения в Windows 10.
1. Оптимизация использования оперативной памяти
Оперативная память (RAM) является одним из важных ресурсов компьютера, который используется приложениями для временного хранения данных. Чтобы оптимизировать использование оперативной памяти, рекомендуется следующие действия:
- Избегать утечек памяти: внимательно следите за освобождением памяти после завершения работы с объектами или переменными.
- Использовать разделение памяти по потокам: распределение памяти между различными потоками приложения может помочь увеличить общую производительность.
- Оптимизировать размеры данных: если вам необходимо хранить большие объемы данных, рассмотрите возможность сжатия или использования других методов оптимизации размера.
2. Предотвращение утечек памяти
Утечки памяти могут стать серьезной проблемой, если приложение не освобождает использованные ресурсы после завершения своей работы. Чтобы предотвратить утечки памяти, следует проверить код приложения на наличие следующих проблем:
- Незакрывающиеся потоки и соединения: убедитесь, что все потоки и соединения закрываются правильно после использования.
- Утечки ресурсов: проверьте, что все ресурсы, такие как файлы или базы данных, закрываются и освобождаются корректно.
- Циклические ссылки: избегайте создания циклических ссылок, которые могут препятствовать освобождению памяти.
3. Использование виртуальной памяти
Виртуальная память – это механизм, который позволяет операционной системе использовать жесткий диск в качестве дополнительного пространства для временного хранения данных. Для оптимального использования виртуальной памяти следует учесть:
- Размер файла подкачки: установите оптимальный размер файла подкачки, который соответствует требованиям вашего приложения.
- Управление файлом подкачки: регулярно проверяйте и оптимизируйте использование файла подкачки, например, удаляя неиспользуемые страницы.
- Избегание фрагментации памяти: минимизируйте фрагментацию памяти путем оптимизации алгоритмов выделения и освобождения памяти.
Соблюдение этих рекомендаций поможет вам эффективно распределить память вашего приложения в Windows 10 и повысить его производительность. Управление памятью является критически важным аспектом разработки приложений, и правильное использование этого ресурса может существенно повлиять на ваш опыт работы с операционной системой.
Основные принципы выделения памяти
Выделение памяти для приложений в Windows 10 может быть сложной задачей, но основные принципы помогут вам справиться с этой задачей более эффективно:
| Принцип | Описание |
|---|---|
| Планирование и оценка | Прежде чем выделить память, определите количество и тип данных, которые приложение будет использовать. Также оцените потребности в памяти для каждой операции. |
| Управление памятью | Правильное управление памятью поможет вам избежать утечек памяти и повысит производительность вашего приложения. Освобождайте память, когда она больше не нужна, и избегайте ненужного копирования данных. |
| Использование операционной системы | Windows 10 предоставляет различные механизмы для управления памятью, такие как виртуальная память и память на диске. Используйте эти механизмы для оптимизации работы вашего приложения. |
| Тестирование и оптимизация | Тестирование и оптимизация вашего приложения помогут найти и исправить проблемы с утечкой памяти, а также повысят производительность. Используйте профилирование и инструменты отладки для идентификации проблемных участков кода. |
Следуя этим основным принципам, вы сможете более эффективно выделять память вашему приложению в Windows 10 и повысить его производительность.
Используйте эффективные методы управления памятью
1. Освобождайте память после использования
После того, как ваше приложение завершает работу с объектами в памяти, убедитесь, что вы освободили все занятые ими ресурсы. Это может включать в себя освобождение памяти, закрытие файлов или сокетов, а также отмену подписок на события или удаление других объектов, которые могут занимать память.
2. Используйте стратегии кеширования
Вместо повторного получения или создания объектов, которые могут потреблять значительное количество памяти, рассмотрите возможность использования кеширования. Вы можете сохранить уже полученные или созданные объекты в памяти и повторно использовать их при необходимости. Это может существенно снизить нагрузку на память и увеличить производительность вашего приложения.
3. Управляйте жизненным циклом объектов
Активное управление жизненным циклом объектов может помочь оптимизировать использование памяти. Вы должны создавать объекты только тогда, когда они действительно необходимы, и убеждаться, что они уничтожаются, когда перестают быть нужными. Полное удаление объектов из памяти позволит освободить ресурсы для других нужд и улучшить производительность вашего приложения.
4. Используйте сборщик мусора
Сборщик мусора в Windows 10 является встроенным инструментом для автоматического управления памятью. Он освобождает память, занятую объектами, которые больше не используются вашим приложением. Однако, не полагайтесь только на сборщик мусора. Создавайте объекты при необходимости и активно освобождайте их после использования.
Следуя этим методам управления памятью, вы сможете оптимизировать использование ресурсов вашего приложения и обеспечить его более эффективную работу в Windows 10. Помните, что эффективное управление памятью является важным аспектом разработки приложений, который в конечном итоге повлияет на пользовательский опыт и производительность вашего приложения.
Оптимизируйте использование памяти в приложении
Вот несколько полезных советов, которые помогут вам оптимизировать использование памяти в вашем приложении:
- Используйте эффективные алгоритмы и структуры данных: Правильный выбор алгоритмов и структур данных может уменьшить количество используемой памяти и ускорить работу приложения. Изучите доступные вам варианты и выберите наиболее эффективные.
- Освобождайте память после использования: Внимательно отслеживайте моменты, когда память больше не нужна вашему приложению, и освобождайте ее с помощью специальных методов или функций. Это поможет предотвратить утечки памяти и улучшить производительность.
- Используйте ленивую загрузку: Если ваше приложение работает с большим объемом данных, рассмотрите возможность использования ленивой загрузки. Это позволит загружать данные по мере необходимости, а не все сразу, что сократит использование памяти.
- Избегайте дублирования данных: При работе с большим объемом данных старайтесь минимизировать дублирование информации. Используйте ссылки на объекты, где это возможно, чтобы сократить потребление памяти.
- Оптимизируйте использование буферов: Если ваше приложение работает с графикой или мультимедиа, эффективное использование буферов может помочь уменьшить потребление памяти и улучшить производительность.
Следуя этим советам, вы сможете оптимизировать использование памяти в вашем приложении и создать быстрое и эффективное приложение для пользователей Windows 10.