
Когда компьютер с ОС Windows 11 Домашняя включается впервые, он должен быть подключен к сети для входа в систему по умолчанию. Подробную информацию см. в разделе «Настройка компьютера с ОС Windows 11 при первом включении». Если компьютер не может подключиться к сети или зависает на экране подключения к сети, выполните следующие действия, чтобы принудительно пропустить этап настройки сетевого соединения.
- Не регистрируйте локальную учетную запись в качестве учетной записи суперадминистратора (Administrator), после того как вы пропустили этап настройки сетевого соединения. Не используйте «Administrator» в качестве имени локальной учетной записи.
- После того как вы пропустили этап настройки сетевого соединения, система Windows не сможет синхронизировать время должным образом. В результате время системных журналов или временных меток будет раньше текущего времени. Это не будет указывать на проблему в работе устройства. Подробную информацию см. в разделе «Синхронизация времени с Интернетом на компьютере Windows».
Руководство
Выполните следующие действия:
- При первом включении компьютера отобразится экран основных настроек. Следуя инструкциям, перейдите к экрану Давайте подключим вас к сети. Затем нажмите комбинацию клавиш Shift + F10, чтобы открыть командную строку cmd.
Этот экран не отобразится, если ваш компьютер уже подключен к сети проводным способом. Чтобы не использовать проводное сетевое соединение, отключите сетевой кабель и выполните следующие действия.
- В окне cmd введите «OOBE\BypassNRO.cmd» (без учета регистра) и нажмите на клавишу Enter. После этого компьютер автоматически перезагрузится.
- После перезагрузки компьютера отобразится экран основных настроек. Следуя инструкциям, перейдите к экрану Давайте подключим вас к сети и нажмите У меня нет подключения к сети (или Пропустить).
- Нажмите Продолжить настройку ограниченных параметров, чтобы пропустить этап настройки сетевого соединения и перейти к следующему экрану. Завершите настройку прочих параметров, следуя инструкциям, чтобы войти в систему Windows.
Если проблема сохраняется, обратитесь в службу поддержки Microsoft и следуйте предоставленным инструкциям. Кроме того, вы можете войти на официальный веб-сайт Microsoft, нажать Связаться с Майкрософт в нижней части главной страницы и следовать инструкциям на экране для решения проблемы.
The whole purpose of a password is to protect your computer. Without a password, anyone with access to it can turn it on, access all your important files, and make changes to your computer that can cause severe damage. But, if you live alone or there is no way anyone can access your computer, having a password can be annoying since it makes you go through an unnecessary step. But the good news is that you can easily make some changes to your Windows 11 computer, so the next time you turn on your computer, you don’t have to enter a password.
Contents
- 1 How to Enable Auto Login on Windows 11
- 1.1 In Settings
- 1.2 User Accounts Window
- 1.3 What if the Users Must Enter a User Name and Password Option is Missing?
- 1.4 Further Reading
- 1.5 Conclusion
To activate automatic login, you must open user accounts and uncheck an option called User must enter a username and password to use this computer. But this last option has been known to be greyed out for some users. So before you get to that option, there are some other options you’ll need to disable to discard that the Users must enter a username and password to this computer option is not greyed out for you when you access it.
In Settings
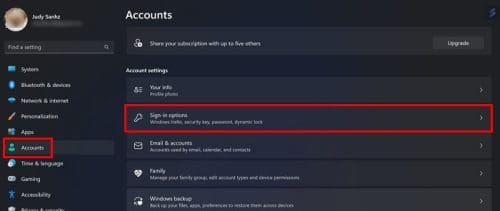
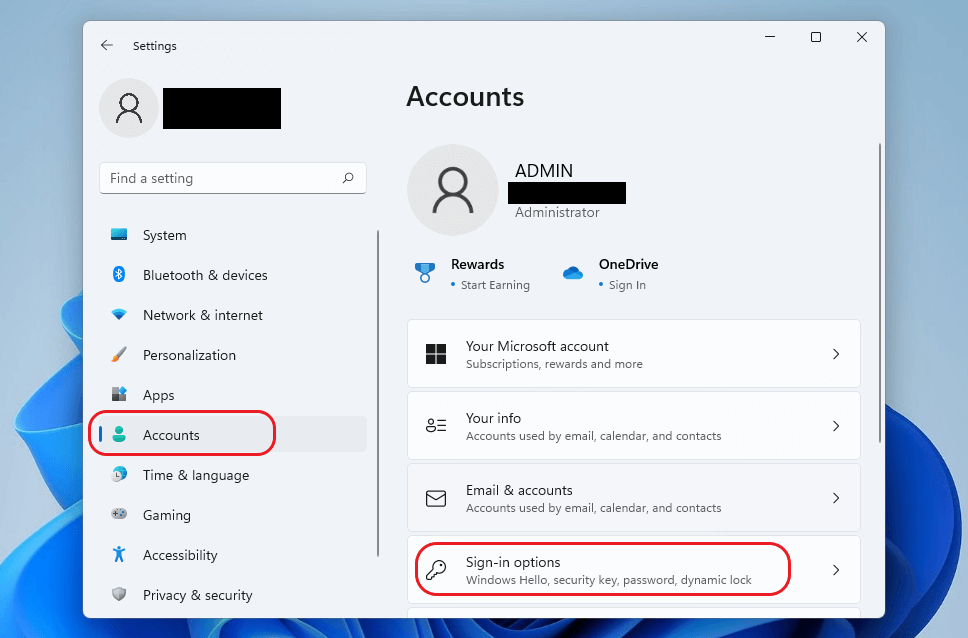
To get started, you’ll need to go to Settings. You can access it by pressing the Windows + I keys (the fastest option) or clicking on the Windows Start menu, followed by the Settings option. Once you’re in Settings, click on Accounts on the left, followed by Sign-in options.
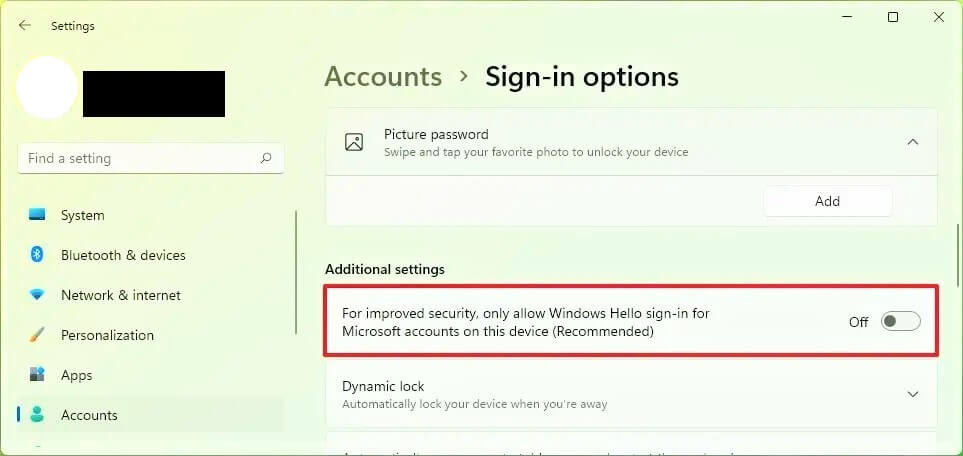
Under the Additional settings section, look for an option called If you’ve been away when should Windows require you to sign in again? Click on the options dropdown menu and choose the never option. Above this option, you should see another option called For improved security, only allow Windows Hello sign-in for Microsoft accounts on this device (Recommended). Toggle off this option.

Also, if you have any sign-in option enabled, such as:
- Face recognition (Windows Hello)
- Fingerprint recognition (Windows Hello)
- Pin (Windows Hello) Security key
Ensure that these sign-in options are disabled. You’ll find these options in Settings > Accounts > Sign-in options. At the top, you’ll see all the available options. If you don’t have access to one, you’ll see a message that says the choice is currently unavailable, so you don’t have to worry about that specific option. Click on the option you want to disable and choose the Remove button. You’ll be asked to enter your password, followed by the OK button. Microsoft needs to make sure that it’s you making the changes.

User Accounts Window
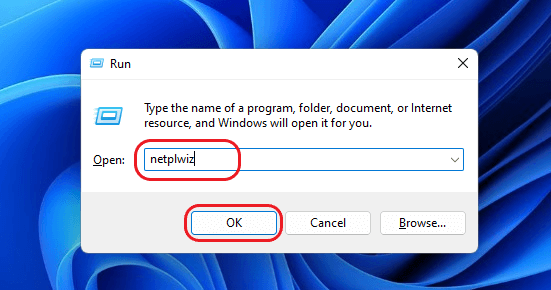
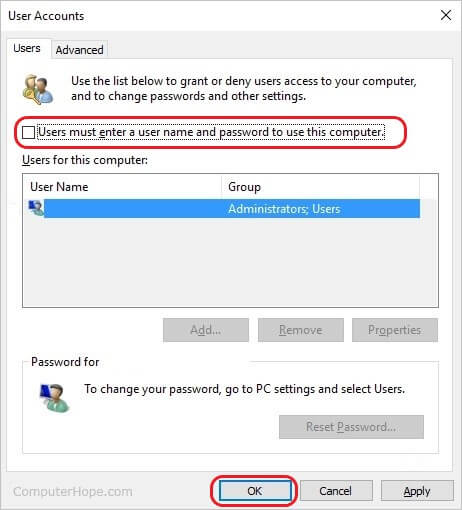
Now that you’ve turned off all these options, it’s time to open the Run box by pressing the Windows + R keys. Enter netplwiz and click ok or press enter. When the user account window opens, click on the username you want to change and uncheck the box for the Users must enter a username and password to use this computer.

Click Ok and Apply. You’ll be asked to enter a username and password. If you’re using a Microsoft account, you’ll need to enter the sign-in info for that account.
What if the Users Must Enter a User Name and Password Option is Missing?
There have been some cases where this option is missing from the User Account window. If that’s your case, you can make it reappear by using the Registry. Be careful when using the Registry since making the wrong changes can damage your computer. Press the Windows +R keys to open the Run box. When it appears, enter regedit. When the Registry window appears, go to:
- HKEY_LOCAL_MACHINE
- SOFTWARE
- Microsoft
- Windows NT
- CurrentVersion
- PasswordLess
- Device
- Double-click on the DevicePasswordLessBuildVersion option
- Replace the Value data with zero
- Click OK
Check to see if the option is now available, and if it’s not, restart your computer and re-check. That’s all there is to it. Now you don’t have to enter your password whenever you need to use your computer. If you ever want to go back and enter your password, ensure that the Users must enter a username and password to use this computer option is checked.
Further Reading
If you feel comfortable using the registry and want to learn to do some others things, here is how you can compare Windows Registry differences. Since you will come across errors sooner or later, here is how you can fix Windows 10 Registry filter driver exception. Or, you can fix system Registry file is missing or contains errors. Remember that you can always use the search bar to look for a specific topic about the registry or any other topic.
Conclusion
Not having to deal with entering your password when you want to use your Windows computer can save you valuable time. When you finally remove the login and use it for the first time without entering your password, you’ll see the login screen, but only to have it auto-login to your account. It shouldn’t take more than a few seconds. The changes will only apply to the account you choose; if there are any others, those will require a password to enter. So, on how many accounts did you remove the login option? Share your thoughts in the comments below, and don’t forget to share the article with others on social media.
Если вы используете для входа в Windows 11 учетную запись Microsoft, при каждом включении вашего устройства необходимо вводить пароль или ПИН-код. Вы единственный пользователь и не хотите, получать запрос на ввод пароля каждый раз, вы можете изменить поведение системы и входить в Windows 11 автоматически без ввода пароля.
Для того чтобы использовать механизм автоматического входа в операционную систему Windows 11, сначала необходимо выполнить небольшую настройку в приложении «Параметры».
Отключить Windows Hello и ввод пароля при пробуждении устройства.
- Если вы используете PIN-код или другую функцию Windows Hello, параметр «Требовать ввод имени пользователя и пароля» будет скрыт, чтобы использовать автоматический вход без ввода пароля, откройте приложение «Параметры».
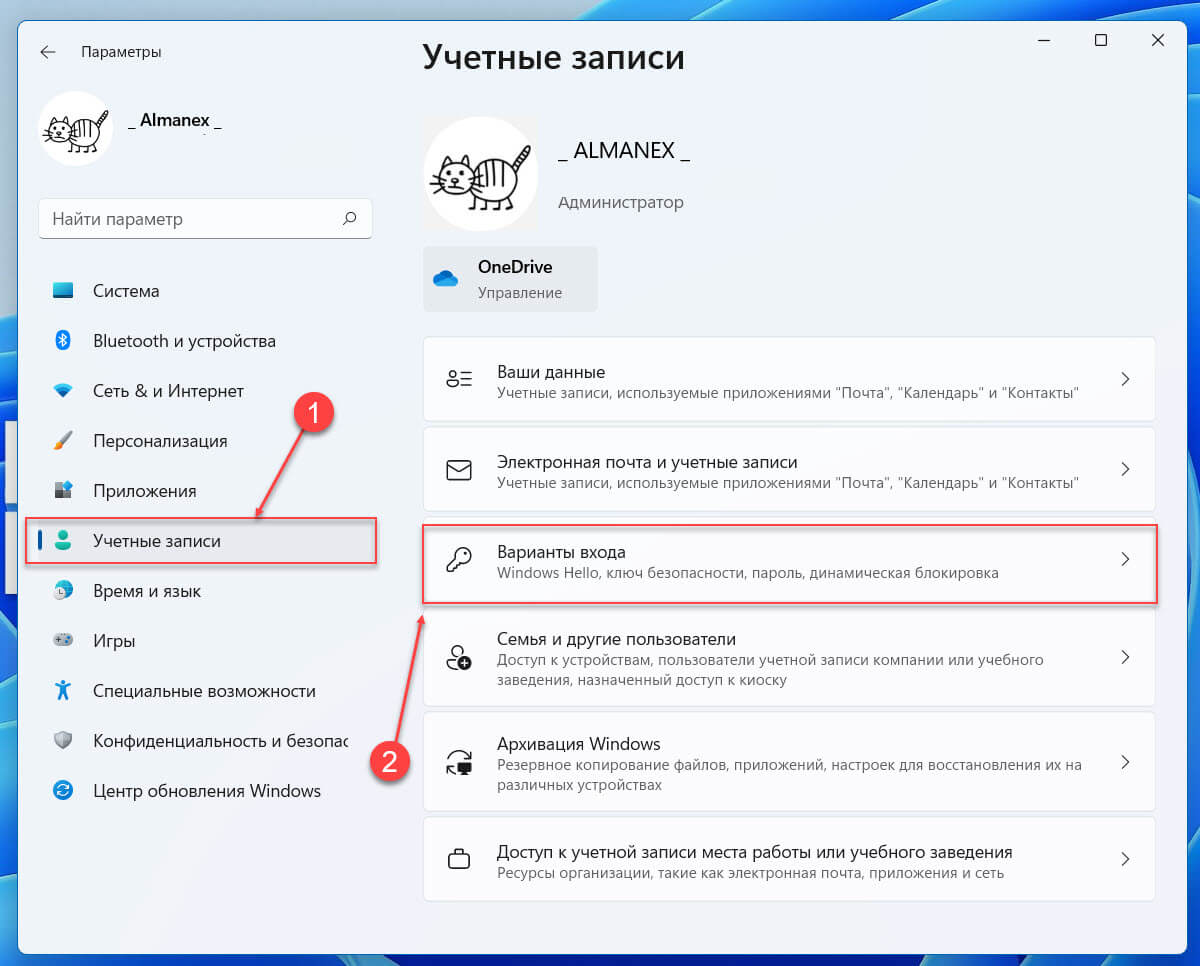
- Перейдите в категорию «Учетные записи» → «Варианты входа»
- В разделе «Дополнительные параметры» передвиньте ползунок для «Для повышения безопасности включите вход Windows Hello для учетных записей Майкрософт на этом устройстве (рекомендуется)» в положение «Откл.»
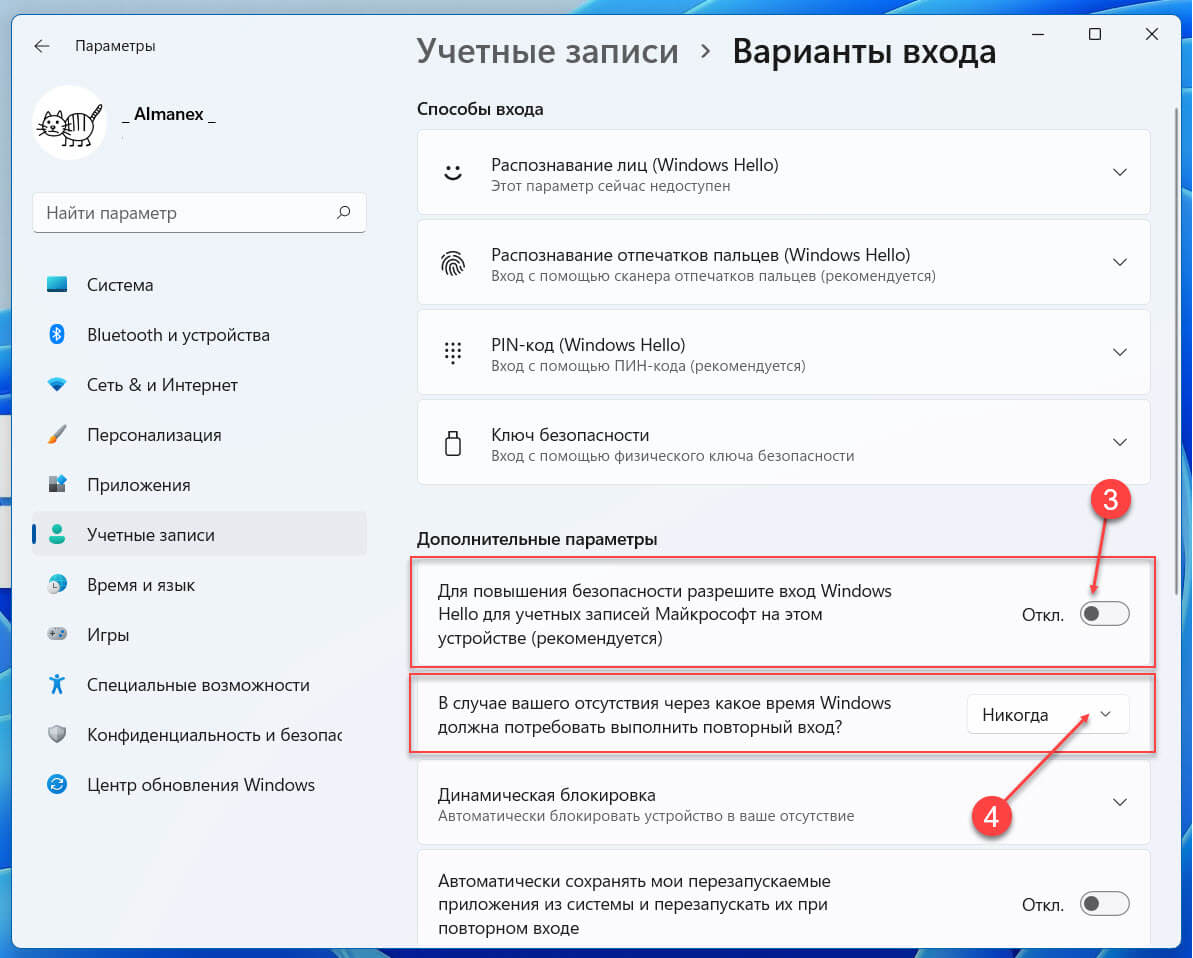
- Сразу под ним находится следующий параметр «В случае вашего отсутствия через какое время Windows должна потребовать выполнить повторный вход?» в выпадающем меню выберите значение «Никогда».
Теперь, перейдем непосредственно к настройке автоматического входа.
Автоматический вход в Windows 11, с помощью одной из команд: control userpasswords2 и netplwiz.
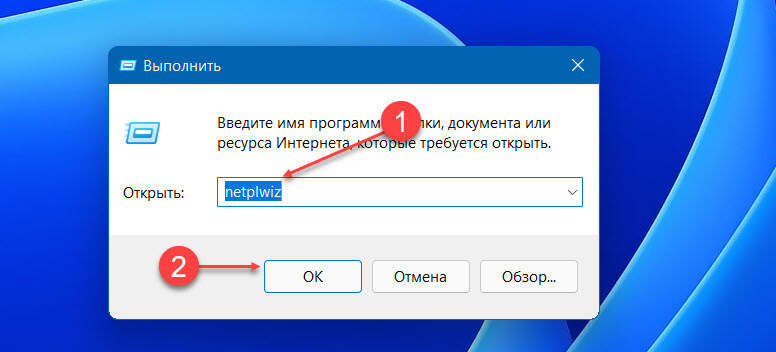
- Нажмите сочетание клавиш Win R это откроет диалоговое окно «Выполнить», введите любую из двух команд представленных ниже и нажмите Enter:
netplwiz
control userpasswords2
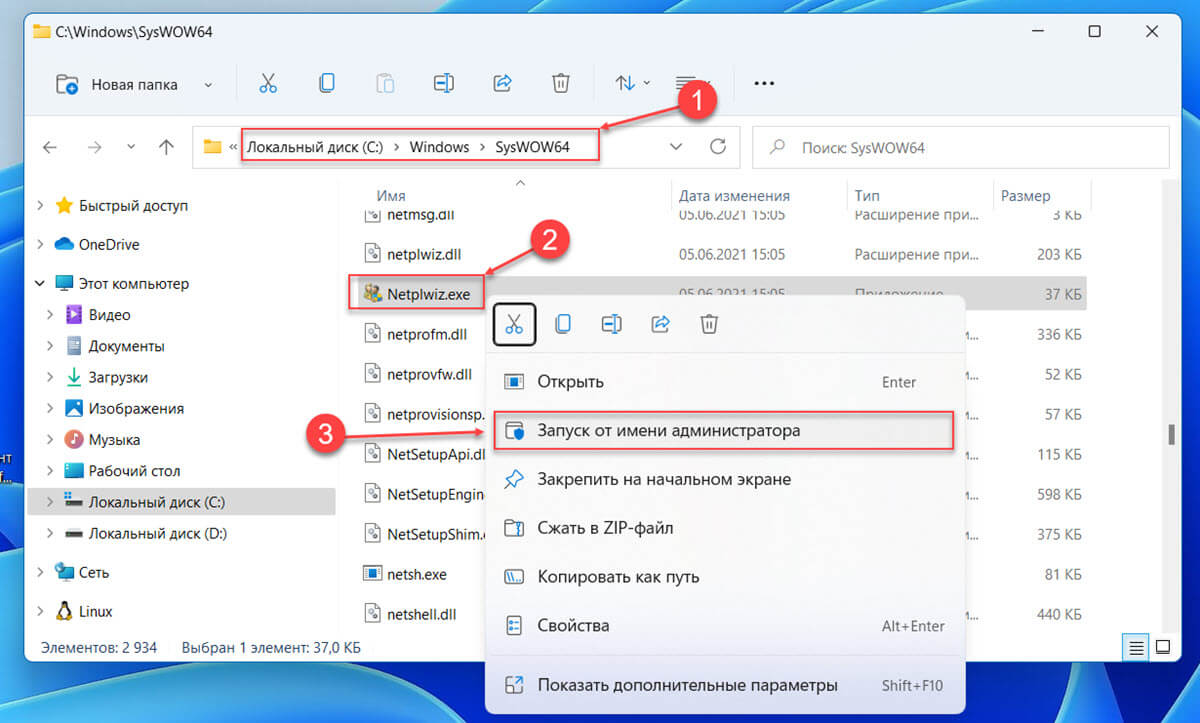
Или, Вы можете открыть папку C:\Windows\SysWOW64 и запустите от имени администратора файл «Netplwiz.exe».
- В открывшемся окне «Учетные записи пользователей» выберите свою учетную запись и снимите флажок «Требовать ввод имени пользователя и пароля», нажмите кнопку «Применить».
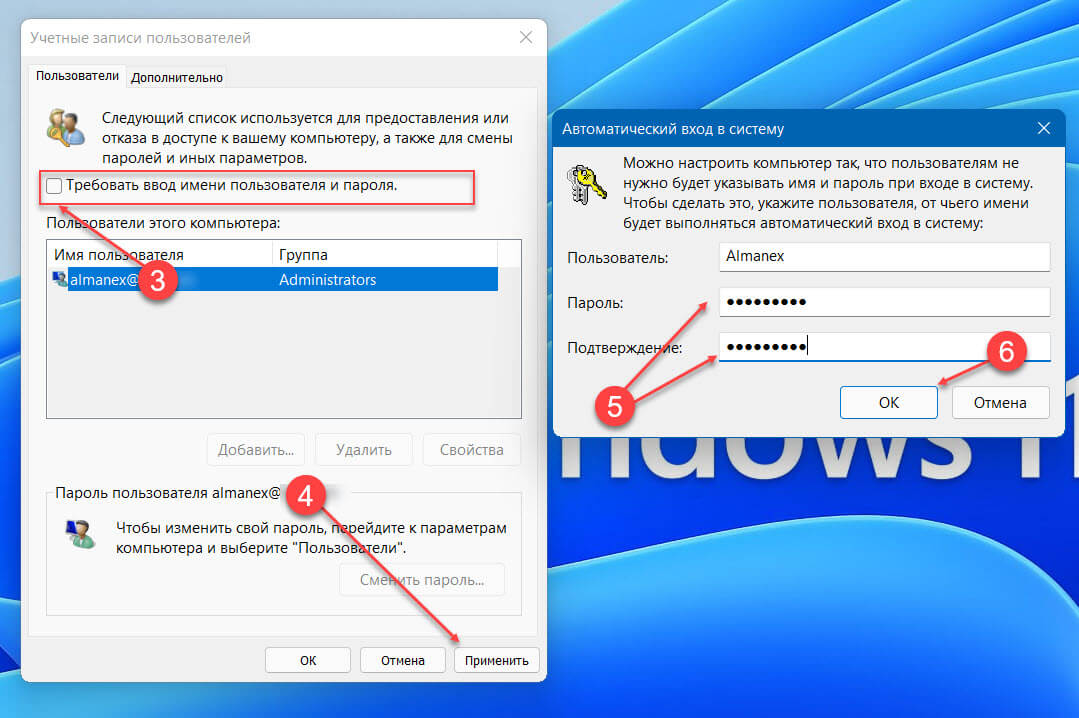
Примечание: если вы не видите настройку «Требовать ввод имени пользователя и пароля», значит вы не отключили «Windows Hello».
- В окне «Автоматический вход в систему» введите в строку «Пароль:» и «Подтверждение:» пароль, который используете для входа в систему.
Если учетная запись является локальной записью и не имеет пароля, просто оставьте это поле пустым.
- Перезагрузите компьютер чтобы изменения вступили в силу.
После перезагрузки устройства вы автоматически войдете систему Windows 11 минуя окно блокировки и ввода пароля.
Автоматический вход в Windows с помощью утилиты «Microsoft AutoLogon».
«Microsoft Autologon» это крохотная утилита предлагаемая Microsoft, которая поможет вам легко изменить настройки механизма автоматического входа в Windows 11. Подобно netplwiz, вы можете настроить автоматический вход для локальной или MSA — учетной записи Microsoft.
Утилита сохраняет ваш пароль в реестре Windows 11, но в целях безопасности он будет зашифрован.
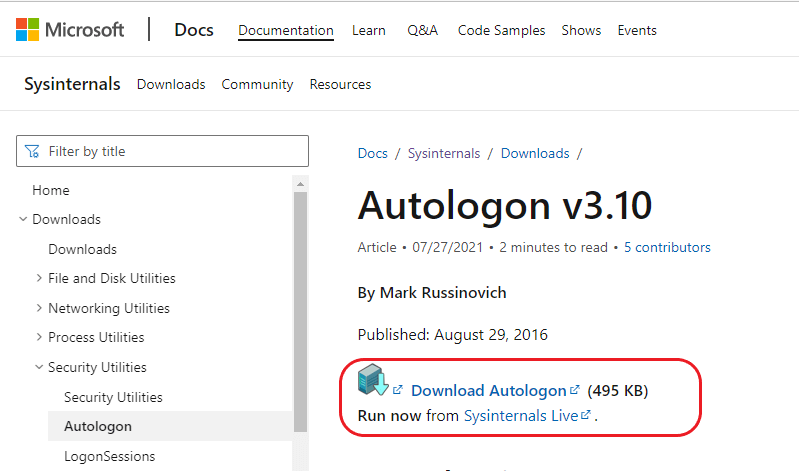
- Перейдите на сайт docs.microsoft.com и загрузите утилиту «AutoLogon» (495 КБ).
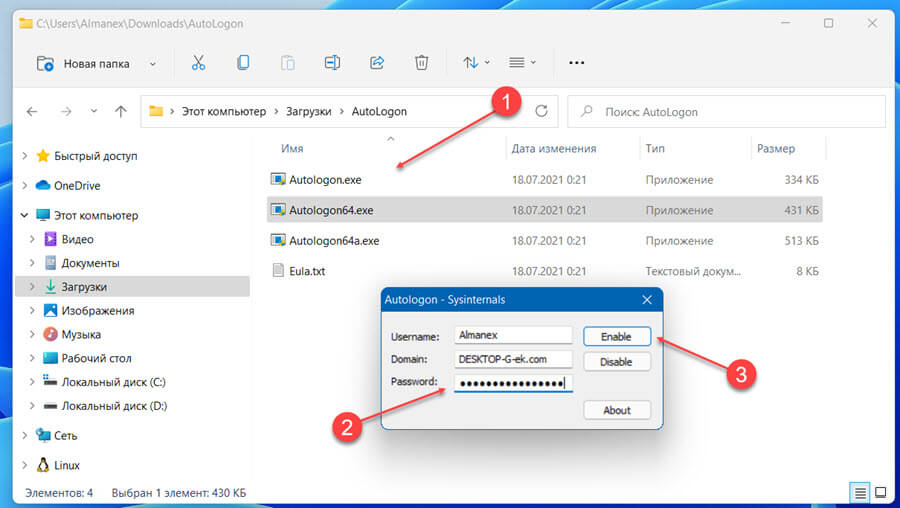
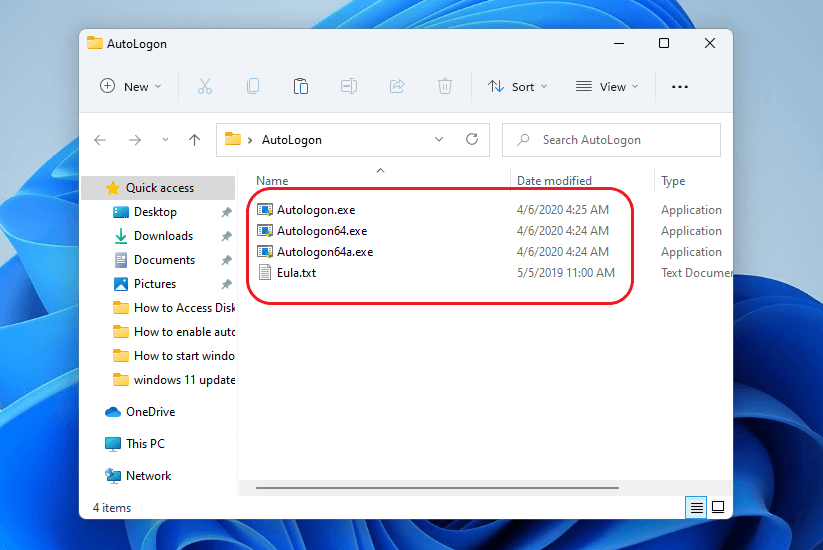
- После загрузки распакуйте архив и дважды кликните файл autologon.exe, примите условия лицензии.
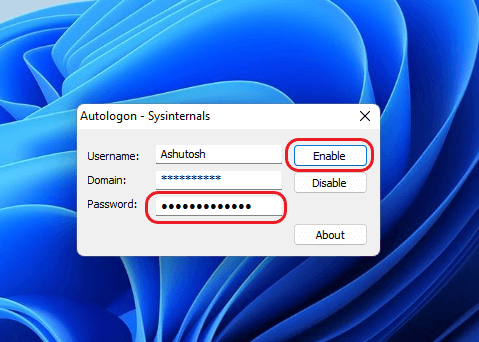
- Введите ваш логин и пароль для входа в систему и нажмите кнопку «Enable», это задействует механизм автоматического входа для выбранной учетной записи пользователя. Если вы все сделали правильно появится подтверждающее, что «Autologon» успешно сконфигурирован.
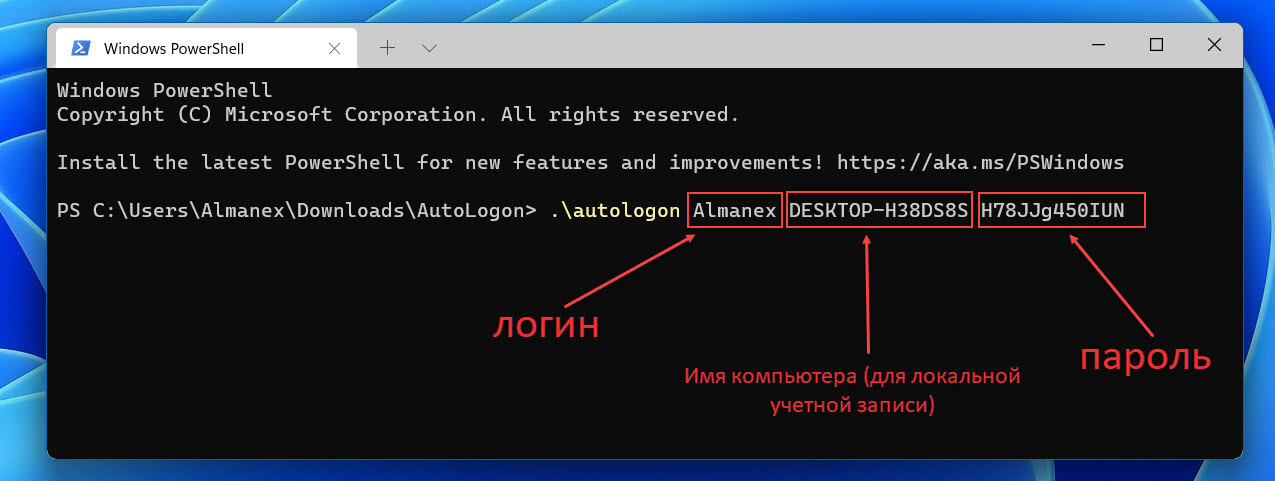
Вы также можете работать с утилитой AutoLogon с помощью Терминала Windows, используя синтаксис:
autologon user domain password
- Перезагрузите ваше устройство с Windows 11, чтобы применить изменение.
- Чтобы отключить автоматический вход, нажмите «Disable». Кроме того, если удерживать клавишу Shift до того, как система выполнит автоматический вход, автоматический вход будет отключен для этого сеанса входа в систему.
Автоматический вход в Windows 11 с помощью редактора реестра.
Вы можете настроить автоматический вход в Windows 11 с помощью редактора реестра.
- Нажмите клавиши Win R на клавиатуре, чтобы открыть диалоговое окно «Выполнить». Введите «regedit» и нажмите Enter, чтобы запустить редактор реестра.
- Перейдите к следующему пути или скопируйте и вставьте в адресную строку редактора реестра следующий путь:
Компьютер\HKEY_LOCAL_MACHINE\SOFTWARE\Microsoft\Windows NT\CurrentVersion\Winlogon
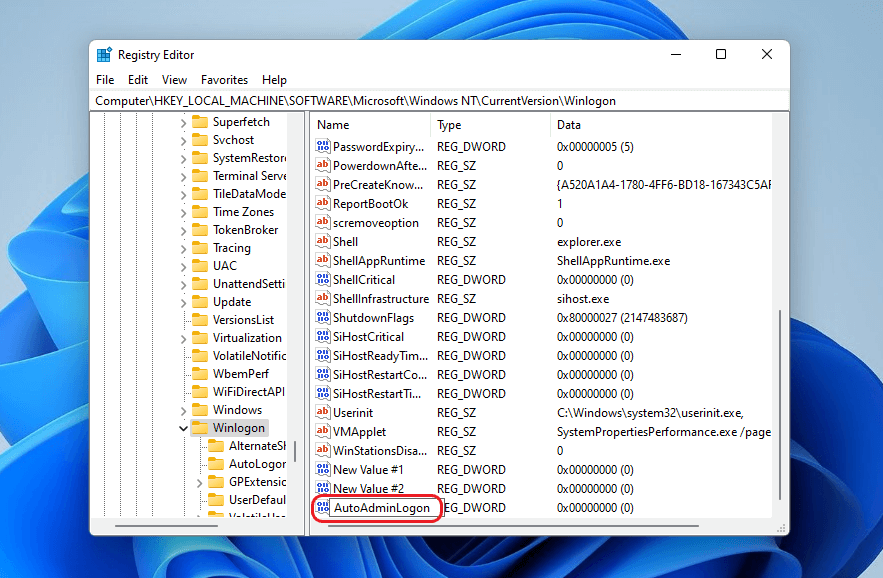
- С права найдите параметр с именем «AutoAdminLogon» и измените его значение на «1». Если параметра не существует создайте новый параметр Dword (32 бита) с именем «AutoAdminLogon» и значением 1.
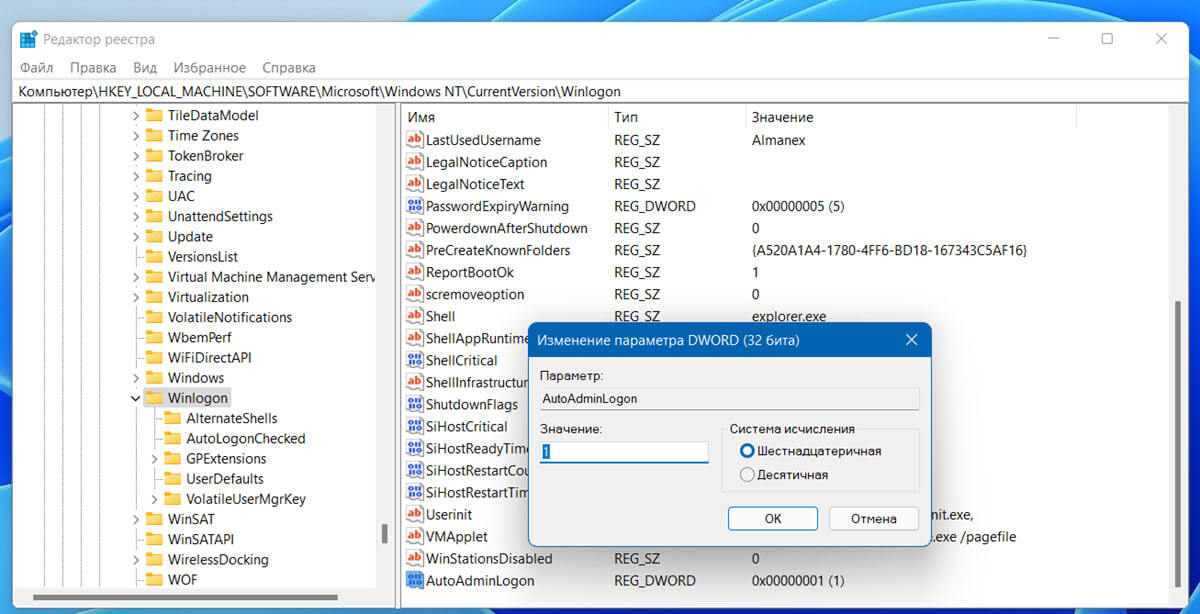
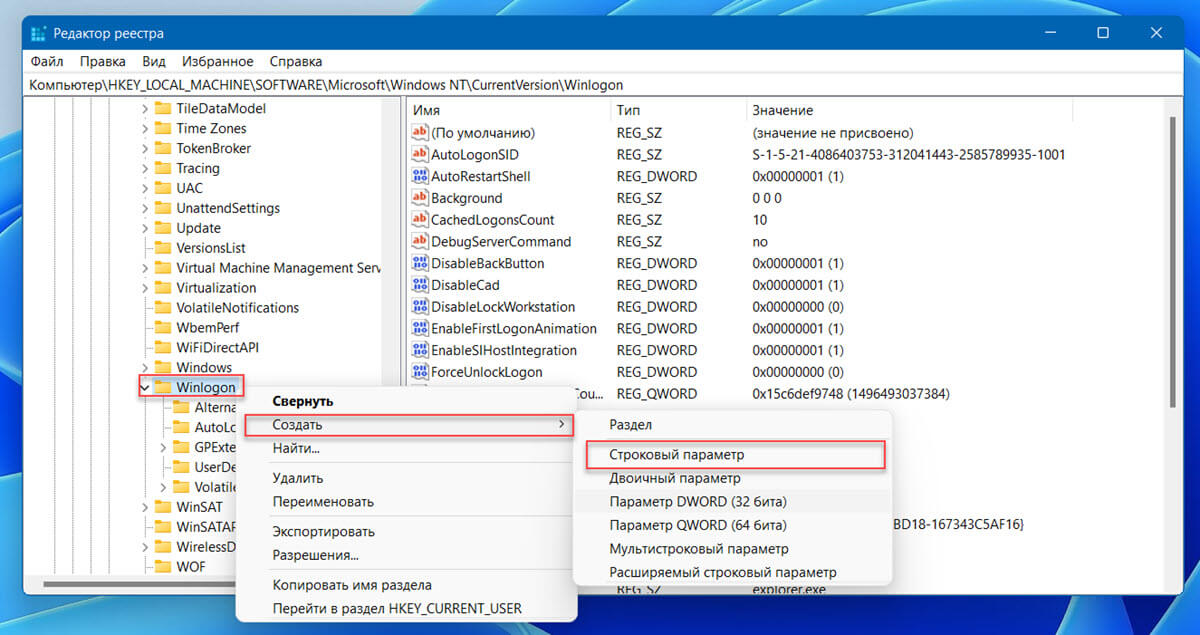
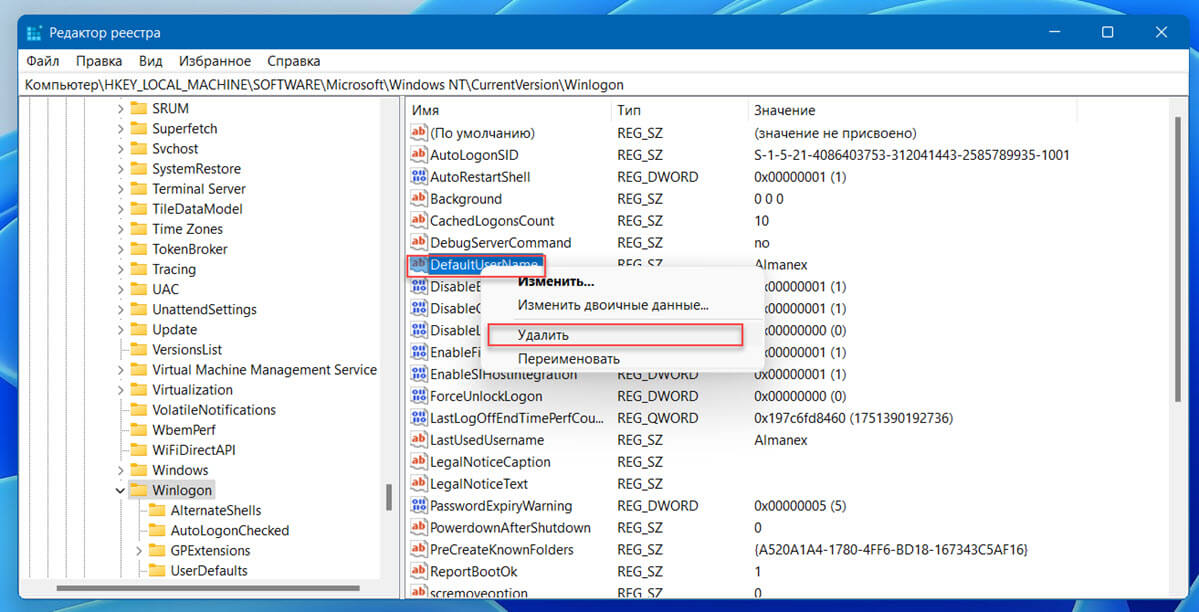
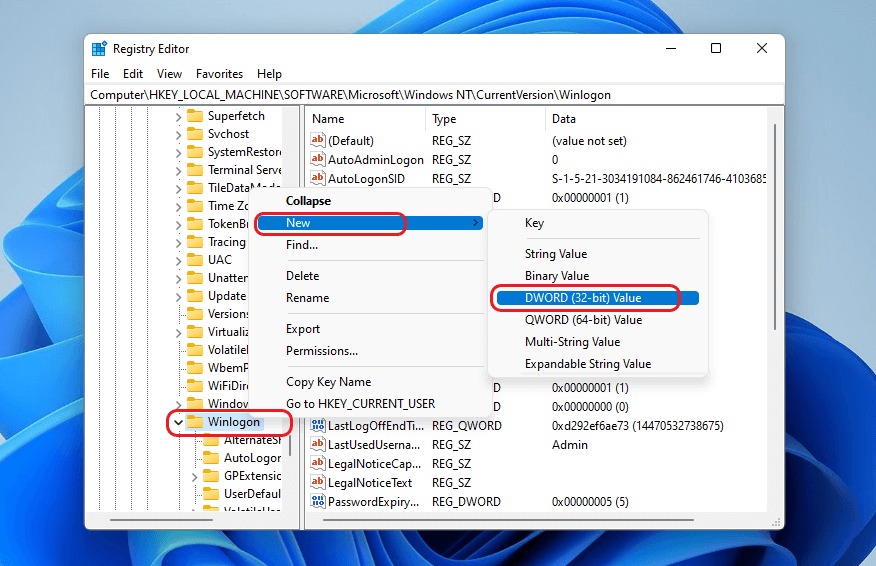
- Теперь необходимо создать еще два строковых параметра в которых будут хранится данные для автоматического входа. Кликните правой кнопкой мыши на разделе «Winlogon» и выберите «Создать» → «Строковой параметр»
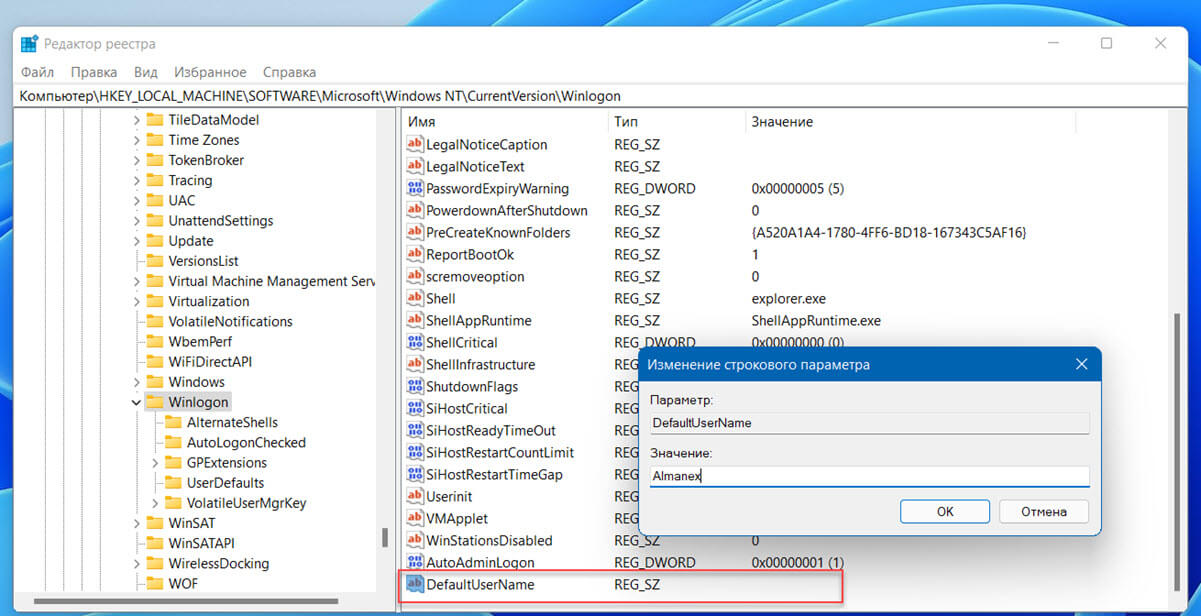
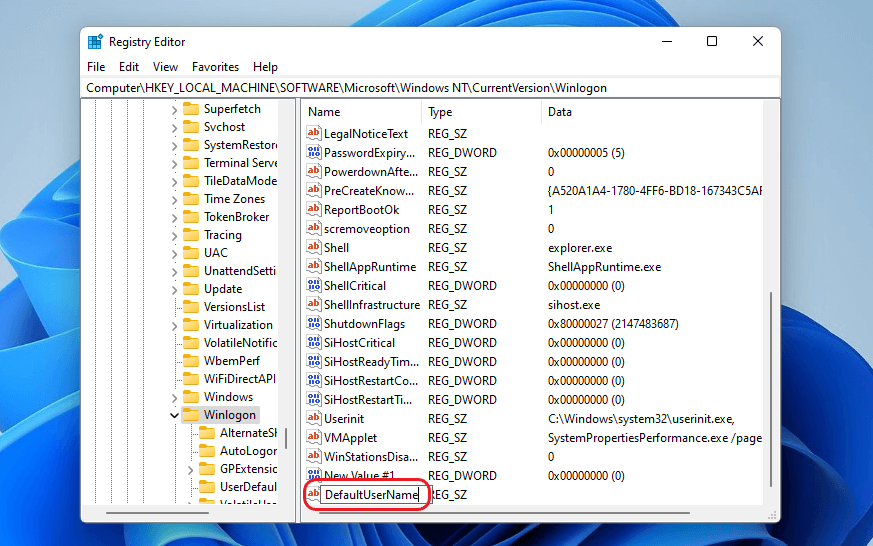
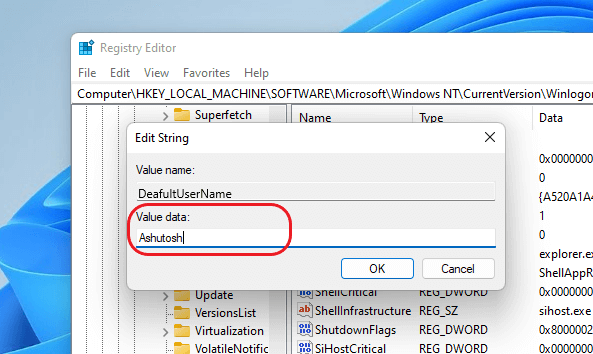
- Задайте имя «DefaultUserName» новому строковому параметру и введите его значение — «Имя пользователя» (имя пользователя должно быть таким же как название папки C:\Users\<Имя пользователя>)
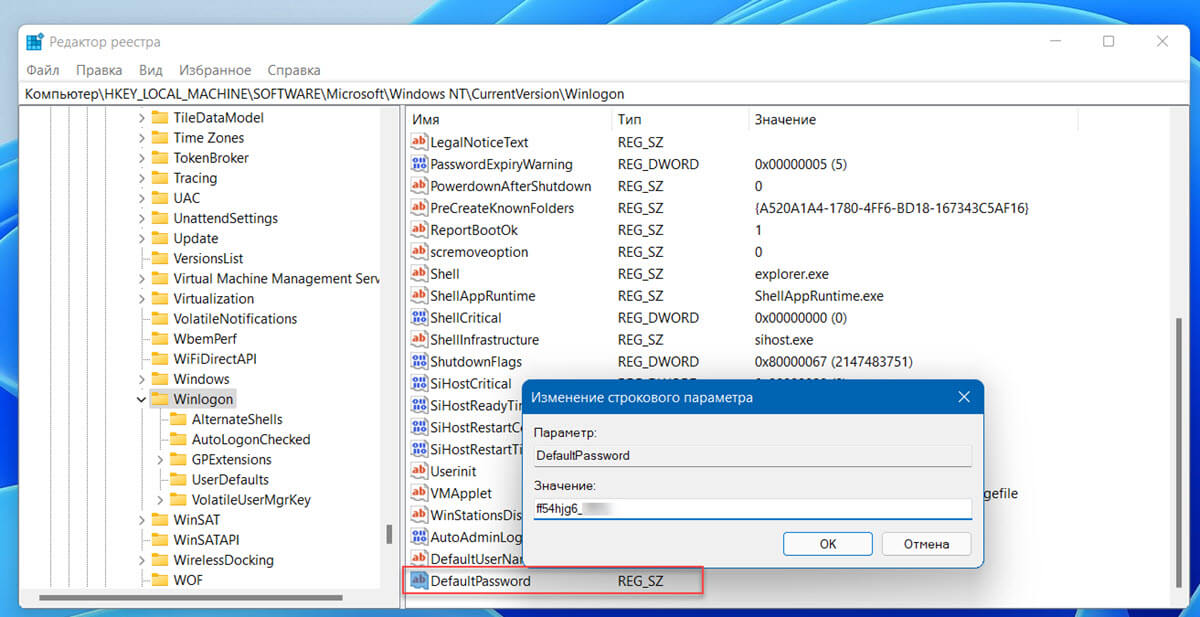
- Повторите процедуру для строкового параметра с именем «DefaultPassword» и введите в качестве значения ваш пароль для входа.
- Если вы используете локальную учетную запись вам потребуется создать третий строковой параметр с именем «DefaultDomainName» и в поле значение введите имя вашего компьютера.
- После того, как все значения будут заполнены, закройте редактор реестра и перезагрузите ваш компьютер.
После перезагрузки вы автоматически войдёте в систему без ввода пароля.
Таблица параметров и их значений
| Имя Строкового параметра | Значение |
| DefaultDomainName | Имя компьютера или имя домена (для локальной учетной записи) |
| DefaultUserName | Имя пользователя (можно посмотреть здесь: C:\Users\<Имя пользователя>) |
| DefaultPassword | Пароль для выбранной учетной записи |
В отличии от предыдущего способа, ваш пароль хранится в реестре в незашифрованном виде. Любой, кто имеет доступ к вашему устройству может посмотреть его. Поэтому я рекомендую использовать «netplwiz» или «Autologon», поскольку они используют шифрование.
Если вы захотите отключить автоматический вход в Windows 11 с помощью этого способа, удалите строковые параметры «DefaultPassword», «DefaultUserName», «AutoAdminLogon».
Все! Поделитесь с нами в комментариях ниже, какой способ автоматического входа в Windows 11 используете вы.
Keeping your Windows 11 PC password protected is indeed a good idea, and we suggest you should always set a password to log in to your system. However, if you only use your PC and no one else has access to it, you can opt to enable Windows auto login. It saves you from entering the password every time you boot your computer and reduces the boot time.
Be cautious! If you are using a common PC or others have access to your PC, enabling Windows 11 auto login may jeopardize your privacy and data stored on your PC. That being said, let us begin with the DIY methods to enable Windows 11 auto login.
4 Best DIY methods for Windows auto login
Enabling Windows auto login is only suitable for a single-user PC. Moreover, if you’ve set a long and complex password, auto login sometimes becomes a lifesaver.
You can the following methods and enable auto login on Windows PC. All the methods are DIY, and you can execute each by following each step carefully.
Method 1: Use Windows Settings to enable auto login
You can use the Windows Settings option to enable auto login on Windows 11. Here’s how to do it.
Step 1: Click the Windows Start > Settings.
Step 2: Select the Accounts option in the left panel of the Settings window and select Sign-in options from the right pane.
Step 3: Click and turn off the toggle button against the For improved security, only allow Windows Hello sign-in for Microsoft Accounts on this device (Recommended) option under the Additional Settings section.
Note: If the option in the above step is greyed out, log out of your device and log in again. Then apply the above step.
Step 4: You’ll be asked to enter your password. Enter it and press Yes.
Step 5: Press Windows + R to open the Run utility. Now type netplwiz in the Run tab and hit Enter or click OK.
Step 6: In the User Accounts window, uncheck the box against Users must enter a username and password to use this computer option, and click OK.
Step 7: Click Apply and enter the password to confirm the changes.
Your Windows 11 auto login is enabled. So next time, when you start your PC, you don’t need to enter the password.
Method 2: Enable Windows 11 auto login using Computer Management
You can also use the Computer Management feature to enable the auto login on Windows 11 PC. To do so, follow the steps given below.
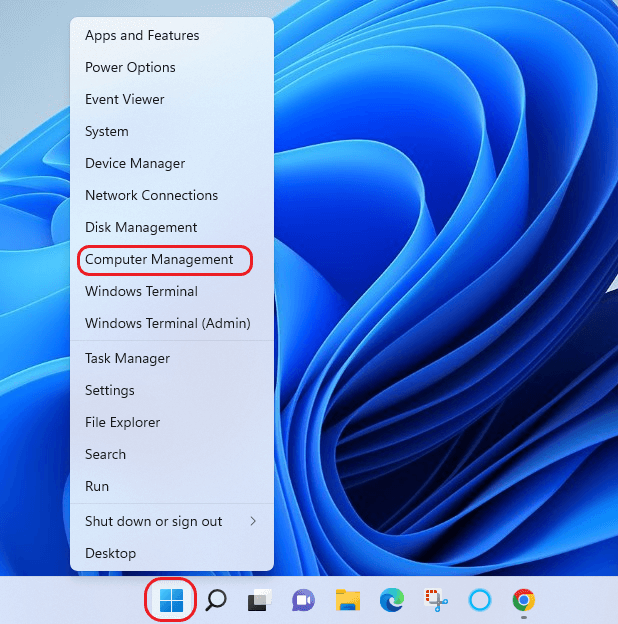
Step 1: Right-click the Start button and click the Computer Management option. Alternatively, press Windows + R,type compmgmt.msc in the Run tab, and hit Enter.
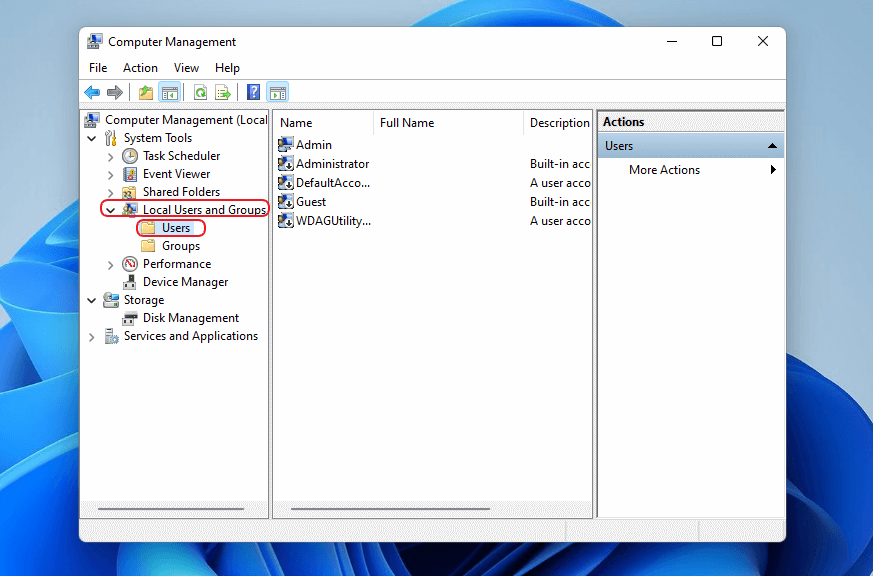
Step 2: Click the Local Users and Group option in the left pane to expand it and click Users.
Step 3: In the right pane, right-click on the User for which you want to enable the auto login and click Set Password… from the menu.
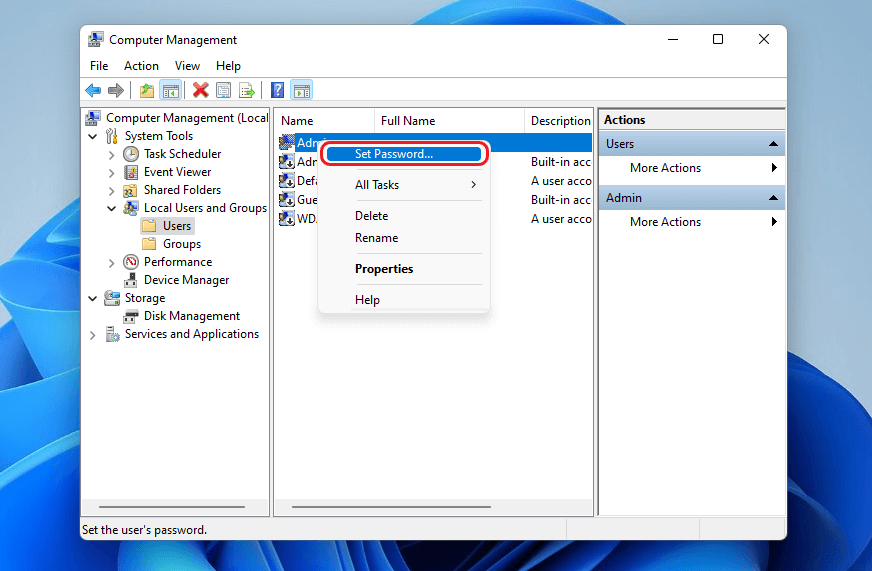
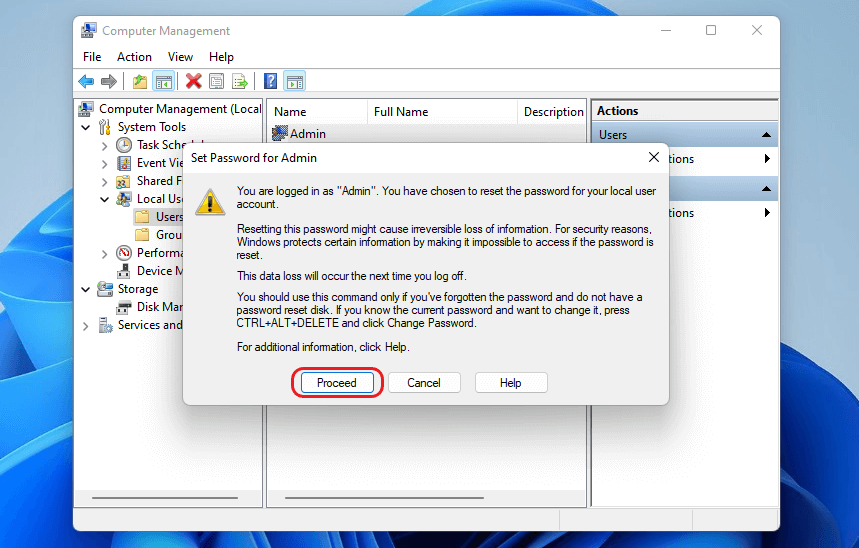
Caution: Proceeding with this method might cause data loss from the selected User Account. However, you can easily recover any lost data using Stellar Data Recovery for Windows without expert assistance.
Step 4: To enable auto login, click Proceed in the warning box.
Step 5: In the Set password window, click OK without entering any password.
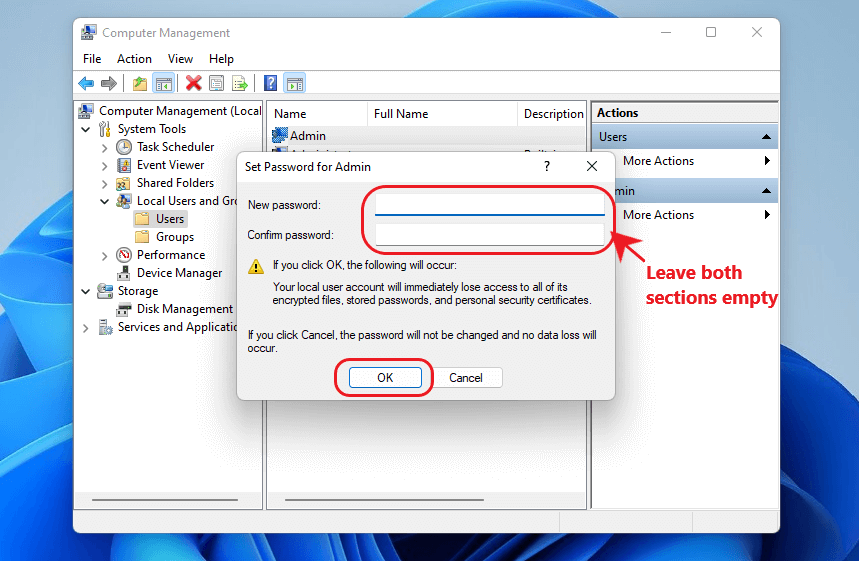
Any password you’ve set earlier will be removed as soon as you press OK. Next, restart your PC to check if auto-login is enabled.
Method 3: Use Windows Registry for Windows auto login
Windows Registry is a collection of databases of configuration settings and other key information related to the Windows OS. It’s a highly sensitive component, and you must be careful while working with it.
Caution: As Windows Registry has the OS information, altering its values will cause data loss that can be mild to severe. Although you can easily get back your data using an effective DIY Windows data recovery software.
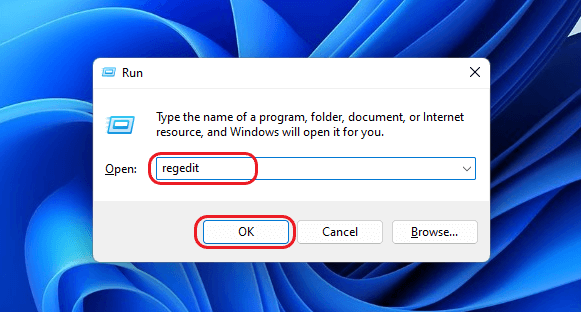
Step 1: Click Windows + R to open the Run utility. Type regedit and press Enter.
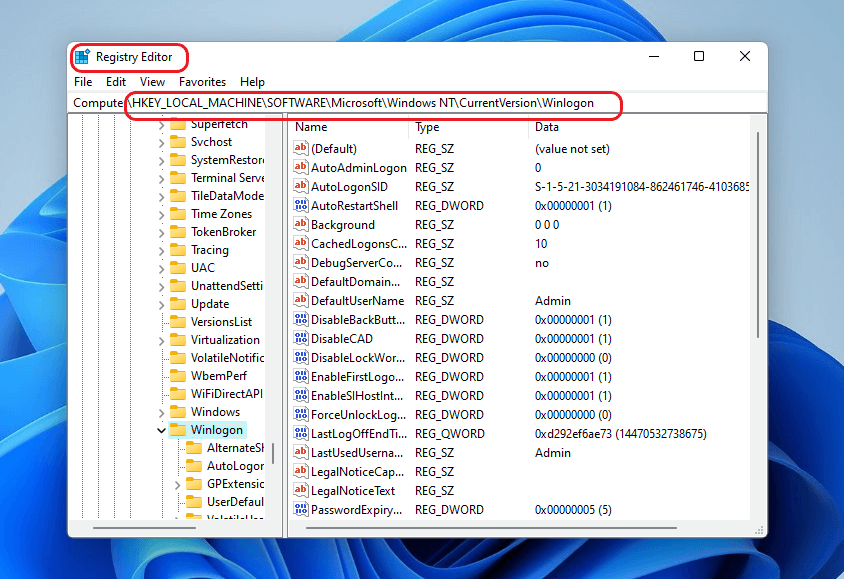
Step 2: In the Windows Registry Editor, navigate the path HKEY_LOCAL_MACHINE\SOFTWARE\Microsoft\Windows NT\CurrentVersion\Winlogon
Step 3: Right-click Winlogon and select New > DWORD (32 Bit) value.
Step 4: Name the new value as AutoAdminLogon. Now, double-click it in the right pane and select the value as 1.
Step 5: Again, right-click Winlogon and select New > String Value. Name the new string value as DefaultUserName.
Step 6: Double-click it and insert your User Name under Value Data. Click OK.
Step 7: Right-click Winlogon again and click New > String Value.
Step 8: Name the value as DefaultPassword. Enter your user password under Value data and click OK.

Once you’ve finished all the steps, your auto login for Windows 11 will be enabled. It’s a reversible process, and you can activate your password anytime again by following the above steps and deleting the created AutoAdminLogon, DefaultUSerName, and DefaultPassword.
Method 4: Use the Autologon tool for auto login on Windows 11
The Autologon tool enables you to manage the built-in auto login mechanism of Windows 11. You need to enter credentials in the Autologon tool once, and then you are relieved of the hassles of entering your user ID and password every time you boot up your PC.
Note: Although your credentials are stored in encrypted form with Autologon, someone with Admin rights can access them. So, you must protect your autologon password.
Step 1: Download the Autologon tool on your PC. You’ll find a zip archive. Then, extract the files to a known location.
Step 2: Find the file suitable for your PC and double-click to run it.
Step 3: Enter your password in the prompt window if needed and press Yes.
Step 4: In the new window again, enter your password and click Enable.
Step 5: A message box with the message Autologon successfully configured will appear. Click OK.
Restart your system for the changes to take effect. Now, your Windows auto login is enabled.
Conclusion
It is quite easy to enable Windows 11 auto login, as seen from the methods above. However, it’s recommended to enable auto login only on a secure PC, which is accessible only by you. If not, your data and privacy might be jeopardized.
Was this article helpful?
FAQs
How do I bypass the login screen on Windows 11?
You can easily bypass the login screen by enabling the Windows 11 auto login. There are 4 ways to do it, which are explained in detail in the above article.
How do I stop Screen timeout on Windows 11?
You can easily stop the screen timeout on Windows 11 by clicking the Start > Settings > System Settings > Power & Battery option.
Check this Windows 11 auto login guide for how to automatically log into Windows 11 without entering a password to save the boot time. MiniTool Software offers many computer tutorials to help you deal with various computer problems. You can check MiniTool News Center for more tips and tricks.
By setting a password for your user account on Windows 11, it can help protect your data and privacy. However, if only you use your computer and it is out of the reach of others, you might choose to bypass the sign-in screen to save the boot time on Windows 11.
Check below for how to directly log into Windows 11 without typing the password. In addition, if you want to recover deleted files on Windows 11, you can try the best free data recovery software for Windows 11: MiniTool Power Data Recovery.
MiniTool Power Data Recovery FreeClick to Download100%Clean & Safe
Also read: Unlock the secrets of hard drive data recovery and regain access to your precious files by delving into this enlightening article.
How to Enable Auto Login on Windows 11 – 3 Ways
Way 1. Set Windows 11 Auto Login from Settings
- Click Start -> Settings.
- Click Accounts in the left panel.
- Under Additional settings, turn off the switch of the option “For improved security, only allow Windows Hello sign-in screen for Microsoft accounts on this device”.
- In the pop-up window, enter the password of the user account and click Yes.
- Next, press Windows + R, type netplwiz in the Run dialog, and press Enter.
- Uncheck the option “User must enter a user name and password to use this computer”. Click OK to enable auto login in Windows 11. To disable Windows 11 auto login, you can check this option again.
- In the Automatically sign in window, you need to enter your user name and password. Click OK and click Apply to save the changes.
- Restart your computer and your computer will automatically log in. You don’t have to type a user name and password to sign in to Windows 11 anymore.
Way 2. Edit Registry to Enable Windows 11 Auto Login
Note: Before you edit Windows registry, it’s highly advised you back up Windows Registry first. In case something goes wrong, you can easily restore Windows Registry to a previous setting. Check: How to backup and restore Windows Registry.
- Press Windows + R, type regedit in the Run dialog, and press Enter to open Windows Registry Editor.
- Navigate to the following path: HKEY_LOCAL_MACHINE\SOFTWARE\Microsoft\Windows NT\CurrentVersion\Winlogon.
- Right-click Winlogon and click New -> DWORD (32-bit) Value. Name the new value AutoAdminLogon.
- Double-click AutoAdminLogon and set its value to 1.
- Next, you can right-click Winlogon and click New -> String Value. Name the new value DefaultUserName. Double-click the value and input your user name under Value data. Click OK.
- Then you can right-click Winlogon again and click New -> String Value. Name the new value DefaultPassword. Enter your user account password under Value data and click OK.
In this way, it will disable the login requirement on your Windows 11 computer and you can log in to your system without password.
If you want to change the settings back to ask for password again, you can follow the same operation above to delete the created AutoAdminLogon, DefaultUserName, and DefaultPassword keys in Windows Registry Editor.
Way 3. Use Microsoft AutoLogon Tool to Enable/Disable Windows 11 Auto Login
Microsoft also provides a tool named AutoLogon that enables automatic sign-in without a password on Windows 11. This tool stores your encrypted account username and password in Windows Registry and lets you easily enable or disable the automatic sign-in feature on Windows 11.
- You can download the AutoLogon tool from Microsoft official website.
- Unzip the downloaded AutoLogon file.
- Double-click the Autologon64 application file.
- Enter your account password and click Yes.
- In the pop-up window, enter your account password again and click Enable.
- Restart your computer to execute the changes.
If you want to turn off auto-logon in Windows 11 in the future, you can double-click the Autologon64 application file again and select Disable.
How to Check If You Have Set a Password/PIN for Windows 11
- Click Start -> Settings.
- Click Accounts in the left panel.
- Click Sign-in options in the right panel.
- Click the Password If you see the text “Sign in with your account’s password” and see a Change button next to it, it means you have set up a password for your account. However, if you see an Add button, it means your account doesn’t set a password yet.
- Still, you can also click PIN (Windows Hello) If you see a Change PIN button, it means you need to sign in with a PIN. If you see a Set up button, then it means you can set up a PIN for the account.
Easy and Free Data Recovery Software for Windows 11/10
MiniTool Software offers a professional data recovery tool to help users recover deleted files or lost data.
MiniTool Power Data Recovery lets you recover any deleted or lost files from Windows PC or laptop. Aside from this, you can also use this program to recover deleted/lost data from USB flash drives, SD cards, memory cards, external hard drives, SSD, etc.
It can recover data from various data loss situations and even lets you restore data from a system crash. It contains a bootable media builder that lets you create a bootable USB drive to boot your computer into WinPE where you can launch MiniTool Power Data Recovery to scan and recover data from PC.
You can download and install MiniTool Power Data Recovery on your PC or laptop, and check how to recover data below.
MiniTool Power Data Recovery FreeClick to Download100%Clean & Safe
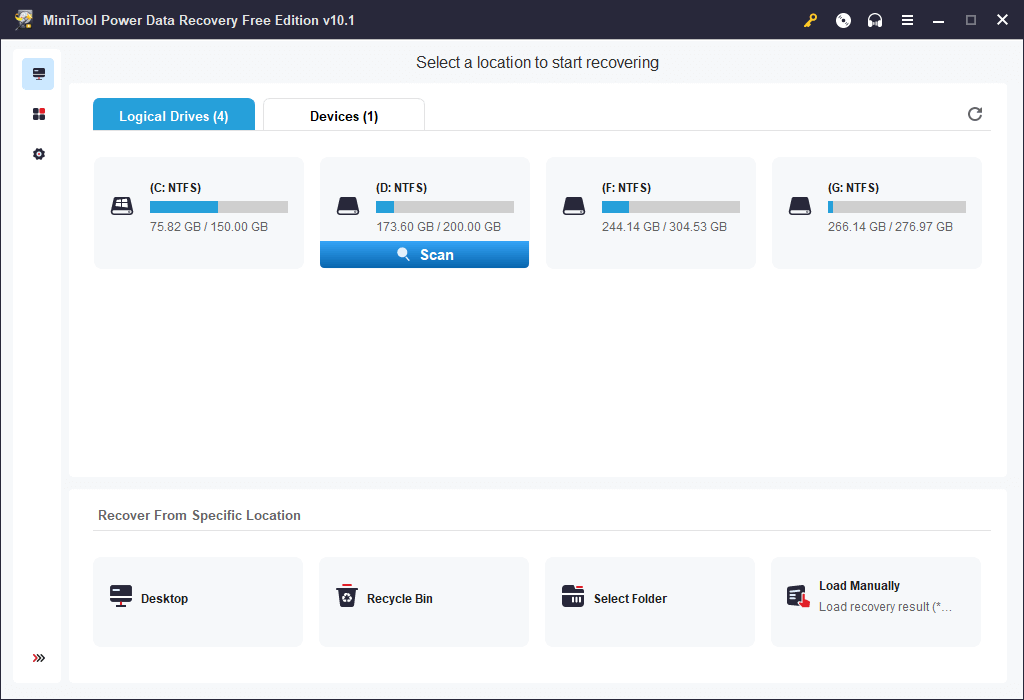
- Launch MiniTool Power Data Recovery to enter into its main UI.
- Find and select the target drive under Logical Drives. Click Scan. Or you can click the Devices tab and select the whole disk or device and click Scan. For external drives like USB flash drives, memory cards, external hard drives, you should connect the device to your computer beforehand.
- After the software finishes the scan process, you can check the scan result to find target files. You can also use the Filter or Find function to quickly find the target file. Check needed files and click the Save Select a new location to store the recovered files.
Tip: To choose a specific type of file to scan, you can click the Scan Settings icon in the left bar to select the file types.
Click to Tweet
Free Disk Partition Manager for Windows 11/10
For Windows users, MiniTool Software also provides a free disk partition manager.
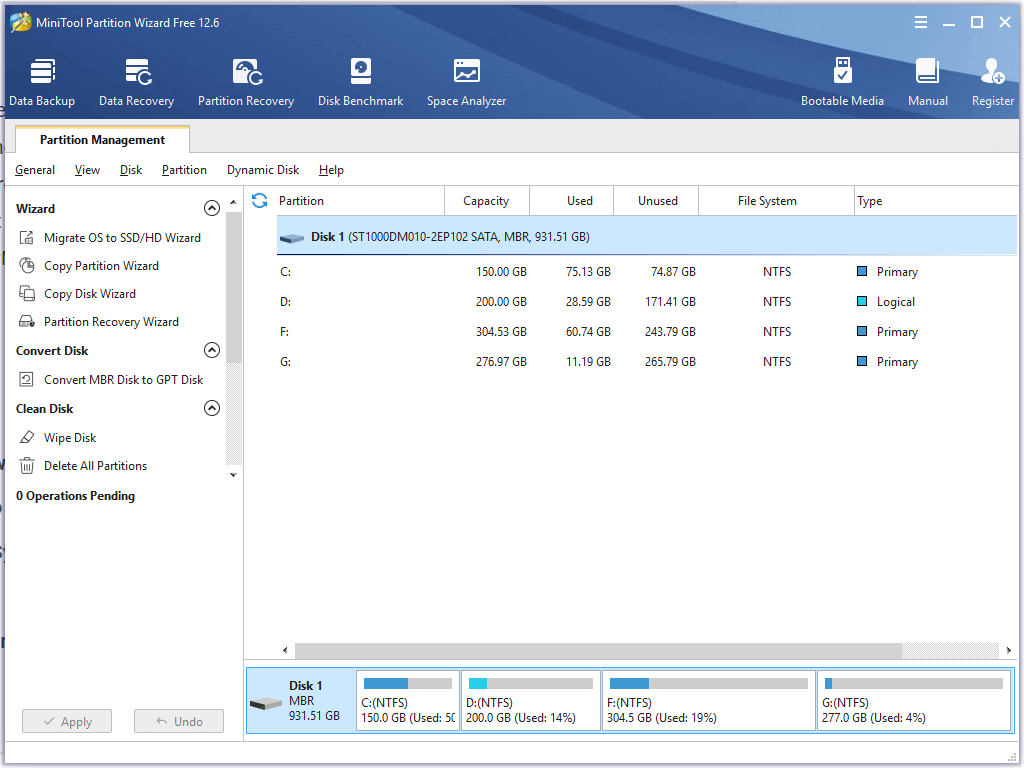
MiniTool Partition Wizard is a professional free hard drive partition manager for Windows. You can use this program to create/delete/extend/resize/format/wipe partition, convert partition between NTFS and FAT32, convert disk between MBR and GPT, check and fix disk errors, benchmark disk, analyze hard drive space usage, and more. It is a full-featured disk partition manager.
If you need a tool to manage disk partitions, you can try this program. Download and install MiniTool Partition Wizard on your Windows computer and try it now.
MiniTool Partition Wizard FreeClick to Download100%Clean & Safe
Free PC Backup Software for Windows 11/10
To avoid permanent data loss, the best way is to always have a backup of important data. You can try a professional PC backup program.
MiniTool ShadowMaker is a professional PC backup program for Windows 11/10. You can use this tool to back up data and system on your PC to another drive with ease.
It lets you freely choose files and folders to back up. You can also select the whole partition or the whole disk to back up to an external hard drive, USB flash drive, or network drive.
It offers two backup modes: backup and sync. Both of these two backup methods support automatic backup. You can set a schedule to back up the selected data automatically. You can restore important data if your computer has problems.
MiniTool ShadowMaker also allows you to backup and restore the Windows system. You can back up the system and restore your Windows system to a previous state from an external drive by using a backup.
Download and install MiniTool ShadowMaker on your Windows computer, and check the simple guide below.
MiniTool ShadowMaker TrialClick to Download100%Clean & Safe
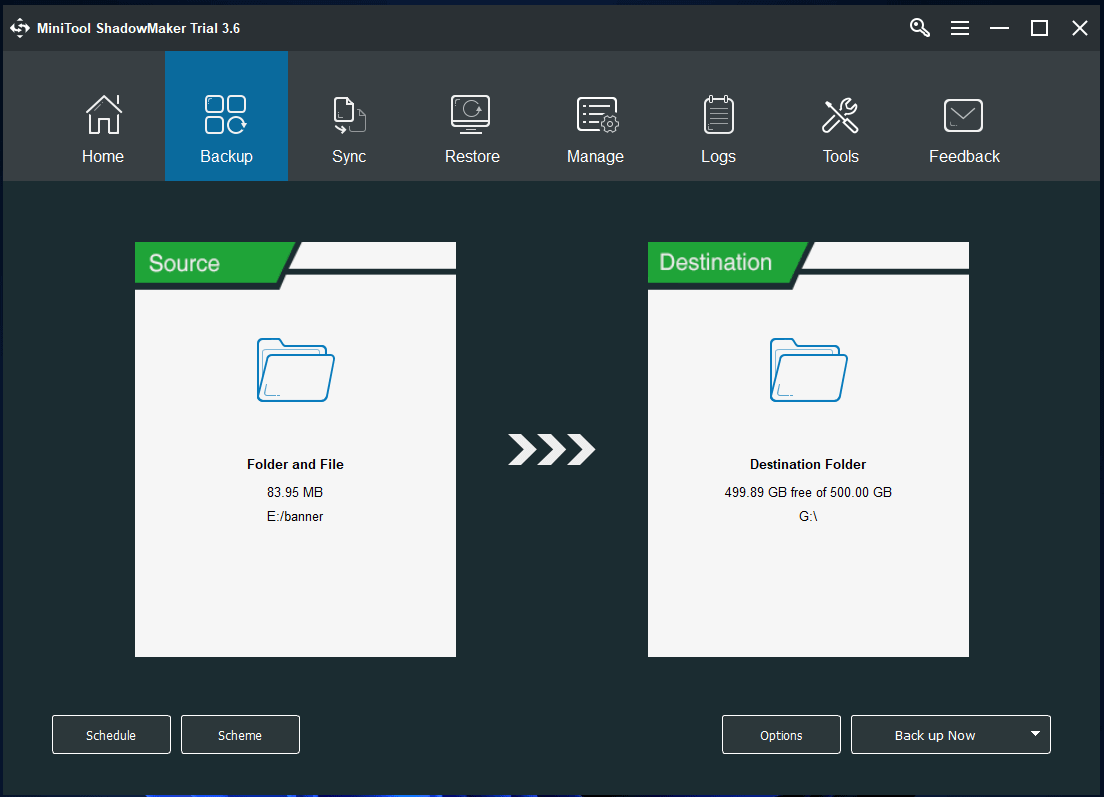
- Run MiniTool ShadowMaker.
- On the main UI, click the Backup module.
- Click the Source section and select the source data you want to back up. You can select files and folders or partitions and disk.
- Click the Destination section and choose a target location or drive to store the backups.
- After selection, click the Back up Now button to start the backup process.
MiniTool Video Repair
A professional free video repair tool allows you to repair corrupted MP4/MOV/M4V/F4V videos. Extremely simple interface and operation. 100% clean and free software.
MiniTool MovieMaker
A professional video editing application offers various video editing features. You can use this program to edit video clips to make personalized videos. You can trim video, add effects/transitions/titles/background music to video, etc. It allows you to export the video in MP4. Many other output formats are also provided. Clean and free.
MiniTool Video Converter
This program is not only a video converter application. It is also a screen recorder and video downloader. You can use this tool to convert any video or audio file to another format, record computer screen and audio, download YouTube videos for offline playback, etc. Clean and free.
Bottom Line
This post teaches you how to enable Windows 11 auto login in 3 ways. Some useful computer software is also provided for your reference. If you have any problems with using MiniTool Software products, you can contact [email protected].