
FAQ
How to Boot from a USB Flash Drive/CD-ROM (Changing Boot Options)
Applicable Products: Notebook, Desktop, All-in-One PC, Gaming Handheld
This article introduces how to boot the system from a USB flash drive or CD-ROM.
Note: The USB flash drive format must be FAT32 so that you are able to boot the system from USB flash drive. Here you can learn more about How to convert the USB flash drive format to FAT32.
To provide you more detailed instruction, you can also click ASUS YouTube video link below to know more about How to boot the system from USB flash drive/CD-ROM:
For those utilizing Notebook, All-in-One PC, or Gaming Handheld devices, two methods are provided below to select the boot device:
Method 1: Enter boot menu by using hotkey
- When the device is completely shut down, persistently hold the [Esc] key on the keyboard and simultaneously press the [Power button] to boot up. Once the Boot menu screen appears, you may release the [Esc] key.
- Select USB flash drive/CD-ROM that you want to use, then press Enter key to boot the system from USB flash drive/CD-ROM.
Note: If your device cannot enter the boot menu by using hotkey Esc, please try Method 2: Enter boot menu through BIOS configuration.
Method 2: Enter boot menu through BIOS configuration
Before booting the system from a USB flash drive or CD-ROM, please let your device enters the BIOS configuration first, here you can learn more about How to enter BIOS configuration. Upon entering the BIOS configuration screen, you will encounter three types of interfaces: UEFI interface, legacy interface, and MyASUS in UEFI. Please refer to the following steps based on the BIOS screen of your device:
How to boot from USB flash drive/CD-ROM in the UEFI mode
In the UEFI interface, you can navigate and confirm using the Arrow Keys and Enter key on the keyboard, Touchpad, or Mouse.
Note: The BIOS configuration screen below may vary slightly depending on the model.
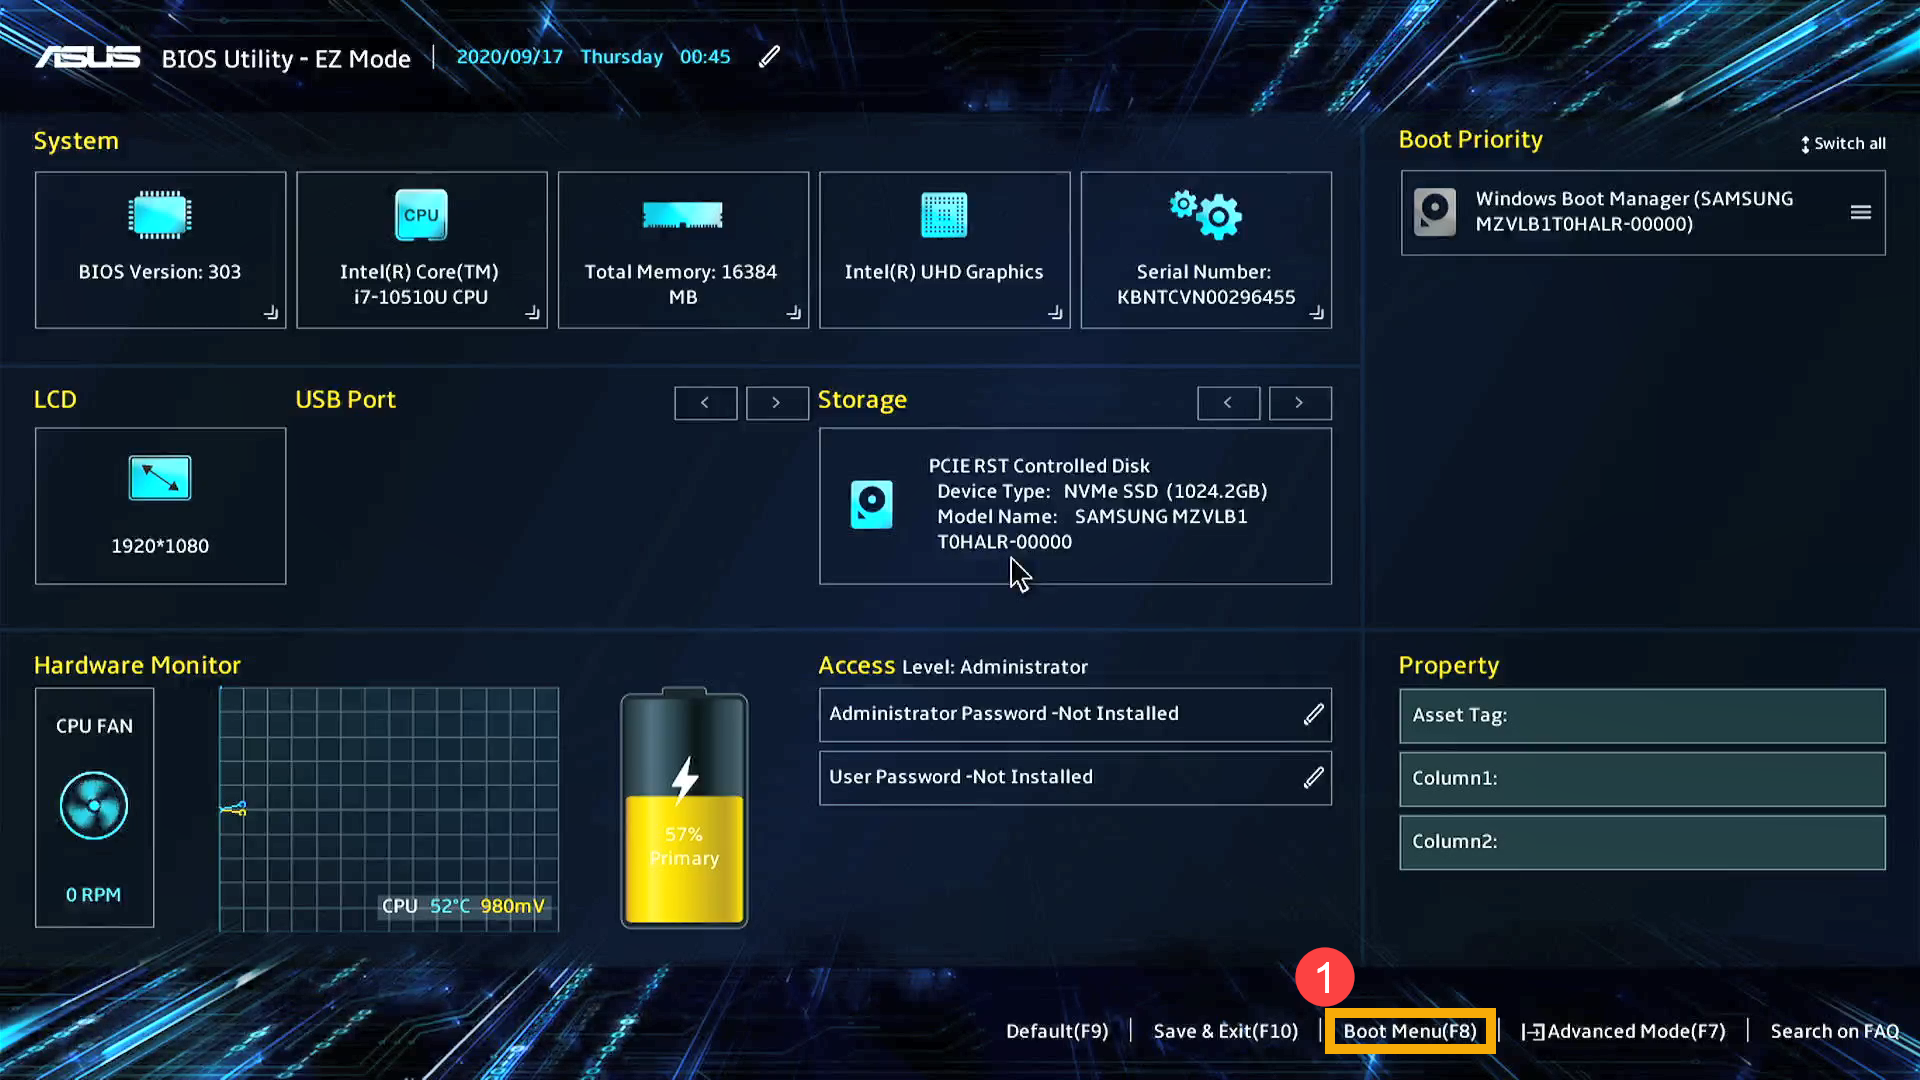
- After entering the BIOS configuration, press the [F8] key on your keyboard, or you can click on the [Boot Menu] option on the screen①.
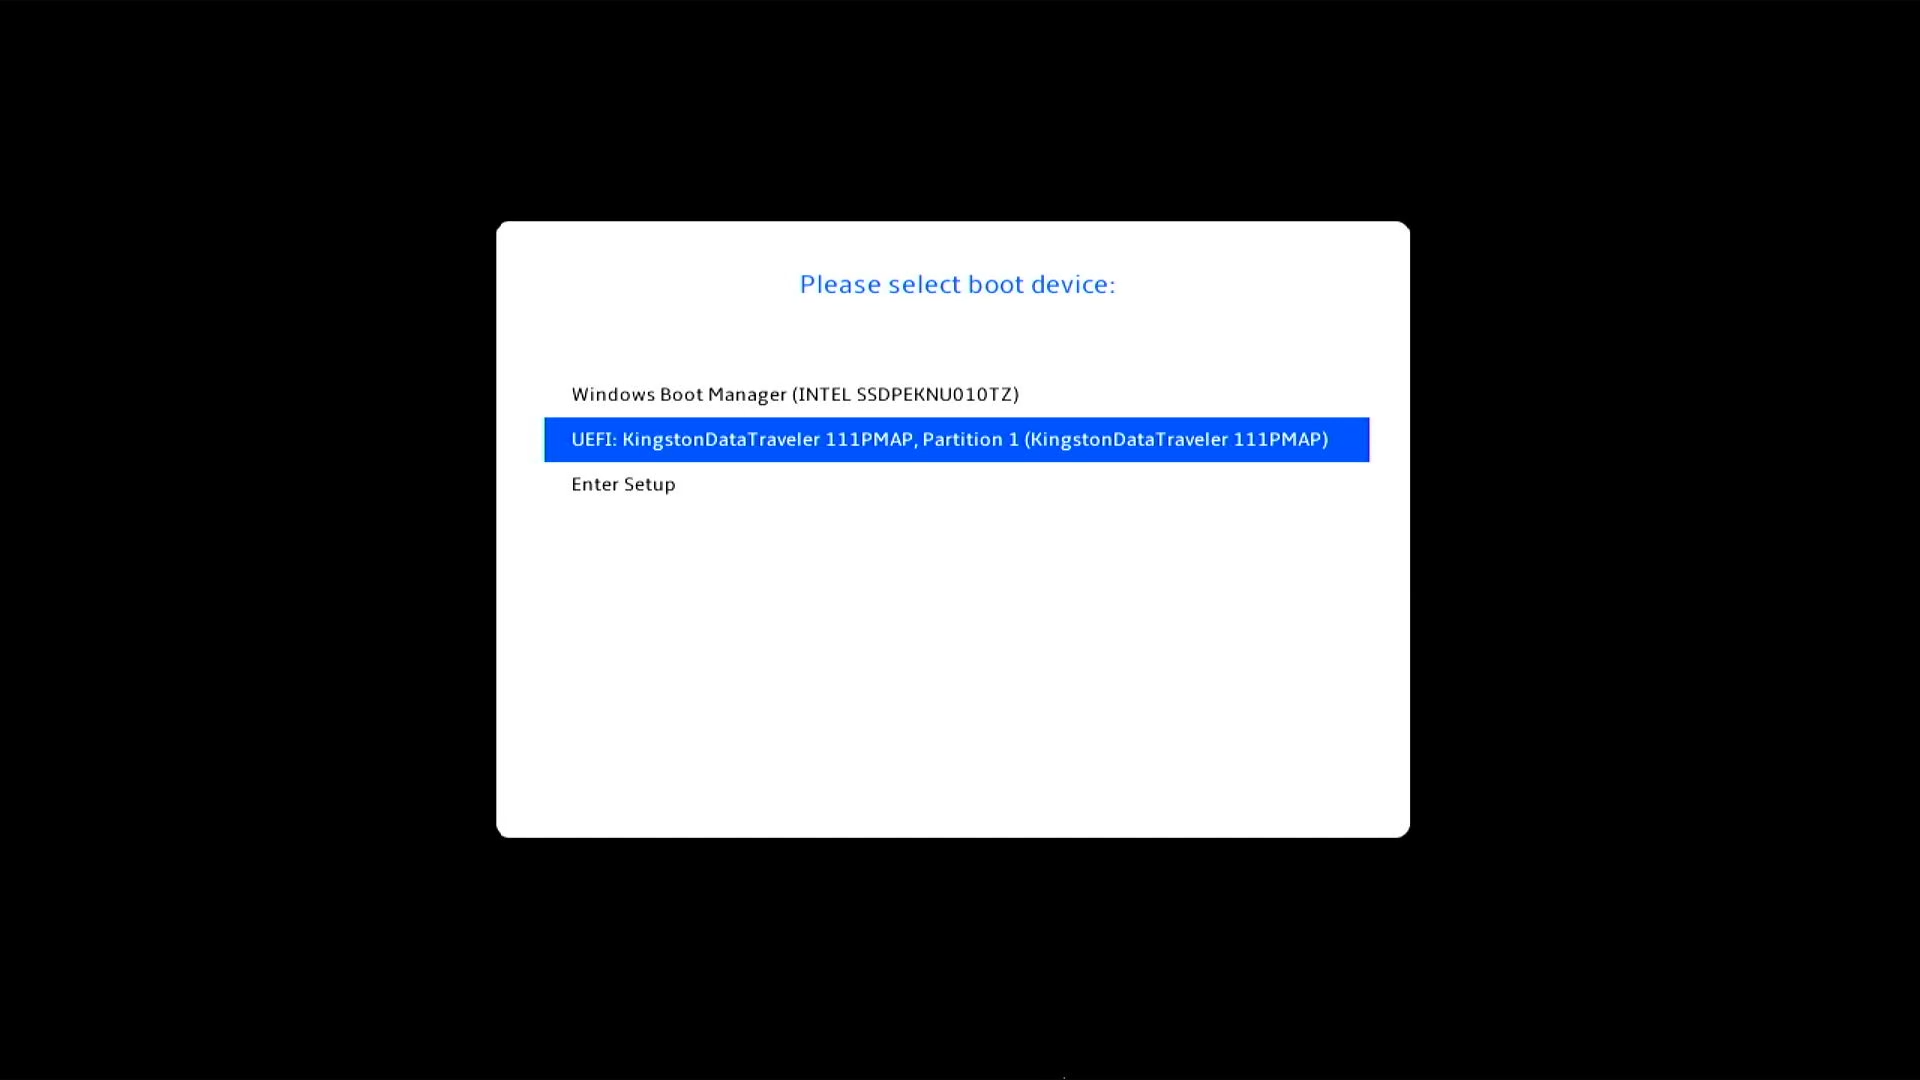
- In the Boot Menu, select the USB flash drive or CD-ROM you wish to boot from②, then press the Enter key to boot from the selected USB or CD-ROM.
If the USB flash drive or CD-ROM you want to use does not appear in the Boot Menu, first refer to How to Adjust the Relevant Settings to Change Boot Options.

How to Adjust the Relevant Settings to Change Boot Options
The settings may vary slightly for each model. If your BIOS configuration screen does not have one of the settings below, please skip it and continue with the following steps.
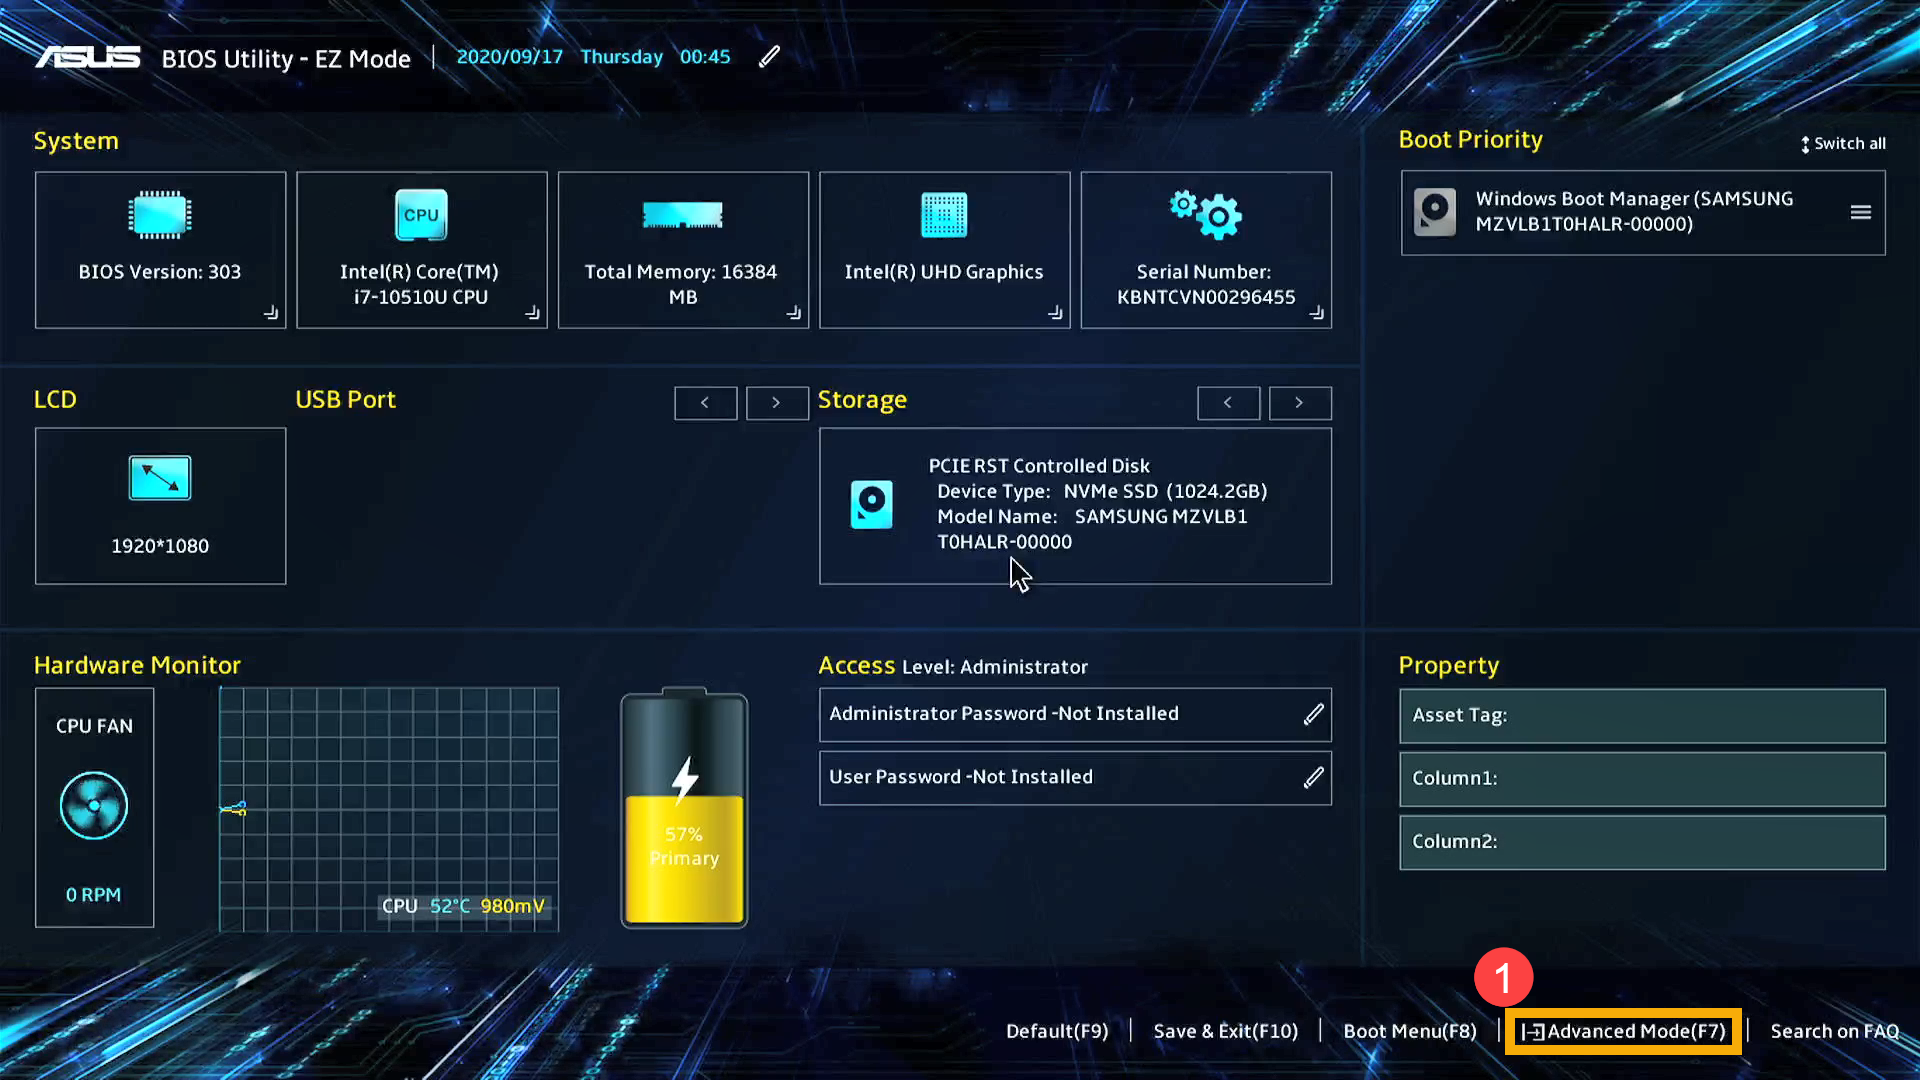
- In the BIOS configuration screen, press the [F7] key on your keyboard, or you can click on the [Advanced Mode]① option on the screen.
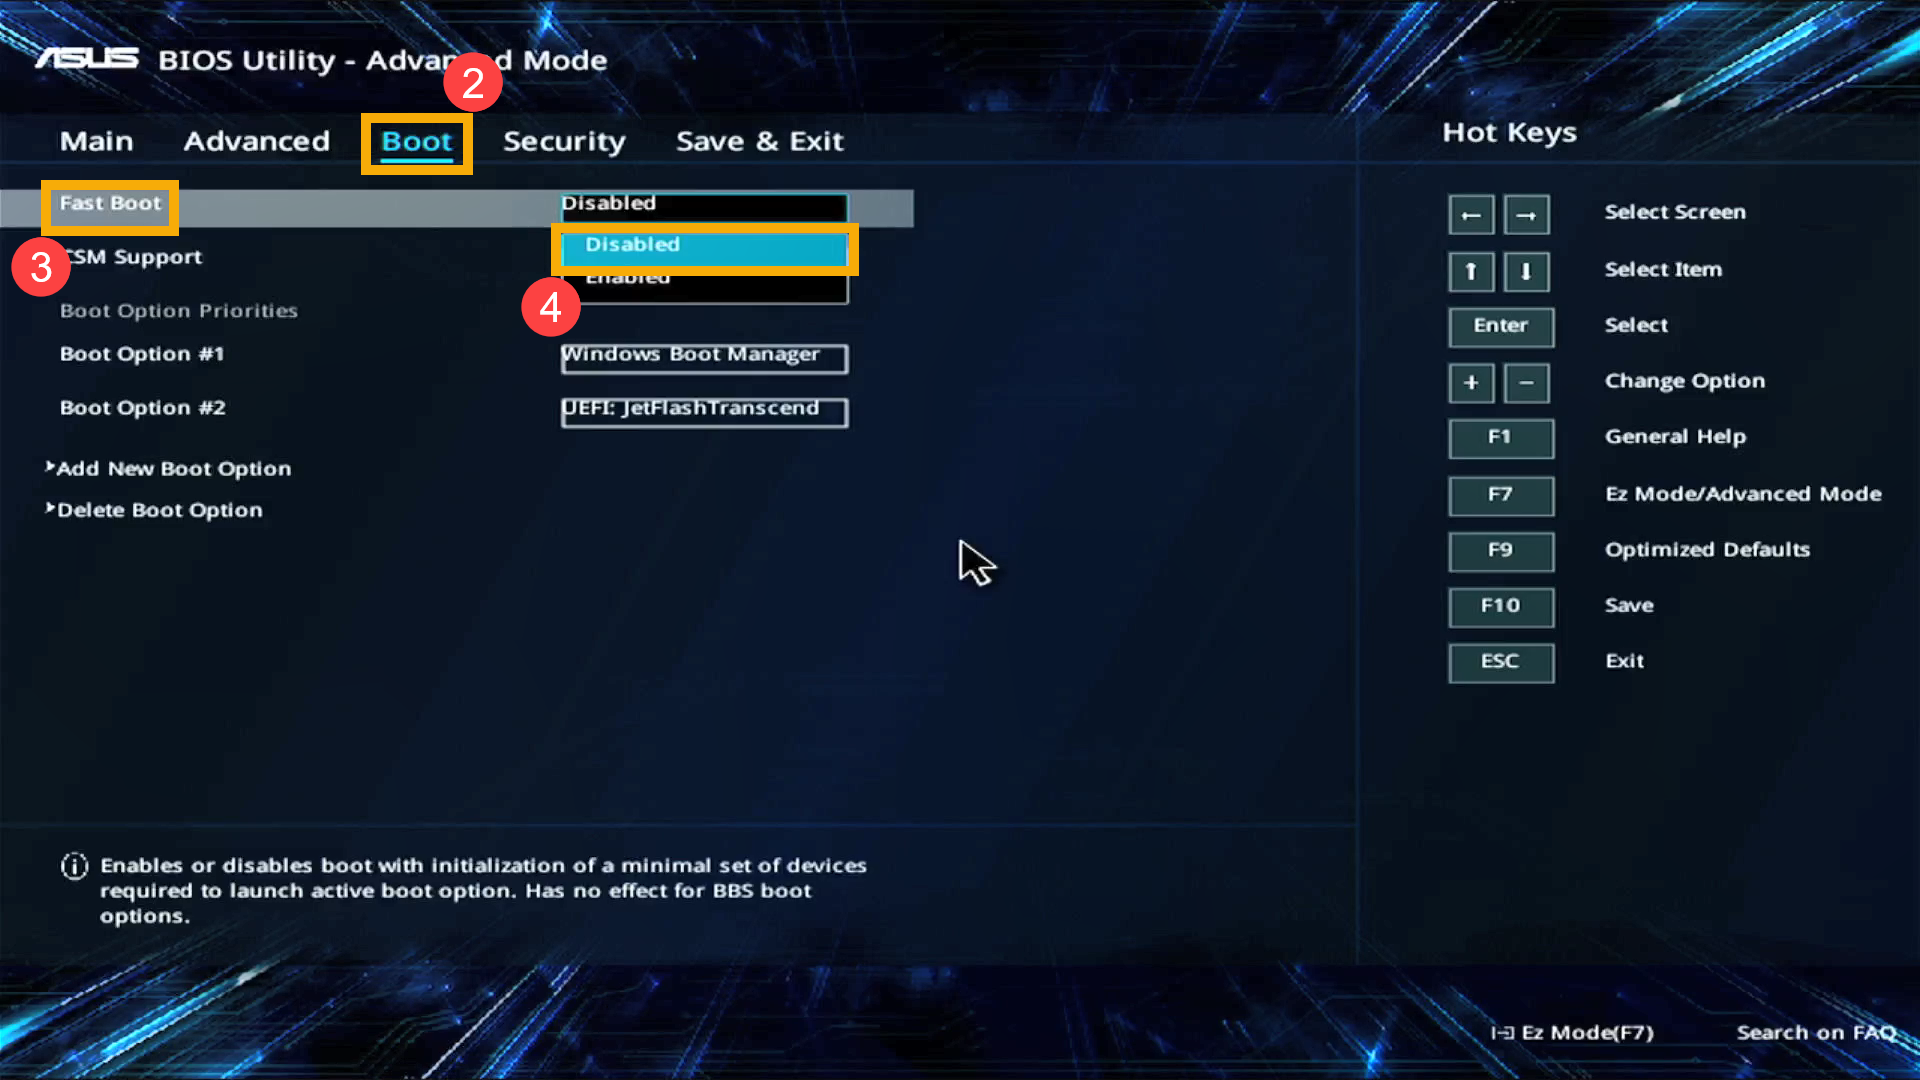
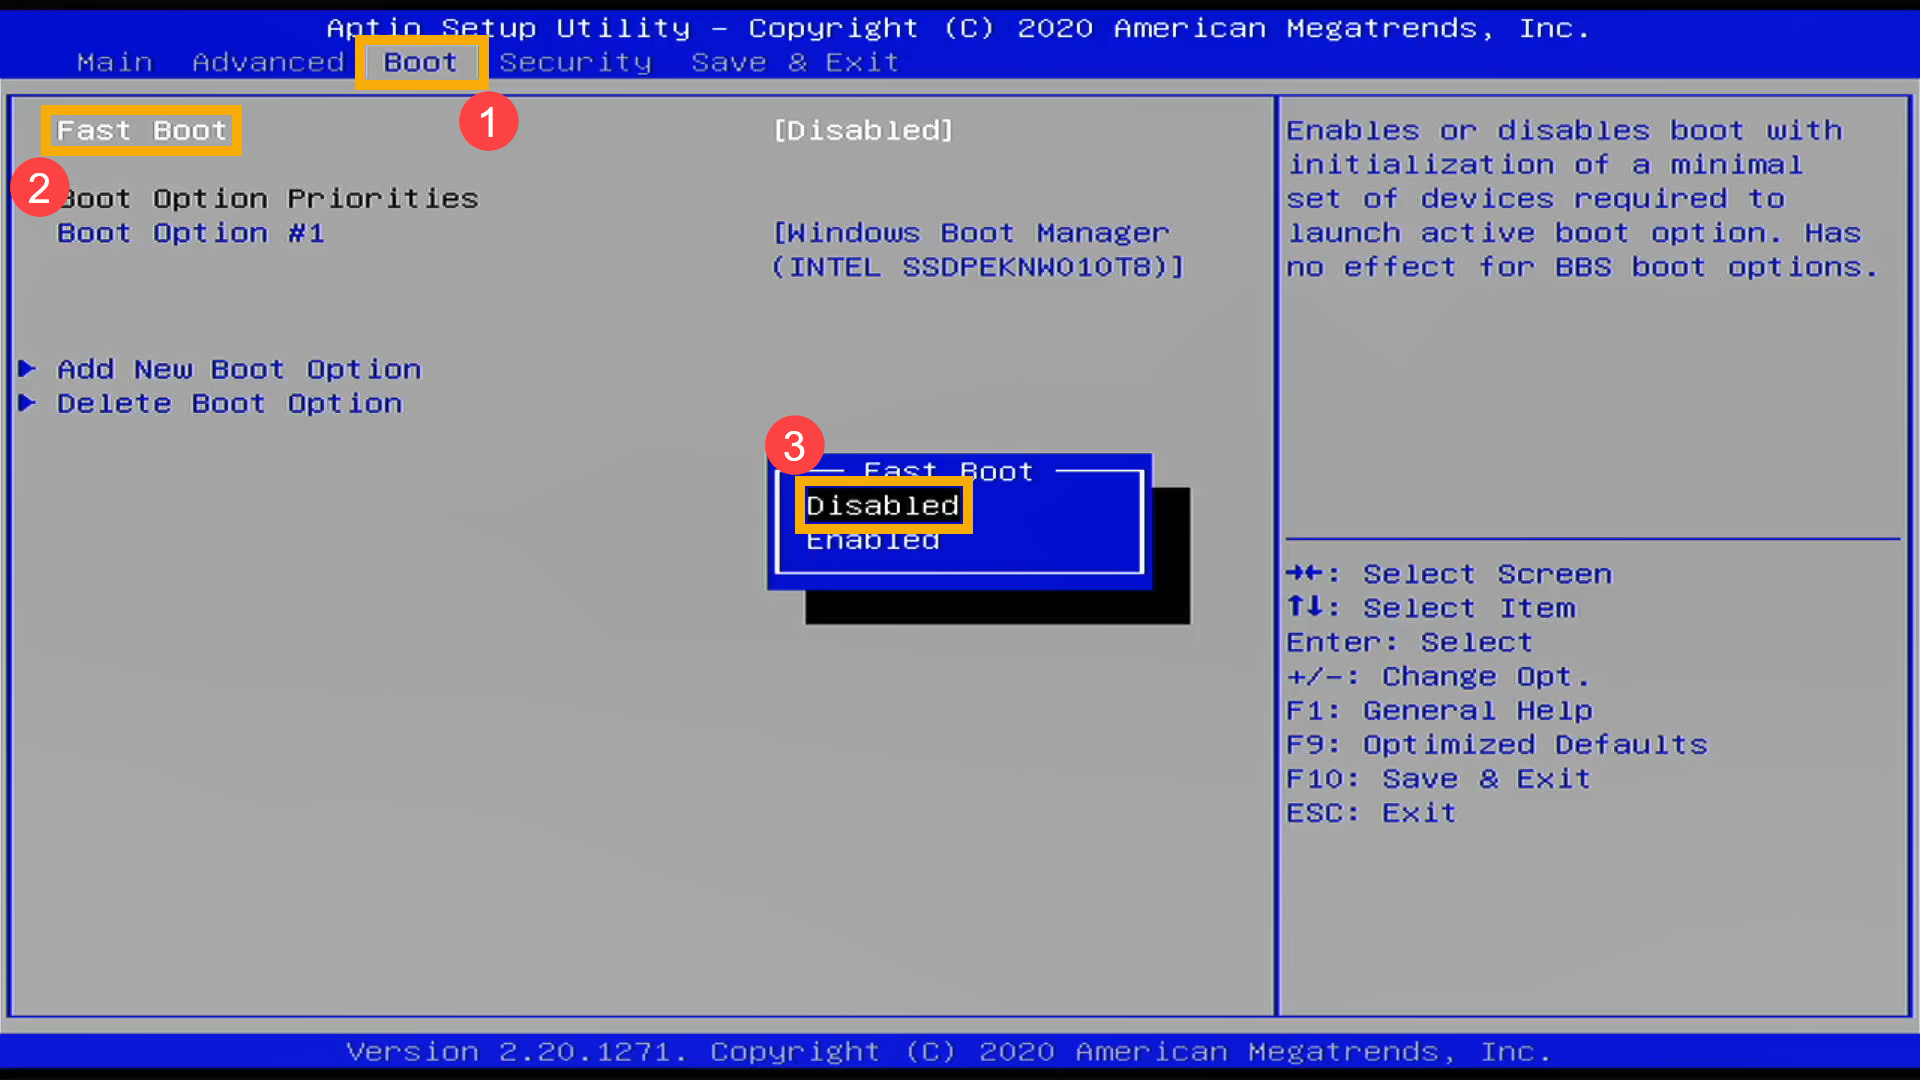
- Enter the [Boot]② screen, select [Fast Boot]③, and then choose [Disabled]④ to turn off the Fast Boot feature.
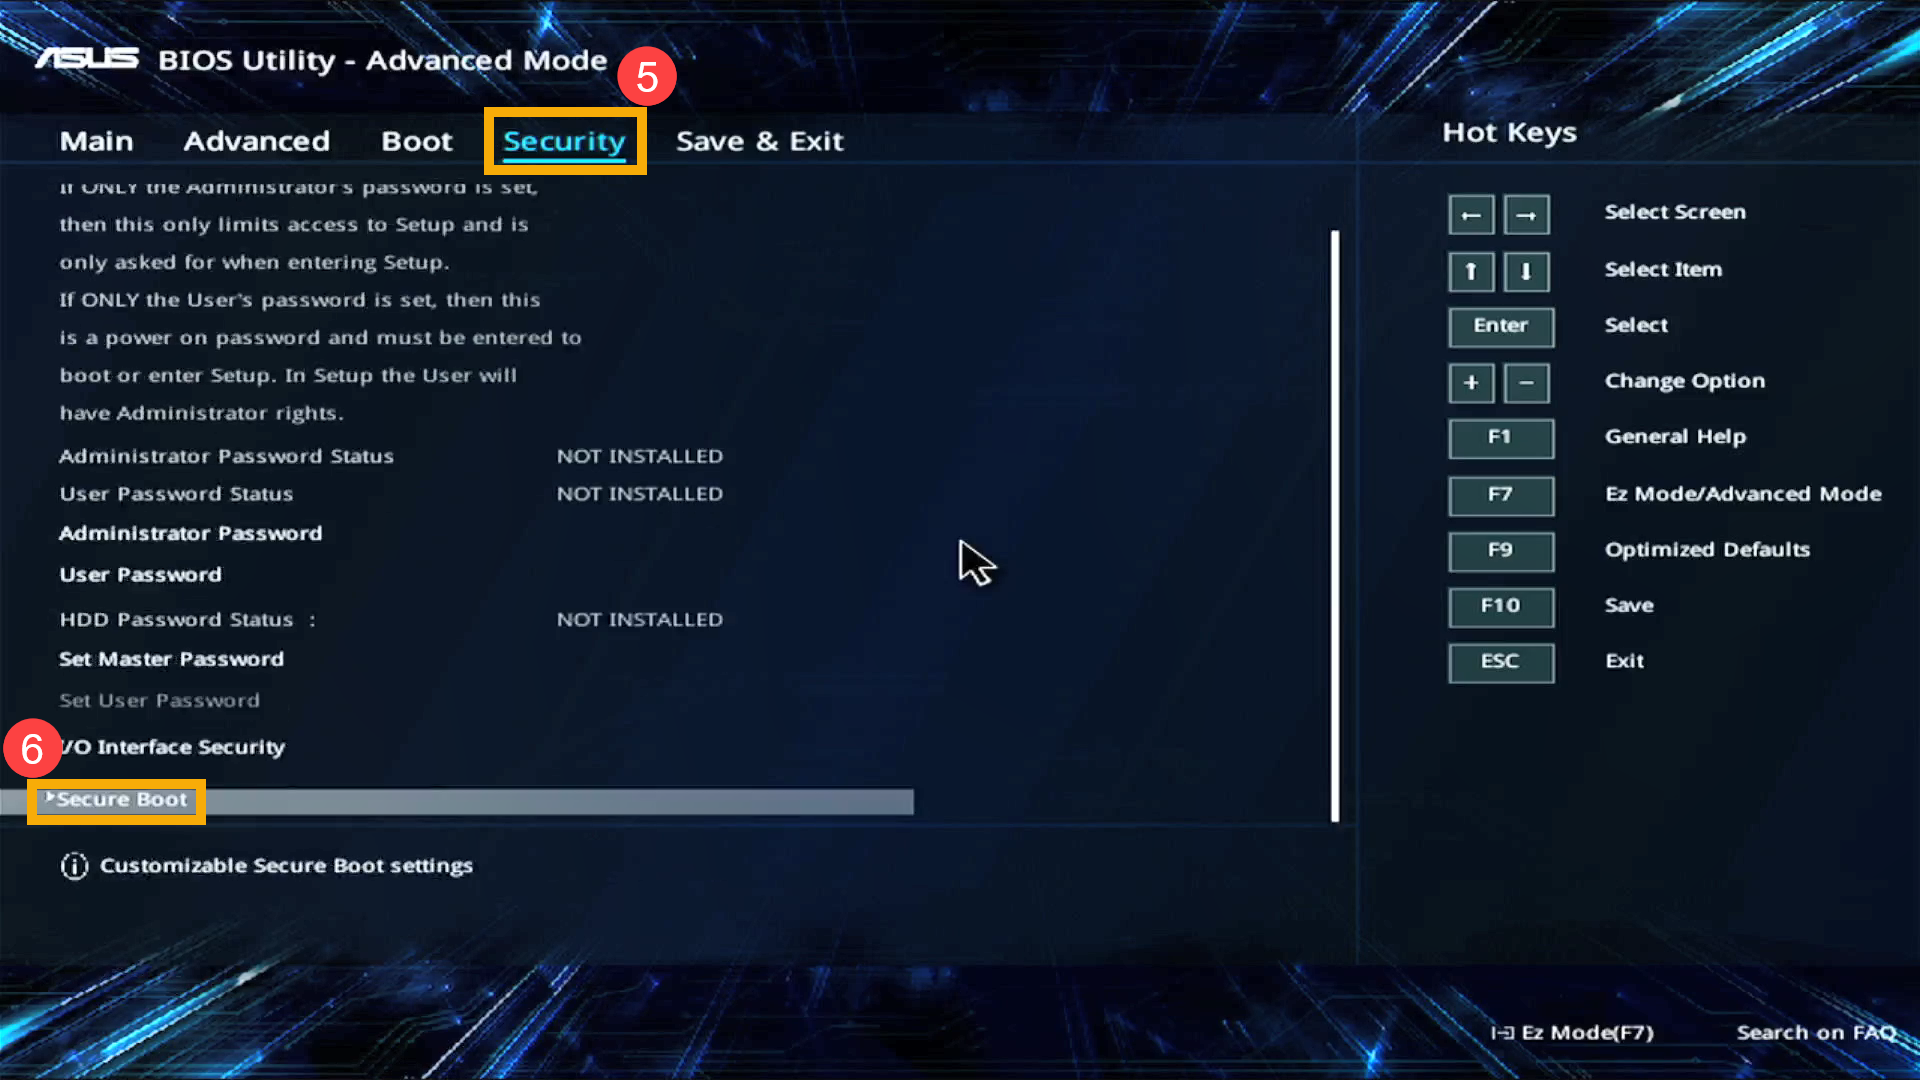
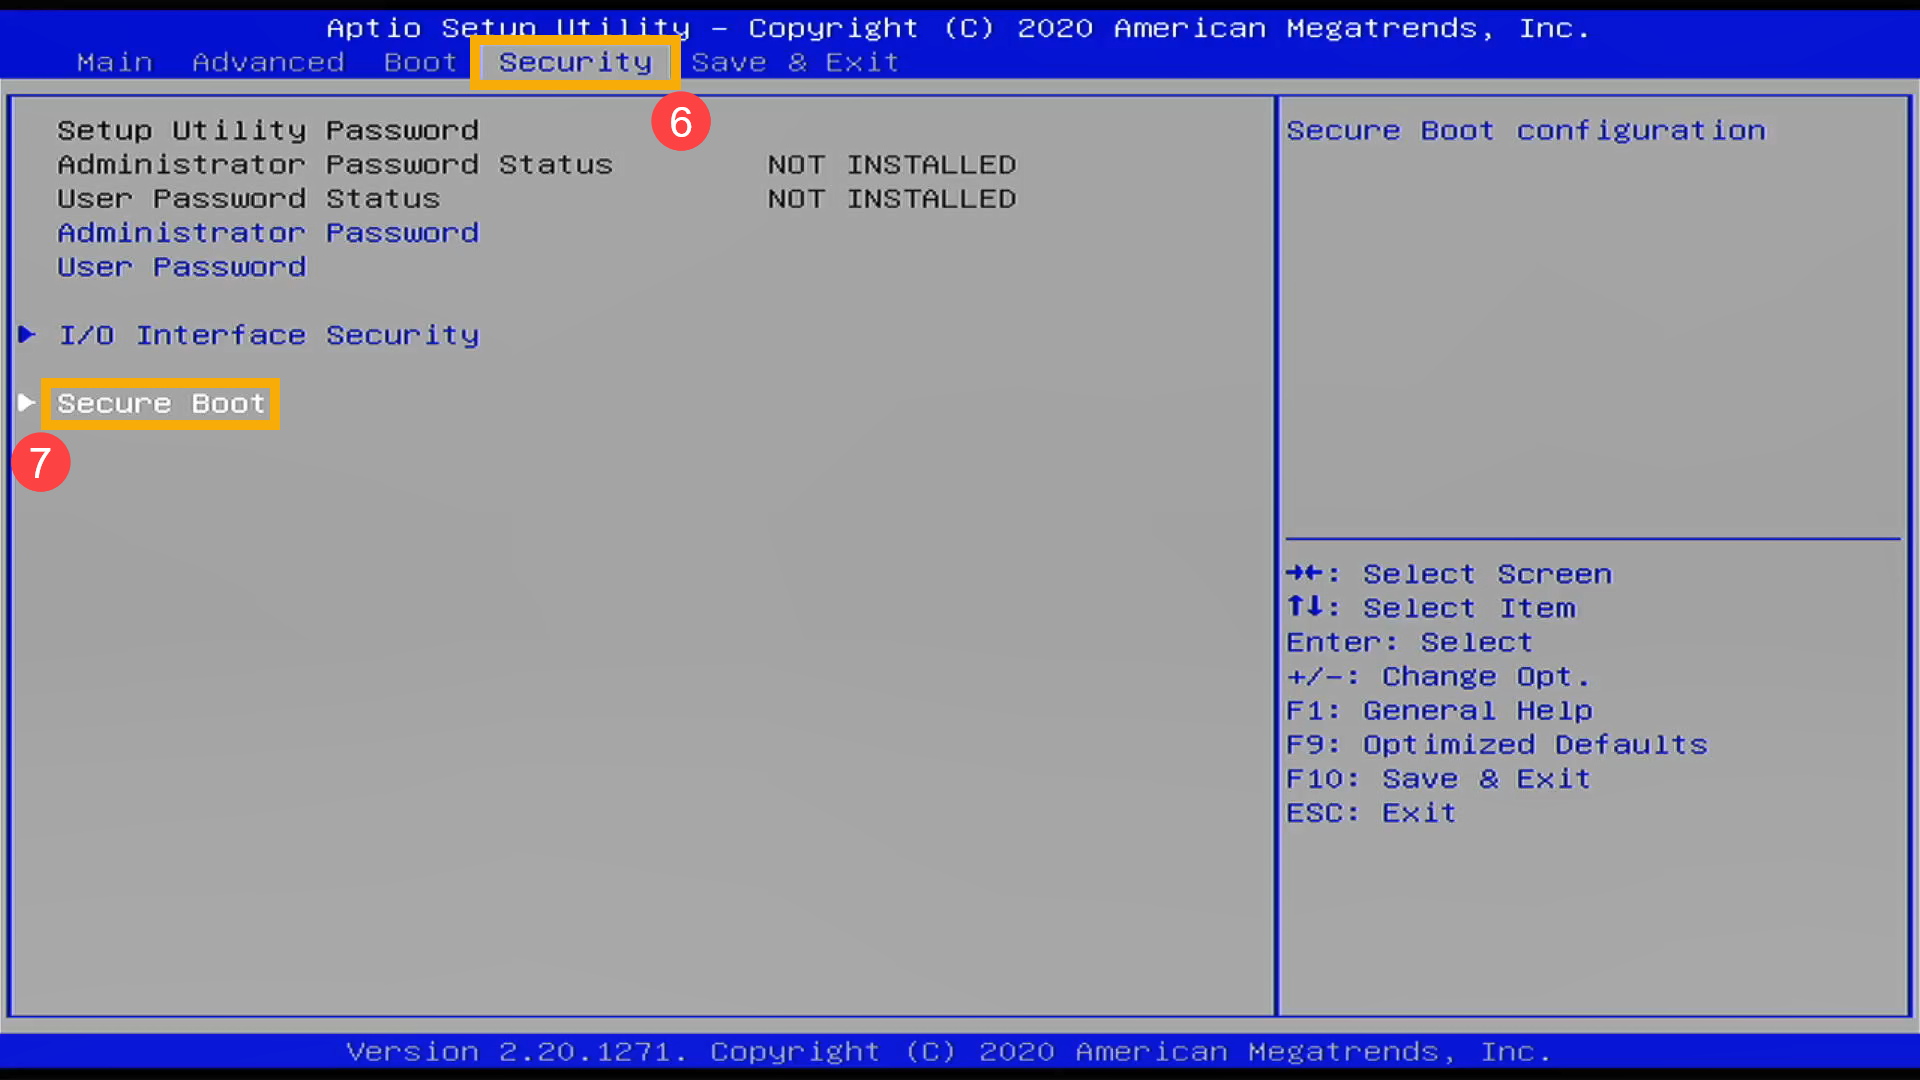
- Enter the [Security]⑤ screen, and then select [Secure Boot]⑥.
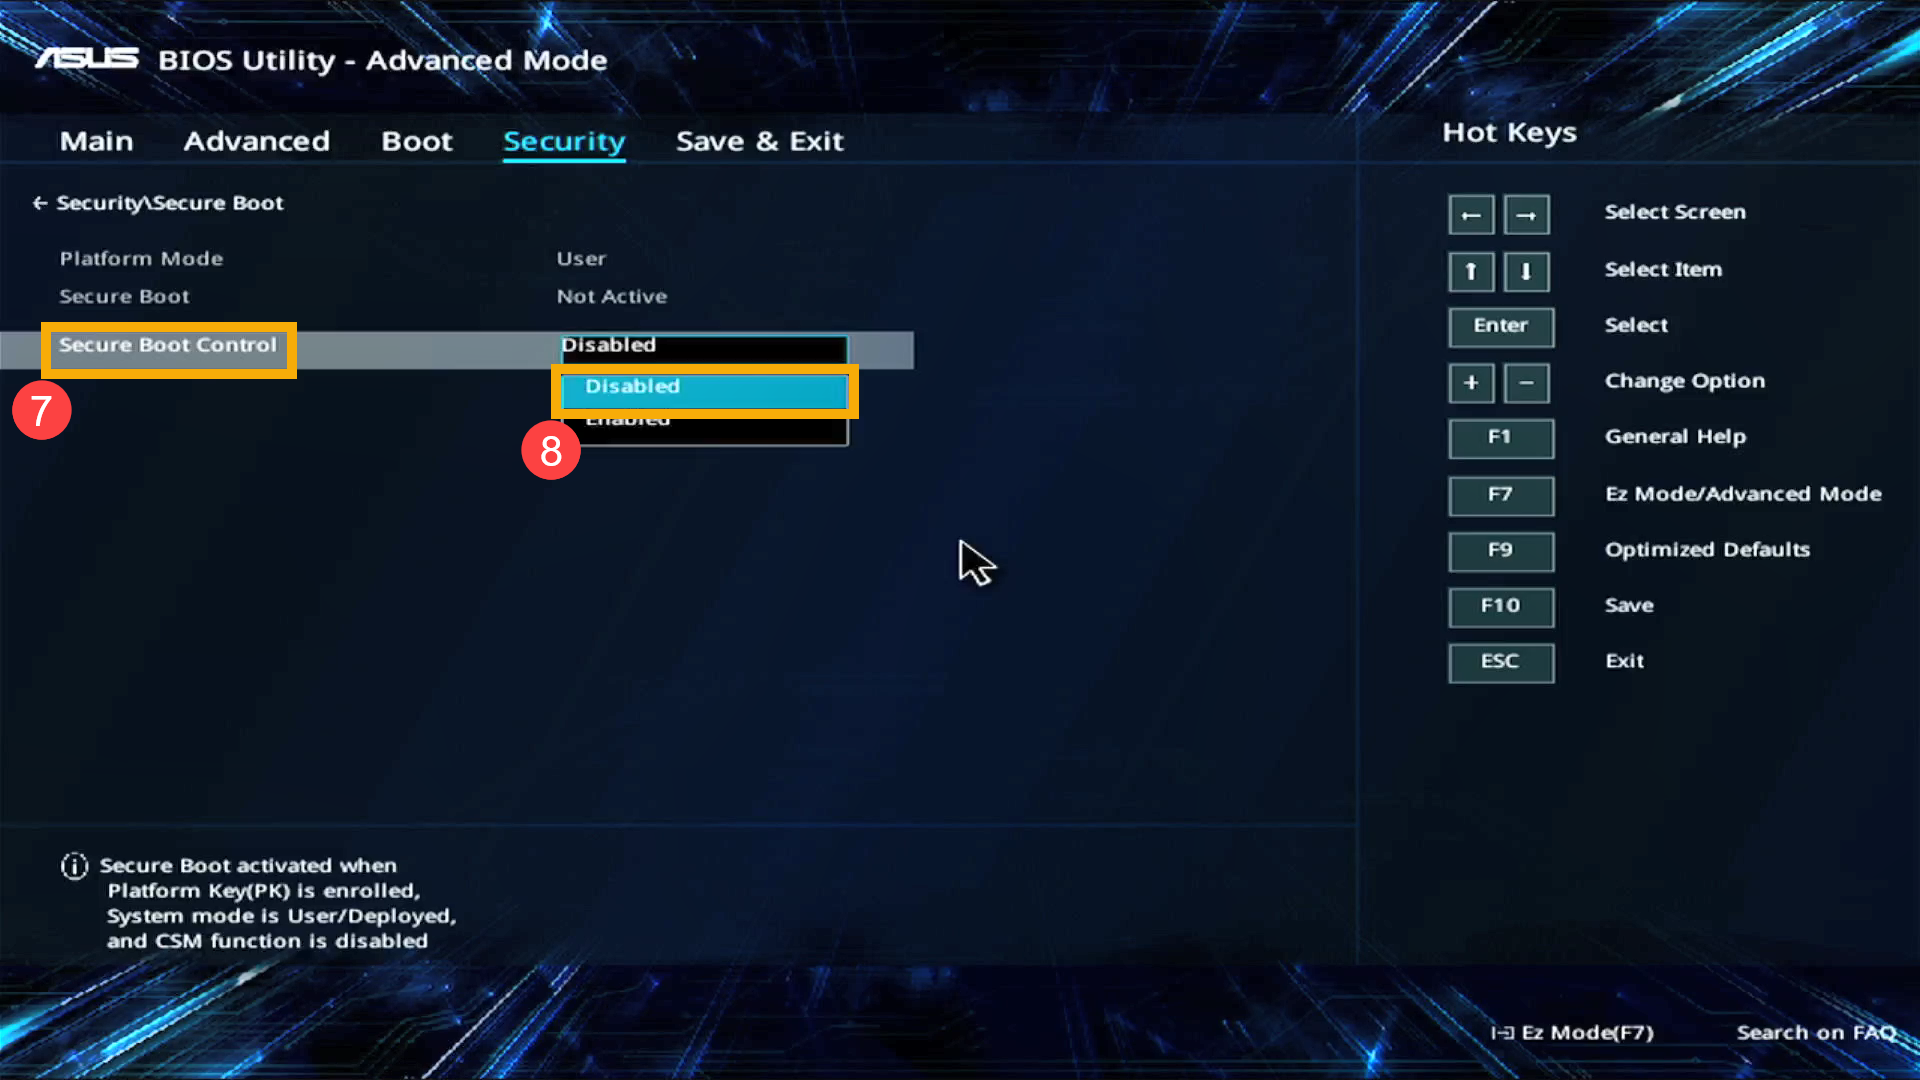
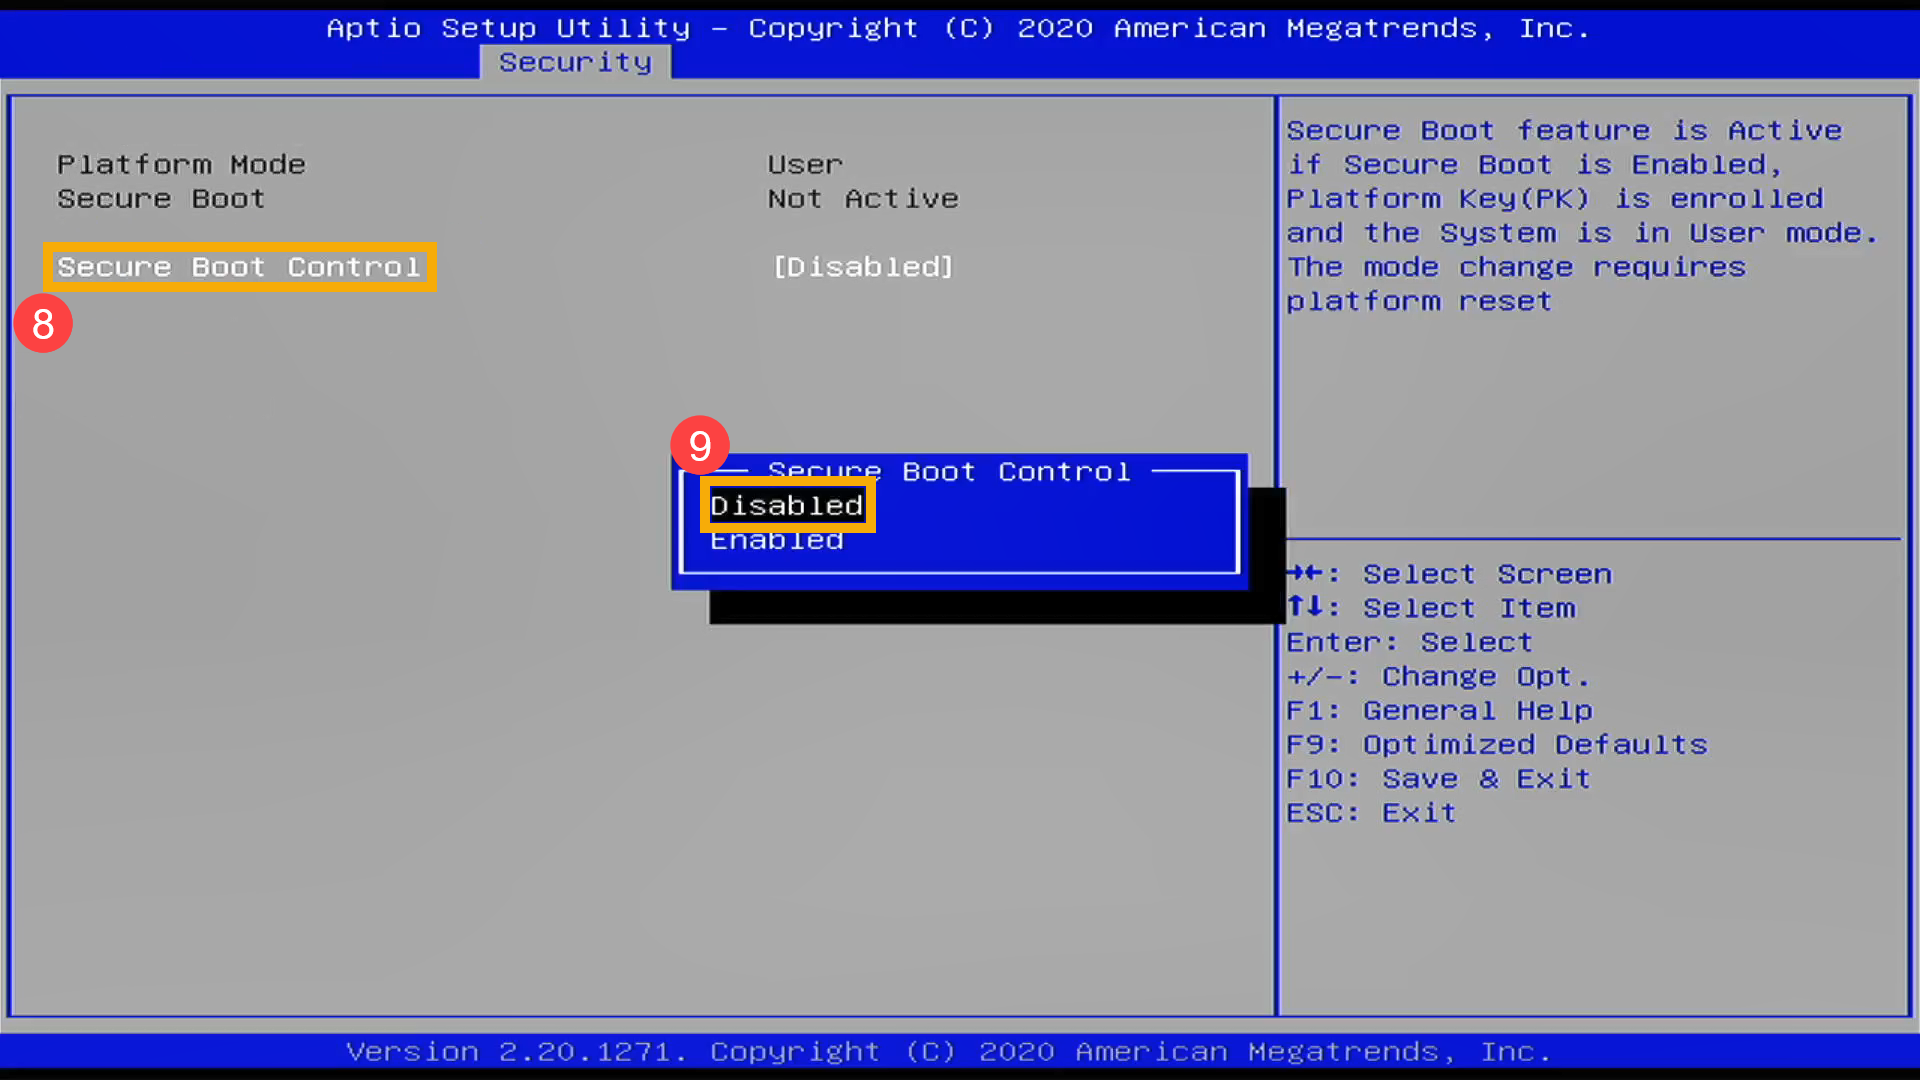
- After entering the Secure Boot screen, select [Secure Boot Control]⑦ and then select [Disabled]⑧.
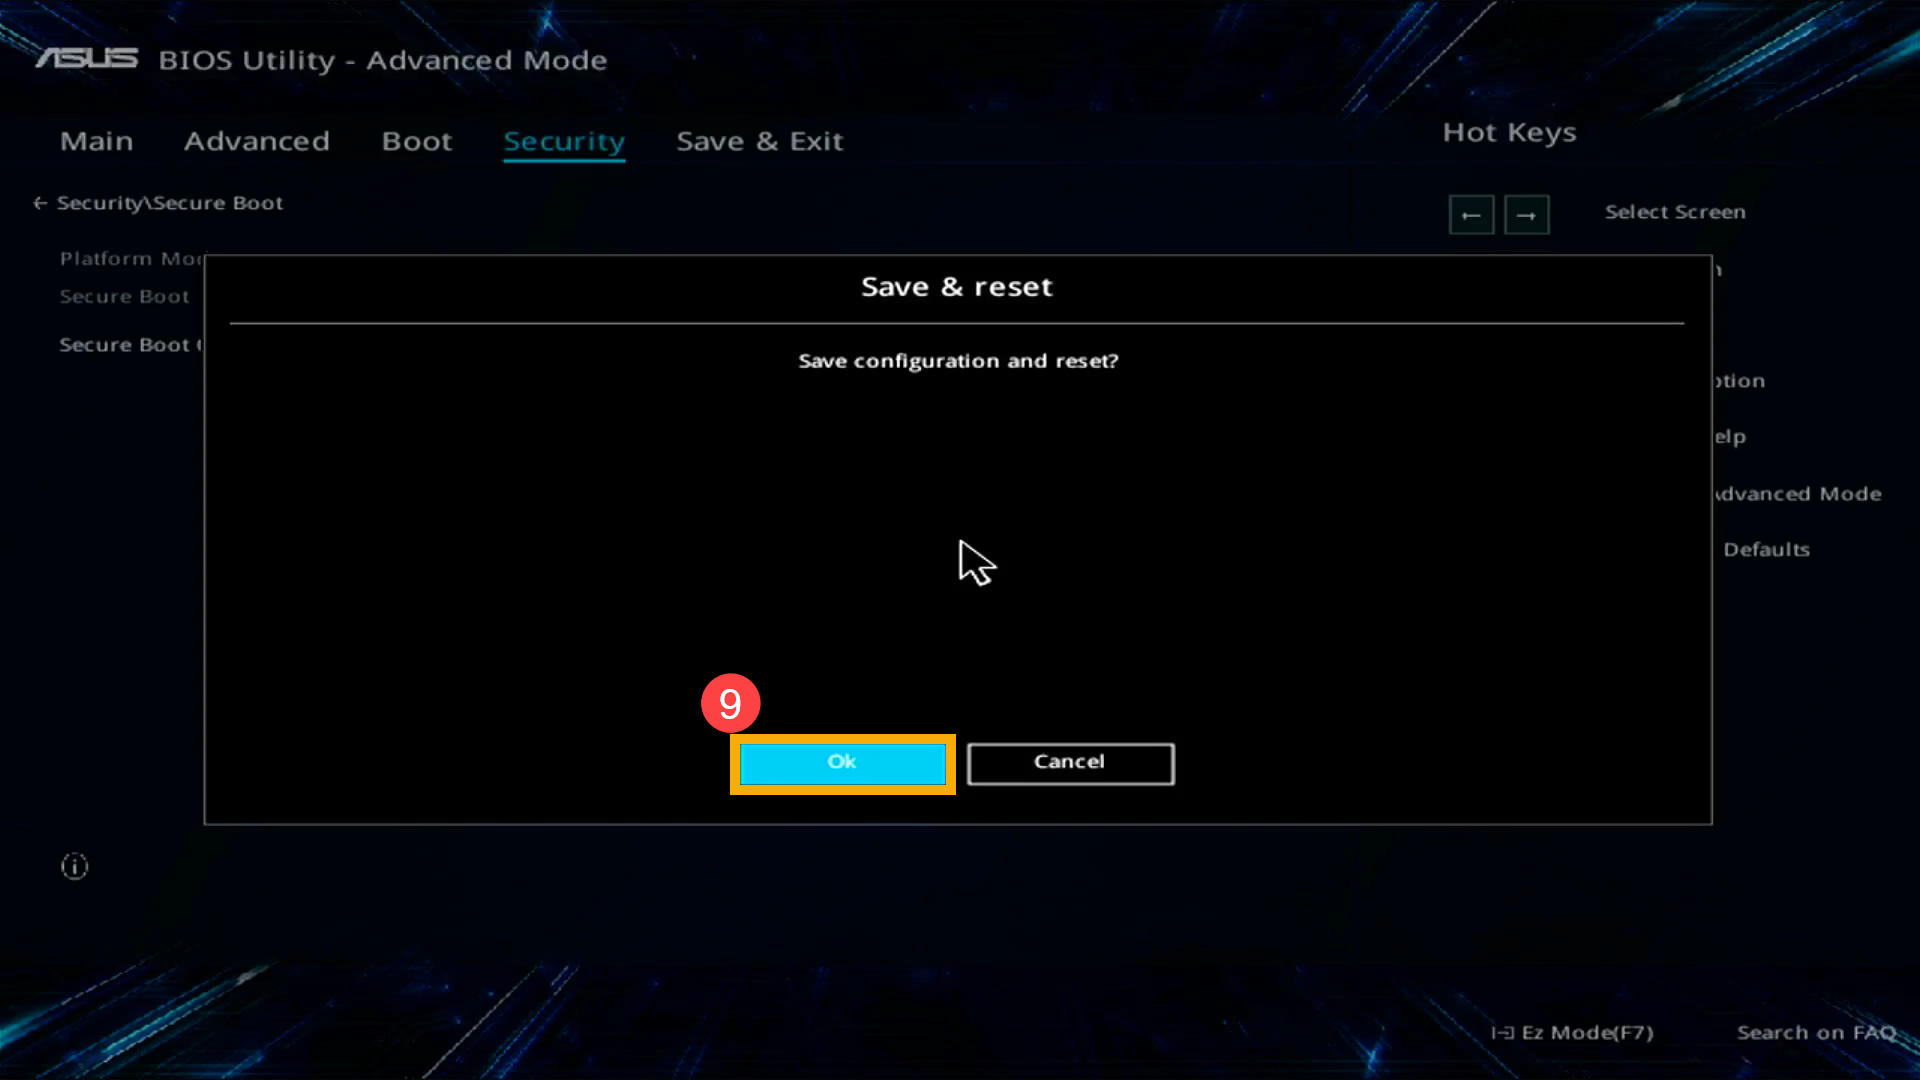
- Save the settings and exit. Press the [F10] key on your keyboard, click [Ok]⑨, and the device will restart and the settings will take effect.
You can also go to the ‘Save & Exit’ page and choose the ‘Save Changes and Exit’ option to save your settings and exit.
- After restarting, try booting from the USB flash drive or CD-ROM again.
How to boot from USB flash drive/CD-ROM in BIOS in the Legacy mode
In the Legacy mode, you can only select and choose item via Arrow Keys and Enter of keyboard.
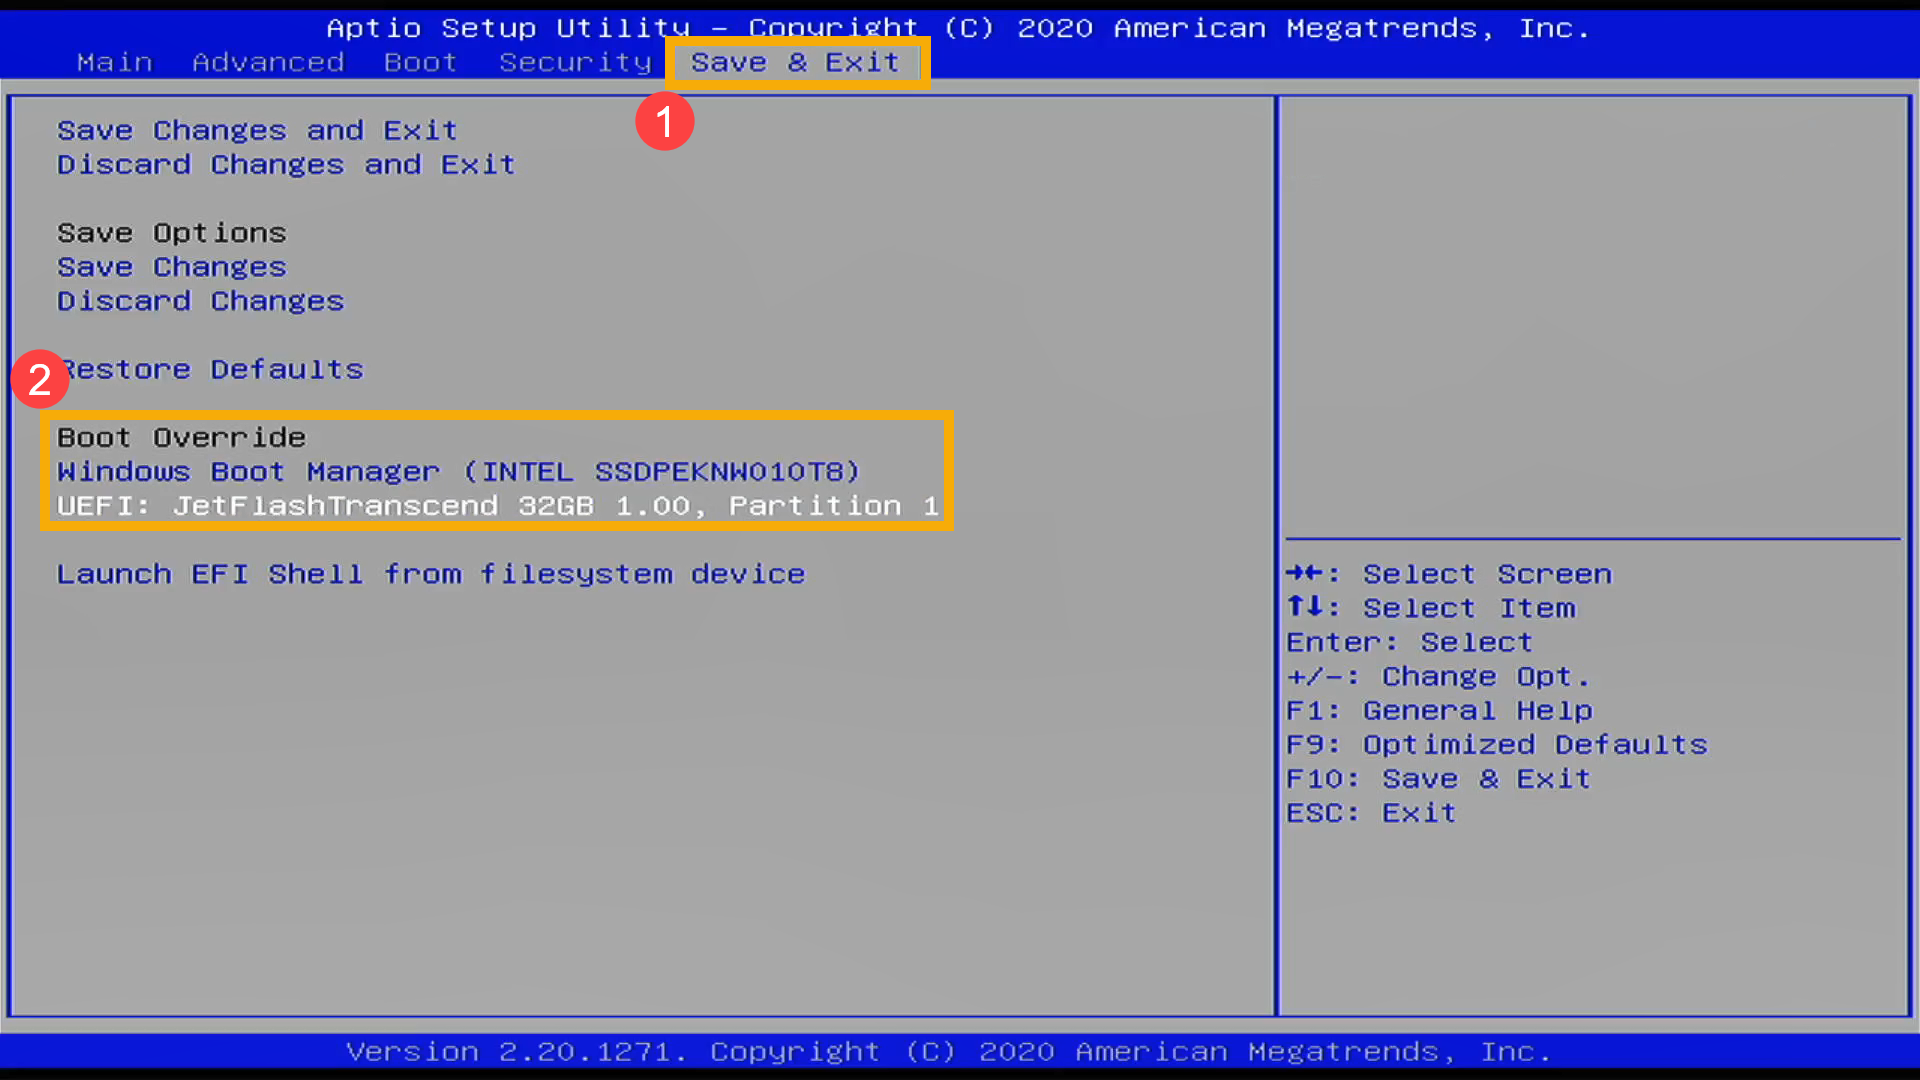
- Enter the [Save & Exit]① screen, select the USB flash drive or CD-ROM in Boot Override you wish to boot from②, then press the Enter key to boot from the selected USB or CD-ROM.
If the USB flash drive or CD-ROM you want to use does not appear in the Boot Override, first refer to How to Adjust the Relevant Settings to Change Boot Options.
How to Adjust the Relevant Settings to Change Boot Options
The settings may vary slightly for each model. If your BIOS configuration screen does not have one of the settings below, please skip it and continue with the following steps.
- Enter the [Boot]① screen, select [Fast Boot]②, and then choose [Disabled]③ to turn off the Fast Boot feature.
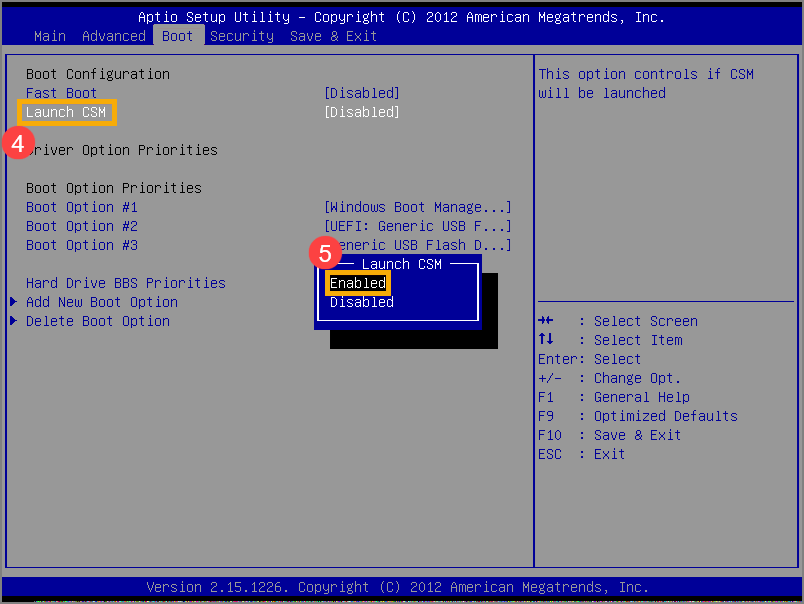
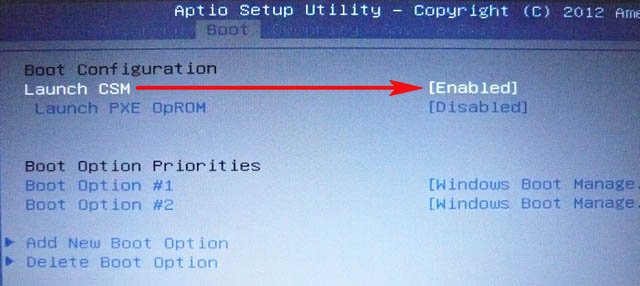
- Select [Launch CSM]④ and then choose [Enabled]⑤.
- Enter the [Security]⑥ screen, and then select [Secure Boot]⑦.
- After entering the Secure Boot screen, select [Secure Boot Control]⑧ and then choose [Disabled]⑨.
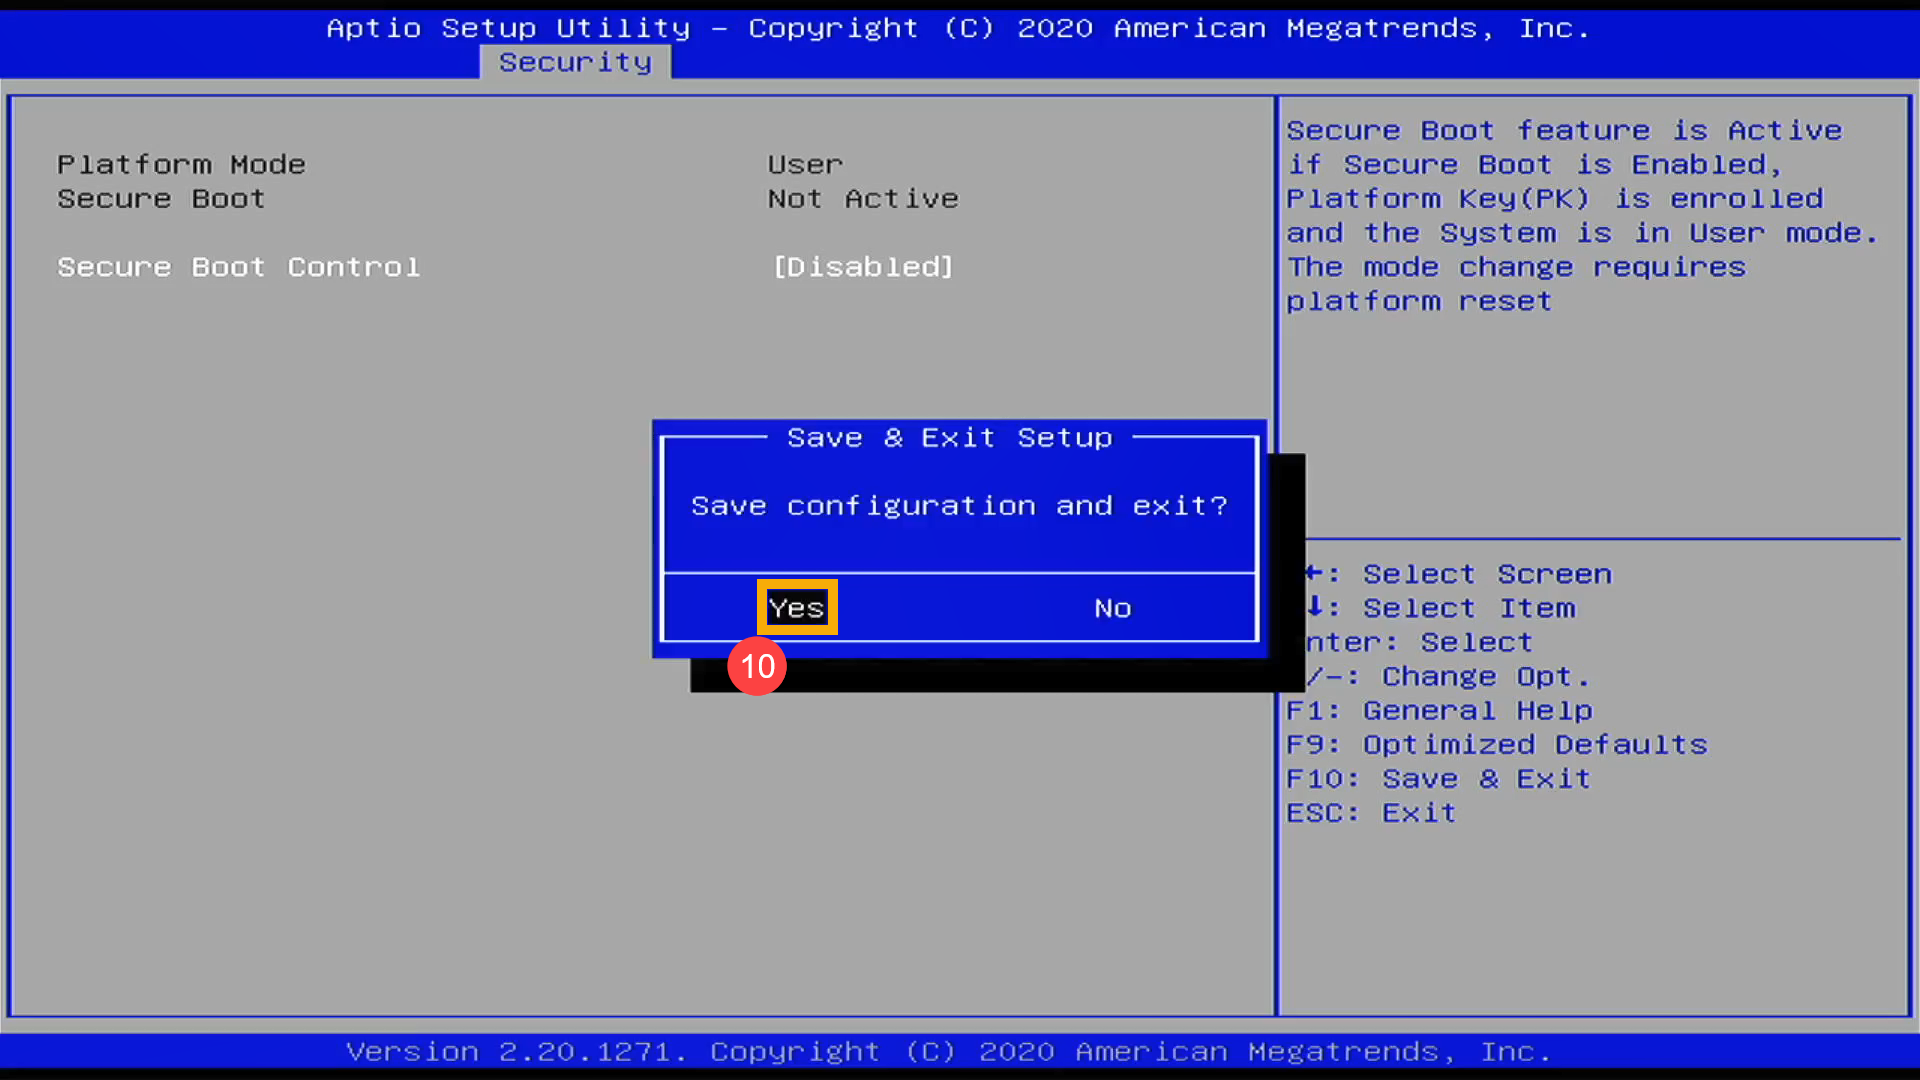
- Save the settings and exit. Press the [F10] key on your keyboard, click [Yes]⑩, and the device will restart and the settings will take effect.
You can also go to the ‘Save & Exit’ page and choose the ‘Save Changes and Exit’ option to save your settings and exit.
- After restarting, try booting from the USB flash drive or CD-ROM again.
How to boot from USB flash drive/CD-ROM in the MyASUS in UEFI mode
In the MyASUS in UEFI interface, you can navigate and confirm using the Arrow Keys and Enter key on the keyboard, Touchpad, or Mouse.
Note: The BIOS configuration screen below may vary slightly depending on the model.
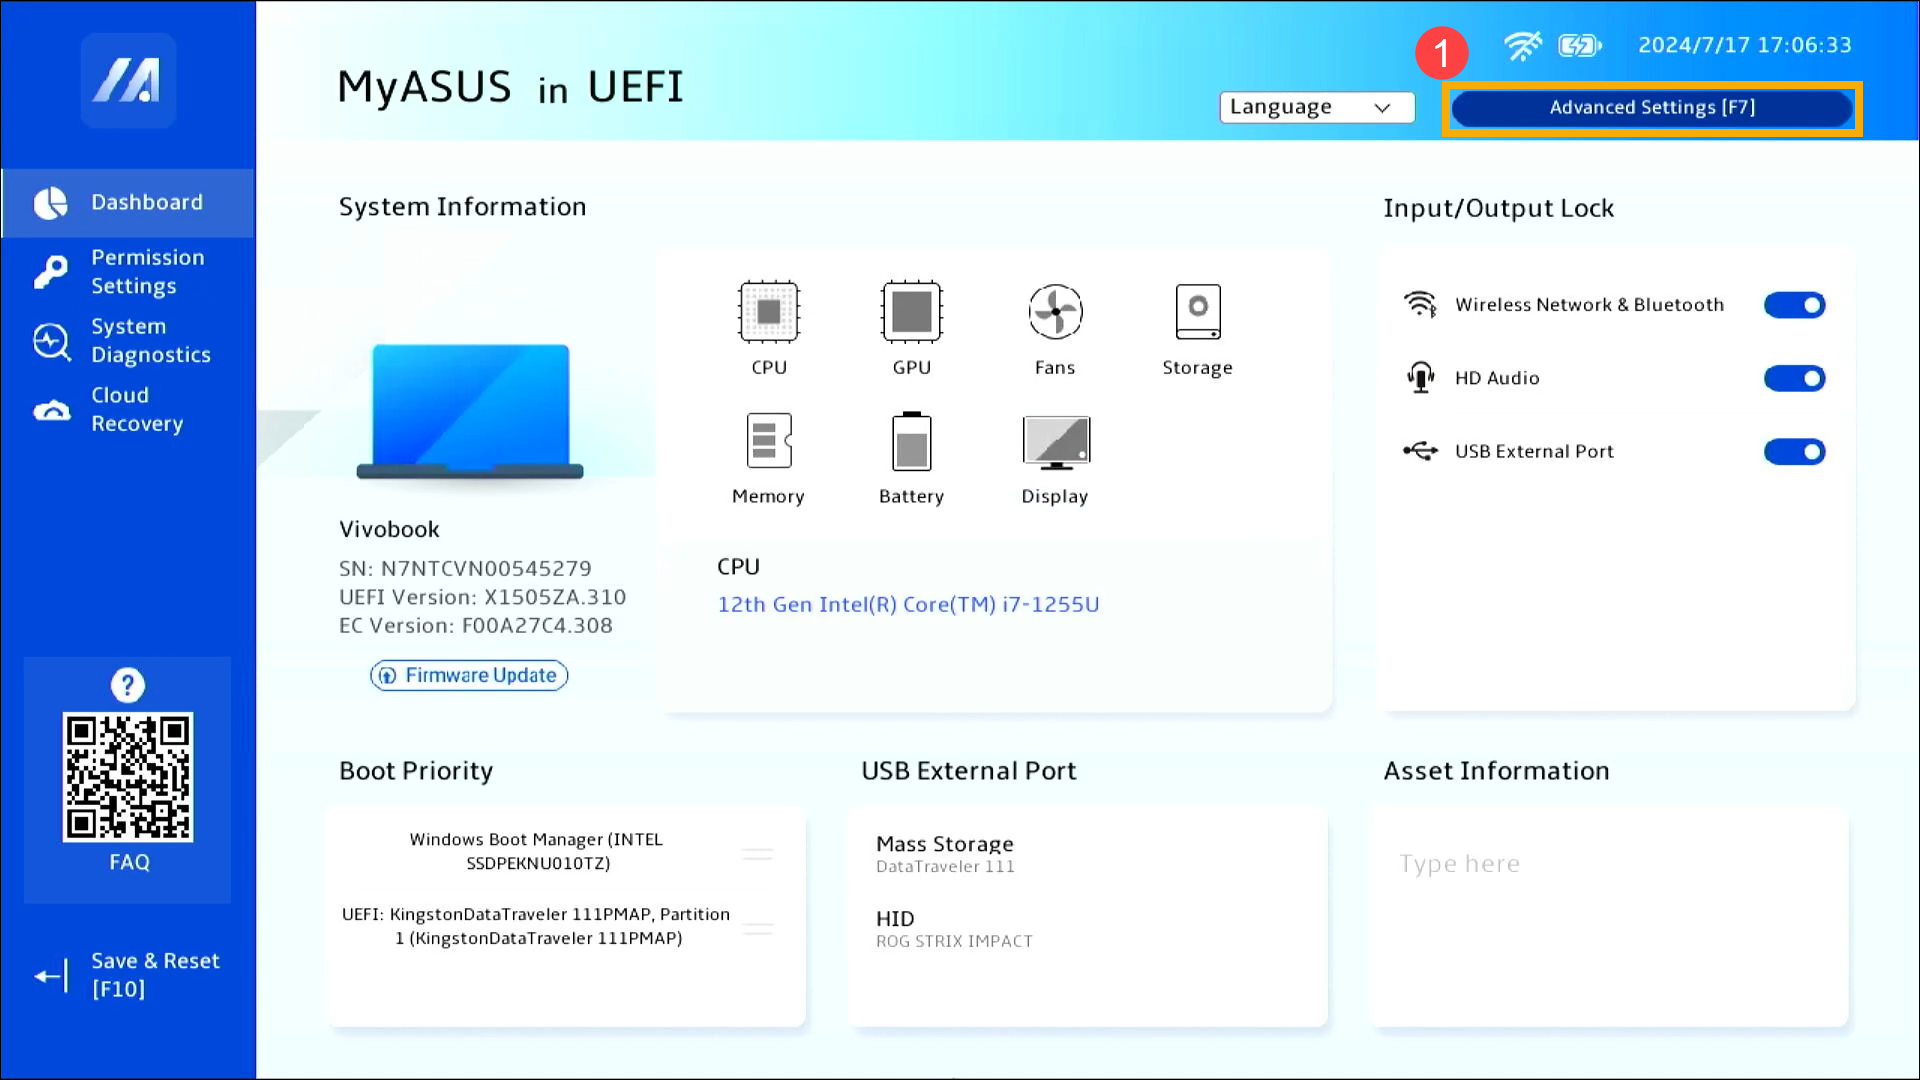
- In the BIOS configuration screen, press the [F7] key on your keyboard, or you can click on the [Advanced Settings]① option on the screen.
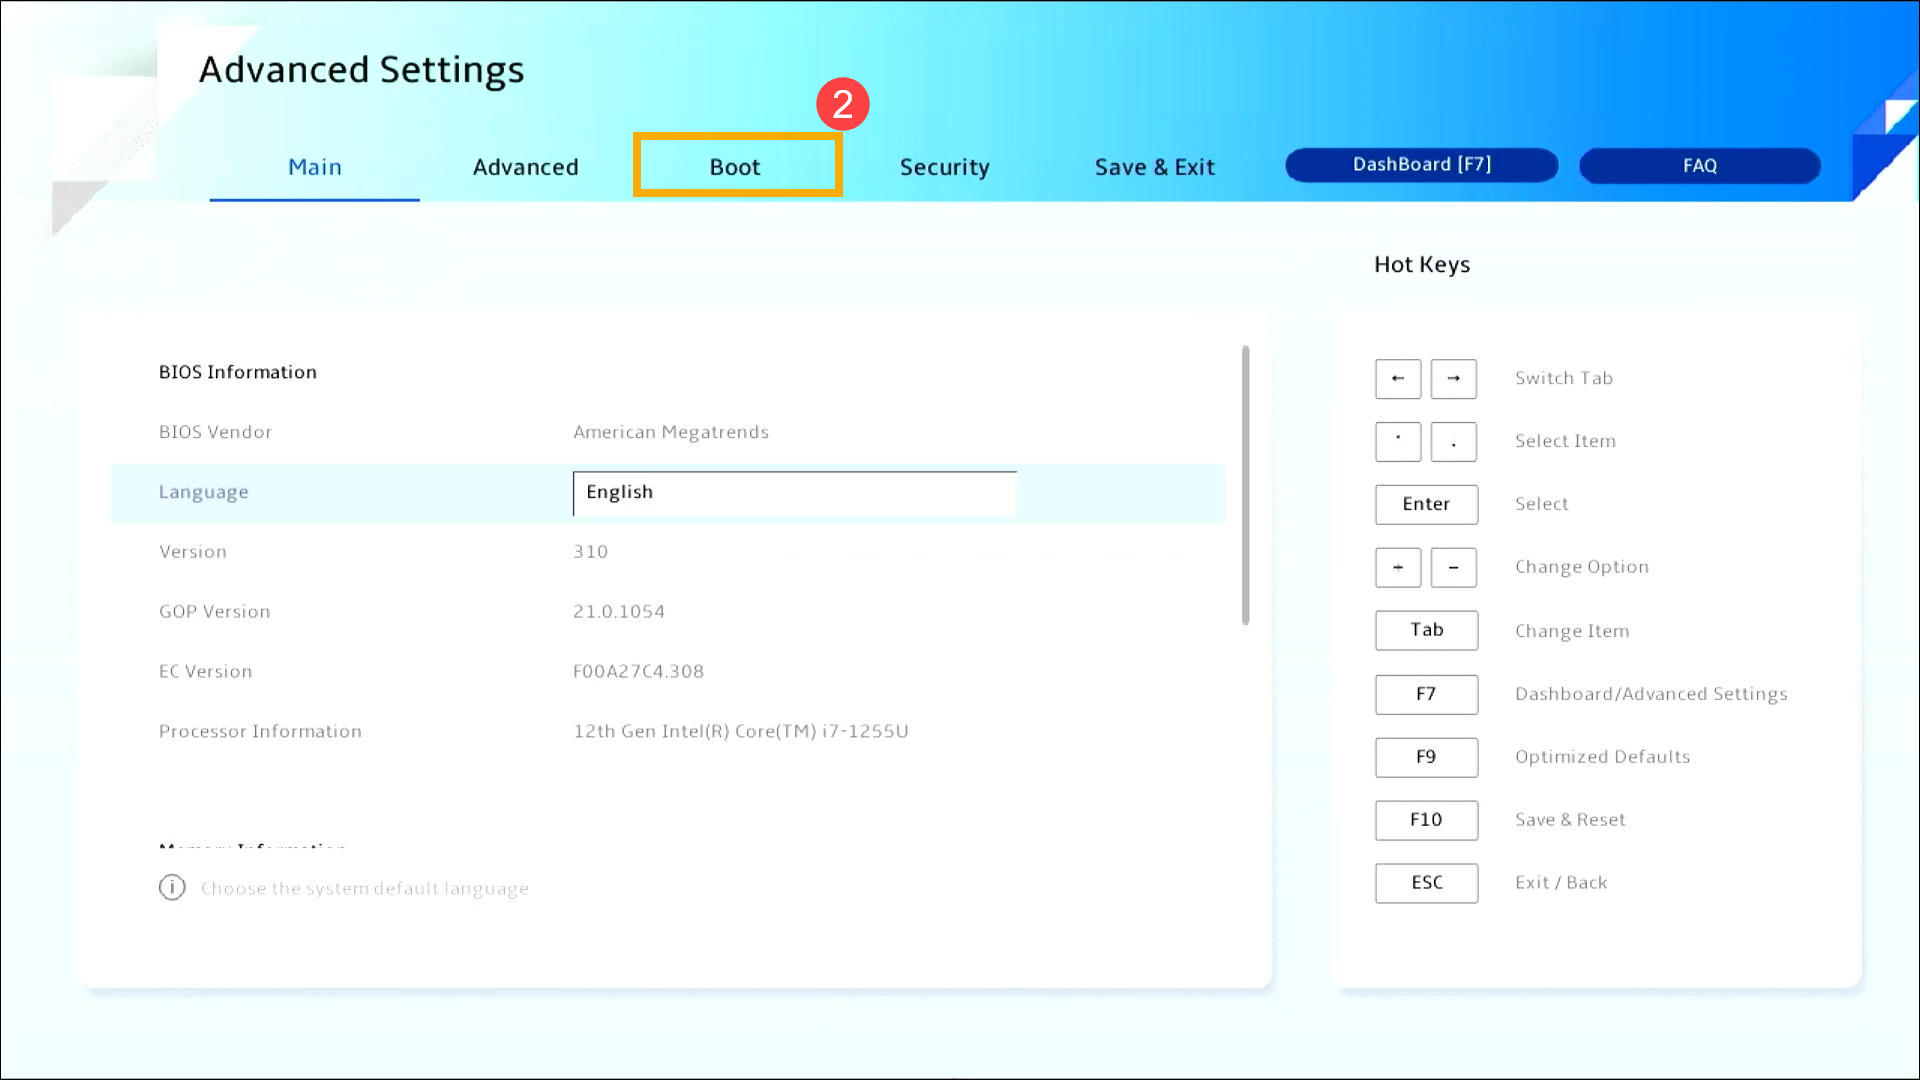
- In Advanced Settings, enter the [Boot] page②.
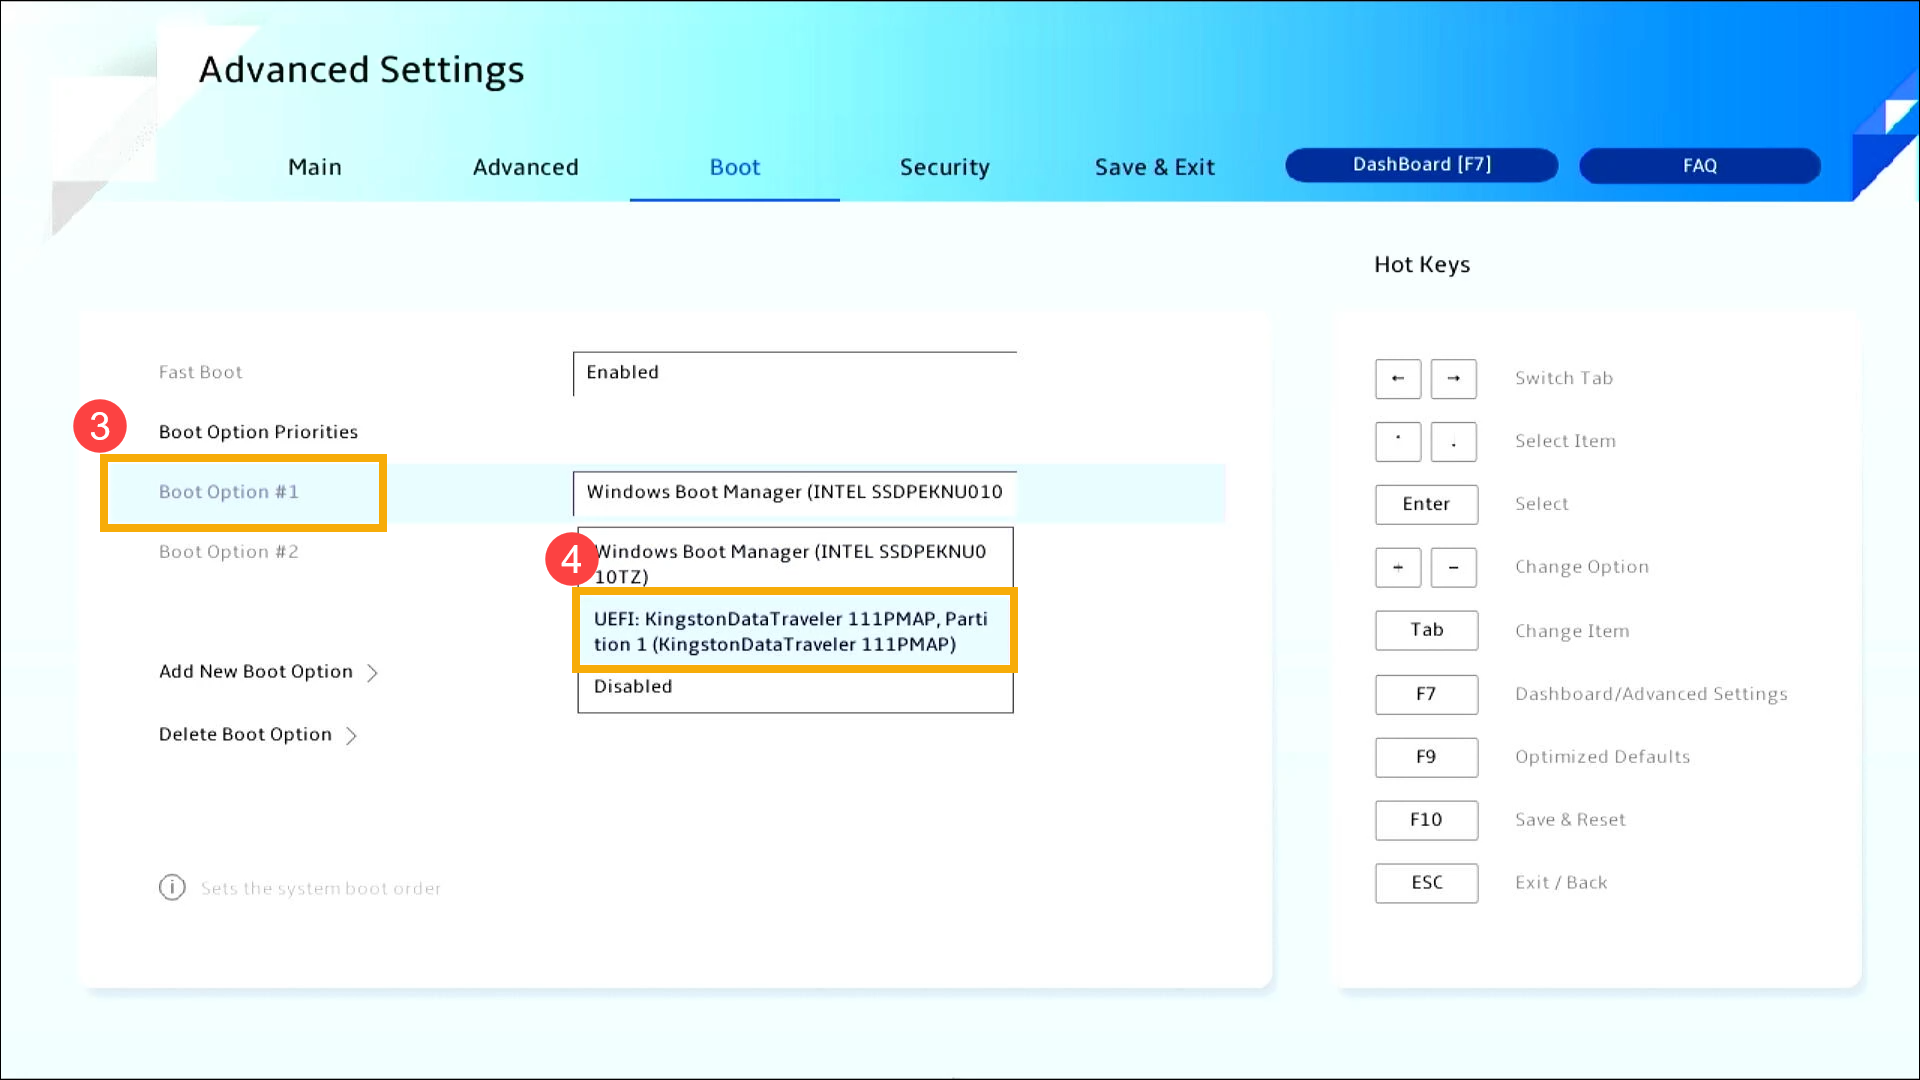
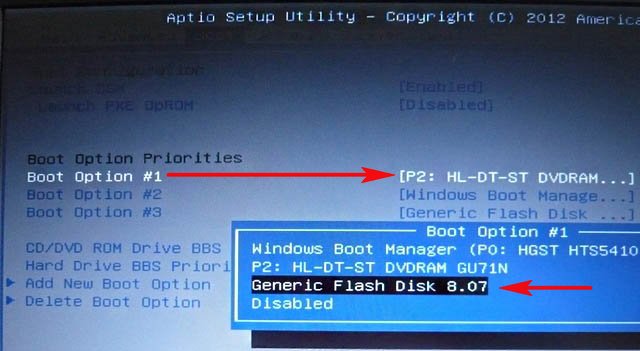
- In [Boot Option #1]③, select the USB flash drive or CD-ROM you want to use④.
If the USB flash drive or CD-ROM you want to use does not appear in the Boot Menu, first refer to How to Adjust the Relevant Settings to Change Boot Options.
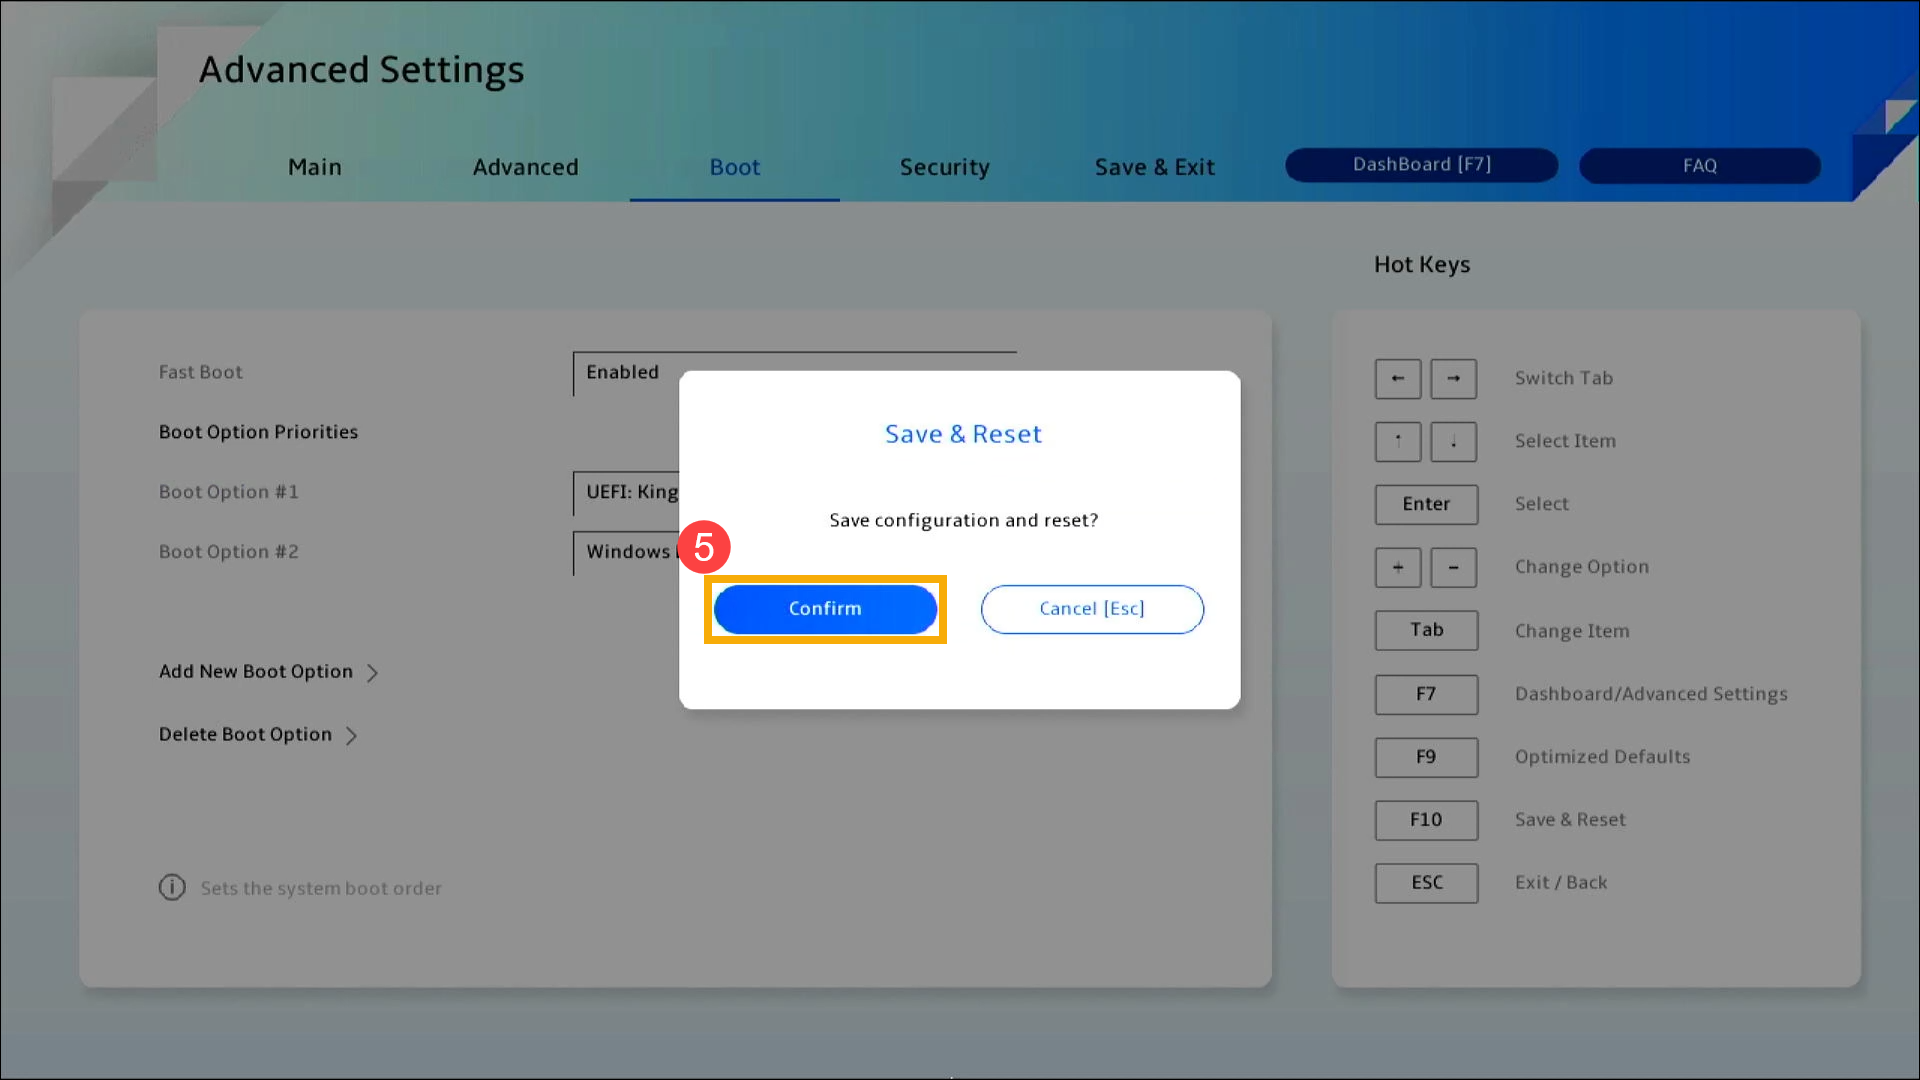
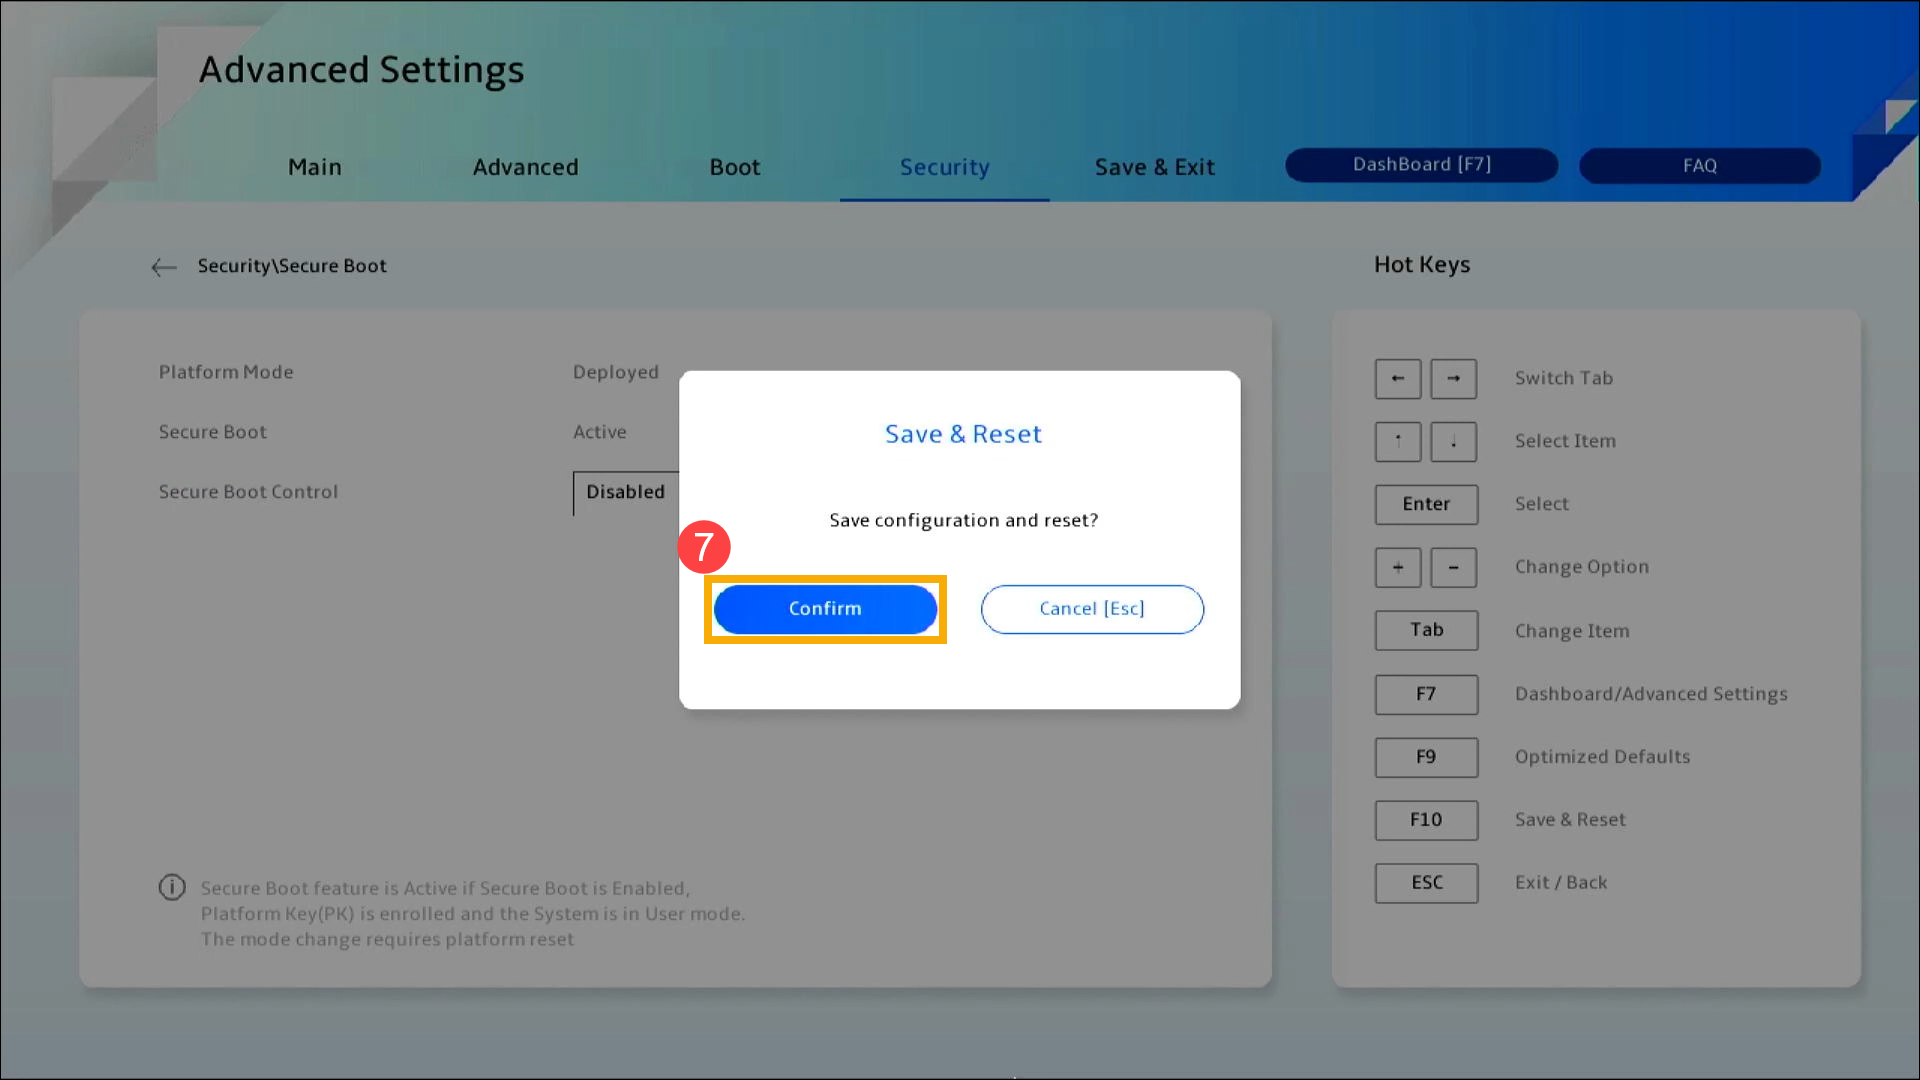
- Save the settings and exit. Press the [F10] key on your keyboard, click [Confirm]⑤. The device will restart and boot from the selected USB flash drive or CD-ROM.
You can also go to the Save & Exit page and choose the Save Changes and Exit option to save your settings and exit.
How to Adjust the Relevant Settings to Change Boot Options
The settings may vary slightly for each model. If your BIOS configuration screen does not have one of the settings below, please skip it and continue with the following steps.
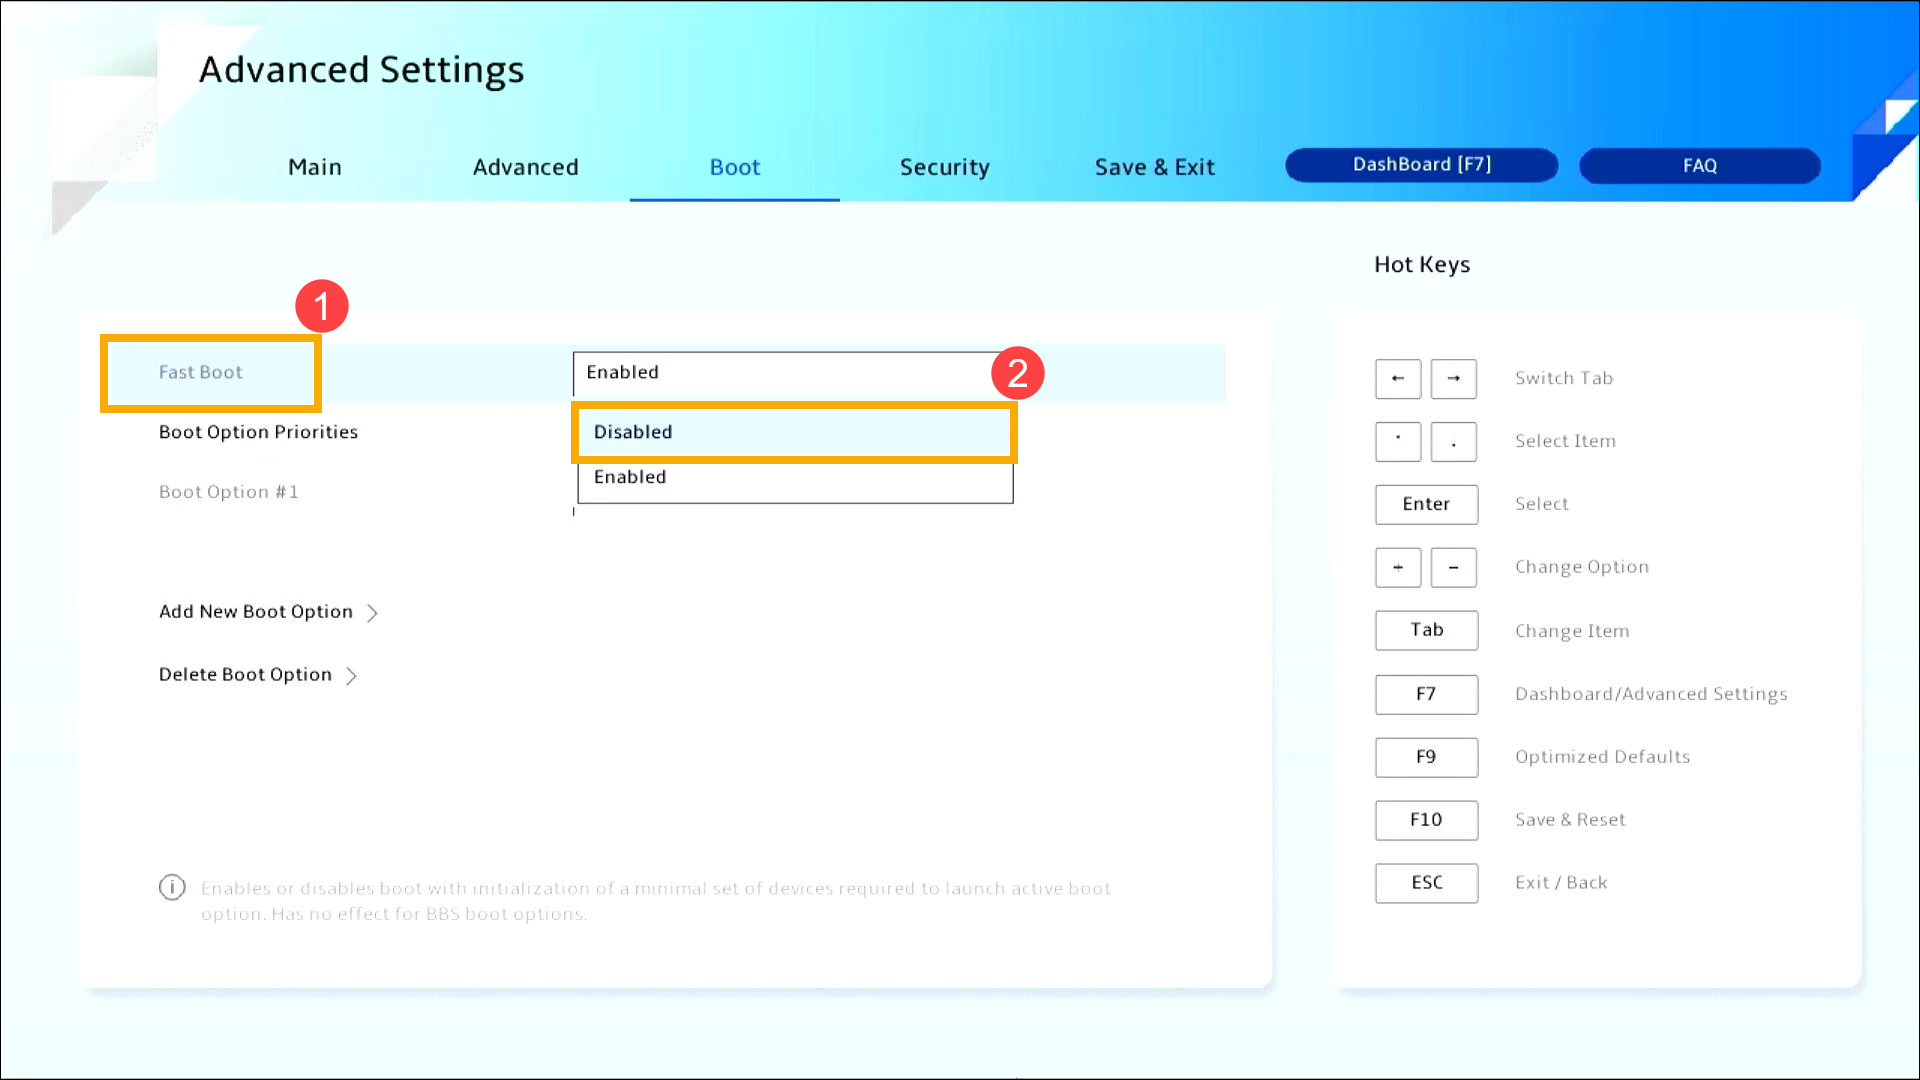
- In the Boot page, select [Fast Boot]①, and then choose [Disabled]②.
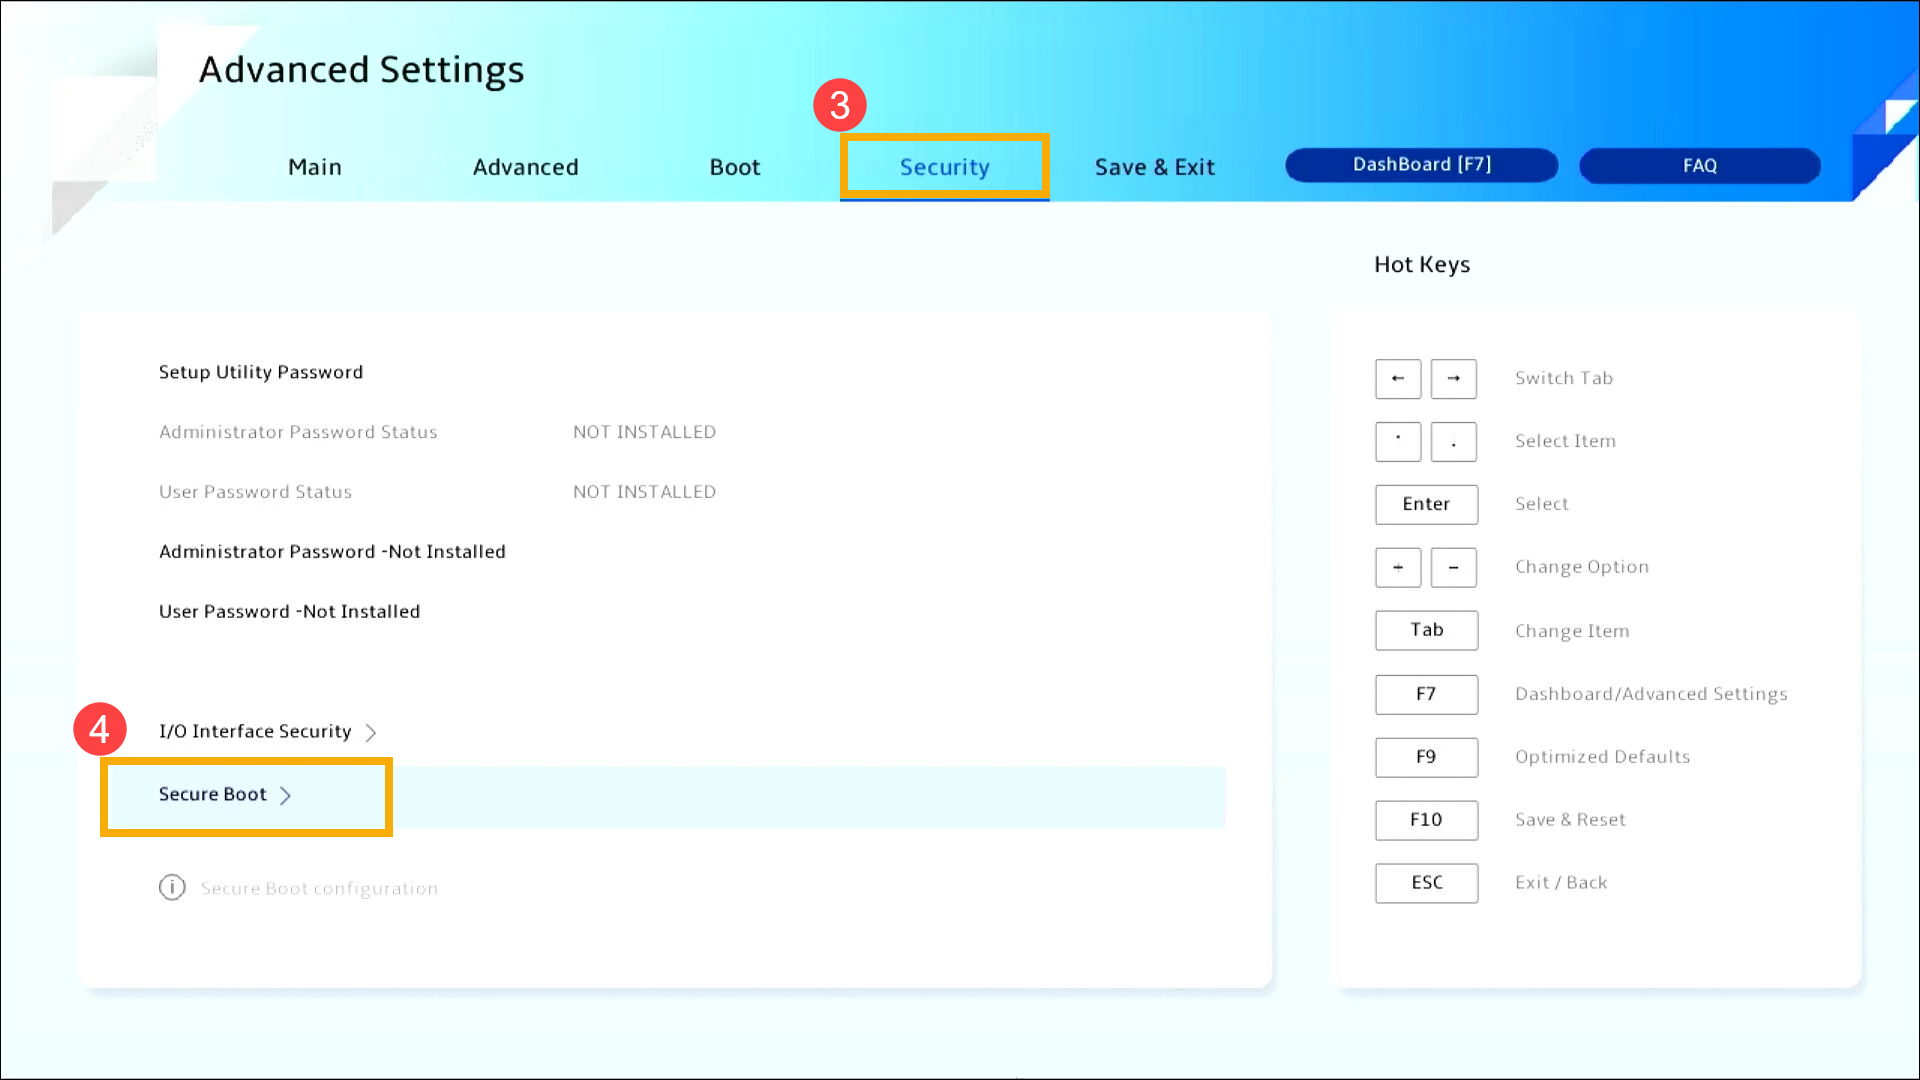
- Enter the [Security]③ screen, and then select [Secure Boot]④.
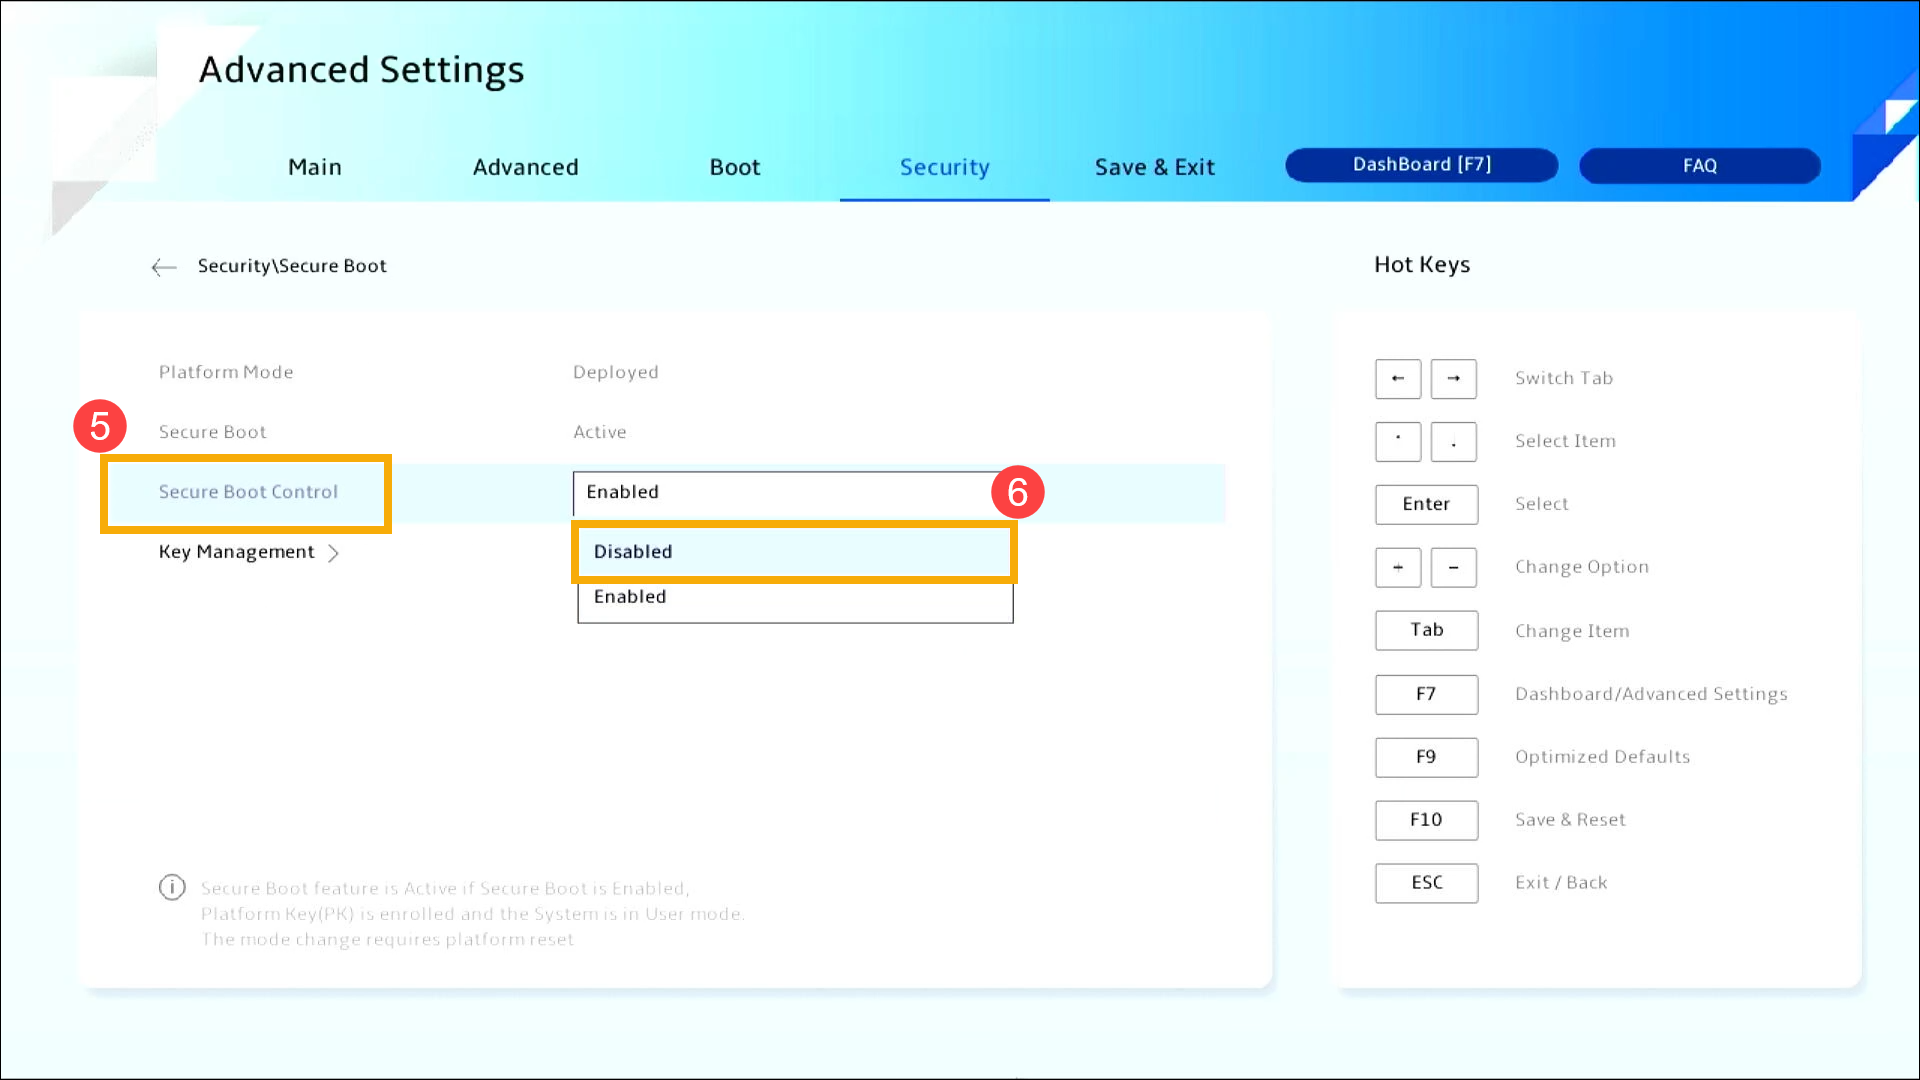
- After entering the Secure Boot screen, select [Secure Boot Control]⑤ and then select [Disabled]⑥.
- Save the settings and exit. Press the [F10] key on your keyboard, click [Confirm]⑦, and the device will restart and the settings will take effect.
You can also go to the ‘Save & Exit’ page and choose the ‘Save Changes and Exit’ option to save your settings and exit.
- After restarting, try booting from the USB flash drive or CD-ROM again.
Selecting the Boot Device on a Desktop Computer
Before booting the system from a USB flash drive or CD-ROM, please let your device enters the BIOS configuration first, here you can learn more about How to enter BIOS configuration. Upon entering the BIOS configuration screen, please refer to the following steps:
How to boot from USB flash drive/CD-ROM in the UEFI mode
In the UEFI interface, you can navigate and confirm using the Arrow Keys and Enter key on the keyboard, or Mouse.
Note: The BIOS configuration screen below may vary slightly depending on the model.
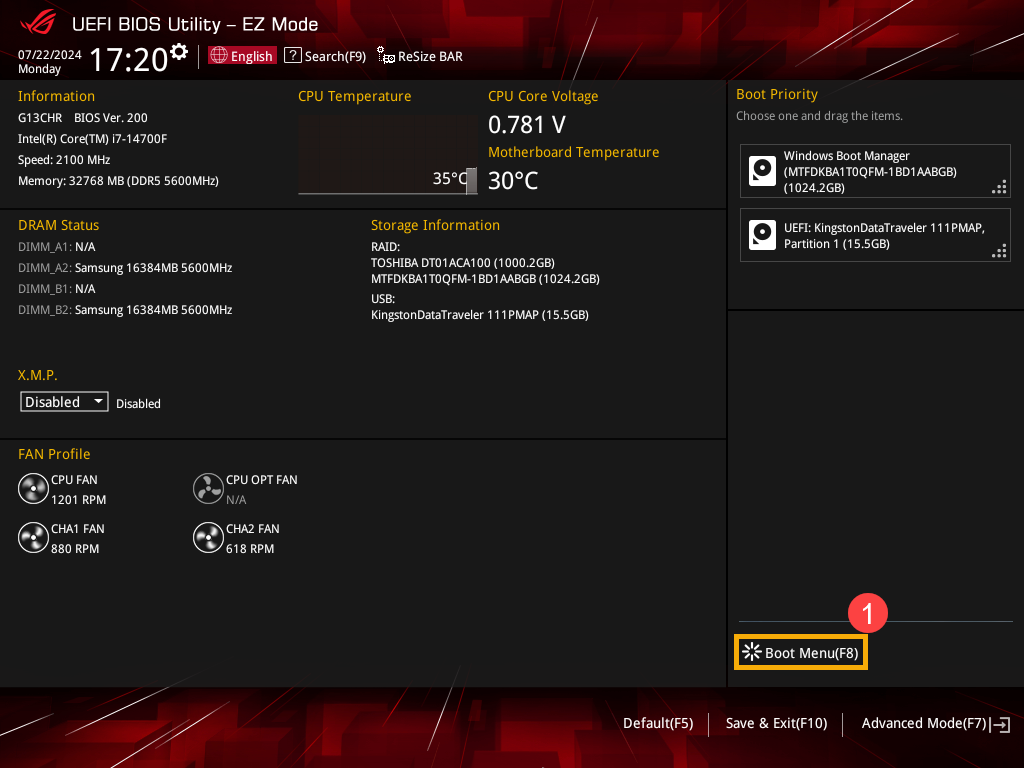
- After entering the BIOS configuration, press the [F8] key on your keyboard, or you can click on the [Boot Menu]① option on the screen.
- In the Boot Menu, select the USB flash drive or CD-ROM you wish to boot from②, then press the Enter key to boot from the selected USB or CD-ROM.
If the USB flash drive or CD-ROM you want to use does not appear in the Boot Menu, first refer to How to Adjust the Relevant Settings to Change Boot Options.
How to Adjust the Relevant Settings to Change Boot Options
The settings may vary slightly for each model. If your BIOS configuration screen does not have one of the settings below, please skip it and continue with the following steps.
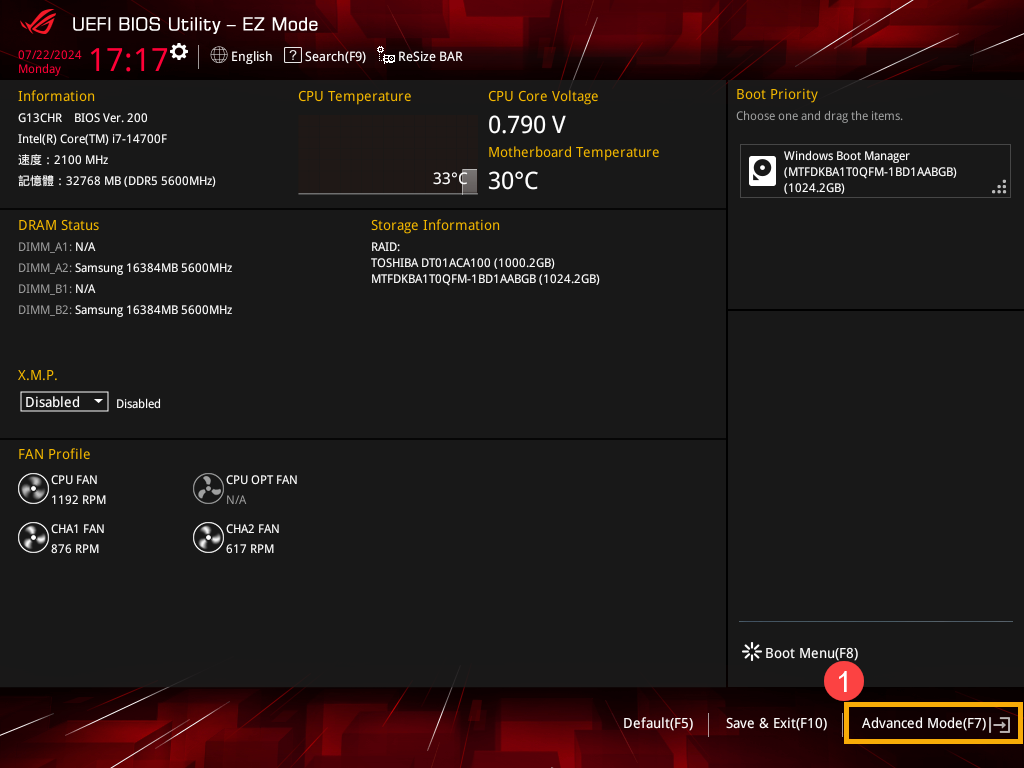
- In the BIOS configuration screen, press the [F7] key on your keyboard, or you can click on the [Advanced Mode]① option on the screen.
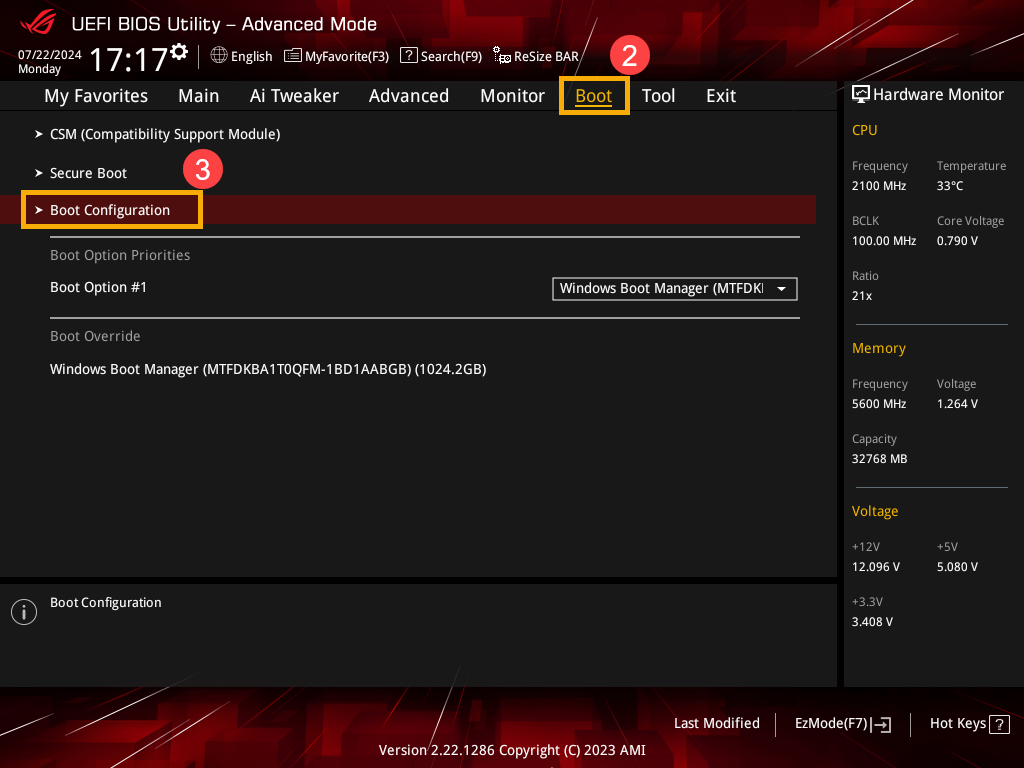
- Enter the [Boot]② screen, and then select [Boot Configuration]③.
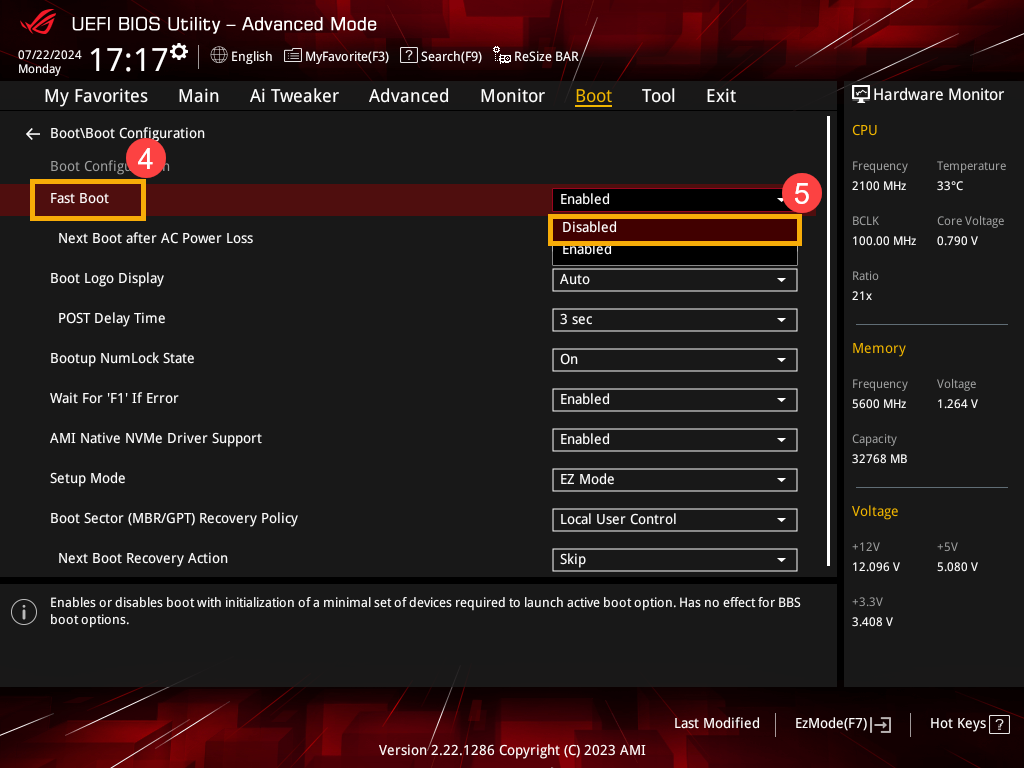
- Within the Boot Configuration page, select [Fast Boot]④ and then choose [Disabled]⑤.
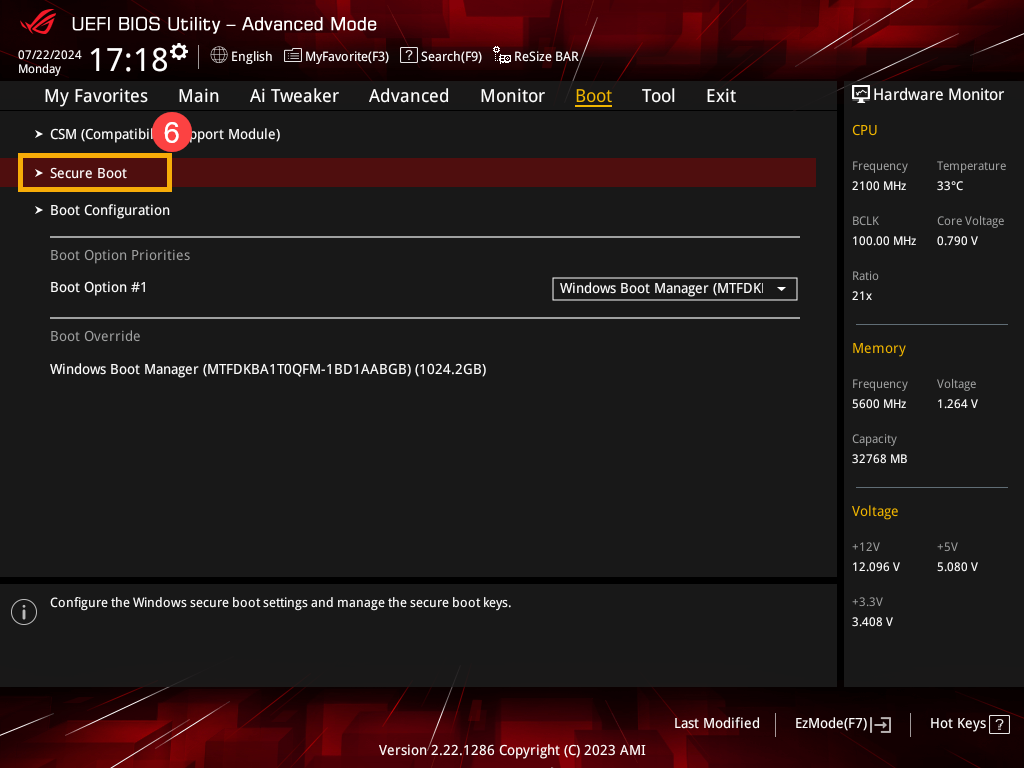
- Go back to the Boot screen and select [Secure Boot]⑥.
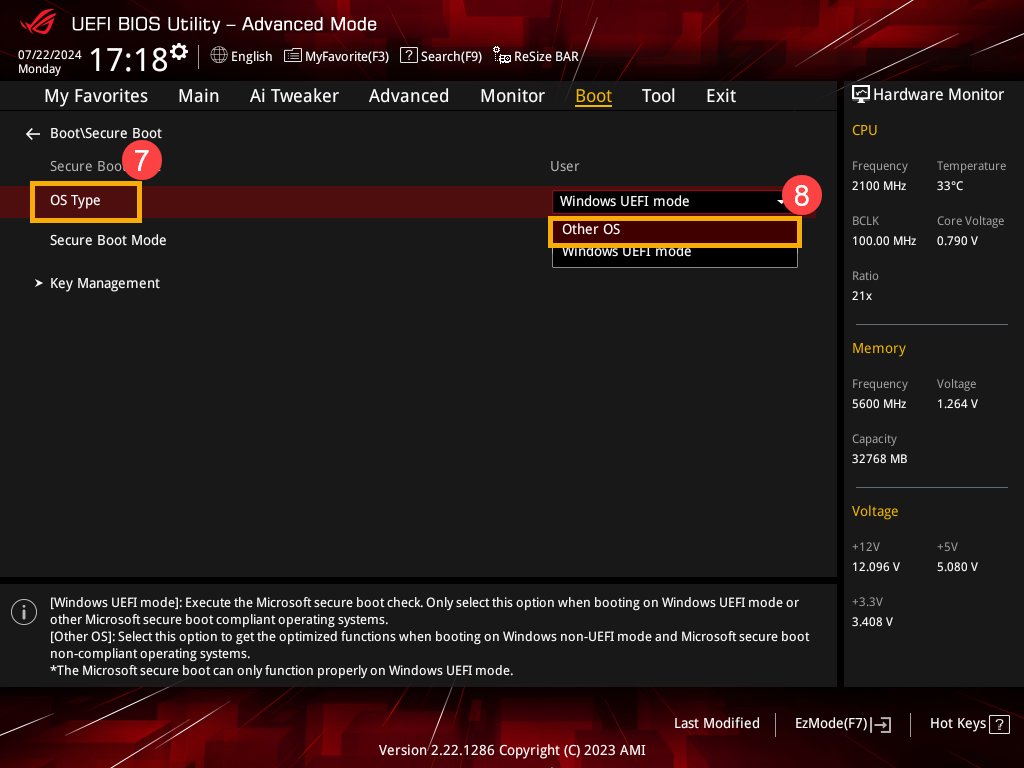
- After entering the Secure Boot screen, select [OS Type]⑦ and then select [Other OS]⑧.
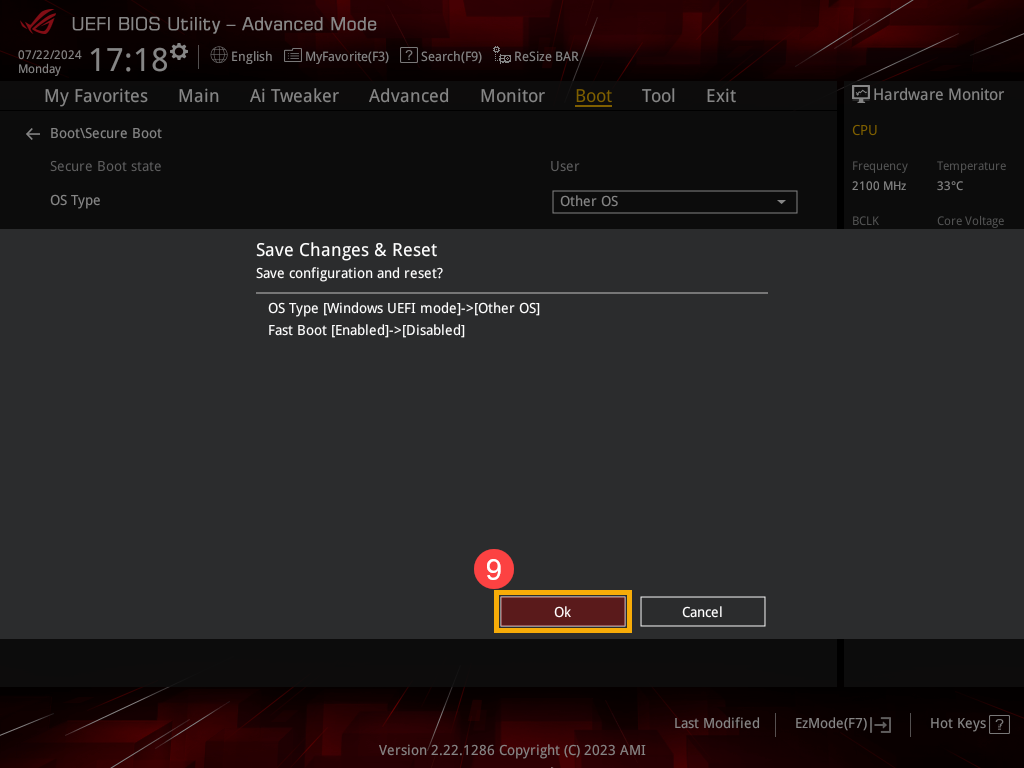
- Save the settings and exit. Press the [F10] key on your keyboard, click [Ok]⑨, and the device will restart and the settings will take effect.
You can also go to the ‘Exit’ page and choose the ‘Save Changes and Exit’ option to save your settings and exit.
- After restarting, try booting from the USB flash drive or CD-ROM again.
Was this information helpful?
Yes
No
- Above information might be partly or entirely quoted from exterior websites or sources. please refer to the information based on the source that we noted. Please directly contact or inquire the sources if there is any further question and note that ASUS is neither relevant nor responsible for its content/service
- This information may not suitable for all the products from the same category/series. Some of the screen shots and operations could be different from the software versions.
- ASUS provides the above information for reference only. If you have any questions about the content, please contact the above product vendor directly. Please note that ASUS is not responsible for the content or service provided by the above product vendor.
- Brand and product names mentioned are trademarks of their respective companies.
Данная инструкция поможет загрузиться с флешки или DVD для установки Windows владельцам материнских плат ASUS с AMI BIOS. В примере рассмотрена плата P5QC выпускавшаяся 2008-2009 году. Последний раз BIOS для неё обновлялся в 2009 году. Насколько я помню 2010 год был последним когда ASUS делал платы с AMI BIOS. Поколение процессоров Core i3/i5/i7 уже требовало UEFI.
Некоторые материнские платы с BIOS позволяли на себя установить 16Gb ОЗУ и поэтому на них можно поставить Windows 10. Поэтому инструкция всё ещё актуальна.
Для тех кто не хочет тратить своё дорогое время на изучение данного мануала предлагаем нашу платную помощь.
Загрузка с флешки или DVD через BIOS на плате ASUS
Вставляем флешку и перезагружаем компьютер. Как только увидим заставку с логотипом материнской платы нажимаем Del для того чтобы зайти в BIOS материнской платы. Заставка выглядит приблизительно так:

Дальше идём в меню Boot:

Нам надо настроить два пункта: Boot Device Priority и Hard Disk Drives.
В Boot Device Priority надо выбрать первым для загрузки любой жёсткий диск компьютера: P0-SPCC SSD170
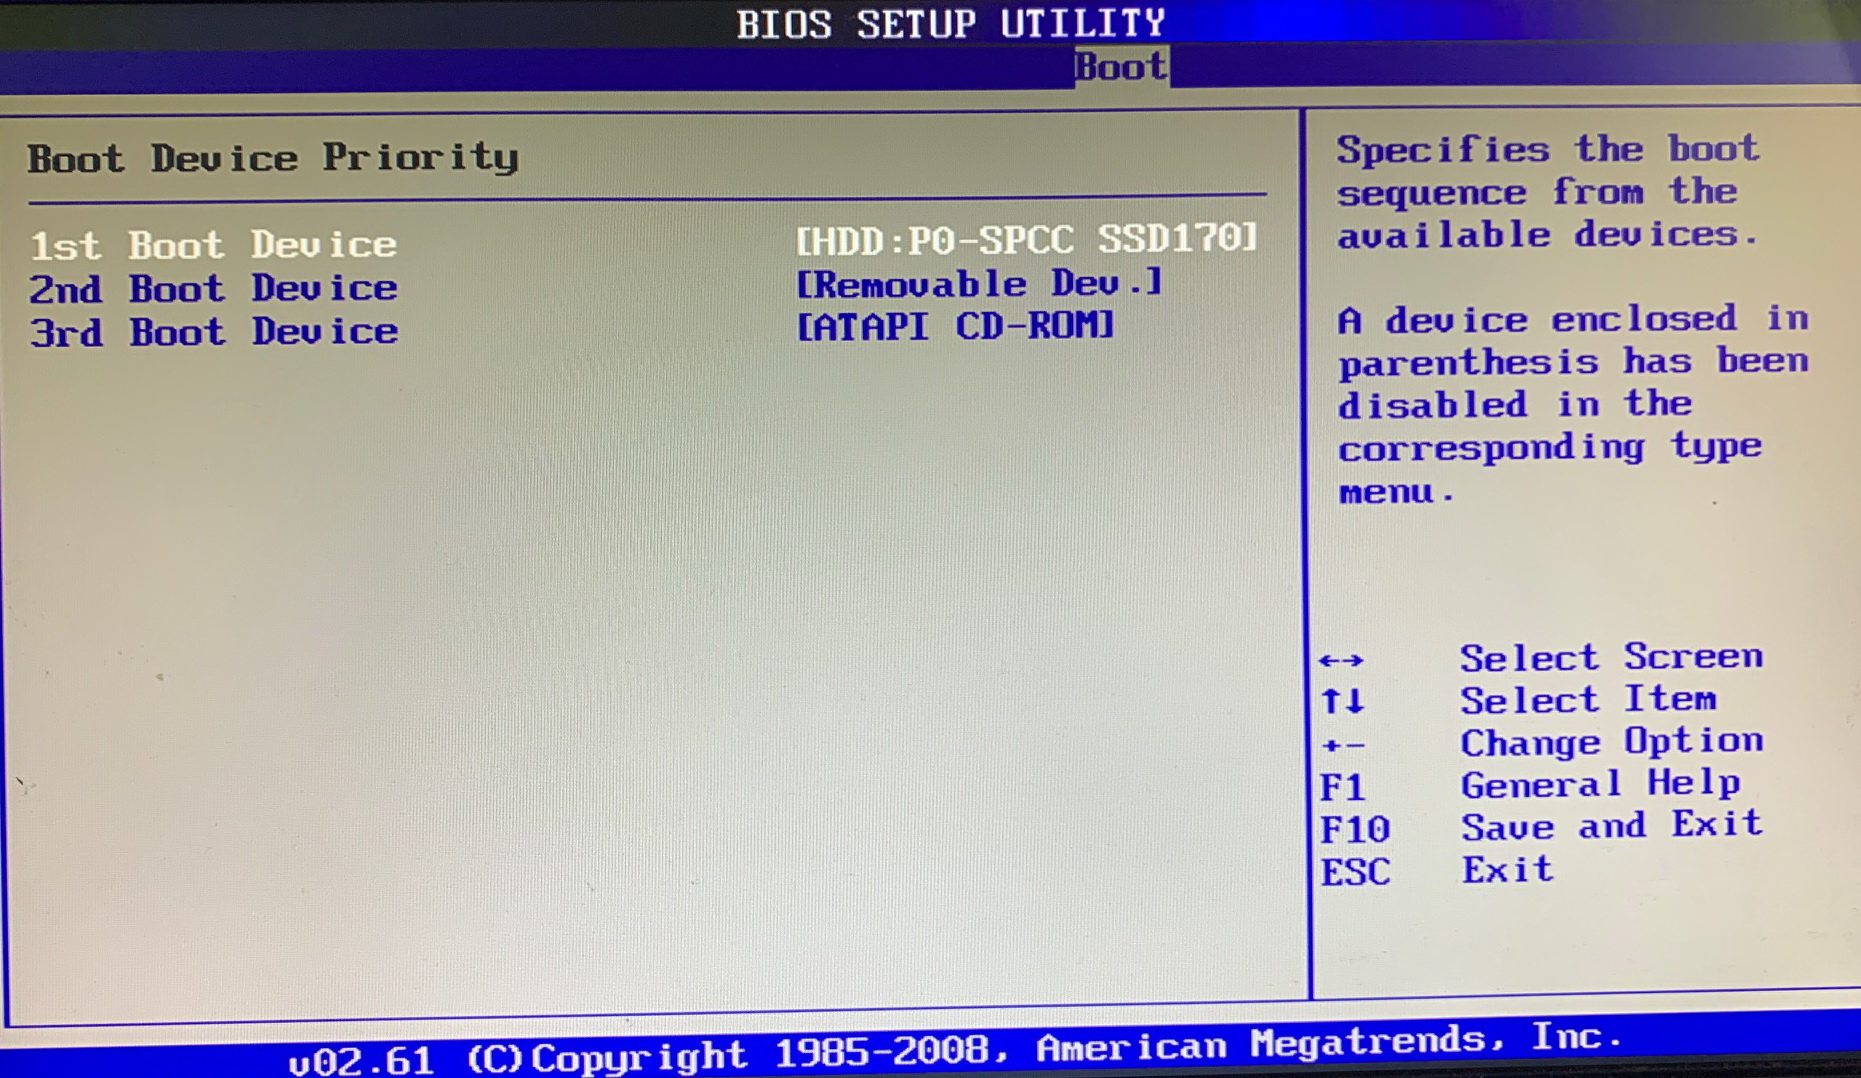
В Hard Disk Drives среди флешек найти нашу и сделать её загрузочной:

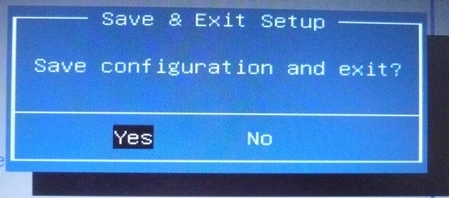
Устанавливаем первой в порядке загрузки Netac OnlyDisk. И всё можно нажимать F10 и подтверждать, что мы хоим сохранить настройки нажатием YES. Плата перезагрузится и начнёт загружаться с флешки.
Разовая загрузка с использованием меню в AMI BIOS на ASUS.
Во время той же заставки ASUS можно нажать F8 и попасть не в BIOS а в меню однократной загрузки, что гораздо удобнее для работ типа переустановка Windows.
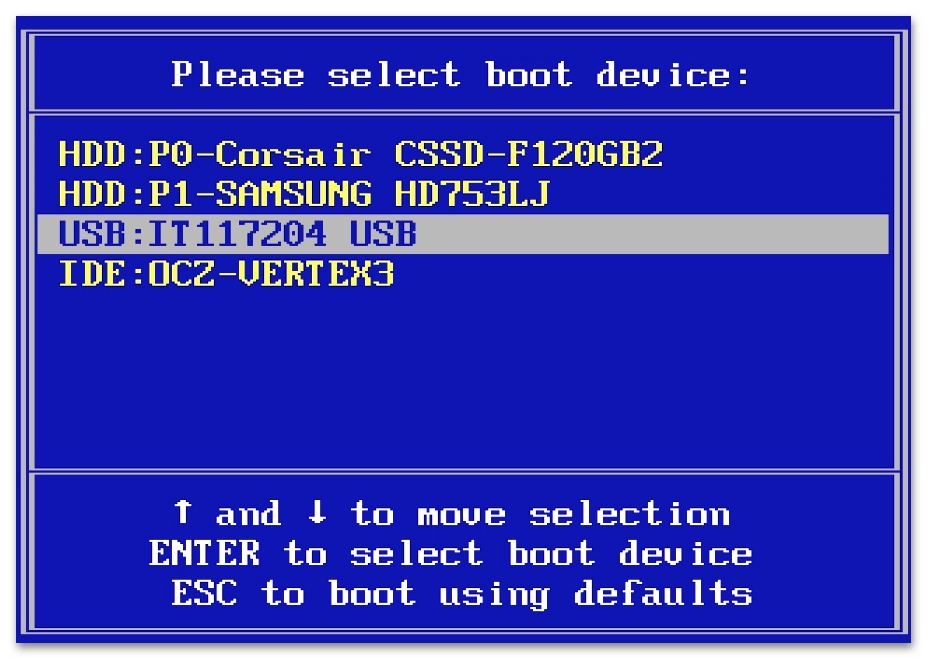
Меню разовой загрузки материнских плат с BIOS минималистично:

Выбираем нашу флешку для загрузки, нажимаем Enter и сразу грузимся. Всё гораздо проще.
Тем у кого не получилось предлагаем нашу платную помощь.
Для этого делаю всё как учили:
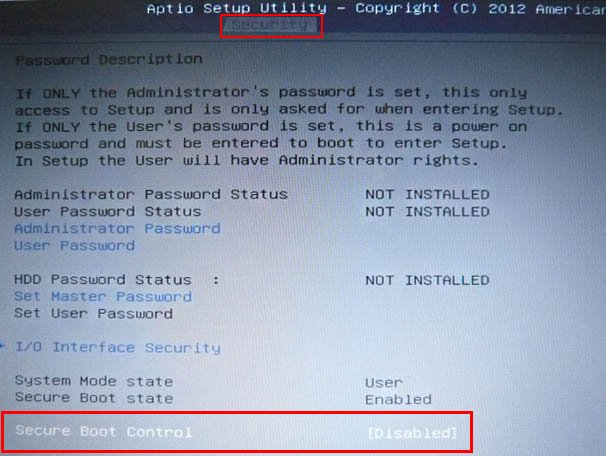
Захожу в БИОС и отключаю «Secure Boot», то есть иду во вкладку Security, в ней выставляю опцию «Secure Boot» в Disabled (отключено), затем иду во вкладку Boot, и выставляю опцию Fast Boot (быстрая загрузка) в Disabled (отключено), а вот опцию Launch CSM (Launch Compatibility Support Module) активация режима совместимости со старыми операционными системами включить не могу, так как опция не активна.
Или по другому. Пытаюсь войти в меню выбора устройства для загрузки ноутбука, в начальной фазе загрузки жму часто клавишу F9 и ничего не происходит, просто загружается Windows 8.
Как загрузить с флешки ноутбук ASUS
Привет друзья! Давайте все вместе загрузим ноутбук ASUS с флешки, уверяю Вам это не сложно и может пригодиться.
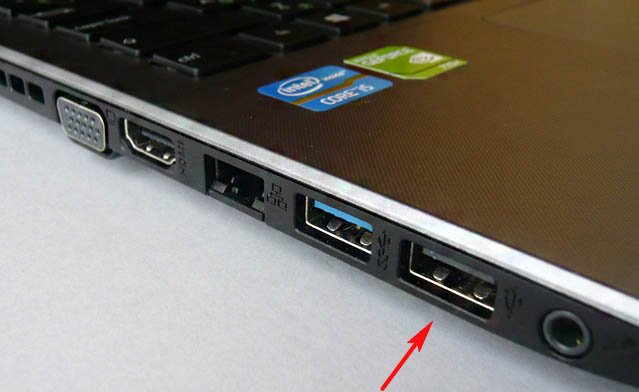
Первым делом подсоединяем нашу флешку к USB порту 2.0 (чёрного цвета), порт USB 3.0 (синего цвета), а в Windows 7 по умолчанию нет драйверов USB 3.0.
{banner_google1}
Перезагружаем ноутбук, в начальной фазе загрузки жмём часто на клавишу delete и входим в БИОС. Сначала отключаем протокол безопасной загрузки, идём во вкладку Security и выставляем опцию «Secure Boot» в Disabled (отключено),
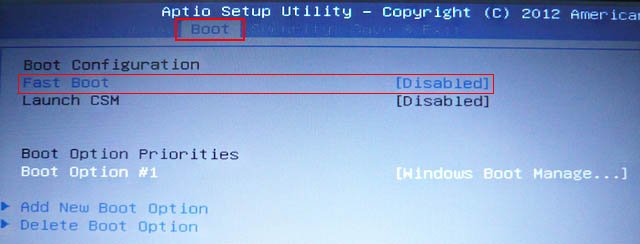
вторым делом во вкладке Boot выставляем опцию Fast Boot (быстрая загрузка) в Disabled (отключено),
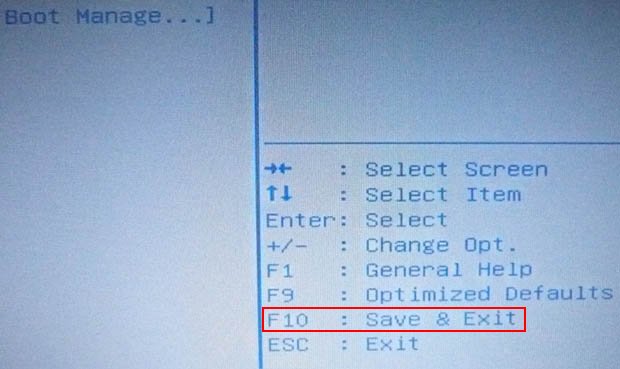
далее жмём на кнопку F10, этим мы сохраняем внесённые нами в БИОС ноутбука изменения и перезагружаемся.
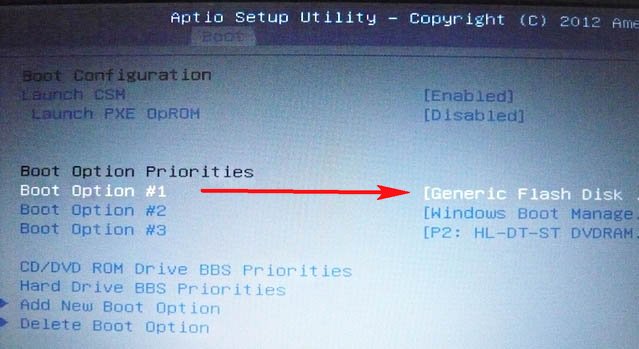
Опять входим в БИОС и идём во вкладку Boot и выставляем опцию Launch CSM в Enabled (расширенная загрузка),
затем спускаемся чуть ниже до опции Boot Option Prioritiesи Boot Option #1 и входим в неё нажав Enter, в появившемся меню с помощью стрелок на клавиатуре выбираем название нашей флешки и жмём Enter.
Жмём на кнопку F10, то есть сохраняем внесённые нами в БИОС ноутбука изменения и перезагружаемся,
далее происходит загрузка ноутбука ASUS с флешки.
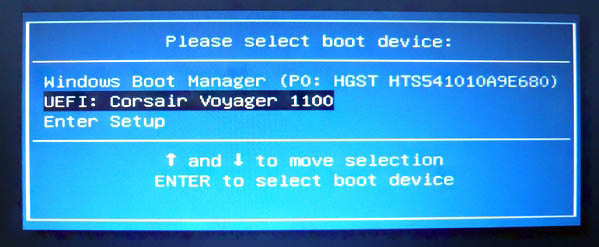
Ещё вы можете использовать загрузочное меню ноутбука Asus. В начальной фазе загрузки ноутбука часто жмите клавишу Esc, попадёте в загрузочное меню, с помощью стрелок на клавиатуре выберите в нём вашу загрузочную флешку и нажмите Enter.
Все способы:
- Вход в Boot Menu на ASUS
- Отключение быстрого запуска
- Вопросы и ответы: 4
Boot Menu — это дополнительная опция BIOS или UEFI, позволяющая быстро выбрать подключенное к компьютеру или ноутбуку загрузочное устройство без необходимости изменения параметров загрузки в самом BIOS. Boot Menu может использоваться как для установки/переустановки ОС, так и для загрузки с LiveCD с набором программного обеспечения для обслуживания ПК.
Как и в случае входа в BIOS, для вызова загрузочного меню необходимо зажать и удерживать при включении компьютера функциональные аппаратные клавиши. Чтобы войти в Boot Menu на ноутбуках и десктопных компьютерах ASUS, выполните следующее:
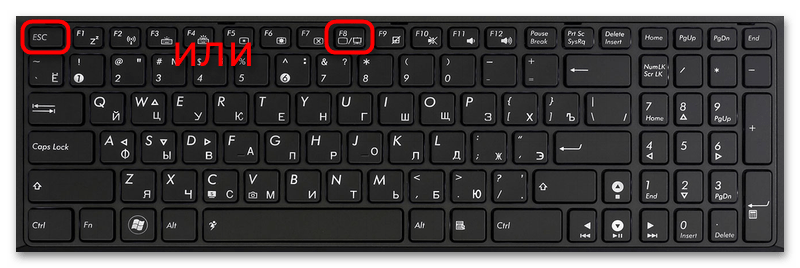
- Подключите к выключенному ноутбуку устройство, с которого хотите загрузиться. Включите ноутбук, одновременно с этим нажав и удерживая клавишу Esc.
- Если у вас ноутбук серии «X» или «K», например ASUS K501UQ, вместо Esc нужно использовать клавишу F8. Впрочем, в некоторых моделях серии «X» для входа в Boot Menu может использоваться клавиша Esc.
- Используя клавиши-стрелки, выберите в появившемся на экране меню внешнее устройство и нажмите Enter.
Отключение быстрого запуска
В Windows 8.1 и 10 входу в Boot Menu может препятствовать активная функция «Быстрый запуск», использующая возможности гибернации и предназначенная для ускорения загрузки операционной системы. Если «Быстрый запуск» включен, вы можете не успеть нажать соответствующую клавишу при включении ноутбука, поэтому данную функцию лучше отключить.
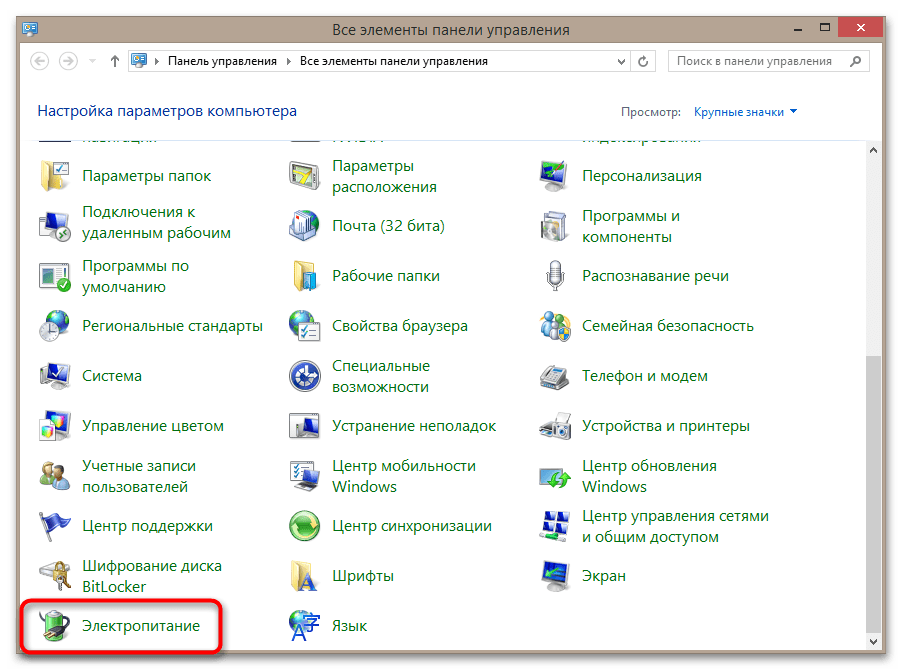
- Откройте классическую «Панель управления» и выберите в ней апплет «Электропитание».
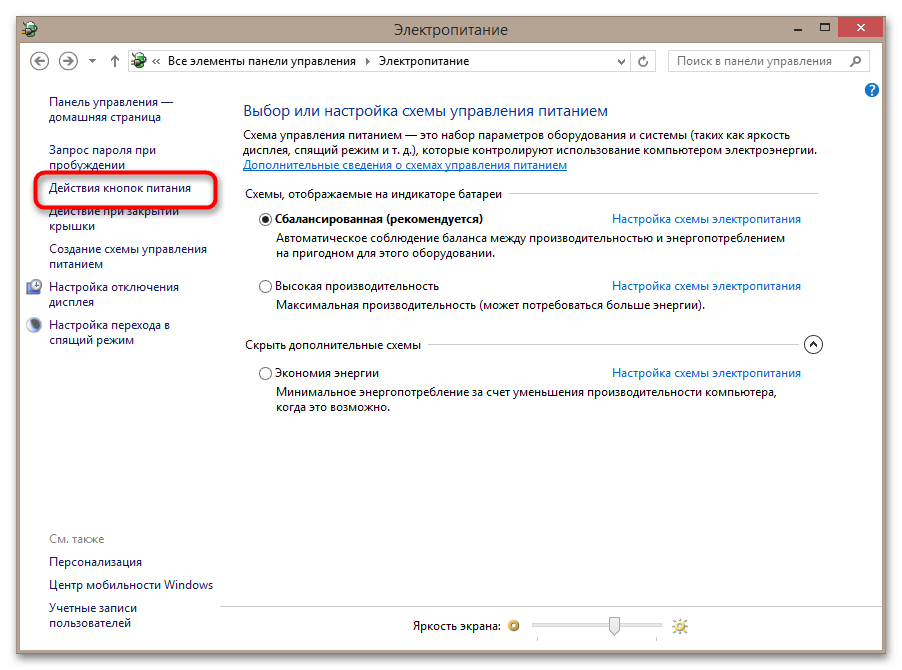
- Слева в меню нажмите ссылку «Действие кнопок питания».
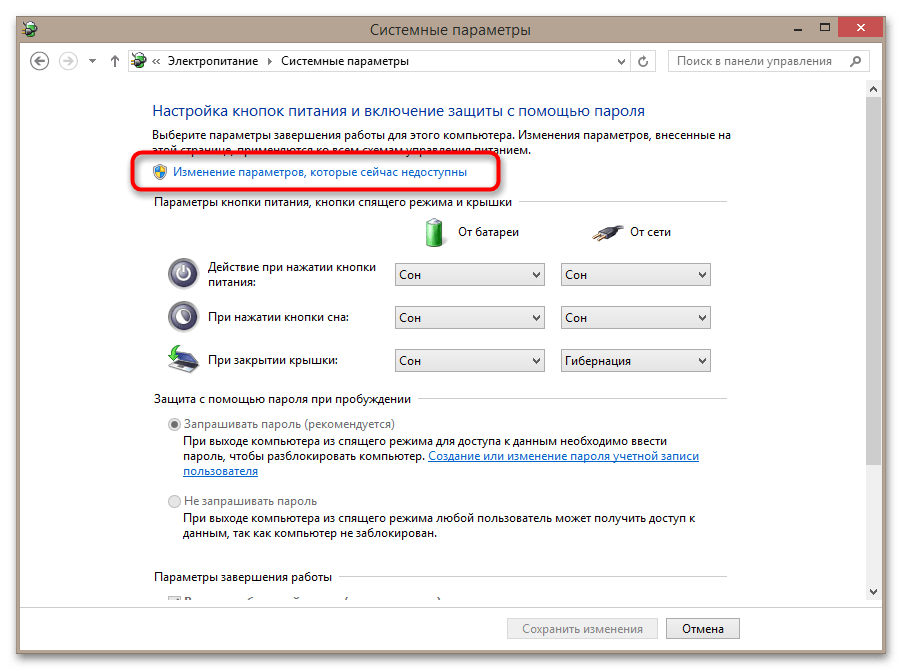
- В следующем окне системных параметров нажмите по ссылке «Изменение параметров, которые сейчас недоступны».
- В блоке «Параметры завершения работы» снимите флажок с пункта «Включить быстрый запуск (рекомендуется)» и сохраните изменения.
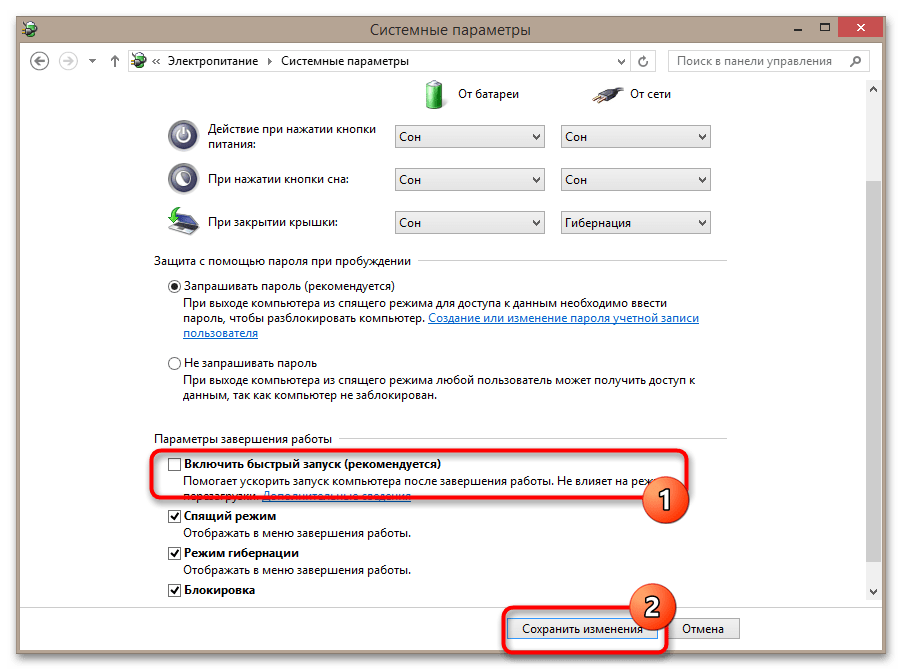
После отключения функции Windows станет загружаться в обычном режиме, не препятствуя вызову загрузочного меню.
Наша группа в TelegramПолезные советы и помощь