
Microsoft is trying to force everybody to update from the old NT4 domain system to the “new” (as in “was new >10 years ago”) Active Directory system. While that’s probably a good idea for most people there are some like me stuck with a working Samba installation that for some reason needs to continue to use NT4 domains.
Getting a Windows computer to join such a domain has become more difficult with Windows 10. Here is what needs to be done (I write this mostly so I can look it up myself):
- Make sure your samba server is configured to enforce the NT4 (SMB1) login. samba.conf must contain the following entry:
[global]
// other entries here
server max protocol = NT1
- Install the SMB1 protocol on the Windows computer. This is done using the “Turn Windows Features on or off” dialog (just type this into the start menu). You need to set the check marks for two entries under “SMB 1.0/CIFS File share Support”:
- SMB 1.0/CIFS Client
- SMB 1.0/CIFS Server
I’m not 100% sure whether the latter is required. I haven’t tried it without.
- Add the following entries to the registry:
Windows Registry Editor Version 5.00

[HKEY_LOCAL_MACHINE\System\CurrentControlSet\Services\LanManWorkstation\Parameters]
"DomainCompatibilityMode"=dword:00000001
"DNSNameResolutionRequired"=dword:00000000
You can either add them manually or copy the above to the .reg file and import that into the registry.
- Reboot the computer to activate these changes.
Now it should be possible to join the Windows 10 computer to the Samba Domain.
Source: Required Settings for Samba NT4 Domains on the Samba Wiki.
Published
В рамках программы импортозамещения и перехода на Российское или открытое ПО, данная риторика в последнее время звучит всё чаще и чаще, не за горами и меня могут попросить реализовать в компании нечто подобное. Поэтому немного проштудировав интернет понял для себя, что в этом вопросе всё печально и придётся долго и упорно импровизировать прежде чем добьюсь успеха.
Итак в этой статье мы рассмотрим вопрос и действительно рабочую схему миграции инфраструктуры Active Directory с Windows 2022 Server на Samba 4.15.13 под управлением Ubuntu Server 22.04 LTS. Начнём с того, что подниму контроллер домена на Windows server 2022 с демонстрацией режимов работы Леса и Домена, изменю групповые политики связанные с паролями. Введу в домен компьютер с Windows 10, подготовлю и настрою Samba в роли второго контроллера домена на Ubuntu Server 22.04LTS. Также подниму второй контроллер домена на Samba, Выполним перенос ролей FSMO, выведем из работы Windows Server 2022. Заключительным этапом будет настройка автоматизированного бэкапа Active Directory средствами Samba Tools.
Понятное дело, что статья это целый большой поэтапный проект, который будет дописываться по мере реализации, при этом я попробую варианты ввода в домен контроллера самба на разных режимах работы леса и домена и вам озвучу готовый работоспособный вариант.
Содержание
- Преследуемые цели
- Поднятие контроллера домена на Windows Server 2022
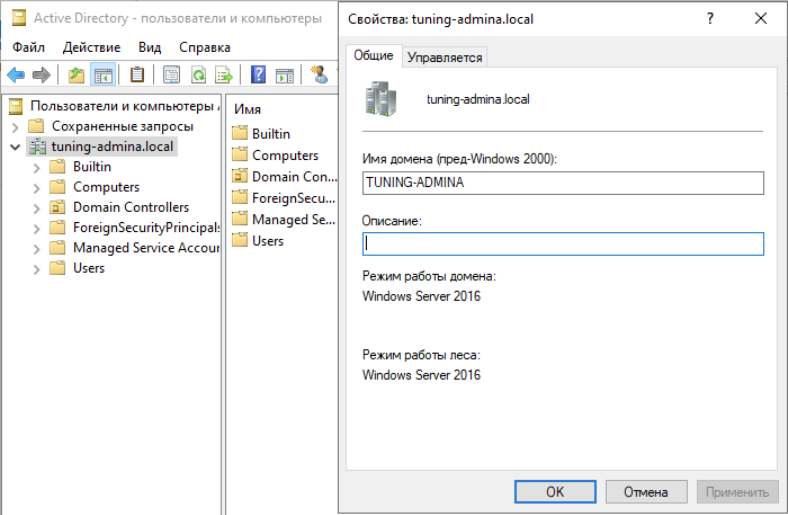
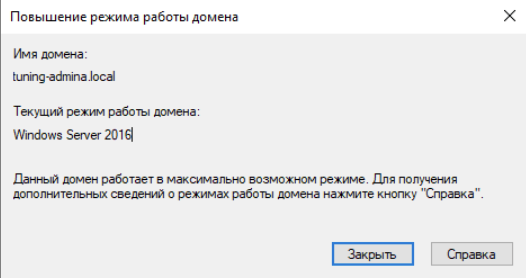
- Демонстрация режимов работы домена и леса
- Ввод в домен компьютер с Windows 10
- Установим средство для удаленного администрирования сервера RSAT для Windows 10
- Понижение режима работы леса и домена
- Настройка резервного контроллера домена
- Установка Samba и ввод в домен
- Перенос ролей FSMO на Samba
- Настраиваем второй контроллер домена
- Установка Samba и ввод в домен
- Понижение контроллера домена на Windows Server 2022
- Проверка работоспособности.
- Настройка бэкапа средствами Samba Tools
- Вывод
Преследуемые цели
Для нас с вами главной преследуемой целью является отточить свои навыки и умения в этом непростом вопросе, с каждым разом набираясь опыта и знаний для того, чтобы в любой момент мы могли без особых хлопот настроить Production вариант.
Поднятие контроллера домена на Windows Server 2022
Установку сервера описывать не буду, тот кто читает эту статью априори должен это уметь.
Dhcp сервер я настраивать не буду он у меня поднят на маршрутизаторе.
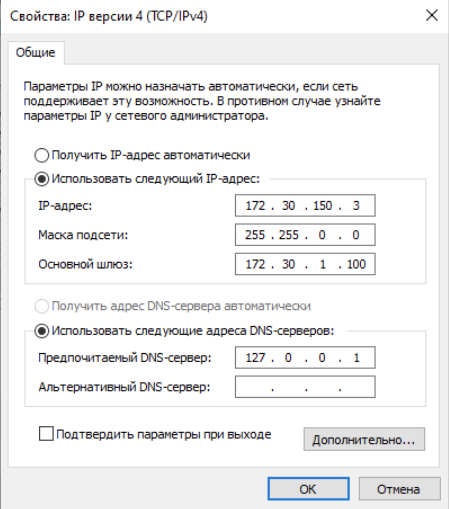
Настраиваем сетевые параметры:
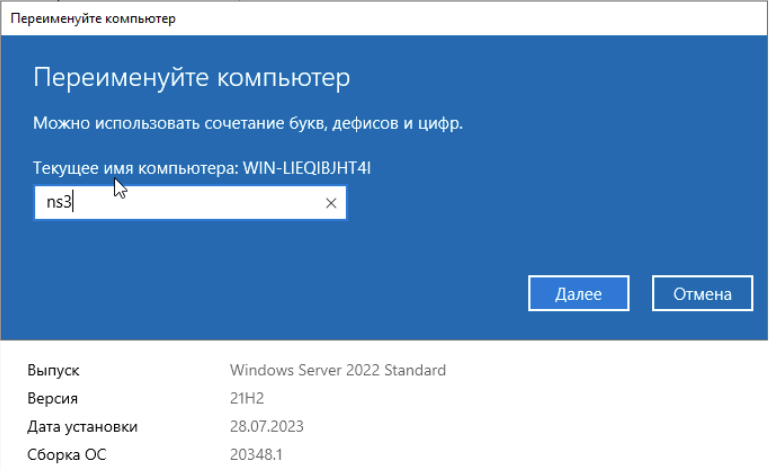
Имена у наших контроллеров будут такие:
ns3 //Windows Server 2022 — имя исходя из того, что он временный пациент.
ns1 //Ubuntu Server 22.04LTS
ns2 //Ubuntu Server 22.04LTS
Переименовываем наш сервер:
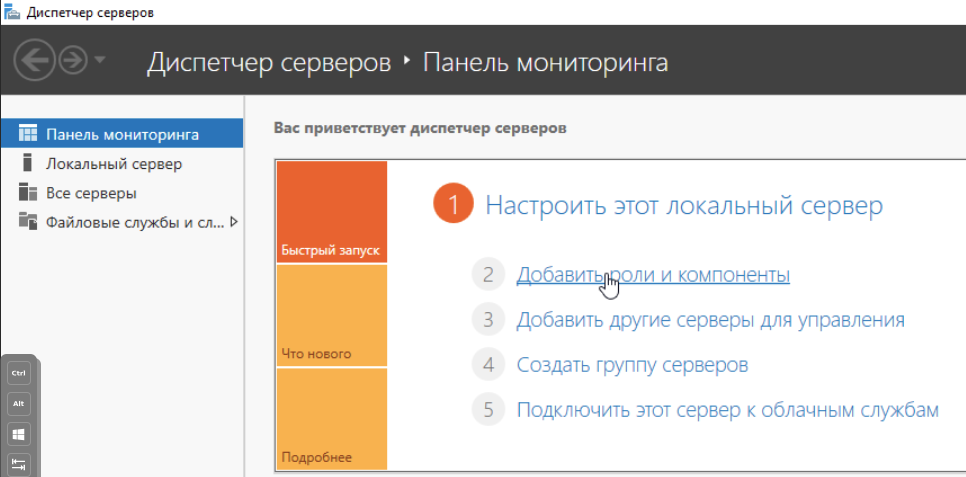
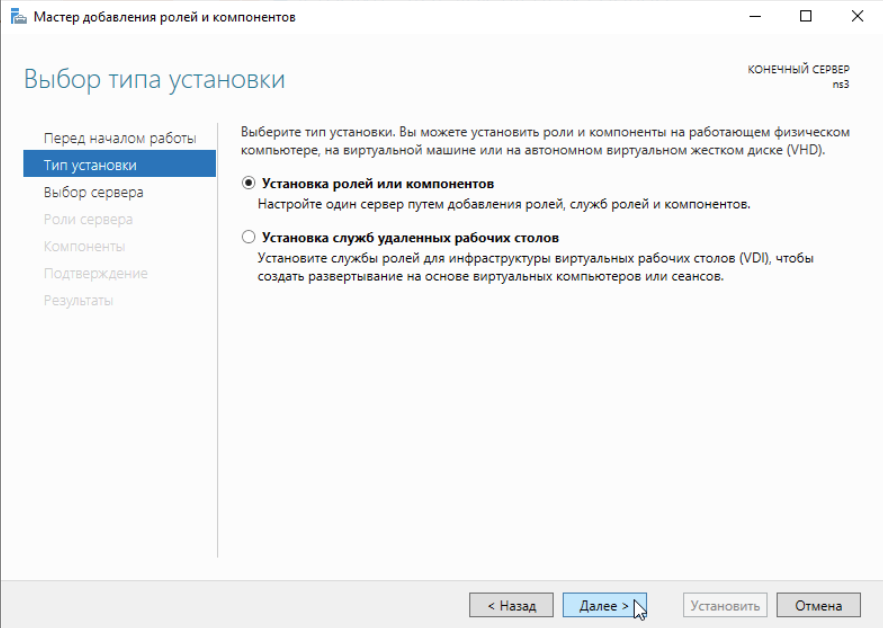
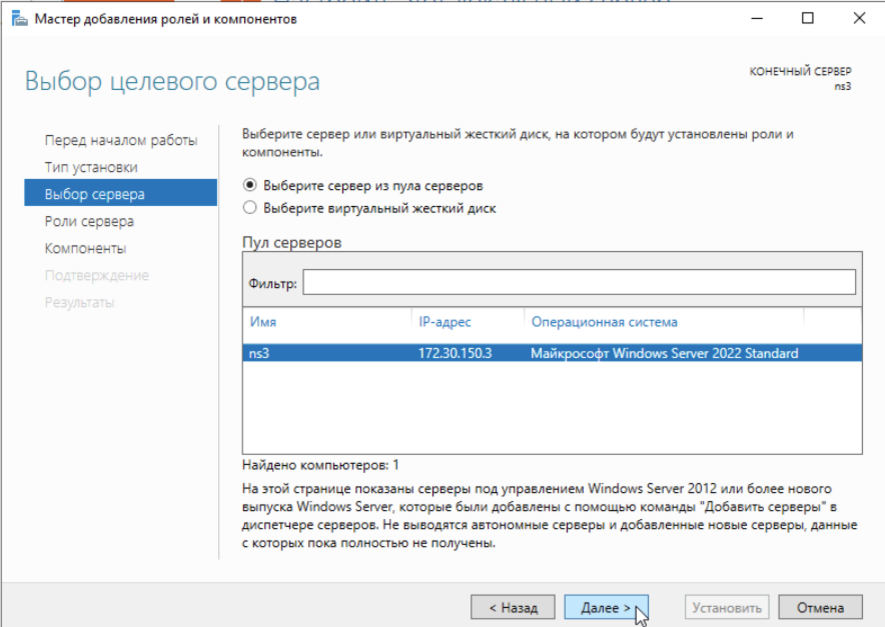
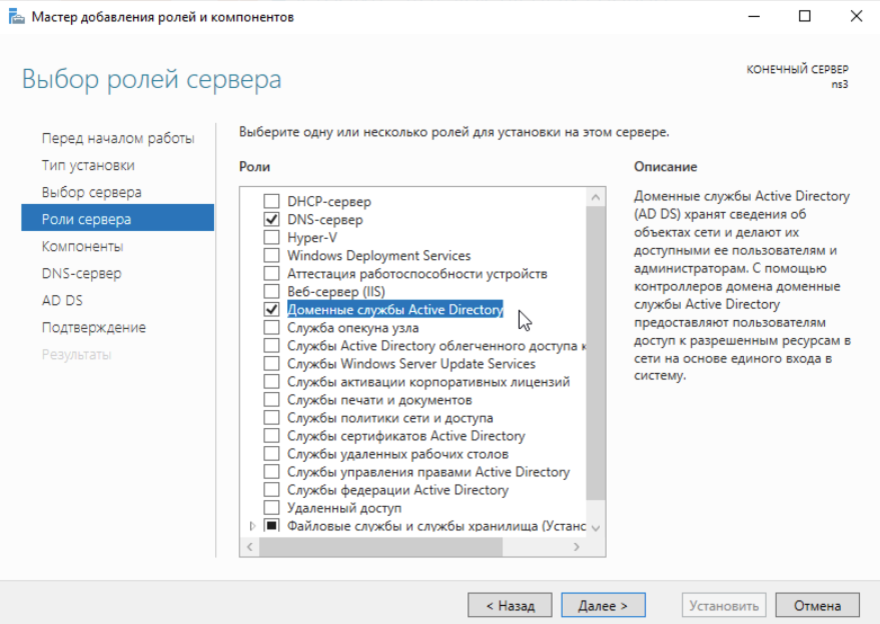
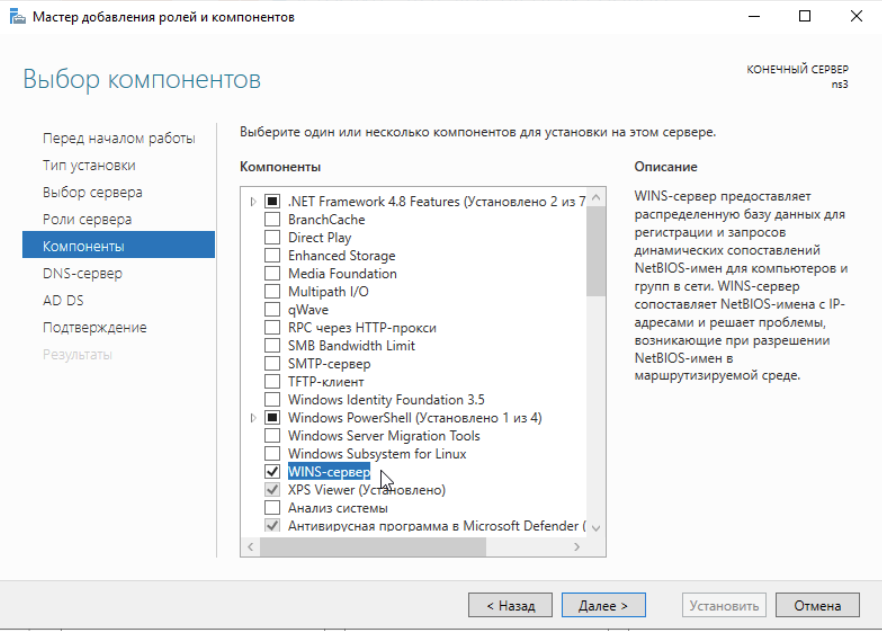
Добавляем роли нашему серверу:
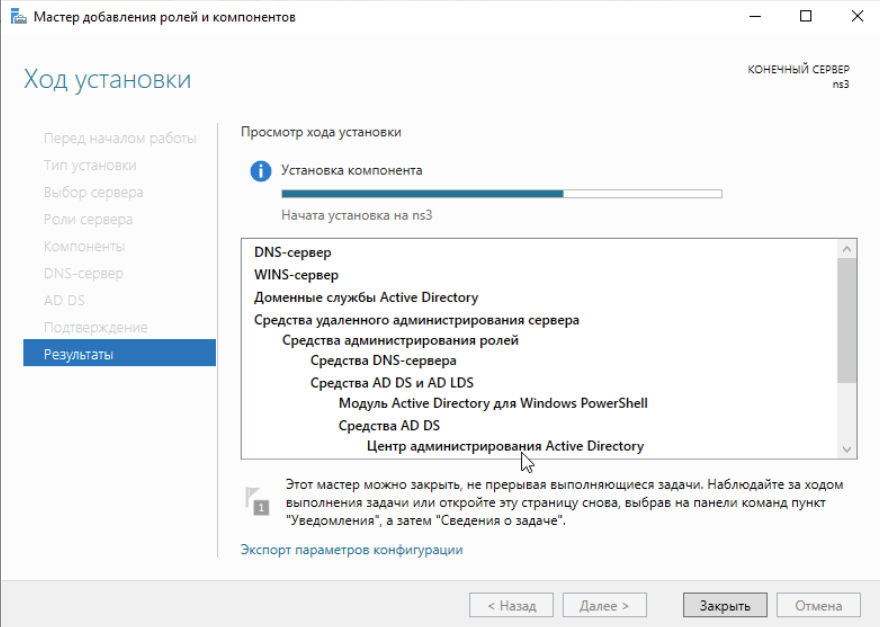
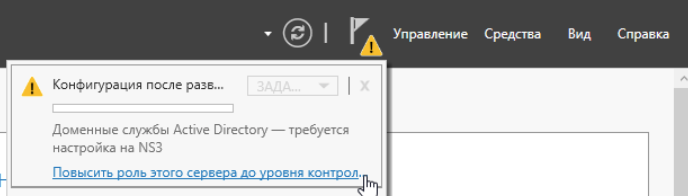
После выполнения установки ролей нажимаем Закрыть и видим вверху сообщение с предложением приступить к настройке установленных ролей:
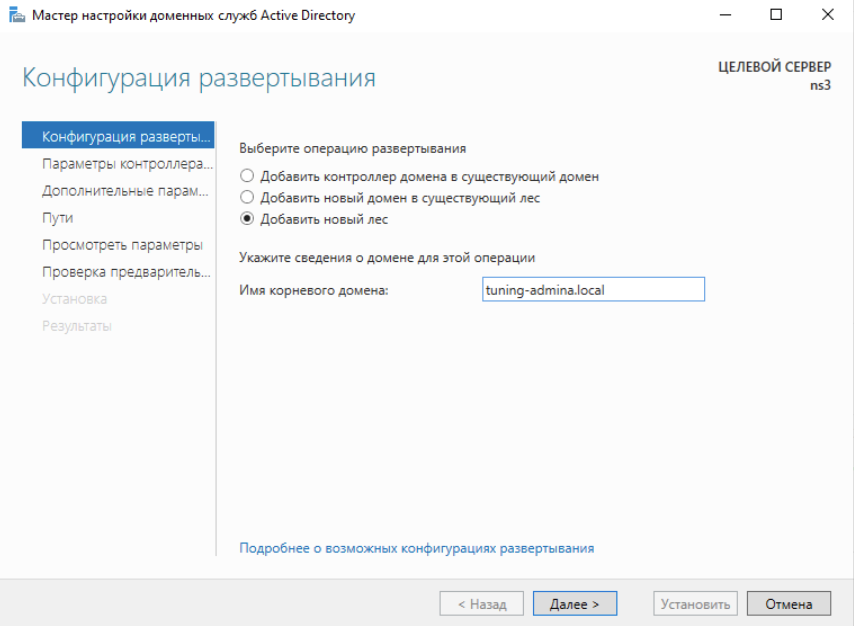
Запустится мастер настройки и первым делом, выбираем Добавить новый лес и указываем имя домена который мы создаем:
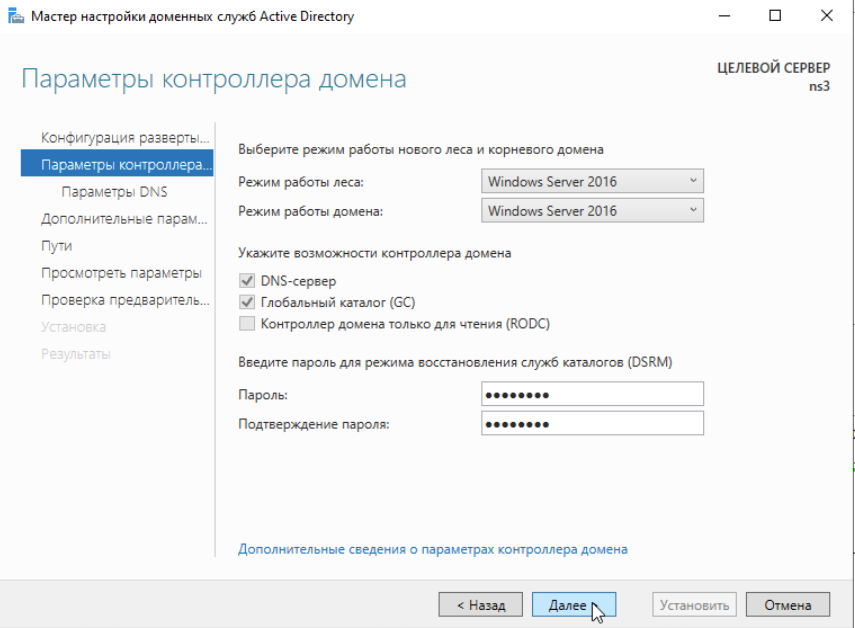
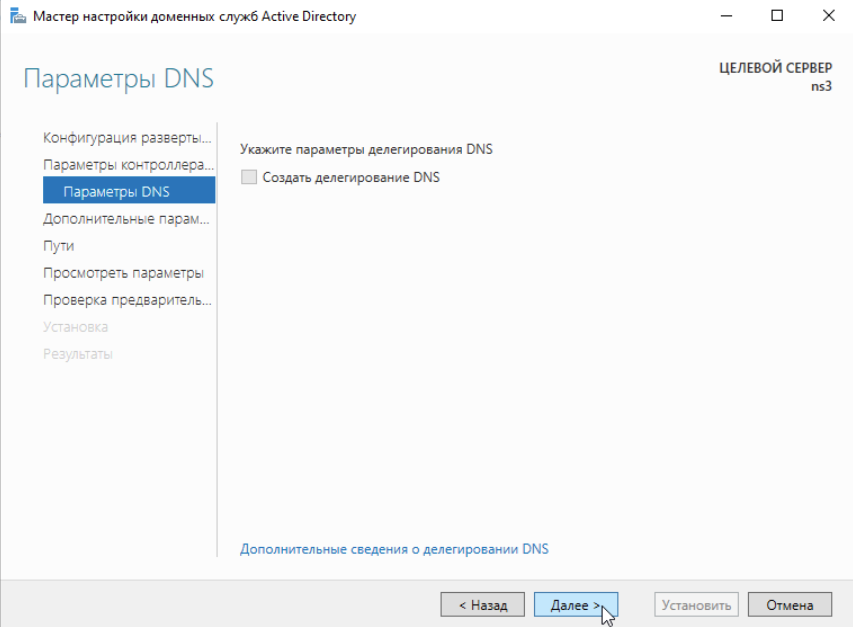
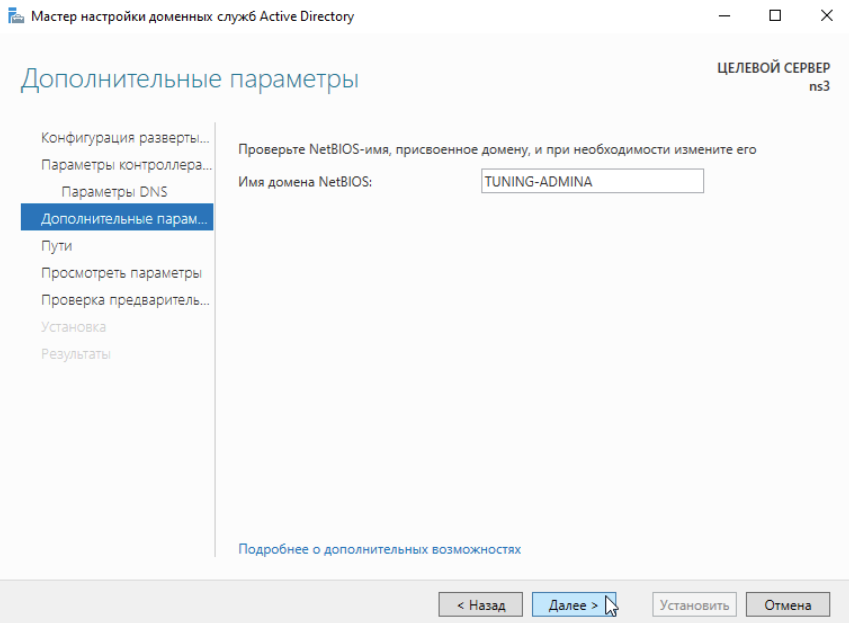
После указания всех необходимых параметров нажимаем Установить:
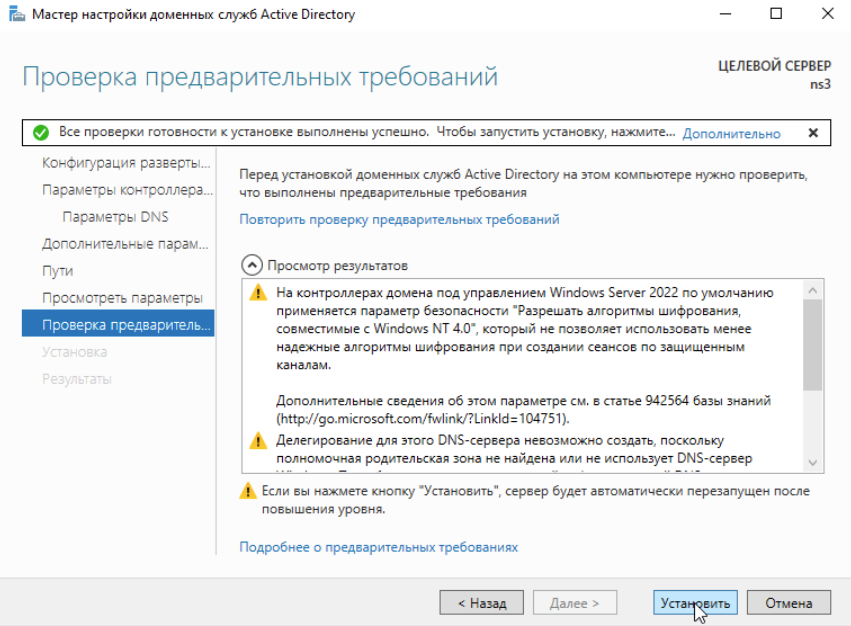
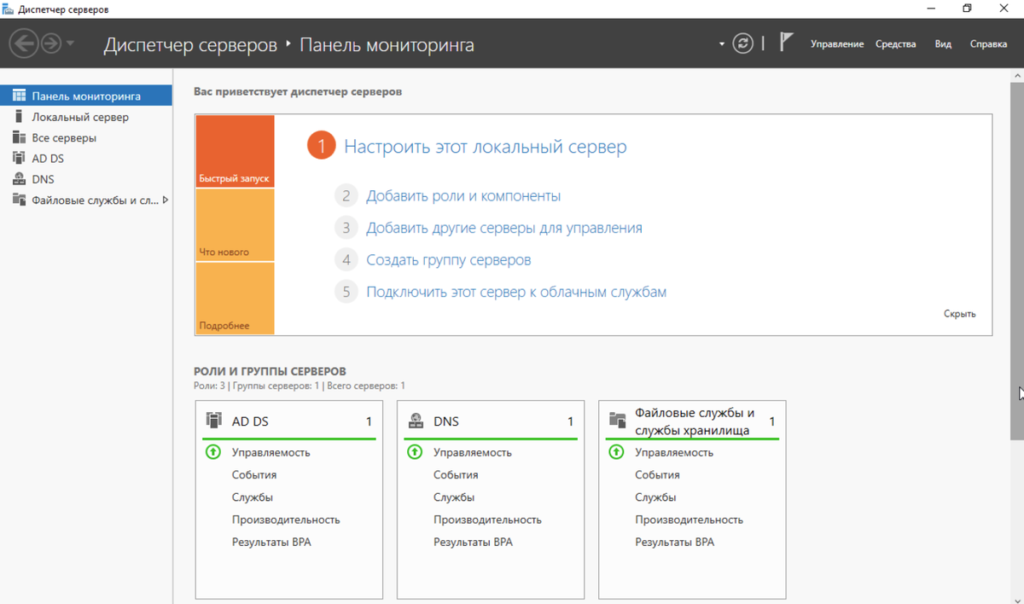
Система автоматически перезагрузится и предложит войти под учеткой администратора домена, как видим роли благополучно установлены:
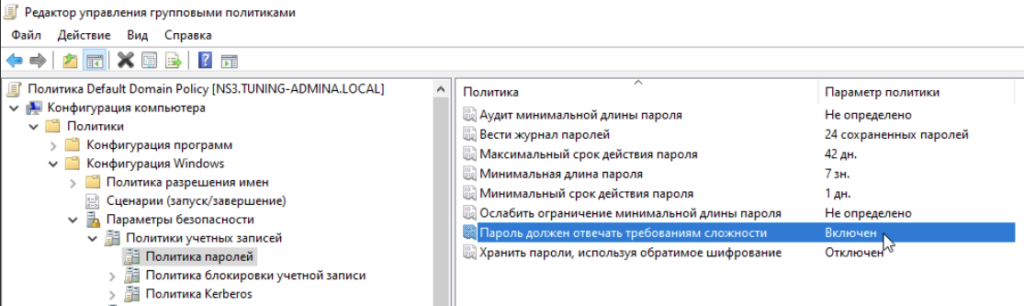
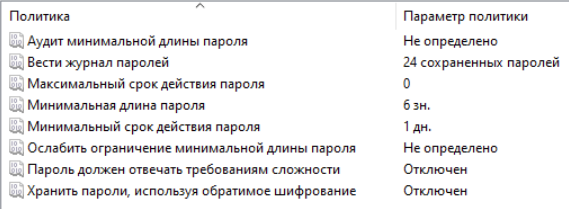
Меняем групповые политики связанные с паролями:
Это делается для того, чтобы понять реплицируются ли они на Samba контроллер.
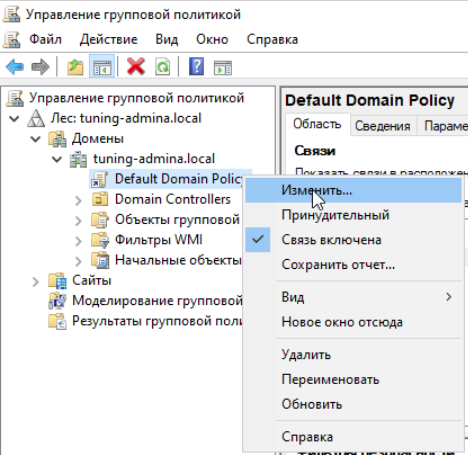
Меняем политики паролей:
Демонстрация режимов работы леса
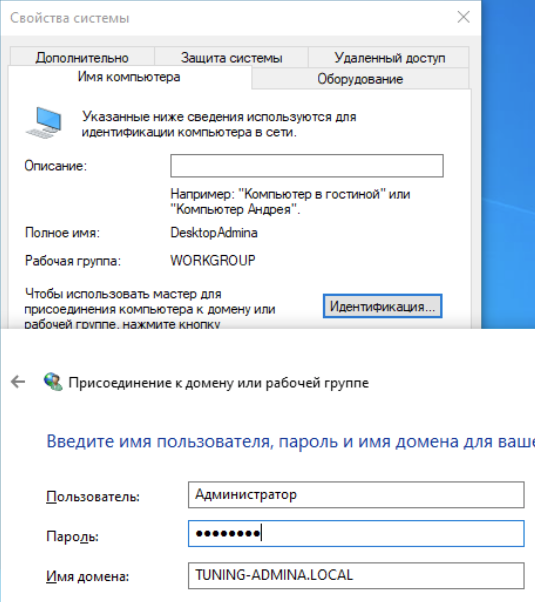
Ввод в домен компьютер с Windows 10
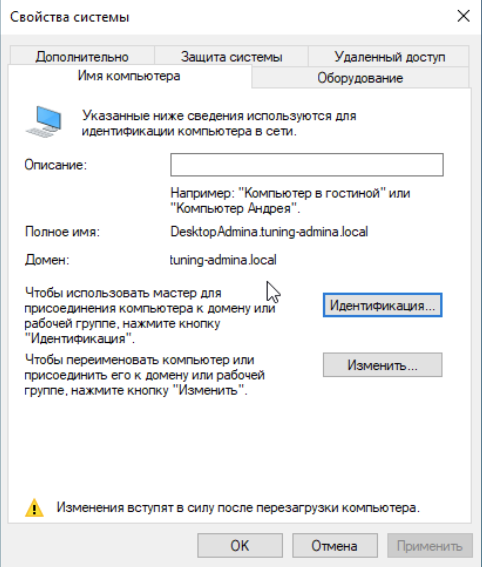
Компьютер в домене, он нам потребуется в дальнейшем для управления инфраструктурой, установим на него RSAT.
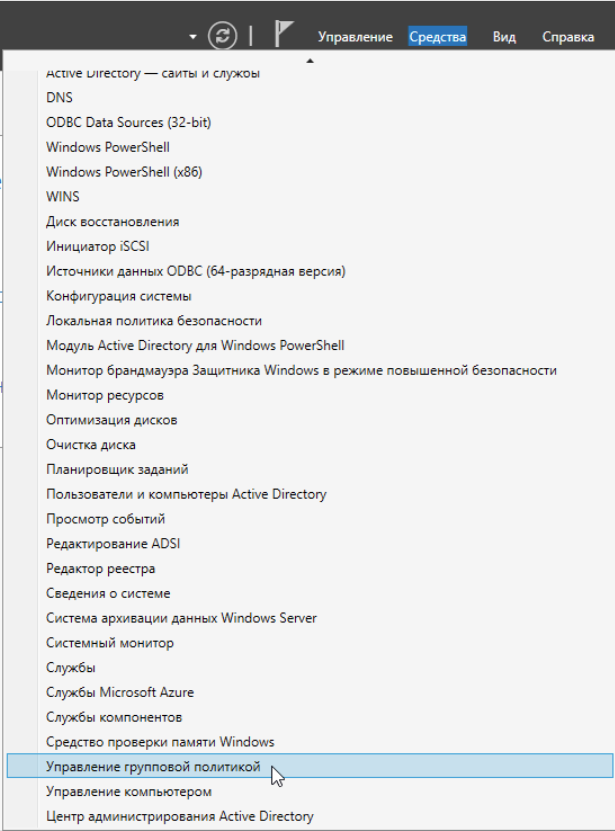
Установим средство для удаленного администрирования сервера RSAT для Windows 10
Проходим по ссылке и скачиваем: https://download.microsoft.com/download/1/D/8/1D8B5022-5477-4B9A-8104-6A71FF9D98AB/WindowsTH-KB2693643-x64.msu
После завершения установки идем в меню «ПУСК» —> Параметры —> Приложения, нажимаем Дополнительные компоненты —> Добавить компонент и выбираем следующие компоненты:
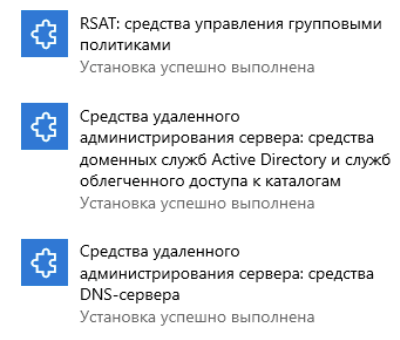
В меню «ПУСК» вам станет доступна консоль администрирования, запускать ее пока не будем:
Понижение режима работы леса и домена
На текущий момент времени Samba 4.15.13 поддерживает:
- Режим работы леса на уровне 2008R2
- Режим работы домена на уровне 2012R2
В связи с чем рекомендую понизить уровень работы леса и домена, прежде чем вводить Samba в роли контроллера. Есть нюансы, которые вам могут помешать это сделать — Exchange server, один из основных.
Мы понизим режимы работы в 2 этапа, с 2016 до 2012R2 и с 2012R2 до 2008R2.
На контроллере домена Запускаем PowerShell:
1) Понижаем режим работы леса
set-ADForestMode -ForestMode Windows2012R2Forest

Указываем имя нашего леса и команду Enter, нас переспрашивают действительно ли мы хотим, пишем Y
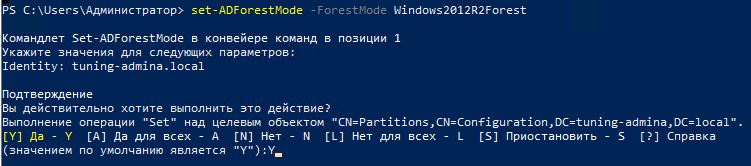
Видим, что режим работы леса у нас изменился:
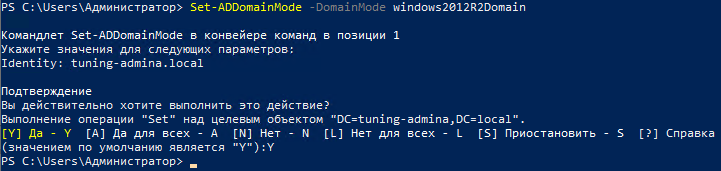
2) Понижаем режим работы домена
Set-ADDomainMode -DomainMode windows2012R2Domain
Как видим процедура схожая

Указываем имя домена и повторяем действия:
Проверяем работу сервера и клиентов домена на всякий случай
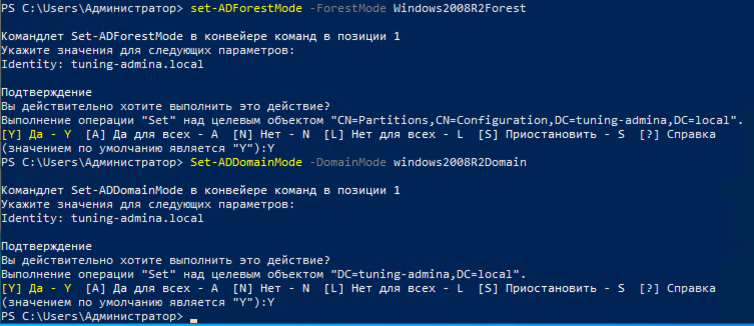
Повторяем операции понижая режимы работы леса и домена до 2008R2:
Теперь можно переходить к настройке и вводу в домен контроллера на Samba.
Настройка резервного контроллера домена
Всё манипуляции делаем под root:
sudo -s
Настраиваем сеть:
nano /etc/netplan/00-installer-config.yaml
network:
ethernets:
ens18:
dhcp4: false
addresses: [172.30.150.1/16]
gateway4: 172.30.1.100
nameservers:
addresses: [172.30.150.3,172.30.150.1]
version: 2
Сохраняем и закрываем редактор:
CTRL+O,CTRL+X
Применяем настройки:
netplan apply
Обновим систему:
apt update && apt upgrade -y
Установим mc, net-tools:
apt install mc net-tools -y
Перезагрузим сервер и продолжим:
reboot
Установите имя для контроллера домена ns1:
hostnamectl set-hostname ns1
Добавляем в файл hosts информацию о сопоставлении имени хостов ns1, ns2, ns3 и IP-адресов.
nano /etc/hosts
172.30.150.1 ns1.tuning-admina.local ns1
172.30.150.2 ns2.tuning-admina.local ns2
172.30.150.3 ns3.tuning-admina.local ns3
Отключим службу сопоставления DNS:
systemctl disable —now systemd-resolved
Удалим символьную ссылку на файл конфигурации:
unlink /etc/resolv.conf
Создадим новый файл конфигурации:
touch /etc/resolv.conf
Приведем файл к следующему виду:
nano /etc/resolv.conf
domain tuning-admina.local
nameserver 172.30.150.3
nameserver 172.30.150.1
Сохраняем и закрываем редактор:
CTRL+O,CTRL+X
Делаем файл конфигурации неизменяемым:
chattr +i /etc/resolv.conf
Перезагрузим сервер и продолжим:
reboot
Установка Samba и ввод в домен
Установим все необходимые пакеты и саму Samba:
apt install -y acl attr samba samba-dsdb-modules samba-vfs-modules winbind libpam-winbind libnss-winbind libpam-krb5 krb5-config krb5-user dnsutils chrony net-tools
Переместим дефолтные конфигурационные файлы smb.conf и krb5.conf:
mv /etc/samba/smb.conf /etc/samba/smb.conf.orig
mv /etc/krb5.conf /etc/krb5.conf.orig
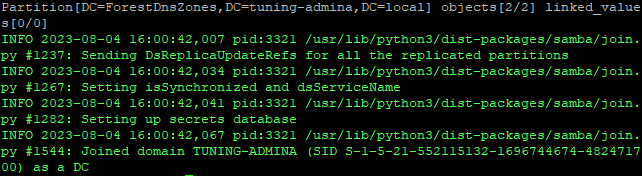
Теперь добавляем наш сервер в домен с привилегиями контроллера:
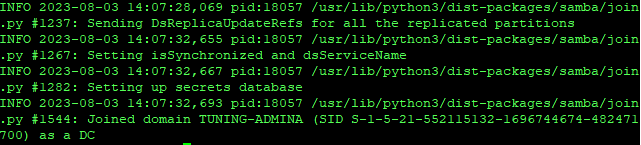
samba-tool domain join tuning-admina.local DC -W AD -U Администратор

Вводим пароль администратора и видим успешное завершение:
Настройка и тестирование после установки
Скопируем конфигурационный файл krb5.conf:
cp /var/lib/samba/private/krb5.conf /etc/krb5.conf
После установки Samba остановим и отключим службы, которые не требуются серверу Samba Active Directory:
systemctl disable —now smbd nmbd winbind
Активируем службу samba-ad-dc:
systemctl unmask samba-ad-dc
Добавляем службу в автозапуск:
systemctl enable samba-ad-dc
Запустим службу Samba Active Directory:
systemctl start samba-ad-dc
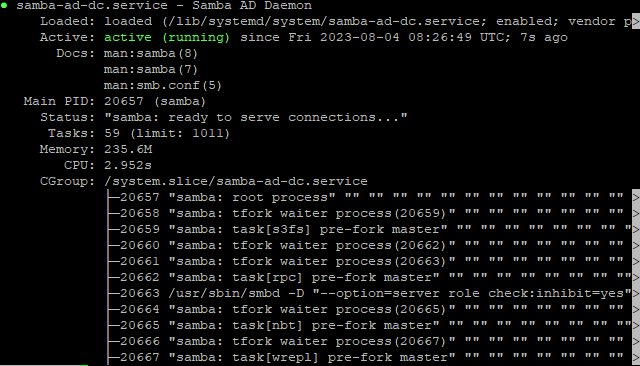
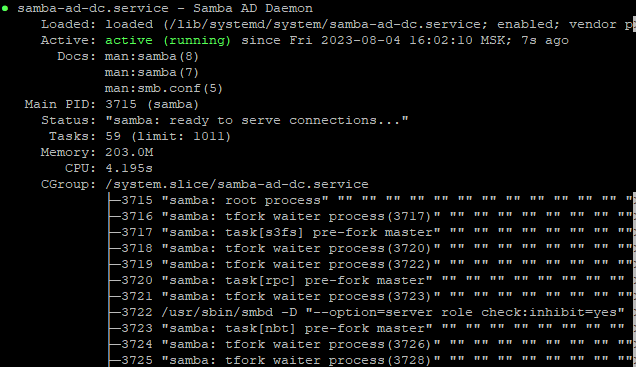
Проверим статус службы:
systemctl status samba-ad-dc
Проверяем настройки DNS:
host -t SRV _ldap._tcp.tuning-admina.local
_ldap._tcp.tuning-admina.local has SRV record 0 100 389 ns1.tuning-admina.local.
_ldap._tcp.tuning-admina.local has SRV record 0 100 389 ns3.tuning-admina.local.
host -t SRV _kerberos._udp.tuning-admina.local
_kerberos._udp.tuning-admina.local has SRV record 0 100 88 ns1.tuning-admina.local.
_kerberos._udp.tuning-admina.local has SRV record 0 100 88 ns3.tuning-admina.local.
host -t A ns1.tuning-admina.local
ns1.tuning-admina.local has address 172.30.150.1
Проверка статуса репликации:
samba-tool drs showrepl
Default-First-Site-Name\NS1
DSA Options: 0x00000001
DSA object GUID: 2b94330a-79e5-4e2b-82f0-ee89cfd52f0f
DSA invocationId: 1f1128ad-c937-403b-b6df-e0560ed817b1
==== INBOUND NEIGHBORS ====
DC=DomainDnsZones,DC=tuning-admina,DC=local
Default-First-Site-Name\NS3 via RPC
DSA object GUID: 8c2f3547-4f6b-4909-a364-c8e0fd5b6484
Last attempt @ Fri Aug 4 08:32:04 2023 UTC was successful
0 consecutive failure(s).
Last success @ Fri Aug 4 08:32:04 2023 UTC
DC=tuning-admina,DC=local
Default-First-Site-Name\NS3 via RPC
DSA object GUID: 8c2f3547-4f6b-4909-a364-c8e0fd5b6484
Last attempt @ Fri Aug 4 08:32:04 2023 UTC was successful
0 consecutive failure(s).
Last success @ Fri Aug 4 08:32:04 2023 UTC
CN=Configuration,DC=tuning-admina,DC=local
Default-First-Site-Name\NS3 via RPC
DSA object GUID: 8c2f3547-4f6b-4909-a364-c8e0fd5b6484
Last attempt @ Fri Aug 4 08:32:04 2023 UTC was successful
0 consecutive failure(s).
Last success @ Fri Aug 4 08:32:04 2023 UTC
DC=ForestDnsZones,DC=tuning-admina,DC=local
Default-First-Site-Name\NS3 via RPC
DSA object GUID: 8c2f3547-4f6b-4909-a364-c8e0fd5b6484
Last attempt @ Fri Aug 4 08:32:04 2023 UTC was successful
0 consecutive failure(s).
Last success @ Fri Aug 4 08:32:04 2023 UTC
CN=Schema,CN=Configuration,DC=tuning-admina,DC=local
Default-First-Site-Name\NS3 via RPC
DSA object GUID: 8c2f3547-4f6b-4909-a364-c8e0fd5b6484
Last attempt @ Fri Aug 4 08:32:04 2023 UTC was successful
0 consecutive failure(s).
Last success @ Fri Aug 4 08:32:04 2023 UTC
==== OUTBOUND NEIGHBORS ====
DC=DomainDnsZones,DC=tuning-admina,DC=local
Default-First-Site-Name\NS3 via RPC
DSA object GUID: 8c2f3547-4f6b-4909-a364-c8e0fd5b6484
Last attempt @ Fri Aug 4 08:30:55 2023 UTC was successful
0 consecutive failure(s).
Last success @ Fri Aug 4 08:30:55 2023 UTC
DC=tuning-admina,DC=local
Default-First-Site-Name\NS3 via RPC
DSA object GUID: 8c2f3547-4f6b-4909-a364-c8e0fd5b6484
Last attempt @ Fri Aug 4 08:30:55 2023 UTC was successful
0 consecutive failure(s).
Last success @ Fri Aug 4 08:30:55 2023 UTC
CN=Configuration,DC=tuning-admina,DC=local
Default-First-Site-Name\NS3 via RPC
DSA object GUID: 8c2f3547-4f6b-4909-a364-c8e0fd5b6484
Last attempt @ Fri Aug 4 08:30:55 2023 UTC was successful
0 consecutive failure(s).
Last success @ Fri Aug 4 08:30:55 2023 UTC
DC=ForestDnsZones,DC=tuning-admina,DC=local
Default-First-Site-Name\NS3 via RPC
DSA object GUID: 8c2f3547-4f6b-4909-a364-c8e0fd5b6484
Last attempt @ Fri Aug 4 08:30:55 2023 UTC was successful
0 consecutive failure(s).
Last success @ Fri Aug 4 08:30:55 2023 UTC
CN=Schema,CN=Configuration,DC=tuning-admina,DC=local
Default-First-Site-Name\NS3 via RPC
DSA object GUID: 8c2f3547-4f6b-4909-a364-c8e0fd5b6484
Last attempt @ Fri Aug 4 08:30:55 2023 UTC was successful
0 consecutive failure(s).
Last success @ Fri Aug 4 08:30:55 2023 UTC
==== KCC CONNECTION OBJECTS ====
Connection —
Connection name: 28d89a63-c92d-45e9-a8ef-c2bac9e25e83
Enabled : TRUE
Server DNS name : ns3.tuning-admina.local
Server DN name : CN=NTDS Settings,CN=NS3,CN=Servers,CN=Default-First-Site-Name,CN=Sites,CN=Configuration,DC=tuning-admina,DC=local
TransportType: RPC
options: 0x00000001
Warning: No NC replicated for Connection!
Как видим все хорошо
В оснастке Active Direcory Пользователи и компьютеры видим наш добавленный контроллер:

Перенос ролей FSMO на Samba
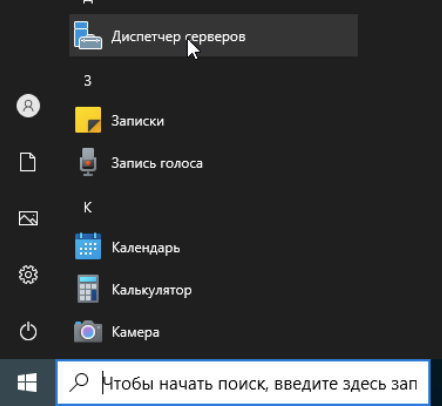
На Windows 10 запускаем Диспетчер серверов:
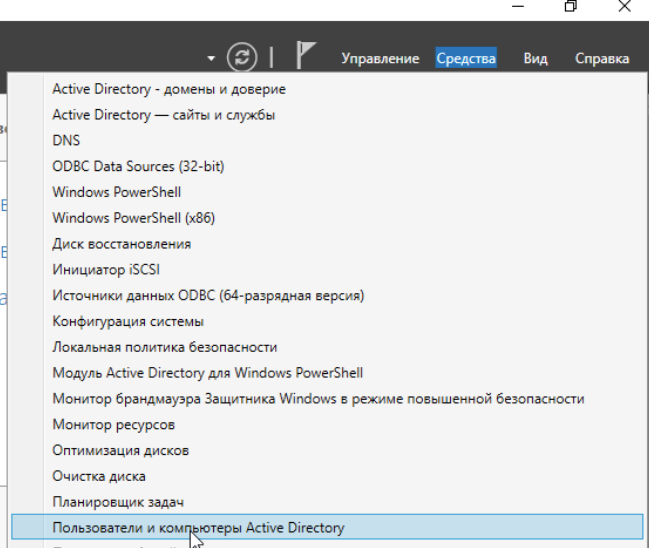
Запускаем оснастку Пользователи и компьютеры Active Directory:
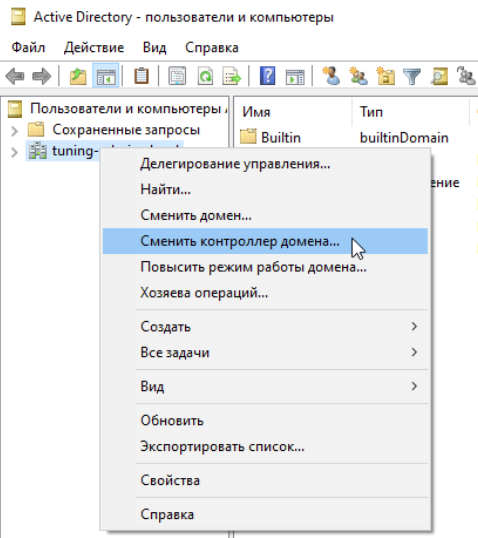
Щелкаем по нашему доменному имени и выбираем сменить контроллер домена:
Выбираем контроллер на Samba:
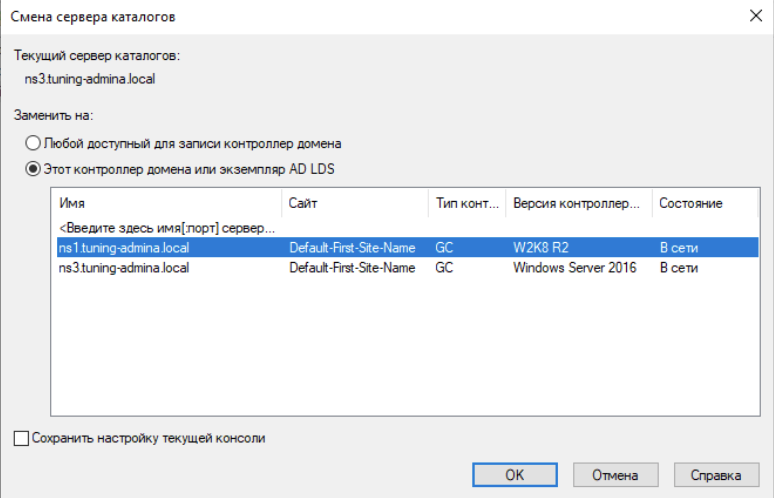
Тем самым мы переключились между контроллерами для управления.
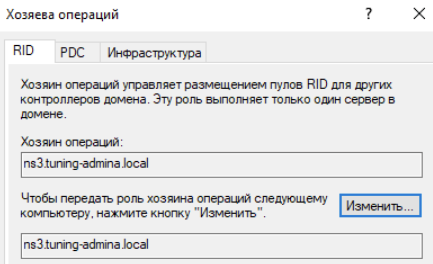
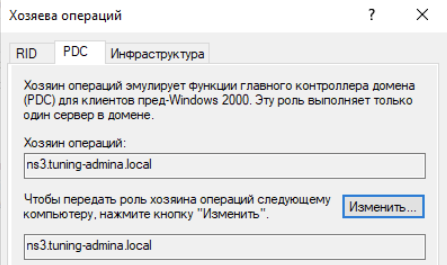
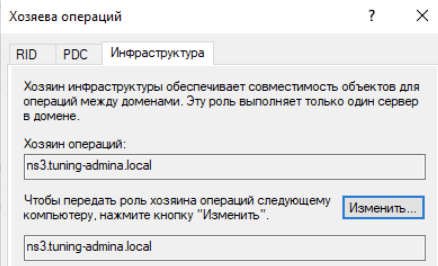
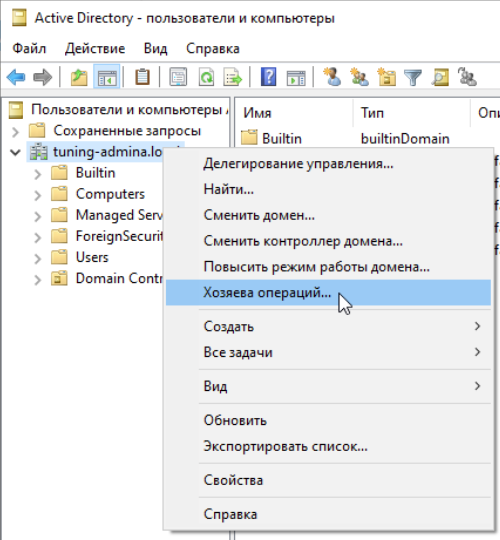
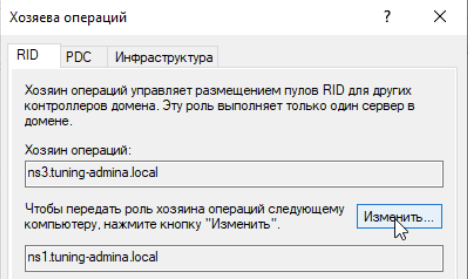
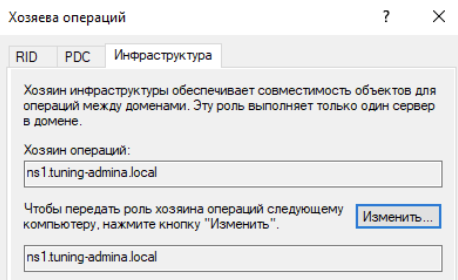
Щелкаем по доменному имени и выбираем хозяева операций:
Меняем значение для всех ролей:
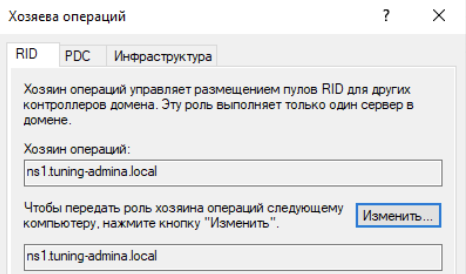

Проверяем перенос ролей на Samba контроллере:
samba-tool fsmo show
SchemaMasterRole owner: CN=NTDS Settings,CN=NS3,CN=Servers,CN=Default-First-Site-Name,CN=Sites,CN=Configuration,DC=tuning-admina,DC=local
InfrastructureMasterRole owner: CN=NTDS Settings,CN=NS1,CN=Servers,CN=Default-First-Site-Name,CN=Sites,CN=Configuration,DC=tuning-admina,DC=local
RidAllocationMasterRole owner: CN=NTDS Settings,CN=NS1,CN=Servers,CN=Default-First-Site-Name,CN=Sites,CN=Configuration,DC=tuning-admina,DC=local
PdcEmulationMasterRole owner: CN=NTDS Settings,CN=NS1,CN=Servers,CN=Default-First-Site-Name,CN=Sites,CN=Configuration,DC=tuning-admina,DC=local
DomainNamingMasterRole owner: CN=NTDS Settings,CN=NS3,CN=Servers,CN=Default-First-Site-Name,CN=Sites,CN=Configuration,DC=tuning-admina,DC=local
DomainDnsZonesMasterRole owner: CN=NTDS Settings,CN=NS3,CN=Servers,CN=Default-First-Site-Name,CN=Sites,CN=Configuration,DC=tuning-admina,DC=local
ForestDnsZonesMasterRole owner: CN=NTDS Settings,CN=NS3,CN=Servers,CN=Default-First-Site-Name,CN=Sites,CN=Configuration,DC=tuning-admina,DC=local
Передача ролей средствами samba-tool:
samba-tool fsmo transfer —role=Роль
Список ролей:
- rid — хозяин RID;
- pdc — эмулятор PDC;
- infrastructure — хозяин инфраструктуры;
- schema — хозяин схемы;
- naming — хозяин именования доменов;
- domaindns — хозяин зоны DNS домена;
- forestdns — хозяин зоны DNS домена;
- all — все роли.
Можно перенести роли одной командой:
samba-tool fsmo transfer —role=all
This DC already has the ‘rid’ FSMO role
This DC already has the ‘pdc’ FSMO role
This DC already has the ‘naming’ FSMO role
This DC already has the ‘infrastructure’ FSMO role
This DC already has the ‘schema’ FSMO role
ERROR: Failed to add role ‘domaindns’: LDAP error 50 LDAP_INSUFFICIENT_ACCESS_RIGHTS — <00002098: SecErr: DSID-0315283E, problem 4003 (INSUFF_ACCESS_RIGHTS), data 0
> <>
На ошибку не обращаем внимание, мы выполним принудительный захват ролей:
samba-tool fsmo seize —force —role=all
Seizing rid FSMO role…
FSMO seize of ‘rid’ role successful
Seizing pdc FSMO role…
FSMO seize of ‘pdc’ role successful
Seizing naming FSMO role…
FSMO seize of ‘naming’ role successful
Seizing infrastructure FSMO role…
FSMO seize of ‘infrastructure’ role successful
Seizing schema FSMO role…
FSMO seize of ‘schema’ role successful
Seizing domaindns FSMO role…
FSMO seize of ‘domaindns’ role successful
Seizing forestdns FSMO role…
FSMO seize of ‘forestdns’ role successful
Проверяем роли:
samba-tool fsmo show
SchemaMasterRole owner: CN=NTDS Settings,CN=NS1,CN=Servers,CN=Default-First-Site-Name,CN=Sites,CN=Configuration,DC=tuning-admina,DC=local
InfrastructureMasterRole owner: CN=NTDS Settings,CN=NS1,CN=Servers,CN=Default-First-Site-Name,CN=Sites,CN=Configuration,DC=tuning-admina,DC=local
RidAllocationMasterRole owner: CN=NTDS Settings,CN=NS1,CN=Servers,CN=Default-First-Site-Name,CN=Sites,CN=Configuration,DC=tuning-admina,DC=local
PdcEmulationMasterRole owner: CN=NTDS Settings,CN=NS1,CN=Servers,CN=Default-First-Site-Name,CN=Sites,CN=Configuration,DC=tuning-admina,DC=local
DomainNamingMasterRole owner: CN=NTDS Settings,CN=NS1,CN=Servers,CN=Default-First-Site-Name,CN=Sites,CN=Configuration,DC=tuning-admina,DC=local
DomainDnsZonesMasterRole owner: CN=NTDS Settings,CN=NS1,CN=Servers,CN=Default-First-Site-Name,CN=Sites,CN=Configuration,DC=tuning-admina,DC=local
ForestDnsZonesMasterRole owner: CN=NTDS Settings,CN=NS1,CN=Servers,CN=Default-First-Site-Name,CN=Sites,CN=Configuration,DC=tuning-admina,DC=local
Отлично двигаемся дальше
Настраиваем второй контроллер домена
Повысим наши права в системе:
sudo -s
Настраиваем сеть, для этого отредактируем конфигурационный файл:
nano /etc/netplan/00-installer-config.yaml
network:
ethernets:
ens18:
dhcp4: false
addresses: [172.30.150.2/16]
gateway4: 172.30.1.100
nameservers:
addresses: [172.30.150.1,172.30.150.2]
version: 2
Сохраняем и закрываем редактор:
CTRL+O,CTRL+X
Применяем настройки:
netplan apply
Обновим систему:
apt update && apt upgrade -y
Устанавливаем временную зону:
timedatectl set-timezone Europe/Moscow
Установим нашему резервному контроллеру домена:
hostnamectl set-hostname ns2
Отредактируем файл hosts, чтобы система могла сопоставить имя ns2 с IP-адресом сервера:
nano /etc/hosts
172.30.150.1 ns1.tuning-admina.local ns1
172.30.150.2 ns2.tuning-admina.local ns2
Сохраняем и закрываем редактор:
CTRL+O,CTRL+X
Отключим службу сопоставления DNS:
systemctl disable —now systemd-resolved
Удалим символьную ссылку на файл конфигурации:
unlink /etc/resolv.conf
Создадим новый файл конфигурации:
touch /etc/resolv.conf
Приведем файл к следующему виду:
nano /etc/resolv.conf
domain tuning-admina.local
nameserver 172.30.150.1
nameserver 172.30.150.2
Сохраняем и закрываем редактор:
CTRL+O,CTRL+X
Делаем файл конфигурации неизменяемым:
chattr +i /etc/resolv.conf
Перезагрузим сервер и продолжим:
reboot
Установка Samba и ввод в домен
Установим все необходимые пакеты и саму Samba:
apt install -y acl attr samba samba-dsdb-modules samba-vfs-modules winbind libpam-winbind libnss-winbind libpam-krb5 krb5-config krb5-user dnsutils chrony net-tools
Переместим конфигурационные файлы smb.conf и krb5.conf:
mv /etc/samba/smb.conf /etc/samba/smb.conf.orig
mv /etc/krb5.conf /etc/krb5.conf.orig
Теперь добавляем наш сервер в домен с привилегиями контроллера:
samba-tool domain join tuning-admina.local DC -W AD -U Администратор
Вводим пароль администратора и видим успешное завершение:
Настройка и тестирование после установки
Скопируем конфигурационный файл krb5.conf:
cp /var/lib/samba/private/krb5.conf /etc/krb5.conf
После установки Samba остановим и отключим службы, которые не требуются серверу Samba Active Directory:
systemctl disable —now smbd nmbd winbind
Активируем службу samba-ad-dc:
systemctl unmask samba-ad-dc
Добавляем службу в автозапуск:
systemctl enable samba-ad-dc
Запустим службу Samba Active Directory:
systemctl start samba-ad-dc
Проверим статус службы:
systemctl status samba-ad-dc
Настройка синхронизации времени
Samba Active Directory зависит от протокола Kerberos, а тот в свою очередь требует, чтобы время сервера и рабочей станции было синхронизировано. Чтобы обеспечить надлежащую синхронизацию времени, нам необходимо настроить сервер NTP.
Изменим владельца каталога:
chown root:_chrony /var/lib/samba/ntp_signd/
А также дадим разрешение на чтение каталога:
chmod 750 /var/lib/samba/ntp_signd/
Отредактируем файл конфигурации добавив следующее в его нижнюю часть файла:
nano /etc/chrony/chrony.conf
# bind the chrony service to IP address of the Samba AD
bindcmdaddress 172.30.150.1
# Клиентам каких сетей разрешен доступ к NTP серверу
allow 172.30.0.0/16
# specify the ntpsigndsocket directory for the Samba AD
ntpsigndsocket /var/lib/samba/ntp_signd
Сохраняем и закрываем редактор:
CTRL+O,CTRL+X
Перезапускаем службу chronyd:
systemctl restart chronyd
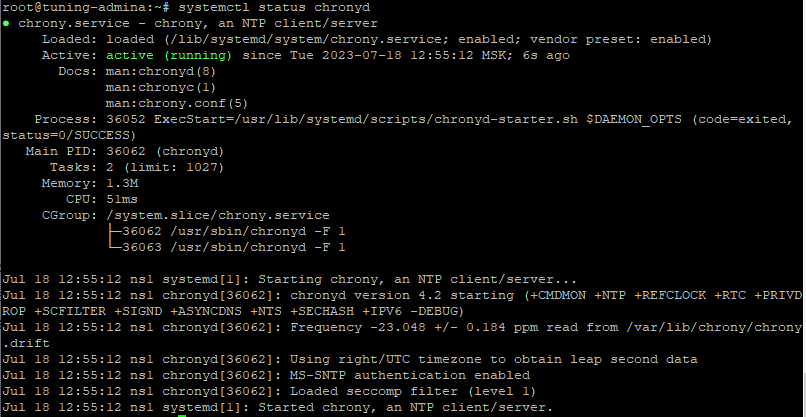
Проверяем статус службы:
systemctl status chronyd
Проверяем настройки DNS:
host -t SRV _ldap._tcp.tuning-admina.local
_ldap._tcp.tuning-admina.local has SRV record 0 100 389 ns1.tuning-admina.local.
host -t SRV _kerberos._udp.tuning-admina.local
_kerberos._udp.tuning-admina.local has SRV record 0 100 88 ns1.tuning-admina.local.
host -t A ns2.tuning-admina.local
ns2.tuning-admina.local has address 172.30.150.2

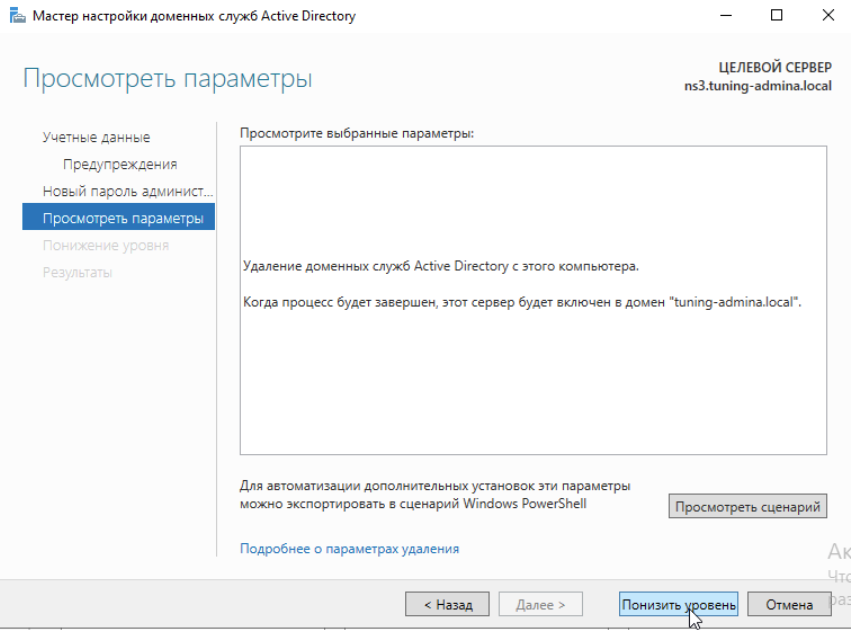
Понижение контроллера домена на Windows Server 2022
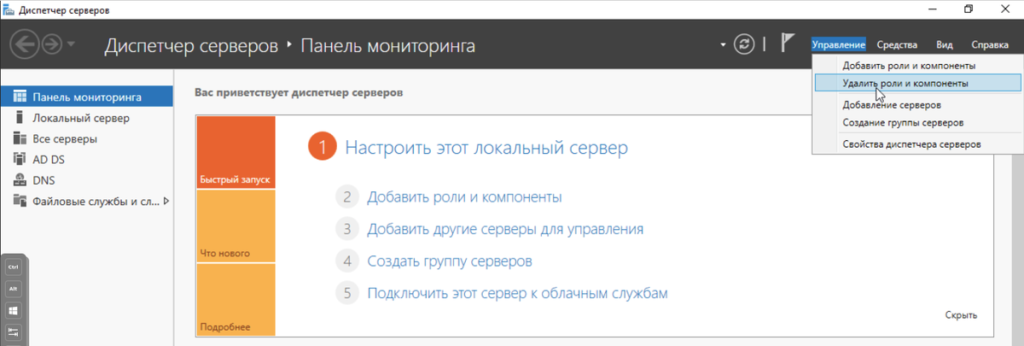
Открываем Диспетчер серверов и в разделе Управление Удалить роли и компоненты:
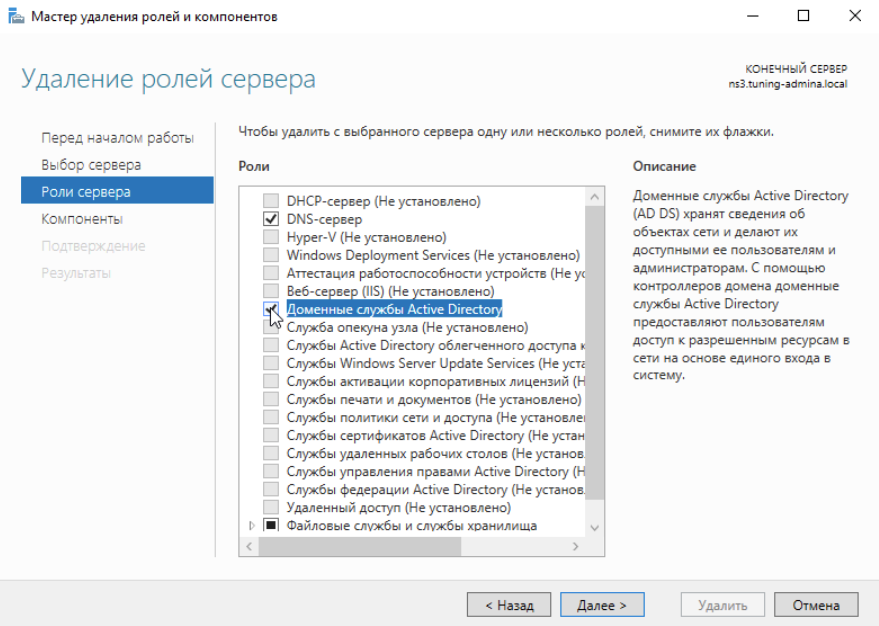
Снимаем галочку над Доменные службы Active Directory:
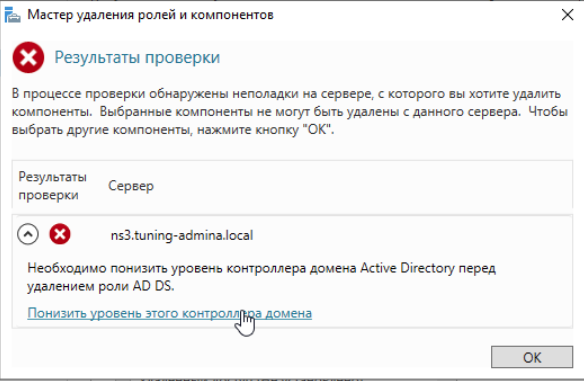
Появляется сообщение от мастера удаления ролей и компонентов, нажимаем внизу Понизить уровень контроллера домена:

Ставим галочку продолжить удаление:
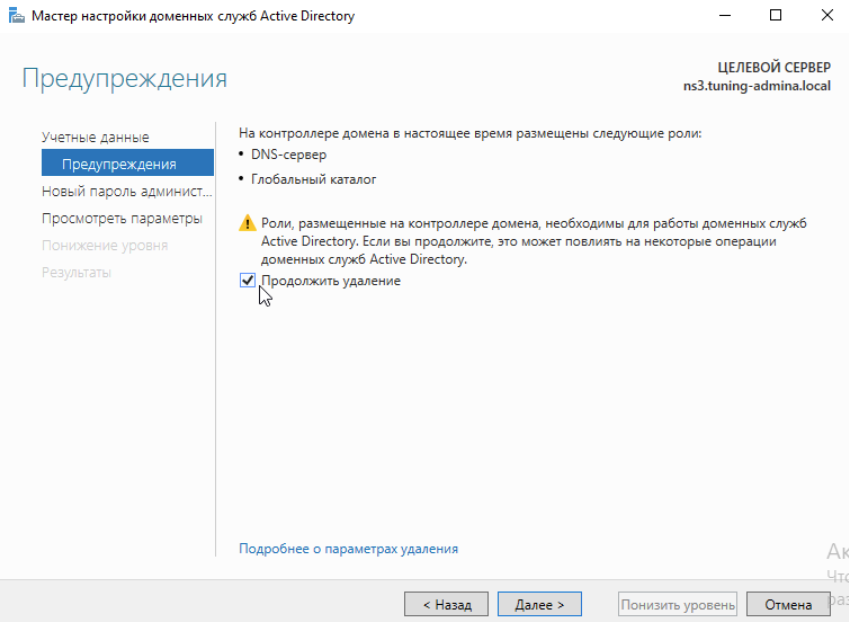
Нажимаем Понизить уровень:
Проверка работоспособности.
Настройка бэкапа средствами Samba Tools
Loading
In this part of the Samba4 AD DC infrastructure series we will talk on how join a Windows 10 machine into a Samba4 realm and how to administer the domain from a Windows 10 workstation.
Once a Windows 10 system has been joined to Samba4 AD DC we can create, remove or disable domain users and groups, we can create new Organizational Units, we can create, edit and manage domain policy or we can manage Samba4 domain DNS service.
All of the above functions and other complex tasks concerning domain administration can be achieved via any modern Windows platform with the help of RSAT – Microsoft Remote Server Administration Tools.
Requirements
- Create an AD Infrastructure with Samba4 on Ubuntu 16.04 – Part 1
- Manage Samba4 AD Infrastructure from Linux Command Line – Part 2
- Manage Samba4 AD Domain Controller DNS and Group Policy from Windows – Part 4
Step 1: Configure Domain Time Synchronization
1. Before starting to administer Samba4 ADDC from Windows 10 with the help of RSAT tools, we need to know and take care of a crucial piece of service required for an Active Directory and this service refers to accurate time synchronization.
Time synchronization can be offered by NTP daemon in most of the Linux distributions. The default maximum time period discrepancy an AD can support is about 5 minutes.
If the divergence time period is greater than 5 minutes you should start experience various errors, most important concerning AD users, joined machines or share access.
To install Network Time Protocol daemon and NTP client utility in Ubuntu, execute the below command.
$ sudo apt-get install ntp ntpdate

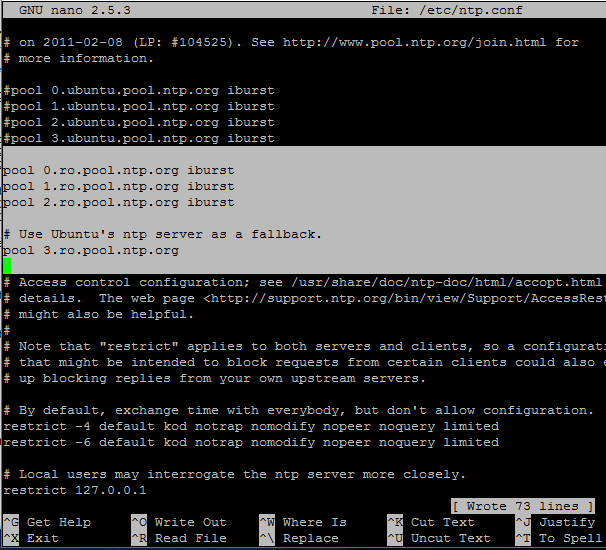
2. Next, open and edit NTP configuration file and replace the default NTP pool server list with a new list of NTP servers which are geographically located near your current physical equipment location.
The list of NTP servers can be obtained by visiting official NTP Pool Project webpage http://www.pool.ntp.org/en/.
$ sudo nano /etc/ntp.conf
Comment the default server list by adding a # in front of each pool line and add the below pool lines with your proper NTP servers as illustrated on the below screenshot.
pool 0.ro.pool.ntp.org iburst
pool 1.ro.pool.ntp.org iburst
pool 2.ro.pool.ntp.org iburst

# Use Ubuntu's ntp server as a fallback.
pool 3.ro.pool.ntp.org
3. Now, don’t close the file yet. Move to the top at the file and add the below line after the driftfile statement. This setup allows the clients to query the server using AD signed NTP requests.
ntpsigndsocket /var/lib/samba/ntp_signd/

4. Finally, move to the bottom of the file and add the below line, as illustrated on the below screenshot, which will allow network clients only to query the time on the server.
restrict default kod nomodify notrap nopeer mssntp

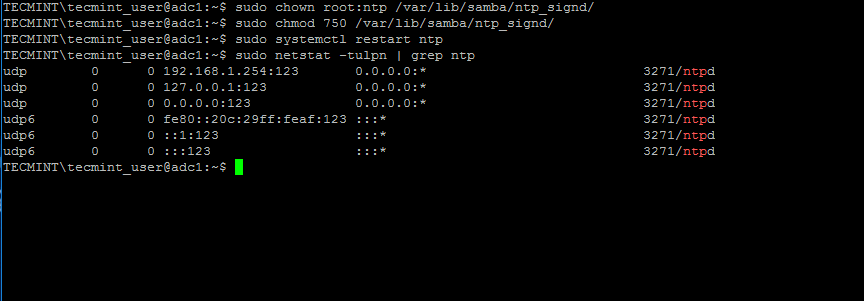
5. When finished, save and close the NTP configuration file and grant NTP service with the proper permissions in order to read the ntp_signed directory.
This is the system path where Samba NTP socket is located. Afterwards, restart NTP daemon to apply changes and verify if NTP has open sockets in your system network table using netstat command combined with grep filter.
$ sudo chown root:ntp /var/lib/samba/ntp_signd/
$ sudo chmod 750 /var/lib/samba/ntp_signd/
$ sudo systemctl restart ntp
$ sudo netstat –tulpn | grep ntp
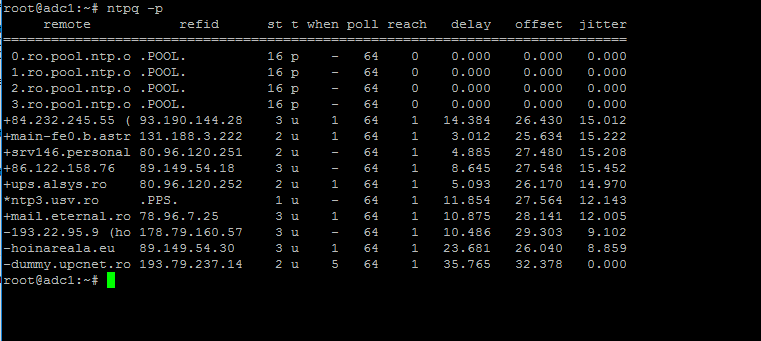
Use the ntpq command line utility to monitor NTP daemon along with the -p flag in order to print a summary of peers state.
$ ntpq -p
Step 2: Troubleshoot NTP Time Issues
6. Sometimes the NTP daemon gets stuck in calculations while trying to synchronize time with an upstream ntp server peer, resulting the following error messages when manually trying to force time synchronization by running ntpdate utility on a client side:
# ntpdate -qu adc1
ntpdate[4472]: no server suitable for synchronization found

when using ntpdate command with -d flag.
# ntpdate -d adc1.tecmint.lan
Server dropped: Leap not in sync

7. To circumvent this issue, use the following trick to solve the problem: On the server, stop the NTP service and use the ntpdate client utility to manually force time synchronization with an external peer using the -b flag as shown below:
# systemctl stop ntp.service
# ntpdate -b 2.ro.pool.ntp.org  [your_ntp_peer]
# systemctl start ntp.service
# systemctl status ntp.service
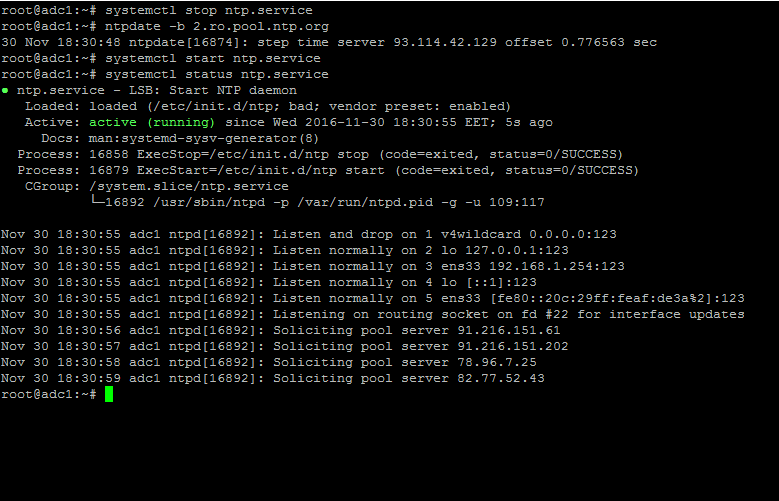
8. After the time has been accurately synchronized, start the NTP daemon on the server and verify from the client side if the service is ready to serve time for local clients by issuing the following command:
# ntpdate -du adc1.tecmint.lan [your_adc_server]
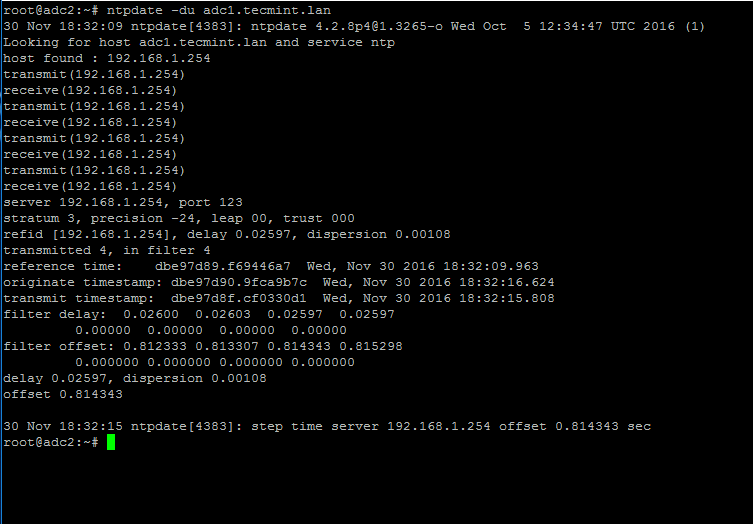
By now, NTP server should work as expected.
Step 3: Join Windows 10 into Realm
9. As we saw in our previous tutorial, Samba4 Active Directory can be managed from command line using samba-tool utility interface which can be accessed directly from server’s VTY console or remotely connected through SSH.
Other, more intuitively and flexible alternative, would be to manage our Samba4 AD Domain Controller via Microsoft Remote Server Administration Tools (RSAT) from a Windows workstation integrated into the domain. These tools are available in almost all modern Windows systems.
The process of joining Windows 10 or older versions of Microsoft OS into Samba4 AD DC is very simple. First, make sure that your Windows 10 workstation has the correct Samba4 DNS IP address configured in order to query the proper realm resolver.
Open Control panel -> Network and Internet -> Network and Sharing Center -> Ethernet card -> Properties -> IPv4 -> Properties -> Use the following DNS server addresses and manually place Samba4 AD IP Address to the network interface as illustrated in the below screenshots.


Here, 192.168.1.254 is the IP Address of Samba4 AD Domain Controller responsible for DNS resolution. Replace the IP Address accordingly.
10. Next, apply the network settings by hitting on OK button, open a Command Prompt and issue a ping against the generic domain name and Samba4 host FQDN in order to test if the realm is reachable through DNS resolution.
ping tecmint.lan
ping adc1.tecmint.lan

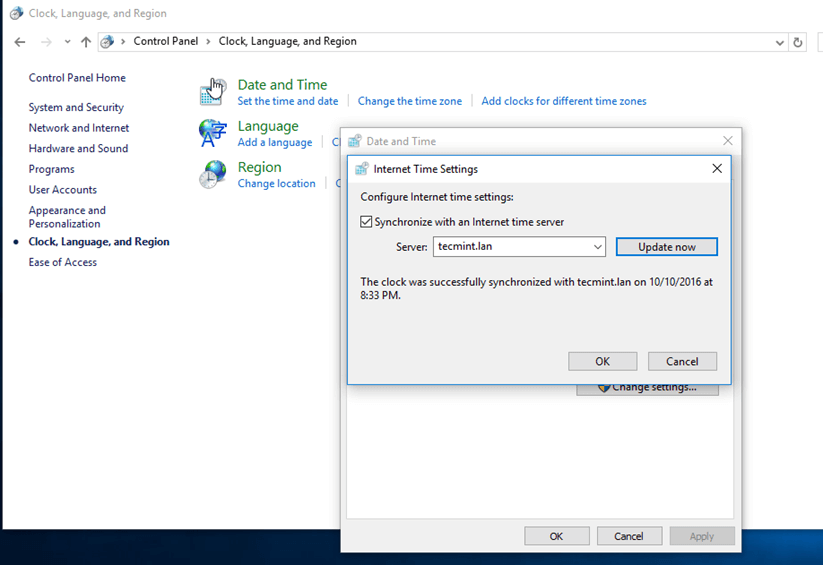
11. If the resolver correctly responds to Windows client DNS queries, then, you need to assure that the time is accurately synchronized with the realm.
Open Control Panel -> Clock, Language and Region -> Set Time and Date -> Internet Time tab -> Change Settings and write your domain name on Synchronize with and Internet time server field.
Hit on Update Now button to force time synchronization with the realm and hit OK to close the window.
12. Finally, join the domain by opening System Properties -> Change -> Member of Domain, write your domain name, hit OK, enter your domain administrative account credentials and hit OK again.
A new pop-up window should open informing you’re a member of the domain. Hit OK to close the pop-up window and reboot the machine in order to apply domain changes.
The below screenshot will illustrate these steps.


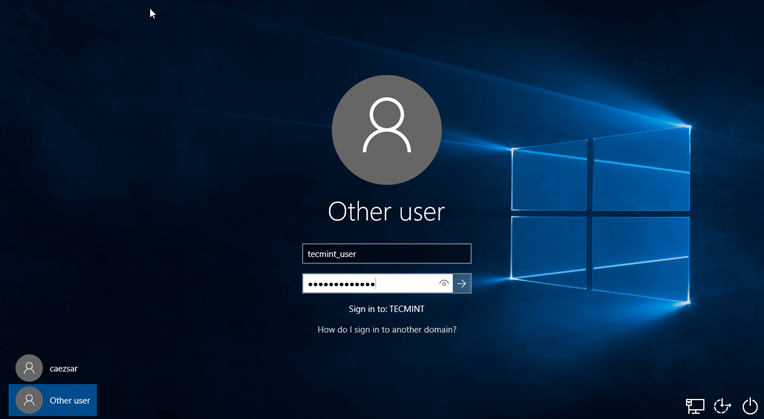
13. After restart, hit on Other user and logon to Windows with a Samba4 domain account with administrative privileges and you should be ready to move to the next step.
Step 4: Administer Samba4 AD DC with RSAT
14. Microsoft Remote Server Administration Tools (RSAT), which will be further used to administer Samba4 Active Directory, can be downloaded from the following links, depending on your Windows version:
- Windows 10: https://www.microsoft.com/en-us/download/details.aspx?id=45520
- Windows 8.1: http://www.microsoft.com/en-us/download/details.aspx?id=39296
- Windows 8: http://www.microsoft.com/en-us/download/details.aspx?id=28972
- Windows 7: http://www.microsoft.com/en-us/download/details.aspx?id=7887
Once the update standalone installer package for Windows 10 has been downloaded on your system, run the installer, wait for the installation to finish and restart the machine to apply all updates.
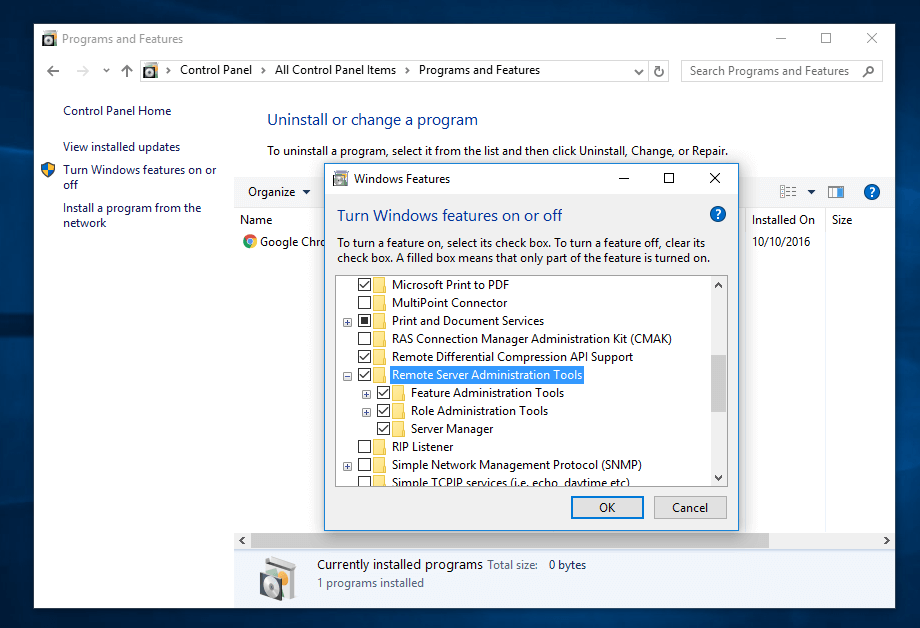
After reboot, open Control Panel -> Programs (Uninstall a Program) -> Turn Windows features on or off and check all Remote Server Administration Tools.
Click OK to start the installation and after the installation process finishes, restart the system.
15. To access RSAT tools go to Control Panel -> System and Security -> Administrative Tools.
The tools can also be found in the Administrative tools menu from start menu. Alternatively, you can open Windows MMC and add Snap-ins using the File -> Add/Remove Snap-in menu.

The most used tools, such as AD UC, DNS and Group Policy Management can be launched directly from Desktop by creating shortcuts using Send to feature from menu.
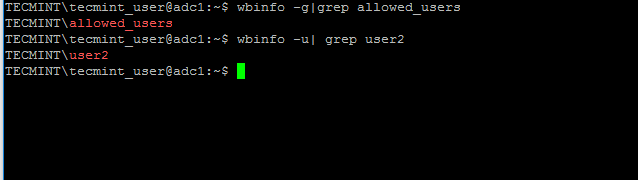
16. You can verify RSAT functionality by opening AD UC and list domain Computers (newly joined windows machine should appear in the list), create a new Organizational Unit or a new user or group.
Verify if the users or groups had been properly created by issuing wbinfo command from Samba4 server side.

That’s it! On the next part of this topic we will cover other important aspects of a Samba4 Active Directory which can be administered via RSAT, such as, how to manage DNS server, add DNS records and create a reverse DNS lookup zone, how to manage and apply domain policy and how to create an interactive logon banner for your domain users.
In this tutorial we will create a new Windows Server 2012 VM and add it to EXAMPLE.COM domain which we created in our previous article using Samba4 AD DC. We can use samba-tool to manage the Active Directory organization but with Windows it is always easier with GUI. Moreover it will feel friendly to anyone who is coming from a Windows background managing Windows Active Directory.
Install Windows Server 2012
Bringing up of Windows Server 2012 VM is not covered as part of this tutorial so I hope you already have your Windows VM or server.
Add Windows to Samba AD DC
Once your Windows Server is up and running, open the run prompt using Ctrl+r and enter ncpa.cpl
This will open Network Connections window
")
Choose your Ethernet Card, right click and select Properties
")
Select «Internet Protocol Version» based on the version you are using. Since I am using IPv4 network, I will choose V4, click on Properties
Provide the IP of your DNS server in the Preferred DNS server. Since we do not have Alternate DNS Server at the moment so we will leave it to only one DNS value.
")
Next open the Properties of This PC and click on Change settings
")
Select the Computer Name TAB and click on Change
")
Now here we need to provide the Realm Name of our Active Directory which in this case is EXAMPLE.COM
As soon as you click on OK you will get a login prompt to authenticate to your Samba Active Directory Domain Controller
")
If the authentication was successful then you should get a confirmation prompt
Next the server must be rebooted to complete the process of adding Windows Server to Samba Active Directory DC.
Install Remote Server Administration Tools (RSAT)
We have samba-tool command which can be used to manage Samba Active Directory DC from the Linux command line but it is more friendly to use the native Windows administrative tools instead. To do so we need to install the Remote Server Administration Tools (RSAT).
- To install RSAT feature, start Server Manager
- From the Manage menu, select Add Roles and Features.
- Click Next to the Before you begin screen.
- For Select installation type, select Role-based or Feature-based installation, and click Next.
- Select the server and click Next.
- Click Next to Server Roles as this does not require any additional role to be added.
- On the Features screen, scroll down to Remote Server Administration Tools,then expand the Feature and Role Administration Tools, select the tools you want installed, then click Next.
- Click Next to the Confirmation.
Click Install to complete the installation, then click Close once complete.
Check Domain Controllers
Now we will use our Windows Server to manage Samba Active Directory Domain Controller.
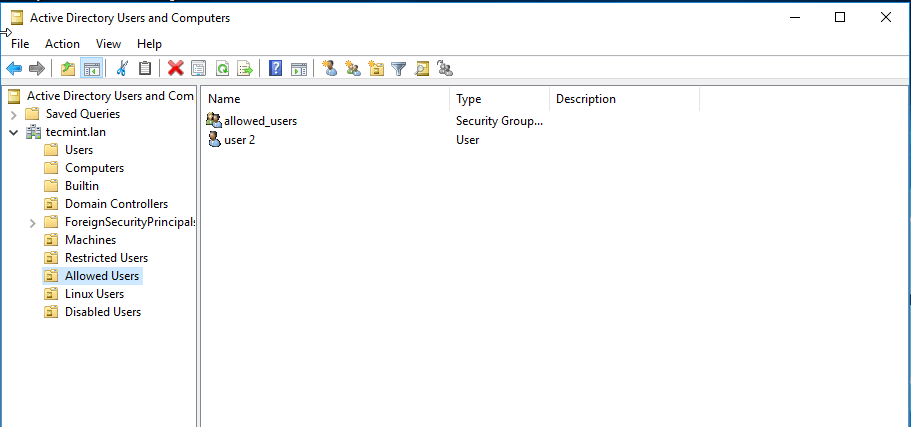
Open the run prompt on your windows workstation, and enter «dsa.msc» which is the shortcut for «Active Directory Users and Computers«
Check the available Domain Controllers. It shows the hostname of our samba-ad.example.com active directory
")
Create AD Users and Groups
Next to create users and groups in the Active Directory, click on the user icon
")
This will open a new pop up window where you can fill in the user details
")
Now you can follow the on-screen instructions to complete the process. Similarly you can create groups, add computers to the domain and much more.
Conclusion
In this tutorial we added Windows Server 2012 to our Samba Active Directory Domain Controller. Similarly you can also add any WIndows Workstation to the Samba AD and then install RSAT to manage your Domain Controller.
Lastly I hope the steps from the article to add Windows Workstation using Samba Domain was helpful. So, let me know your suggestions and feedback using the comment section.
Can’t find what you’re searching for? Let us assist you.
Enter your query below, and we’ll provide instant results tailored to your needs.