
If you can’t open Windows Defender or access any of its settings, or if you have accidentally uninstalled Windows Defender, this guide will show you how to reinstall Windows Defender in Windows 11 via PowerShell command lines.
Although Windows Defender has always been the default antivirus software that comes preinstalled with Windows, some users may find the app missing after certain events such as after updating Windows or after installing or uninstalling certain third party antivirus software.
When the problem occurs and you try to open Windows Defender, Windows may prompt you the “You’ll need a new app to open this Windows Defender link” pop up that ask you to find a compatible app from Microsoft Store to open Windows Defender related link or setting. This indicates that Windows Defender is either missing or corrupted in Windows 11.
Reinstall Windows Defender in Windows 11
You can reinstall Microsoft Windows Defender in Windows 11 by executing a single line of command through PowerShell or Windows Terminal. However, you will need administrator rights to be able to execute the command.
Thus, you will need to first open Windows Terminal or PowerShell with admin rights. To do so, right-click the Start button on the taskbar and select “Windows Terminal (Admin)“.
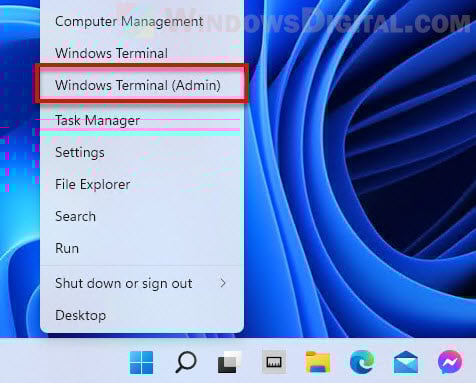
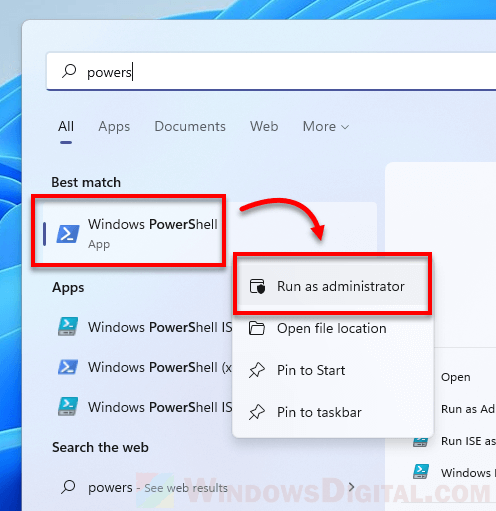
Alternatively, you can search for PowerShell through Start menu. Then, right-click Windows PowerShell from the search result and select Run as administrator.
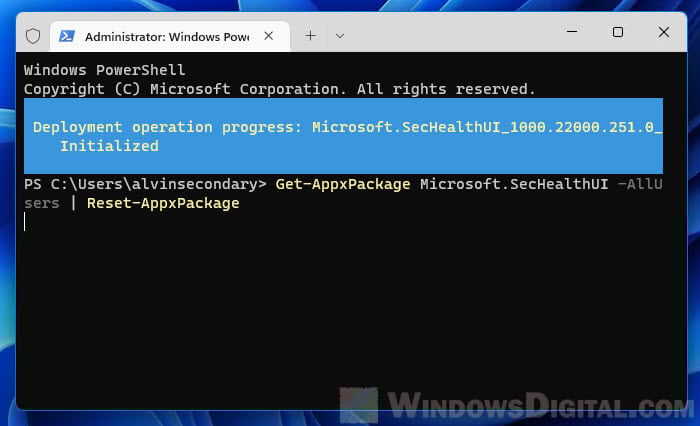
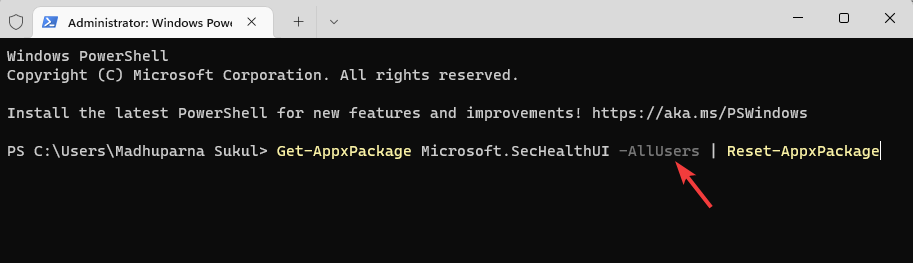
Once you have an elevated (admin) Windows Terminal or PowerShell window opened, enter the following command to reset and reinstall Windows Defender in Windows 11.
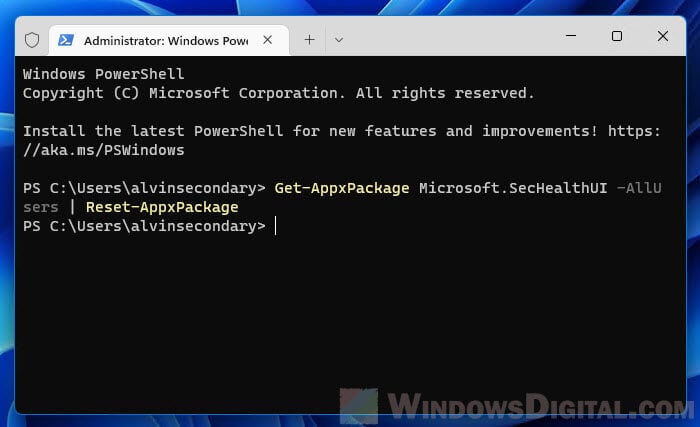
Get-AppxPackage Microsoft.SecHealthUI -AllUsers | Reset-AppxPackage
After executing the command, Windows Terminal will begin to reset Windows Defender and show a progress message that says “Deployment operation progress”. It may take a while for the process to complete.
Once completed, the progress message will disappear and Windows Terminal will start at a new line, which indicates the previous command has been executed.
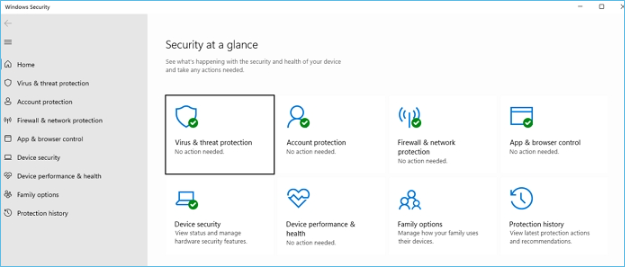
Now, you can press Win + i keys to open Settings and go to Privacy & security > Windows Security. This should open up the Windows Security (Windows Defender) settings like it used to.
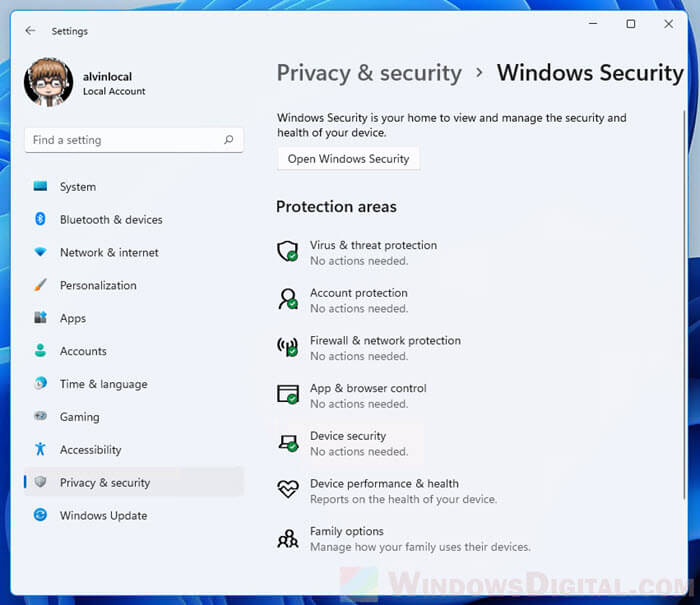
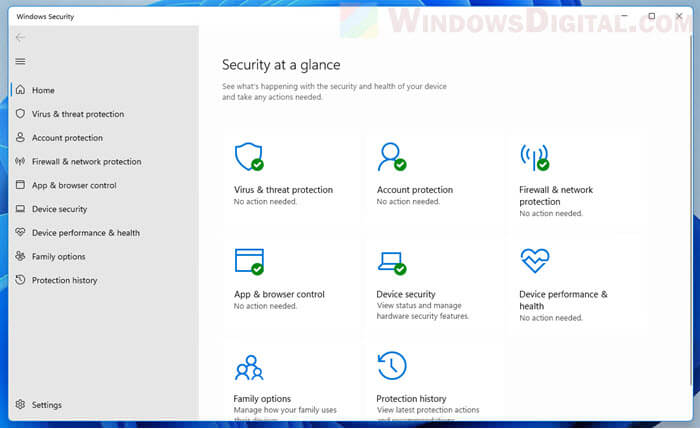
To further verify if Windows Defender is successfully installed, click on the “Open Windows Security” button to open the Windows Security window. From there, you can manage your computer’s security such as virus protection, firewall, network protection, browser control, etc.
PowerShell shows errors when executing the command
If the command above doesn’t work or if you receive errors when you execute the command, try the following commands instead to reinstall Windows Defender in Windows 11.
In an elevated (admin) Windows Terminal or PowerShell window, enter the following commands in the following order.
Set-ExecutionPolicy Unrestricted
Get-AppXPackage -AllUsers | Foreach {Add-AppxPackage -DisableDevelopmentMode -Register "$($_.InstallLocation)\AppXManifest.xml"}
Set-ExecutionPolicy Default
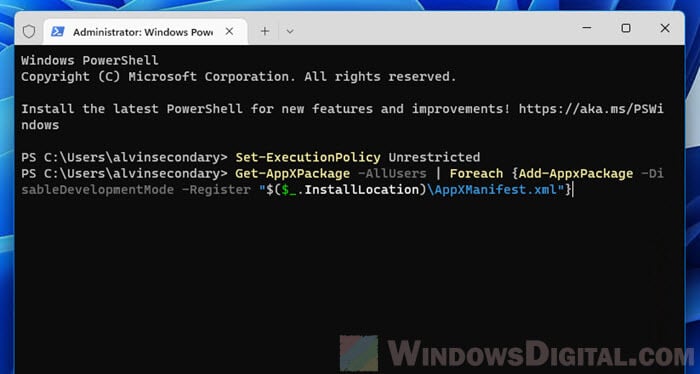
Since the command requires execution policy to be set to unrestricted in order to be executed successfully, you should set the execution policy back to its default (by running the third line of command as shown above) after the Get-AppXPackage process is completed.
If you receive an error that says “Access is denied”, it indicates that you do not have the rights to run the command. As mentioned above, you need to open Windows Terminal or PowerShell as administrator in order to execute the command successfully.
How to enable Windows Defender if you already have an existing antivirus software
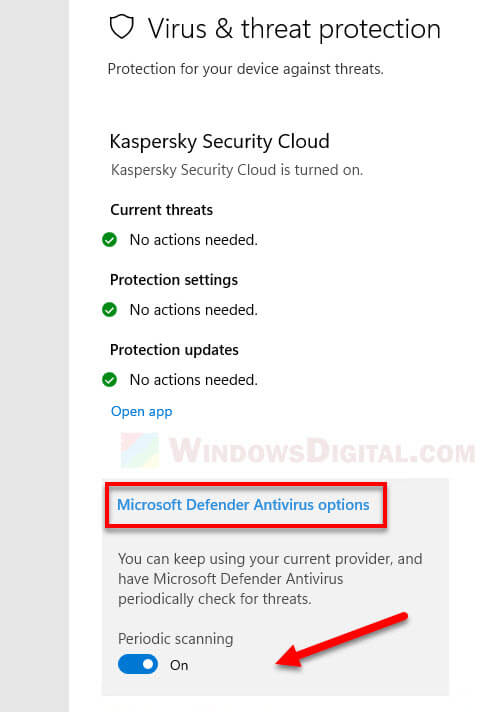
If you already have an existing third party antivirus program actively running and protecting your PC, Microsoft Defender Antivirus will be disabled. However, you can re-enable Microsoft Defender periodic scanning to have it periodically check for threats in conjunction with your other antivirus software.
To enable Windows Defender with periodic scanning when you are already using an existing third party antivirus software, open Settings and navigate to Privacy & Security > Windows Security, then click the Open Windows Security button.
Next, select Virus & threat protection and click Microsoft Defender Antivirus options. This will expand the setting and you should then be able to see a toggle option. Toggle on the Periodic scanning option to enable Windows Defender periodic scan while also using your other antivirus software.
Readers help support Windows Report. We may get a commission if you buy through our links.
Read our disclosure page to find out how can you help Windows Report sustain the editorial team. Read more
XINSTALL BY CLICKING THE DOWNLOAD
FILE
Windows 11 has its antivirus, but if it encounters issues, you might need to reinstall Windows Security on Windows 11, and this guide will show you a few ways to do it
How do I reinstall Windows Defender in Windows 11?
1. Use Windows PowerShell
- Right-click on the Start button and select Windows Terminal (Admin) from the menu.
- Copy and paste the below command in the Terminal and hit Enter:
Get-AppxPackage Microsoft.SecHealthUI -AllUsers | Reset-AppxPackage
- Once the command is successfully executed and it generates the success message, exit the Terminal.
Alternatively, you can use the following command instead: PowerShell -ExecutionPolicy Unrestricted -Command "& {$manifest = (Get-AppxPackage WindowsDefender).InstallLocation + '\AppxManifest.xml' ; Add-AppxPackage -DisableDevelopmentMode -Register -ForceApplicationShutdown $manifest}
Using these commands, you should be able to repair Windows Security in Windows 11.
2. Reset Windows Security via Settings
- Press the Windows key + X and select Apps and Features.

- Locate Windows Security, click the three dots next to it, and choose Advanced options.

- Next, click on Reset and click Reset again to confirm.


How do I reset Windows Security in Windows 11?
You can achieve this from the Settings app, by following the guides from Solution 2 of this guide.
- Microsoft Defender will allow SOC teams and admins to refine the threat detection process
- How to Delete Windows 11 Saved Passwords
- How to Download DirectX 12 Agility SDK [Installation Guide]
- How to Open PPTX File in Windows 11? Use These 4 Ways
You can try these methods if Windows Security is not opening in Windows 11 or if Windows Defender is missing. However, if the problem persists, your only option might be to reset Windows 11 or use a different antivirus software.
As for other issues, we wrote a guide on what to do if Windows Defender turns off on Windows 11, so don’t miss it for more information.
What method do you use to reinstall Windows Defender on Windows 11? Let us know in the comments section below.
Madhuparna Roy
A diploma holder in computers and with a keen interest in technology, Madhuparna is passionate about writing How-to guides and helping people solve the most intricate Windows issues.
It all started with the evolution of mobile phones and Google, and that has now settled with Windows.
Every Windows computer comes with Windows Defender as its anti-malware tool by default. It is like the first line of defense in your Windows PC against malware/viruses. Although it has been found in many cases that the Windows defender is not showing up or Windows defender is missing on Windows 11/10 PCs.
One of the many issues users encounter while using Microsoft’s built-in antivirus on their system is that they can’t find Windows defender on their PC/laptops. Users have previously expressed dissatisfaction with Windows 11 Defender being disabled. However, several users were unable to locate the software at all on their PC.
Why Is There No Windows Defender On My Windows 11 PC
If you are wondering why don’t you have Windows defender on your Windows 11 PC?
- This could be due to many reasons including malware invasion and service issues.
- Additionally, modifications to the registry that disable Windows Defender could be the root of the problem.
With all said, now let us see the possible fixes for the issue.
Read Also: Is Windows Defender Good Enough For PC Protection
How to Fix Windows Defender Missing on Windows 11/10 PC
This article describes how to install Windows Defender on Windows 11/10 PC/laptops using the Settings app or PowerShell. So without further ado, Let’s get started.
Method 1: Install Windows Defender via PowerShell
You cannot install Windows Defender like you can other programs since it is not installed on your PC in the same way as other programs. Instead, utilize a PowerShell code to complete the task by following these instructions. It can take five seconds to several minutes to finish.
- Press the Windows key with the key X to open the WinX
- Now from the list, choose Windows terminal (Admin).
- Then paste these exact commands and press the Enter key after each command:
Set-ExecutionPolicy Unrestricted
Get-AppXPackage -AllUsers | Foreach {Add-AppxPackage-DisableDevelopmentMode – Register “$($_.InstallLocation) \AppXManifest.xml”}.

All default Windows applications can be reinstalled with the command above. This is extremely helpful if a file error during an update prevented Windows Defender from being installed on Windows 11.
Read Also: What To Do If Windows Defender Keeps Saying Threats Found
Method 2: Repair and install Windows Defender
Windows Defender can occasionally be installed improperly or incompletely. In Windows 11, the command listed below will disassemble every component of the computer and reinstall it from the scratch.
- Press the Windows key with the key X to open the WinX
- Now from the list, choose Windows terminal (Admin).
- Then paste this exact command and press the Enter key:
Get-AppxPackage Microsoft.SecHealthUI-AllUsers | Reset-AppxPackage

Read Also: How To Enable Ransomware Protection In Windows Defender?
Method 3: Reset Windows Defender
- Press the Windows key with the key I to open Settings and click on
- Now click on Default Apps.

- Scroll down to the bottom of the page and click Reset in front of Reset all default apps.


Read Also: How To Clear The Windows Defender Protection History On a PC
To Wrap This Up
So, in this way you can fix this Windows Defender missing on Windows 11/10 PCs. Contrary to several other problems, this one is simple to resolve, as was just explained above. We sincerely hope that this useful advice will help you reactivate Windows Defender to safeguard your computer.
Subscribe to our newsletter to ensure that you never miss a tech update. And for more such troubleshooting guides and tips & tricks related to Windows, Android, iOS, and macOS, follow us on Facebook, Instagram, and YouTube
Next Read: 5 Solutions to Fix the “Windows Defender Failed to Initialize” Issue
Windows Defender is the default anti-malware program on every Windows PC. Users complain about Windows Defender missing in action from their computers for various reasons. Common causes of such issues include security program conflicts or corrupted files. Interestingly, you can find effective solutions to the Windows Defender missing problem within a few steps. In addition, you can also seek an alternative for safeguarding your data under any circumstance. Let’s solve the problem of the missing Windows Defender.

See also:
Windows Defender Download
Quick Solutions
Microsoft Defender is one of the leading anti-malware services available on Windows. Therefore, it is also referred to as Windows Defender in many cases. However, you may end up missing the Windows Defender on your computer on certain occasions.
You wouldn’t want to miss the most powerful antivirus program associated with Windows 11. Most importantly, it is an essential tool for the safety of your computer from numerous threats such as viruses, malware attacks, spyware, and other issues. If Windows Defender does not work, you don’t have to panic. The following post will outline a few simple solutions for the missing Windows Defender on your Windows 11 PC.
Causes of Missing Windows Defender on Windows 11
The best way to solve the problem of Windows Defender involves the identification of the causes of the problem. Why don’t you see the Windows Defender protecting your system against malicious threats? The most common reasons for the missing Windows Defender include deleted Windows Defender files or conflicts with another security program. Some other reasons are listed below:
- You don’t have the latest updates for Windows 11.
- The time and date on your computer are incorrect.
- You have turned off Windows Defender manually.
- A system configuration error prevents Windows Defender from launching.
- Windows Defender has been turned off due to a Group Policy.
📖Read Also: Windows 11 Virus & Threat Protection Not Working
For example, if you have installed new antivirus software, it can interfere with the working of Windows Defender. Generally, you would find the following common causes for which Windows Defender is not visible on your system.
Full Analysis: Is Windows 11 Need Any Antivirus
Regardless of having built-in Windows Defender, antivirus software is essential to keep malware and spiteful attacks at bay! Consider using the EaseUS Todo Backup tool for complete PC protection.
How to Fix Windows Defender Missing Windows 11 Problem
As you can notice, the different causes for the missing Windows Defender problem are pretty trivial. With a keen eye for detail, you can identify these causes and resolve the issue with simple troubleshooting methods. For example, you can try resetting Windows Defender as the first solution. However, if you don’t find any likely results with the simple solutions, you can try the following solutions.
- Method 1. Re-enable Windows Defender If It’s Disabled
- Method 2. Restart Your System
- Method 3. Check for System Updates
- Method 4. Download and Run Microsoft Safety Scanner
- Method 5. Reinstall Defender from the Microsoft Website
Method 1. Re-enable Windows Defender If It’s Disabled
You can use the following steps to enable Windows Defender manually if it has been disabled by accident.
Step 1. Open «Settings» and access «Privacy & Security».
Step 2. Select «Windows Security» and click «Virus & threat protection».
Step 3. Open the Manage Settings link and enable «Real-Time Protection with Windows Defender».
Method 2. Restart Your System
One of the standard solutions for almost every problem is to restart your system. Here are the simple steps to restart your system.
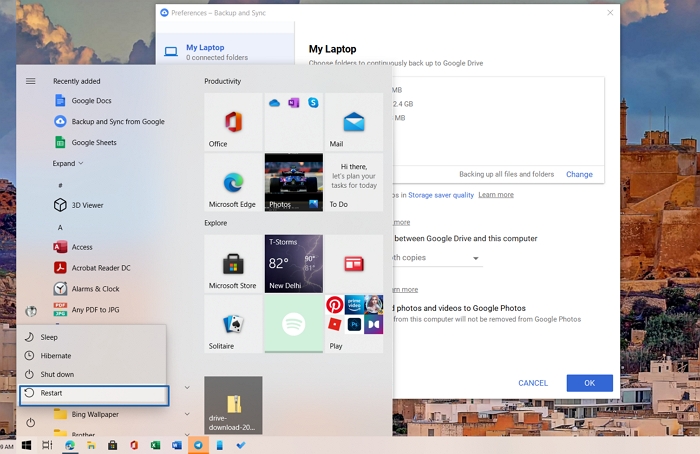
Step 1. Save all your work.
Step 2. Click on the «Windows» button
Step 3. Then click on the «Power» button, and then choose the «Restart» option.
Method 3. Check for System Updates
The lack of the latest updates can also be one of the common reasons for Windows Defender not working on your system. Here are a few easy steps to check for Windows updates.
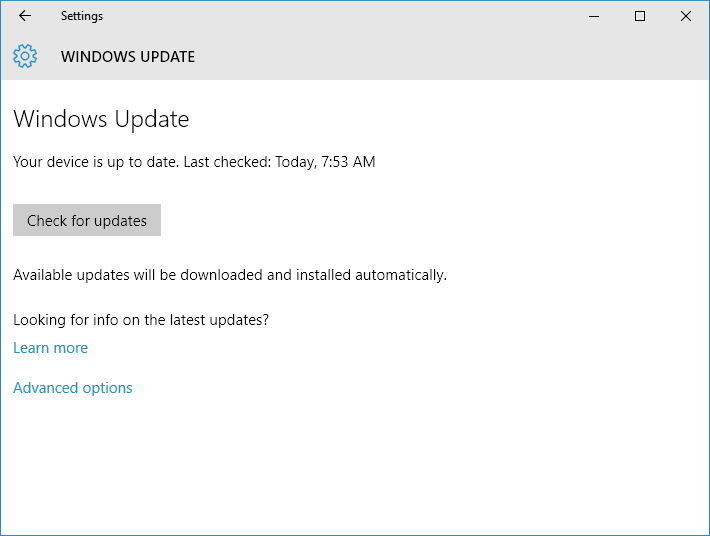
Step 1. Open Windows settings using «Win» and «I» keys.
Step 2. Find «Windows Update» on the left-hand side of the screen and click on it.
Step 3. Look for the «Check for updates» option and click on it for running Windows updates manually.
Method 4. Download and Run Microsoft Safety Scanner
Microsoft Safety Scanner is a powerful tool tailored to identify and remove malware from Windows systems. You can download it and run a scan with the following steps.
Step 1. Download Microsoft Safety Scanner from the official Microsoft Support website and complete the installation process according to the instructions.
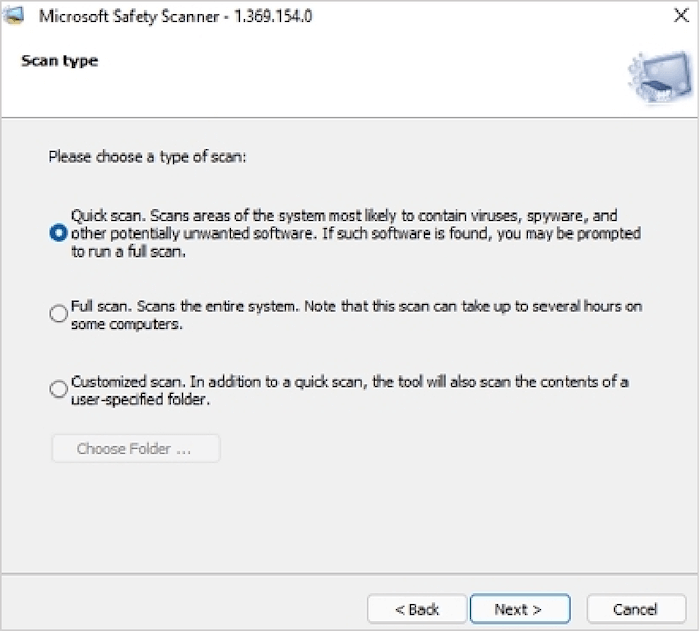
Step 2. Once you have completed the installation process, you will find three different scanning options: Quick scan, Full scan, and Customized scan.
Step 3. Depending on the type of scan you select, the Microsoft Safety Scanner would take several minutes for the scanning process.
Method 5. Reinstall Defender from the Microsoft Website
If the above solutions don’t work out, you must choose the final resort, i.e., reinstalling Windows Defender. Microsoft Defender is not available directly through the website, but you can download it using Windows terminal or PowerShell.
Step 1. Open Windows Terminal with admin permission.
Step 2. Copy-paste the following command and press the Enter key.
Get-AppxPackage Microsoft.SecHealthUI -AllUsers | Reset-AppxPackage
Step 3. It will install and fix any problem related to Defender in Windows.
Once done, search for Windows Defender in the Start Menu and open it. Make sure to setup the real-time protection.
Keep Data From Viruses Attack Even Windows Defender Go Missing
The problem of missing Windows Defender can have critical consequences for your computer. Without the default anti-malware protection tool, your system will likely be vulnerable to viruses and malware attacks. However, you need to note that whether you solve the issue of a missing Windows Defender or not, your data is at risk.
Therefore, your priority should be safeguarding your data above everything else. EaseUS Todo Backup tool can offer an exclusive opportunity for you to relax regarding data backup and security.
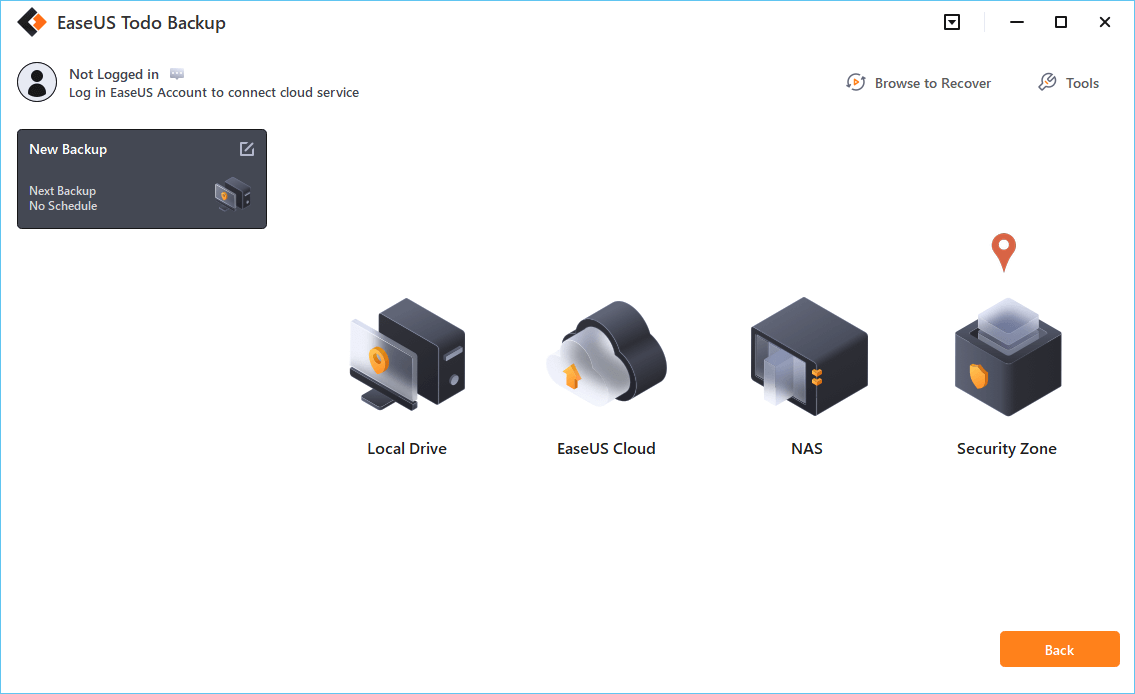
EaseUS Todo Backup is a powerful, one-stop destination for all your data backup requirements. You can easily take data backup from disks, files, operating systems, and partitions and store it according to your preferences. It also ensures easier data recovery to ensure you always have control over your data. However, the most crucial feature of EaseUS Todo Backup is called Security Zone. It’s a tool that creates a secret partition on your computer that cannot be explored or changed by the user or third-party apps or the Windows itself. This feature allows EaseUS Todo Backup to help protect your important data from ransomeware.
You can follow the steps listed below to keep your data from viruses attack even Windows Defender go missing.
Step 1. Select Backup Contents
On the main window, click the big question mark button to select backup contents. You can choose to back up individual files, entire disk or partition, operating system and mails.

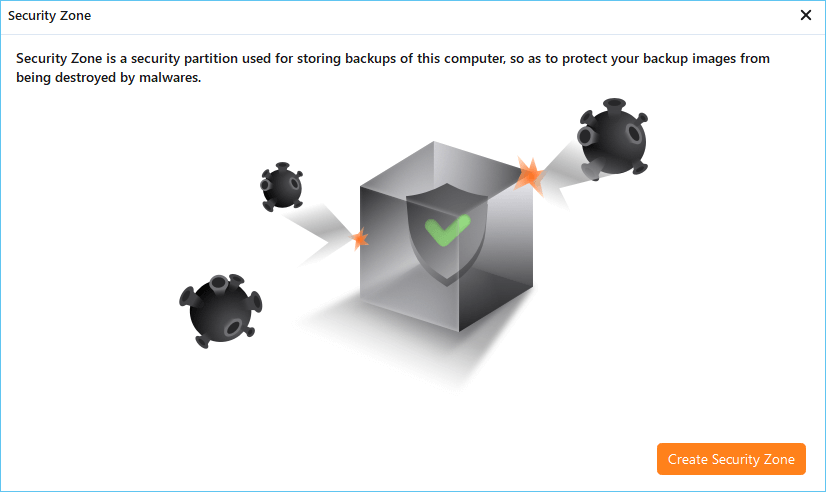
Step 2. Select Security Zone as Backup Destination
While selecting backup destination, you can see the Security Zone option. Click Security Zone and use it as a backup destination.
However, if you’re first to use the Security Zone function, EaseUS Todo Backup will guide you to create one. Click «Create Security Zone«.
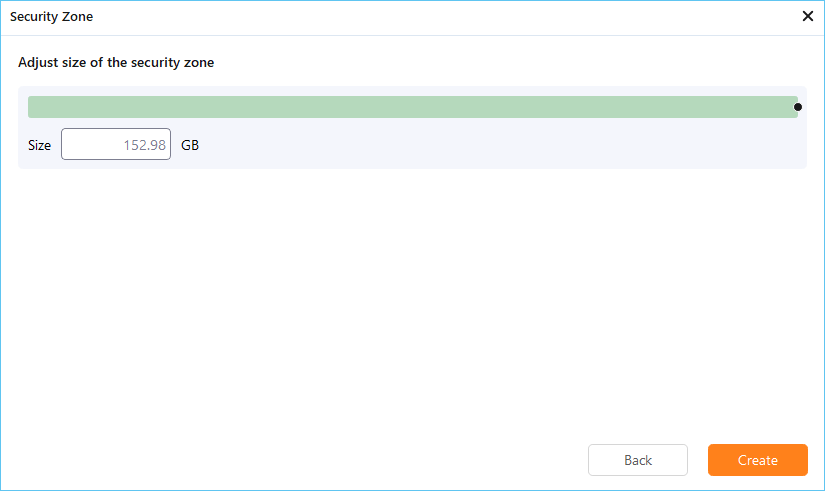
Choose a partition with enough free space for your backups and then click «Continue«.
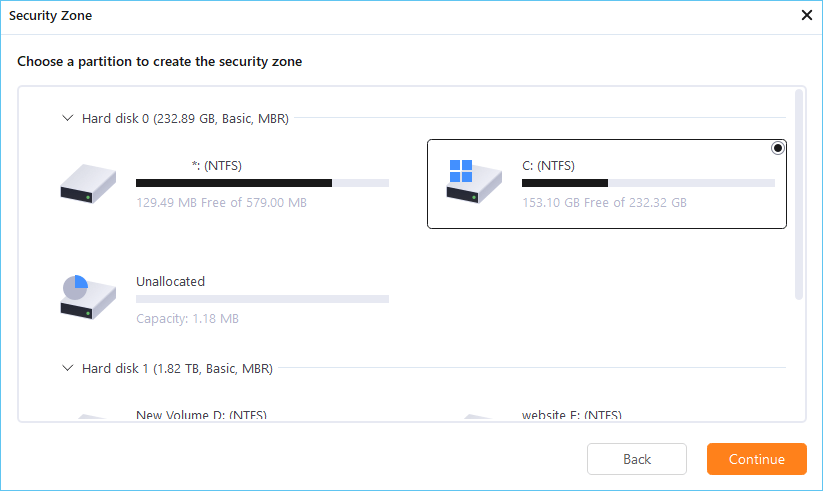
You can adjust the partition size for the security zone. Click «Create» to get it done.
Step 3. Execute the backup task
Click «Backup Now» to start the backup process. Your backups of OS, files, drives and mails in the security zone will be fully protected from being seen or destroyed by virus, ransomeware and trojan.
Bottom Line
The curious case of a missing Windows Defender can be annoying and troublesome if left unchecked. You don’t want to risk your valuable data to unprecedented malware attacks, viruses, or other threats. Therefore, you must identify the causes of the problem, such as a conflicting security program. Subsequently, you must implement the necessary troubleshooting methods and check whether Windows Defender works. Above everything else, you can ensure secure backup of your data with EaseUS Todo Backup, a reliable tool for safe data backup and recovery.
Xx_Light_xX
⭐⭐⭐⭐⭐
Здравствуйте, у меня возникла проблема с Защитником Windows 11. После его удаления, я не знаю, как его восстановить. Подскажите, пожалуйста, как можно восстановить Защитник Windows 11 после удаления?
Windows_Pro
⭐⭐⭐⭐
Для восстановления Защитника Windows 11 после удаления, вы можете попробовать следующее: зайдите в Панель управления, затем в Программы и компоненты, и нажмите на «Турбо-режим» или «Восстановить Windows». Если это не сработает, то можно попробовать использовать команду sfc /scannow в командной строке с правами администратора.
IT_Specialist
⭐⭐⭐⭐⭐
Еще один способ восстановить Защитник Windows 11 — это использовать встроенную утилиту «Восстановление системы». Для этого зайдите в Панель управления, затем в Система, и нажмите на «Восстановление системы». Выберите дату, когда Защитник Windows еще работал, и следуйте инструкциям на экране.
Microsoft_Fan
⭐⭐⭐
Если вышеуказанные методы не помогли, то можно попробовать переустановить Защитник Windows 11. Для этого зайдите в Microsoft Store, найдите Защитник Windows, и нажмите на «Установить». Если у вас возникли проблемы с доступом к Microsoft Store, то можно попробовать использовать команду wsreset.exe в командной строке с правами администратора.
Вопрос решён. Тема закрыта.
- Могут ли мыши залезть на кровать к спящему человеку?
- Что делать, если поступил перевод от незнакомого человека?
- Сколько времени требуется Амоксиклаву, чтобы начать оказывать терапевтическое действие у взрослых?