
Все способы:
- Способ 1: Восстановление системных файлов
- Способ 2: Откат к точке восстановления
- Способ 3: Копирование исполняемого файла
- Вопросы и ответы: 0
Важно! В этой статье будет рассказываться о том, как восстановить работу «Защитника Windows» после его полного удаления. Этот процесс подробно описывался в другой статье на нашем сайте, ссылка на которую дана ниже. Если вы ранее выполняли представленные там действия, значит, текущее руководство будет актуально.
Подробнее: Как удалить «Защитник Windows» в Windows 10
Примечание! Если штатный антивирус Windows 10 вы не удаляли, а просто отключали средствами операционной системы, для восстановления его работы обратитесь за помощью к другой статье на нашем сайте, перейдя по ссылке ниже.
Подробнее: Как включить «Защитник Windows» в Windows 10

Способ 1: Восстановление системных файлов
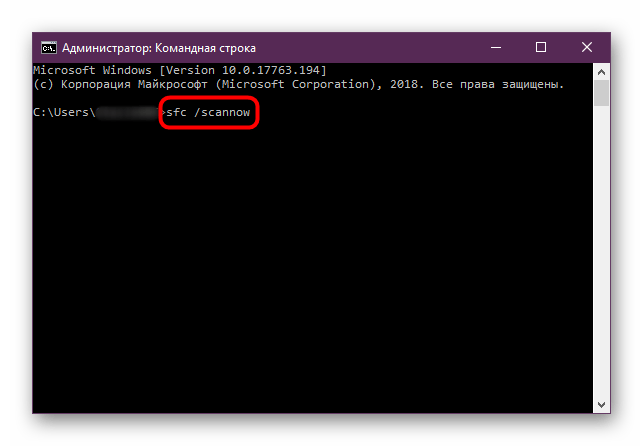
Удаленный исполняемый файл «Защитника Windows» является системным, поэтому его можно попытаться восстановить с помощью специальной предустановленной консольной утилиты SFC. Это несложная процедура, достаточно только открыть «Командную строку» и инициализировать запуск приложения путем ввода команд. Этот процесс детально описывается в другом материале на нашем сайте, при необходимости ознакомьтесь с изложенной там информацией, воспользовавшись ссылкой ниже.
Подробнее: Восстановление целостности системных файлов в Windows 10
Способ 2: Откат к точке восстановления
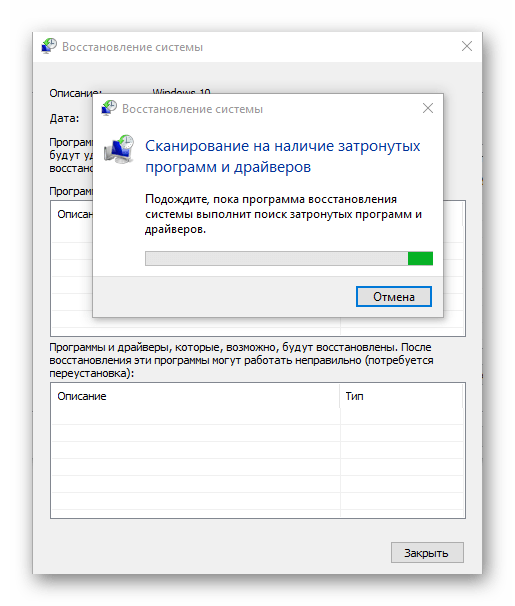
Попробовать восстановить работу «Защитника Windows» можно путем отката операционной системы до контрольной точки. Только в этом случае важно, чтобы она была сделана до удаления штатного антивируса, иначе способ окажется неэффективным. При удовлетворении этого условия произведите откат через соответствующее приложение в Windows 10. Если вы не знаете, как это сделать, воспользуйтесь руководством, представленным в другой статье на нашем сайте.
Подробнее: Как откатить Windows 10 до точки восстановления
Обратите внимание! Создавать контрольные точки в Windows 10 рекомендуется систематически. Это позволит в любой момент при появлении неисправностей совершить откат до рабочей версии, не затрачивая время на устранение проблем вручную. Ознакомьтесь со статьей на нашем сайте, в которой подробно рассказывается об этой процедуре.
Подробнее: Как создать точку восстановления в Windows 10

Способ 3: Копирование исполняемого файла
Если ни один из приведенных выше способов не помог вам, установить «Защитник Windows» придется вручную. Эта процедура отличается от стандартной инсталляции программного обеспечения в операционной системе, поэтому далее она будет рассмотрена подробнее.
Компания Microsoft не предоставляет установочного файла «Защитника Windows», поэтому файлы антивируса придется поместить в корневую директорию на системном диске вручную. Но прежде их следует перенести на свой компьютер, предварительно скопировав с другого. Расположение исполняемого файла указано ниже:
C:\Program Files\Windows Defender\MsMpEng.exe
Примечание! Вы также можете скачать исполняемый файл «MsMpEng.exe» из интернета, но этого делать не рекомендуется, если вы не уверены в надежности источника. Есть немалая вероятность того, что вы занесете в свою операционную систему вирус.
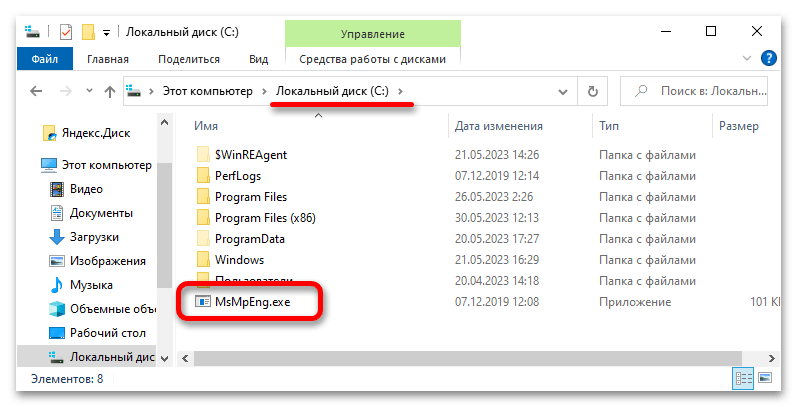
Получив в свое распоряжение исполняемый файл «Защитника Windows», поместите его в корневой каталог диска C, чтобы к нему был быстрый доступ при выполнении действий, описанных далее в этой статье.
После этого необходимо будет запустить «Командную строку» в среде восстановления. Требуется это для того, чтобы у вас была возможность редактировать системные разделы.
- Перезапустите компьютер с зажатой клавишей Shift. Для этого откройте меню «Пуск», щелкните по кнопке выключения, зажмите указанную клавишу и кликните по пункту «Перезагрузка».
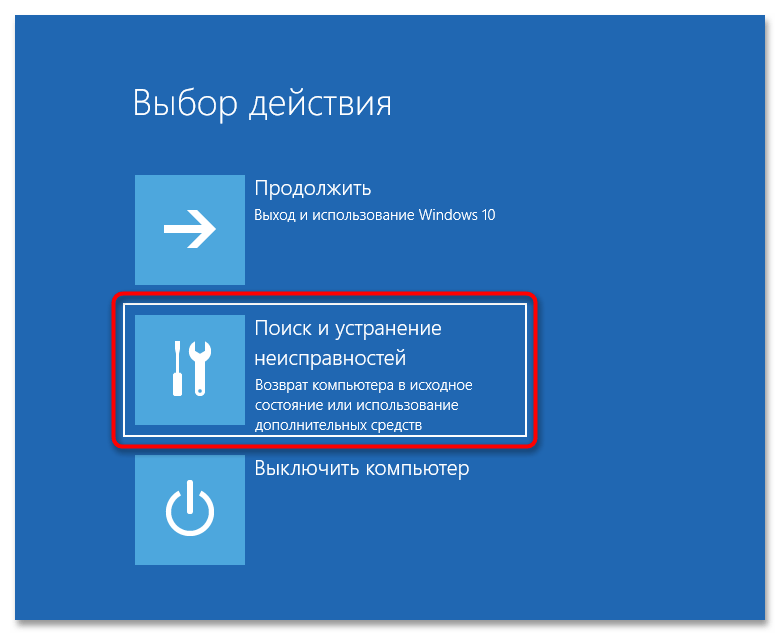
- Дождитесь, пока компьютер перезапустится и на экране появится главное меню среды восстановления. Затем перейдите в раздел «Поиск и устранение неисправностей».
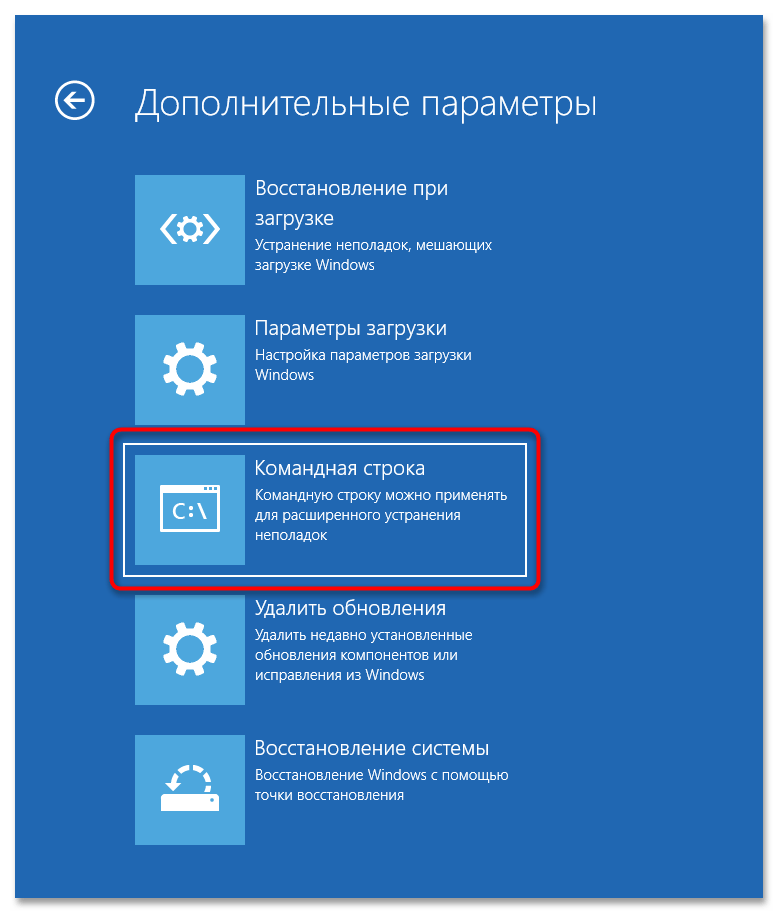
- Далее проследуйте в меню «Дополнительные параметры», щелкнув левой кнопкой мыши по одноименному элементу.
- Запустите «Командную строку», нажав по ней в списке дополнительных параметров среды восстановления.
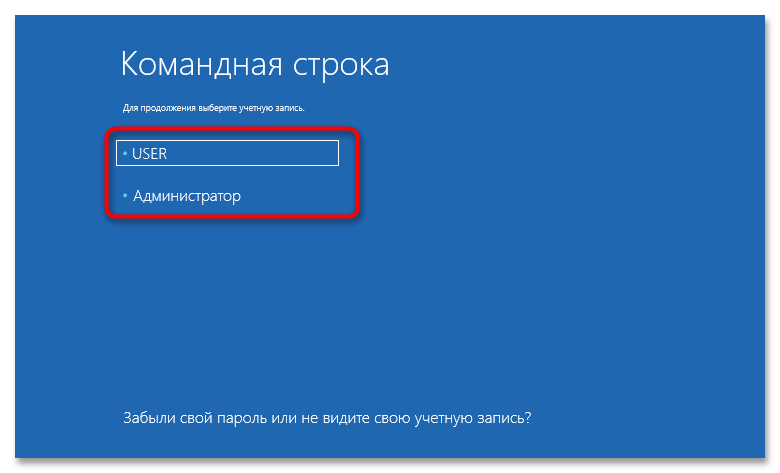
- На экране выбора учетных записей Windows 10 выберите любую, к которой у вас есть доступ. Для этого единожды кликните левой кнопкой мыши по ее названию.
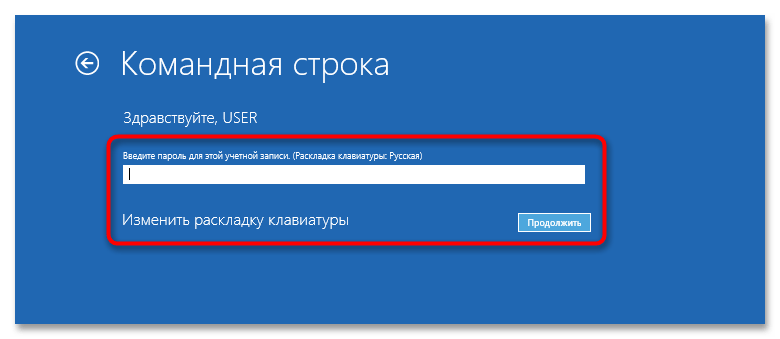
- При необходимости введите пароль и нажмите по кнопке «Продолжить». Если пароль не был задан, просто оставьте поле пустым.
- Дождитесь перезагрузки компьютера, пока на экране не отобразится «Командная строка», запущенная в среде восстановления.


Теперь необходимо путем ввода специальных команд переместить файл с системного диска в корневую директорию «Защитника Windows». Важно четко следовать дальнейшим указаниям, чтобы процедура прошла успешно, поэтому внимательно следите за тем, какие команды вводите.
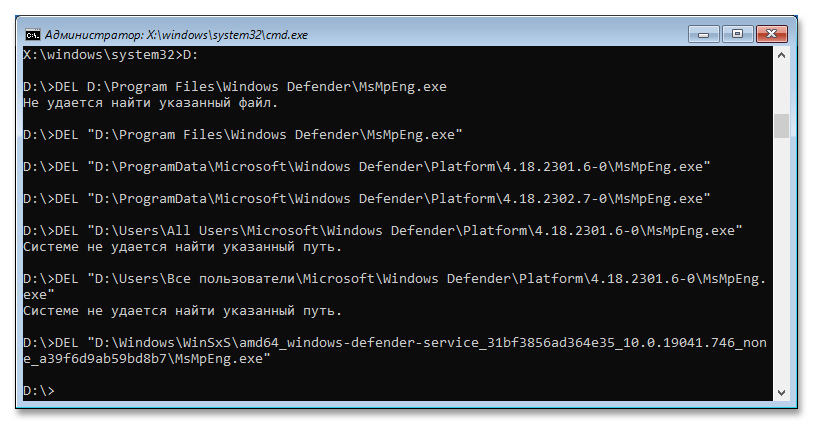
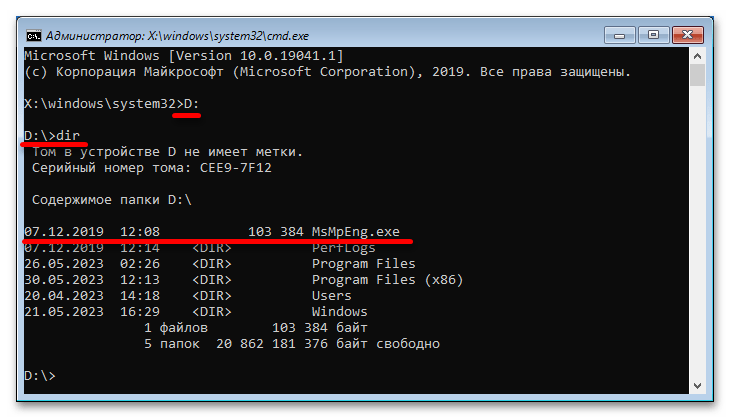
- По умолчанию «Командная строка» в среде восстановления открывается на диске X, поэтому необходимо перейти на системный раздел, обозначающийся в Windows 10 буквой C. Но здесь диски спутаны, зачастую системный раздел имеет букву D, это необходимо выяснить. Для этого перейдите на него и просмотрите содержащиеся в корневой директории папки. Чтобы это сделать, поочередно выполните приведенные ниже команды
D:
dirНа экране отобразится список всех файлов текущего каталога. Найдите ранее помещенный исполняемый файл «Защитника Windows» под названием «MsMpEng.exe». Если он здесь есть, значит, диск определен верно и вы можете продолжать следовать инструкции. Если его нет, перейдите на другой диск, введя его букву, следующую по алфавиту, и нажав Enter, например
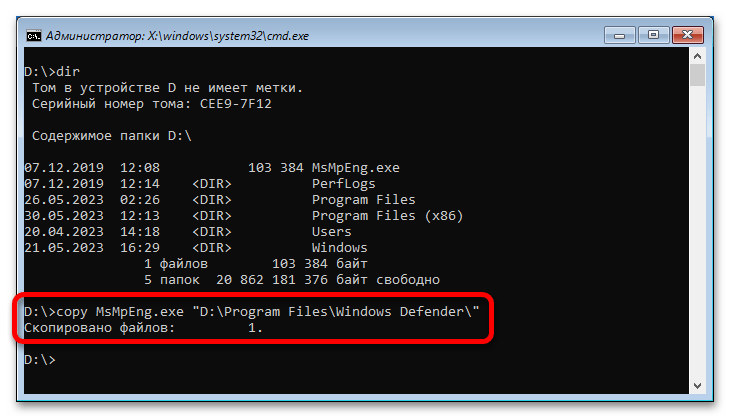
E:,F:, илиH:. - Переместите исполняемый файл антивируса в его корневую директорию. Для этого введите специальную команду, указанную ниже:
copy MsMpEng.exe "D:\Program Files\Windows Defender\"Обратите внимание! У вас начальная буква диска может отличаться. При необходимости смените ее на ту, которую вы определили на предыдущем шаге.
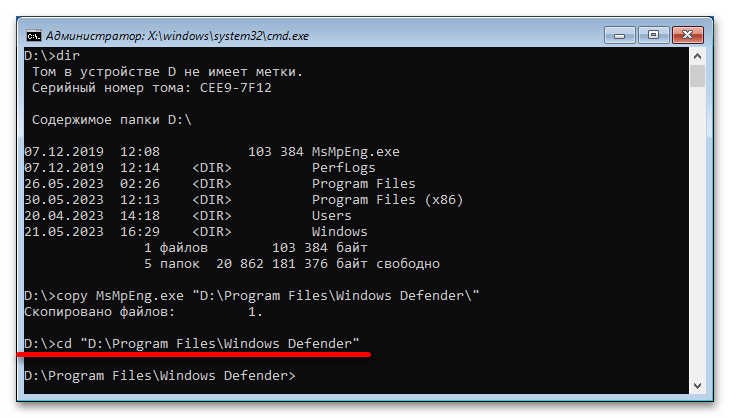
- Чтобы убедиться в успешном перемещении файла, перейдите в корневую директорию «Защитника Windows». Для этого нужно воспользоваться командой
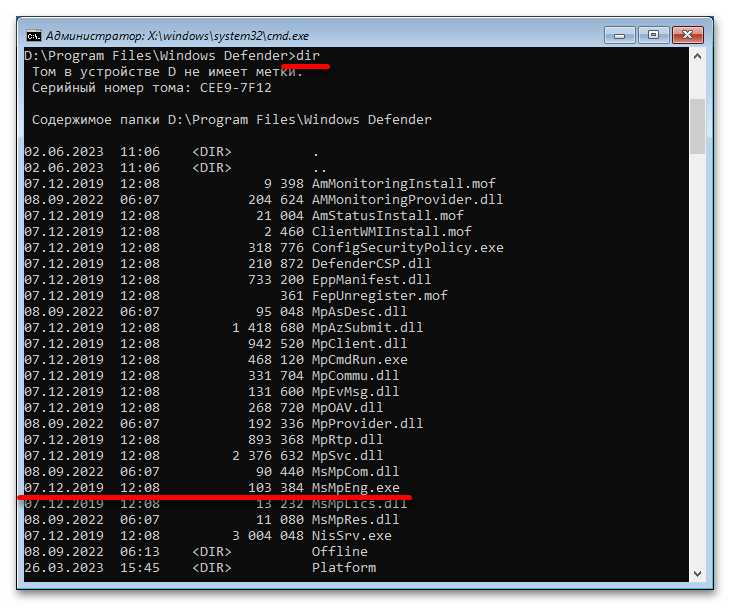
cd, указав целевой каталог.cd "D:\Program Files\Windows Defender\" - После перехода отобразите в окне консоли список всех содержащихся в этой папке файлов. Для этого воспользуйтесь уже знакомой командой
dir. Найдите в списке файл с названием «MsMpEng.exe». Если он есть, значит, все прошло успешно и можно перезагрузить компьютер, выполнив вход в операционную систему.
Если файла в директории нет, повторите выполнение этой инструкции с самого начала. Возможно, вы неверно определили букву системного диска или неправильно ее указали при выполнении команды копирования.
Важно! Если после выполнения всех действий, описанных в этом способе, работу «Защитника Windows» восстановить не получилось, попробуйте повторно воспользоваться первым методом из статьи, проведя восстановление системных файлов с помощью утилиты SFC.
Наша группа в TelegramПолезные советы и помощь
Windows 10 Creators Update has a lot of changes, improvements, and visual and performance enhancements. One of the major changes Microsoft has made to the Creators Update is giving a complete makeover to the regular Windows Defender.
The new Windows Defender user interface brings all the anti-virus, firewall, smart screen, device health, and family options in one Window. You can access it either from the Settings app or by searching in the Start Menu. As good as the new Windows Defender user interface is, if you don’t like it or if you just want to the old user interface back, here’s how to get it back.
Restore Old Windows Defender User Interface
To restore the old Windows Defender user interface in Windows 10 Creators Update, you don’t have to modify the Registry Editor or Group Policy settings. All you have to do is create a simple shortcut.
To start, right-click on the desktop and select the option “New” and then “Create Shortcut.”

The above action will open the “Create Shortcut” window. Here, click on the “Browse” button appearing right next to the empty field.

In the Browse window, navigate to the following location: “C:\Program Files\Windows Defender\.” Select the “MSASCui.exe” file and click on the “OK” button.
As soon as you click on the button, the file path will be added to the blank field in the main window. Click on the “Next” button to continue.

Now, name your shortcut and click on the “Finish” button. In my case I named my shortcut “Windows Defender (Old UI).”

That’s it. You are done creating the Windows Defender shortcut.
Double-click on the newly created shortcut, and the Windows Defender will be opened with the old user interface. You may receive a “What’s New” window telling you to turn on Windows Defender. Simply click on the “Turn On” button and then “Close” to close the window.

As soon as you do that, you will see the old and familiar user interface. For some odd reason it takes a few seconds to open Windows Defender in the old user interface, so don’t worry if the app doesn’t open instantly.

If you ever want to revert back, simply delete the newly-created Windows Defender shortcut.
Can I Still Access New Windows Defender UI?
Since we haven’t done any changes to the Windows Defender itself, you can still access the new UI from the Setting app. To do that, click on the “Notifications Icon” on the taskbar and select the option “All Settings.”
Here, select the option “Update and Security.”
Now, navigate to “Windows Defender” option appearing on the left panel and click on the “Open Windows Defender Security Center” button.

That’s all there is to do, the Windows Defender will open in its new UI.

Do comment below sharing your thoughts and experiences about using the above method to get the old user interface in Windows Defender back.
Download Windows Speedup Tool to fix errors and make PC run faster
If Windows Defender is missing or you see You’ll need a new app to open this windowsdefender error message in Windows 11/10, here is how you can get rid of the issue and start using Windows Defender or Windows Security. You need to go through all these solutions to troubleshoot the issue.
If Windows Defender is missing on Windows 11/10, follow these steps:
- Ask your administrator
- Start Windows Security Health Service
- Reinstall using Windows Terminal
- Check Group Policy settings
- Use System Restore point
Before you begin, you should know that now Windows Defender is integrated with Windows Security.
1] Ask your administrator
It is the first thing you need to do when Windows Defender is missing on your Windows 11/10 computer. At times, your administrator could disable or remove certain apps or features from all the networked computers. However, if you do not face this problem on an organization computer, you can go through other solutions mentioned below.
2] Start Windows Security Health Service
If the Windows Security Health Service has some issues or you have set an incorrect value, it may not work. In other words, Windows Security or Windows Defender might not be working on your computer. That is why you need to verify if Windows Security Health Service is running or not. Follow the following steps to check that:
- Press Win+R to open the Run prompt.
- Type regedit and hit the Enter button.
- Click on the Yes option.
- Go to this path:
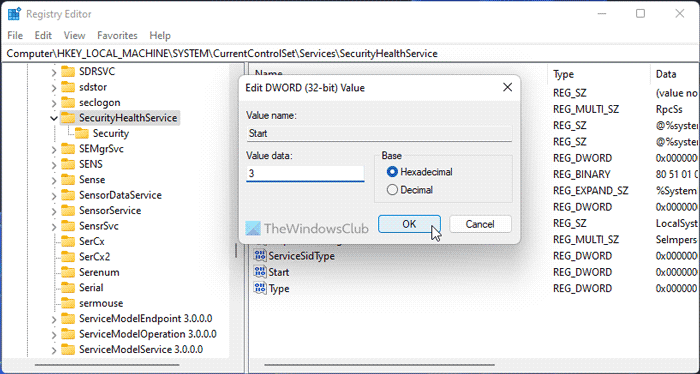
HKEY_LOCAL_MACHINE\SYSTEM\CurrentControlSet\Services\SecurityHealthService - Double-click on the Start REG_DWORD value.
- Set the Value data as 3.
- Click the OK button.
Finally, restart your computer and check if it resolves the issue or not.
3] Reinstall using Windows Terminal
You can reinstall the Windows Defender using Windows Terminal’s CMD or standalone Command Prompt instance. Whether you use Windows 11 or Windows 10, the process is almost the same for both versions. To reinstall Windows Defender using Windows Terminal, follow these steps:
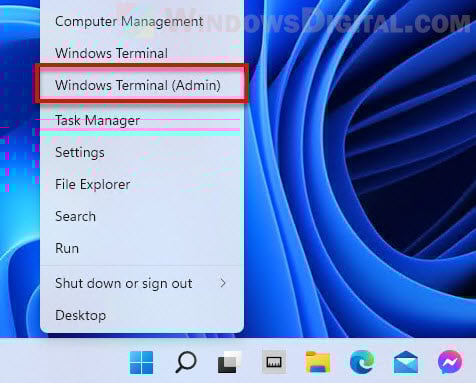
- Press Win+X to open the WinX menu.
- Select the Windows Terminal (Admin) option.
- Click the Yes button.
- Ensure that the Command Prompt instance is opened.
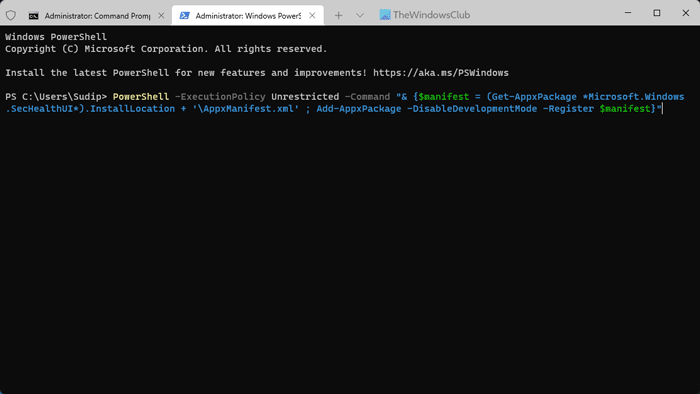
- Enter this command:
PowerShell -ExecutionPolicy Unrestricted -Command "& {$manifest = (Get-AppxPackage *Microsoft.Windows.SecHealthUI*).InstallLocation + '\AppxManifest.xml' ; Add-AppxPackage -DisableDevelopmentMode -Register $manifest}"
Alternatively, you can open the elevated Command Prompt window and enter the same command as above.
Read:
- How to Reset Windows Security Security Settings to default values
- How to reset Windows Security app or reinstall Windows Defender
4] Check Group Policy settings
There is a Local Group Policy Editor setting that might be responsible for this error on your computer. Therefore, follow these steps to check the Group Policy setting:
- Search for gpedit.msc in the Taskbar search box.
- Click on the individual search result.
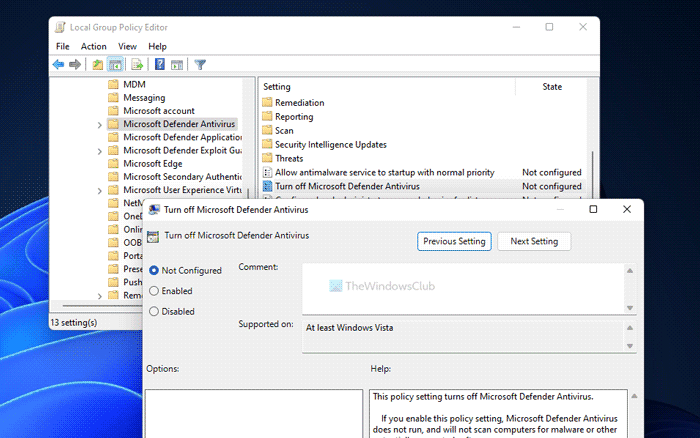
- Go to Computer Configuration > Administrative Templates > Windows Components > Microsoft Defender Antivirus
- Double-click on the Turn off Microsoft Defender Antivirus setting.
- Choose the Not Configured option.
- Click the OK button.
Then, restart your computer and check if it resolves the problem or not.
Read: Windows Security is not opening or working
5] Use System Restore point
If none of the solutions has worked for you, it is probably the last thing you need to opt for in order to troubleshoot the issue. At times, an adware or malware attack could cause this issue on your computer. In such situations, even if you ditch the adware or malware, it might not fix all the problems. That is why it is recommended to use the System Restore point to get the job done. You can follow this guide to restore Windows using a System Restore point.
Read: Troubleshoot Definition update issues for Microsoft Defender
How do I fix Windows Defender missing?
If Windows Defender is missing on your computer, you need to follow the suggestions mentioned above. Ask your administrator, Start Windows Security Health Service, Reinstall using Windows Terminal, Check Group Policy settings or use System Restore point.
How do I restore Windows Defender?
To restore Windows Defender or Windows Security in Windows 11/10, you can follow the solutions mentioned above. However, you may not be able to do that when your system administrator has blocked access. Otherwise, you can start the Windows Security Health Service using Registry Editor, reinstall the app using Windows PowerShell, etc.
That’s all! Hope these solutions worked for you.
Read: Cannot or Unable to turn on Windows Defender.
Anand Khanse is the Admin of TheWindowsClub.com, a 10-year Microsoft MVP (2006-16) & a Windows Insider MVP (2016-2022). Please read the entire post & the comments first, create a System Restore Point before making any changes to your system & be careful about any 3rd-party offers while installing freeware.
If you can’t open Windows Defender or access any of its settings, or if you have accidentally uninstalled Windows Defender, this guide will show you how to reinstall Windows Defender in Windows 11 via PowerShell command lines.
Although Windows Defender has always been the default antivirus software that comes preinstalled with Windows, some users may find the app missing after certain events such as after updating Windows or after installing or uninstalling certain third party antivirus software.
When the problem occurs and you try to open Windows Defender, Windows may prompt you the “You’ll need a new app to open this Windows Defender link” pop up that ask you to find a compatible app from Microsoft Store to open Windows Defender related link or setting. This indicates that Windows Defender is either missing or corrupted in Windows 11.
Reinstall Windows Defender in Windows 11
You can reinstall Microsoft Windows Defender in Windows 11 by executing a single line of command through PowerShell or Windows Terminal. However, you will need administrator rights to be able to execute the command.
Thus, you will need to first open Windows Terminal or PowerShell with admin rights. To do so, right-click the Start button on the taskbar and select “Windows Terminal (Admin)“.
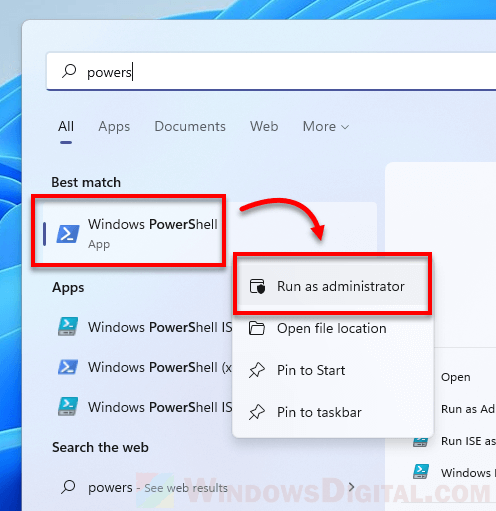
Alternatively, you can search for PowerShell through Start menu. Then, right-click Windows PowerShell from the search result and select Run as administrator.
Once you have an elevated (admin) Windows Terminal or PowerShell window opened, enter the following command to reset and reinstall Windows Defender in Windows 11.
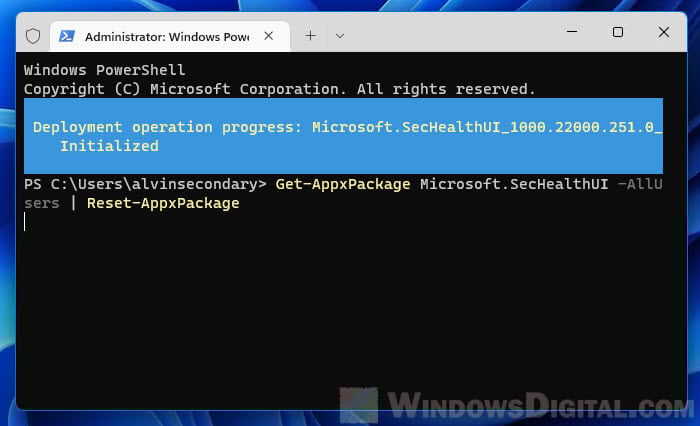
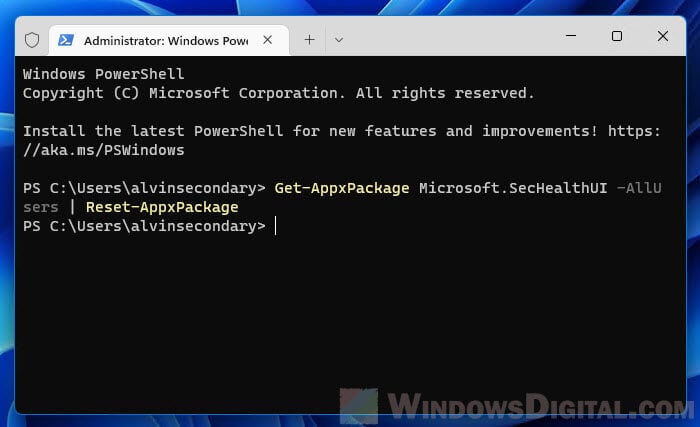
Get-AppxPackage Microsoft.SecHealthUI -AllUsers | Reset-AppxPackage
After executing the command, Windows Terminal will begin to reset Windows Defender and show a progress message that says “Deployment operation progress”. It may take a while for the process to complete.
Once completed, the progress message will disappear and Windows Terminal will start at a new line, which indicates the previous command has been executed.
Now, you can press Win + i keys to open Settings and go to Privacy & security > Windows Security. This should open up the Windows Security (Windows Defender) settings like it used to.
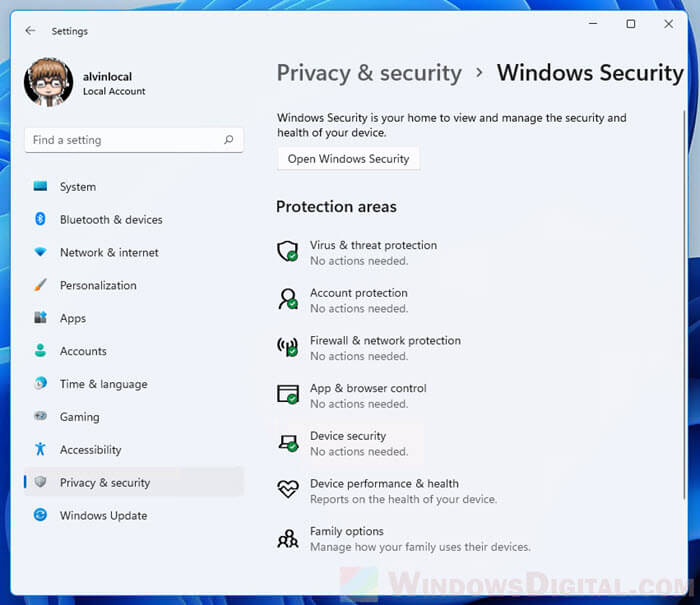
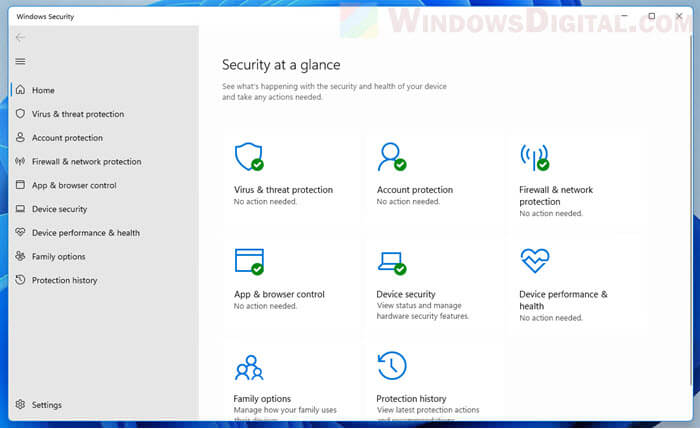
To further verify if Windows Defender is successfully installed, click on the “Open Windows Security” button to open the Windows Security window. From there, you can manage your computer’s security such as virus protection, firewall, network protection, browser control, etc.
PowerShell shows errors when executing the command
If the command above doesn’t work or if you receive errors when you execute the command, try the following commands instead to reinstall Windows Defender in Windows 11.
In an elevated (admin) Windows Terminal or PowerShell window, enter the following commands in the following order.
Set-ExecutionPolicy Unrestricted
Get-AppXPackage -AllUsers | Foreach {Add-AppxPackage -DisableDevelopmentMode -Register "$($_.InstallLocation)\AppXManifest.xml"}
Set-ExecutionPolicy Default
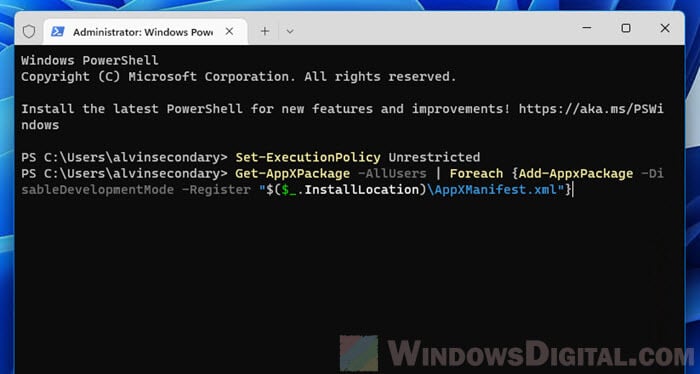
Since the command requires execution policy to be set to unrestricted in order to be executed successfully, you should set the execution policy back to its default (by running the third line of command as shown above) after the Get-AppXPackage process is completed.
If you receive an error that says “Access is denied”, it indicates that you do not have the rights to run the command. As mentioned above, you need to open Windows Terminal or PowerShell as administrator in order to execute the command successfully.
How to enable Windows Defender if you already have an existing antivirus software
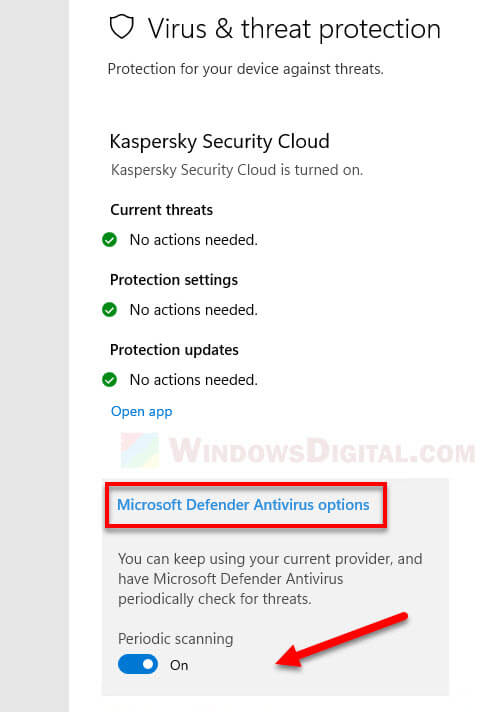
If you already have an existing third party antivirus program actively running and protecting your PC, Microsoft Defender Antivirus will be disabled. However, you can re-enable Microsoft Defender periodic scanning to have it periodically check for threats in conjunction with your other antivirus software.
To enable Windows Defender with periodic scanning when you are already using an existing third party antivirus software, open Settings and navigate to Privacy & Security > Windows Security, then click the Open Windows Security button.
Next, select Virus & threat protection and click Microsoft Defender Antivirus options. This will expand the setting and you should then be able to see a toggle option. Toggle on the Periodic scanning option to enable Windows Defender periodic scan while also using your other antivirus software.
This wikiHow will teach you how to restore Windows Defender to default settings in Windows 10 using Windows Security settings or Control Panel.
-

Press Win + I (that’s an uppercase i) to open Settings, then click Update & Security > Windows Security > Open Windows Security.
-
It’s in the tile with the signal icon.
-
This will restore any changes you’ve made to the default settings for Windows Defender.


-

You can search for this by pressing the Windows key then typing «Control Panel» and then clicking the app result.
-
It’s next to an icon of a brick wall in front of a globe.
-
You’ll need to click Restore defaults again when prompted, then click Yes to confirm. Once you have done that, your default settings will be restored to your Windows Defender settings.[1]


Ask a Question
200 characters left
Include your email address to get a message when this question is answered.
Submit
References
About this article
Article SummaryX
1. Open Windows Security.
2. Click Firewall & network protection.
3. Click Restore firewalls to default.
Did this summary help you?
Thanks to all authors for creating a page that has been read 10,494 times.