
В Windows 10 у каждого элемента есть владелец, и этому владельцу назначены некоторые разрешения, поэтому он / она может управлять этим элементом. Разрешения могут быть доступны для чтения, записи, изменения. Вы можете изменить / получить доступ / изменить элемент, только если у вас есть необходимые разрешения. Обычно, если у вас нет прав доступа к элементу, вы должны стать владельцем этого элемента и настроить подходящие разрешения.
Говоря о изменении разрешений, существует термин, который называется TrustedInstaller. Что это за TrustedInstaller? Ну, это специальная учетная запись, которая является владельцем многими системных файлов / папок, разделов реестра и отдельных объектов. Например, папка WindowsApps в корневом каталоге программ Windows 10, которая содержит множество пакетов приложений UWP для разных приложений, имеет TrustedInstaller в качестве владельца по умолчанию.
Чтобы изменить любой файл в конкретном пакете приложения, вам может понадобиться стать владельцем папки WindowsApps. В этой статье рассмотрим, как вы можете восстановить право собственности для TrustedInstaller. Произвести замену владельца не составит труда, а вот как восстановить в своих правах TrustedInstaller, подробнее ниже.
Как восстановить права собственности для TrustedInstaller в Windows 10.
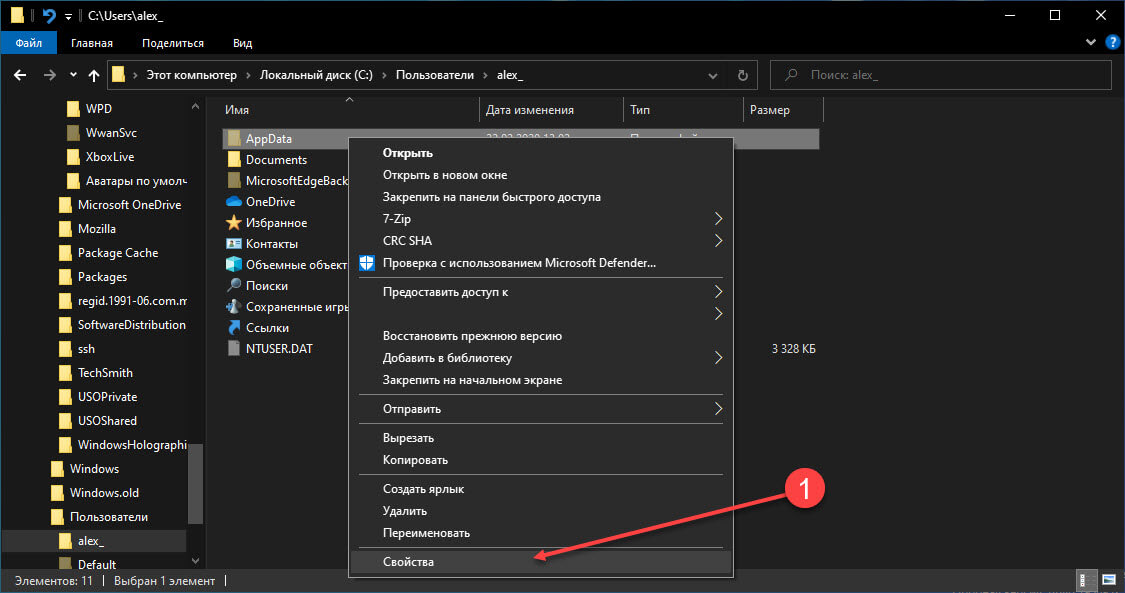
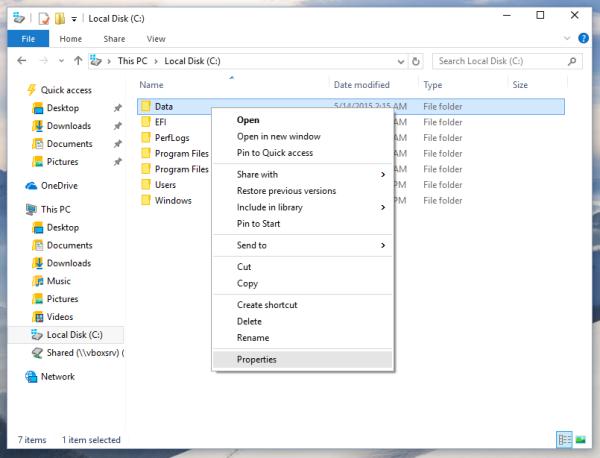
Шаг 1: Кликните правой кнопкой мыши файл или папку, для которой вы хотите вернуть владельца TrustedInstaller, и выберите в контекстном меню «Свойства».
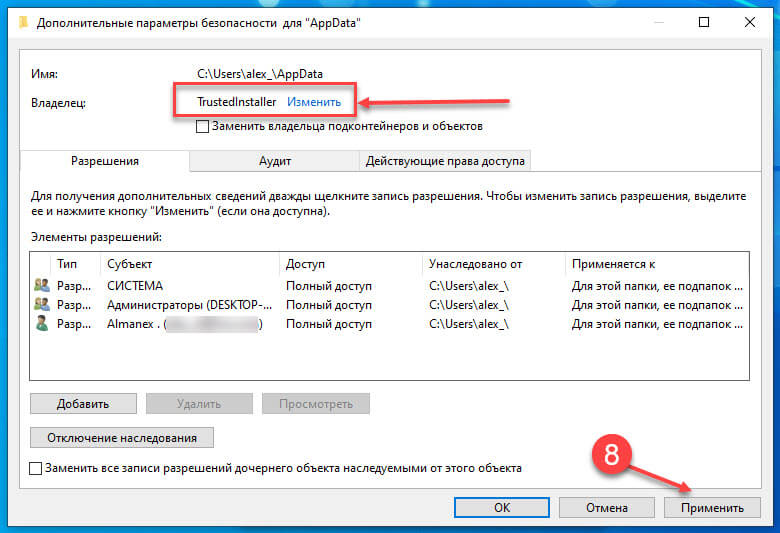
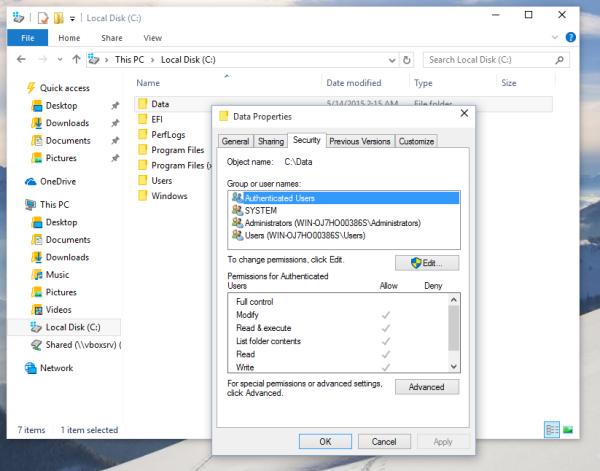
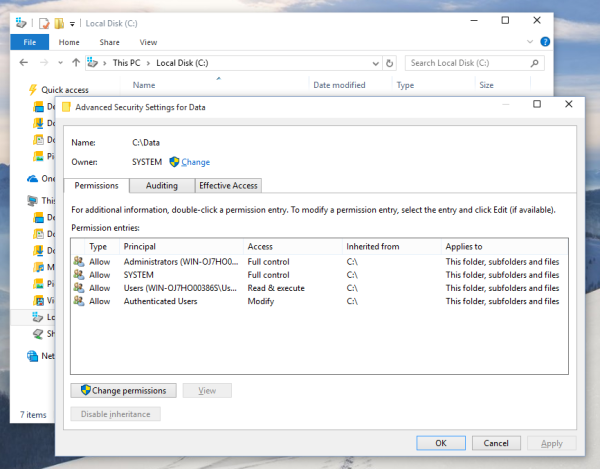
Шаг 2: В окне свойств перейдите на вкладку «Безопасность» и нажмите кнопку «Дополнительно».

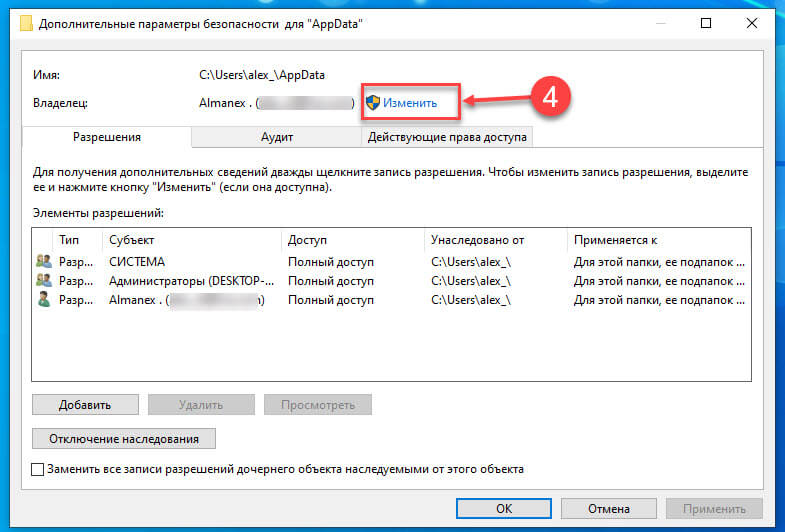
Шаг 3: Двигаясь дальше, в окне «Дополнительные параметры безопасности» нажмите ссылку «Изменить» рядом с именем существующего владельца.
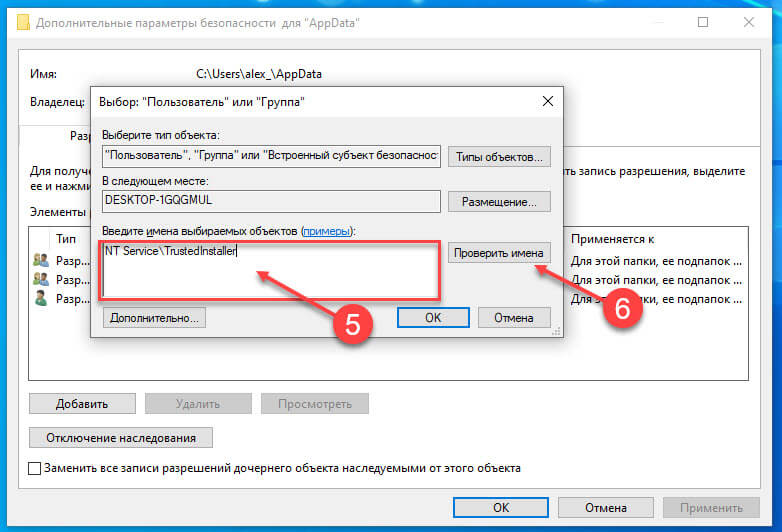
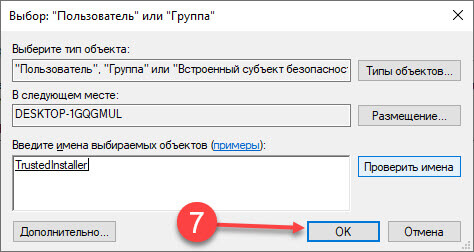
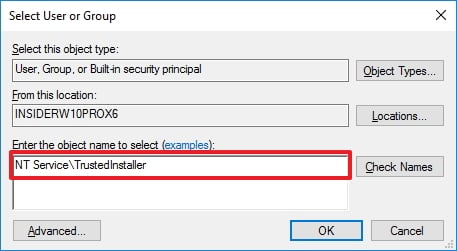
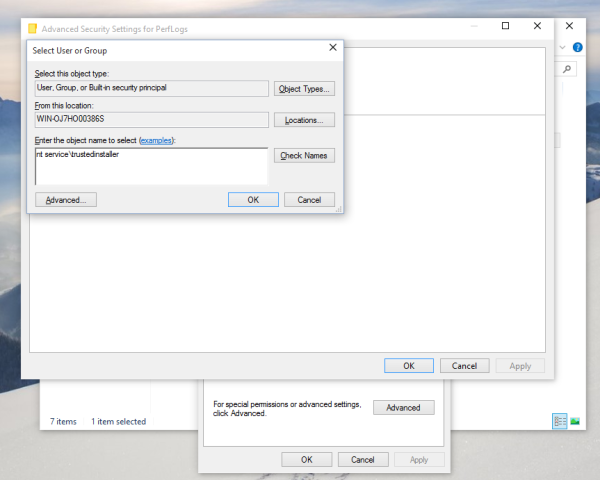
Шаг 4: Теперь в окне «Выбор: пользователь или группа» введите: NT Service\TrustedInstaller и нажмите кнопку «Проверить имена». NT Service\TrustedInstaller Автоматически будет изменен на TrustedInstaller. Нажмите «ОК».
Шаг 5: Итак, в предыдущем окне видим что владельцем снова стал TrustedInstaller. Теперь просто нажмите «Применить» , «OK» , «OK», чтобы сохранить и применить эти настройки к данному элементу.
Таким образом, вы можете восстановить владельца TrustedInstaller для любого элемента в Windows 10.
Все!
Рекомендуем: Как получить полный доступ к конкретной записи реестра для редактирования или удаления.
If you’re like most tech-savvy users, you don’t settle for default configurations. You’re always looking for ways to customize your system to improve productivity or to make your PC more unique.
Sometimes, to customize the operating system, in this case Windows 10, you need to modify some system files. When you need to do this, it often requires taking full control of certain files, which involves removing the special built-in «TrustedInstaller» user account as the owner of the file and granting your account full access.
However, later on, you may want to restore the original permission settings to the system file, but there is not an option to do that on Windows 10. In addition, if this isn’t something you do every day, you’ll probably forget what the original settings were.
In this Windows 10 guide, we’ll walk you through the steps to restore ownership of system files to the TrustedInstaller built-in user account.
How to restore TrustedInstaller ownership to system files
- Open File Explorer.
- Browse to the system file you previously changed ownership.
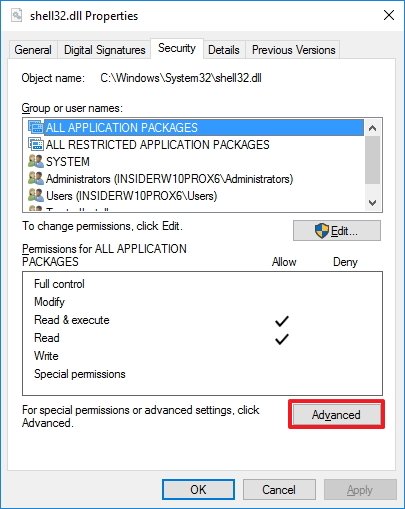
- Right-click the file, and select Properties.
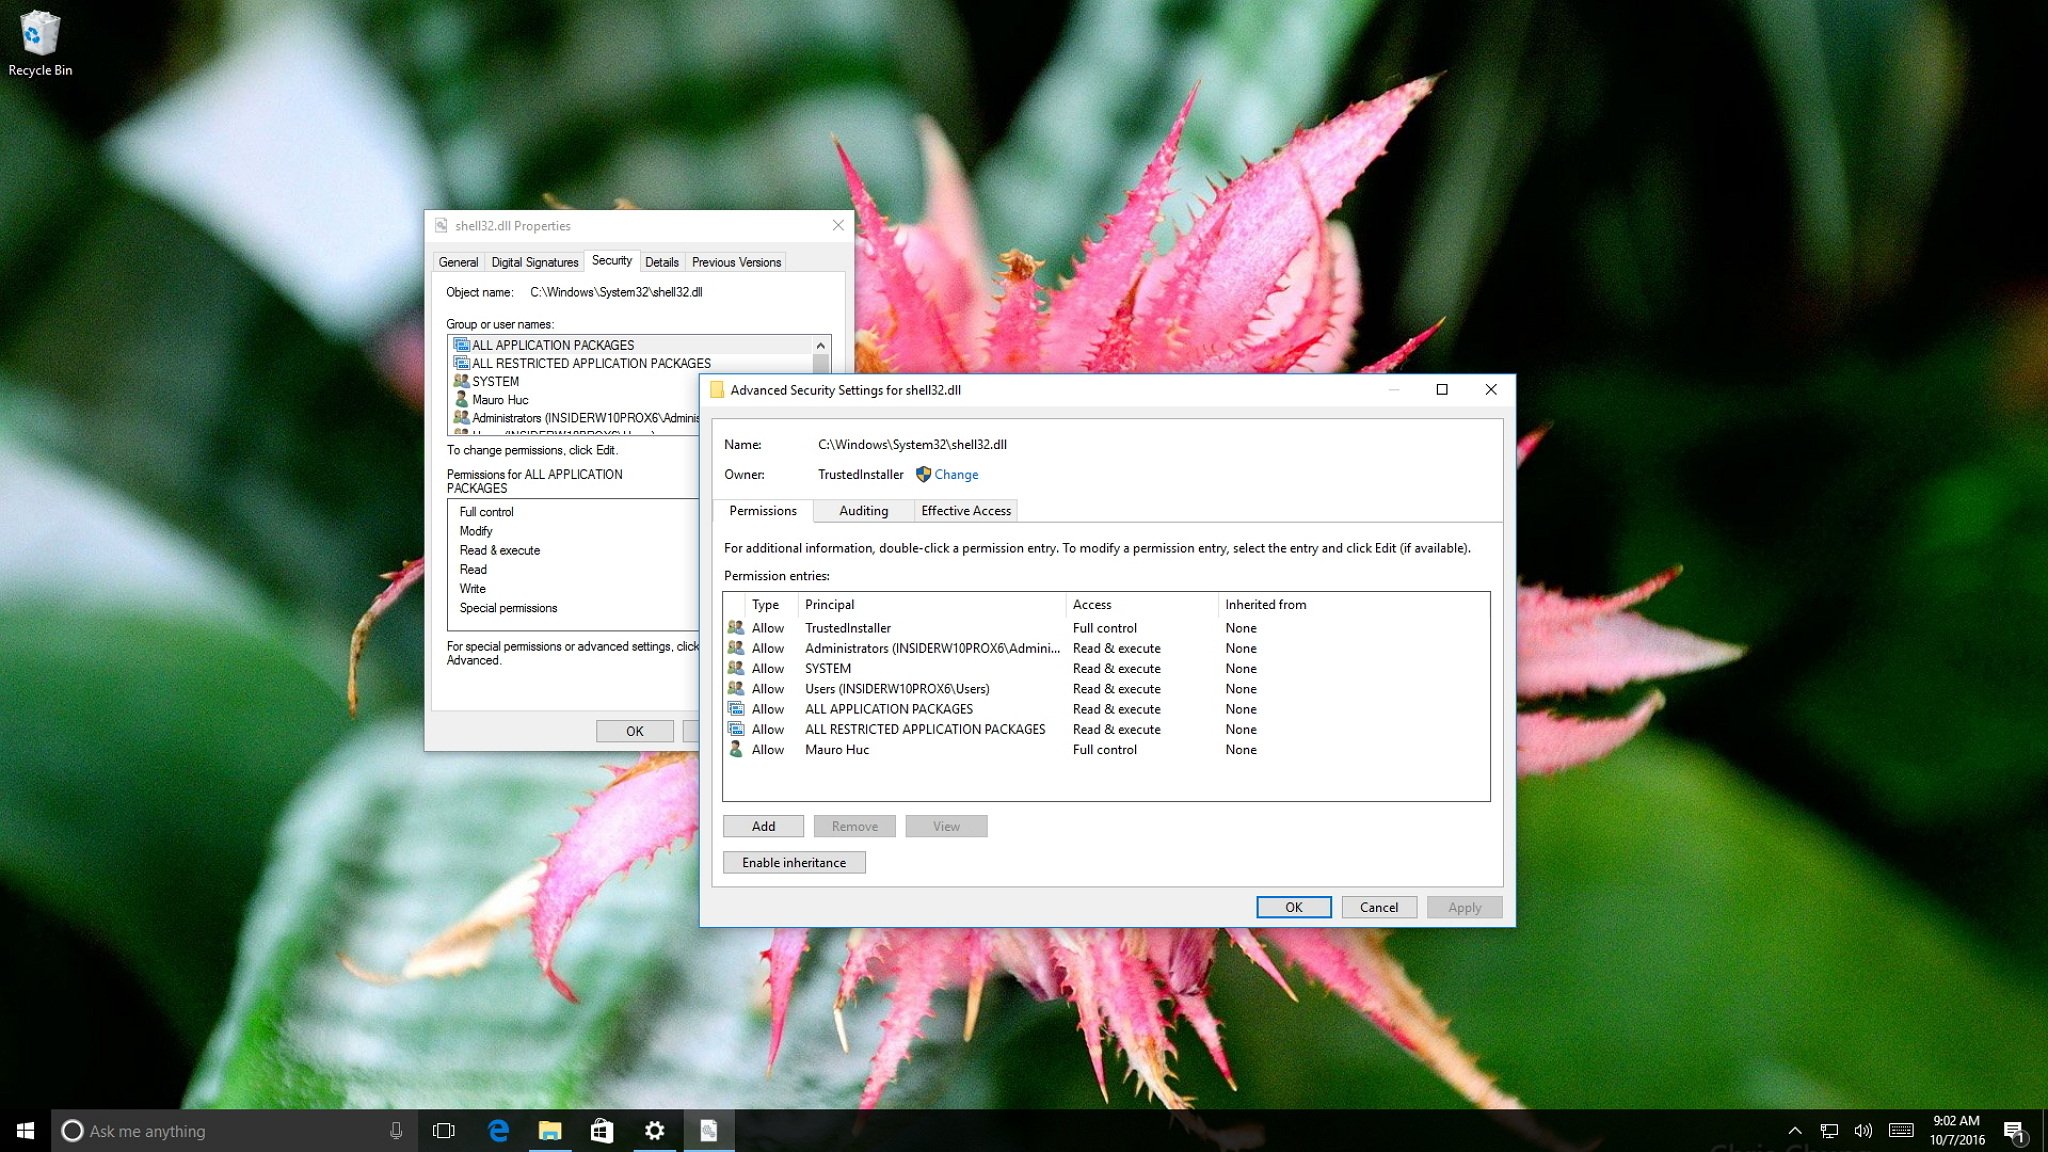
- Click on the Security tab.
- Click the Advanced button.
- On the «Advanced Security Settings» page, click the Change link on Owner.
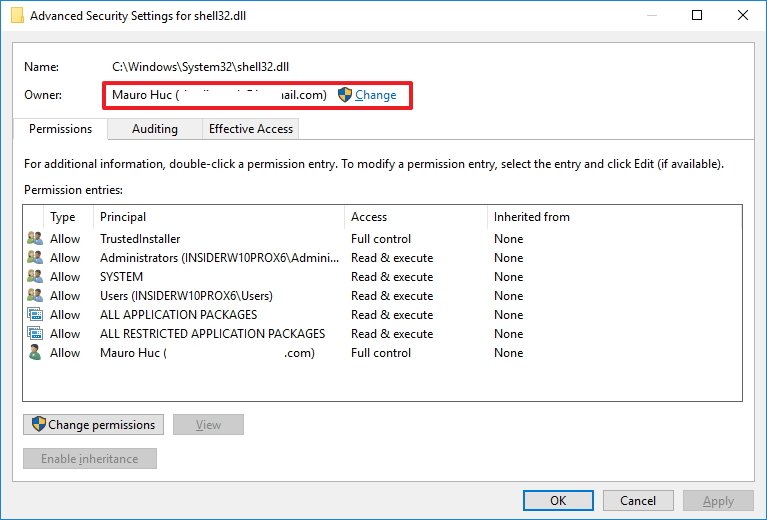
- On the «Select User or Group» page, type the following to add the TrustedInstaller account and click Check Names:
NT Service\TrustedInstaller - Click OK.
- Click Apply.
- Click OK again to complete the task.
These steps now restored the ownership of the file to the built-in TrustedInstaller.
Keep in mind that this works for system files as well as for system folders. Also, don’t forget to check the «Replace owner on the subcontainers and objects» and «Replace all child object permission entries with inheritable permission entries from this object» options, if you previously changed these settings on system folders.
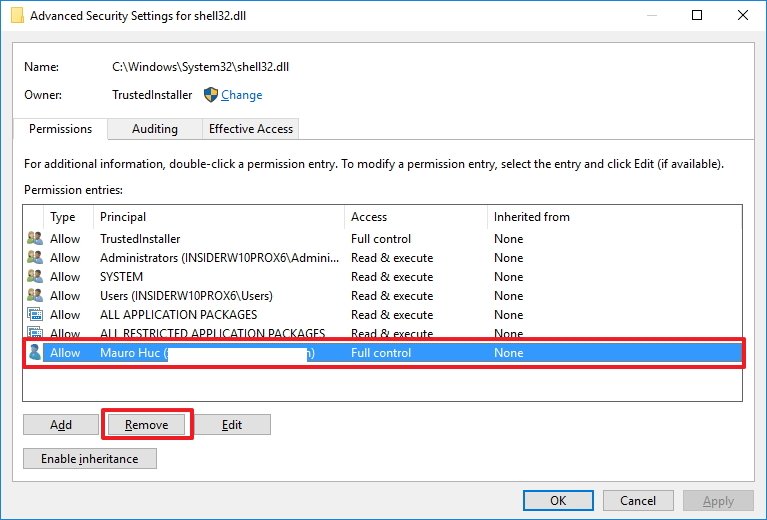
Finally, if you granted yourself full control to the system file, you may also want to remove these settings as well, and to do that you can use the following steps:
All the latest news, reviews, and guides for Windows and Xbox diehards.
- Right-click the system file, and select Properties.
- Click on the Security tab.
- Click the Advanced button.
- On the «Advanced Security Settings» page select your account.
- Click Remove.
- Click Apply.
- Click OK to complete the task.
More Windows 10 resources
For more help articles, coverage, and answers on Windows 10, you can visit the following resources:
- Windows 10 on Windows Central – All you need to know
- Windows 10 help, tips, and tricks
- Windows 10 forums on Windows Central
Mauro Huculak has been a Windows How-To Expert contributor for WindowsCentral.com for nearly a decade and has over 15 years of experience writing comprehensive guides. He also has an IT background and has achieved different professional certifications from Microsoft, Cisco, VMware, and CompTIA. He has been recognized as a Microsoft MVP for many years.
By default, almost all system files, system folders and even Registry keys in Windows 10 are owned by a special built-in user account called «TrustedInstaller». So, once you take ownership and grant admin permissions to a file oe folder, and later want to restore the TrustedInstaller account as the owner, you will notice that it is not shown in the list of accounts. Here is how to restore the TrustedInstaller ownership in Windows 10.
To restore the TrustedInstaller ownership in Windows 10, do the following:
- Open File Explorer, and then locate the file or folder you want to take ownership of.
- Right-click the file or folder, click Properties, and then click the Security tab.


- Click the Advanced button. The «Advanced Security Settings» window will appear. Here you need to change the Owner of the key.
Click the Change link next to the «Owner:» label
- The Select User or Group window will appear.Type here «NT Service\TrustedInstaller» as the new owner name:

- Click OK to change the ownership.
You are done.
Also, you may want to add a special context menu to File Explorer to save your time.
You can save significant amount of time by adding the Change owner command to the right-click context menu in File Explorer.
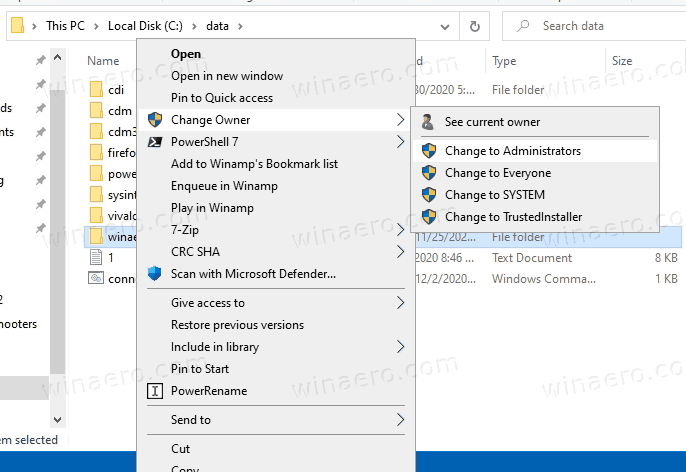
This will allow you to change the file, folder, or drive owner with one click. The context menu provides useful options to quickly change the owner to one of the built-in system accounts, including the Administrators group, the Everyone, SYSTEM, and TrustedInstaller system accounts. No extra steps required in this case. To learn more about the Change owner context menu, please refer to the following post.
How to Add Change Owner Context Menu in Windows 10
There, you will find ready-to-use Registry files, detailed instructions, and clarifications about how every context menu entry works.
That’s it. Using this trick, it is possible to easily restore ownership of the file or folder back to the TrustedInstaller account in Windows 10. You might be interested to read how to take ownership and get full access to files and folders in Windows 10.
Support us
Winaero greatly relies on your support. You can help the site keep bringing you interesting and useful content and software by using these options:
If you like this article, please share it using the buttons below. It won’t take a lot from you, but it will help us grow. Thanks for your support!
TrustedInstaller.exe is a Windows Module service which is an integral part of Windows Resource Protection (WRP). This restricts access to certain core system files, folders and registry keys that are part of Windows installation. TrustedInstaller is a built-in user account that has all the necessary permission to access files and folders in the Windows.

What is the work of Windows Resource Protection (WRP)?
The WRP protect Windows files with extension .dll, .exe, .oxc and .sys files from being modified or replaced. By default, these files extensions can only be modified or replaced by the Windows Module Installer service, TrustedInstaller. If you change or customize the default TrustedInstaller settings, then you’re putting your system at risk.
Sometimes you need to change the ownership of the file to modify or replace system files. Still, once you are done with the customization, there is no option to give back the permission to TrustedInstaller, and sometimes this may lead to the system being unstable as it no longer can protect the system core files. This guide will show you how to restore TrustedInstaller as File Owner in Windows with the below-listed steps.
Make sure to create a restore point just in case something goes wrong.
1. Right-click on the file, folder or Registry Key to restore the ownership to default TruestedInstaller and then click Properties.

2. Now switch to the security tab and then click the Advanced button near the bottom.
3. On the Advanced Security Settings page click Change under the Owner.

4. Next, type “NT Service\TrustedInstaller” (without quotes) under Enter the object name to select and click on Check Names then click OK.

5. Make sure to checkmark “Replace owner on the subcontainers and objects” under Owner and again checkmark “Replace all child object permission entries with inheritable permission entries from this object” in the bottom.

6. Click Apply, followed by OK.
Now if you have granted Full Control to your user account then you also need to remove these settings as well, follow the below steps to do that:
1. Again right-click on the same file, folder or registry key and select Properties.
2. Switch to Security tab and click the Advanced button near the bottom.
3. Now on the Advanced Security Settings page select (highlight) your account under Permissions entries list.

4. Click Remove and then click Apply followed by OK.
Recommended:
- Fix Windows 10 Brightness Settings Not Working
- How to Fix Internet Explorer cannot display the webpage error
- 5 ways to fix Windows has detected an IP address conflict
- Fix Windows Store Error Code 0x8000ffff
That’s it you have successfully learned How to Restore TrustedInstaller as File Owner in Windows 10 if you still have any queries regarding this post feel free to ask them in the comment’s section.
We all customization lovers know that we need to take ownership of a system file before replacing or modifying the file in Windows. Almost all Windows customization stuff require modification of system files for example, you need to edit Explorer.exe file to customize Start ORB in Windows 7, you need to edit authui.dll file to change login screen, etc.
By default, a built-in system account “TrustedInstaller” has ownership and full control of all system files in Windows Vista, Windows 7 and later OS, so you need to take ownership and assign full permission to yourself before modifying or replacing the system file.
Taking ownership of a file or folder is very easy. We have provided a ready-made registry script which automatically adds a new option “Take Ownership” in file and folder context menu (right-click menu). So you just need to right-click on a file or folder and select “Take Ownership” option and it automatically makes you the owner of that file/folder and assigns you full permission on that file/folder.
How to Add “Take Ownership” Option to File or Folder Context Menu in Windows
We have also posted a detailed and easy to understand guide which teaches you how to take ownership of a file or folder manually in Windows:
[Guide] How to Take Ownership (Permission) of a File or Folder Manually in Windows?
Now the question comes! Once you have taken ownership of a file and now you want to restore “TrustedInstaller” as default owner of that file, how will you do that? How will you change the owner of a file back to “TrustedInstaller”?
We never realized that someone might need to restore ownership of a file to “TrustedInstaller” until we received following comment from an AskVG reader “KS”:
How do I give permissions back to TrustedInstaller, when I changed it, TrustedInstaller wasn’t in the list of possible owners anymore??
That was really an interesting point. Once you take ownership of a file or folder in Windows, if you go back to its Properties and try to change the owner back to “TrustedInstaller”, you’ll be surprised to see that “TrustedInstaller” is no longer present in the users list.
So how to bring back the built-in system user “TrustedInstaller” and set it as default owner of a file or folder? Don’t worry! Here is the solution.
Today in this tutorial, we’ll tell you how to restore “TrustedInstaller” as default owner of a file or folder in Windows if you changed its owner to yourself?
So without wasting time, lets start the tutorial:
NOTE: The same method will apply to restore “TrustedInstaller” as owner of registry keys in Registry Editor.
1. Go to the folder which contains the file or folder for which you want to restore ownership to “TrustedInstaller”. Right-click on the file or folder and select Properties.
2. It’ll open its Properties window. Now go to “Security” tab and click on Advanced button.
3. It’ll open a new window.
For Windows XP, Vista and Windows 7:
Go to “Owner” tab and you’ll see that the owner would be set to your username and “TrustedInstaller” would not be present in the list as we mentioned above.
We’ll add it manually. Click on “Edit” button:

It’ll open another window. Click on “Other users or groups” button.

For Windows 8/8.1, Windows 10 and later:
Click on “Change” button present near your user account name in advanced security window.
4. Now type NT SERVICE\TrustedInstaller in “Enter the object name to select” text box and click on OK button as shown in following screenshot:

5. It’ll immediately add “TrustedInstaller” to the users list. Click on Apply button.

6. Windows will show a message box, click on OK button to close it. Again click on OK button in all opened windows and you have successfully restored “TrustedInstaller” as default owner of the file or folder.
You can check and confirm the owner by opening the file or folder Properties and you’ll see that “TrustedInstaller” has become the owner of that file or folder again.
Also Check:
Add “Restore Ownership to TrustedInstaller” Option in Files / Folders Context Menu
You are here: Home » Troubleshooting Guides » [Guide] How to Restore “TrustedInstaller” as Default Owner of a File, Folder or Registry Key in Windows?