
Windows 11 data loss occurs due to multiple reasons like an accidental deletion, a system crash, or a virus attack. Permanently deleting the files you need can be a very frustrating and stressful experience, just like what the Reddit user below is going through right now:
I accidentally deleted some files on my laptop. I have a habit of using Shift+delete, so I don’t need to clear my recycle bin every time I delete something. I worked on a lot of projects that I have no use for later, which is where I started using said shortcut. Please tell me whether I can get them back. — From Reddit
In this tutorial, we will discuss three methods and tools available to restore permanently deleted files in Windows 11, and provide useful tips to help you prevent data loss in the future.
| Methods | Recovery Tips |
| 🥇Windows 11 data recovery software | Use professional Windows 11 deleted files recovery software to get back lost files in any situation. You can recover Shift+Delete files in Windows 11. |
| 💽Restore files from previous versions | Previous versions are from restore points or Windows backup. But you need to turn on the automatic backup feature beforehand. |
| 🧿Retrieve with File History | Like undo permanent deletion, this solution is useful when File History is enabled before you lose files. |
Recover Permanently Deleted Files in Windows 11 by Using Deleted File Recovery Software
Emptying the Recycle Bin doesn’t necessarily mean that your files are gone forever. It might seem like it, but that’s not exactly the case. The most effective way to retrieve permanently deleted files in Windows 11 is using EaseUS Data Recovery Wizard.
This data recovery tool works in different situations. For example, it can not only restore your deleted files but also recover files from your partition that is formatted by mistake.
EaseUS Deleted File Recovery Windows 11
- Restore permanently deleted files, documents, photos, videos, audio, music, and emails easily.
- Support almost every storage device, including hard drives, memory cards, flash drives, digital cameras, and camcorders.
- Recover data after accidental deleting, formatting, virus attack, system crash, and Windows update.
How to recover permanently deleted files Windows 11 free?
You can try the free data recovery software of EaseUS to recover up to 2GB of data in Windows 11 for free. This software scans the drive through quick and deep scan algorithms and finds the permanently deleted files and folders for you.
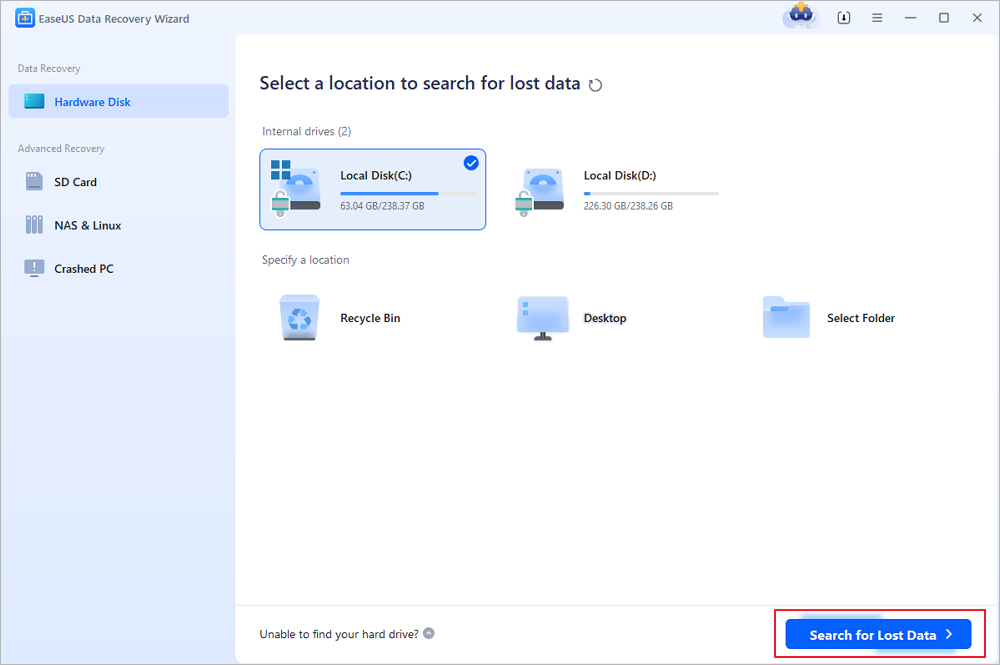
Step 1. Select the location to scan
Choose the specific device and drive where you have permanently deleted files using Shift delete or emptying recycle bin. Then, click the «Search for Lost Data» button to find lost files.
Step 2. Check the results
The software will automatically start scanning all over the selected drive. When the scan completes, select the deleted or lost folders in the left panel using the «Path» feature. Then, apply the «Filter» feature or use the search box to quickly find the deleted files.

Step 3. Recover deleted files
Select the deleted files and click «Preview». Next, click «Recover» to save them to another secure location or device. You can choose a cloud storage, such as OneDrive, Google Drive, etc., and click «Save» to save your recovered files.

Don’t forget to share this powerful file recovery software with your friends on Twitter, Facebook, or Instagram!
Here is the video tutorial for restoring permanently deleted files in Windows 11. If you don’t like reading words, you can get information from the video.

How to Restore Permanently Deleted Files Windows 11 from Previous Versions
Previous Versions works only if you have backed up your data using Windows 11 File History or created a restore point before. Follow the steps below to restore deleted files in Windows 11.
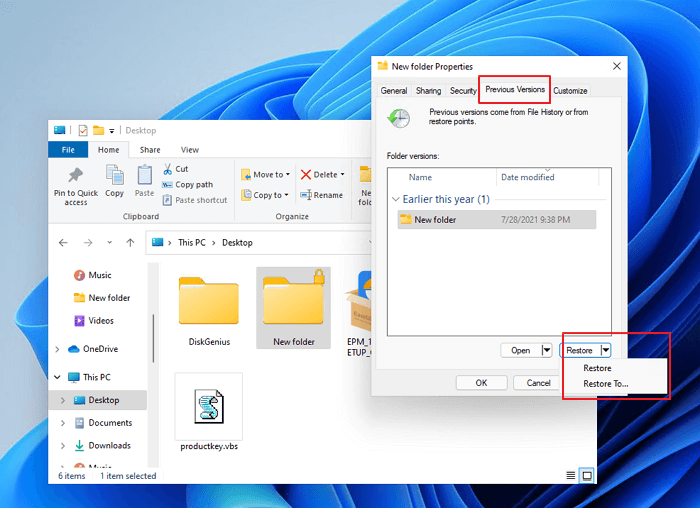
Right-click the file or folder location that has saved the deleted files you want to recover, and then select «Restore previous versions». You’ll see a list of available previous versions of the deleted file or folder. If you have enabled Windows backup for backing up your files, the list will display the saved files on the backup and also available restore points.
Microsoft provides the ultimate guides on how to recover lost or deleted files from previous versions; go to see details.
Retrieve Permanently Deleted Folder in Windows 11 Files with File History
This method could work only if you turned on «File History» before you had permanently deleted your files or folders. File History is a built-in tool that can restore your files and folders to a previous version. Follow the steps below to restore permanently deleted files from File History in Windows 11.
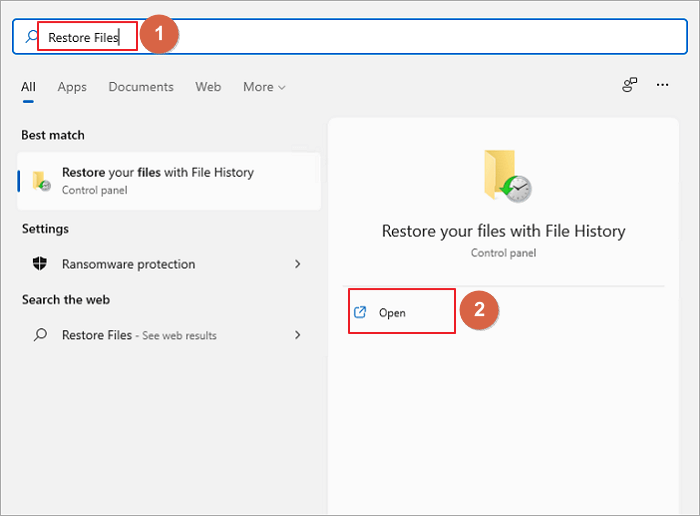
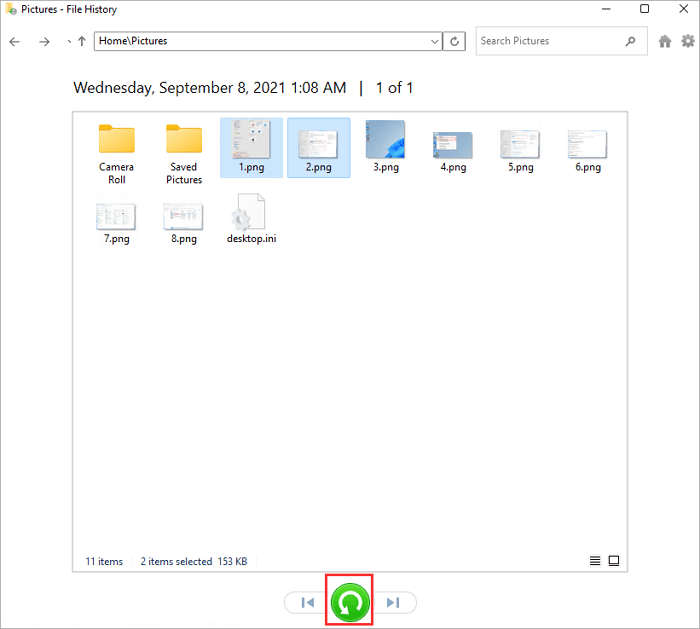
Step 1. At the Task Bar, click the search icon, type «Restore Files», and click «Open».
Step 2. Look for the folder that contains the old address of your deleted files.
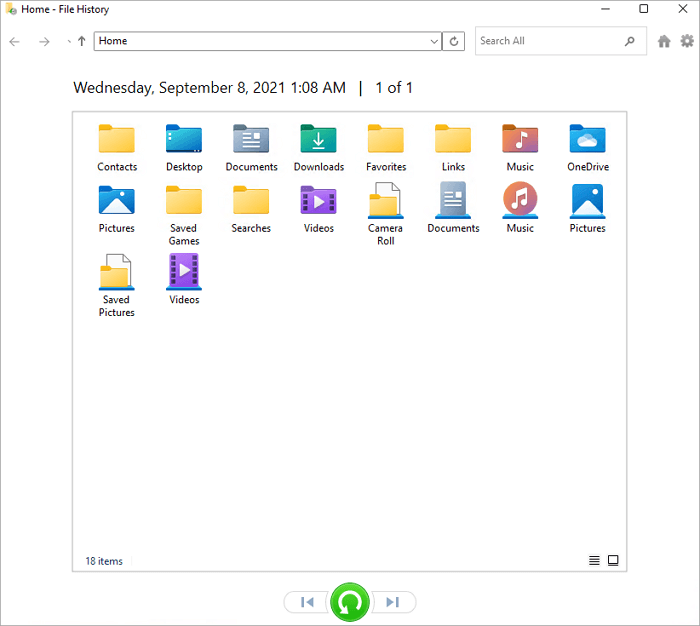
Step 3. You can right-click the files to preview them.
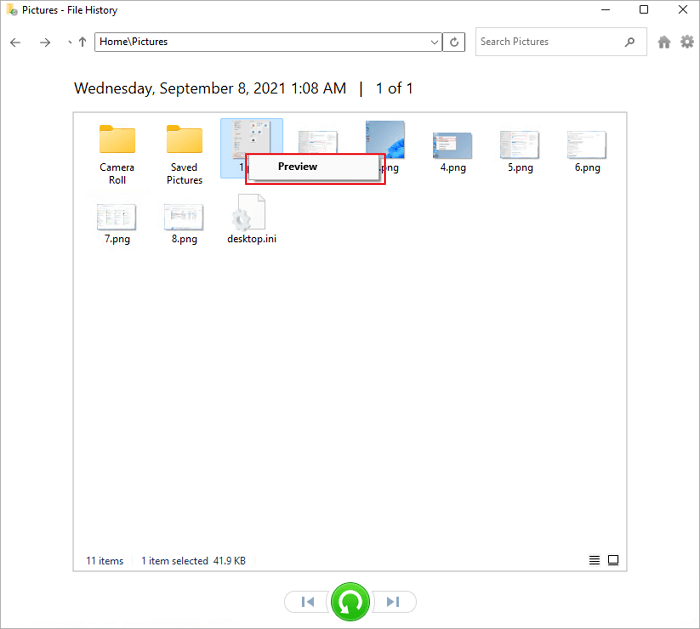
Step 4. Finally, select the files and click the «Restore» button. The deleted files will get back to their original location.
Know More: Where Do Permanently Deleted Files Go Windows 11
In Windows 11, the recently deleted files are in the Recycle Bin — you delete them by right-clicking it and selecting «Delete». This doesn’t mean a permanent deletion. A permanently deleted file means you not only click the «Delete» option but also click the «empty Recycle Bin» button.
When a Windows 11 PC permanently deletes a file or the Recycle Bin is emptied, it removes the reference to the file. That is to say, the permanently deleted file is no longer readable by the computer, and you can no longer see the file on the drive.
However, the deleted files are still on the hard drive, SD card, or USB flash drive, at least until another file or part of another file is saved to the same location. Thus, if you want to restore permanently deleted files, you must take action as soon as possible. Once you have stored new data in the same location, the deleted files will get lost forever. At that time, there’s little chance of getting them back.
Well, you can recover permanently deleted files in Windows 11 in three proven ways. Even if you have pressed the «Shift + Deleted» to delete a folder or file completely, you can undo permanent delete in Windows 11 efficiently.
Bonus Tip: How to Protect Your Data and Files in Windows 11
To avoid accidental deletions and misoperation, you need to learn how to protect your files and folders in Windows 11. The most straightforward way to protect your folder is password-protecting your folder in Windows 11. With the help of this method, you can:
- Avoid data loss even if multiple people use the same account on a computer.
- Protect your confidential or private folders on the computer.
- Protect a folder with a password for additional file security.
The other way to protect your folder is to make a file backup in Windows 11. No matter how you lose your data, you can restore them with a backup.
Conclusion
If you accidentally deleted files and folders from your Windows PC, you can recover them from the recycle bin folder. However, if you delete them permanently, the permanently deleted files and folders cannot be recovered from the Recycle Bin. In this article, we have walked you through the methods of how to retrieve files after permanently deleting them.
EaseUS data recovery software is recommended because you can retrieve all kinds of data even if you have little technical know-how.
The following are the frequently asked questions on restoring permanently deleted files in Windows 11. Check the brief answers for these problems.
Can a permanently deleted file be restored?
Yes, if you do the right thing, you can recover files that have been permanently deleted. First, do not use your device in case of data wiping. Then, apply professional deleted file recovery software to retrieve file as soon as possible.
How to recover permanently deleted files in Windows 11 using CMD?
You can try using the «chkdsk» command in Command Prompt to check the file system of the selected drive. After the file system is repaired, you can access the device and recover permanently deleted files from Windows 11 using CMD.
How to restore permanently deleted folder in Windows 11?
If you have a backup of the folder, you can restore it from the backup. Alternatively, you can try using a data recovery tool like EaseUS data recovery software to scan the HDD/SSD/USB/SD card for any recoverable data. Then, preview and restore permanently deleted folders easily.
How to recover permanently deleted videos from laptop Windows 11?
You can try data recovery software such as EaseUS Data Recovery Wizard to recover deleted videos from a laptop running Windows 11. This program can scan the disk for any recoverable files and attempt to restore it. It’s important to note that the chances of successfully retrieving deleted videos decrease over time as the data is overwritten by new files.
Even with Microsoft’s latest, Windows 11, I’ve found myself in a bind more than once because files just disappeared on me. But here’s the good news: this OS has some solid tricks up its sleeve for helping you recover deleted files on Windows 11, getting back what you thought was gone for good. It also works well with a bunch of other tools I’ve tried.
Situations That Commonly Lead to Windows 11 Data Loss
Data loss costs organizations and individual home users a staggering amount of money every year. Why? Because its causes are numerous and sometimes difficult to prepare for ahead of time.
Based on my own experiences with files going missing, here’s a list of the usual problems I’ve run into:
- 😲 Human error – Even though Windows 11 tries to make things easy, it’s still pretty new. I’ve definitely had my moments of clicking around and suddenly, poof, something important vanishes. It’s all too easy to accidentally send a crucial file into oblivion while you’re still getting the hang of things.
- 🖥️ Software issues – Windows is a massively complicated operating system because it maintains backward compatibility with generations and generations of software applications. That’s why it’s relatively common for Windows users to encounter software issues, and some, such as this problem with gradual Windows 11 desktop corruption, are serious enough to cause – either directly or indirectly – the loss of important files.
- ⚠️ Data corruption – A file can become corrupted and impossible to open because of software and hardware issues alike. When that happens, you might be able to repair the damage using dedicated tools, or you can always recover a functioning version of the file from a backup.
- 📛 Hardware malfunction – Modern storage devices can store huge quantities of data and do so without costing too much money, but their reliability still leaves something to be desired. As this Reddit user’s experience with brand-new SSDs shows, malfunction can occur unpredictably – even when everything seems fine on the surface. In their case, large files were disappearing or suddenly turning into unreadable zero-byte data.
- ⚡ Unpredictable disasters – A particularly close lightning strike or a single spilled cup of coffee can render an entire storage device – or even an entire computer – unusable, causing an instant loss of valuable data.
- 👾 Malware– One of the most common malware threats today, ransomware, causes data loss by encrypting files and demanding a ransom payment for their decryption. Unfortunately, ransomware attacks are on the rise, and Windows 11 are prime targets.
- ⚙️ Upgrading gone wrong – I always hear from the tech gurus to do a clean install with new Windows versions. Learned that the hard way when I tried to take the easy route with an upgrade and ended up with data loss.
- 🔄 Insider Program Rollbacks – For those daring enough to test the latest builds from the Windows Insider Program, beware. A known issue with rollback operations can break Dev Drives, leading to a loss of all stored data.
Given the variety of scenarios that lead to data loss on Windows 11, I sorted these issues into three main categories, each matched with solutions that I’ve personally tested and found to work.
| Loss scenarios | Recommended solution |
| Recent data loss (accidental deletion and other human errors) |
|
| Permanent data loss (formatting, malware, software issues, upgrading gone wrong, data corruption) |
|
| Hardware-related data loss (hardware malfunctions and other unpredictable disasters) |
|
In this section, we’re taking a detailed look at the most useful solutions for recovering deleted files on Windows 11. Since each solution is useful in a different data loss situation, we recommend you first consult the table in the previous section to determine which one you should start with.
Method 1: Recover Files using Undo Delete
Whenever you perform an action on your Windows computer, you can use the Undo feature to take the action back. This feature can come in handy when you make a mistake when using your Windows 11 computer and accidentally delete a file you actually wanted to keep.
Let’s imagine that you’ve deleted an important image from organizing your photo collection. To get it back:
- Make sure the folder where your photos are located is in focus.
- Press CTRL + Z on your keyboard.
- Alternatively, you can right-click anywhere in the folder and choose the Undo Delete option.
Method 2: Recover Deleted Files from a Recycle Bin in Windows 11
Windows 11 comes with a slightly redesigned Recycle Bin compared to Windows 10, but it functions exactly the same, allowing you to undelete recently deleted files without software unless:
- You used Shift + Delete to permanently delete them.
- The files exceed the Recycle Bin’s size limit (which you can adjust in Recycle Bin properties).
- The files were deleted from USB flash drives or SD cards (though files from external SSDs and HDDs do go to the Recycle Bin).
If you believe that your deleted files had a chance to end up in the Recycle Bin, here’s how to recover them:
- Double-click the Recycle Bin icon on your Desktop.
- Select the files you want to recover.
- Right-click any of the selected files and choose the Restore option.
- Alternatively, drag and drop the selected files to a location of your choice.
Method 3: Restore Files Using the File History Feature
The File History backup feature has saved countless files from permanent deletion since its introduction in Windows 8, and you can still use it to undelete files in Windows 11 – even those that no longer appear in the Recycle Bin.
Keep in mind that File History can only help recover your files if you enabled it before the data loss occurred. However, even if you haven’t explicitly enabled File History, you might still be able to recover your files from a system restore point.
Here’s how to recover deleted files in Windows 11 not in Recycle Bin using File History:
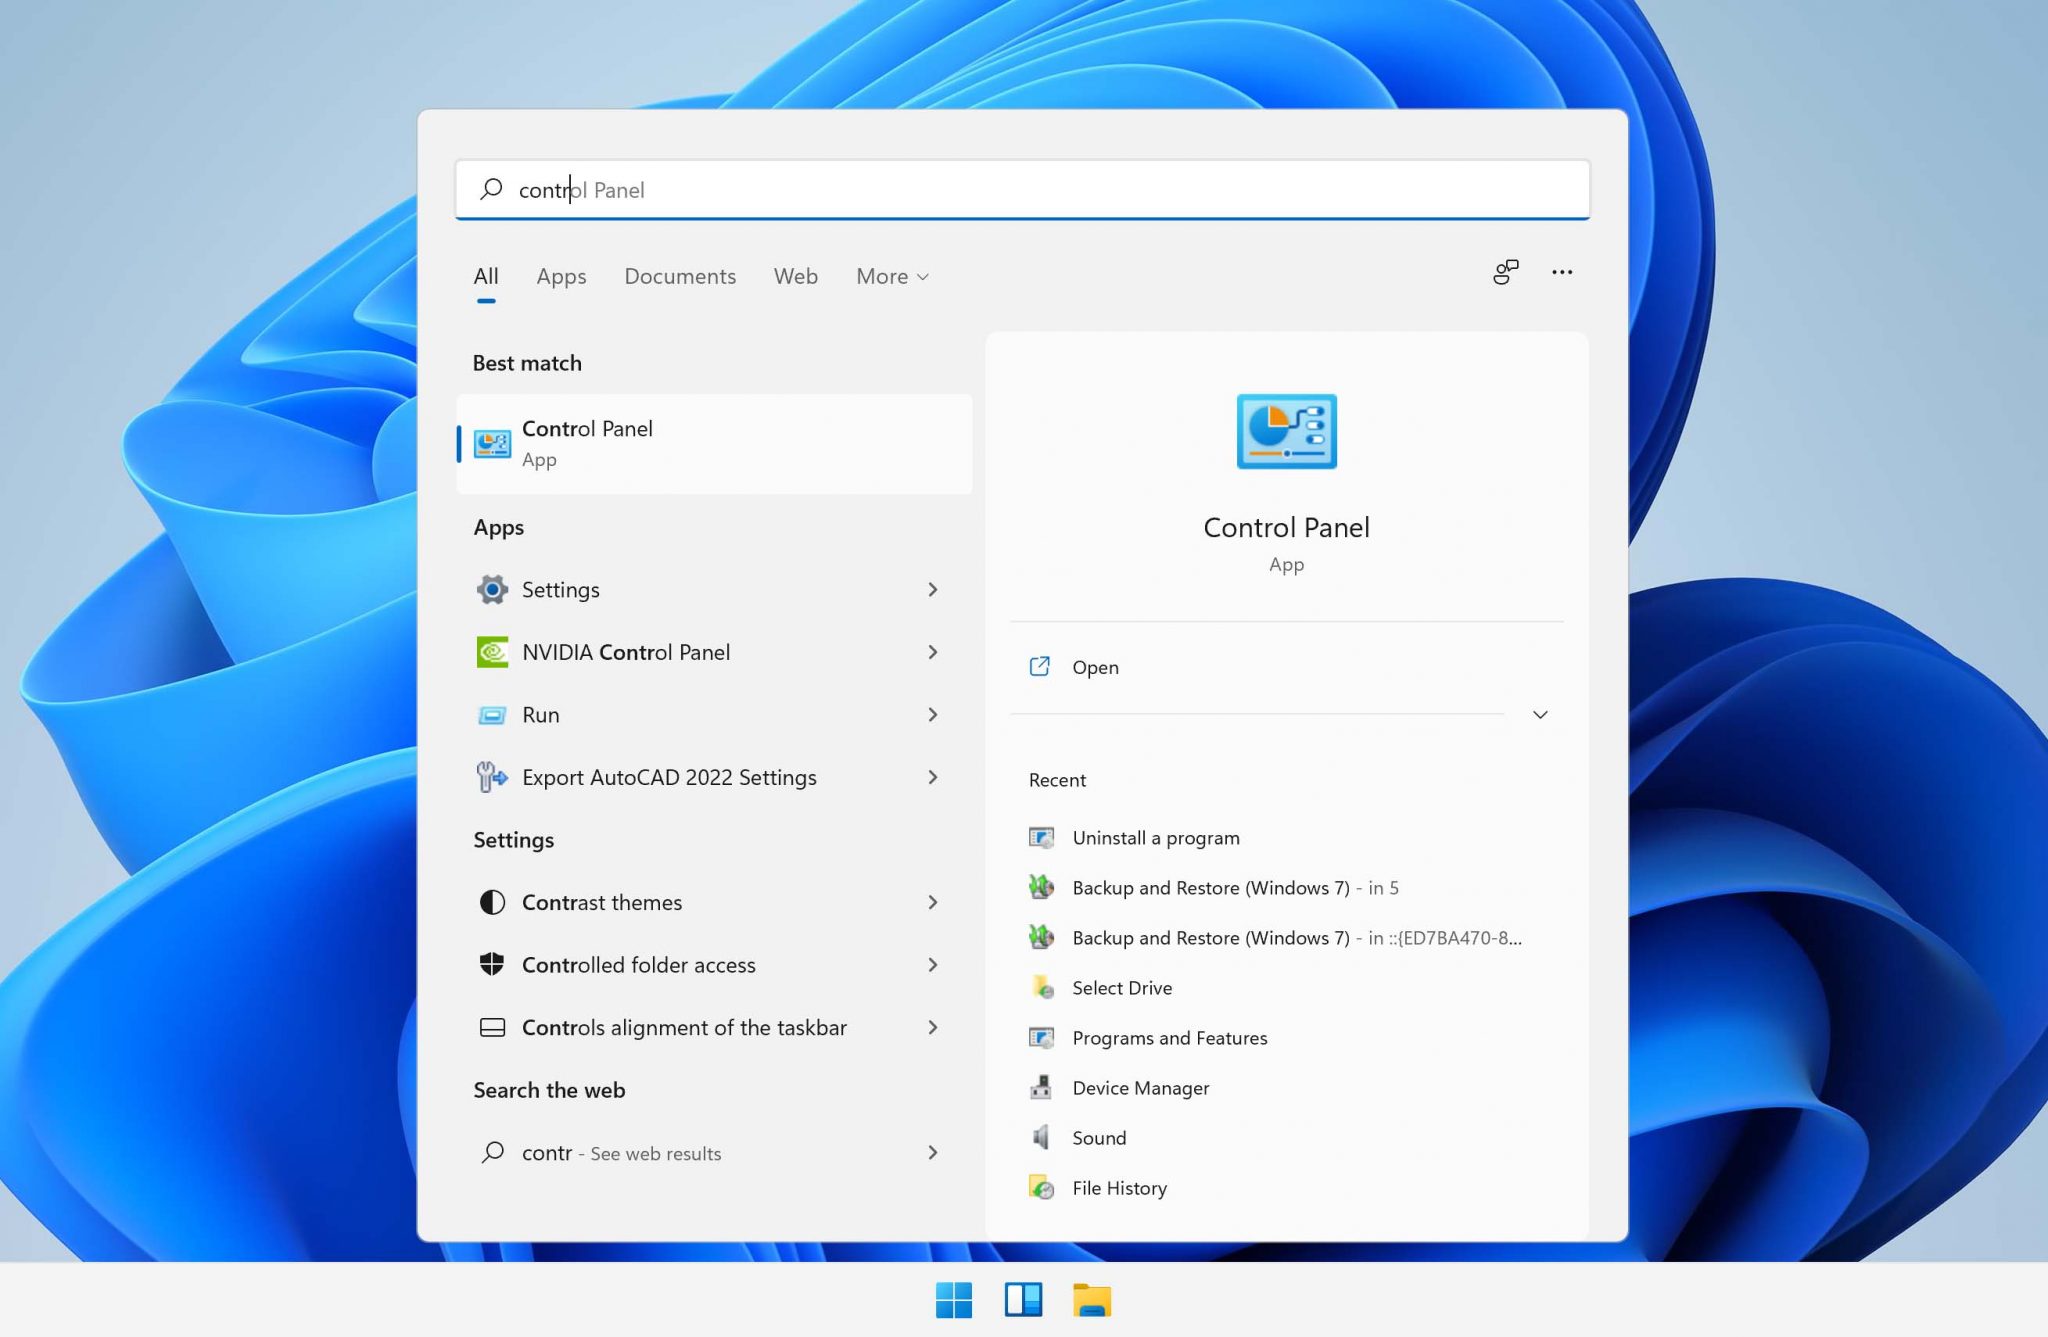
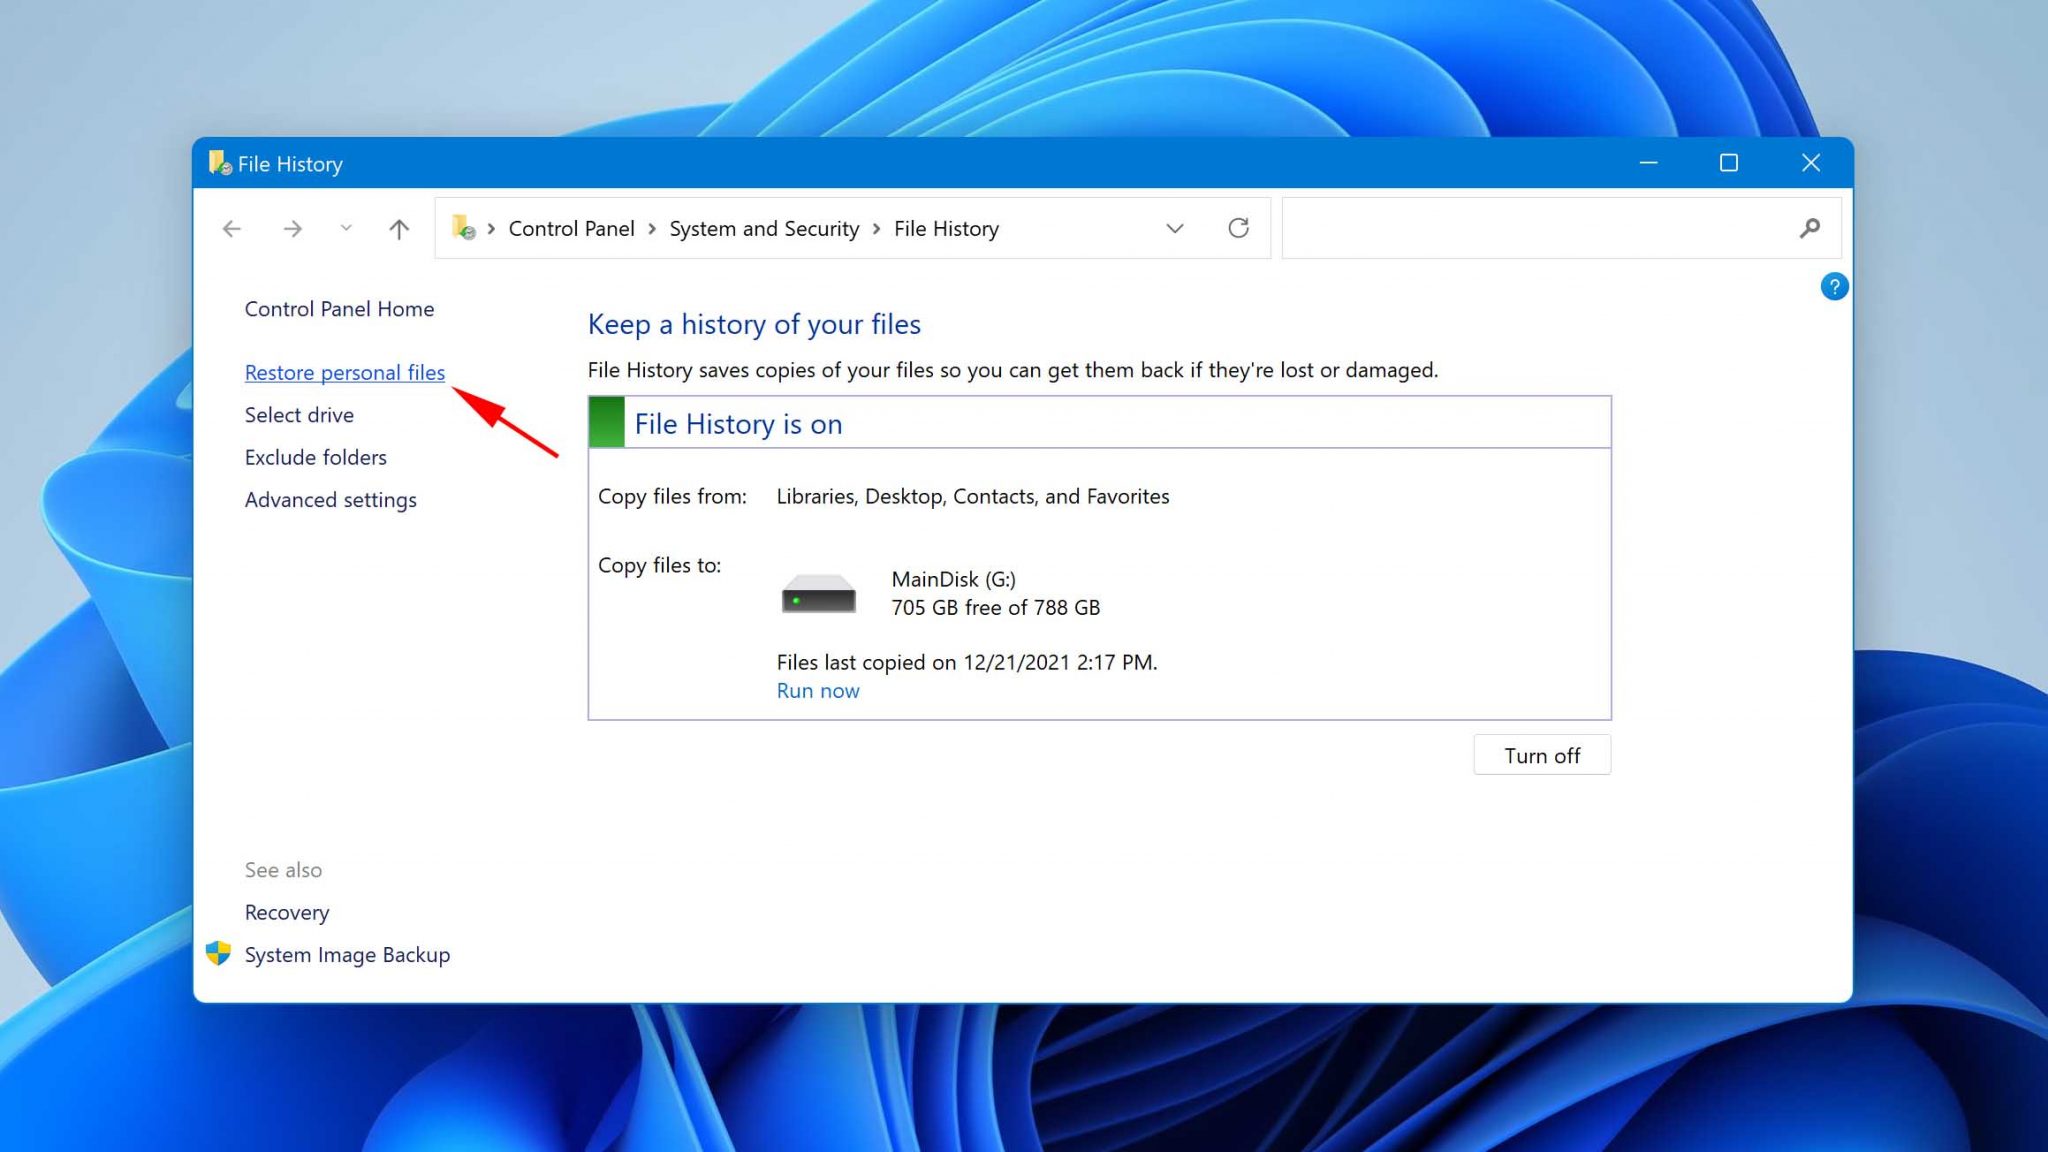
- Open the Start menu and type in Control panel.

- Launch the Control Panel app.
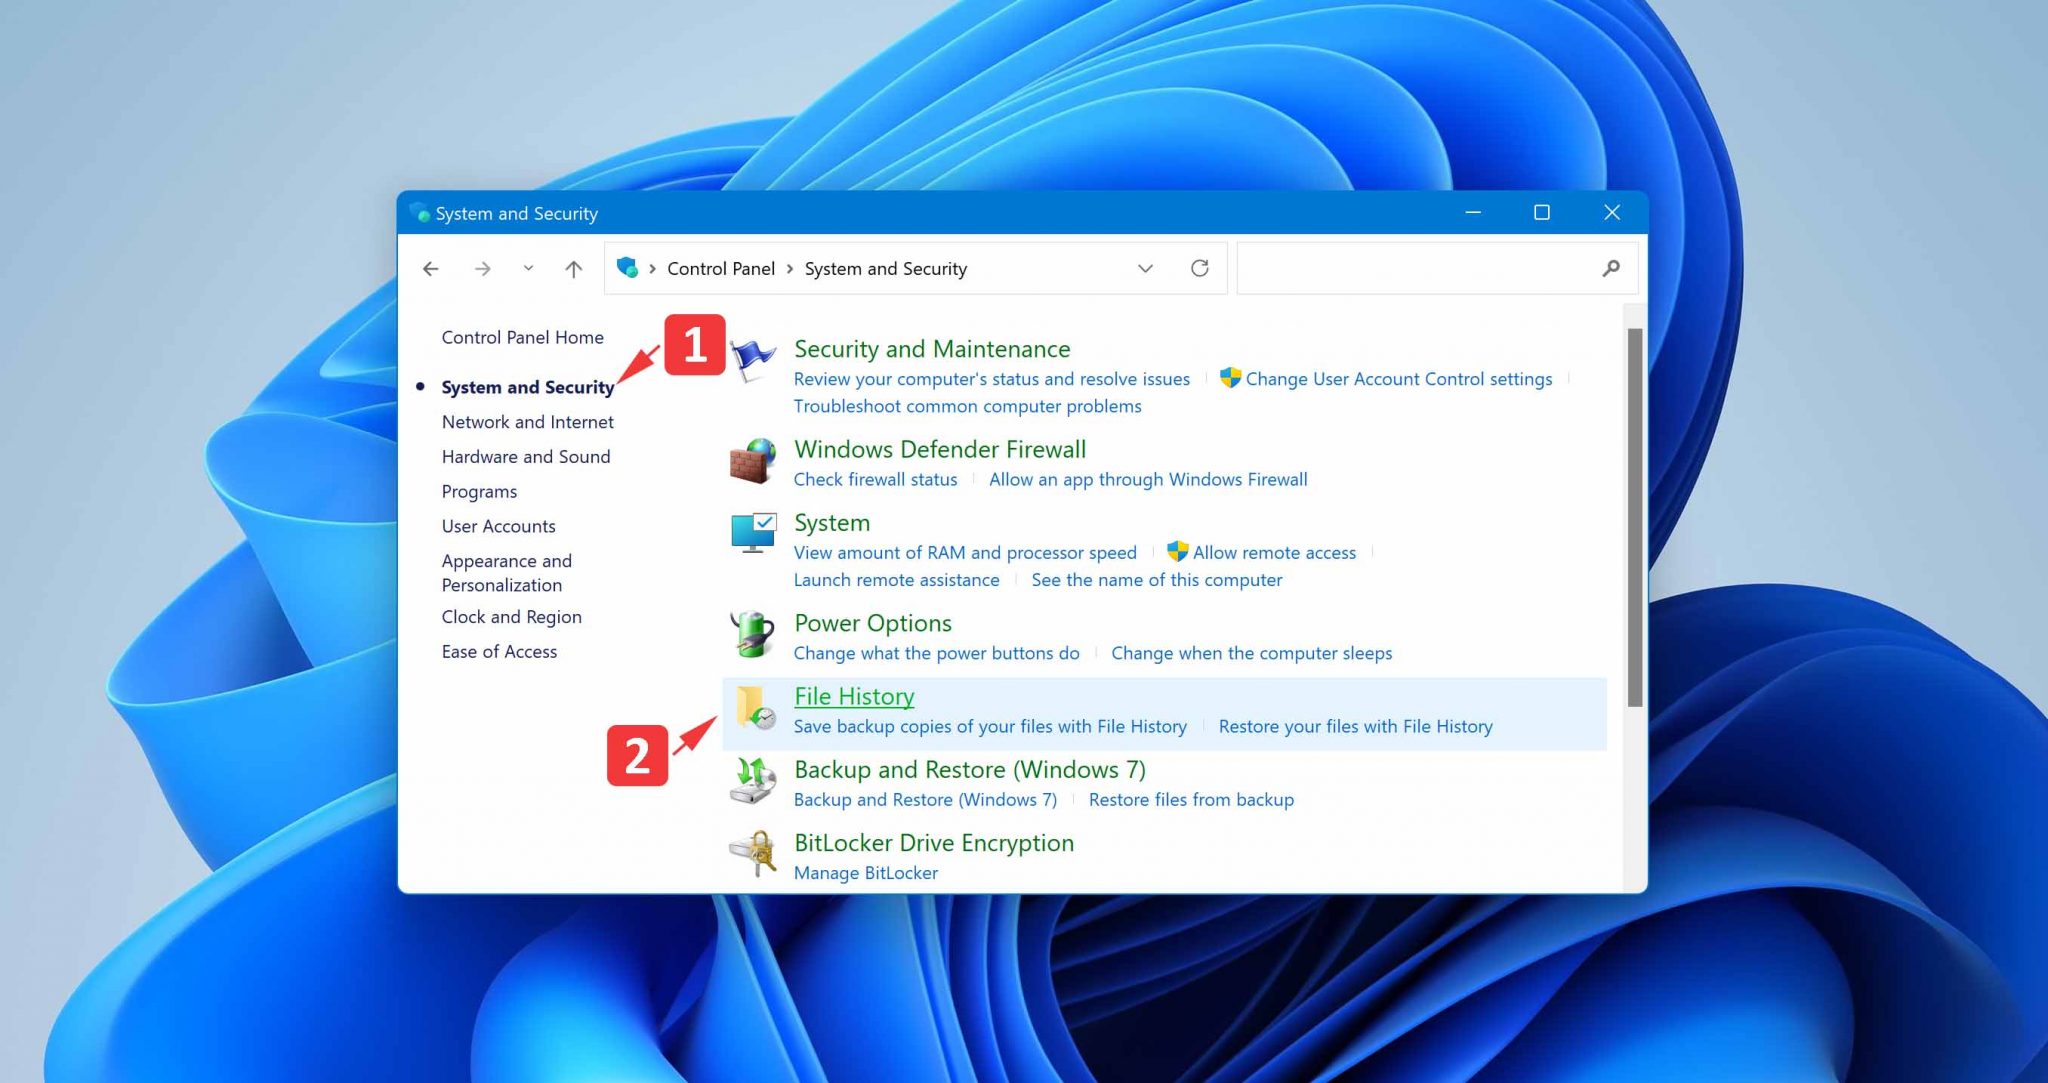
- Navigate to System and Security > File History.

- Click the Restore personal files option located in the left sidebar.

- Go back in time until you find a backup copy that contains the files you want to recover.
- Select your files.
- Click the green recover button.
If you want to recover files that were present in some other location than those backed up by File History, your best bet is to use a different recovery method.
Method 4: Recover without Third-Party Software using Command Prompt
Included with Windows 11 are several command-line tools that can resolve certain file system issues and, in some cases, help you regain access to files that are seemingly deleted even though that’s not the real issue.
However, keep in mind that these tools only address file system-related problems, so if a file is actually deleted or structurally damaged, then they won’t help.
CHKDSK
The most important command-line tool for repairing corrupted files is CHKDSK. With it, you can repair file system errors that might make previously inaccessible or disappeared files reappear.
You can access CHKDSK either directly from Command Prompt (cmd.exe) or from storage device Properties.
Command Prompt:
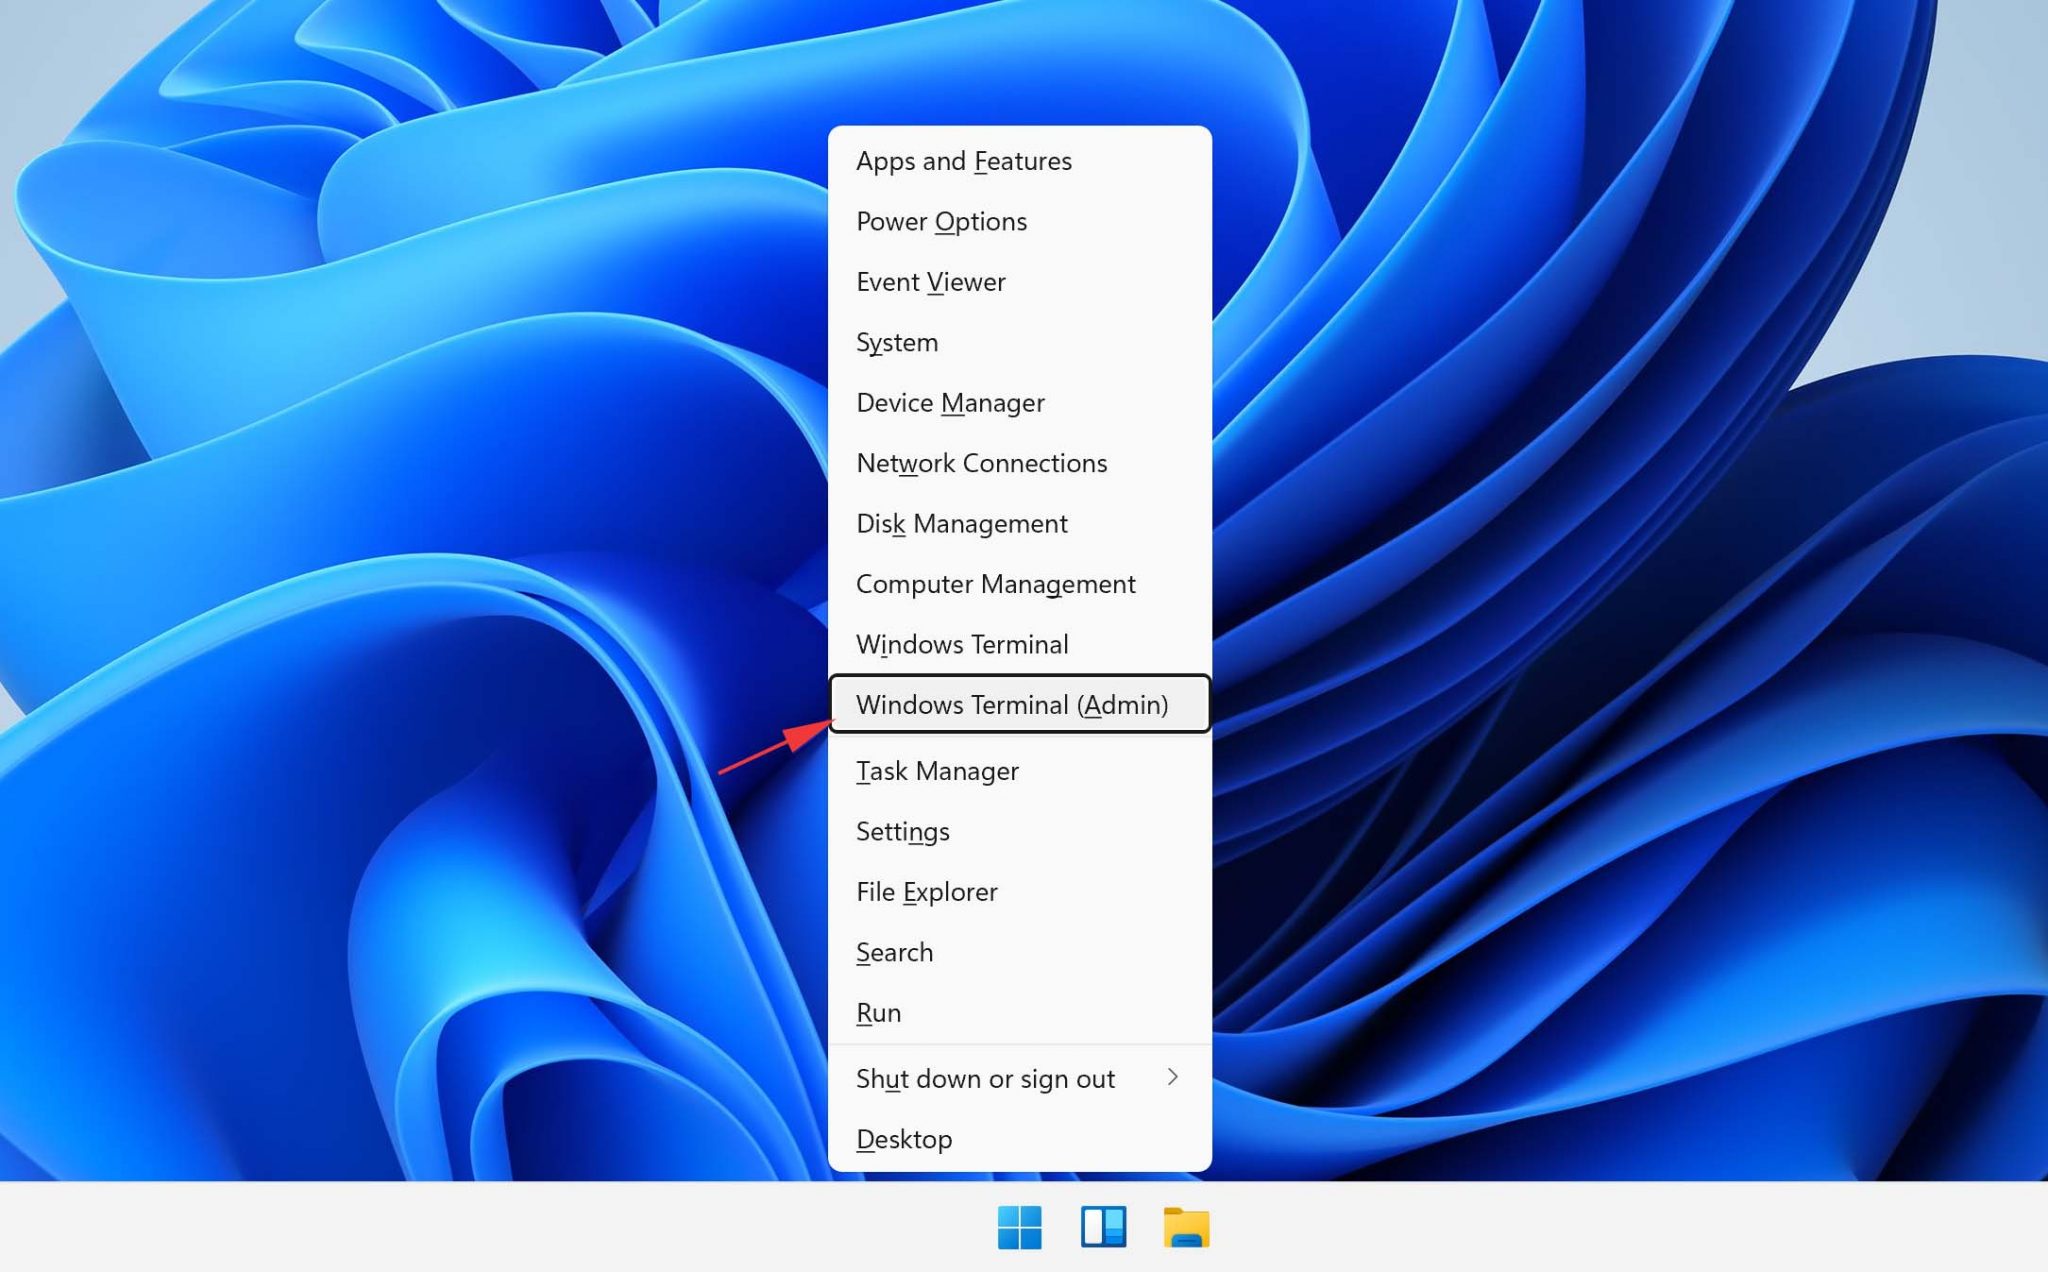
- Press Win + X and select the Windows Terminal (Admin) option.

- Type in:
chkdsk volume: /r(make sure to replace “volume” with the letter assigned to your storage device). - Press Enter on your keyboard and wait for CHKDSK to scan and repair your storage device.
Properties:
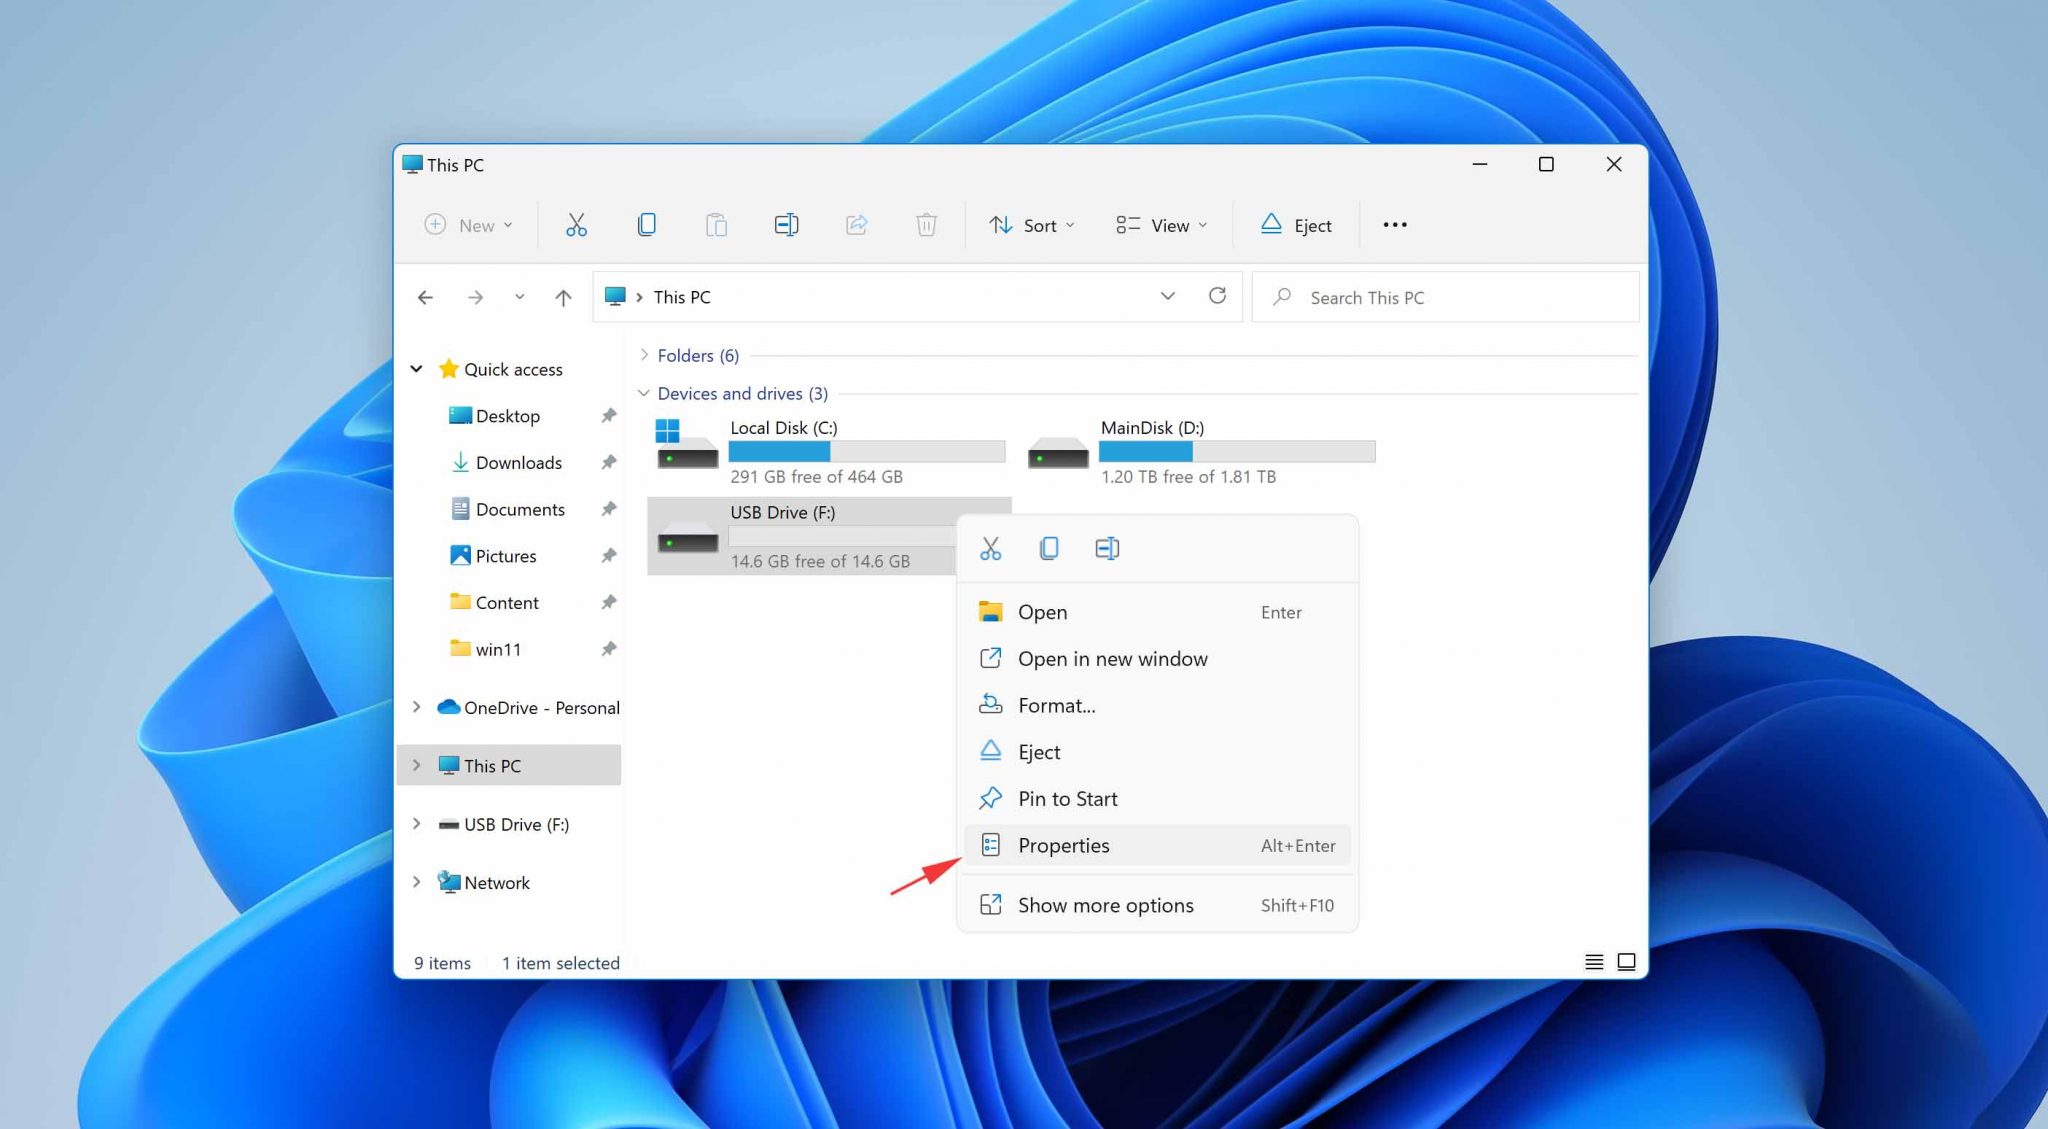
- Launch File Explorer.
- Select This PC from the list of locations in the left sidebar.
- Right-click the storage device you want to repair and choose Properties.

- Select the Tools tab.
- Click the Check button.
ATTRIB
In addition to CHKDSK, Windows 11 also comes with a tool called ATTRIB. You can use this tool to change various characteristics, or “attributes” of a computer file or directory. For example, you can unhide files that have become hidden by malware. Here’s what you need to do:
- Press Win + X and select the Windows Terminal option.
- Type in:
attrib -h -r -s /s /d volume:\*.*(replace “volume” with the letter assigned to your storage device). - Press Enter on your keyboard.
Method 5: Recover Permanently Deleted Files from an Older Backup
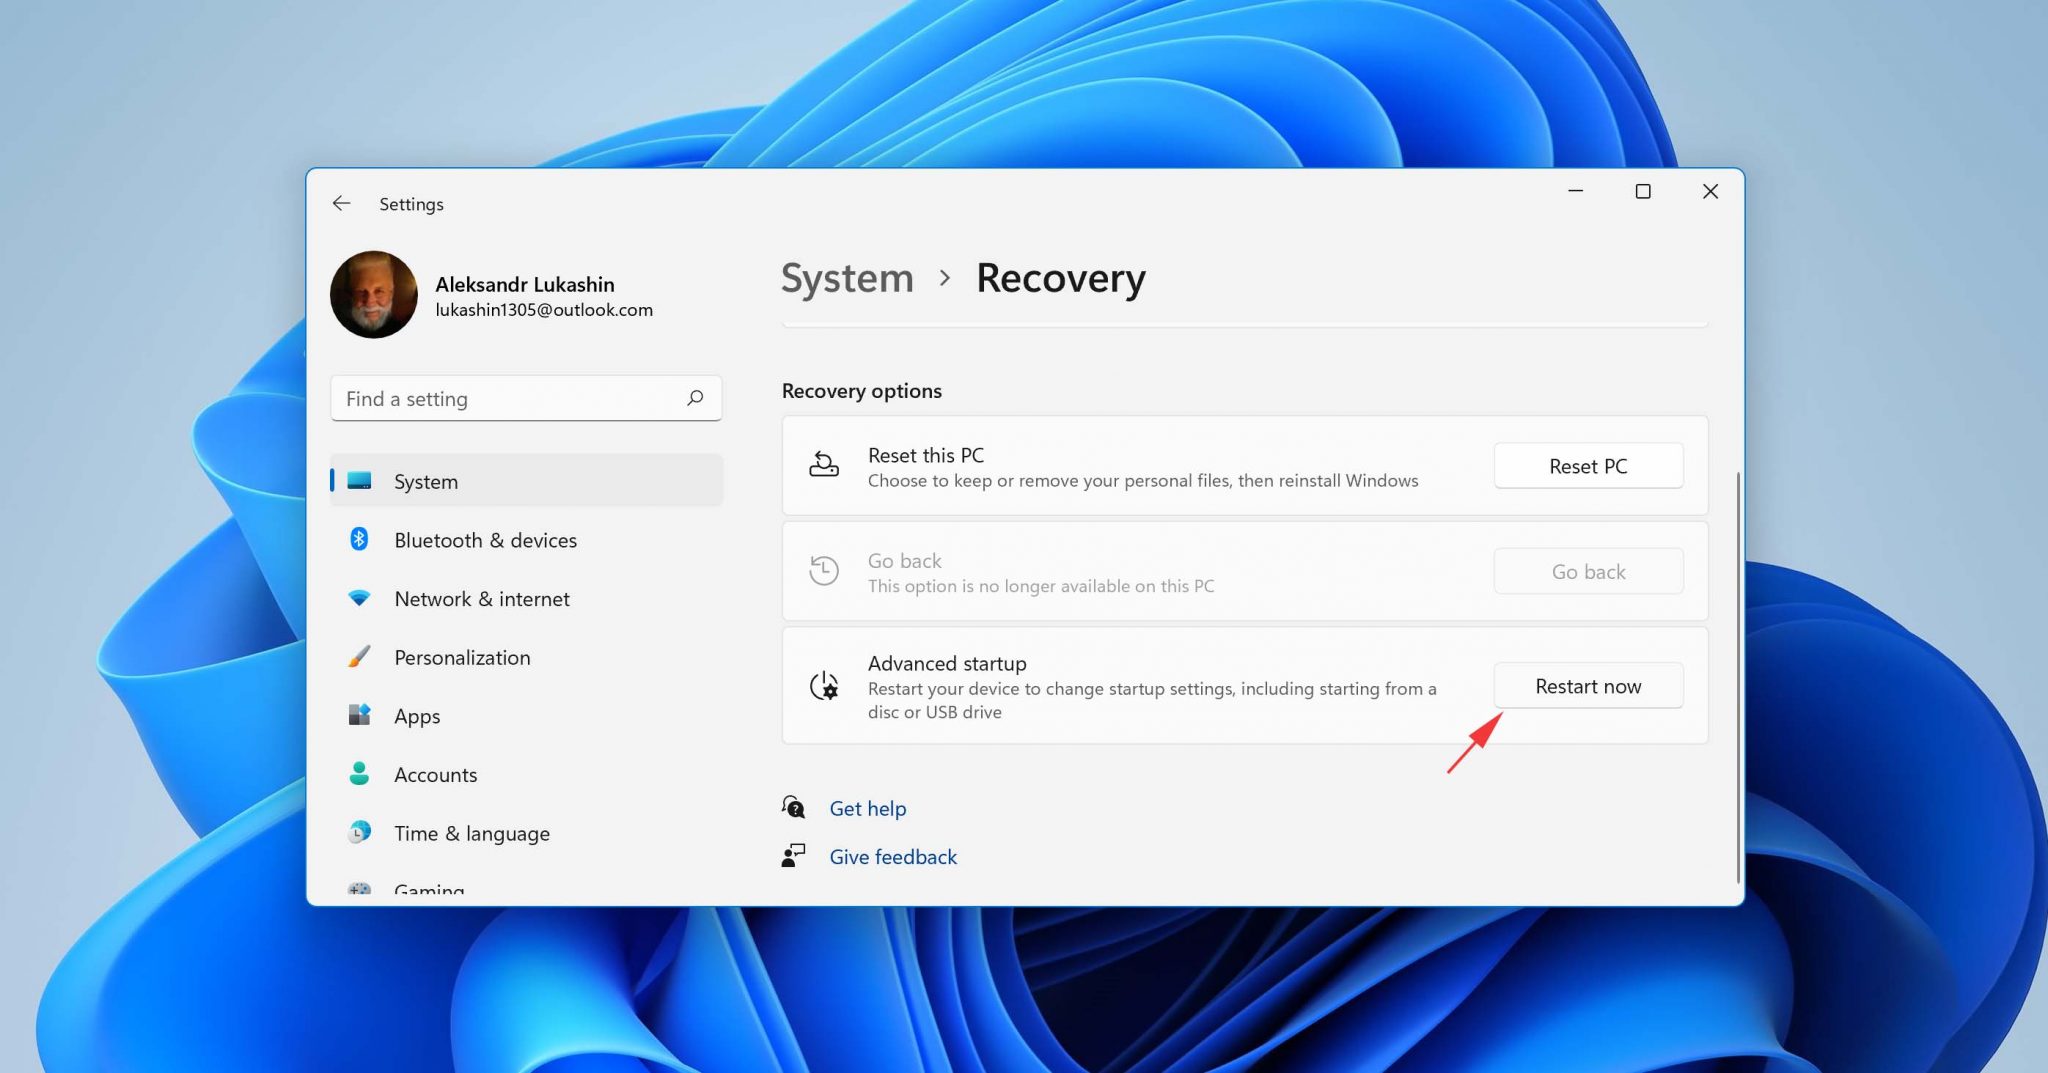
One of the oldest data recovery features present in Windows 11 is the Backup and Restore feature. This feature comes from Windows 7 (and Windows Vista), and it lets you create a complete image of your computer and recover lost data from it.
Assuming you have a backup image to recover from, this is what you need to do:
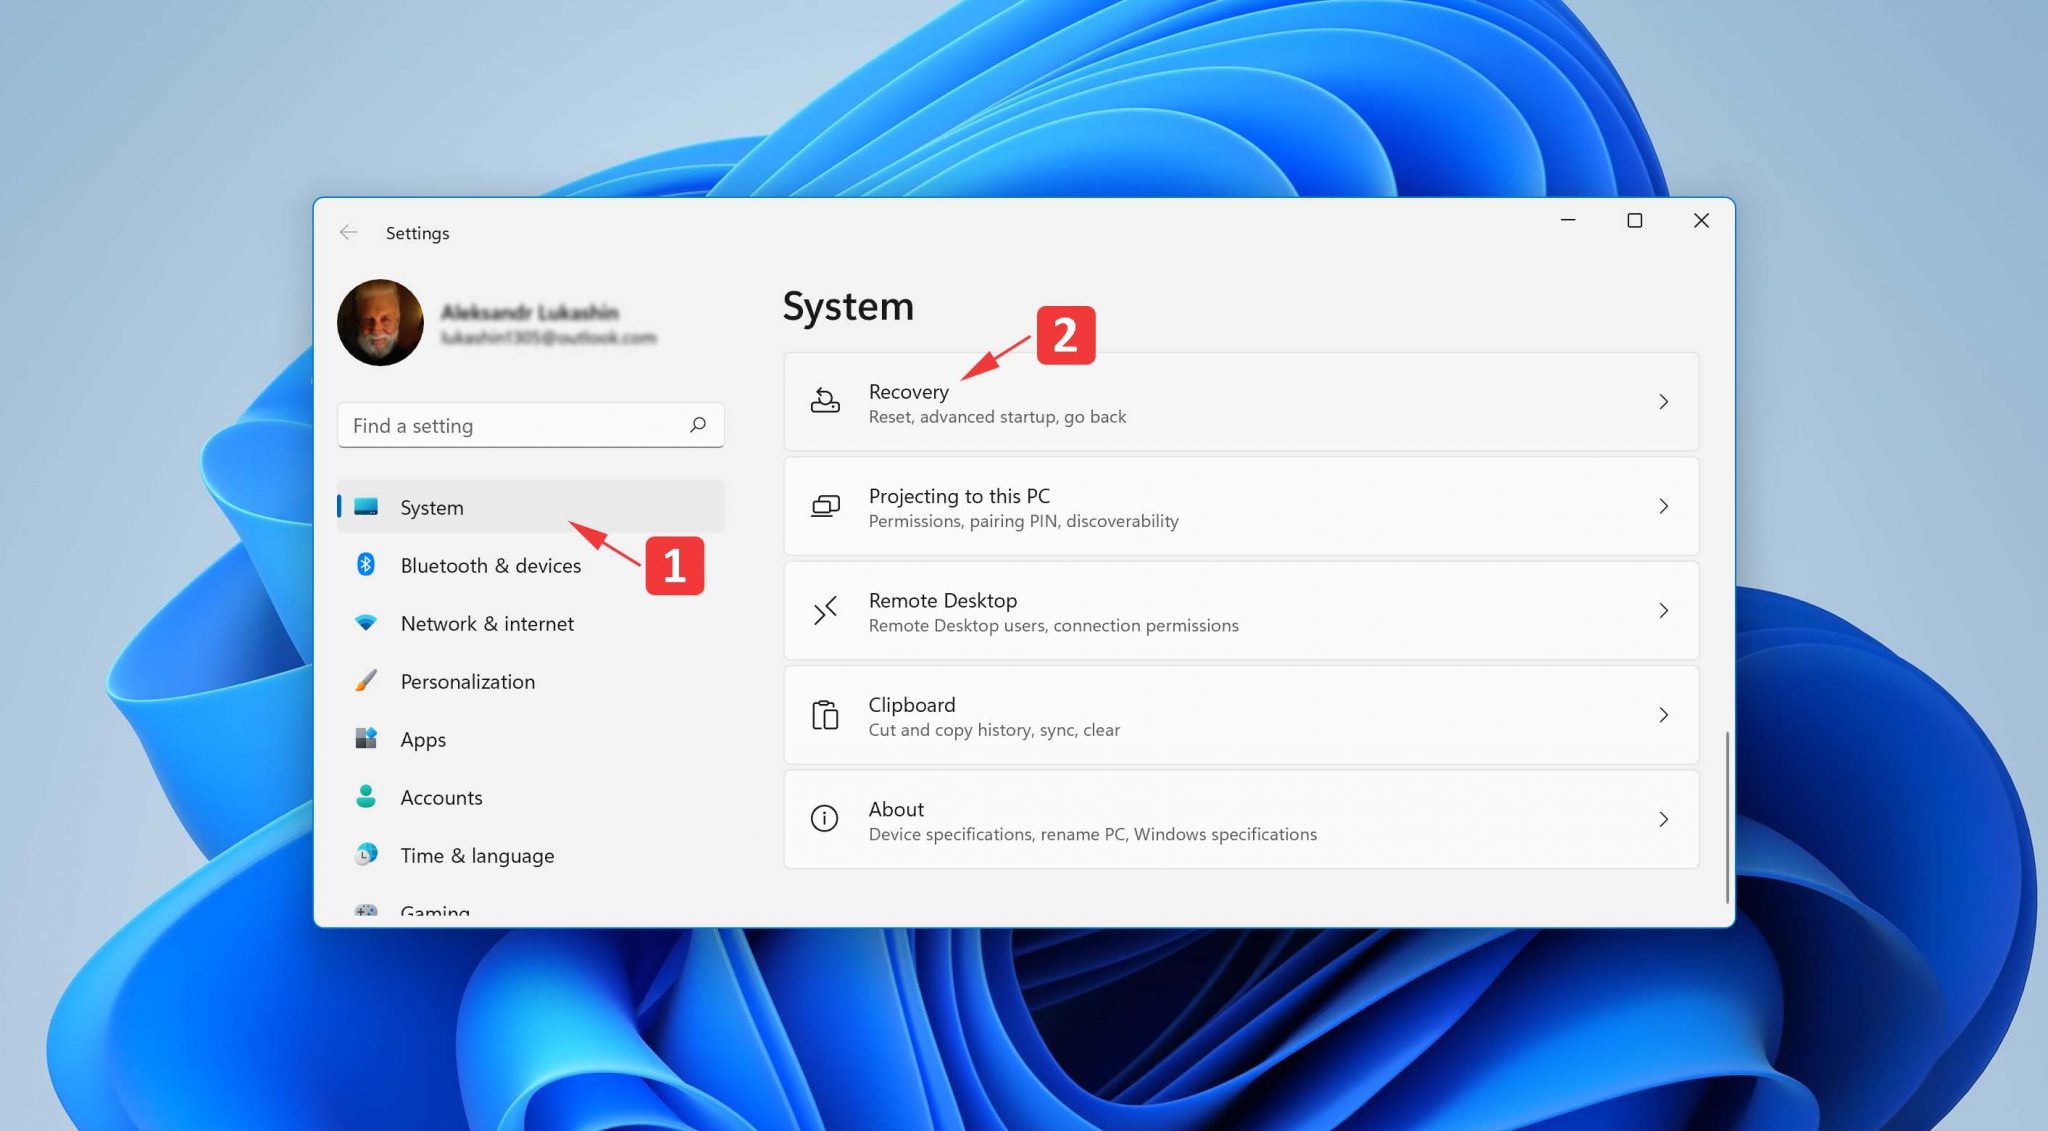
- Launch the Settings app.
- Navigate to System > Recovery.

- Click the Restart now button.

- Go to Troubleshoot > Advanced options > See more recovery options > System Image Recovery.
- Choose your system image backup.
The biggest advantage of the Backup and Restore feature is the fact that the system image created with it contains a full copy of all drives required for Windows to run, so you can use it to address even the most desperate cases of data loss. In Windows 11, you can also recover your Microsoft Store apps and OneDrive folders.
Method 6: Recover Permanently Deleted Files Using Third-Party Data Recovery Software
What if you need to recover permanently deleted files on Windows 11, but don’t have a backup from which you could recover them? In a situation like that, your best option is to use a third-party data recovery software application like Disk Drill.
Disk Drill is fully compatible with Windows 11, and it can recover up to 500 MB of deleted files on Windows 11 for free. The application supports all commonly and many not-so-commonly used file formats and is compatible with all standard Windows file systems, including:
- NTFS (the default Windows file system)
- FAT32 (commonly used on external drives)
- exFAT (for larger external storage devices)
- ReFS (Resilient File System, Windows’ newest file system optimized for data integrity and RAID configurations)
Here’s how to find deleted files on Windows 11 using Disk Drill:
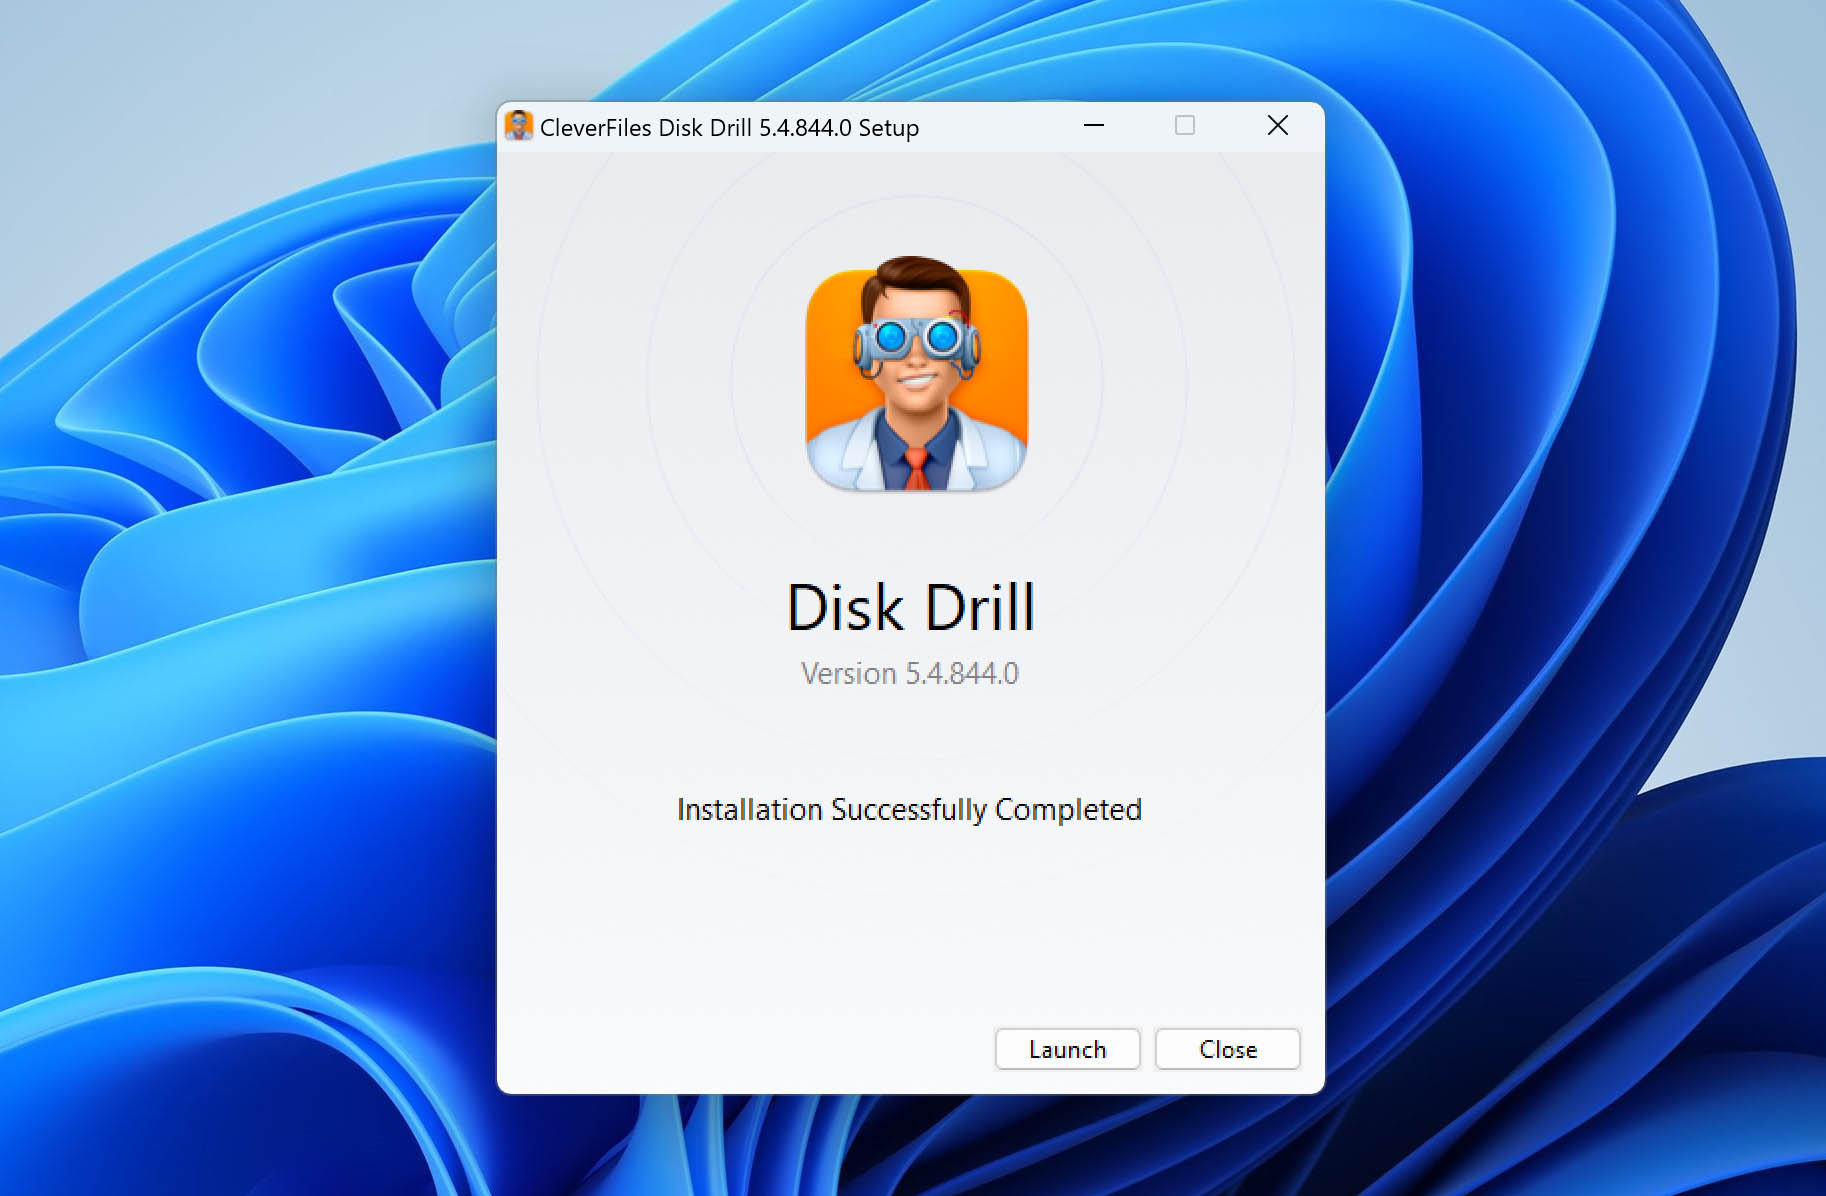
- Download and install Disk Drill for Windows.

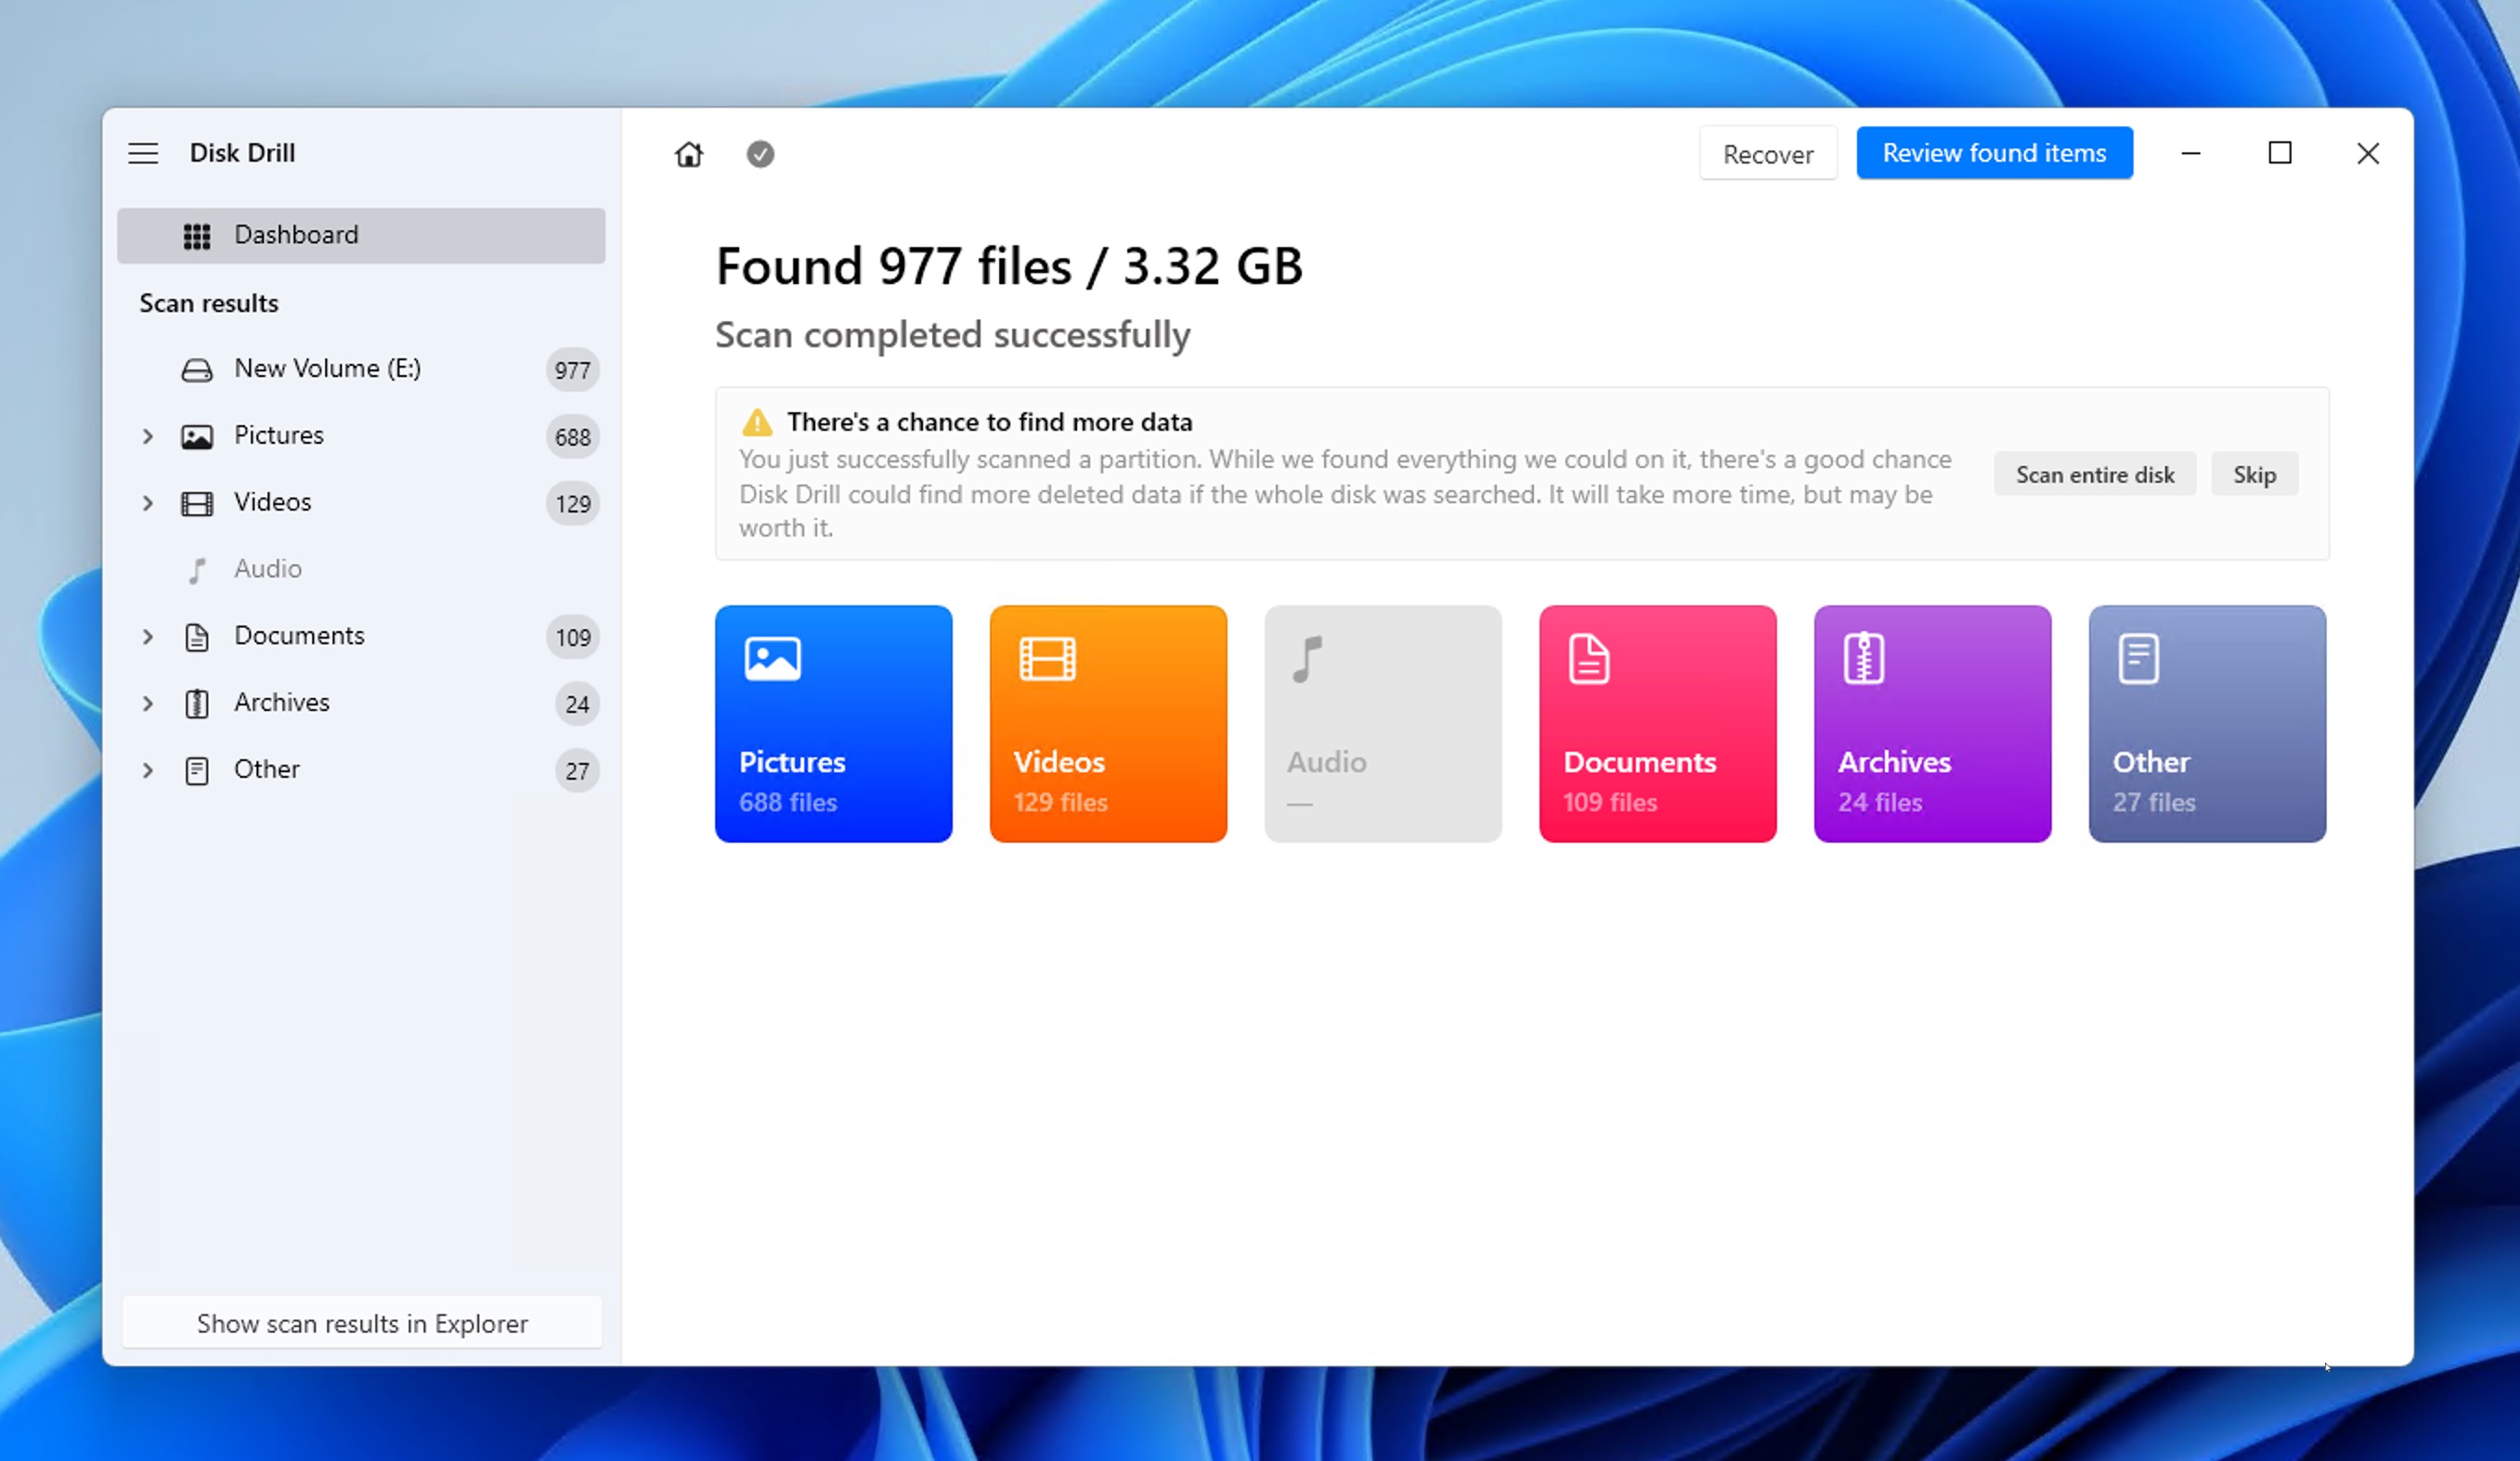
- Select your storage device and click Search for lost data.

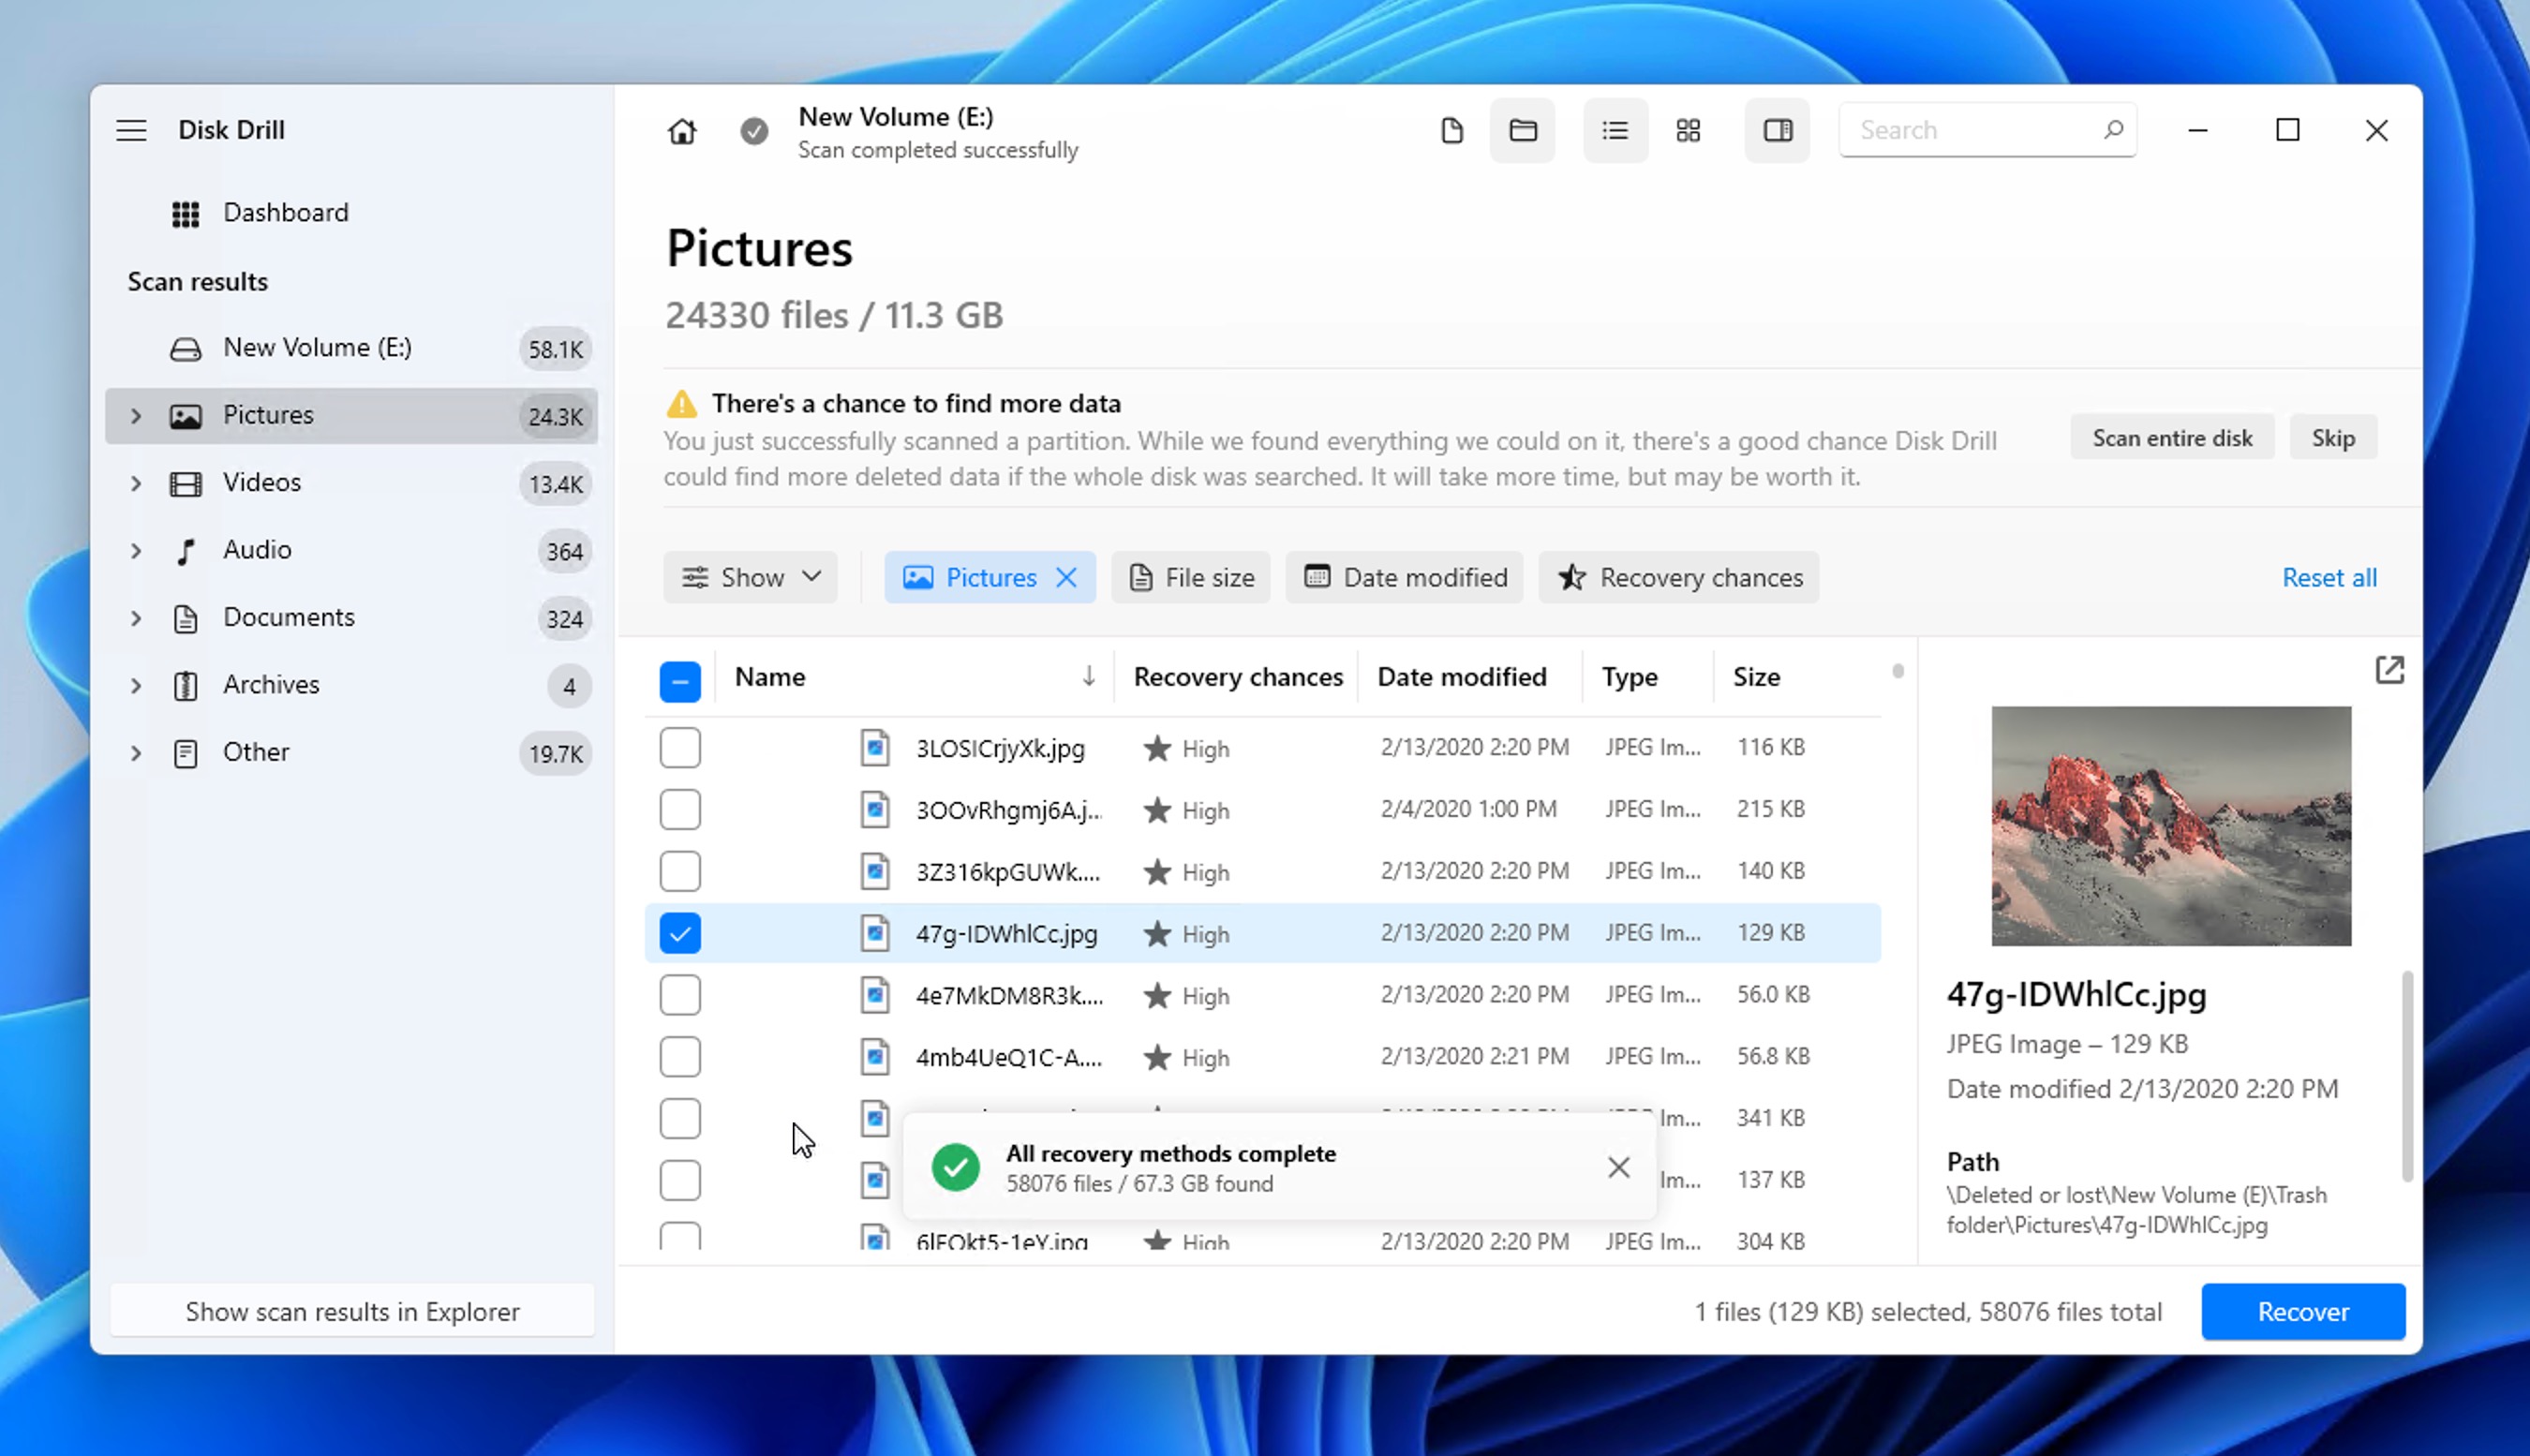
- Wait until your storage device is scanned or click the Review found items button to view scan results in real time.

- Preview & select your files. If the number of found files is overwhelming, then you can narrow the list down using file type, file size, and other filters.

- Click the Recover button and tell Disk Drill where it should recover the selected files.

You can use Disk Drill to recover permanently deleted files such as Shift deleted from most types of storage devices supported by Windows 11, but it works best with traditional spinning drives and flash-based storage devices that don’t take advantage of the TRIM command to improve performance by reclaiming data blocks that are no longer in use.
In other words, Disk Drill and other similar data recovery software solutions struggle to deliver good data recovery results when recovering data from a TRIM-enabled SSD. You can check if TRIM is enabled on your SSD in Windows 11 by entering the following command in Windows Terminal:
fsutil behavior query DisableDeleteNotify
Method 7: Use Microsoft’s Windows File Recovery Tool
Microsoft developed its own data recovery software application, called Windows File Recovery, and you can download it from the Microsoft Store. Windows File Recovery runs on Windows 11, and it can be used to recover many commonly used file formats from local storage devices. It supports NTFS, ReFS, FAT, and exFAT file systems.
Unlike Disk Drill and other feature-packed data recovery solutions, Windows File Recovery doesn’t have a graphical user interface. Instead, the tool is controlled from Command Prompt. This is what its syntax looks like:
winfr source-drive: destination-drive: [/mode] [/switches]
You can find a detailed explanation of the syntax and available modes and switches on Microsoft’s website. For the purposes of this article, we’re focusing only on how to recover a deleted folder in Windows 11 using Windows File Recovery:
- Press Win + X and select the Windows Terminal option.
- Type in the following command to recover the Documents folder on drive C to drive E:
winfr C: E: /regular /n \Users\<username>\Documents\
Of course, you can replace the path to the Documents folder with any path you want, and you can also pick a different source and destination drive. Check out the full Windows File Recovery Tool review here.
Method 8: Retrieve Lost Data from a Cloud Backup Using OneDrive
Integrated into Windows 11 is Microsoft’s cloud backup service, OneDrive. Using OneDrive, you can back up your files to the cloud and retrieve them from any device with a connection to the internet:
- Go to the OneDrive website (or open OneDrive in your browser).
- Log in with your Microsoft email address and password.
- Select the files you want to retrieve and click the Download button.
If you haven’t done so already, we recommend you take advantage of the OneDrive application that’s included with Windows 11 so that you can access your cloud files directly from File History and enjoy automatic data backups:
- Click the OneDrive icon in the system tray.
- Click Sign in.
- Log in with your Microsoft email address and password.
- Select the location of the OneDrive folder.
- Complete the initial setup process.
Remember that OneDrive can back up your files only if you have a working connection to the internet. If you’re often on a laptop with no internet access, you might be better off relying primarily on a local backup solution. What’s more, OneDrive’s free tier is limited to 5 GB, so be sure to upgrade if you need more storage space.
How to Protect Your Files on Windows 11
As a Windows 11 user, you should take certain steps to protect your files against data loss:
- 🤔 Think before you click: Human error is a leading cause of data loss, so the easiest and most effective step you can take to avoid losing important files is to be more careful, especially when deleting files, downloading stuff from the internet, and reading email messages containing suspicious attachments and links.
- 💽 Store local backups on a dedicated backup drive: Keeping backup copies of important files on the same storage device where the original files are located is a big no-no. Instead, you should have a dedicated backup drive, such as an external hard drive. You can then configure a backup tool like File History to automatically back up files to this drive at a regular interval. Additionally, you should consider using the ReFS file system for your backup drive, as it’s even more reliable than NTFS.
- ☁️ Enable OneDrive cloud backups: As described in the previous section of this article, Windows 11 makes it easy to backup files to the cloud using OneDrive, Microsoft’s file hosting service and synchronization service. Free users get 5 GB of free personal cloud storage, and you can choose from multiple subscription plans to get a lot more. OneDrive users can further protect their data by enabling the Personal Vault feature, which includes file encryption, malware scanning, and monitoring.
- 🛡️ Keep antivirus software enabled and updated: Windows 11 comes with capable antivirus software, Microsoft Defender, whose purpose is to protect users against viruses and other malware. Microsoft Defender is enabled by default, and it consumes minimal system resources, so you should resist the temptation to turn it off. Additionally, Microsoft Defender SmartScreen helps filter out untrusted apps and suspicious websites before they cause problems.
- 🧰 Equip yourself with reliable data recovery software: To successfully recover permanently deleted files, it’s paramount that you act quickly and don’t waste precious time. That’s why it’s a good idea to have reliable data recovery software like Disk Drill installed on your computer so that you can use it without any delay.
- 🔐 Consider disabling BitLocker: Recently, Windows 11 began enabling BitLocker encryption by default on some devices, which can complicate the file recovery process if you ever need to recover files deleted from the encrypted drive. If you’re not worried about theft of the physical device, you may want to disable BitLocker encryption to maximize your recovery options.
These simple best practices can go a long way in keeping the looming danger of data loss at bay, making it well worth the time necessary to implement them.
Conclusion
Windows 11, with its sharp focus on security and revamped user interface, marks an important step forward for Microsoft and its customers. But despite all the improvements, data loss will continue to be a major issue for all Windows 11 users because many of its causes, such as human error and hardware failure, are impossible for Microsoft to address. Fortunately, there are effective methods you can take advantage of to restore lost data.
FAQ
You can recover permanently deleted files in Windows 11 from an existing backup or using data recovery software, which is available from Microsoft as well as a number of third-party software developers.
Yes, Microsoft offers its own free data recovery software tool, called Windows File Recovery, and similar (but typically far more polished, capable, and easy to use) tools are also available from various third-party developers. For example, Disk Drill by CleverFiles lets you recover up to 500 MB of data for free, and it has an intuitive graphical user interface that makes it suitable even for inexperienced users.
Windows 11 comes with multiple native data recovery capabilities, including the Recycle Bin folder, the Undo feature, and File History.
If you delete files on your Windows 11 computer, they will go directly to the Recycle Bin folder. However, if you use the Shift + Delete shortcut to delete them, you won’t be able to find them there. When you empty the Recycle Bin or use the shortcut to delete files, Windows removes all pointers to them and makes the files invisible for you.
It depends on how much time has passed after deleting the files. When you delete a file on a Windows 11 computer, the file becomes invisible to you but remains present on the hard drive. So if the operating system still hasn’t overwritten the deleted files with new data, it may be possible to recover them.
Even if you haven’t been backing up your files on a Windows 11 computer, you still have some options when it comes to recovering deleted files. Here’s what you should try:
- Check the Recycle Bin folder
- Use the Undo Delete tool
- Use the File History feature
- Use Command Prompt
- Use third-party data recovery software
David Morelo
David Morelo is a professional content writer focused on the technology sector, with expertise ranging from consumer products to the latest tech innovations. His approach involves personally testing each product according…
Read full bio
David Morelo is a professional content writer focused on the technology sector, with expertise ranging from consumer products to the latest tech innovations. His approach involves personally testing each product according…
Read full bio
Approved by
Brett Johnson
This article has been approved by Brett Johnson, Data Recovery Engineer at ACE Data Recovery. Brett has a Bachelor’s Degree in Computer Systems and Network, 12 years of experience.
This article has been approved by Brett Johnson, Data Recovery Engineer at ACE Data Recovery. Brett has a Bachelor’s Degree in Computer Systems and Network, 12 years of experience.
Новая операционная система Windows 11 привносит некую свежесть за счет нового дизайна и новых функций. Все это уже не раз обсуждалось на просторах интернета. Мы же поговорим о том, что делать, если исчезли важные данные и как их правильно восстановить в Windows 11.

Содержание
- Использование функции «История файлов»
- 1.1 Как включить «Историю файлов» в Windows 11?
- 1.2 Как отключить «Историю файлов» в Windows 11?
- 1.3 Как восстановить данные при помощи функции «История файлов»
- Восстановление удаленных файлов в Windows 11 при помощи Windows File Recovery
- Восстановление удаленных файлов в Windows 11 при помощи RS Partition Recovery (наилучший вариант)
Использование функции «История файлов»
Функция «История файлов» также присутствует и в Windows 11, однако самый главный недостаток этого метода заключается в том, что можно восстанавливать только данные, хранящиеся на рабочем столе и в папках «Мои Документы», «Мои Изображения», «Моя Музыка», «Избранное» и «Контакты». В случае потери файлов на других локальных или съемных дисках – использовать этот метод не получится.
Важно: Стоит отметить, что «История файлов» не всегда работает корректно и в некоторых случаях либо отказывается работать, либо само восстановление удаленных файлов может работать некорректно. Поэтому вы должны быть готовы, что этот метод может не сработать и вы потеряете ценные данные.
В отличии от Windows 10 запустить «Историю файлов» в Windows 11 через настройки системы нельзя, так как разработчики убрали ее из этого меню, сделав акцент на лаконичности и удобстве использования. В настройках отображаются только базовые параметры, которые по мнению разработчиков будут использоваться чаще всего.
1.1 Как включить «Историю файлов» в Windows 11?
В Windows 11 запустить функцию «История файлов» можно используя «Панель управления». Однако перед тем, как приступать к использованию этой функции обзаведитесь внешним жестким диском, или флэшкой. Чем больше будет накопитель, тем больше информации сможет сохранить функция, и, соответственно, больше данных вы сможете восстановить в случае проблем.
Давайте рассмотрим ближе процесс включения функции «История файлов»:
- Подключите ваш внешний жесткий диск или флэшку к компьютеру.
- Нажмите комбинацию клавиш «Win + R», в открывшемся окне введите «control» и нажмите «OK»

- Перед вами откроется «Панель управления». Справа вверху, возле пункта «Просмотр» выберите режим отображения «Мелкие значки»

- В открывшемся найдите пункт «История файлов» и щелкните на нем.

- Перед вами откроется окно функции «История файлов». В нем будет отображаться подключенный накопитель, на который будут копироваться данные. Нажмите кнопку «Включить»


Подсказка: если вы как какой-либо причине передумали использовать «Историю файлов», просто нажмите кнопку «Остановить»

По завершении копирования файлов будет отображаться дата последнего копирования.
Важно: Ваш компьютер будет периодически копировать данные до тех пор, пока накопитель будет подключен к компьютеру. Если же у вас есть более свежие данные, которые хотите сохранить – повторите эту инструкцию еще раз.
1.2 Как отключить «Историю файлов» в Windows 11?
Если у вас больше не необходимости в использовании «Истории файлов» — вы без проблем можете ее отключить. Для этого откройте окно «Истории файлов» используя первые четыре шага из предыдущего пункта и нажмите кнопку «Отключить» для отключения резервного копирования данных.

По нажатии кнопки «Остановить» функция «История файлов» будет полностью выключена, однако сохраненные ранее останутся на диске. Соответственно, если вы намерены одолжить кому-то накопитель – удалите данные вручную.
1.3 Как восстановить данные при помощи функции «История файлов»
В случае необходимости вы можете в любой момент восстановить удаленный файл, который хранился в любой из папок «Мои Документы», «Мои Изображения», «Моя Музыка», «Избранное» и «Контакты». Для этого следует:
- Откройте окно «Истории файлов» используя шаги, описанные в пункте 1.1
- В меню слева нажмите на «Восстановление личных файлов»

Начнется сканирование накопителя на наличие файлов, для восстановления. Это может занять некоторое время, в зависимости от объема диска.
- После завершения сканирования диска перед вами откроется диск и вы сможете выбрать удаленную папку или файл, который нужно восстановить. Для начала восстановления просто нажмите зеленую кнопку внизу посередине.


Подсказка: чтобы открыть папку и найти удаленных файл два раза щелкните по ней. То есть вся навигация по резервной копии выглядит как в обычном проводнике.
По умолчанию функция «История файлов» восстанавливает файлы туда, где они хранились раньше. Если вы хотите записать восстановленный файл в другое место – щелкните на иконке шестерни справа вверху и выберите «Восстановить в»
Перед вами откроется окно с выбором папки, куда нужно восстановить ваши файлы
Восстановление удаленных файлов в Windows 11 при помощи Windows File Recovery
Не так давно компания Microsoft выпустила свою собственную программы для восстановления утерянных данных под названием Windows File Recovery. Скачать ее можно из Microsoft Store, однако перед этим рекомендуется рассмотреть ряд особенностей программы. Во-первых, программа не имеет графического интерфейса, и все манипуляции производятся путем ввода команд в командной строке. Соответственно, вы должны будете их запомнить, или записать, чтобы иметь возможность пользоваться Windows File Recovery.
Другой особенностью программы является поддержка только файловых систем NTFS, FAT32, ExFAT и ReFS. Никаких файловых систем, отличных от тех, которые поддерживает Windows.
После запуска скачанного приложения вы увидите следующее окно:

Для начала восстановления используется команда:
winfr F: D:\Recovered
Эта команда найдет и восстановит все удаленные файлы, которые находятся на диске F:\ и сохранит найденные данные в папку D:\Recovered; Естественно, что букву диска и путь для записи восстановленных файлов вы можете указать свои.
Можно также указывать дополнительные параметры. К примеру, /x — активирует анализ по сигнатурам файлов. Соответственно, команда будет выглядеть следующим образом:
winfr F: D:\Recovered /x
Для поиска по заданным типам файлов можно использовать параметр /y. К примеру, команда, которая будет искать только .jpeg изображения будет иметь следующий вид:
winfr E: D:\Recovered /x /y:JPEG,PNG
Стоит отметить, что флаг /y использовать только с /x. В противном случае программа выдаст ошибку.
Ключ /n используется для восстановления удаленных файлов, в которых есть определенные символы. К примеру, если добавить «rep» — програма бедт искать только те файлы, в имени которых есть эти буквы. Сама же команда будет выглядеть так:
winfr F: D:\Recovered /x /n re*
Важно: если не указать ключ /x – программа будет работать только с NTFS диском. Знак * указывает, что указанные символы могут встречаться в любой части имени файла.
При помощи флага /n можно также указать из какой папки нужно восстановить удаленные файлы. Команда будет выглядеть следующим образом:
winfr F: D:\Recovered /x /n Users\username\Desktop\
…где Users\username\Desktop\ — это папка, из которой будет производится восстановление файлов.
Примечание: Имя диска уже обозначено в начале команды, соответственно лишний раз указывать имя диска не нужно.
Как вы могли заметить, работать в Windows File Recovery неподготовленному пользователю не слишком удобно. Однако, если вы любитель командной строки – эта программа для вас.
Восстановление удаленных файлов в Windows 11 при помощи RS Partition Recovery (наилучший вариант)
Предыдущие два метода обладают несколькими существенными недостатками. В случае с использованием функции «История файлов» проблема кроется в возможности восстановления удаленных файлов только с определенных системных папок. А что делать, если данные утерянные с другого диска, или карты памяти?
Использование Windows File Recovery тоже нельзя считать удачным решением ввиду сложности запуска процесса восстановления (чтобы начать восстановление нужно ввести куча команд и т.д.). А что делать неопытным пользователям? Есть множество профессий, которые не требуют глубоких знаний ПК и используют компьютер на базовом уровне.
Но еще большим недостатком Windows File Recovery является отсутствие поддержки любых файловых систем, отличных от NTFS или FAT. Что же делать, если диск ранее использовался в Linux и использует файловую систему ext4?
К счастью, есть решение, которое позволяет восстанавливать удаленные данные независимо от уровня знаний компьютера или типа файловой системы.
Речь идет о программе RS Partition Recovery – лучшем решении на рынке на сегодняшний день.
Программа обладает интуитивно-понятным интерфейсом, благодаря которому восстановить данные могут даже неопытные пользователи.
Но самое главное преимущество RS Partition Recovery – это поддержка ВСЕХ современных файловых систем. Таким образом, вы можете восстановить утерянные данные с любого диска, независимо от типа компьютера (ПК, Mac, сервер, NAS) или файловой системы. Также можно восстанавливать данные как с локальных дисков, так и с любых других внешних дисков, флэшек или карт памяти.
Весь процесс восстановления удаленных файлов происходит в несколько кликов и выглядит следующим образом:
Шаг 1.
Установите и запустите программу
RS Partition Recovery.
Шаг 2.
Выберите диск или раздел, с которого вы хотите восстановить данные.

Шаг 3.
Выберите тип анализа.

Быстрое сканирование, которое следует использовать в случае недавней потери файла. Программа быстро просканирует диск и покажет файлы, доступные для восстановления.
Функция Полный анализ позволяет вам найти потерянные данные после форматирования, изменения размера диска или повреждения файловой структуры (RAW).
Шаг 4.
Предварительный просмотр и выбор файлов для восстановления.

Шаг 5.
Добавьте файлы, которые хотите сохранить, в «Список восстановления» или выберите весь раздел и нажмите Восстановить.

Следует отметить, что лучше сохранить восстановленный файл на внешний жесткий диск или USB-накопитель.
Как видите, наличие удобного интерфейса и встроенного мастера восстановления удаленных файлов, а также поддержка всех файловых систем сильно выделяет RS Partition Recovery среди других программ и делает ее must-have инструментом, который должен быть у каждого владельца компьютера.
Часто задаваемые вопросы
В отличии от Windows 10 в Windows 11 «История файлов» запускается через панель управления. Нажмите «Win + R» и введите команду «control». В открывшемся окне включите режим отображения «Маленькие иконки» и щелкните по пункте «История файлов».
Программа Windows File Recovery устанавливается через магазин приложений Microsoft Store. Просто в поле поиска введите название программы и выберите соответствующий результат.
Воспользуйтесь программой RS Partition Recovery. В отличии от других программ для восстановления данных RS Partition Recovery всегда работает правильно и позволяет восстанавливать ценные данные после случайного удаления файлов, форматирования диска, повреждениях таблицы разделов накопителя и во многих других случаях.
В Windows 11 вы можете использовать программу RS Partition Recovery, которая удобна в использовании и восстанавливает файлы независимо от типа накопителя или функцию «История файлов» (восстанавливает файлы только из системных папок) и программу Windows File Recovery (работает только через командную строку и поддерживает только родные для Windows файловые системы).
Общий синтаксис
В следующей таблице кратко описано, для чего используется каждый переключатель расширенного режима.
|
Параметр или переключатель |
Описание |
Поддерживаемые режимы |
|---|---|---|
|
Source-drive: |
Указывает запоминающее устройство, на котором были потеряны файлы. Должен отличаться от конечного диска. |
Все |
|
Destination-drive: |
Указывает запоминающее устройство и папку, в которую будут помещены восстановленные файлы. Должен отличаться от исходного диска. |
Все |
|
/regular |
Обычный режим, стандартный параметр восстановления для неповрежденных дисков NTFS. |
Обычный |
|
/extensive |
Расширенный режим, параметр тщательного восстановления, подходящий для всех файловых систем. |
Расширенный |
|
/n<filter> |
Ищет определенный файл по указанному имени файла, пути к файлу, типу файла или подстановочным знакам. Например:
|
Все |
|
/? |
Сводка синтаксиса и переключателей для обычных пользователей. |
Все |
|
/! |
Сводка синтаксиса и переключателей для опытных пользователей. |
Все |
Расширенный синтаксис
В следующей таблице кратко описано, для чего используется каждый переключатель расширенного режима.
|
Переключатель |
Описание |
Поддерживаемые режимы |
|---|---|---|
|
/ntfs |
Режим NTFS — параметр быстрого восстановления для работоспособных дисков NTFS с помощью основной таблицы файлов |
NTFS |
|
/segment |
Режим сегментов, параметр восстановления для дисков NTFS с использованием сегментов записей файлов |
Сегмент |
|
/signature |
Режим подписи, параметр восстановления для всех типов файловых систем с использованием заголовков файлов |
Подпись |
|
/y:<type(s)> |
Восстановление файлов с определенными группами расширений, разделенных запятыми |
Подпись |
|
/# |
Группы расширений режима подписи и поддерживаемые типы файлов. |
Подпись |
|
/p:<folder> |
Сохраняет файл журнала операции восстановления в расположении, отличном от расположения по умолчанию на диске восстановления (например, D:\logfile). |
Все |
|
/a |
Отключает запросы пользователей, что полезно в файле сценария. |
Все |
|
/u |
Восстанавливает неудаленные файлы, например из корзины. |
NTFS |
|
/k |
Восстанавливает системные файлы. |
NTFS |
|
/o:<a|n|b> |
Указывает, следует ли всегда (a), никогда (n) перезаписывать файл или оставлять обе копии (b). По умолчанию выдается запрос на перезапись. |
NTFS |
|
/g |
Восстанавливает файлы без основных потоков данных. |
NTFS |
|
/e |
Для получения приемлемого объема результатов и нацеливания на пользовательские файлы по умолчанию некоторые типы файлов отфильтровываются. Данный переключатель удаляет этот фильтр. Полный список этих типов файлов приведен после данной таблицы. |
NTFS |
|
/e:<extension> |
Указывает, какие типы файлов фильтруются. Полный список этих типов файлов приведен после данной таблицы. |
NTFS |
|
/s:<sectors> |
Указывает количество секторов на исходном устройстве. Для получения сведений о секторах используйте fsutil. |
Сегмент |
|
/b:<bytes> |
Указывает размер кластера на исходном устройстве. |
Сегмент |
Список фильтруемых расширений файлов
Следующие типы файлов по умолчанию отфильтровываются из результатов. Используйте параметр /e , чтобы отключить этот фильтр, или фильтр /e:<extension> , чтобы указать типы файлов, которые не следует фильтровать.
_, adm, admx, appx, appx, ascx, asm, aspx, aux, ax, bin, browser, c, cab, cat cdf-ms, catalogItem, cdxm, cmake, cmd, coffee, config, cp, cpp, cs, cshtm, css, cur, dat, dll, et, evtx, exe, fon, gpd, h, hbakedcurve, htm, htm, ico, id, ildl, ilpdb, iltoc, iltocpdb, in, inf, inf_loc, ini, js, json, lib, lnk, log, man, manifest, map, metadata, mf, mof, msc, msi, mui, mui, mum, mun, nls, npmignore, nupkg, nuspec, obj, p7s, p7x, pak, pckdep, pdb, pf, pkgdef, plist, pnf, pp, pri, props, ps1, ps1xm, psd1, psm1, py, resjson, resw, resx, rl, rs, sha512, snippet, sq, sys, t4, targets, th, tlb, tmSnippet, toc, ts, tt, ttf, vb, vbhtm, vbs, vsdir, vsix, vsixlangpack, vsixmanifest, vstdir, vstemplate, vstman, winmd, xam, xbf, xm, xrm-ms, xs, xsd, ym
How can you recover deleted files on Windows 11?
Windows
11 promises both UX and performance improvements that align the operating
system (OS) with modern apps and services, while leveraging the compute and
memory power of next-generation processors. But no matter how shiny the new OS,
users will still need to deal with routine issues such as recovering lost
files. There are many reasons why files may be deleted or become unavailable:
- Human error, such as
accidental deletion or overwriting of files.
- Software issues, such as an
app crashing while data is being processed, a document editor not saving or
updating files properly, or backup software not working properly.
- Hardware malfunctions, such
as firmware corruption, read / write mechanical failure, or damaged hard
drives. The causes of these malfunctions are diverse, from aging equipment to
sudden power failures / surges, or mishandling, to name a few.
- Unpredictable natural
disasters such as fires, floods and earthquakes that destroy equipment and, by
extension, the data stored on it.
- Malware, ransomware and
other cybersecurity exploits
that can freeze, steal or damage data assets.
- Early versions of a Windows
OS can be buggy, and sometimes files can be lost in upgrades to Windows 11.
In this article, we’ll look at different methods for recovering
lost files in Windows 11.
How to perform immediate recovery of accidentally deleted files in
Windows 11?
It
happens to us all — we realize in real time that we have accidentally deleted a
file. But there’s no need to panic. Windows 11 continues to support the basic
features that make it easy to recover these lost files as long as we act
immediately:
● Recycle
Bin: As long as you didn’t delete the files using the
Shift+Delete shortcut, you should be able to find them in the Recycle Bin.
Double click the Recycle Bin on the desktop, select the files to be recovered,
and either drag and drop the files to the desired location or right click the
file and select «Restore.»
● Undo
Delete: With the folder from which you accidentally deleted the
file(s) in focus, press CTRL+Z, or right click anywhere in the folder and
choose «Undo Delete.» Be sure to use this method as soon as you
become aware of the accidental deletion — and definitely before you restart the
computer.
How to recover deleted files with Windows 11 File Recovery?
Windows
File Recovery is a command-line utility for recovering deleted files from local
disk drives, USB flash drives, or memory cards. It has two modes:
«Regular» for recovering recently deleted files, and
«Extensive» for trickier situations such as recovering files deleted
a while ago or from disks that have been formatted or corrupted. Windows File
Recovery supports two file systems: NTFS and FAT or exFAT.
Windows
File Recovery works on Windows 11, but it doesn’t come preinstalled. You can
download it for free from the Microsoft Store and install it, but there are a
number of drawbacks that limit the utility’s usability:
- It’s command line only and
you have to learn its general and advanced syntax to set parameters, switches
and filters. To recover a folder, a typical command line would be: winfr
source-drive: destination-drive: [/mode] [/switches] Note that in Windows 11,
you can run Windows File Recovery on Windows Terminal (press Windows Button +X
and select Windows Terminal).
- It won’t work if the lost
or deleted files have been overwritten by new data. So, it’s critical to run
Windows File Recovery as soon as possible after discovering that files are
missing.
- The Extensive mode can be
quite time-consuming.
How to recover files on Windows 11 after an upgrade?
This
section focuses specifically on five methods for recovering files after
upgrading to Windows 11. These include:
- Dealing with account issues
(you were signed in with a temporary profile or the admin account was disabled)
- Troubleshooting Windows
Search to find files that were hidden or relocated
- Restoring files from native
backup utilities
- Rolling back to the
previous Windows version
Method 1: Dealing with a temporary profile
If files
are missing after a Windows 11 upgrade, it might be because you have been
signed in with a temporary profile (which Windows does automatically when it
experiences difficulty logging into your usual profile).
To see if
this is the problem, go to the Start menu, select Settings → Accounts and then
Sync your settings. If you get the message «You are signed in with a
temporary profile …» or the message «We can’t sign into your
account,» then restart the machine and log in again to your usual profile.
After the successful login, sync your settings as described above.
Note that
once you sign out of the temporary profile, it will no longer be accessible.
Therefore, as an extra precaution, before rebooting, you should back up the
files in the temporary profile to an external storage device.
Method 2: Enable administrator account
During
the course of the Windows 11 upgrade, the local administrator account may be
disabled, in which case the files associated with the account will not be available.
- Select Local Users and
Groups on the left side of the Computer Management pane.
- Now double-click Users (on
the right side of the pane) and then double click Administrator to open the
Properties interface.
- Make sure that the option
Account is disabled is unchecked.
- Click Apply and OK, then
sign in with the admin account. The lost documents should now be available.
Method 3: Troubleshooting Windows 11 Search
If you’re
having trouble finding files using Windows Search, you may need to initiate a
rebuilding of the search index, as follows:
- Use the Search box on the
Windows taskbar to locate and open the Indexing Options pane.
- Click the Advanced button.
- In the Troubleshooting sub-pane, click Rebuild to delete the current index and rebuild a new one from scratch.
If some
files still seem to be missing, it could be that Windows defined certain file
types as hidden during the upgrade. Here’s what you can do, as shown in figure
1:
[Figure
1: Showing hidden items]
- Open the File Explorer pane
[1] and select the View tab [2].
- In the Show / Hide area,
make sure that Hidden items is checked [3].
- Search again for the
missing files.
Method 4: Recover files after Windows 11 upgrade with
native backup
If all of
the methods described above don’t uncover the missing files, it is quite
possible that you will have to restore them from your native Windows 11 backup.
Windows 11 continues to support the two native Windows backup features:
- File History, which
automatically maintains incremental backups of files stored in frequently used
folders. You can choose the external destination backup drive as well as
customize the folders that will be included or excluded. However, please note
that only the specified folders will be backed up. For end-to-end file backups,
it’s best to use a third-party backup software.
- Backup and Restore (Windows
7), which not only backs up data files to a user-designated local or
external drive, it also creates a system image.
File
History allows you to restore individual files, while Windows Backup and
Restore supports only full restores. In either case, access the appropriate
interface in the Control Panel and follow the instructions.
Note that
if you are using OneDrive to back up and sync files, you can restore the
missing files from there.
Tip: Create a document with the same name as the missing file, right-click the file to open Properties, select the Previous Versions tab, and select the most recent previous version as created by File History.
Method 5: Restoring to a previous version to recover your
deleted files
Sometimes
you’ll have to restore to the previous Windows version, copy the files that
were lost during the Windows 11 upgrade, then reinstall the upgrade.
It’s
worth noting that any files you created or apps you installed after upgrading
to Windows 11 will be lost if you roll back to your previous version.
How do I find recently deleted files in Windows 11?
Recently
deleted files reside in the Recycle Bin in Windows 11. As long as you haven’t
perma-deleted them or emptied the Recycle Bin by habit, you can open the
Recycle Bin and browse through recently deleted files.
If you
want to restore a file, right-click on it and select the «Restore»
option. You can also drag and drop the file to the desktop or a folder to
restore it.
How can I recover a deleted Word document in Windows 11?
Accidental
deletion is a common mishap with Word documents. Even if they try their best,
mis-clicks can send them to oblivion. This, of course, can be reverted by the
humans responsible for the Word documents.
Aside
from Recycle Bin restore and the «Undo Delete» option, you’ll find
the most efficient methods to recover deleted Word documents below. Let’s
explore them.
- Via File History
File
History persists as a feature in Windows 11. You can use it to restore saved
copies of Word documents from the File History backup drive.
File
History outweighs Recycle Bin and «Undo Delete», as it can retrieve
files that have even been permanently deleted (and are no longer residing in
the Recycle Bin).
Here’s
how to use this approach:
- Open the
«Start» menu → type in «Control Panel« - Execute the
«Control Panel» app - Find
«System and Security» → «File History« - Click on
«Restore personal files» (it’s on the left sidebar) - Browse through
File History backup copies to find the one containing the deleted Word
document → select the document (or documents) → click the green recovery
button.
You can
also access File History backup copies (as well as restore points) by
right-clicking the folders where the original files were located. After
right-clicking, select «Show more options → Restore previous versions.»
Then, browse through the versions and find the one containing the deleted Word
document to recover it.
- Via CHKDSK
(Command Prompt)
The good
old Command Prompt is still here to aid you in recovering deleted files and
even repairing corrupted documents.
To use
CHKDSK, you can use two approaches — go via the Command Prompt or Properties.
CHKDSK
via Command Prompt:
- Press the
«Win» + «X» buttons -> select the «Windows
Terminal» option - Type chkdsk
volume: /r (Here, replace «volume» with the letter
corresponding to your storage device) - Hit «Enter»
on the keyboard and let CHKDSK scan and repair the specific storage device
CHKDSK
via Properties:
- Launch
«File Explorer« - Select
«This PC» from the locations list on the left sidebar - Right-click on
the storage device you wish to repair → select «Properties« - Select the
«Tools» tab - Click on the
«Check» button
- Via ATTRIB
Windows
11 comes with an extra recovery tool called «ATTRIB«. You can use
ATTRIB to change specific characteristics of computer files or directories
(also called «attributes,» hence ATTRIB).
This
option doesn’t literally recover perma-deleted files but rather
«reveals» documents that have become obscured from view. (for
example, by malware)
We
include it because, sometimes, we may perceive a Word document as deleted when
it is merely hidden from view by a user or a malicious program.
Here’s
how to use ATTRIB:
- Press “Win” +
“X” → select the “Windows Terminal” option. - Type attrib
-h -r -s /s /d volume:\*.* (Here, replace “volume” with the letter corresponding
to your storage device). - Press
«Enter» on the keyboard.
- Via an older
Windows backup
Back in
the day, Windows 7 (and Windows Vista) introduced the Backup and Restore
feature. Despite its seniority, the option still holds its ground in Windows
11. With it, you can create a complete PC image and recover data from it.
If you
somehow delete a Word document and want it back the old-school way, here’s how
to go about it:
- Launch the
«Settings» app - Find “System” →
“Recovery” - Click on «Restart
now« - Go for
“Troubleshoot” → “Advanced options” → “See more recovery options” →
“System Image Recovery” - Choose the
system image backup
Keep in
mind, you need to have at least one already created Windows Image backup to
restore documents from it. As a bonus, the Backup and Restore (Windows 7)
enables backups of all critical drives required for Windows to run optimally,
so you can use it for more than simply recovering Word documents.
- Via third-party
recovery software
Third-party
recovery solutions can prove helpful in recovering Word documents in specific
conditions.
If the
storage drive for the original (deleted) file is not corrupted or compromised,
you’d probably be able to restore the file. However, if the drive has suffered
physical damage, causing some files to get erased, you may not recover them
successfully, even with a robust solution.
- Via the File
Recovery Tool
Windows
File Recovery is Microsoft’s native data recovery app. It’s available for
download from the Microsoft Store and runs on Windows 10 (2004) and newer
versions, including Windows 11.
You can
use it to recover common file formats from local storage.
As
Windows File Recovery doesn’t have its own graphical interface, you’d need to
control it via the Command Prompt.
To do that:
- Press “Win” +
“X” → select “Windows Terminal” - Type in winfr
C: E: /regular /n \Users\<username>\Documents\ to restore the
Documents folder on drive C to drive E.
You can
also pick a different path for the Documents folder, as well as different
source and destination drives.
- Via cloud backup
from OneDrive
If you
have been using Windows for a while, you’re probably familiar with its native
OneDrive cloud backup solution. The feature enables you to sync files between
your computer and cloud storage.
To use
it, you’d need to create an account and enable backups to OneDrive.
Once
that’s done, you can restore data from it as long as you have a stable internet
connection. However, the OneDrive cloud’s purpose is to mirror the contents of
the OneDrive folder on your PC or laptop. It does so by syncing the data from
your device with data on the cloud about every 10 minutes.
So, if
you delete a file from your computer, with the file stored in the OneDrive
folder, you’d have about 10 minutes (at best) to retrieve it from OneDrive
before the next sync cycle.
To
recover a deleted document from OneDrive:
- Visit https://onedrive.live.com/
- Log in to your
account via your Microsoft email address and passcode - Browse through
the backed-up files and select which ones you need to retrieve → click the
«Download» button
You can
also use the OneDrive app included in Windows 11 to access cloud backup
documents from the File History feature. This will also enable automatic
backups of your data.
Keep in
mind, if you rely on a computer without internet access, it’s obsolete to set
up OneDrive as it won’t be able to back up any data.
- Via backup from
a third-party backup solution
Dedicated
backup solutions offer what we call «true backup».
Instead
of syncing your data (like OneDrive), third-party backup solutions create
copies of your files and folders, transfer them to secure cloud (or local)
storage, and ensure their protection and availability for immediate recovery.
If you
hold backups on a dedicated cloud, you can access them anytime (as long as you
maintain a stable internet connection) and recover Word documents even if you
have erased the document from your computer.
Moreover,
you can back up data to external HDDs or other media carriers to ensure quick
access even if you don’t have an internet connection. You can encrypt the
backups, so only you’d have access to the data on them, even if you lose them
or somebody steals them.
A reliable backup is the most effective way to restore deleted Word documents.
If you
have a copy of the Word file in storage, losing access to it could only occur
if the backup is somehow compromised. Otherwise, you’d be able to recover data
from it freely anytime you need.
Naturally,
it’s up to you to choose a file recovery approach – all of the discussed
options can retrieve Word documents under the right circumstances; however,
only true backup ensures your data’s entirety, integrity, and availability.
What is the File History feature in Windows 11?
As we’ve
mentioned, File History is Windows’ in-built data recovery feature. With it,
you can take a timeline snapshot of critical files on your computer, place it
in storage, and use it to recover stored data when needed.
Below, we
will explore how to set up and use the feature. Let’s go.
How to set up File History in Windows 11?
First,
you need to set up File History so it’s enabled and operating correctly. To use
File History, you’ll also need an external hard drive dedicated to File History
storage.
This is
where the software will keep snapshots of your files securely. If you don’t
have external storage connected to your device, you won’t be able to use File
History.
Here’s
how to enable the feature in Windows 11:
- Connect the
external storage to your computer - Type
«control panel» in the «Start» menu → choose the
«Control Panel» app - Here, change the
view to «Large Icons» to find «File History» quicker - If you still
haven’t connected an external storage device to your computer, you’ll see
a message — «No usable drive was found.» If you have connected
an external drive but still get this message, try reconnecting and
refreshing the page (either via the «Refresh» button or the
«F5» button) - Click on the
«Turn on» button - File History is
now enabled and will start an automatic backup
Using
File History in Windows 11
You have
enabled File History to back up data from your computer to external storage.
However, there are a few other things you might want to configure.
- Choose folders
for File History backups
File
History backs up essential folders by default — documents, desktop, pictures and
videos. Nonetheless, you can add any folder you wish to backup by File History.
To do so, you’d need to add a specific folder to one of the default libraries.
Here’s
how:
- Right-click the
folder you wish to add to File History backups → select «Show more
options» to open the old Context menu - From the menu,
choose «Include in library» → select the directory you want
to transfer the folders and files to
Any
folder or file added to the library will be included in future File History
backups.
- Exclude folders
from File History backups
On the
other hand, you might not want to include a particular folder to File History
backup. You can exclude a folder by following the instructions below.
- Open
«Start» and search for «file history« - Click on the
«File History» option from the «Best match» label on
the top - In the
«File History» window, open the «Excluded folders»
link (it’s on the list on the left) - Click the
«Add» button → choose which folders (or subfolders) to exclude
from future File History backups - After you’ve
selected the excluded folders, click the «Save» button to
confirm your choice (it’s at the bottom of the screen)
- Manage backup
timers
File
History automates backups, which is convenient for many users. However,
frequent backups may quickly fill up your external storage if you don’t audit
them. To ease the burden of constantly updating backups to optimize storage
space, you can configure File History backups frequency.
To do so:
- Open
«Start» and search for «file history« - Click on the
«File History» option from the «Best match» label on
the top - Once in the
«File History» menu, click on «Advanced settings»
(it’s on the list on the right) - Here, you can
set the backup frequency; the options vary from 10 minutes to daily
backups; you can also configure the retention span of backups on the
external storage drive and delete old File History backup copies to
optimize drive space
How to restore files with File History in Windows 11?
File
History enables you to store data locally and recover it in cases of accidental
deletion or data corruption. Since it’s not a syncing feature but creates
copies of your files, you can recover the data as it was included in your last
File History backup.
That
means some recent changes may not be present, but it also counters malware
spreading over your entire backup.
To
restore files from File History backups:
- Open “Start” →
search for “file history” → launch the feature. - In the
«File History» window, click on the «Restore personal
files» link (it’s on the list on the left). - The command will
open a «File History» window with all of your available backups;
you can scroll through files and folders via the controls at the bottom
(given you have your storage drive connected to your computer). - To restore a
file or a folder, select them and click the «Restore» button
(it’s at the bottom of the screen). - Once you restore
a file or a folder, they’re moved back to their original location on your
PC or laptop, so you’d be able to access them normally.
Do I need File History turned on?
In the
strictly etymological sense of the question, you don’t necessarily need File
History to always be turned on to operate your computer appropriately. File
History is an optional feature for Windows users. It’s not a critical operating
system process, so you are free not to use it.
However,
File History enables users to back up their files frequently and, thus, keep
secure storage of their vital data outside of their primary machine (on an
external storage drive).
If you
want to safeguard your files against human error (accidental deletion), power
surges, and cyberattacks, it’s convenient to have File History turned on. It
will automatically make copies of the default folders on your PC and keep them
securely in storage. This way, if you delete or lose data, you’d be able to
recover it from the backups.
Now, even
if you’ve enabled File History, you don’t need to keep it turned on at all
times.
While
having the feature running constantly, you won’t need to bother with manual
backups. Nonetheless, you can go for manual backups if you want to optimize
storage space and don’t mind doing it.
Manual File History backups
Automatic
backups are the most convenient, but they can also burden your external HDD if
you make frequent changes to File History default folders on your PC. If you
choose to run manual backups, you won’t need File History turned on at all
times. In addition, you won’t have your storage space fill up unexpectedly.
You can
initiate manual backups from the File History window. There, you’d see a line
labeled «Run now» (typically placed below your external storage drive
specs in the middle of the screen).
On the
other hand, you’d probably want to copy and back up critical documents as soon
as you’ve made changes to them. So, File History’s running state is all up to
the user.
If you’re
confident you won’t forget about manual backups, you can only turn File History
on when initiating a backup. If you prefer to have the feature run automatic
backups, it’s best to leave it turned on at all times.
Lastly,
you can choose not to use File History at all. Although it’s convenient (and
free), you can choose from different storage options. There’s the public cloud
(free, with limited space and lower data security), a cloud backup solution
(paid, with enhanced security options), or a dedicated backup solution for both
local and cloud backups (paid, with enhanced security and backup options).
What folders does File History back up?
As we’ve
mentioned, File History comprises a predetermined set of folders eligible for
automatic backup. Those are the user folders, libraries, the desktop, saved
games, favorites from Internet Explorer, and searches.
User
folders typically include Documents, Pictures, Desktop, and Videos. If you want
to back up an item, it must reside in one of those mentioned above.
You can’t
add separate, customized folders to be included in a File History backup, but
you can exclude one or more if you wish.
How long are File History backups retained by default?
File
History cares a lot about your backups. If it’s up to the feature, it will keep
every backup forever by default. However, the default setting may quickly fill
up your external storage if you edit, remove or add files frequently.
You can
set the retention span for backups from the File History settings menu. Here,
you can choose timeframes from one month to two years, «Until space is
needed,» or leave the default option «Forever» on.
Depending
on your data creation speeds, you’d probably want to pick a value between one and
six months to keep your storage optimized.
A lower
retention span means backups will be removed quicker, so you need to be careful
in picking the shortest period. However, if you initiate daily backups, you’d
still have a month to recover deleted or lost data. If not, you may want to
calculate the optimal backup-retention cycle for your data creation habits.
As for
extended retention periods, six months of backup creation would mean
comprehensive storage, but it would also translate to less available storage
space. If you pick a higher retention period, it would be best to audit your
backups from time to time to ease the load on your external drive.
How do I restore an app in Windows 11?
When
discussing app restoration in Windows 11, it may refer to three primary cases.
If an app
isn’t operating correctly, you can repair and restore it via Windows settings.
If you
wish to reinstall an app to potentially fix it (or for any other reason,
really), you can do it via PowerShell in Windows 11.
Lastly,
if you want to restore already installed apps from one Windows device to
another, you could use the «Restore Apps» function for Windows 11.
Let’s discuss
all three one by one now.
How to restore an app via Windows 11 settings?
Windows
settings allow users to repair specific apps, although it doesn’t offer the
«repair», «change», or «modify» options for all
apps and programs on your PC.
However,
the method can still be helpful, so let’s explore how to proceed with it. Repair options via the «Settings» page:
- Select “Start” → “Settings”
→ “Apps” → “Apps & features”
- Click the «More»
icon next to the app you wish to repair.
- Select «Advanced
options» under the app’s name (again, some apps won’t have that option
available).
- On the «Advanced
options» page, select «Repair» (if available).
If «Repair» isn’t available (or doesn’t fix the issue), select «Reset.»
Repair options
via «Control Panel»
- Type «control
panel» in the Search on your taskbar → select «Control Panel»
from the results.
- Select “Programs” →
“Programs and Features”
- Right click on the program
you wish to repair → choose «Repair.»
If
«Repair» isn’t available, select «Change» and follow the on-screen
directions to complete the process.
How to reinstall an app via PowerShell in Windows 11?
Sometimes,
you want to reinstall individual apps (even not supported by the previous
method) to fix them (or for any other reason).
To use
PowerShell in such a case, follow the steps below.
- Type
«windows powershell» in the Windows search box → right-click on
«PowerShell» → choose the «Run as administrator»
option - You’ll see a
PowerShell prompt → type Get-Appxpackage –Allusers and press
«Enter« - Scroll down to locate
the entry of the specific app and copy its «PackageFullName»
(after finding and selecting the app’s «PackageFullName,» you’ll
need to use Ctrl + C to copy it; the right-click and copy command doesn’t
work here). - Now, type and
execute the following command:
Add-AppxPackage
-register “C:\Program Files\WindowsApps\<PackageFullName>”
–DisableDevelopmentMode
In the
command above, you’d need to replace the label «PackageFullName» with
the actual package name of the specific app you want to reinstall. Also, you’d
need to replace «C» with the corresponding drive letter to where
Windows 11 is installed.
How to restore
apps via the «Restore Apps» feature for Windows 11?
Restoring
previously installed apps to a new Windows installation is probably the most time-consuming
task during the process. This is why Microsoft is working on developing a
«Restore Apps» feature for Windows 11.
With it,
you’d be able to quickly reinstall all previously installed apps from the
Microsoft Store on a freshly installed PC.
You’d
still need to install desktop applications manually, but «Restore
Apps» will enable users to install all Microsoft Apps connected to their
account by clicking a single button.
Although
we haven’t seen it in action, screenshots of the
development process suggest a user-friendly command to command all of your apps back when switching to Windows 11.
When you
visit the «Library» in the Microsoft Store, you’ll see a new option
appear. It will show all previously associated apps with your Microsoft
account. You’d be able to click on the «Restore all» button to
restore all of the said apps on your new Windows 11 installation.
You could
also pick individual apps and restore only those you wish to keep.
However,
you won’t be able to use this feature for desktop apps like Photoshop, Steam or
MS Office.
Another
thing to look for is Microsoft’s addition to the «Restore Apps»
feature. As it seems, users will be able to search for an app via the
«Search» function on the Windows taskbar and install it directly
without accessing the Microsoft Store.
How do you reset app data?
Sometimes,
new OS versions may be buggy and cause apps to malfunction. And even if you’ve
upgraded to Windows 11 and all is well, an app may still crash or fail to open.
In such
cases, you can try repairing the app via Settings or the other means we’ve
discussed. However, if repairing doesn’t bear fruit, you may need to reset the
app’s data.
Keep in
mind that resetting an app will erase all of the app’s data on your device
(including sign-in credentials and preferences). It will also unpin the app
from the taskbar, so you’d need to pin it manually after the reset.
The
guides below will walk you through resetting Universal Windows Platform (UWP)
apps.
If you’re
sure that an app reset is needed, here are the ways to go about it.
Reset app data via Settings
To reset
app data in Settings, follow the steps below.
1.
Press «Win» +
«I» to open «Settings«
2.
Click on «Apps»
(on the left) → click on «Apps & features» or on «Installed
apps» (on the right)
3.
Browse through the apps
list and click on the three-dotted button next to the app you wish to reset →
select «Advanced options»
4.
Click on
«Terminate» to ensure the app and all related processes aren’t
running
5.
Click on «Reset» →
click on «Reset» again to confirm
6.
Settings will now reset the
app to its default state
Reset app
data via the Start menu
If the
app you want to reset isn’t listed in «Settings,» you can try
resetting it from the Start menu.
Here’s
how to do it:
- Open the Start
menu - Click on the «All
apps» button - Browse through
apps and right-click (or press and hold) on the app you want to reset →
click on «More» → click on «App settings» - Click on
«Terminate» to ensure the app and all related processes aren’t
running - Click on
«Reset» → click on «Reset» again to confirm - Settings will
now reset the app to its default state
Reset app
data via PowerShell
For this
step to work, you’d need to have the Capability Access Manager Service (camsvc)
enabled to run the commands below.
To use PowerShell in such a case, follow the steps below.
- Type «windows powershell» in the Windows search box → right-click on «PowerShell» → choose the «Run as administrator» option
- Copy-paste the command
below and press «Enter» to check all installed UWP apps for the
current user
Get-AppxPackage | Select
Name >»$env:userprofile\Desktop\Apps_List.txt»
(this will output a list to
a text file on your desktop)
Or,
Get-AppxPackage | Select
Name
(this will output a list
inside PowerShell)
- Scroll through the list of
UWP apps to find the name of the app you wish to reset
- Type the following command
in PowerShell and press «Enter»
Get-AppxPackage *UWP app
name* | Reset-AppxPackage
Here, substitute «UWP
app name» in the command line with the app’s actual name.
Reset
listed app data via PowerShell
Again,
you’d need camsvc running to go for this approach.
Once it’s
active, go for the steps below.
- Open
«Windows Terminal» → select «Windows PowerShell« - Copy-paste the
corresponding command to the app you wish to reset → press
«Enter» (we will include a list of the commands below)
Do you lose your files when upgrading to Windows 11?
As
announced by Microsoft, Windows 11 became available for users on October 5, 2021.
It comes
with a streamlined new design, new startup sound, some new features, visual
upgrades and more. As with any newer OS version, it’s designed with innovation
in mind, but some users have already reported losing their files after
upgrading to Windows 11.
Generally,
there’s no need to worry about losing files after updating to Windows 11. The
reported cases can be explained by system bugs or human error; we expect the
official Windows 11 version not to present any data loss issues.
Users
won’t lose their data during upgrading if they simply select the «Keep
personal files and apps» option during Windows setup. If you fail to
choose the option, there’s a chance of losing personal data during the setup.
Even if
you don’t lose data, keep in mind that Windows removed some features from
Windows 10. Those are, News & Interests, Desktop Wallpaper, Math Input
Panel, Quick Status, Tablet Mode, Touch Keyboard and Wallet.
In any
case, you’ll have plenty of time to decide whether you want to update to Windows
11 (at least one Windows 10 release will be supported until October 14, 2025).
Regardless
of when you upgrade your OS, it’s best to back up your files before you do.
We’re not saying you’ll lose data during Windows 11 update, but errors do
happen. For example, you may fail to tick the «Keep personal files and
apps» option, or a power surge can strike during setup.
If you
somehow lose your data and don’t have it backed up in storage, you’d need to
rebuild it. Or, if that’s not possible, you’ll lose it for good.
Windows 11 recovery solution: Acronis Cyber Protect Home
Office
Acronis True Image (formerly Acronis
True Image) is a unified solution for small offices (up to five computers) that
delivers exceptional backup and recovery capabilities along with advanced cybersecurity
protection. No matter what the cause of disruption — from hardware or software
failure to a cyberattack — Acronis True Image ensures quick
restores and recovery.
With
Acronis True Image, you can create a full-disk image backup, but
the solution also:
- Enables you to create local backups and back up to the cloud to make it easy to
follow the industry-accepted 3-2-1 rule of backup.
- Works at a highly granular level, making it easy to backup and restore a single
file or an entire file system
- Backs up your iPhone and Android devices
- Supports iOS to or from Android migration
- Creates direct cloud-to-cloud backups of your Microsoft 365 account, including the emails and
attachments from your Outlook.com mailbox and all of the files in your OneDrive
- Offers machine-intelligence (MI)-based cybersecurity to block attacks in real
time — before malware, ransomware, or cryptojackers can cause damage — and it
keeps accidental infections and unwanted cyberattacks away from your valuable
data while browsing online or video conferencing with your family and friends
Learn
more about Acronis True Image or try it out for free.