
Encountered the “Windows Time service is missing” or the “Windows Time service not starting automatically” issue in Windows 10/11? In this post from MiniTool, we will show you how to restore the Windows Time service.
The Windows Time service (Win32Time) is an important Microsoft Windows service used to keep the date and time synchronized on all clients and servers in the network. If the Windows Time service not starting automatically or is missing, the date and time synchronization will be unavailable. This problem is not uncommon, and here is a true example.
I have Windows 10 Pro installed on my PC. After the last update, I have a problem with the time as it changes continuously either after startup or while using the PC. Searching online, I noticed that Windows Time is missing from the list of my services. What should I do?superuser.com
Next, we will guide you on how to restore the Windows Time service.
How to Restore the Missing Windows Time Service
Before performing the following steps, it is suggested to attempt some basic troubleshooting, such as restarting your computer and updating Windows to the latest version. If the “Windows Time service missing” problem persists, try the advanced solutions below.
Way 1. Change the Time Server
The disappearance of the Windows Time service may be related to the problem of the time server. So, you can try to change a time server to check if the issue can be fixed.
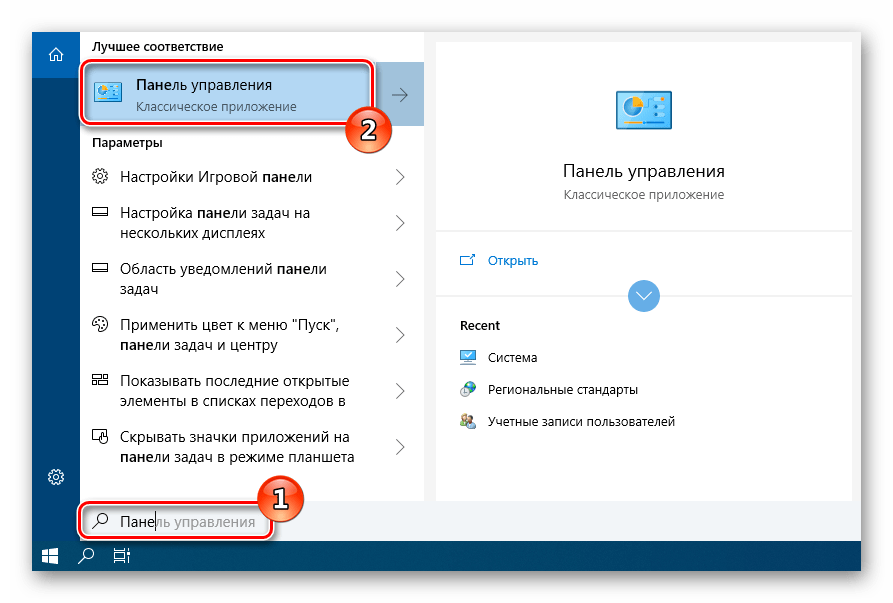
Step 1. Open the Control Panel by using the Windows search box.
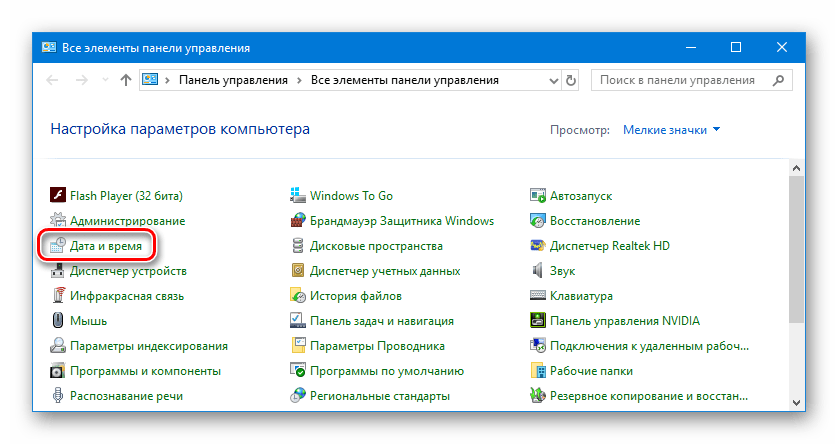
Step 2. In Control Panel, click Date and Time.
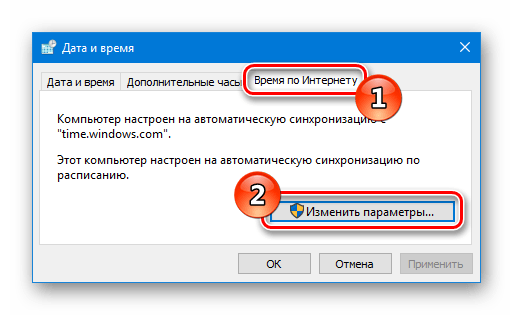
Step 3. Move on to the Internet Time section, then click the Change settings button.
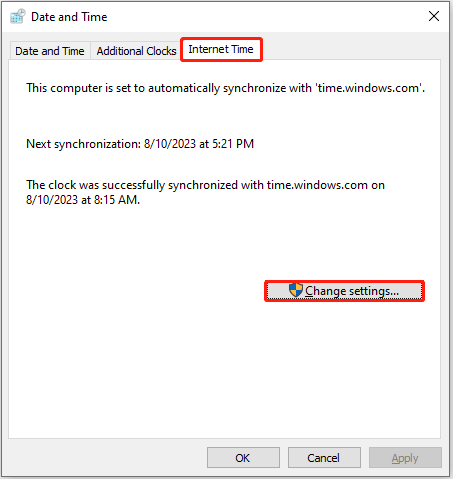
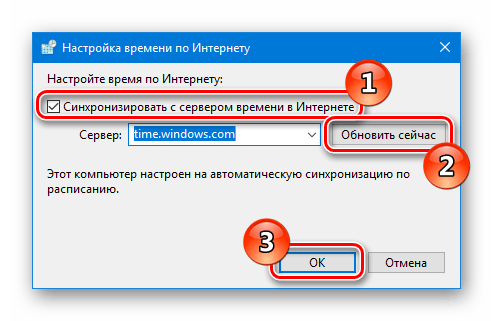
Step 4. Change another time server from the drop-down menu and then click the Update Now button.
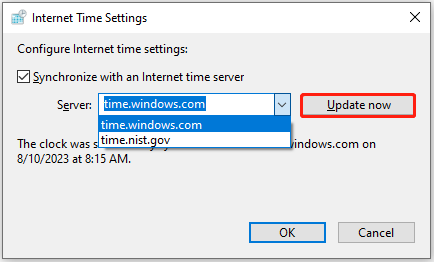
Step 5. Finally, click the OK button to save your changes.
After this operation, you can open Windows Services to check if the missing Windows Time service is restored.
Way 2. Re-Register the Windows Time Service
Re-registering Win32Time is also an effective way to restore the missing Windows Time service. Follow the guide below to complete the necessary actions.
Step 1. Type cmd in the Windows search box and right-click the Command Prompt result to select Run as administrator.
Step 2. When the UAC window appears, select the Yes button.
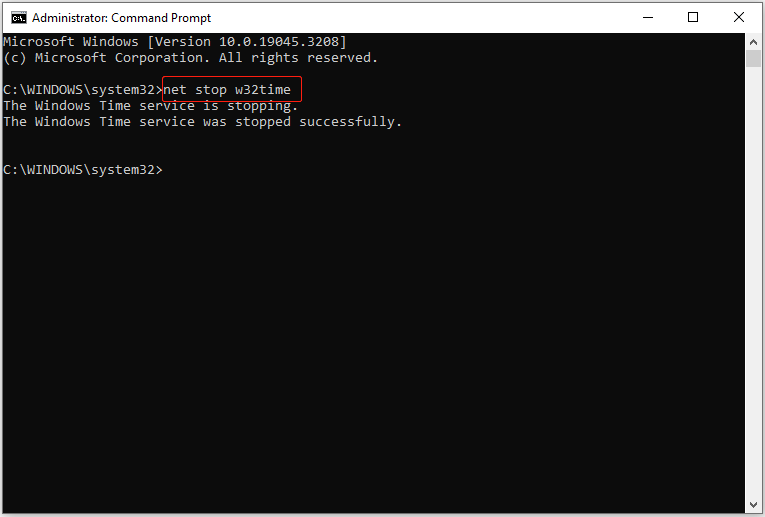
Step 3. In the Command Prompt window, type net stop w32time and press Enter to execute this command. After executing this command, the Windows Time service will be stopped.
Step 4. Type the following command lines in sequence. And press Enter after each command.
- w32tm /unregister
- w32tm /register
- net start w32time
Once all command lines are executed, restart your computer and check if the “Windows Time service is missing” issue has been resolved.
Way 3. Enable Time Synchronization Tasks
If the Time Synchronization tasks are disabled, you may find that the Windows Time service is missing. To restore the missing Windows Time service, follow the instructions below to enable the Time Synchronization tasks.
Step 1. Type Task Scheduler in the Windows search box and select it from the best match result.
Step 2. Expand the Task Scheduler Library folder and navigate to Microsoft > Windows > Time Synchronization.
Step 3. Check if the Time Synchronization tasks are disabled. If yes, right-click each task to select Enable.
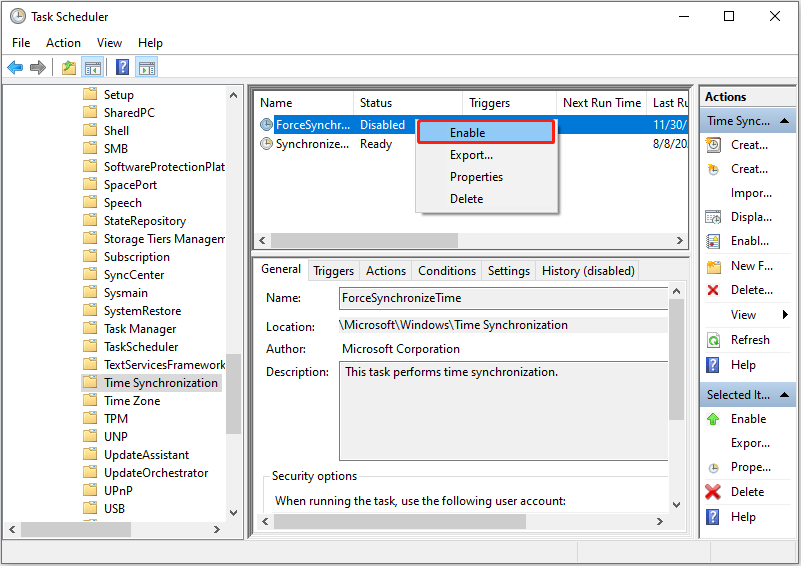
Make sure all tasks are enabled. Then exit Task Scheduler and restart your computer to check if the missing Windows Time service is back.
Way 4. Perform a DISM and SFC Scan
Corrupted system files can trigger the “Windows Time service missing” issue as well. In this situation, you can use the System File Checker tool to repair missing or corrupted system files.
Step 1. Open the Command Prompt as administrator by using the Windows search box.
Step 2. In the command line window, type DISM.exe /Online /Cleanup-image /Restorehealth and press Enter.
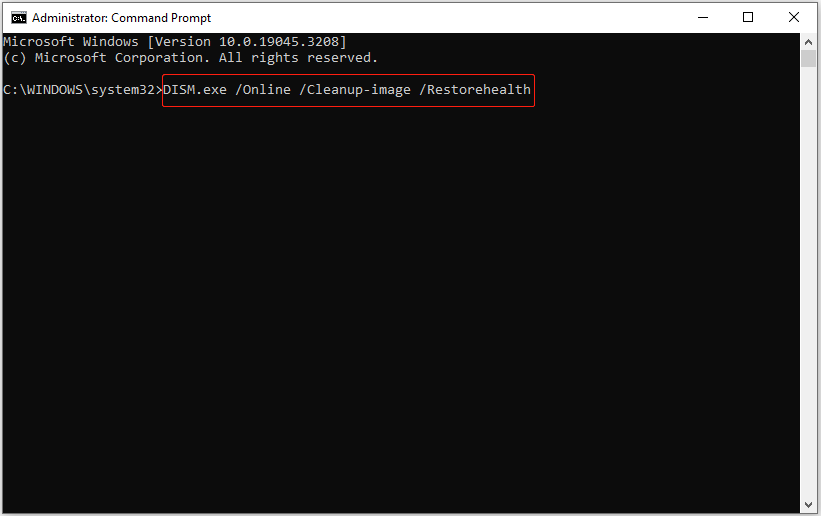
Step 3. Wait for the process to complete, then type sfc /scannow and press Enter.
Top Recommendation
Corrupted system files not only can cause the Windows Time service missing issue, but also can lead to data loss issues, such as Windows deleting files automatically, files getting deleted when left-clicking, and so on.
In such situations, you can use MiniTool Power Data Recovery, the best free data recovery software to recover deleted files. MiniTool Power Data Recovery supports recovering documents, pictures, videos, audio, etc. from computer hard drives, USB flash drives, SD cards, and other file storage devices.
MiniTool Power Data Recovery FreeClick to Download100%Clean & Safe
Bottom Line
This article explains what should you do when the Windows Time service is missing. Just try to change the time server, re-register the Windows Time service, enable Time Synchronization tasks, and perform a DISM/SFC scan.
Should you have any questions, do not hesitate to leave your comments below or send an email to [email protected].
Fix Windows Time Service not working: If you’re facing issues with your clock then it’s possible that Windows Time service might not be working correctly which is why you’re facing this issue but don’t worry as today we are going to discuss how to fix this issue. The main cause seems to be Windows time service which doesn’t start automatically which is causing the delay in date and time. This issue can be fixed by enabling Time Synchronization in Task Scheduler but this fix may or may not work for everyone as every user have different system configuration.

Users have also reported that while manually synchronizing time they face the error message “An error occurred while windows was synchronizing with time.windows.com” but don’t worry as we have got this covered. So without wasting any time let’s see how to Fix Windows Time Service not working with the help of below-listed troubleshooting guide.
Table of Contents
Make sure to create a restore point just in case something goes wrong.
Method 1: Start Windows Time service
1.Press Windows Key + R then type services.msc and hit Enter.
2.Find Windows Time Service in the list then right-click and select Properties.

3.Make sure the Startup type is set to Automatic (Delayed Start) and the service is running, if not then click on start.

4.Click Apply followed by OK.
Method 2: Run SFC and DISM
1.Press Windows Key + X then click on Command Prompt(Admin).
2.Now type the following in the cmd and hit enter:
Sfc /scannow
sfc /scannow /offbootdir=c:\ /offwindir=c:\windows (If above fails then try this one)

3.Wait for the above process to finish and once done restart your PC.
4.Again open cmd and type the following command and hit enter after each one:
a) Dism /Online /Cleanup-Image /CheckHealth
b) Dism /Online /Cleanup-Image /ScanHealth
c) Dism /Online /Cleanup-Image /RestoreHealth

5.Let the DISM command run and wait for it to finish.
6. If the above command doesn’t work then try on the below:
Dism /Image:C:\offline /Cleanup-Image /RestoreHealth /Source:c:\test\mount\windows
Dism /Online /Cleanup-Image /RestoreHealth /Source:c:\test\mount\windows /LimitAccess
Note: Replace the C:\RepairSource\Windows with the location of your repair source (Windows Installation or Recovery Disc).
7.Reboot your PC to save changes and see if you’re able to Fix Windows Time Service not working issue.
Method 3: Use a different synchronization server
1.Press Windows Key + Q to bring up Windows Search then type control and click on Control Panel.
2.Now type date in the Control Panel search and click on Date and Time.
3. On the next window switch to Internet Time tab and click on “Change settings“.

4.Make sure to checkmark “Synchronize with an Internet time server” then from the server dropdown select time.nist.gov.

5.Click Update now button then click OK and see if you’re able to Fix Windows Time Service not working issue.
Method 4: Unregister and then again Register Time Service
1.Press Windows Key + X then select Command Prompt (Admin).
2.Type the following command into cmd and hit Enter after each one:
net stop w32time
w32tm /unregister
w32tm /register
net start w32time
w32tm /resync

3.Wait for the above commands to finish then again follow the method 3.
4.Restart your PC and see if you’re able Fix Windows Time Service not working issue.
Method 5: Temporarily Disable Firewall
1.Type control in Windows Search then click on Control Panel from the search result.
2.Next, click on System and Security and then click on Windows Firewall.

3.Now from the left window pane click on Turn Windows Firewall on or off.
4.Select Turn off Windows Firewall and restart your PC.
If the above method doesn’t work make sure to follow the exact same steps to turn on your Firewall again.
Method 6: Enable Time Synchronization in Task Scheduler
1.Press Windows Key + X then select Control Panel.
2.Click System and Security and then click Administrative Tools.

3.Double click on Task Scheduler and navigate to the following path:
Task Scheduler Library / Microsoft / Windows / Time Synchronization
4.Under Time Synchronization, right-click on Synchronize Time and select Enable.
5.Reboot your PC to save changes.
Method 7: Change the default update interval
1.Press Windows Key + R then type regedit and hit Enter to open Registry Editor.
2.Navigate to the following registry key:
HKEY_LOCAL_MACHINE\SYSTEM\CurrentControlSet\Services\W32Time\TimeProviders\NtpClient
3.Select NtpClient then in the right window pane double-click on SpecialPollInterval key.

4.Select Decimal from the Base section then in the value data field type 604800 and click OK.

5.Reboot your PC to save your changes and see if you’re able to Fix Windows Time Service not working issue.
Method 8: Add more Time servers
1.Press Windows Key + R then type regedit and hit Enter to open Registry Editor.
2.Navigate to the following registry key:
HKEY_LOCAL_MACHINE\SOFTWARE\Microsoft\Windows\CurrentVersion\DateTime\Servers
3.Right-click on Servers then select New > String value than name this string as 3.

Note: Check if you already have 3 keys then you need to name this key as 4. Similarly, if you have already have 4 keys then you need to start from 5.
4.Double-click this newly created key then type tick.usno.navy.mil in the value data field and click OK.

5.Now you could add more servers by following the above steps, just use the following in value data field:
time-a.nist.gov
time-b.nist.gov
clock.isc.org
pool.ntp.org
6.Reboot your PC to save changes then again follow the method 2 to change to these time servers.
Recommended:
- Fix Windows 10 Stuck at Preparing Security Options
- Fix If playback doesn’t begin shortly try restarting your device
- How to Schedule Windows 10 Automatic Shutdown
- Fix CD or DVD Drive Not Reading Discs in Windows 10
That’s it you have successfully Fix Windows Time Service not working in Windows 10 but if you still have any questions regarding this post then feel free to ask them in the comment’s section.
,
If Windows 10 not syncing time or displays wrong time, continue reading below to fix the problem. You may have noticed that your computer doesn’t sync to the time of your new location after moving to a new country. Your computer may also not sync to the correct time every time you restart the device, and you should always manually update the date and time on every restart.
The time synchronization problems usually occurs when the Windows Time service is disabled or when Windows fails to synchronize the time with the Internet time server, with error: «An error occurred while Windows was synchronizing with time.nist.com. This operation returned because the timeout period expired.».
In this guide you’ll find several methods to fix time syncing issues in Windows 11/10/8 or 7 OS.
How to FIX: Windows 10/11 Time Not Syncing – Time Synchronization Failed.
- Enable the Time Synchronization task.
- Start or Restart the Time service.
- Reregister Windows Time Service & Resync Time.
- Change the Internet Time server.
Method 1: FIX Windows Not Syncing Time issue by Enabling the SynchronizeTime task.
The first troubleshooting step to fix the time-syncing issues is to check if the time synchronization feature is enabled in task scheduler.
1. Simultaneously press the Windows + R keys to open Run command box.
2. Type taskschd.msc then click OK to open Task Scheduler.
![image_thumb[6]](https://www.wintips.org/wp-content/uploads/2022/04/image_thumb6_thumb-1.png "image_thumb[6]")
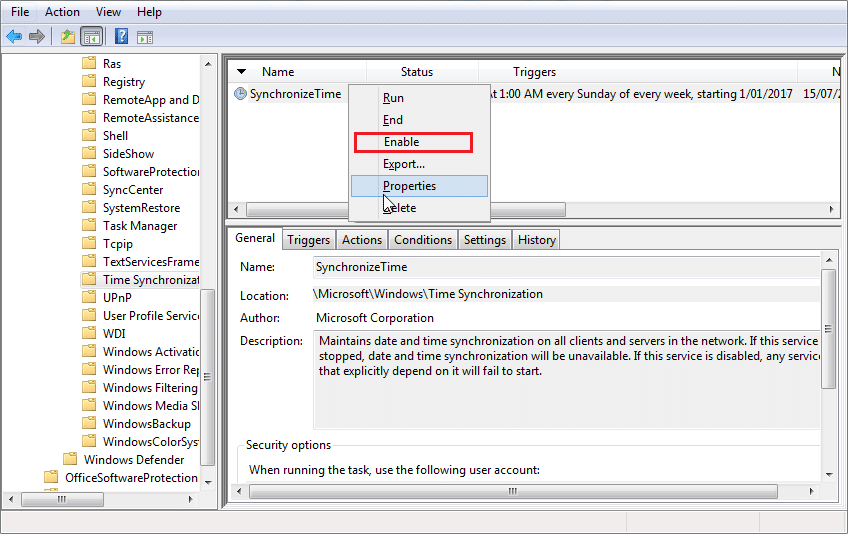
3. On the left pane in task scheduler, expand Task Scheduler Library -> Microsoft .> Windows.

4. Under Windows, scroll down and select Time Synchronization.

5. In the right pane, under the Name column, right-click at SynchronizeTime and click Enable.

6. Close the task scheduler, then check if the time on the device is syncing. If the problem persists, continue to method-2 below.
Method 2: Start/Restart the Windows Time service.
Once the time synchronization task is enabled, proceed to start the Windows Time service (or to restart it if already started).
1. Press the Windows + R keys to open Run command box.
2. Type services.msc and click OK to launch Services.

3. Locate Windows Time among the services, if it is running, right-click and Restart the service. However, if it is stopped, right-click and select Start.

4. Now check if the time is automatically synced.
Method 3. Reregister Windows Time Service and Resync Time using Command Prompt.
When Windows 10 is not syncing time, we can use command prompt to re-register the Time Service and then resync time.
1. In the Search box type cmd or command prompt and select Run as Administrator.
![image_thumb[2]](https://www.wintips.org/wp-content/uploads/2022/04/image_thumb2_thumb.jpg "image_thumb[2]")
2. Type the commands below to unregister the time service by removing its configuration information from the registry and then to resynchronize the time.
- net stop w32time
- w32tm /unregister
- w32tm /register
- net start w32time
- w32tm /resync /nowait

3. Once all commands are executed, restart the computer. Your time will be accurately synchronized.
Method 4: Use Another Internet Time Server.
Another method to solve time synchronization problems in Windows 10, is to change the Internet time server to which Windows is connected to synchronize the computer’s time.
1. Press the Windows + R keys to open Run command box.
2. Type control date/time and click OK to open the «Date and Time» settings.
3. At Date and Tine window, ensure that you have specified the correct Time Zone.

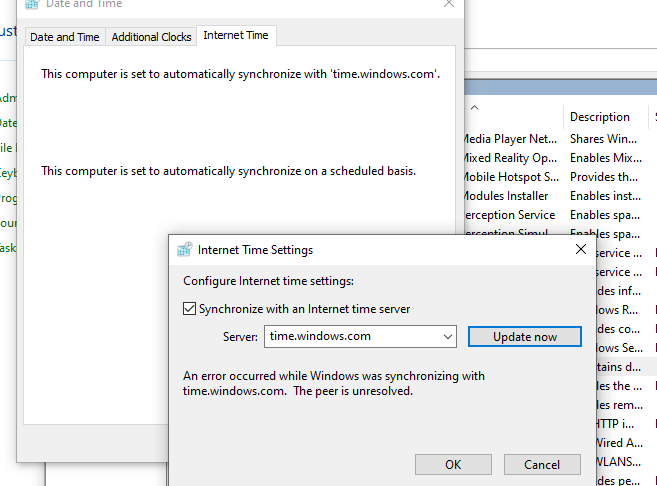
4. Then select the Internet Time tab and click Change Settings.

5. Ensure that Synchronize with an Internet time server is checked. Then, click on the dropdown and change the time Server. When done, click Update now.

6. Once it updates, the time on your device will synchronize correctly with the time of the region where you are based. *
* Note: If, after following the above methods, your computer loses time after shutdown, this indicates a faulty CMOS battery. In such a case, replace the CMOS battery in the device.
That’s it! Which method worked for you?
Let me know if this guide has helped you by leaving your comment about your experience. Please like and share this guide to help others.
If this article was useful for you, please consider supporting us by making a donation. Even $1 can a make a huge difference for us in our effort to continue to help others while keeping this site free:
- Author
- Recent Posts
Konstantinos is the founder and administrator of Wintips.org. Since 1995 he works and provides IT support as a computer and network expert to individuals and large companies. He is specialized in solving problems related to Windows or other Microsoft products (Windows Server, Office, Microsoft 365, etc.).
Вы можете столкнуться с ошибкой синхронизации времени в Windows, когда ваш компьютер не может автоматически синхронизировать свое время с серверами времени time.microsoft.com в Интернете. Из-за некорректного времени на компьютере у вас может возникать ошибка «
Your clock is ahead/ Ваши Часы спешат (отстают)
» при открытии HTTPS сайтов Chrome (и в других браузерах), не корректно работать сторонние программы, и появляться различные другие неприятности.
Если попытаться вручную выполнить синхронизацию времени из панели управления Windows (Control Panel -> Date and Time -> Internet Time -> Change Settings -> Update now), появляется ошибка:
An error occurred while windows was synchronizing with time.windows.com. The peer is unreachable.
Также здесь может быть ошибка:
The peer is unresolved.
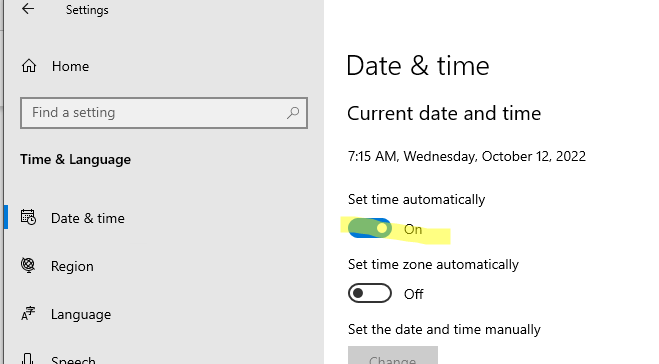
Проверьте, что у вас настроена автоматическая синхронизация времени с NTP серверами в Интернете. Перейдите в раздел Settings -> Time and Language -> Date and Time (можно перейти в этот раздел с помощью команды быстрого доступа по URI:
ms-settings:dateandtime
). Проверьте, что здесь включена опцию Set time automatically и выполните синхронизацию, нажав кнопку Sync now в разделе Additional settings.
Если синхронизация времени с Интернетом не работает, проверьте, с какого внешнего NTP сервера должен получить время ваш компьютер. Выполните команду:
w32tm /query /peers
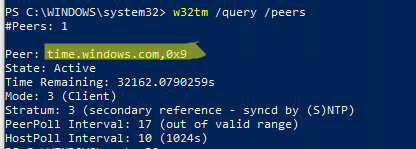
По умолчанию компьютеры в рабочих группах (не присоединенные к домену Active Directory) настроены на получение времени с серверов time.windows.com.
Если при запуске этой команды появилась ошибка “The following error occurred: The service has not been started. (0x80070426)”, проверьте состояние службы Windows Time. Она должна быть настроена на автоматический или ручной запуск. Можете проверить состояние службы с помощью PowerShell или консоли services.msc:
Get-Service w32time| Select DisplayName,Status, ServiceName,StartType
Перезапустите службу:
Restart-Service -Name w32time
Если служба отключена, включите ее.

Проверьте, что с вашего компьютера доступен хост time.microsoft.com.
Сначала проверьте, что ваш компьютер может разрешить это имя в IP адрес:
nslookup time.windows.com
Если ваш компьютер не может отрезолвить это имя в IP адрес (ошибка синхронизации времени The peer is unresolved), значит в настройках сетевого адаптера вашего компьютера указан DNS сервер, который не доступен, или изолирован от интернета. Попробуйте сменить адрес первичного DNS сервера на DNS сервер Google (8.8.8.8). Можно изменить настройки DNS для сетевого адаптера в Windows с помощью PowerShell.
Вывести список сетевых интерфейсов:
Get-NetAdapter

Изменить настройки DNS для сетевого адаптера с ifIndex 10:
Set-DNSClientServerAddress –InterfaceIndex 10 –ServerAddresses 8.8.8.8
Проверьте доступность сервера с помощью ping:
ping time.windows.com
И затем проверьте, что сервер времени Microsoft доступен по порту NTP (UDP 123). Для проверки доступности UDP порта можно использовать утилиту portquery или можно напрямую обратиться к серверу и запросить у него текущее время:
w32tm /stripchart /computer:time.windows.com
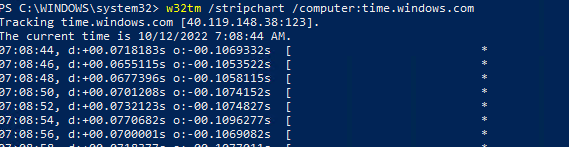
Если команда вернет ошибку error: 0x800705B4, значить указанный NTP сервер не доступен. Проверьте, что в Windows открыт исходящий порт UDP/123 для протокола NTP (по умолчанию порт должен быть открыт). Вы можете принудительно открыть порт в Windows Defender Firewall с помощью PowerShell:
New-NetFirewallRule -DisplayName "AllowOutNTP" -Direction Outbound -Protocol UDP -RemotePort 123 -Action Allow
Enable-NetFirewallRule -DisplayName AllowOutNTP
Также убедитесь, что исходящий NTP трафик не блокируется на сетевом уровне (провайдера, вашего файервола или другими сетевыми устройствами).
Если этот NTP сервер не доступен, вы можете использовать другой NTP сервер.
Можно указать
time.nist.gov
или ближайший к вам NTP сервер, который можно получить на сайте
https://www.ntppool.org
.
Можно изменить адрес вашего NTP сервера с помощью командной строки:
w32tm /config /manualpeerlist:time.nist.gov,0x1 /syncfromflags:manual /reliable:yes /update
Перезапустите службу времени (в данном примере вы запустим несколько команд в одну строку):
net stop w32time && net start w32time
Затем выполните синхронизацию времени:
w32tm /config /update
w32tm /resync
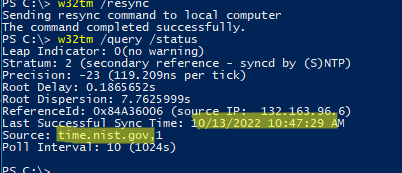
Проверьте, что ваш компьютер успешно получил время с нового источника времени (NTP сервера):
w32tm /query /status
Если ничего не помогло, попробуйте полностью сбросить настройки службы Windows Time:
net stop w32time
w32tm /unregister
w32tm /register
net start w32time
Выполните синхронизацию времени:
w32tm /resync
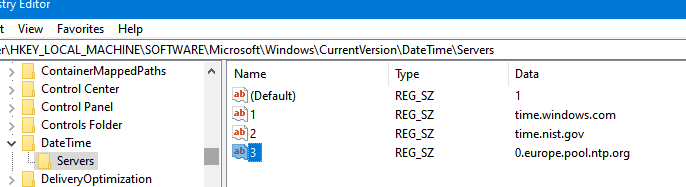
Также вы можете добавить NTP сервер в список серверов времени и выполнить синхронизацию из панели управления Windows. Перейдите в Settings -> Time & language -> Date & time -> Additional clocks –> Internet Time
Убедитесь, что включена опцию Synchronize with an Internet time, добавьте новый сервер time.nist.gov и нажмите кнопку Update Now.
Вы можете добавить NTP сервера в этот список через реестр HKEY_LOCAL_MACHINE\SOFTWARE\Microsoft\Windows\CurrentVersion\DateTime\Servers.
Для автоматической синхронизации времени в Windows используется отдельно задание в планировщике Task Scheduler. Запустите консоль taskschd.msc и перейдите в раздел Task Scheduler (Local) -> Task Scheduler Library -> Microsoft -> Windows -> Time Synchronization. Проверьте, что задание SynchronizeTime включено.
Также вы можете проверить состояние задания Task Scheduler с помощью PowerShell:
Get-ScheduledTask SynchronizeTime
Чтобы включить его:
Get-ScheduledTask SynchronizeTime|Enable-ScheduledTask
Иногда пользователи операционной системы Windows 10 могут столкнуться с проблемой неработающей синхронизации времени. В нашей короткой статье мы опишем несколько методов, при помощи которых можно устранить такую неполадку.
- Способ 1 – Ручная синхронизация с изменением сервера
- Способ 2 – Включение службы синхронизации
- Способ 3 – Проверка системных файлов
Варианты исправления ошибки
Чтобы восстановить нормальную работу синхронизации времени, можно прибегнуть к нескольким вариантам исправления неполадки. В первую очередь следует попробовать вручную провести эту процедуру, при надобности изменив сервер синхронизации, а также проверить, работает ли системная служба, отвечающая за эту функцию.
Нужный нам сервис также можно перезапустить с использованием специальных команд. Если такие действия не приведут к положительному результату, то воспользоваться программой, которая проверит целостность системных файлов.
Ручная синхронизация с изменением сервера
Синхронизировать время можно вручную, проделав следующие операции:
- Открываем «Панель управления» воспользовавшись поиском системы.

Открываем «Панель управления» из поисковых результатов
- Далее кликаем по иконке «Дата и время».

Переходим в раздел «Дата и время»
- В новом окне переходим на вкладку «Время по Интернету» и нажимаем «Изменить параметры».

Открываем окно для изменения настроек
- Отмечаем пункт синхронизации и кликаем «Обновить сейчас».

Запускаем синхронизацию вручную
Если синхронизировать время не удастся, то можно попробовать изменить сервер подключения в списке.
Загрузка …
Включение службы синхронизации
В некоторых случаях дата и время не синхронизируются из-за отключенной службы в системе. Чтобы её активировать, нам потребуется сделать следующее:
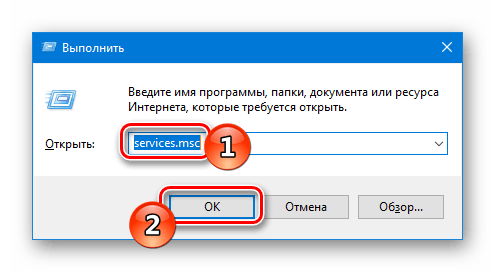
- Запускаем диалоговое окно «Выполнить», нажав на клавиатуре клавиши «Win+R».
- Далее в появившееся окно вводим команду services.msc и нажимаем «OK».

Открываем сервисы системы при помощи команды
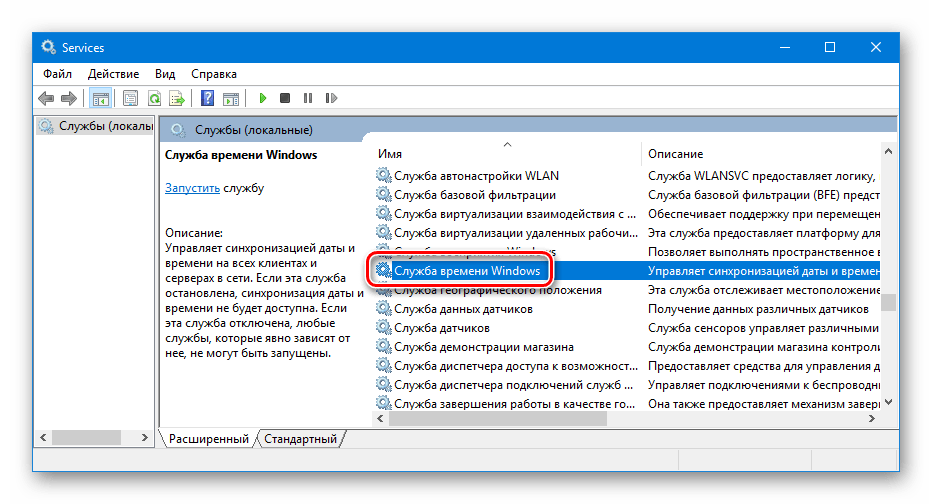
- На экране появится список, в котором потребуется отыскать строку «Служба времени Windows» и кликнуть по ней дважды.

Открываем настройки службы времени
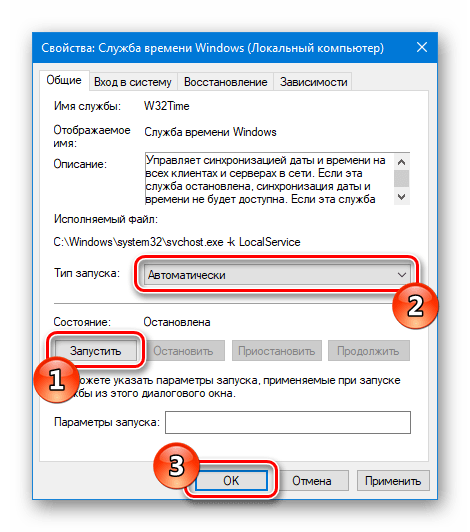
- В новом окне нажимаем на кнопку «Запустить» и устанавливаем тип запуска «Автоматически».
- Кликаем по кнопке «ОК».

Запускаем службу и устанавливаем её автозапуск
Так мы запустим деактивированный сервис синхронизации.
Кроме этого метода также можно попробовать включить службу при помощи специальных команд. Для этого сделаем следующее:
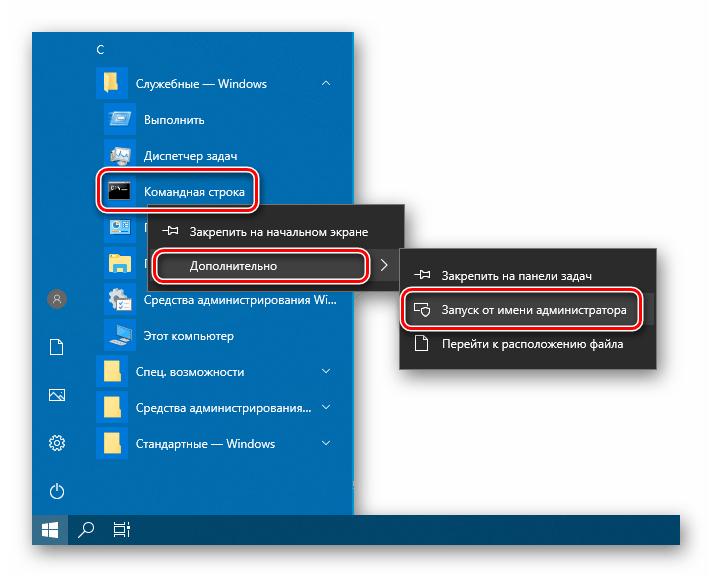
- Запускаем «Командную строку» от имени администратора из стартового меню системы.

Запускаем «Командную строку» из стартового меню
- В появившееся окно вводим команду w32tm /unregister, которая отключит синхронизацию.

Вводим команду для отключения сервиса синхронизации
- После этого включаем её обратно с использованием команды w32tm /register
Вводим команду для перезапуска сервиса синхронизации

Загрузка …
Проверка системных файлов
Если ни один из способов не помог решить проблему с синхронизацией времени, то можно проверить целостность системных файлов Windows. Для этого проделаем следующие шаги:
- Запускаем «Командную строку» от имени администратора из стартового меню.
- В появившееся окно вводим команду sfc /scannow и нажимаем «Enter».
Запускаем проверку системных файлов

Загрузка …
Начнется проверка файлов, по окончании которой перезагружаем компьютер и проверяем, заработала ли синхронизация.
На этом все. Теперь вы знаете, как устранить неполадки с синхронизацией времени в Windows 10.
Загрузка …
Post Views: 25 534