
-
Home
-
News
- How to Reset Windows Update Components in Windows 11/10?
By Vera | Follow |
Last Updated
How do I reset Windows Update components in Windows 11/10? Perhaps you are looking for the answer to this question. Take it easy and you can find three effective ways to reset Windows Update components to fix the update problems. Now, let’s go on with this post from MiniTool.
Besides drivers and other security enhancements, Windows Update components are responsible for downloading and installing all the feature and quality updates. They are indispensable. However, sometimes the cache gets corrupted or some related services go wrong, Windows update issues appear.
Although there are many ways to fix the update problems, if you always run into update errors, you should reset Windows update to its default settings. If the Windows update fails to install, this will be quite useful.
Well then, how can you reset Windows Update components? This is an easy task and you can follow these methods below.
How to Reset Windows Update Components on Windows 11/10?
Run Windows Troubleshooter
In Windows 11/10, some useful snap-in troubleshooters can be used to fix several computer issues. Windows Update Troubleshooter can be used to fix update issues by resetting some components that need it.
Follow these steps to reset Windows Update components:
Step 1: Right-click the Start button and choose Settings from the context menu.
Step 2: Go to System > Troubleshoot > Other troubleshooters.
Step 3: Locate Windows Update and click Run.
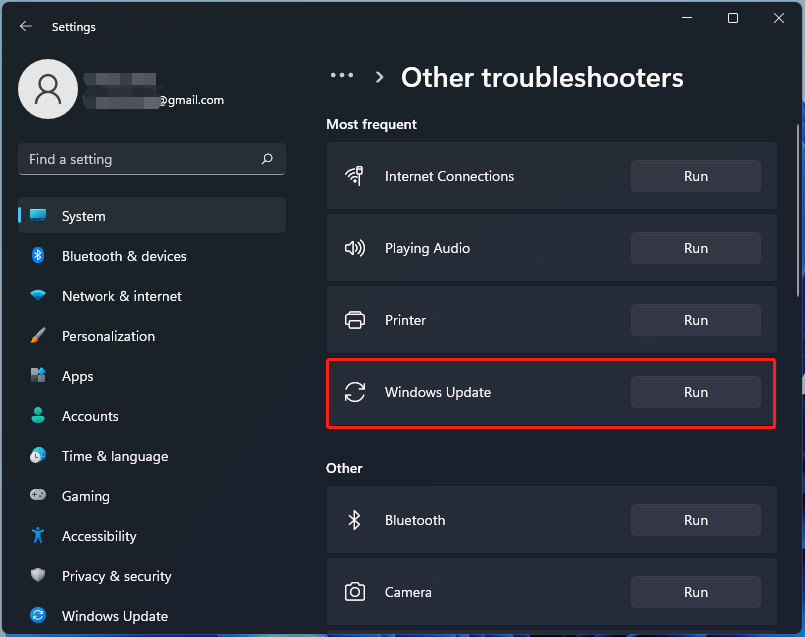
This troubleshooter will start scanning for any issues and fix them. Note that this way only resets Windows Update components when needed.
Run Command Prompt to Reset Windows Update Components
Resetting Windows Update components via Command Prompt is a time-consuming process but it is fairly effective. The process is a bit complicated and you should follow the guide below for this task.
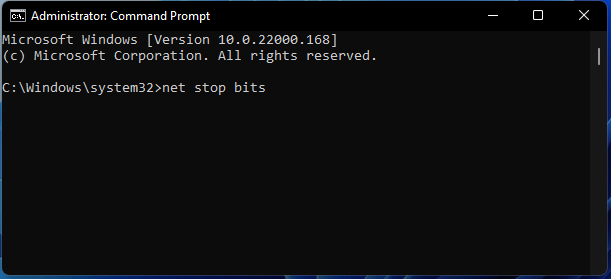
Step 1: Launch Command Prompt in Windows 11/10 with admin privileges.
Step 2: Run these commands below to stop the BITS (Background Intelligent Transfer Service), Windows Update service, and Cryptographic service and press Enter after each command.
net stop bits
net stop wuauserv
net stop appidsvc
net stop cryptsvc
Step 3: Delete the qmgr*.dat files by typing this command – Del “%ALLUSERSPROFILE%\Application Data\Microsoft\Network\Downloader\qmgr*.dat” and press Enter.
Tip: If you first try to reset Windows Update components, you can skip this step. If you have tried all the steps but don’t work, try this step.
Step 4: Rename the SoftwareDistribution and catroot2 folder by typing the commands below and press Enter.
Ren %systemroot%\SoftwareDistribution SoftwareDistribution.bak
Ren %systemroot%\system32\catroot2 catroot2.bak
Step 5: Run these commands to reset the BITS service and the Windows Update service, and then press Enter after each command.
sc.exe sdset bits D:(A;;CCLCSWRPWPDTLOCRRC;;;SY)(A;;CCDCLCSWRPWPDTLOCRSDRCWDWO;;;BA)(A;;CCLCSWLOCRRC;;;AU)(A;;CCLCSWRPWPDTLOCRRC;;;PU)
sc.exe sdset wuauserv D:(A;;CCLCSWRPWPDTLOCRRC;;;SY)(A;;CCDCLCSWRPWPDTLOCRSDRCWDWO;;;BA)(A;;CCLCSWLOCRRC;;;AU)(A;;CCLCSWRPWPDTLOCRRC;;;PU)
Step 6: Run this command – cd /d %windir%\system32.
Step 7: Type the following commands to re-register all the related BITS and Windows Update .dll files and press Enter after each line
regsvr32.exe atl.dll
regsvr32.exe urlmon.dll
regsvr32.exe mshtml.dll
regsvr32.exe shdocvw.dll
regsvr32.exe browseui.dll
regsvr32.exe jscript.dll
regsvr32.exe vbscript.dll
regsvr32.exe scrrun.dll
regsvr32.exe msxml.dll
regsvr32.exe msxml3.dll
regsvr32.exe msxml6.dll
regsvr32.exe actxprxy.dll
regsvr32.exe softpub.dll
regsvr32.exe wintrust.dll
regsvr32.exe dssenh.dll
regsvr32.exe rsaenh.dll
regsvr32.exe gpkcsp.dll
regsvr32.exe sccbase.dll
regsvr32.exe slbcsp.dll
regsvr32.exe cryptdlg.dll
regsvr32.exe oleaut32.dll
regsvr32.exe ole32.dll
regsvr32.exe shell32.dll
regsvr32.exe initpki.dll
regsvr32.exe wuapi.dll
regsvr32.exe wuaueng.dll
regsvr32.exe wuaueng1.dll
regsvr32.exe wucltui.dll
regsvr32.exe wups.dll
regsvr32.exe wups2.dll
regsvr32.exe wuweb.dll
regsvr32.exe qmgr.dll
regsvr32.exe qmgrprxy.dll
regsvr32.exe wucltux.dll
regsvr32.exe muweb.dll
regsvr32.exe wuwebv.dll
Step 8: Launch Registry Editor, go to HKEY_LOCAL_MACHINE\COMPONENTS and then delete some incorrect registry values including PendingXmlIdentifier, NextQueueEntryIndex, and AdvancedInstallersNeedResolving.
Step 9: Restart your computer and then open CMD as an administrator. Then, type the command – netsh winsock reset and press Enter to reset Winsock.
Step 10: Execute these commands below and press Enter after each one command to reset Windows update services:
net start bits
net start wuauserv
net start appidsvc
net start cryptsvc
Step 11: At last, reboot your computer to let all changes take effect.
That’s all the steps to reset Windows Update components in Windows 11/10. Just follow the detailed process to easily do this task when needed.
About The Author
Position: Columnist
Vera is an editor of the MiniTool Team since 2016 who has more than 7 years’ writing experiences in the field of technical articles. Her articles mainly focus on disk & partition management, PC data recovery, video conversion, as well as PC backup & restore, helping users to solve some errors and issues when using their computers. In her spare times, she likes shopping, playing games and reading some articles.
Windows updates are important for keep your system secure and up to date with the latest patches and improvements. Microsoft regularly releases Windows updates with the latest security enhancements and bug fixes that need to be installed as soon as possible to secure and optimize Your PC. However, Sometimes, Windows Update may encounter issues that prevent it from downloading or installing updates properly. In such cases, Reset Windows Update components are effective in fixing the problem. Resetting Windows Update components will clear the cache, stop/start the related services, and re-register the DLL files. This will allow Windows Update to start fresh and download the updates again.
Contents
- 1 Reset Windows Update Components
- 1.1 Run Windows Update Troubleshooter
- 1.2 Manually reset windows update
- 1.3 Run SFC and DISM command
- 1.4 Install windows updates manually
If you consistently encounter errors while trying to install Windows updates, resetting the update components can help resolve the underlying issues. Again Sometimes, updates may get stuck in the installation process. This could be due to corrupted files or misconfigurations in the Windows Update components that need to be cleared.
If update downloads are slow or repeatedly fail, resetting the update components might resolve the connectivity or download-related issues. If the Windows Update service is not working correctly or fails to start, resetting the components can often restore its functionality.
Run Windows Update Troubleshooter
Whenever you experience a problem installing Windows updates, the first step is to run the built-in troubleshooter. The troubleshooter reset some of the components that are involved in the update process, such as the Background Intelligent Transfer Service (BITS), the Windows Update database, and the Windows Update service.
- Press the Windows key + I to open Settings.
- Go to “Update & Security” and then “Troubleshoot.”
- Click on the Additional troubleshooters link, to display all troubleshooters list
- Run the “Windows Update Troubleshooter.”
The troubleshooter will attempt to identify and automatically fix issues related to Windows Update. If the troubleshooter doesn’t resolve the issue manually reset the Windows update following the next steps.
Manually reset windows update
If the built-in update troubleshooter fails to fix the problem, here is how to reset Windows Update components to defaults in Windows 11/10.
Note: Before proceeding, it’s advisable to create a system restore point or back up your important data.
Step 1: Stop Windows Update and related Services
Press Windows key + S, Search for Command Prompt and select the Run as administrator option. Run the following commands to stop the Background Intelligent Transfer Service (BITS), Windows Update service, and Cryptographic service.
net stop bits
net stop wuauserv
net stop appidsvc
net stop cryptsvc
Step 2: Delete qmgr.dat Files:
Next, you need to run the following command to delete all the qmgr*.dat files created by BITS from your PC
Del “%ALLUSERSPROFILE%\Application Data\Microsoft\Network\Downloader\*.*”
Type Y and press enter key to confirm the deletion.
Step 3: Flush SoftwareDistribution and catroot2 Folders:
Clear existing Windows Update cache and force Windows 10/11 to redownload updates instead of utilizing potentially damaged files already present on the system.
This process ensures a fresh and reliable source for updating the operating system.
Run following commands to rename the softwaredistribution and catroot2 folder where windows update stored before install on your devcie.
- Ren %systemroot%\SoftwareDistribution SoftwareDistribution.bak
- Ren %systemroot%\system32\catroot2 catroot2.bak
Next time when you check for updates, it will create new softwaredistribution and catroot2 folder and download fresh update files.
Step 4: Reset BITS and Windows Update Services Security Descriptor
Run the following commands to reset the BITS and Windows Update services to their default security descriptor,
sc.exe sdset bits D:(A;;CCLCSWRPWPDTLOCRRC;;;SY)(A;;CCDCLCSWRPWPDTLOCRSDRCWDWO;;;BA)(A;;CCLCSWLOCRRC;;;AU)(A;;CCLCSWRPWPDTLOCRRC;;;PU)
sc.exe sdset wuauserv D:(A;;CCLCSWRPWPDTLOCRRC;;;SY)(A;;CCDCLCSWRPWPDTLOCRSDRCWDWO;;;BA)(A;;CCLCSWLOCRRC;;;AU)(A;;CCLCSWRPWPDTLOCRRC;;;PU)
Step 5: Re-register BITS and Windows Update DLL Files:
Run command cd /d %windir%\system32 to move to the System32 folder. And perfom following commands to register all the corresponding BITS and Windows Update DLL files on the Registry.
regsvr32.exe atl.dll
regsvr32.exe urlmon.dll
regsvr32.exe mshtml.dll
regsvr32.exe shdocvw.dll
regsvr32.exe browseui.dll
regsvr32.exe jscript.dll
regsvr32.exe vbscript.dll
regsvr32.exe scrrun.dll
regsvr32.exe msxml.dll
regsvr32.exe msxml3.dll
regsvr32.exe msxml6.dll
regsvr32.exe actxprxy.dll
regsvr32.exe softpub.dll
regsvr32.exe wintrust.dll
regsvr32.exe dssenh.dll
regsvr32.exe rsaenh.dll
regsvr32.exe gpkcsp.dll
regsvr32.exe sccbase.dll
regsvr32.exe slbcsp.dll
regsvr32.exe cryptdlg.dll
regsvr32.exe oleaut32.dll
regsvr32.exe ole32.dll
regsvr32.exe shell32.dll
regsvr32.exe initpki.dll
regsvr32.exe wuapi.dll
regsvr32.exe wuaueng.dll
regsvr32.exe wuaueng1.dll
regsvr32.exe wucltui.dll
regsvr32.exe wups.dll
regsvr32.exe wups2.dll
regsvr32.exe wuweb.dll
regsvr32.exe qmgr.dll
regsvr32.exe qmgrprxy.dll
regsvr32.exe wucltux.dll
regsvr32.exe muweb.dll
regsvr32.exe wuwebv.dll
regsvr32.exe wudriver.dll
Step 6 : Delete Incorrect Registry Values
Open Registry Editor by pressing Win + R, typing regedit, and pressing Enter.
Navigate to HKEY_LOCAL_MACHINE\SOFTWARE\Microsoft\Windows\CurrentVersion\WindowsUpdate and delete any values named SusClientId or SusClientIdValidation.
Step 7: Reset Winsock
Winsock defines how Windows network software should access network services, especially TCP/IP. Windows OS comes with a Dynamic Link Library (DLL) file called winsock.dll which implements the API and coordinates Windows programs and TCP/IP connections. If Due to some reason, Winsock gets corrupted. you may experience difficulty in establishing a connection to the Internet. Therefore resetting Winsock is a Good solution.
Open command prompt as administrator and run following two commands:
netsh winsock reset
netsh winsock reset proxy
Step 8: Restart Windows Update and related Services
You can restart your PC or run following commands to restart the BITS, Windows Update, and Cryptographic services.
net start bits
net start wuauserv
net start appidsvc
net start cryptsvc
After completing these steps, check if your Windows Update issues have been resolved. Restart your computer if necessary.
Run SFC and DISM command
In some cases, you may also need to run the System File Checker (SFC) and Deployment Image Servicing and Management (DISM) commands to repair any corrupted system files that may affect Windows Update. These commands scan your system for any integrity violations and attempt to fix them automatically.
- Press windows key + S, type cmd and Open command prompt window as administrator.
- First run the system file checker command sfc /scannow and press Enter. This will start the SFC scan, which may take some time to complete.
- If the SFC scan finds and fixes any issues, restart your computer and check if Windows Update works.
- If the SFC scan does not fix the issue or reports that it could not repair some files, type DISM /Online /Cleanup-Image /RestoreHealth and press Enter.
- This will start the DISM scan, which may also take some time to complete.
- If the DISM scan finds and fixes any issues, restart your computer and run the SFC scan again to verify that all issues are resolved.
- Check if Windows Update works.
Install windows updates manually
If none of these steps work for you, you may want to try manually installing the latest Windows update from Microsoft’s website. This can sometimes fix issues that prevent Windows Update from working properly.
To manually install a Windows update:
- Go to the official Microsoft Update Catalog.
- Enter the KB number of the update you want to install.
- Download the appropriate update for your system architecture (32-bit or 64-bit).
- Once you’ve identified and selected the update, click the “Download” button. Save the update file to a location on your computer.
- Double-click the downloaded update file (usually a .msu or .exe file), Follow the on-screen instructions provided by the update installer.
If prompted, restart your computer to complete the installation. After the restart, go to “Settings” > “Update & Security” > “Windows Update.” Check for additional updates to make sure your system is up to date.
Also Read:
- How To Fix Disk Errors with Check Disk Utility (CHKDSK)
- Fix wuauserv (Windows update) High CPU usage in Windows 10
- 3 Ways to Reset Windows 10 Password with/without software
- Solved: “Windows Update Components Must Be Repaired” In Windows 10
- How to fix windows update when it gets stuck at 0 percent or 100
Ошибки при установке обновлений Windows 11 и 10 — одна из самых частых проблем, с которыми сталкиваются пользователей. А наиболее чаще всего применяемое решение — сброс компонентов Центра обновлений, удаление временных файлов, сброс параметров сети, перерегистрация DLL.
Всё это можно сделать вручную или автоматически, в том числе в PowerShell, именно этот способ описан далее в статье.
Использование модуля PSWindowsUpdate для сброса Центра обновления
Для PowerShell имеется специальный модуль для управления обновлениями — PSWindowsUpdate, с помощью которого можно устанавливать обновления и выполнять множество других задач, например, отключать скачивание и установку ненужных обновлений. С его же помощью возможно исправить большинство ошибок Центра обновлений, но сначала потребуется установить соответствующий модуль:
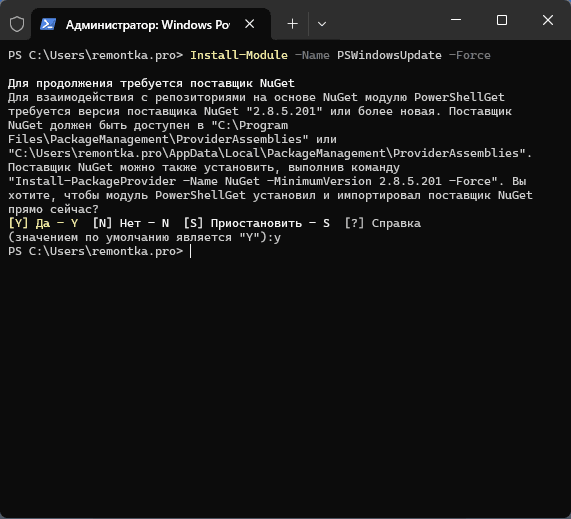
- Запустите Windows PowerShell или Терминал Windows от имени администратора, это можно сделать, нажав правой кнопкой мыши по кнопке «Пуск» и выбрав соответствующий пункт контекстного меню.
- Введите команду
Install-Module -Name PSWindowsUpdate -Force
и подтвердите установку, нажав Y и Enter.

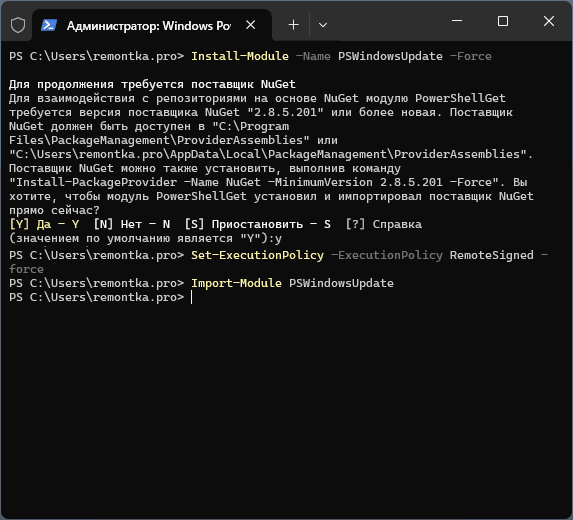
- Измените политику выполнения скриптов PowerShell для возможности запуска удалённо подписанных сценариев, используя одну из следующих команд. Первая изменит политику навсегда, вторая — только для текущей сессии:
Set-ExecutionPolicy -ExecutionPolicy RemoteSigned -force
Set-ExecutionPolicy -ExecutionPolicy RemoteSigned -Scope Process
- Введите команду
Import-Module PSWindowsUpdate
для импорта модуля в текущую сессию.

Готово, теперь вы можете использовать все команды PSWindowsUpdate в PowerShell. Для последующего использования все команды, приведённые выше уже не потребуются: модуль установлен и его функции доступны всегда.
Для получения полного списка команд можно использовать
Get-Command -module PSWindowsUpdate
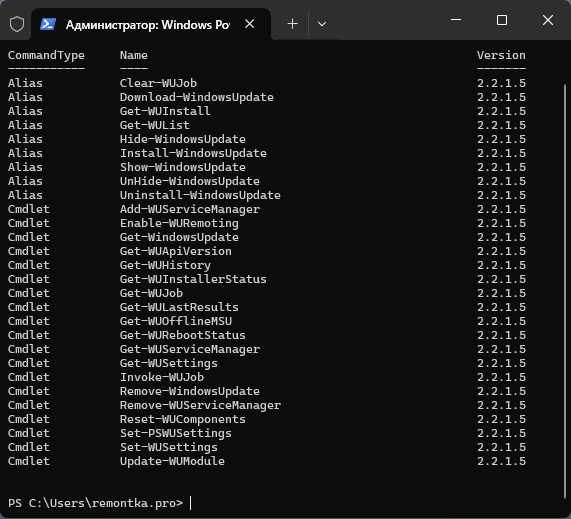
В контексте сброса компонентов Центра обновлений нас интересует лишь одна:
Reset-WUComponents -Verbose
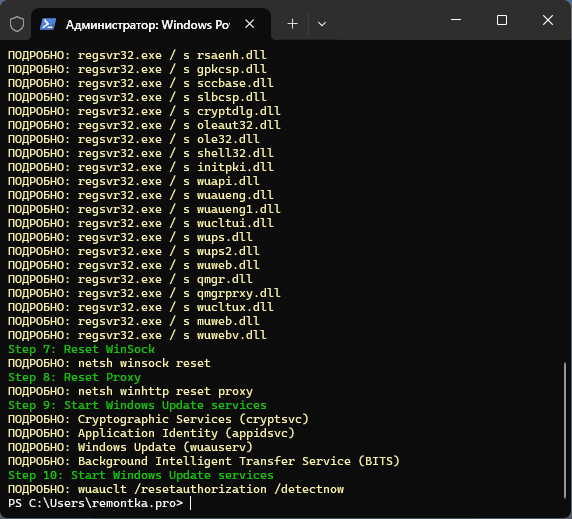
Достаточно использовать эту команду и по порядку автоматически будут выполнены следующие задачи:
- Отключение служб, используемых Центром обновлений Windows — BITS, wuauserv, appidsvc, cryptsvc.
- Удаление файлов состояния службы BITS.
- Резервное копирование папки SoftwareDistribution с загруженными файлами обновлений.
- Резервное копирование папки CatRoot для пересоздания базы данных каталогов.
- Удаление старых журналов Центра обновлений.
- Сброс служб Центра обновлений.
- Перерегистрация библиотек DLL, использующихся службами Центра обновлений.
- Сброс WinSocks и прокси.
- Перезапуск служб Центра обновлений.
В результате, если проблемы обновлений не вызваны более серьёзными повреждениями системы или недоступностью Интернета и серверов Майкрософт, с большой вероятностью они будут решены, причем быстрее чем если все эти операции выполнять вручную.
Есть и другие похожие инструменты, например, отдельная утилита Reset Windows Update Tool, описанная в материале про исправление ошибок Центра обновлений, но PSWindowsUpdate заслуживает внимания, поскольку описываемая задача — лишь одна из его возможностей в части работы с обновлениями Windows.

This tutorial will show you how to completely reset Windows Update components and policies to default in Windows 10 and Windows 11.
Windows Update keeps Windows 11 updated by automatically downloading and installing the latest updates, drivers, and hotfixes released by Microsoft.
Sometimes you may have an issue with Windows Update such as not being able to download or install updates, error messages, not being able to search for new updates, pending updates issue, etc. These kind of issues can occur when the Windows Update database or components are corrupted, one or more services related to Windows Update are not running, etc.
Resetting the Windows Update components can usually solve these types of issues.
References:
EXAMPLE: Windows Update

Here’s How:
1 Click/tap on the Download button below to download the ZIP file below.
Reset_Reregister_Windows_Update_Components_for_Windows11.zip
(Content of BAT file for reference)
Code:
@echo off

:: Prompt to Run as administrator
Set "Variable=0" & if exist "%temp%\getadmin.vbs" del "%temp%\getadmin.vbs"
fsutil dirty query %systemdrive%  >nul 2>&1 && goto :(Privileges_got)
If "%1"=="%Variable%" (echo. &echo. Please right-click on the file and select &echo. "Run as administrator". &echo. Press any key to exit. &pause>nul 2>&1& exit)
cmd /u /c echo Set UAC = CreateObject^("Shell.Application"^) : UAC.ShellExecute "%~0", "%Variable%", "", "runas", 1 > "%temp%\getadmin.vbs"&cscript //nologo "%temp%\getadmin.vbs" & exit
:(Privileges_got)

:: Checking and Stopping the Windows Update services
set b=0

:bits
set /a b=%b%+1
if %b% equ 3 (
   goto end1
)
net stop bits
echo Checking the bits service status.
sc query bits | findstr /I /C:"STOPPED"
if not %errorlevel%==0 (
    goto bits
)
goto loop2

:end1
cls
echo.
echo Cannot reset Windows Update since "Background Intelligent Transfer Service" (bits) service failed to stop. Please restart the computer, and try again.
echo.
pause
goto Start


:loop2
set w=0

:wuauserv
set /a w=%w%+1
if %w% equ 3 (
   goto end2
)
net stop wuauserv
echo Checking the wuauserv service status.
sc query wuauserv | findstr /I /C:"STOPPED"
if not %errorlevel%==0 (
    goto wuauserv
)
goto loop3

:end2
cls
echo.
echo Cannot reset Windows Update since "Windows Update" (wuauserv) service failed to stop. Please restart the computer, and try again.
echo.
pause
goto Start


:loop3
set c=0

:cryptsvc
set /a c=%c%+1
if %c% equ 3 (
   goto end4
)
net stop cryptsvc
echo Checking the cryptsvc service status.
sc query cryptsvc | findstr /I /C:"STOPPED"
if not %errorlevel%==0 (
    goto cryptsvc
)
goto Reset

:end4
cls
echo.
echo Cannot reset Windows Update since "Cryptographic Services" (cryptsvc) service failed to stop. Please restart the computer, and try again.
echo.
pause
goto Start


:Reset
Ipconfig /flushdns
del /s /q /f "%ALLUSERSPROFILE%\Application Data\Microsoft\Network\Downloader\qmgr*.dat"
del /s /q /f "%ALLUSERSPROFILE%\Microsoft\Network\Downloader\qmgr*.dat"
del /s /q /f "%SYSTEMROOT%\Logs\WindowsUpdate\*"

if exist "C:\$WinREAgent" rmdir /s /q "C:\$WinREAgent"

if exist "%SYSTEMROOT%\winsxs\pending.xml.bak" del /s /q /f "%SYSTEMROOT%\winsxs\pending.xml.bak"
if exist "%SYSTEMROOT%\winsxs\pending.xml" (
    takeown /f "%SYSTEMROOT%\winsxs\pending.xml"
    attrib -r -s -h /s /d "%SYSTEMROOT%\winsxs\pending.xml"
    ren "%SYSTEMROOT%\winsxs\pending.xml" pending.xml.bak
)

if exist "%SYSTEMROOT%\SoftwareDistribution\DataStore.bak" rmdir /s /q "%SYSTEMROOT%\SoftwareDistribution\DataStore.bak"
if exist "%SYSTEMROOT%\SoftwareDistribution\DataStore" (
    attrib -r -s -h /s /d "%SYSTEMROOT%\SoftwareDistribution\DataStore"
    ren "%SYSTEMROOT%\SoftwareDistribution\DataStore" DataStore.bak
)

if exist "%SYSTEMROOT%\SoftwareDistribution\Download.bak" rmdir /s /q "%SYSTEMROOT%\SoftwareDistribution\Download.bak"
if exist "%SYSTEMROOT%\SoftwareDistribution\Download" (
    attrib -r -s -h /s /d "%SYSTEMROOT%\SoftwareDistribution\Download"
    ren "%SYSTEMROOT%\SoftwareDistribution\Download" Download.bak
)

if exist "%SYSTEMROOT%\system32\Catroot2.bak" rmdir /s /q "%SYSTEMROOT%\system32\Catroot2.bak"
if exist "%SYSTEMROOT%\system32\Catroot2" (
    attrib -r -s -h /s /d "%SYSTEMROOT%\system32\Catroot2"
    ren "%SYSTEMROOT%\system32\Catroot2" Catroot2.bak
)


:: Reset Windows Update policies
reg delete "HKCU\SOFTWARE\Policies\Microsoft\Windows\WindowsUpdate" /f
reg delete "HKCU\SOFTWARE\Microsoft\Windows\CurrentVersion\Policies\WindowsUpdate" /f
reg delete "HKLM\SOFTWARE\Policies\Microsoft\Windows\WindowsUpdate" /f
reg delete "HKLM\SOFTWARE\Microsoft\Windows\CurrentVersion\Policies\WindowsUpdate" /f
gpupdate /force


:: Reset the BITS service and the Windows Update service to the default security descriptor
sc.exe sdset bits D:(A;CI;CCDCLCSWRPWPDTLOCRSDRCWDWO;;;SY)(A;;CCDCLCSWRPWPDTLOCRSDRCWDWO;;;BA)(A;;CCLCSWLOCRRC;;;IU)(A;;CCLCSWLOCRRC;;;SU)
sc.exe sdset wuauserv D:(A;;CCLCSWRPLORC;;;AU)(A;;CCDCLCSWRPWPDTLOCRSDRCWDWO;;;BA)(A;;CCDCLCSWRPWPDTLOCRSDRCWDWO;;;SY)


:: Reregister the BITS files and the Windows Update files
cd /d %windir%\system32
regsvr32.exe /s atl.dll
regsvr32.exe /s urlmon.dll
regsvr32.exe /s mshtml.dll
regsvr32.exe /s shdocvw.dll
regsvr32.exe /s browseui.dll
regsvr32.exe /s jscript.dll
regsvr32.exe /s vbscript.dll
regsvr32.exe /s scrrun.dll
regsvr32.exe /s msxml.dll
regsvr32.exe /s msxml3.dll
regsvr32.exe /s msxml6.dll
regsvr32.exe /s actxprxy.dll
regsvr32.exe /s softpub.dll
regsvr32.exe /s wintrust.dll
regsvr32.exe /s dssenh.dll
regsvr32.exe /s rsaenh.dll
regsvr32.exe /s gpkcsp.dll
regsvr32.exe /s sccbase.dll
regsvr32.exe /s slbcsp.dll
regsvr32.exe /s cryptdlg.dll
regsvr32.exe /s oleaut32.dll
regsvr32.exe /s ole32.dll
regsvr32.exe /s shell32.dll
regsvr32.exe /s initpki.dll
regsvr32.exe /s wuapi.dll
regsvr32.exe /s wuaueng.dll
regsvr32.exe /s wuaueng1.dll
regsvr32.exe /s wucltui.dll
regsvr32.exe /s wups.dll
regsvr32.exe /s wups2.dll
regsvr32.exe /s wuweb.dll
regsvr32.exe /s qmgr.dll
regsvr32.exe /s qmgrprxy.dll
regsvr32.exe /s wucltux.dll
regsvr32.exe /s muweb.dll
regsvr32.exe /s wuwebv.dll
netsh winsock reset
netsh winsock reset proxy

:: Set the startup type as automatic
sc config wuauserv start= auto
sc config bits start= auto
sc config DcomLaunch start= auto

:Start
net start bits
net start wuauserv
net start cryptsvc

:: Restart computer
cls
echo It is required to restart the computer to finish resetting Windows Update.
echo.
echo Please save and close anything open now, before the computer is restarted.
echo.
pause
echo.
echo.
echo.
echo *** Restart computer now. ***
echo.
pause
shutdown /r /f /t 0
2 Save the ZIP file to your desktop.
3 Unblock the ZIP file.
4 Extract the BAT file from the ZIP file.
5 Run the .bat file.
6 If prompted by UAC, click/tap on Yes to approve run as administrator.
7 When resetting Windows Update has finished you will be prompted to Please save and close anything open now, before the computer is restarted., and press any key to continue when ready. (see screenshot below)
If a service fails to stop after 3 attempts, the .bat file will automatically end with a «Failed to reset Windows Update» message and prompt to press a key to continue.
When a key is pressed, the .bat file will then restart any service it had stopped before closing the command prompt.
7 You will now be prompted to press any key to Restart computer now.
This will immediately restart the computer. Save and close anything open before continuing.
It is important to restart the computer immediately after running the .bat file to apply without opening anything else.

That’s it,
Shawn Brink
-
Reset_Reregister_Windows_Update_Components_for_Windows11.zip
Reset_Reregister_Windows_Update_Components_for_Windows11.zip
2 KB
· Views: 118,069
Last edited:
-
-
#2
Hello Shawn mate having great difficulties with downloading some particular updates namely KB5008353 (error 0x80073701) have tried all sorts of solutions that have been suggested and have just now tried to download your bat file but it will not do so. Any suggestions please? No hurry as I am just about to go offline for a while. As a by the by the security updates do download and install no problem and just so you know I am running the version that can be run on unsupported hardware.
-
- OS
- Windows 11 Pro 23H2 (OS Build 22631.4169) Desktop (OS Build 22621.4317)
- Computer type
- Laptop
- Manufacturer/Model
- Asus Vivo notebook X712FA or Desktop Ivy Bridge build
- CPU
- i7 -10510U / Intel i5 3750K
- Motherboard
- Asus generic & Asus P8Z77-V
- Memory
- Samsung 16GB DDR4 2666 MHz & G-Skill 16GB DDR3 2134MHz
- Graphics Card(s)
- On board Intel CPU graphics & Nvidia GeForce GTX 1050Ti
- Sound Card
- Laptop onboard & Xonar DSX Card
- Monitor(s) Displays
- Generic & Samsung 27″ SAM0C4C
- Hard Drives
- Samsung 970 Pro NMe & Samsung 870 EVO 500GB
- PSU
- N/A
- Case
- N/A
- Cooling
- Asus in built
- Keyboard
- Generic
- Mouse
- Logitec Wireless
- Internet Speed
- 50Mbs max allowance — occasionally up to 75Mbs
- Browser
- Brave
- Antivirus
- ESET Ultimate Security on both
- Other Info
- Desktop running Windows11 Pro with unsupported hardware fix
-
-
#3
For the above error please run:
0x80073701
| Message | Description | Mitigation |
|---|---|---|
| ERROR_SXS_ASSEMBLY_MISSING; The referenced assembly could not be found. | Typically, a component store corruption caused when a component is in a partially installed state. | Repair the component store with Dism RestoreHealth command or manually repair it with the payload from the partially installed component. From an elevated command prompt, run these commands: DISM /ONLINE /CLEANUP-IMAGE /SCANHEALTH DISM /ONLINE /CLEANUP-IMAGE /CHECKHEALTH DISM /ONLINE /CLEANUP-IMAGE /RESTOREHEALTH Sfc /Scannow Restart the device. |
-
- OS
- Windows 10
- Computer type
- Laptop
- Manufacturer/Model
- HP
- CPU
- Intel(R) Core(TM) i7-4800MQ CPU @ 2.70GHz
- Motherboard
- Product : 190A Version : KBC Version 94.56
- Memory
- 16 GB Total: Manufacturer : Samsung MemoryType : DDR3 FormFactor : SODIMM Capacity : 8GB Speed : 1600
- Graphics Card(s)
- NVIDIA Quadro K3100M; Intel(R) HD Graphics 4600
- Sound Card
- IDT High Definition Audio CODEC; PNP Device ID HDAUDIO\FUNC_01&VEN_111D&DEV_76E0
- Hard Drives
- Model Hitachi HTS727575A9E364
- Antivirus
- Microsoft Defender
- Other Info
- Mobile Workstation
-
-
#4
For the above error please run:
0x80073701
Message Description Mitigation ERROR_SXS_ASSEMBLY_MISSING; The referenced assembly could not be found. Typically, a component store corruption caused when a component is in a partially installed state. Repair the component store with Dism RestoreHealth command or manually repair it with the payload from the partially installed component. From an elevated command prompt, run these commands:
DISM /ONLINE /CLEANUP-IMAGE /SCANHEALTH
DISM /ONLINE /CLEANUP-IMAGE /CHECKHEALTH
DISM /ONLINE /CLEANUP-IMAGE /RESTOREHEALTH
Sfc /Scannow
Restart the device
Hi,
Where did you get that table with mitigation steps??
Thanks!
-
- OS
- Windows 11
- Computer type
- PC/Desktop
- Manufacturer/Model
- Build myself
- CPU
- Core i5 12600K
- Motherboard
- Asus Prime Z690M-Plus D4
- Memory
- DDR4 32 GB 3200Mhz GSkill
- Graphics Card(s)
- Geforce GTX 3060 TI
- Monitor(s) Displays
- Acer VG270S
- Screen Resolution
- 1080p
- Hard Drives
- 1TB SSD NVMe WD Blue
512 GB SSD Sata Crucial MX500
- PSU
- Zalman Zm750-hp Plus 750W
- Case
- Corsair Carbide 275Q Quiet Gaming Case
- Cooling
- Air Cooler DeepCool AS500 RGB 140mm
- Keyboard
- Sharkoon Skiller Mech 3
- Mouse
- Logitech G502 Hero
- Internet Speed
- 200 Mbps
- Browser
- Edge Chromium
- Antivirus
- Microsoft Defender
-
-
#5
It was more than two weeks ago and I no longer remember the source.
-
- OS
- Windows 10
- Computer type
- Laptop
- Manufacturer/Model
- HP
- CPU
- Intel(R) Core(TM) i7-4800MQ CPU @ 2.70GHz
- Motherboard
- Product : 190A Version : KBC Version 94.56
- Memory
- 16 GB Total: Manufacturer : Samsung MemoryType : DDR3 FormFactor : SODIMM Capacity : 8GB Speed : 1600
- Graphics Card(s)
- NVIDIA Quadro K3100M; Intel(R) HD Graphics 4600
- Sound Card
- IDT High Definition Audio CODEC; PNP Device ID HDAUDIO\FUNC_01&VEN_111D&DEV_76E0
- Hard Drives
- Model Hitachi HTS727575A9E364
- Antivirus
- Microsoft Defender
- Other Info
- Mobile Workstation
-
-
#6
Sorry to reply so late, but I had to thank you for the solution described above.
The original link was from here:
-
listoferrors-and-solutions.pdf
listoferrors-and-solutions.pdf
1.8 MB
· Views: 752
-
- OS
- Windows 11, Linux Ubuntu
-
-
#7
Thanks for the batch, it’s the most comprehensive that I’ve seen.
Question: is anything that it does related to Windows Update «cookies,» as in resetting/renewing them? Because I want to do that but can’t find any documentation about where they are or how (surely this is unrelated to Edge cookies, because that would be ridiculous). Maybe it’s just poor terminology.
Reference:
My Get-WindowsUpdateLog shows 0x80244007, and WU unfortunately can see nothing beyond Defender updates. It is unrelated to WSUS in my case, as I’m not using it.
-
- OS
- Windows 11
-
-
#8
Thanks for the batch, it’s the most comprehensive that I’ve seen.
Question: is anything that it does related to Windows Update «cookies,» as in resetting/renewing them? Because I want to do that but can’t find any documentation about where they are or how (surely this is unrelated to Edge cookies, because that would be ridiculous). Maybe it’s just poor terminology.
Hello mate,
The BAT doesn’t affect cookies, but it’s not going to hurt anything to see if it may help with the error or not.
-
- OS
- Windows 11 Pro for Workstations
- Computer type
- PC/Desktop
- Manufacturer/Model
- Custom self build
- CPU
- Intel i7-8700K 5 GHz
- Motherboard
- ASUS ROG Maximus XI Formula Z390
- Memory
- 64 GB (4x16GB) G.SKILL TridentZ RGB DDR4 3600 MHz (F4-3600C18D-32GTZR)
- Graphics Card(s)
- ASUS ROG-STRIX-GTX1080TI-O11G-GAMING (11GB GDDR5X)
- Sound Card
- Integrated Digital Audio (S/PDIF)
- Monitor(s) Displays
- 2 x Samsung Odyssey G75 27″
- Screen Resolution
- 2560×1440
- Hard Drives
- 1TB Samsung 990 PRO M.2,
4TB Samsung 990 PRO M.2,
8TB WD MyCloudEX2Ultra NAS
- PSU
- Seasonic Prime Titanium 850W
- Case
- Thermaltake Core P3 wall mounted
- Cooling
- Corsair Hydro H115i
- Keyboard
- Logitech wireless K800
- Mouse
- Logitech MX Master 3
- Internet Speed
- 1 Gbps Download and 35 Mbps Upload
- Browser
- Google Chrome
- Antivirus
- Microsoft Defender and Malwarebytes Premium
- Other Info
- Logitech Z625 speaker system,
Logitech BRIO 4K Pro webcam,
HP Color LaserJet Pro MFP M477fdn,
CyberPower CP1500PFCLCD
Galaxy S23 Plus phone
-
- Operating System
- Windows 11 Pro
- Computer type
- Laptop
- Manufacturer/Model
- Surface Laptop 7 Copilot+ PC
- CPU
- Snapdragon X Elite (12 core) 3.42 GHz
- Memory
- 16 GB LPDDR5x-7467 MHz
- Monitor(s) Displays
- 15″ HDR
- Screen Resolution
- 2496 x 1664
- Hard Drives
- 1 TB SSD
- Internet Speed
- Wi-Fi 7 and Bluetooth 5.4
- Browser
- Chrome and Edge
- Antivirus
- Windows Defender
-
-
#9
@Brink Yeah, I forgot to mention that I have used it but it has no effect on whatever this is. I’m only surmising that WU cookies are at play based on the MS article for the number, but there could easily be other reasons.
Update: Just wanted to include here that the solution was not to think of problems with WU itself (which is what the batch would address) but what could be stopping it from looking in the right place. The WU log turned out to have a more relevant error, 0x8007051F, which suggested a problem with the connection to Azure Active Directory. That’s resolved by the procedure mentioned here, which in turn allowed the PC to actually see WU again. An edge case of edge cases.
Last edited:
-
- OS
- Windows 11
-
-
#10
What is meant by Unblock the .bat file.
-
- OS
- Windows 11
- Computer type
- Laptop
- CPU
- AMD Ryzen 7 5700U
- Motherboard
- HP 887A (FP6)
- Memory
- 16.0GB Dual-Channel Unknown @ 1596MHz (22-22-22-52)
- Graphics Card(s)
- 512MB ATI AMD Radeon Graphics (HP)
- Monitor(s) Displays
- Generic PnP Monitor
- Screen Resolution
- 1920×1080
- Hard Drives
- 238GB KBG40ZNV256G KIOXIA (Unknown (SSD))
- Mouse
- Razer Naga Pro
- Internet Speed
- 424.4 Mbps download 230.5 Mbps upload
- Browser
- Microsoft Edge
- Antivirus
- Bitdefender Total Security
-
-
#11
What is meant by
Unblock the .bat file.
Hello,
The link below will help explain unblock more.

Unblock File Downloaded from Internet in Windows 11
This tutorial will show you different ways on how to unblock files downloaded from the Internet depending on how they were blocked in Windows 11. When you download files from the Internet, Windows 11 shows you a security warning every time you try to open it by default. Some file types are…
www.elevenforum.com
-
- OS
- Windows 11 Pro for Workstations
- Computer type
- PC/Desktop
- Manufacturer/Model
- Custom self build
- CPU
- Intel i7-8700K 5 GHz
- Motherboard
- ASUS ROG Maximus XI Formula Z390
- Memory
- 64 GB (4x16GB) G.SKILL TridentZ RGB DDR4 3600 MHz (F4-3600C18D-32GTZR)
- Graphics Card(s)
- ASUS ROG-STRIX-GTX1080TI-O11G-GAMING (11GB GDDR5X)
- Sound Card
- Integrated Digital Audio (S/PDIF)
- Monitor(s) Displays
- 2 x Samsung Odyssey G75 27″
- Screen Resolution
- 2560×1440
- Hard Drives
- 1TB Samsung 990 PRO M.2,
4TB Samsung 990 PRO M.2,
8TB WD MyCloudEX2Ultra NAS
- PSU
- Seasonic Prime Titanium 850W
- Case
- Thermaltake Core P3 wall mounted
- Cooling
- Corsair Hydro H115i
- Keyboard
- Logitech wireless K800
- Mouse
- Logitech MX Master 3
- Internet Speed
- 1 Gbps Download and 35 Mbps Upload
- Browser
- Google Chrome
- Antivirus
- Microsoft Defender and Malwarebytes Premium
- Other Info
- Logitech Z625 speaker system,
Logitech BRIO 4K Pro webcam,
HP Color LaserJet Pro MFP M477fdn,
CyberPower CP1500PFCLCD
Galaxy S23 Plus phone
-
- Operating System
- Windows 11 Pro
- Computer type
- Laptop
- Manufacturer/Model
- Surface Laptop 7 Copilot+ PC
- CPU
- Snapdragon X Elite (12 core) 3.42 GHz
- Memory
- 16 GB LPDDR5x-7467 MHz
- Monitor(s) Displays
- 15″ HDR
- Screen Resolution
- 2496 x 1664
- Hard Drives
- 1 TB SSD
- Internet Speed
- Wi-Fi 7 and Bluetooth 5.4
- Browser
- Chrome and Edge
- Antivirus
- Windows Defender
-
-
#12
Unblock is neither in the context menu nor Properties. Upon opening the file I didn’t get a warning by Open File nor Microsoft Defender SmartScreen. Nothing in PowerShell worked for me either.
-
- OS
- Windows 11
- Computer type
- Laptop
- CPU
- AMD Ryzen 7 5700U
- Motherboard
- HP 887A (FP6)
- Memory
- 16.0GB Dual-Channel Unknown @ 1596MHz (22-22-22-52)
- Graphics Card(s)
- 512MB ATI AMD Radeon Graphics (HP)
- Monitor(s) Displays
- Generic PnP Monitor
- Screen Resolution
- 1920×1080
- Hard Drives
- 238GB KBG40ZNV256G KIOXIA (Unknown (SSD))
- Mouse
- Razer Naga Pro
- Internet Speed
- 424.4 Mbps download 230.5 Mbps upload
- Browser
- Microsoft Edge
- Antivirus
- Bitdefender Total Security
-
-
#13
Unblock is neither in the context menu nor Properties. Upon opening the file I didn’t get a warning by Open File nor Microsoft Defender SmartScreen. Nothing in PowerShell worked for me either.
It must have already been unblocked.
Were you able to successfully reset Windows Update with the BAT file?
-
- OS
- Windows 11 Pro for Workstations
- Computer type
- PC/Desktop
- Manufacturer/Model
- Custom self build
- CPU
- Intel i7-8700K 5 GHz
- Motherboard
- ASUS ROG Maximus XI Formula Z390
- Memory
- 64 GB (4x16GB) G.SKILL TridentZ RGB DDR4 3600 MHz (F4-3600C18D-32GTZR)
- Graphics Card(s)
- ASUS ROG-STRIX-GTX1080TI-O11G-GAMING (11GB GDDR5X)
- Sound Card
- Integrated Digital Audio (S/PDIF)
- Monitor(s) Displays
- 2 x Samsung Odyssey G75 27″
- Screen Resolution
- 2560×1440
- Hard Drives
- 1TB Samsung 990 PRO M.2,
4TB Samsung 990 PRO M.2,
8TB WD MyCloudEX2Ultra NAS
- PSU
- Seasonic Prime Titanium 850W
- Case
- Thermaltake Core P3 wall mounted
- Cooling
- Corsair Hydro H115i
- Keyboard
- Logitech wireless K800
- Mouse
- Logitech MX Master 3
- Internet Speed
- 1 Gbps Download and 35 Mbps Upload
- Browser
- Google Chrome
- Antivirus
- Microsoft Defender and Malwarebytes Premium
- Other Info
- Logitech Z625 speaker system,
Logitech BRIO 4K Pro webcam,
HP Color LaserJet Pro MFP M477fdn,
CyberPower CP1500PFCLCD
Galaxy S23 Plus phone
-
- Operating System
- Windows 11 Pro
- Computer type
- Laptop
- Manufacturer/Model
- Surface Laptop 7 Copilot+ PC
- CPU
- Snapdragon X Elite (12 core) 3.42 GHz
- Memory
- 16 GB LPDDR5x-7467 MHz
- Monitor(s) Displays
- 15″ HDR
- Screen Resolution
- 2496 x 1664
- Hard Drives
- 1 TB SSD
- Internet Speed
- Wi-Fi 7 and Bluetooth 5.4
- Browser
- Chrome and Edge
- Antivirus
- Windows Defender
-
-
#14
No, it did prompt to reset, but I have the same version of Windows.
-
- OS
- Windows 11
- Computer type
- Laptop
- CPU
- AMD Ryzen 7 5700U
- Motherboard
- HP 887A (FP6)
- Memory
- 16.0GB Dual-Channel Unknown @ 1596MHz (22-22-22-52)
- Graphics Card(s)
- 512MB ATI AMD Radeon Graphics (HP)
- Monitor(s) Displays
- Generic PnP Monitor
- Screen Resolution
- 1920×1080
- Hard Drives
- 238GB KBG40ZNV256G KIOXIA (Unknown (SSD))
- Mouse
- Razer Naga Pro
- Internet Speed
- 424.4 Mbps download 230.5 Mbps upload
- Browser
- Microsoft Edge
- Antivirus
- Bitdefender Total Security
-
-
#15
No, it did prompt to reset, but I have the same version of Windows.
Are you able to use an ISO or MSU to update with instead?
-
- OS
- Windows 11 Pro for Workstations
- Computer type
- PC/Desktop
- Manufacturer/Model
- Custom self build
- CPU
- Intel i7-8700K 5 GHz
- Motherboard
- ASUS ROG Maximus XI Formula Z390
- Memory
- 64 GB (4x16GB) G.SKILL TridentZ RGB DDR4 3600 MHz (F4-3600C18D-32GTZR)
- Graphics Card(s)
- ASUS ROG-STRIX-GTX1080TI-O11G-GAMING (11GB GDDR5X)
- Sound Card
- Integrated Digital Audio (S/PDIF)
- Monitor(s) Displays
- 2 x Samsung Odyssey G75 27″
- Screen Resolution
- 2560×1440
- Hard Drives
- 1TB Samsung 990 PRO M.2,
4TB Samsung 990 PRO M.2,
8TB WD MyCloudEX2Ultra NAS
- PSU
- Seasonic Prime Titanium 850W
- Case
- Thermaltake Core P3 wall mounted
- Cooling
- Corsair Hydro H115i
- Keyboard
- Logitech wireless K800
- Mouse
- Logitech MX Master 3
- Internet Speed
- 1 Gbps Download and 35 Mbps Upload
- Browser
- Google Chrome
- Antivirus
- Microsoft Defender and Malwarebytes Premium
- Other Info
- Logitech Z625 speaker system,
Logitech BRIO 4K Pro webcam,
HP Color LaserJet Pro MFP M477fdn,
CyberPower CP1500PFCLCD
Galaxy S23 Plus phone
-
- Operating System
- Windows 11 Pro
- Computer type
- Laptop
- Manufacturer/Model
- Surface Laptop 7 Copilot+ PC
- CPU
- Snapdragon X Elite (12 core) 3.42 GHz
- Memory
- 16 GB LPDDR5x-7467 MHz
- Monitor(s) Displays
- 15″ HDR
- Screen Resolution
- 2496 x 1664
- Hard Drives
- 1 TB SSD
- Internet Speed
- Wi-Fi 7 and Bluetooth 5.4
- Browser
- Chrome and Edge
- Antivirus
- Windows Defender
-
-
#16
-
- OS
- Windows 11
- Computer type
- Laptop
- CPU
- AMD Ryzen 7 5700U
- Motherboard
- HP 887A (FP6)
- Memory
- 16.0GB Dual-Channel Unknown @ 1596MHz (22-22-22-52)
- Graphics Card(s)
- 512MB ATI AMD Radeon Graphics (HP)
- Monitor(s) Displays
- Generic PnP Monitor
- Screen Resolution
- 1920×1080
- Hard Drives
- 238GB KBG40ZNV256G KIOXIA (Unknown (SSD))
- Mouse
- Razer Naga Pro
- Internet Speed
- 424.4 Mbps download 230.5 Mbps upload
- Browser
- Microsoft Edge
- Antivirus
- Bitdefender Total Security
-
-
#17
-
- OS
- Windows 11 Pro for Workstations
- Computer type
- PC/Desktop
- Manufacturer/Model
- Custom self build
- CPU
- Intel i7-8700K 5 GHz
- Motherboard
- ASUS ROG Maximus XI Formula Z390
- Memory
- 64 GB (4x16GB) G.SKILL TridentZ RGB DDR4 3600 MHz (F4-3600C18D-32GTZR)
- Graphics Card(s)
- ASUS ROG-STRIX-GTX1080TI-O11G-GAMING (11GB GDDR5X)
- Sound Card
- Integrated Digital Audio (S/PDIF)
- Monitor(s) Displays
- 2 x Samsung Odyssey G75 27″
- Screen Resolution
- 2560×1440
- Hard Drives
- 1TB Samsung 990 PRO M.2,
4TB Samsung 990 PRO M.2,
8TB WD MyCloudEX2Ultra NAS
- PSU
- Seasonic Prime Titanium 850W
- Case
- Thermaltake Core P3 wall mounted
- Cooling
- Corsair Hydro H115i
- Keyboard
- Logitech wireless K800
- Mouse
- Logitech MX Master 3
- Internet Speed
- 1 Gbps Download and 35 Mbps Upload
- Browser
- Google Chrome
- Antivirus
- Microsoft Defender and Malwarebytes Premium
- Other Info
- Logitech Z625 speaker system,
Logitech BRIO 4K Pro webcam,
HP Color LaserJet Pro MFP M477fdn,
CyberPower CP1500PFCLCD
Galaxy S23 Plus phone
-
- Operating System
- Windows 11 Pro
- Computer type
- Laptop
- Manufacturer/Model
- Surface Laptop 7 Copilot+ PC
- CPU
- Snapdragon X Elite (12 core) 3.42 GHz
- Memory
- 16 GB LPDDR5x-7467 MHz
- Monitor(s) Displays
- 15″ HDR
- Screen Resolution
- 2496 x 1664
- Hard Drives
- 1 TB SSD
- Internet Speed
- Wi-Fi 7 and Bluetooth 5.4
- Browser
- Chrome and Edge
- Antivirus
- Windows Defender
Try3
Well-known member
-
-
#18
I can see that they’ve been written/edited separately but are the Win11 & Win10 batch files interchangeable?
Denis
-
- OS
- Windows 11 Home x64 Version 23H2 Build 22631.3447
-
-
#19
I can see that they’ve been written/edited separately but are the Win11 & Win10 batch files interchangeable?
Denis
Hello Denis,
Yes, you can use it for both W10 and W11.
-
- OS
- Windows 11 Pro for Workstations
- Computer type
- PC/Desktop
- Manufacturer/Model
- Custom self build
- CPU
- Intel i7-8700K 5 GHz
- Motherboard
- ASUS ROG Maximus XI Formula Z390
- Memory
- 64 GB (4x16GB) G.SKILL TridentZ RGB DDR4 3600 MHz (F4-3600C18D-32GTZR)
- Graphics Card(s)
- ASUS ROG-STRIX-GTX1080TI-O11G-GAMING (11GB GDDR5X)
- Sound Card
- Integrated Digital Audio (S/PDIF)
- Monitor(s) Displays
- 2 x Samsung Odyssey G75 27″
- Screen Resolution
- 2560×1440
- Hard Drives
- 1TB Samsung 990 PRO M.2,
4TB Samsung 990 PRO M.2,
8TB WD MyCloudEX2Ultra NAS
- PSU
- Seasonic Prime Titanium 850W
- Case
- Thermaltake Core P3 wall mounted
- Cooling
- Corsair Hydro H115i
- Keyboard
- Logitech wireless K800
- Mouse
- Logitech MX Master 3
- Internet Speed
- 1 Gbps Download and 35 Mbps Upload
- Browser
- Google Chrome
- Antivirus
- Microsoft Defender and Malwarebytes Premium
- Other Info
- Logitech Z625 speaker system,
Logitech BRIO 4K Pro webcam,
HP Color LaserJet Pro MFP M477fdn,
CyberPower CP1500PFCLCD
Galaxy S23 Plus phone
-
- Operating System
- Windows 11 Pro
- Computer type
- Laptop
- Manufacturer/Model
- Surface Laptop 7 Copilot+ PC
- CPU
- Snapdragon X Elite (12 core) 3.42 GHz
- Memory
- 16 GB LPDDR5x-7467 MHz
- Monitor(s) Displays
- 15″ HDR
- Screen Resolution
- 2496 x 1664
- Hard Drives
- 1 TB SSD
- Internet Speed
- Wi-Fi 7 and Bluetooth 5.4
- Browser
- Chrome and Edge
- Antivirus
- Windows Defender
Try3
Well-known member
-
-
#20
-
- OS
- Windows 11 Home x64 Version 23H2 Build 22631.3447
On Windows 11, the Windows Update service allows the system to receive the latest update from Microsoft to address bugs, patch security vulnerabilities, and deploy newer drivers. Also, it’s the service of choice to download feature updates, and Insider preview builds.
The caveat is that Windows Update is not perfect, and sometimes computers may be unable to download or install updates because of specific errors, the system not connecting to the service online, and many other problems.
Usually, problems occur when the update mechanism services stop working, Windows 11 is dealing with update cache issues, or the system finds corruptions in some installation files. If something is happening, you can reset Windows Update on Windows 11 to fix most issues using the Troubleshoot feature, applying updates manually, repairing corrupted system files, or resetting the Windows Update components.
In this guide, you will learn how to reset the Windows Update components on Windows 11.
- Reset Windows Update with Troubleshoot on Windows 11
- Fix Windows Update manually installing updates on Windows 11
- Fix Windows Update repairing corrupted files on Windows 11
- Reset Windows Update with Command Prompt on Windows 11
Reset Windows Update with Troubleshoot on Windows 11
To reset Windows Update using the Troubleshoot feature on Windows 11, use these steps:
-
Open Settings on Windows 11.
-
Click on System.
-
Click the Troubleshoot tab.
-
Click the Other troubleshooters setting.

-
Under the “Most frequent” section, click the Run button for the “Windows Update” setting.
-
Continue with the on-screen directions (if applicable).


Once the computer restarts, the next you try to update Windows 11, the system should work as expected.
Fix Windows Update manually installing updates on Windows 11
If you have problems using Windows Update, installing the latest update available may resolve the issue automatically. Also, cumulative updates now combine the “Servicing Stack Update” (SSU), an update designed to improve and fix problems to make Windows Update more reliable.
To install an update manually to fix problems with Windows Update on Windows 11, use these steps:
-
Open the Windows 11 update history website.
-
Select the latest update of Windows 11 from the left pane (and note the update’s “KB” number).
Quick tip: You can check your current version on Settings > System > About, and under the “Windows Specifications” section, confirm the version information.
-
Open the Microsoft Update Catalog website.
-
Search for the knowledge base (KB) number for the latest update (x64).

-
Click the Download button for the latest Windows 11 update.
-
Click the “.msu” download link and save the file on the device.
-
Double-click the package to install it and fix Windows Update problems.

-
Restart the computer.


After you complete the steps, the device will apply the most recent update. The installation should have also resolved any issues with the Windows Update service.
Fix Windows Update repairing corrupted files on Windows 11
The Windows Update service may break as a result of corrupted system files. If this is the case, you can use the Deployment Image Servicing and Management (DISM) to ensure that the local system image of Windows 11 is in good health, and then the System File Checker (SFC) to fix problems on Windows Update using the files of the local system image.
To repair system files to fix Windows 11 update problems, use these steps:
-
Open Start.
-
Search for Command Prompt, right-click the top result, and select the Run as administrator option.
-
Type the following DISM command to repair corrupted system files and press Enter:
dism.exe /Online /Cleanup-image /Restorehealth
-
Type the following SFC command to repair system files and press Enter:
sfc /scannow


Once you complete the steps, the Windows Update components should start working again, and you can check for updates again to verify.
Reset Windows Update with Command Prompt on Windows 11
Alternatively, it’s also possible to reset all the Windows Update components with commands to fix the most common problems. Typically, this is the best option to resolve issues with the update mechanism on Windows 11.
To reset Windows Update manually from Command Prompt on Windows 11, use these steps:
-
Open Start.
-
Search for Command Prompt, right-click the top result, and select the Run as administrator option.
-
Type the following commands to stop the Background Intelligent Transfer Service (BITS), Windows Update service, and Cryptographic service, and press Enter on each line:
net stop bits
net stop wuauserv
net stop appidsvc
net stop cryptsvc

Quick tip: You may need to run the command more than once until you see the message that the service has stopped successfully.
-
Type the following command to delete all the “qmgr*.dat” files created by BITS from your computer and press Enter:
Del "%ALLUSERSPROFILE%\Application Data\Microsoft\Network\Downloader\*.*"

-
Type “Y” to confirm the deletion.
-
Type the following commands to clear the Windows Update cache to allow Windows 11 to re-download the updates instead of using the files already downloaded on the system that might be damaged, and press Enter on each line:
rmdir %systemroot%\SoftwareDistribution /S /Q
rmdir %systemroot%\system32\catroot2 /S /Q
Quick tip: We use the remove directory
rmdircommand with the/Soption to delete the specified directory and all subdirectories within the main folder, and the/Qoption deletes directories quietly without confirmation. If you get the message “The process cannot access the file because it is being used by another process,” repeat step No. 1 and try again, as one of the services might have restarted unexpectedly. -
Type the following commands to reset the BITS and Windows Update services to their default security descriptor, and press Enter on each line:
sc.exe sdset bits D:(A;;CCLCSWRPWPDTLOCRRC;;;SY)(A;;CCDCLCSWRPWPDTLOCRSDRCWDWO;;;BA)(A;;CCLCSWLOCRRC;;;AU)(A;;CCLCSWRPWPDTLOCRRC;;;PU)
sc.exe sdset wuauserv D:(A;;CCLCSWRPWPDTLOCRRC;;;SY)(A;;CCDCLCSWRPWPDTLOCRSDRCWDWO;;;BA)(A;;CCLCSWLOCRRC;;;AU)(A;;CCLCSWRPWPDTLOCRRC;;;PU)
-
Type the following command to move to the System32 folder and press Enter:
cd /d %windir%\system32
-
Type the following commands to register all the corresponding BITS and Windows Update DLL files on the Registry and press Enter on each line:
regsvr32.exe /s atl.dll
regsvr32.exe /s urlmon.dll
regsvr32.exe /s mshtml.dll
regsvr32.exe /s shdocvw.dll
regsvr32.exe /s browseui.dll
regsvr32.exe /s jscript.dll
regsvr32.exe /s vbscript.dll
regsvr32.exe /s scrrun.dll
regsvr32.exe /s msxml.dll
regsvr32.exe /s msxml3.dll
regsvr32.exe /s msxml6.dll
regsvr32.exe /s actxprxy.dll
regsvr32.exe /s softpub.dll
regsvr32.exe /s wintrust.dll
regsvr32.exe /s dssenh.dll
regsvr32.exe /s rsaenh.dll
regsvr32.exe /s gpkcsp.dll
regsvr32.exe /s sccbase.dll
regsvr32.exe /s slbcsp.dll
regsvr32.exe /s cryptdlg.dll
regsvr32.exe /s oleaut32.dll
regsvr32.exe /s ole32.dll
regsvr32.exe /s shell32.dll
regsvr32.exe /s initpki.dll
regsvr32.exe /s wuapi.dll
regsvr32.exe /s wuaueng.dll
regsvr32.exe /s wuaueng1.dll
regsvr32.exe /s wucltui.dll
regsvr32.exe /s wups.dll
regsvr32.exe /s wups2.dll
regsvr32.exe /s wuweb.dll
regsvr32.exe /s qmgr.dll
regsvr32.exe /s qmgrprxy.dll
regsvr32.exe /s wucltux.dll
regsvr32.exe /s muweb.dll
regsvr32.exe /s wuwebv.dll
Quick note: The
regsvr32helps to register “.DLL” files as command components in the Registry, and we use the/Soption to specify the tool to run the command silently without prompting additional messages. -
Type the following commands to reset the network configurations that might be part of the problem (but do not restart your computer just yet), and press Enter on each line:
netsh winsock reset
netsh winsock reset proxy

-
Type the following commands to restart the BITS, Windows Update, and Cryptographic services, and press Enter on each line:
net start bits
net start wuauserv
net start appidsvc
net start cryptsvc
-
Restart the computer.


After you complete the steps, Windows Update will reset, and it should work again on Windows 11.
If you receive the error “0x80248007” while downloading a cumulative or feature update, you will need to wait sometime (up to 24 hours), and the error will go away automatically.