
Last Updated :
07 Apr, 2025
Opening the Local Group Policy Editor in Windows Home can be tricky, as this feature is typically unavailable in the Home edition by default. However, workarounds exist to access Group Policy on Windows Home and manage system policies effectively. In this guide, we’ll show you how to enable Group Policy Editor in Windows Home and navigate the Group Policy settings to customize your system preferences.
Table of Content
- How to Access the Group Policy Editor in Windows Home?
- Method 1: Using Search Bar
- Method 2: Using Run Dialog
- How to Configure Windows Settings Without the Group Policy Editor?
- How to Enable Group Policy Editor (gpedit. msc) on Windows 10/11 Home Edition?
- Method 1: Using PowerShell Script
- Method 2: Using GPEdit Installer
What Is Group Policy Editor in Windows?
The Group Policy Editor, an administrative tool in Windows, enables the configuration of various operating system aspects. It offers a user interface that manages policies influencing the system’s behavior and user experience. It allows you to control how the system works and what users can do, like setting passwords, blocking certain programs, or changing desktop settings.
How to Access the Group Policy Editor in Windows Home?
Users can access the Local Group Policy Editor directly on Windows Professional or Enterprise editions. However, Home edition users must implement a workaround to access this feature, as it is not included by default.
Method 1: Using Search Bar
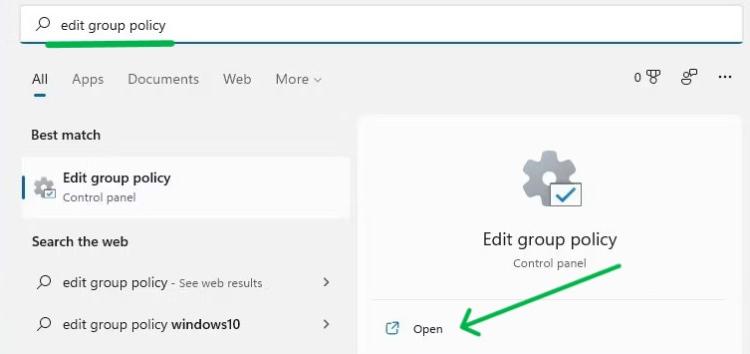
Step 1: Press WindowsKey + S then on the search bar type «Edit group policy«
Step 2: On the right side click on «open«
Method 2: Using Run Dialog
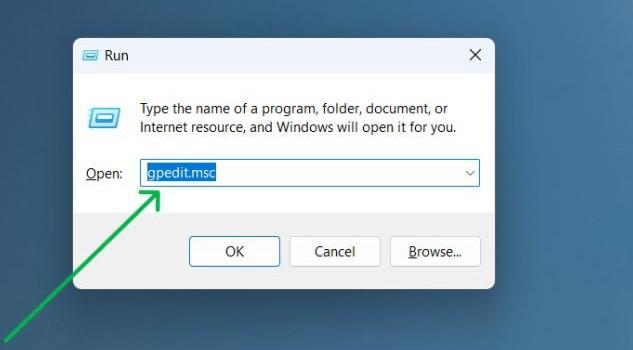
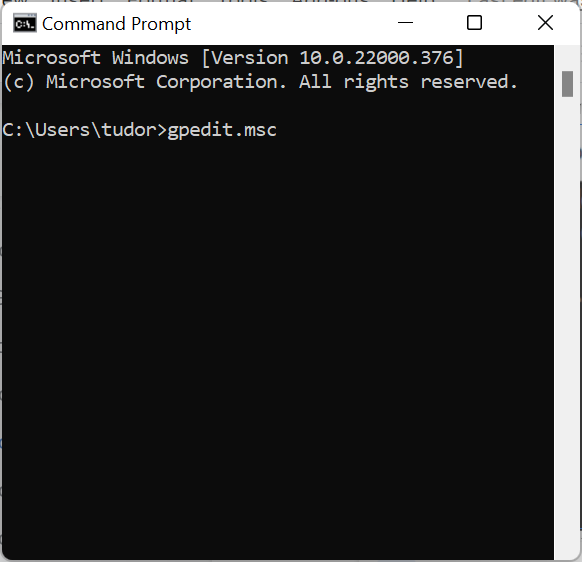
Step 1: Press Windows + R then on run dialog type «gpedit.msc«
Step 2: Press the Enter button or OK to open the group policy on Windows home
How to Configure Windows Settings Without the Group Policy Editor?
To Open the Group Policy editor, Users of Windows Home editions must use alternative methods to configure system settings typically managed by the Group Policy Editor. These methods can include direct registry edits or the use of third-party software solutions.
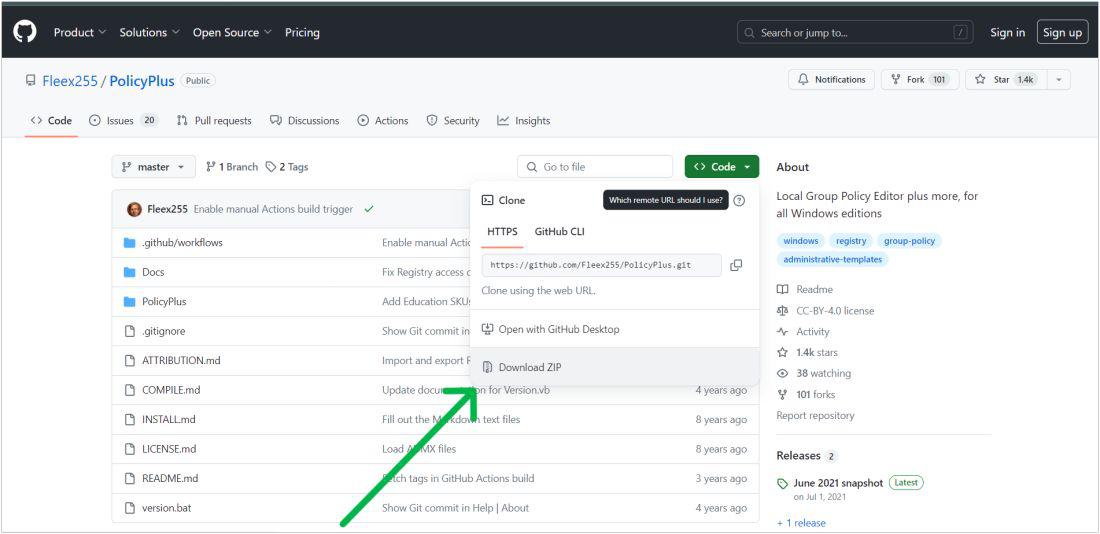
Policy Plus, a free and open-source tool, extends the capabilities of Group Policy settings to all Windows editions, beyond just Professional and Enterprise. It empowers users to view and edit Registry-based policies across local GPOs, per-user GPOs, individual POL files, offline Registry user hives, and the live Registry.
You can download Policy Plus from GitHub:
https://github.com/Fleex255/PolicyPlus
How to Enable Group Policy Editor (gpedit. msc) on Windows 10/11 Home Edition?
To enable the Group Policy Editor on Windows Home editions, you can use any method like GPEdit Installer or PowerShell Script to enable the Group Policy Editor on Windows Home edition.
Method 1: Using PowerShell Script
For the more technically inclined, enabling the Group Policy Editor via a PowerShell script is an efficient way to activate this feature. This method involves executing a script that automates the installation process, providing a swift and direct approach to accessing the Group Policy Editor on Windows Home Editions.
Step 1: Open Notepad
Step 2: Copy this code and paste it into Notepad and save as it a .batfile
@echo off
pushd "%~dp0"
dir /b %SystemRoot%\servicing\Packages\Microsoft-Windows-GroupPolicy-ClientExtensions-Package~3*.mum >List.txt
dir /b %SystemRoot%\servicing\Packages\Microsoft-Windows-GroupPolicy-ClientTools-Package~3*.mum >>List.txt
for /f %%i in ('findstr /i . List.txt 2^>nul') do dism /online /norestart /add-package:"%SystemRoot%\servicing\Packages\%%i"
pause
Step 3: After that click on the saved file and select «Run as administrator» from the menu
Step 4: After completion, press any key to close the Command Prompt
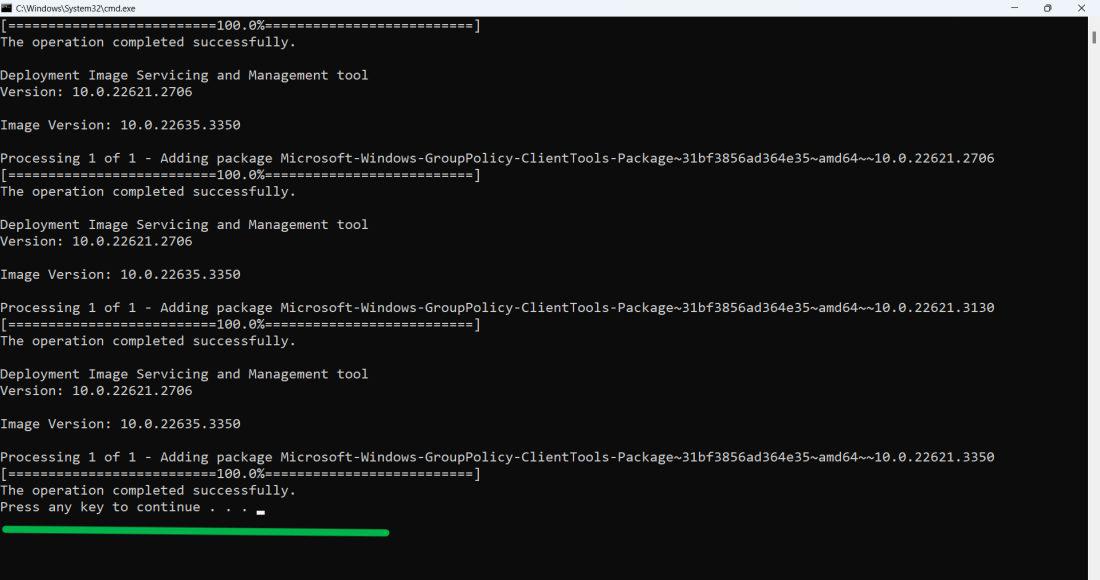
Step 5: Restart Your computer
Method 2: Using GPEdit Installer
Unlocking the Group Policy Editor in Windows Home Edition is made simple with the GPEdit Installer. This method provides a hassle-free installation process, allowing users to quickly gain access to the editor’s extensive settings and configurations without complex procedures.
Step 1: Download the setup file from this link
https://bit.ly/3INu7Xg
Step 2: Double-click on the setup.exe file then click on «next«
Step 3: Select Install
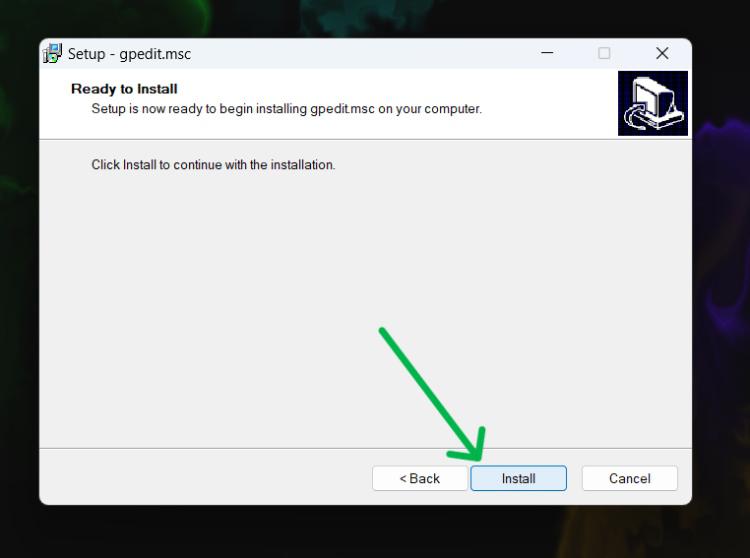
Step 4: After clicking on the install button a window will be pop
Step 5: Restart your computer
Also Read
- How to Fix the “Cannot Find Gpedit.msc” Error on Windows 11?
- How to Stop Windows 10 Update Permanently?
- How To Change Network Settings of Window From Public to Private?
Conclusion
Though Windows Home doesn’t natively include the Local Group Policy Editor, you can use a workaround to install and open Local Group Policy Editor in Windows Home. By following these steps, you’ll be able to adjust important Group Policy settings that are normally reserved for Pro and Enterprise editions. Understanding how to use Group Policy Editor in Windows Home can help you manage your system more effectively and unlock additional control over your PC.
Многие инструкции по настройке и решению проблем с Windows 10, 8.1 или Windows 7 содержат, среди прочих пунктов «Откройте редактор групповой политики», однако не все начинающие пользователи знают, как это сделать. В этой инструкции подробно о том, как открыть редактор локальной групповой политики несколькими способами.
Заранее обращу внимание на то, что эта системная утилита присутствует только в Корпоративной и Профессиональной версиях Windows 10, 8.1 и Windows 7 (для последней — также в редакции «Максимальная». В Домашней вы получите сообщение о том, что запустить инструмент не удается, хотя это можно и обойти, подробно: Не удается найти gpedit.msc в Windows.
Способы открыть редактор групповой политики (gpedit.msc)
Ниже — все основные способы запуска редактора локальной групповой политики. Существуют и другие, но они являются производными от описанных далее.
Диалоговое окно «Выполнить»
Первый способ, о котором я пишу чаще других, подходящий для всех актуальных версий Windows — нажать клавиши Win+R (Win — клавиша с эмблемой ОС), и в открывшееся окно «Выполнить» ввести gpedit.msc
После этого нажмите Enter или Ok — сразу откроется интерфейс редактора локальной групповой политики, при условии его наличия в вашей редакции системы.
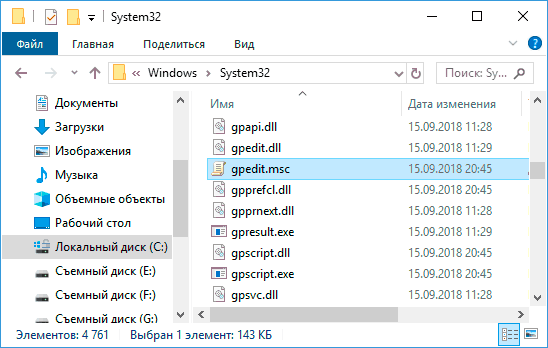
Файл gpedit.msc
Вы можете запустить редактор локальной групповой политики, а также создать ярлык для него в нужном вам расположении, используя файл для запуска: он находится в папке C:\Windows\System32 и имеет имя gpedit.msc
Поиск Windows 10, 8.1 и Windows 7
Одна из функций ОС Windows, которой пользователи незаслуженно не уделяют внимания — поиск в системе, который в Windows 7 находится в меню «Пуск», в Windows 10 — в панели задач, а в 8.1 — в отдельной панели поиска (можно вызвать клавишами Win+I). Если вы не знаете, как что-либо запустить, используйте поиск: обычно, это самый быстрый способ.
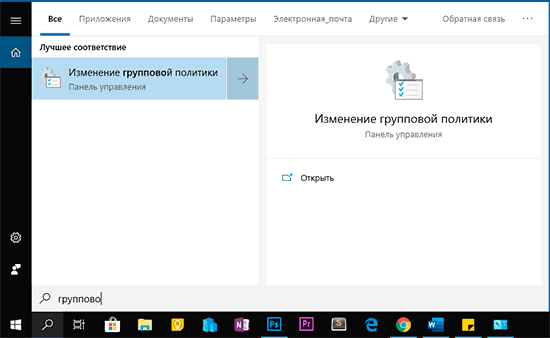
Однако, по какой-то причине, нужный результат находится только если вводить «Групповой политики», без слова «Редактор». По этому же запросу нужный результат можно найти в поиске в «Параметры» Windows 10.
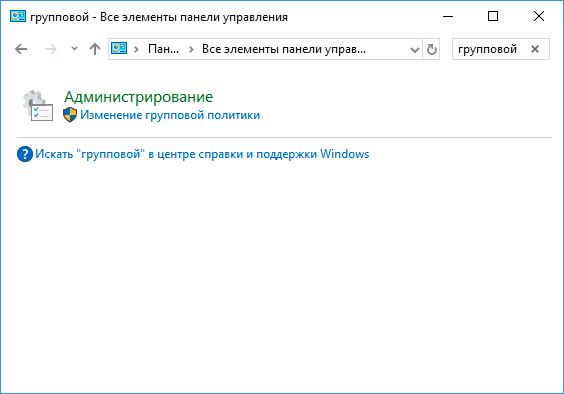
Панель управления
Запуск редактор локальной групповой политики возможен из панели управления, однако тоже с некоторыми странностями: он должен находиться в разделе «Администрирование», однако если его открыть, такого пункта там не будет (во всяком случае в Windows 10).
Если же начать вводить «Групповой политики» в поиске в панели управления (в окно справа вверху), редактор будет найден именно в разделе «Администрирование».
Все остальные способы — по сути варианты уже описанных: например, gpedit.msc вы можете запустить из командной строки или PowerShell, ярлык к файлу gpedit.msc можно закрепить на панели задач или в меню Пуск. Так или иначе, думаю, что описываемых методов для ваших целей окажется достаточно. Также может быть полезным: Редактор локальной групповой Windows политики для начинающих.
Групповая политика — это способ настройки параметров компьютера и пользователя для устройств, которые присоединены к доменным службам Active Directory (AD), а также к учетным записям локальных пользователей. Она контролирует широкий спектр параметров и может использоваться для принудительного применения и изменения настроек по умолчанию для соответствующих пользователей. Локальная групповая политика — это базовая версия групповой политики для компьютеров, не входящих в домен. Параметры локальной групповой политики хранятся в следующих папках:
- C:\Windows\System32\GroupPolicy
- C:\Windows\System32\GroupPolicyUsers.
Когда в Windows 10 вам необходимо открыть редактор локальной групповой политики, для этого вы можете использовать командную строку, команду выполнить, поиск на панели задач, меню Пуск или с помощью консоли управления (MMC).
Рассмотрим самые простые варианты:
- C помощью меню Пуск.
- C помощью команды Выполнить.
- C помощью Проводника Windows.
- С помощью командной строки или PowerShell
- Открыть редактор локальной групповой политики в качестве оснастки консоли управления.
- Открыть редактор локальной групповой политики в Windows 10 Home.
Открыть редактор локальной групповой политики с помощью меню «Пуск».
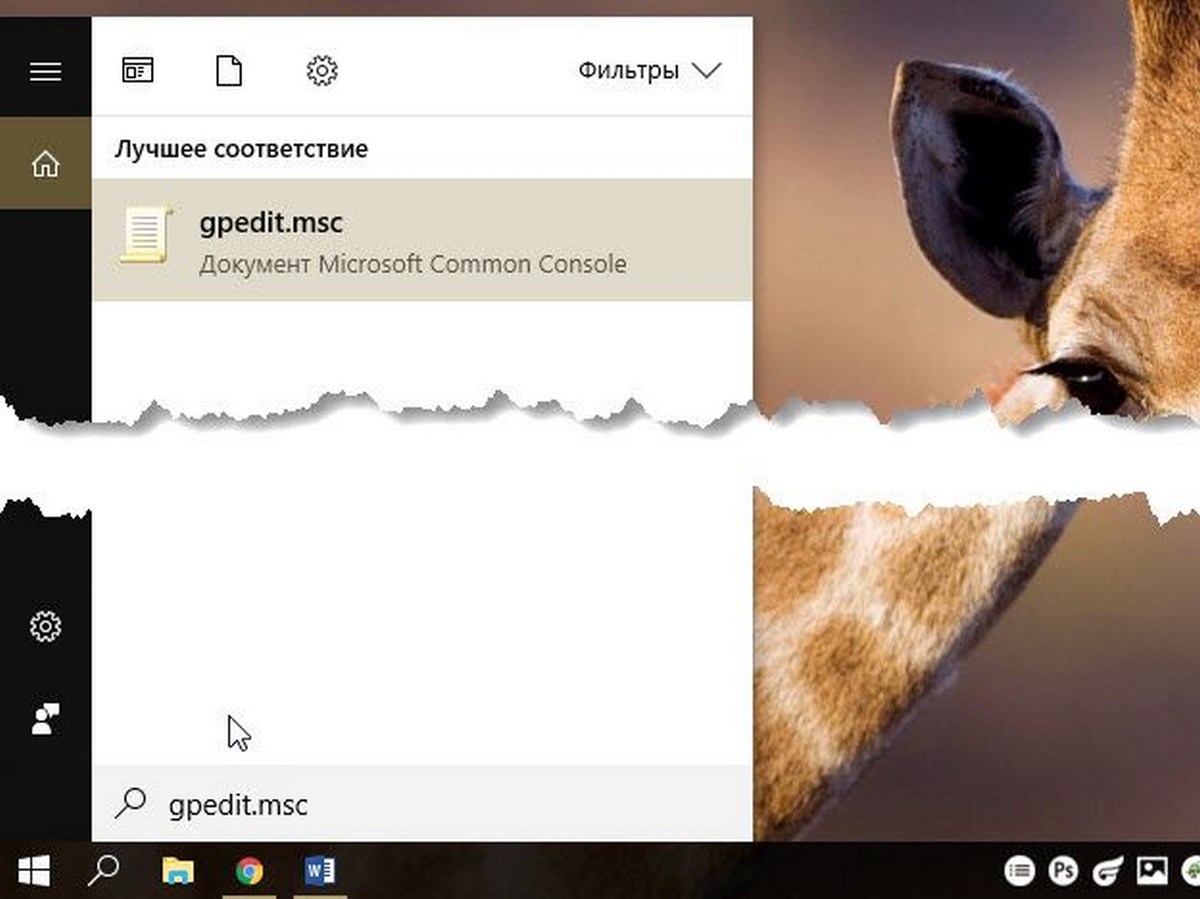
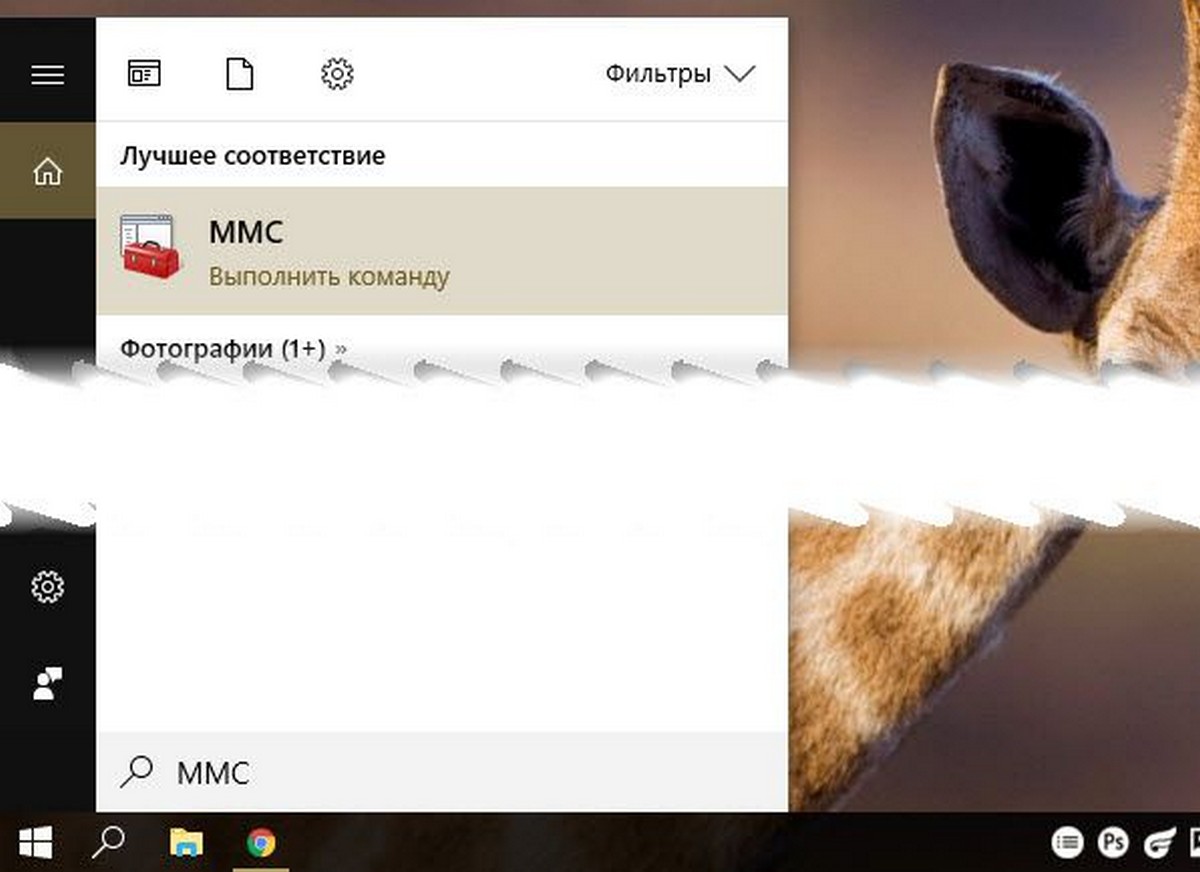
- Откройте меню «Пуск» и введите gpedit.msc в верхней части меню появится значок, при клике, на котором, откроется редактор политики.
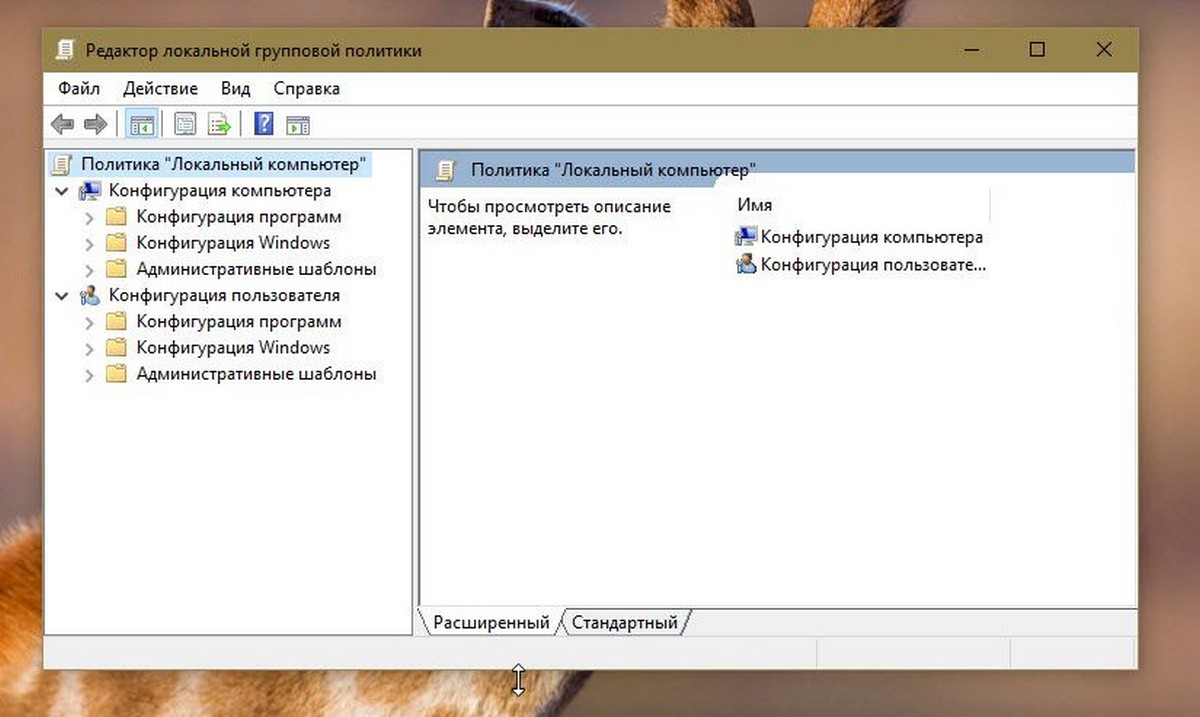
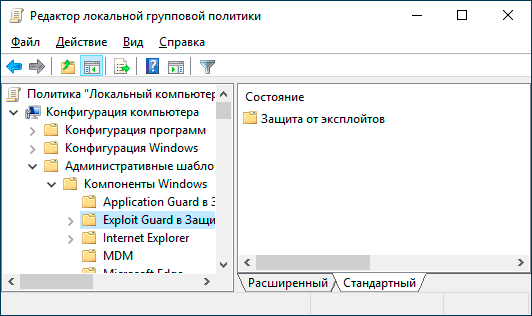
Чтобы просмотреть все применяемые политики в разделе «Конфигурация компьютера», перейдите в раздел «Конфигурация компьютера \ Административные шаблоны \ Все параметры»
Чтобы просмотреть все применяемые политики пользовательской настройки, перейдите в раздел «Конфигурация пользователя \ Административные шаблоны \ Все параметры».
Примечание: вы можете использовать поиск на панели задач.
Открыть редактор локальной групповой политики с помощью команды «Выполнить».
- Нажмите сочетание клавиш Win + X или кликните правой кнопкой мыши на меню «Пуск».
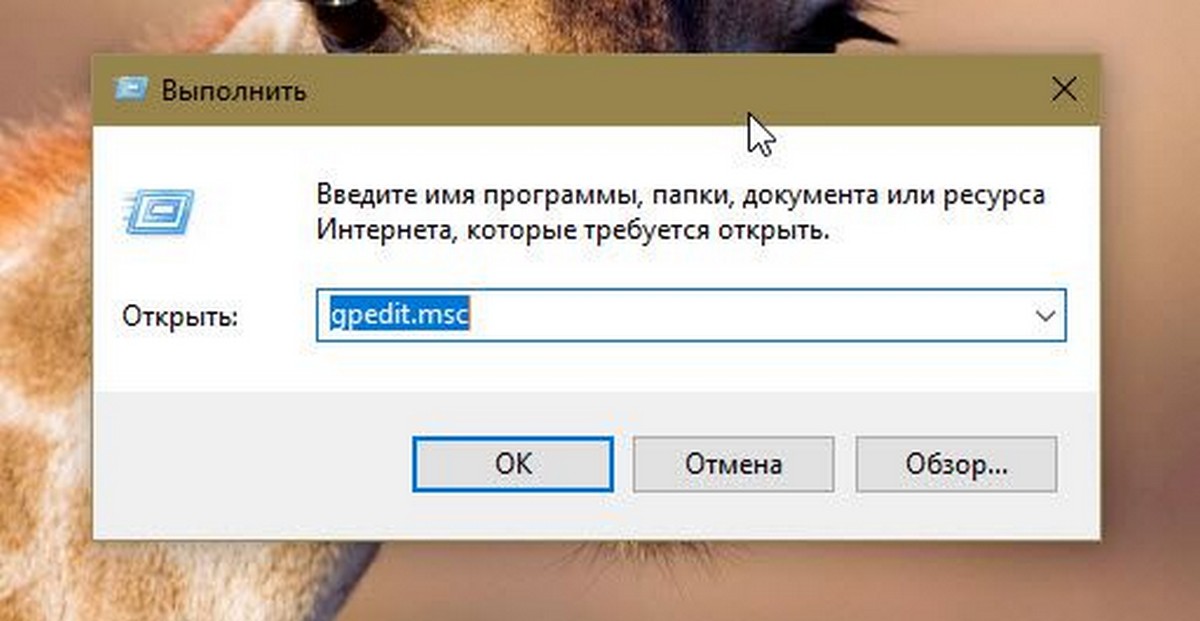
- В открывшемся меню выберите Выполнить.
- В строке «Открыть» введите — gpedit.msc и нажмите кнопку «ОК».
Открыть редактор локальной групповой политики с помощью Проводника Windows.
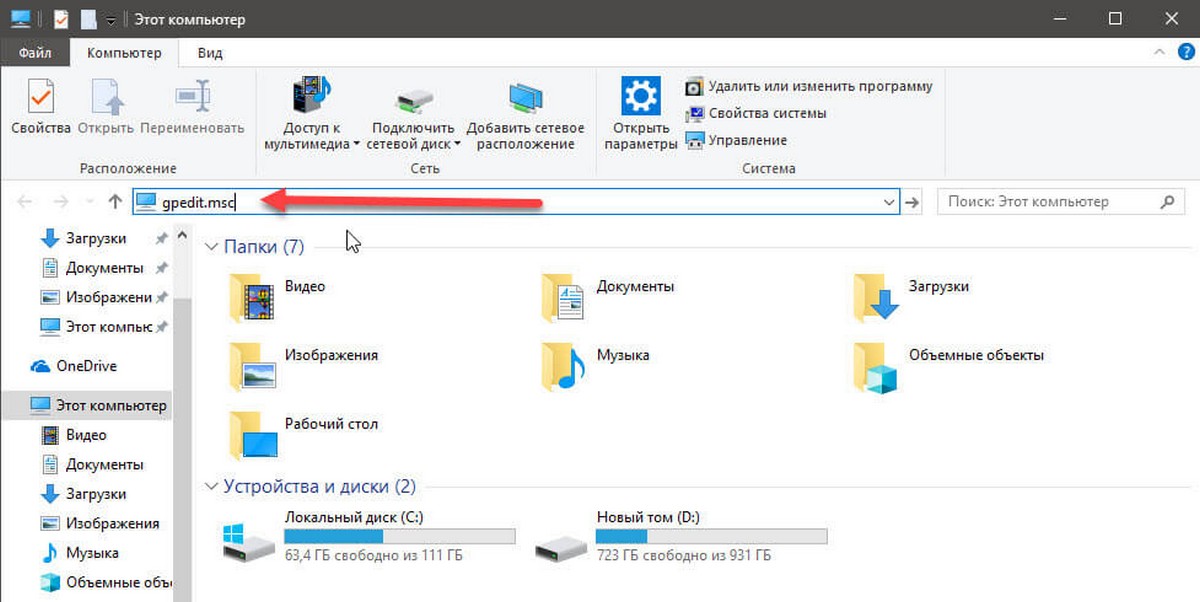
- Откройте Проводник с помощью ярлыка на панели задач или просто нажав сочетание клавиш Win + E
- В адресную строку проводника введите или скопируйте и вставьте:
gpedit.msc
- Нажмите Enter
Открыть редактор локальной групповой политики из командной строки или PowerShell
- Откройте Командную строку или вы можете открыть новый экземпляр PowerShell.
- Введите: gpedit.msc и нажмите клавишу Enter.
Открыть редактор локальной групповой политики в качестве оснастки консоли управления.
- Откройте консоль управления MMC. (Нажмите кнопку «Пуск», введите mmc и нажмите клавишу Enter).
- В меню Файл выберите пункт Добавить или удалить оснастку.
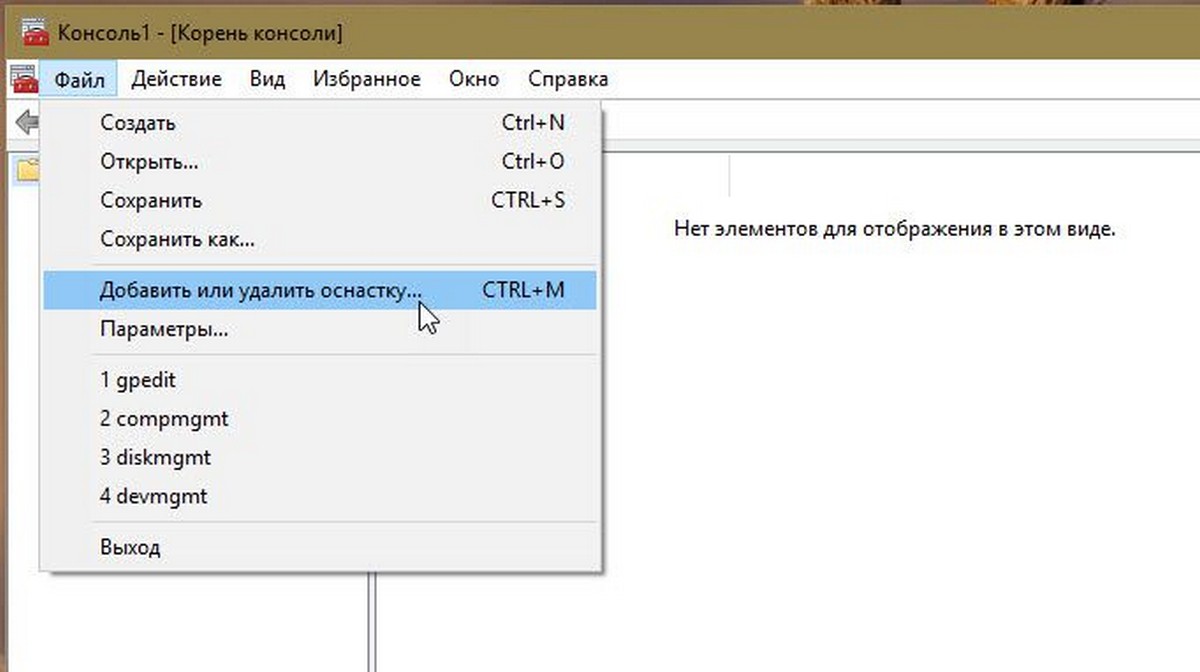
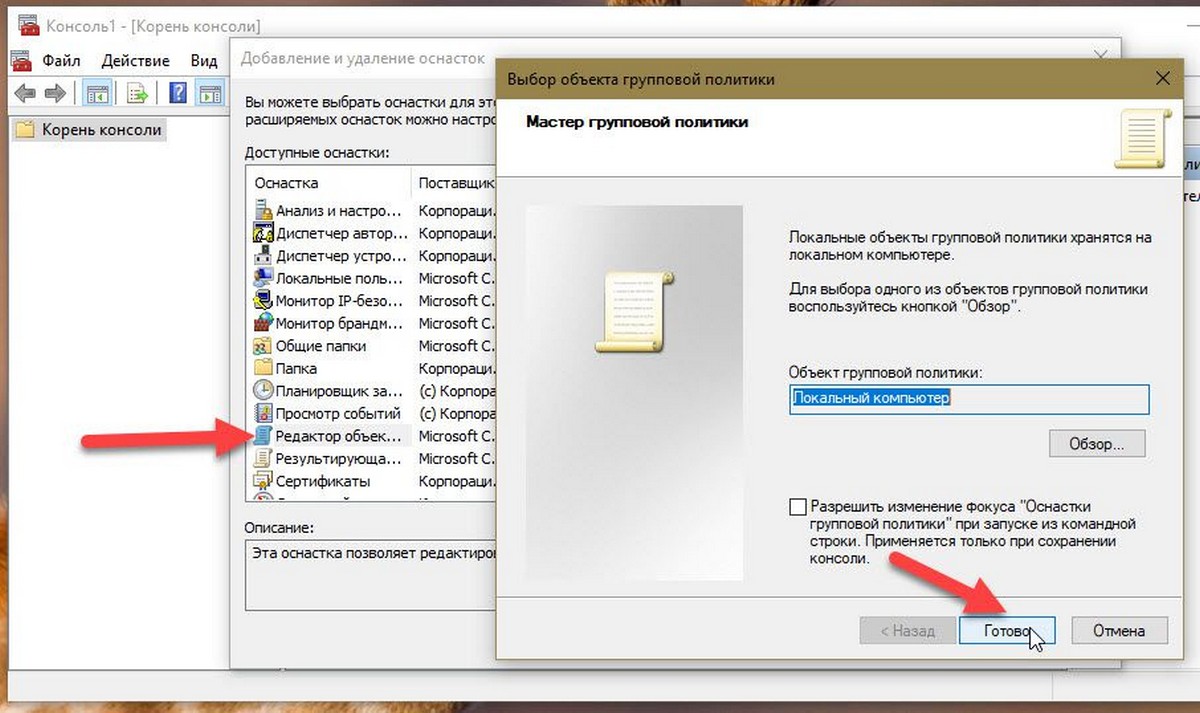
- В открывшимся диалоговом окне, дважды кликните «Редактор объектов групповой политики» и нажмите кнопку «Готово» и «ОК».
Открыть редактор локальной групповой политики в Windows 10 Home.
Как вы уже знаете, приложение Редактора локальной групповой политики доступно в Windows 10 Pro, Enterprise или Education. Пользователи Windows 10 Home не имеют доступа к gpedit.msc из-за ограничений ОС. Вот простое и элегантное решение, которое позволяет разблокировать его без установки сторонних приложений.
Существует простой способ включить Редактор локальных групповых политик в Windows 10 Home запустив всего лишь один пакетный файл.
Чтобы включить Gpedit.msc (групповая политика) в Windows 10 Home
- Загрузите следующий ZIP-архив: Скачать ZIP-архив.
- Распакуйте его содержимое в любую папку. Он содержит только один файл, gpedit_home.cmd
- Кликните правой кнопкой мыши по файлу.
- Выберите в контекстном меню «Запуск от имени администратора».
Все!
Пакетный файл вызовет DISM для активации редактора локальной групповой политики. Подождите, пока командный файл не завершит свою работу.
Помните, что некоторые политики не будут работать в Windows Home. Некоторые политики жестко заданы для версий Windows Pro. Кроме того, если вы активируете gpedit.msc с помощью предоставленного пакетного файла, изменение политик для отдельных пользователей не вступит в силу. Они по-прежнему требуют настройки реестра.
Вы можете самостоятельно создать пакетный файл. Прежде чем начать, рекомендуем создать точку восстановления системы, и вы могли в любой момент отменить произведенные изменения в системе.
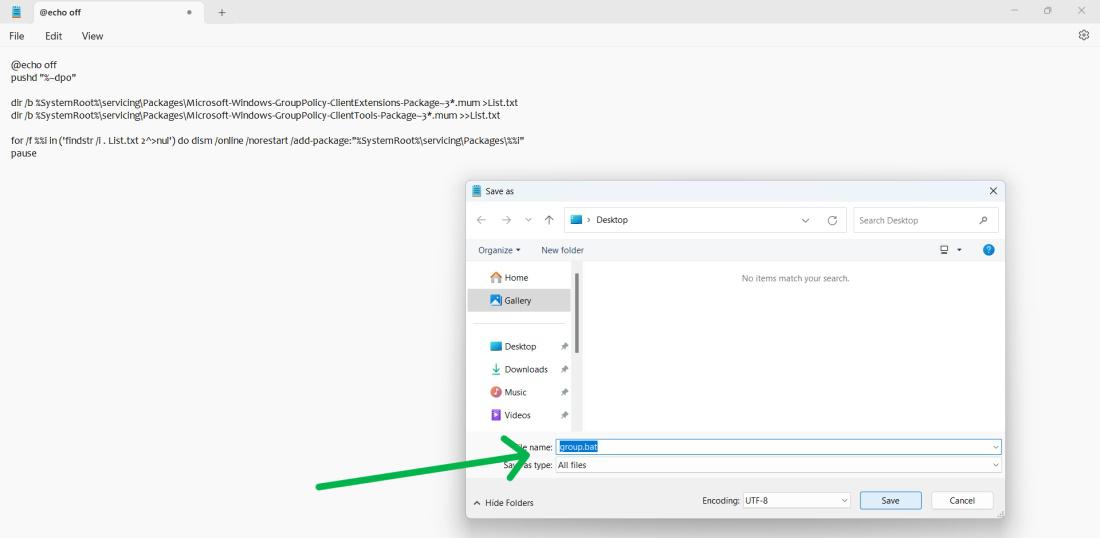
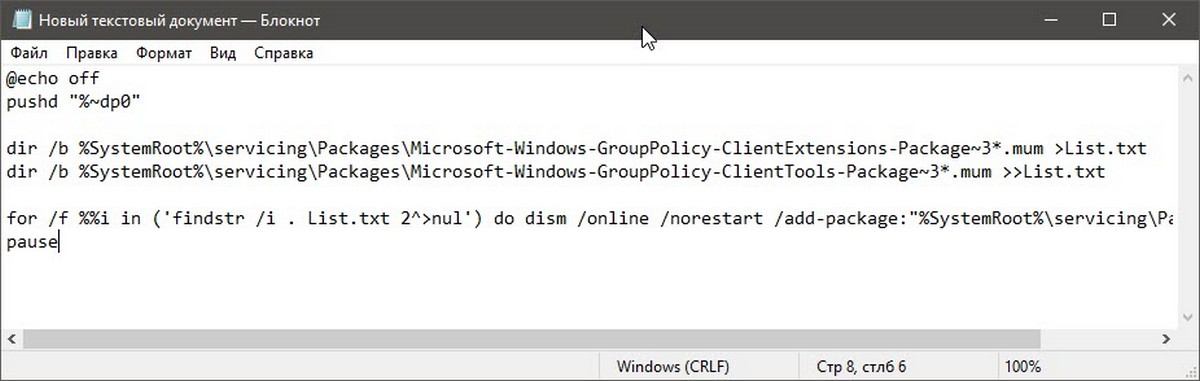
- Откройте текстовый редактор, например «Блокнот».
- Скопируйте и вставьте следующие строки:
@echo off
pushd "%~dp0"

dir /b %SystemRoot%\servicing\Packages\Microsoft-Windows-GroupPolicy-ClientExtensions-Package~3*.mum >List.txt
dir /b %SystemRoot%\servicing\Packages\Microsoft-Windows-GroupPolicy-ClientTools-Package~3*.mum >>List.txt

for /f %%i in ('findstr /i . List.txt 2^>nul') do dism /online /norestart /add-package:"%SystemRoot%\servicing\Packages\%%i"
pause
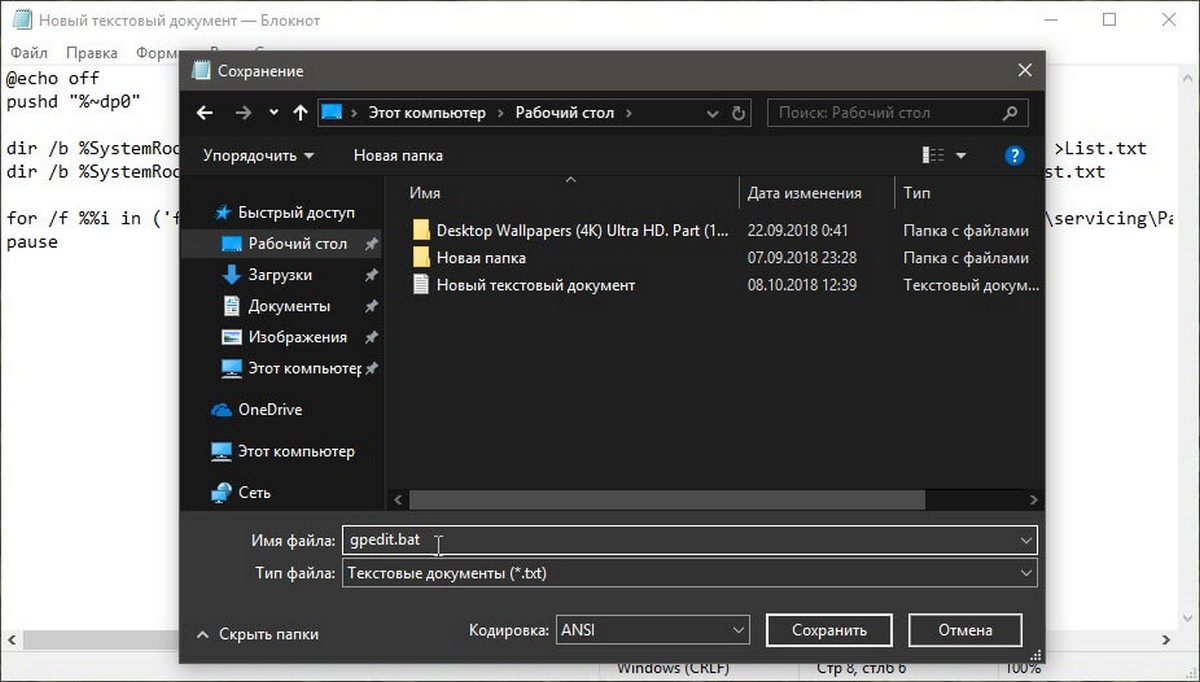
- В меню «Файл» текстового редактора выберите «Сохранить как» в диалоговом окне в строке «Имя файла» введите — gpedit.bat и нажмите кнопку «Сохранить».
- Запустите от имени Администратора полученный пакетный файл gpedit.bat
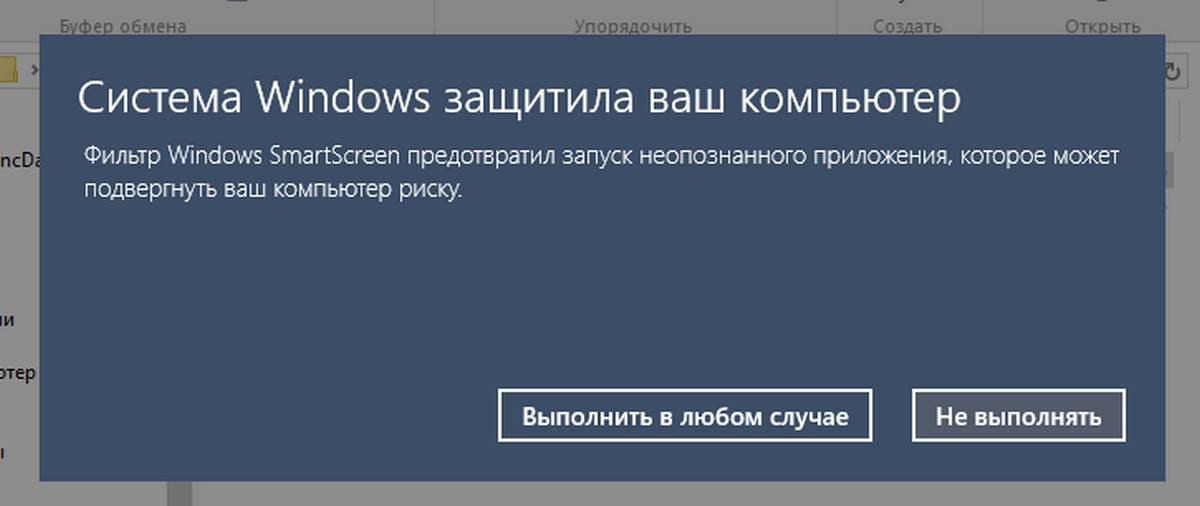
- При запросе фильтра Windows SmartScreen, нажмите «Подробнее», затем нажмите кнопку «Выполнить в любом случае».
- В окне Контроля учетных записей, нажмите кнопку «Да».
- Дождитесь пока утилита DISM внесет изменения и закройте окно.
Все! Редактор локальных групповых политик (gpedit.msc) включен и теперь Вы можете его запустить любым из описанных выше способов.
Policy Plus
Существует хорошая альтернатива встроенному приложению gpedit.msc, которое называется Policy Plus. Это стороннее приложение с открытым исходным кодом: PolicyPlus
Policy Plus предназначен для того, чтобы сделать параметры групповой политики доступными для всех.
- Редактор работает на всех выпусках Windows, не только на Pro и Enterprise
- Полностью соблюдает условия лицензирования
-
Просмотр и редактирование политик на основе реестра в локальных объектах групповой политики, объектах групповой политики для отдельных пользователей, отдельных файлах POL, автономных кустах пользователей реестра и действующем реестре
- Переход к политикам по идентификатору, тексту или отдельным записям реестра.
- Просмотр дополнительной технической информации об объектах (политики, категории, продукты)
- Удобные способы изменить и импортировать настройки политики
Рекомендуем:
- Как Windows 10 вернуть настройки локальной групповой политики по умолчанию.
- 12 способов открыть редактор локальной групповой политики в Windows 11
The Local Group Policy Editor enables a power user to control a large number of settings in Windows. You can control the sign-in and shutdown processes, the features and the apps that users are allowed to access, and you can do so using a simple interface that offers lots of information. The tool itself is rather hidden from view and before using it, you obviously need to know how to get to Local Group Policy Editor in Windows 10 and Windows 11. We have put together a comprehensive list of methods for accessing it, so that you can choose the one that is most convenient:
Where is the Local Group Policy Editor in Windows? I can’t find it!
The Local Group Policy Editor is a tool aimed at power users of Windows. You can find lots of information about using the tool in this article: What is the Local Group Policy Editor, and how do I use it?
If you try the methods below and the Local Group Policy Editor doesn’t show up, you may have a version of Windows that doesn’t come with the tool. By default, you can find the editor only in:
- Windows 11 Pro and Windows 11 Enterprise
- Windows 10 Pro and Windows 10 Enterprise
- Windows 7 Professional, Windows 7 Ultimate, and Windows 7 Enterprise
- Windows 8.1 Professional and Windows 8.1 Enterprise
Although the process isn’t covered in this article, there are ways to install the Local Group Policy Editor on Windows Home editions as well. If you do not know your Windows version, read this tutorial: How to tell what Windows I have (11 ways).
NOTE: This article covers Windows 11 and Windows 10. Still, many of the methods described below are valid for older versions of Windows as well.
Editing policies globally versus editing policies for specific users or groups
If you have other users on your Windows computer (for example other family members), you can control what kinds of changes they can make and what applications they can run. Before you open the Local Group Policy Editor, you first need to decide whether you want the changes to apply to all users (including yourself) or only to specific users or groups of users (for example non-administrators) on your computer. The process of opening the Local Group Policy Editor is going to be very different, depending on your objective.
First, let’s see how you can open the editor if you want to apply the changes to all users.
NOTE: You need to have administrative privileges in order to be able to access the Local Group Policy Editor. If you try opening it as a regular user, you get this error:
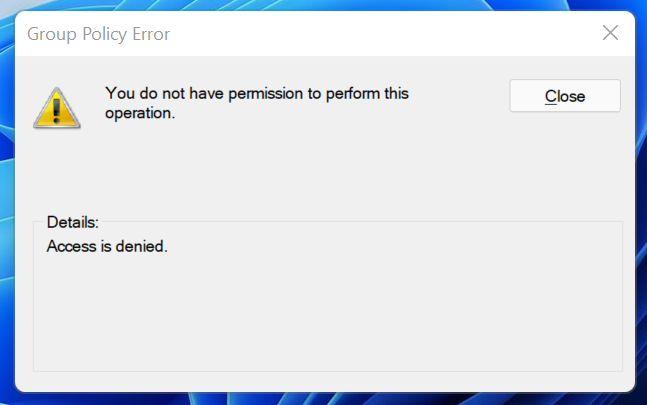
Only users with administrative rights can use the Local Group Policy Editor
Opening the Local Group Policy Editor to change settings for all users
If you want the settings that you modify to affect all users of the computer (or if you want to modify settings related to the computer itself), here are all the ways you can open the Local Group Policy Editor:
1. Open Local Group Policy Editor using Windows Search
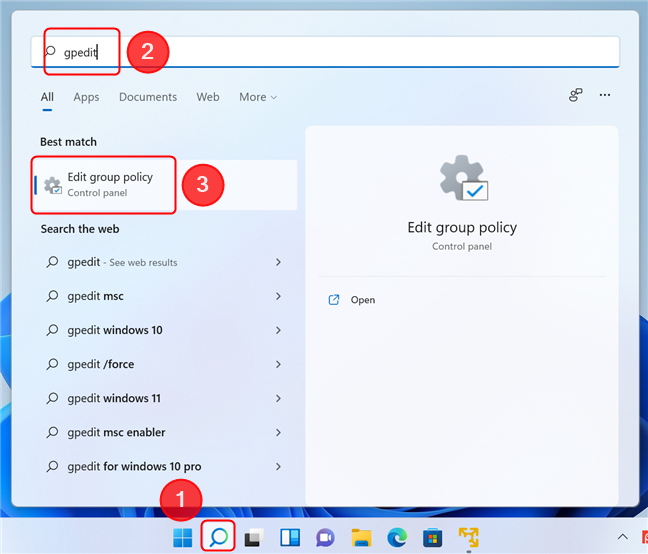
The first method of opening the Local Group Policy Editor is pretty simple: you have to search for it by name or by the name of its executable file: gpedit.msc. For Windows 11, press Windows + S on your keyboard or click/tap on the magnifier icon on your taskbar to open the Search window. Then, type either gpedit or group policy, and the result should show up as you type. Click or tap on the “Edit group policy” result.
Open the Local Group Policy Editor using Search in Windows 11
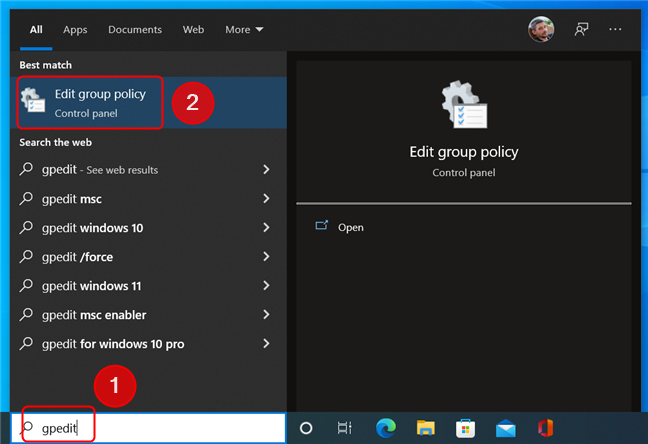
Are you wondering how to find Local Group Policy Editor In Windows 10? Well, the process is even simpler in this case, since this popular operating system has a search field in its taskbar. Just click or tap on the input field (or press Windows + S) and then type gpedit or group policy. In the results list, click or tap on “Edit group policy.”
TIP: You can use the Start Menu to initiate a search, as well. Simply open it by pressing the Windows key or clicking the Start Menu icon on the taskbar, then start typing the keyword.
2. Open the Local Group Policy Editor from Settings
Open the Local Group Policy Editor using Search in Windows 10
You can also access the Local Group Policy Editor from the Settings app in Windows 11 or Windows 10. First, open Settings (one way to do it is by pressing Windows + I on your keyboard), then type gpedit in the search box and select the “Edit group policy” result. Here’s how it looks on Windows 11:
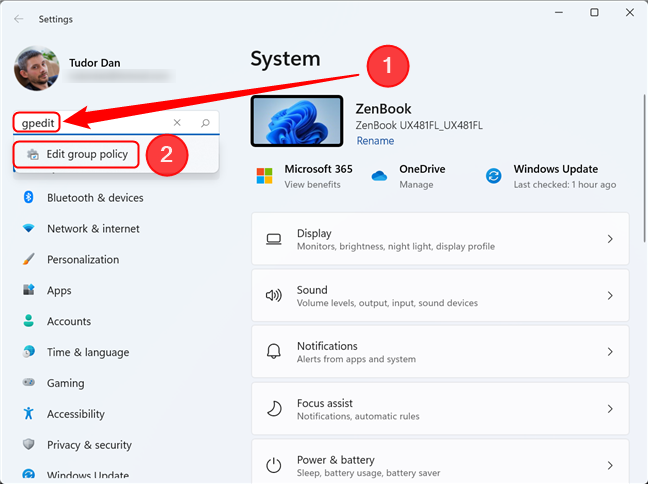
Open the Local Group Policy Editor from Settings in Windows 11
…and here’s how it looks on Windows 10. Very similar.
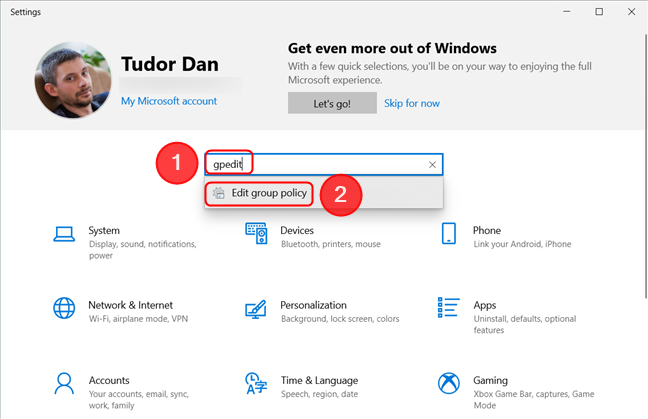
Open the Local Group Policy Editor from Settings in Windows 10
3. Create a shortcut for Local Group Policy Editor
If you want to access the editor very frequently but prefer to use desktop shortcuts, then you can create one for Local Group Policy Editor. In the Create Shortcut wizard, type gpedit.msc in the Location field. If you don’t know how to create shortcuts, read this article: How to create shortcuts for files, folders, apps, and web pages in Windows.
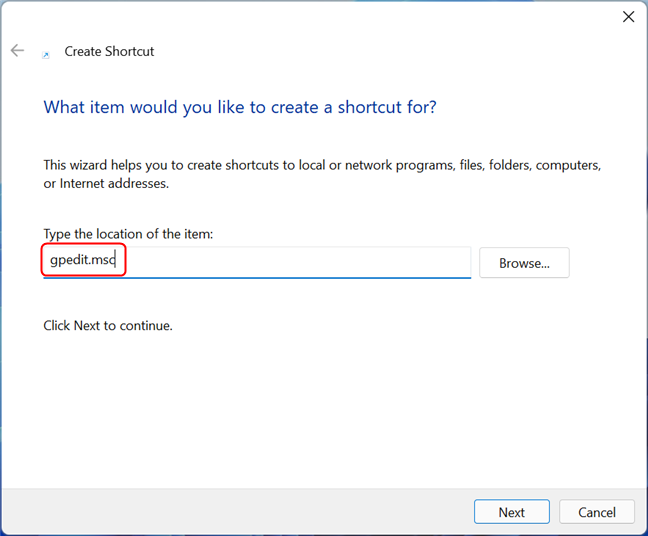
Create a shortcut to the Local Group Policy Editor in Windows
After creating it, you can open Local Group Policy Editor by double-clicking or double-tapping on the shortcut.
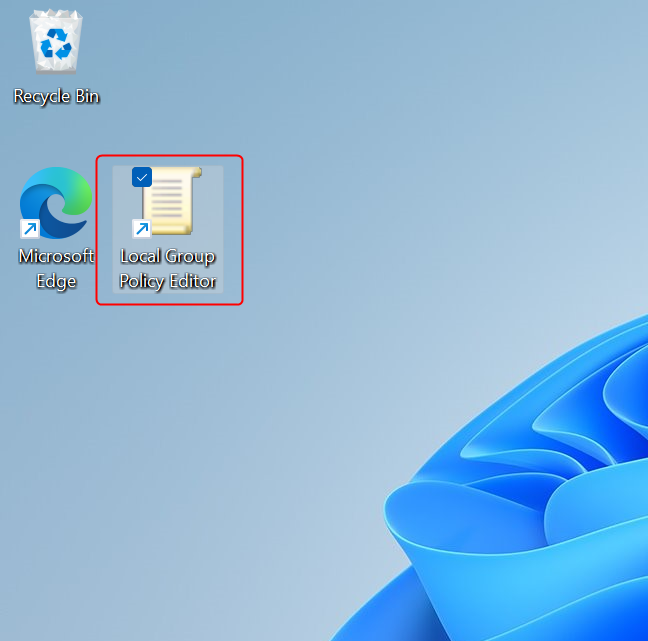
The Local Group Policy Editor shortcut
4. Pin the Local Group Policy Editor to the taskbar or the Start Menu
If you use the Local Group Policy Editor frequently, you can pin it to the taskbar or the Start Menu, but first, you need to create a shortcut for the editor. After creating it, in Windows 11, right-click or tap and hold the icon. Next, access the old right-click menu by selecting “Show more options”. Then, click or tap on one of the two actions, depending on what you want to do.
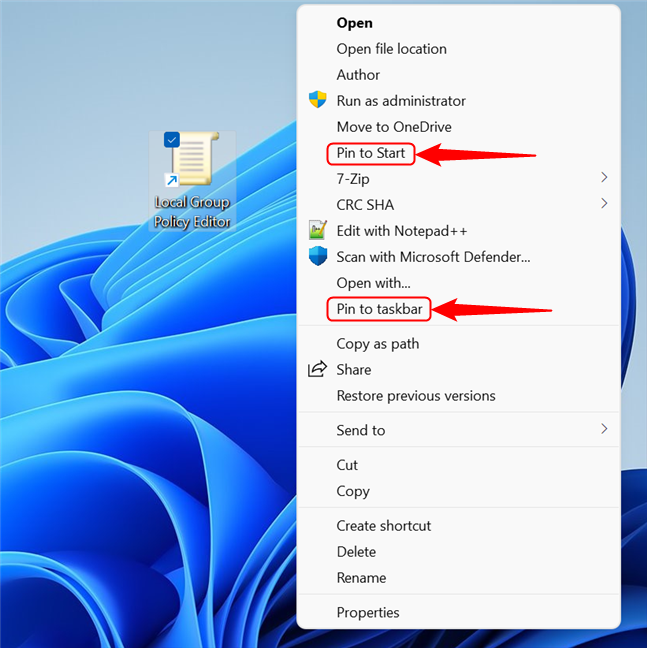
Select one of the two options if you want to pin the shortcut in Windows 11
In Windows 10, since the classic right-click menu is the default, simply right-click (or tap and hold) on the shortcut and select Pin to Start or Pin to taskbar.
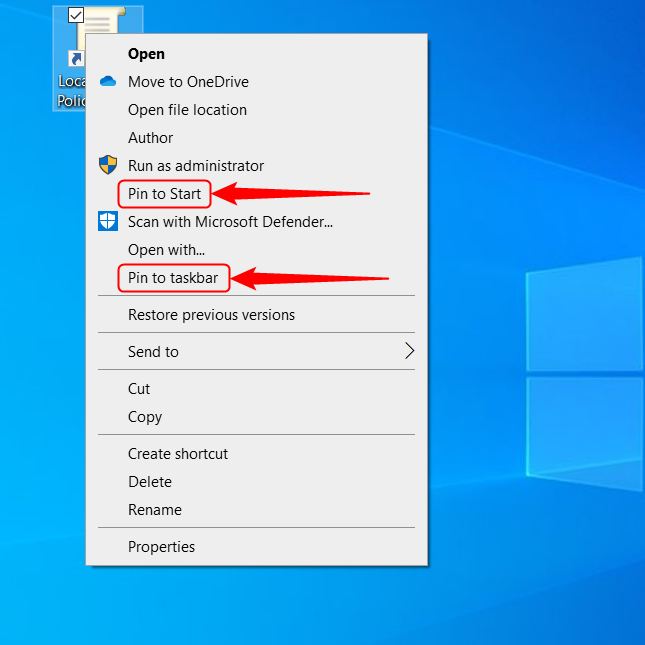
Pinning the Local Group Policy editor is easier in Windows 10
From now on, you can open Local Group Policy Editor from the Start Menu or the taskbar.
5. Opening the Local Group Policy Editor from Control Panel
Local Group Policy Editor is also available through the Control Panel. First, open the Control Panel. Then, click on the search box, type “group policy” and click or tap on Edit group policy in the results list.
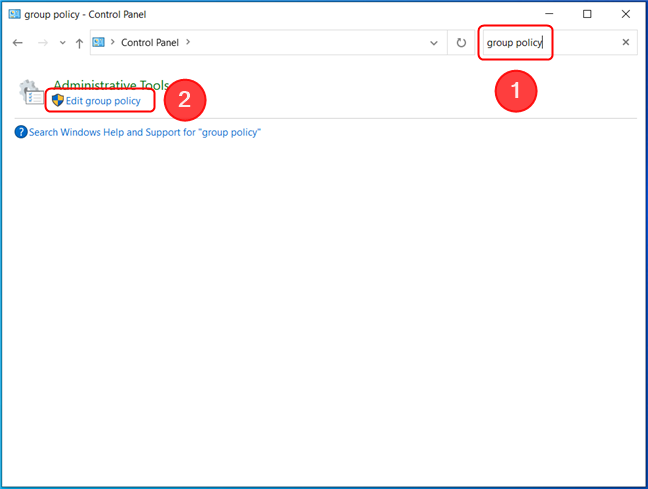
Open Local Group Policy Editor from the Control Panel
NOTE: Although Windows lists the search result under Administrative tools (in Windows 10) or Windows tools (in Windows 11), if you open the location, the Edit group policy shortcut is not there. Thus, the only way to reach it in the Control Panel is to use the search feature.
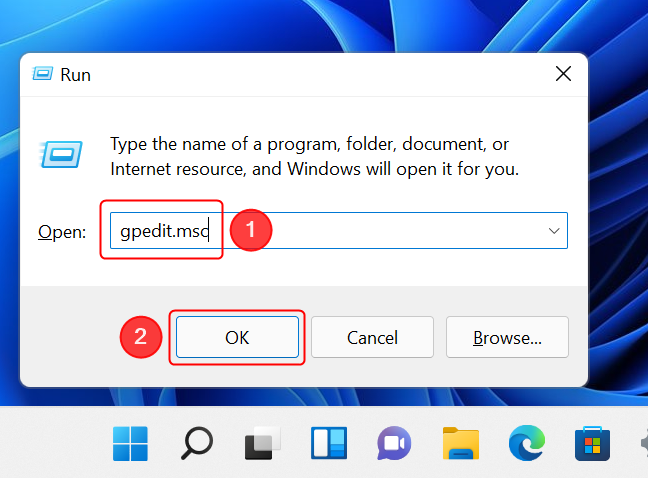
6. Open Local Group Policy Editor by using the Run window
Here’s another way to open Local Group Policy Editor: Press Windows + R on the keyboard to open the Run window. Then, type gpedit.msc and press Enter on the keyboard or click OK.
Open the Local Group Policy Editor using Run
7. Open Local Group Policy Editor by using Command Prompt, PowerShell or Windows Terminal
You can also use Command Prompt, PowerShell, or Windows Terminal to open the editor. In any of these apps, type gpedit.msc in the command line and press Enter.
The command is identical for Command Prompt and PowerShell
8. Open Local Group Policy Editor by using Task Manager
You can open Local Group Policy Editor using the Task Manager. Launch Task Manager (a quick way to do it is by pressing Ctrl + Shift + Esc on your keyboard). If you are presented with the compact view of the Task Manager, press More details in the bottom-left corner. Next, open the File menu and click or tap “Run new task”.
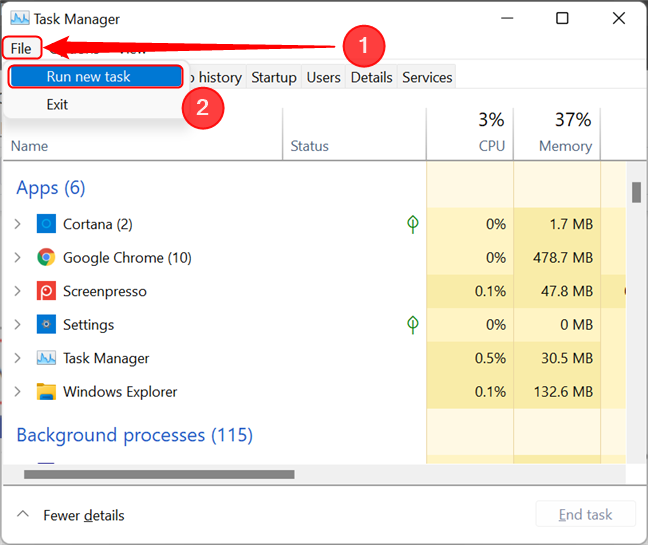
Run a new task in Task Manager
Now, type gpedit.msc in the Open field of the “Create new task” window. Press Enter or OK to run the command.
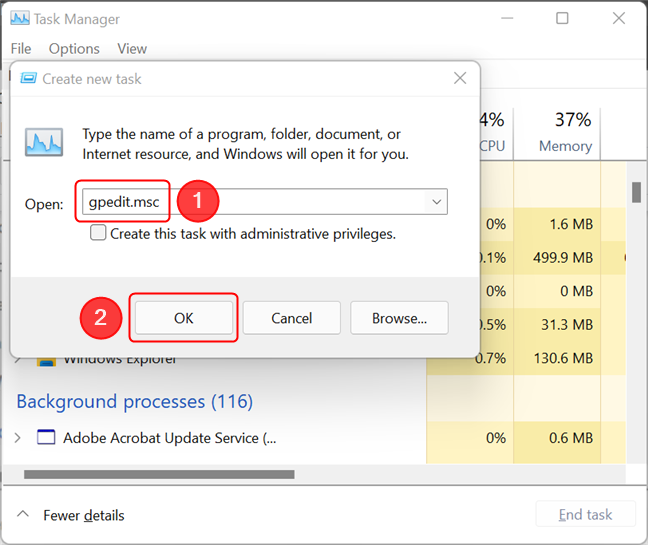
Opening the Local Group Policy Editor from the Task Manager
9. Open Local Group Policy Editor by using File Explorer
The File Explorer from Windows 11 and Windows 10 is another convenient way to start the Local Group Policy Editor. Simply open File Explorer, then type gpedit.msc in the address bar and press Enter on the keyboard.
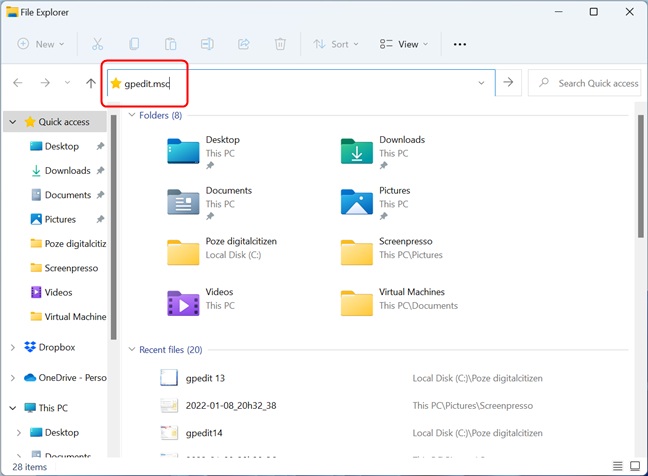
Run the Local Group Policy Editor from File Explorer in Windows 11 and Windows 10
10. Open Local Group Policy Editor by running its executable file
On both Windows 11 and Windows 10, the Local Group Policy Editor executable file is found in the System32 subfolder of the Windows folder. Navigate to “C:\Windows\System32” and look for a file named gpedit. If you hover your mouse cursor over the file, its description should be “Microsoft Common Console Document”. Once you identified the correct file, double-click or double-tap on it.
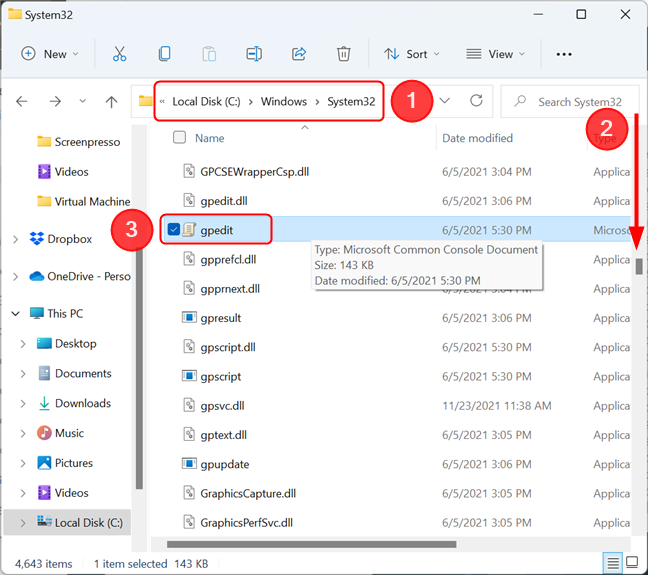
The file is located in the System32 folder
Opening the Local Group Policy Editor to change settings for specific users or groups
If you want to adjust settings only for a specific user account or user group on your Windows PC, launching the Local Group Policy Editor is more complicated and begins with launching the Microsoft Management Console. The quickest way to do this is by pressing Windows + R to open the Run window, typing mmc and pressing Enter. If you get a UAC warning, press Yes to continue. In the MMC window that appears, open the File menu, then click or tap on Add/Remove Snap-in.
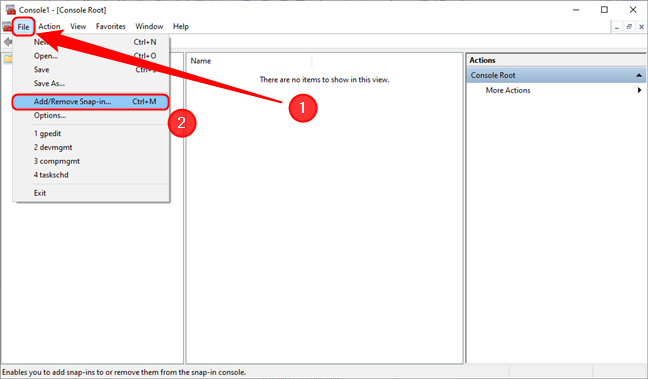
Add a snap-in in the Microsoft Management Console
The Add or Remove Snap-ins window appears. Here, click or tap on Group Policy Object Editor, then press Add. Alternatively, you can double-click the Group Policy Object Editor snap-in.
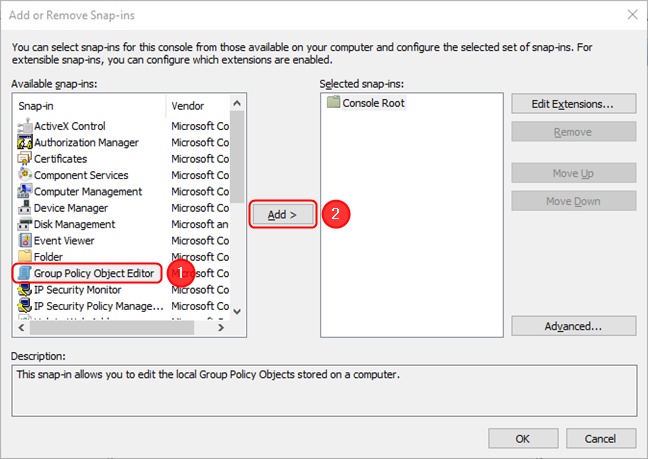
Select the Group Policy Object Editor, then press Add
This opens the Select Group Policy Object wizard. Click or tap on Browse to continue.
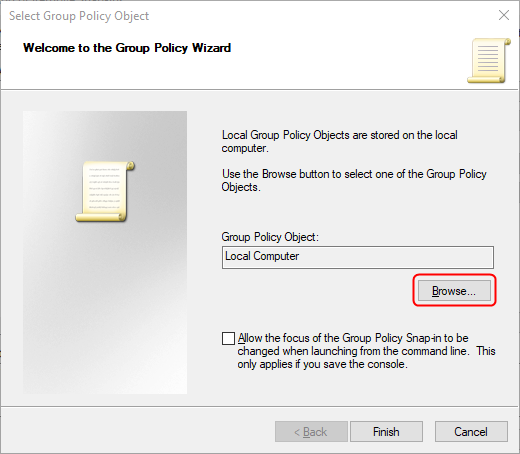
Hit Browse in the wizard
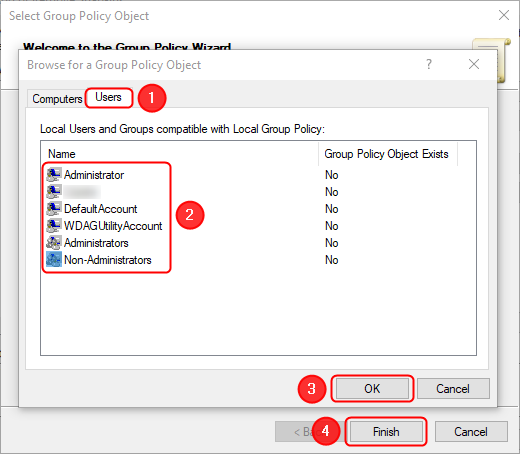
In the next window, go to the Users tab, select the user or the group of users for which you want to make changes (we selected the Non-Administrators group), then click or tap on OK afterward. Finally, press Finish.
Selecting the user or the group for which you want to change settings
The Add or Remove Snap-ins window comes into focus. Press the OK button in the lower-right. This opens the settings tree applicable to the selected user/group.
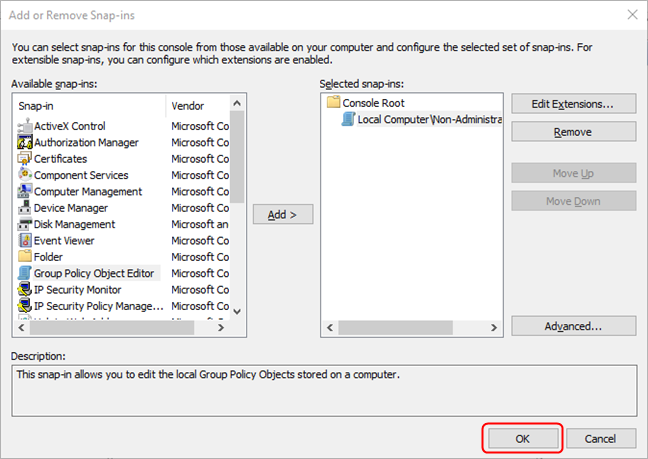
Press OK and the Editor will appear
If you plan on changing the settings frequently, in order to bypass this lengthy process, you can save the console settings. Open the File menu, then click or tap on Save as.
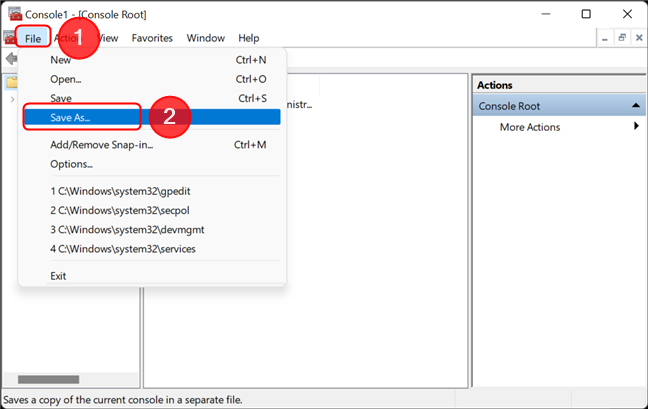
Save the console configuration for the Local Group Policy Editor
Next, navigate to the location where you want a shortcut to the console to be created, rename the shortcut, and click or tap on Save.
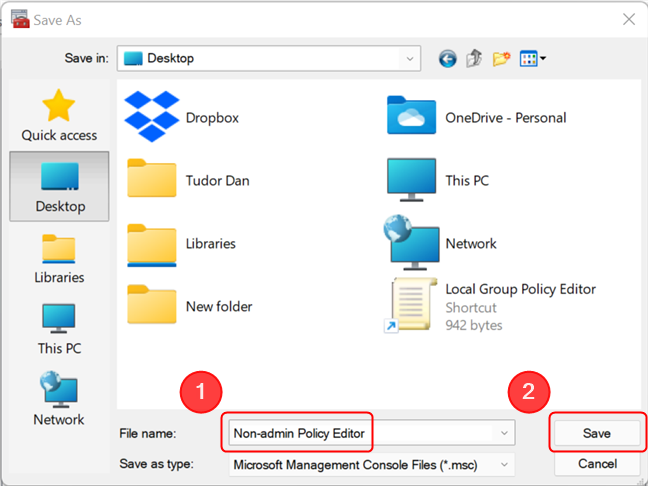
Rename the shortcut and place it in a folder of your choosing
The next time you want to modify the settings for the same user or group, simply double-click or double-tap the newly-created icon.
NOTE: The settings you alter in the Local Group Policy Editor will be enforced and will override the user’s preferences. For example, you can enforce a certain wallpaper, in which case the user will have no way of changing it (unless it has access to Local Group Policy Editor).
What do you plan to change in the Local Group Policy Editor?
Local Group Policy Editor is a powerful tool designed for power users and IT administrators. You get to control many aspects of how the other users access and use your Windows PC. What do you plan to change in the Local Group Policy Editor? Let us know your preferences in a comment below. Also, if you know any other ways of opening the editor, share them with us and we will update the article.
В этой статье мы расскажем о простых и доступных способах открытия Редактора групповых политик в Windows 10 Pro и Enterprise. По умолчанию этот инструмент для тонкой настройки Windows не доступен в домашней редакции (Home).
С помощью кнопки или строки поиска на панели задач Windows 10
В Windows 10 на панели задач можно встретить кнопку поиска в виде лупы или строки с текстом «Введите здесь текст для поиска».
- Нажмите на кнопку поиска.
- Начните набирать текст
групп. - Windows установит лучшее соответствие и первым вариантом предложит приложение «Изменение групповой политики».
- Нажмите на предложенный вариант. После этого откроется окно Редактора локальной групповой политики.

C помощью адресной строки в проводнике
Еще один вариант открытия Редактора локальной групповой политики из любой папки.
- Откройте приложение «Проводник» (Explorer) или просто щелкните по ярлыку «Мой компьютер» на рабочем столе. Также можно нажать на клавиатуре кнопку с логотипом Windows + E.
- В адресной строке начните вводить текст
gpedit.msc - Нажмите кнопку Enter.

С помощью приложения «Выполнить»
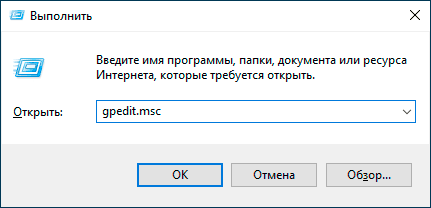
- Запустите приложение «Выполнить» (нажмите на клавиатуре кнопку с логотипом Windows + R ).
- Введите текст
gpedit.msc. - Нажмите кнопку «ОК».

А какой вариант открытия Редактора локальной групповой политики используете вы?
Напишите в комментариях о своих способах 😉