
Все способы:
- Вход в БИОС на MSI
- Решение проблем со входом в BIOS/UEFI
- Вопросы и ответы: 8
Компания MSI выпускает различную компьютерную продукцию, среди которой есть полноценные десктопные ПК, моноблоки, ноутбуки и материнские платы. Владельцам того или иного устройства может понадобиться войти в BIOS для изменения каких-либо настроек. При этом в зависимости от модели системной платы клавиша или их комбинация будет отличаться, в связи с чем общеизвестные значения могут не подойти.
Процесс входа в BIOS или UEFI для MSI практически ничем не отличается от других устройств. После того как вы включите ПК или ноутбук, первым делом отобразится заставка с логотипом компании. В этот момент нужно успевать нажать клавишу для входа в BIOS. Лучше всего делать краткие быстрые нажатия, чтобы наверняка попасть в настройки, однако действенным оказывается и длительное удерживание клавиши вплоть до отображения главного меню БИОС. Если вы пропустите момент, когда ПК отзывчив к вызову BIOS, загрузка пойдет дальше и придется снова перезагружаться, чтобы повторить вышеописанные действия.
Основными клавишами для входа являются следующие: Del (она же Delete) и F2. Эти значения (преимущественно Del) применимы и к моноблокам, и к ноутбукам этого бренда, а также к материнским платам с UEFI. Реже актуальной оказывается F2. Разброс значений здесь небольшой, поэтому каких-то нестандартных клавиш или их комбинаций не встречается.
Материнские платы MSI могут быть встроены в ноутбуки других производителей, например, как сейчас это практикуется с лэптопами HP. В этом случае процесс входа меняется обычно на F1.
Читайте также: Входим в BIOS на ноутбуке HP
Вы также можете посмотреть клавишу, которая отвечает за вход, через руководство пользователя, скачанное с официального сайта MSI.
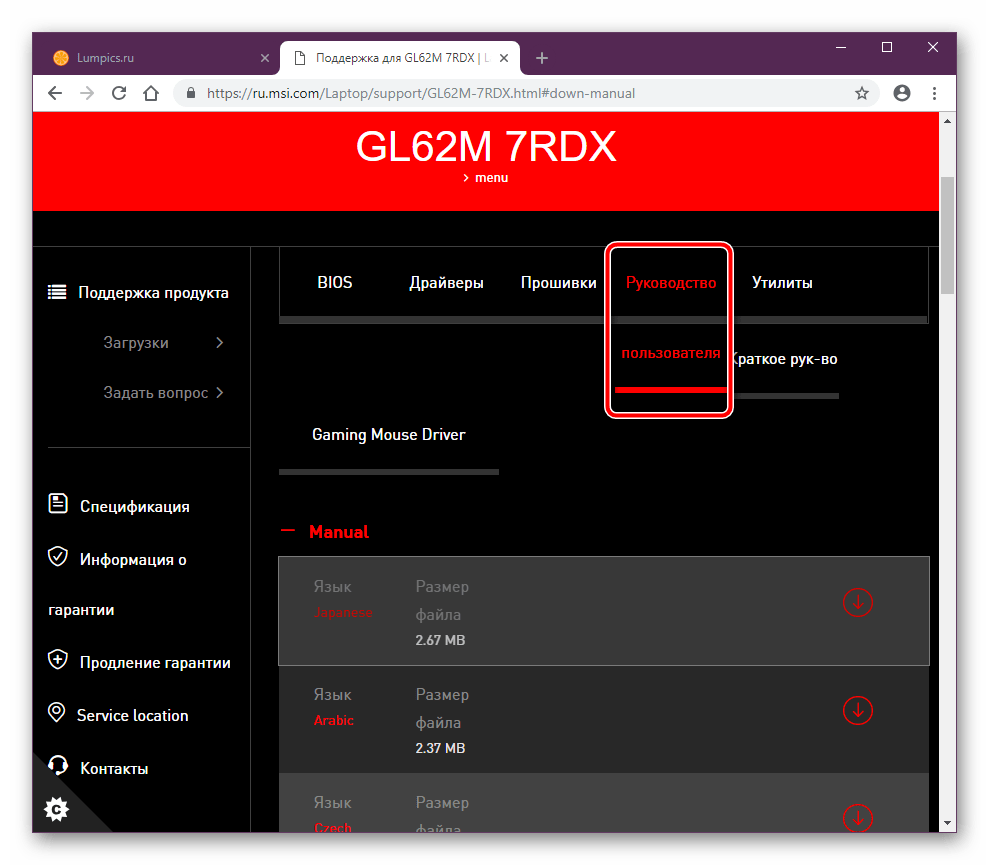
Перейти в раздел поддержки на сайте MSI
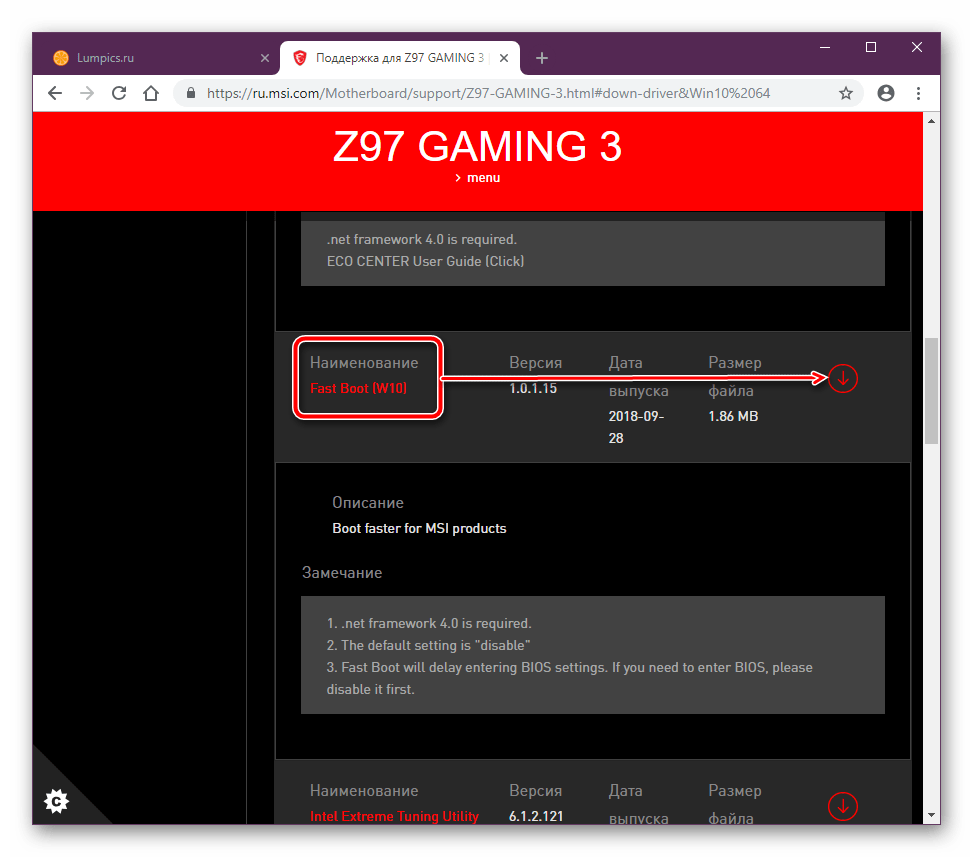
- Используя ссылку выше, вы можете попасть на страницу с загрузками технической информации и данных с официального ресурса МСИ. Во всплывающем окне укажите модель вашего устройства. Ручной выбор здесь работает не всегда корректно, однако если у вас не наблюдается с ним проблем, используйте этот вариант.
- На странице продукта переключитесь на вкладку «Руководство пользователя».
- Найдите предпочитаемый язык и напротив него кликните по иконке скачивания.
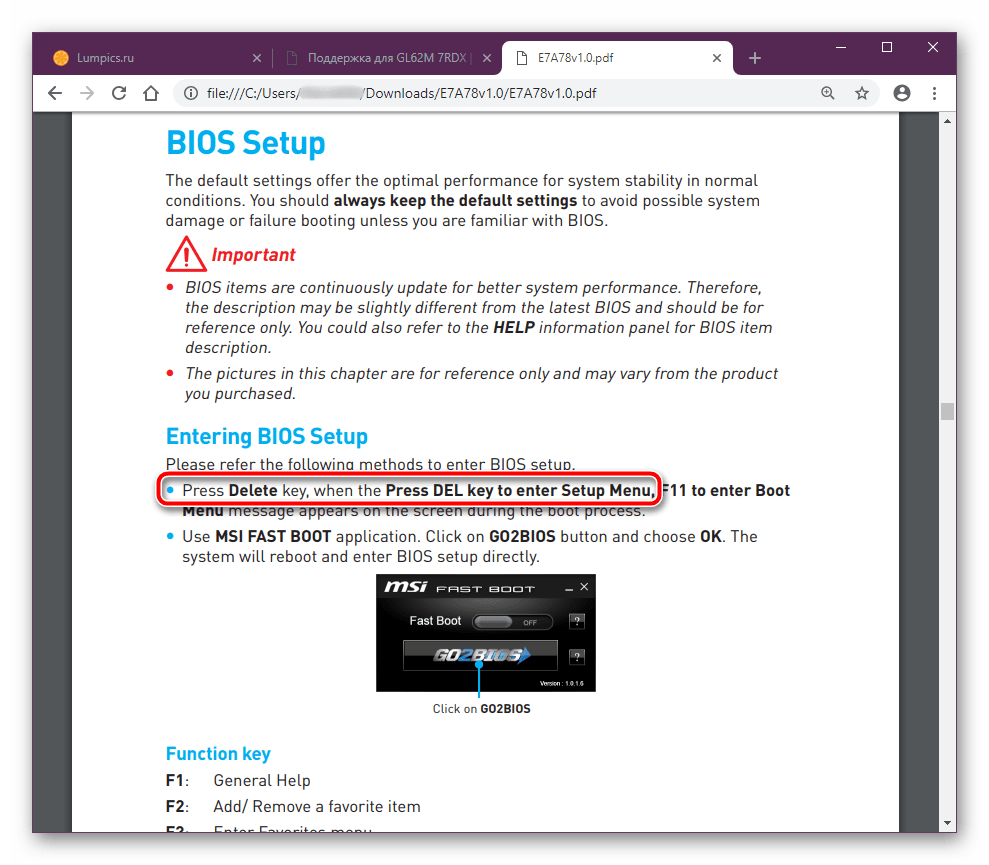
- После загрузки распакуйте архив и откройте PDF. Это можно сделать прямо в браузере, так как многие современные веб-обозреватели поддерживают просмотр ПДФ.
- Найдите в документации раздел BIOS через оглавление или поиск по документу при помощи сочетания клавиш Ctrl + F.
- Посмотрите, какая клавиша назначена для конкретной модели устройства и воспользуйтесь ей при следующем включении или перезагрузке ПК.


Естественно, если материнская плата MSI встроена в ноутбук другого производителя, искать документацию понадобится на сайте той компании. Принцип поиска аналогичен и различается незначительно.
Решение проблем со входом в BIOS/UEFI
Нередки ситуации, когда войти в БИОС не удается, просто нажав нужную клавишу. Если никаких серьезных неполадок, требующих аппаратного вмешательства, нет, но попасть в BIOS вы все же не можете, возможно, ранее в его настройках был включена опция «Fast Boot» (быстрая загрузка). Основное предназначение этой опции заключается в управлении режимом запуска компьютера, позволяя пользователю вручную ускорять этот процесс или делать его стандартным.
Читайте также: Что такое «Quick Boot» («Fast Boot») в BIOS
Для его отключения используйте утилиту с идентичным названием от MSI. Помимо переключателя опции быстрой загрузки в ней есть функция, выполняющая автоматический вход в БИОС при следующем включении ПК.
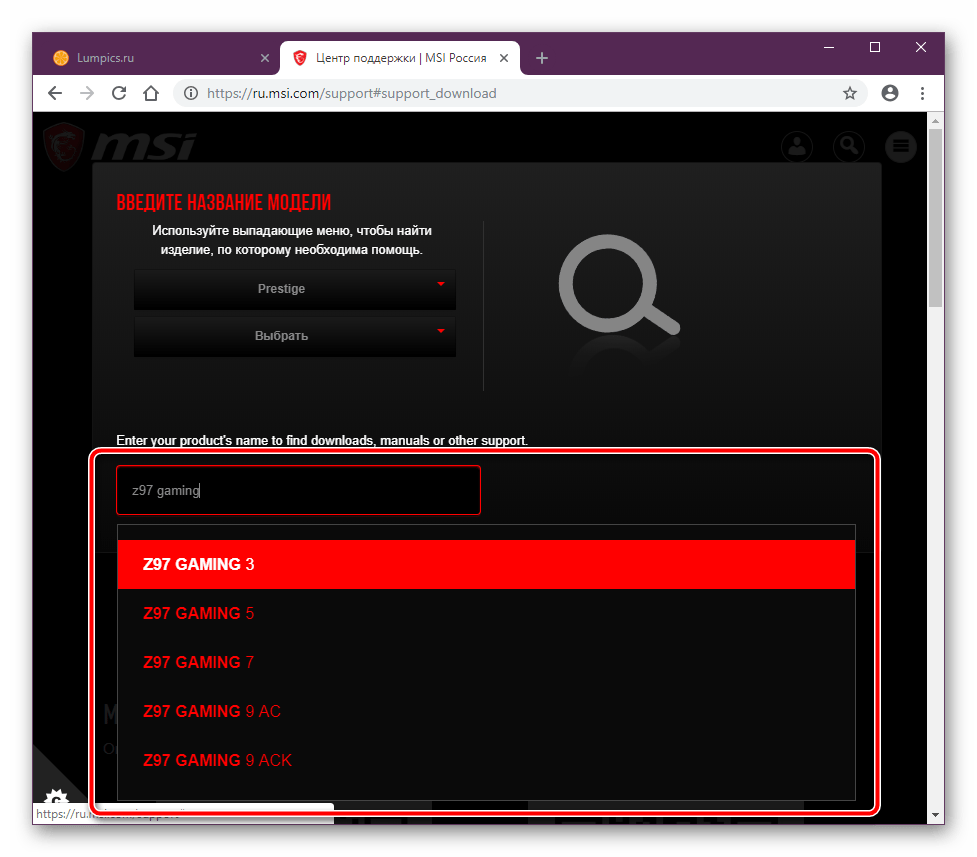
Решение предназначено для материнских плат, поэтому нужно выполнять поиск по установленной в ваш ПК/ноутбук модели. Утилита MSI Fast Boot есть не для всех материнских плат этого производителя.
Перейти в раздел поддержки на сайте MSI
- Зайдите на сайт MSI по ссылке выше, в поисковое поле введите модель вашей системной платы и из выпадающего списка выберите нужный вариант.
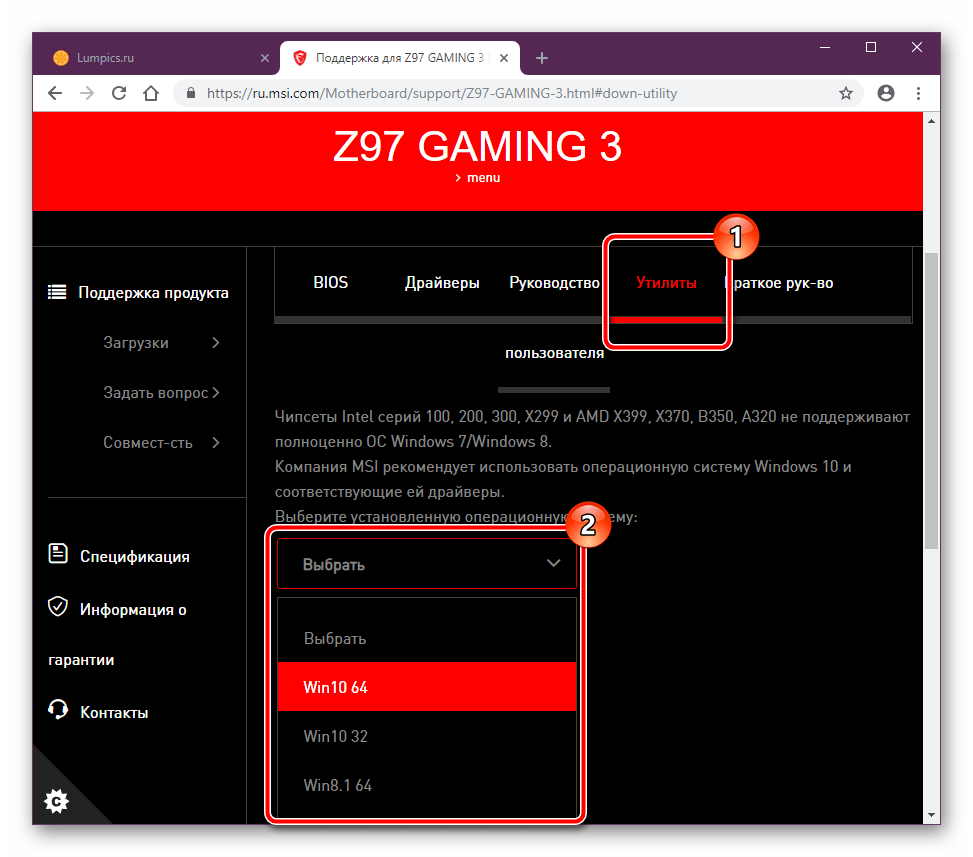
- Находясь на странице комплектующего, перейдите на вкладку «Утилиты» и укажите версию своей операционной системы.
- Из списка найдите «Fast Boot» и нажмите на иконку скачивания.
- Распакуйте ZIP-архив, установите и запустите программу.
- Отключите режим «Fast Boot» кнопкой в виде переключателя на «OFF». Теперь вы можете перезагрузить ПК и зайти в БИОС клавишей, указанной в первой части статьи.
- Альтернативным вариантом является использование кнопки «GO2BIOS», при которой компьютер во время следующего запуска сам перейдет в БИОС. Отключать быструю загрузку при этом не нужно. Словом, этот вариант подходит для единичного входа через перезапуск ПК.
Когда описанная инструкция не приносит желаемого результата, скорее всего, проблема является следствием неправильных действий пользователя или сбоев, произошедших по тем или иным причинам. Наиболее эффективным вариантом будет сброс настроек, естественно, способами в обход возможностей самого BIOS. Читайте о них в другой статье.
Подробнее: Сбрасываем настройки BIOS
Не лишним будет ознакомиться с информацией о том, что может повлиять на утрату работоспособности BIOS.
Подробнее: Почему не работает BIOS
Ну а если вы столкнулись с тем, что дальше логотипа материнской платы загрузка не идет, пригодиться может следующий материал.
Подробнее: Что делать, если компьютер зависает на логотипе материнской платы
Попасть в BIOS/UEFI может быть проблематично владельцам беспроводных или частично неработающих клавиатур. На этот случай есть решение по ссылке ниже.
Подробнее: Входим в BIOS без клавиатуры
На этом мы завершаем статью, если у вас сохранились трудности со входом в БИОС или УЕФИ, пишите о своей проблеме в комментариях, а мы постараемся помочь.
Наша группа в TelegramПолезные советы и помощь
Доброго времени!
Производитель MSI…
Если говорить в целом, — то производитель не «исхитряется» и проблем с настройкой BIOS его ноутбуков возникает куда реже, чем у некоторых других… 🙂
Однако, вопросы поступают (с регулярностью), и я решил набросать неск. «подсказок» в своей небольшой заметке (тем паче, что по продажам MSI за последний год вырос на нашем рынке… а значит тенденция пока не изменится).
Итак, перейдем к делу…
*
Ноутбуки MSI: варианты войти в BIOS
📌❶ Первый
👉 В подавляющем большинстве ноутбуков MSI, которые сегодня в обиходе, — основными клавишами для входа в BIOS явл. DEL и F2 (посл. реже.). Нажимать одну из них нужно сразу же после включения ноутбука (а лучше жать непрерывно)! Кстати, эти клавиши применимы и к ноутбукам, и к моноблокам!
Важно: если у вас не получается открыть настройки BIOS — попробуйте выключить ноутбук, затем зажать клавишу Delete (или F2) и включить ноутбук. Через 2-5 сек. — должно появиться меню BIOS (на этом этапе клавишу можно будет отпустить…).
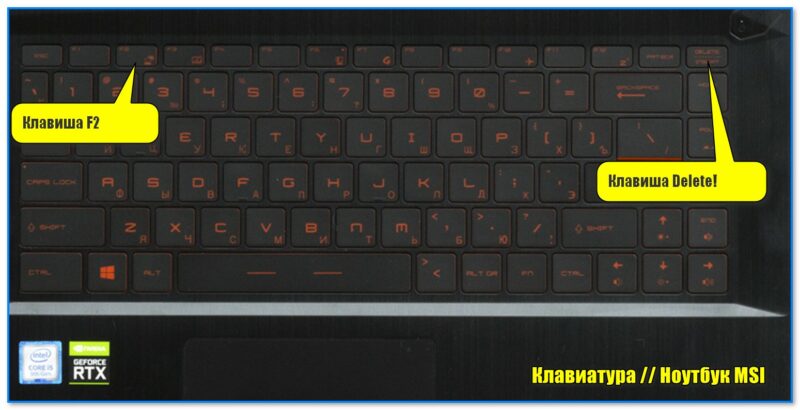
Ноутбук MSI — клавиатура, вид сверху
Также можно попробовать подкл. проводную внешнюю клавиатуру и на ней нажать заветную клавишу.
*
👉 Кстати!
Если вам нужен BIOS для того, чтобы установить Windows, — можно попробовать воспользоваться BOOT Menu (клавиша F11 при вкл. устройства) и из него выбрать загрузочный носитель (флешку).
*
📌❷ Второй
Ссылка на офиц. сайт: https://ru.msi.com/support/nb
Если первый способ не сработал — рекомендую (настоятельно) открыть офиц. сайт MSI, ввести в поисковую строку свою модель ноутбука, и перейти в раздел документации. См. скрины ниже. 👇

Указываем модель устройства и заходим в спецификацию
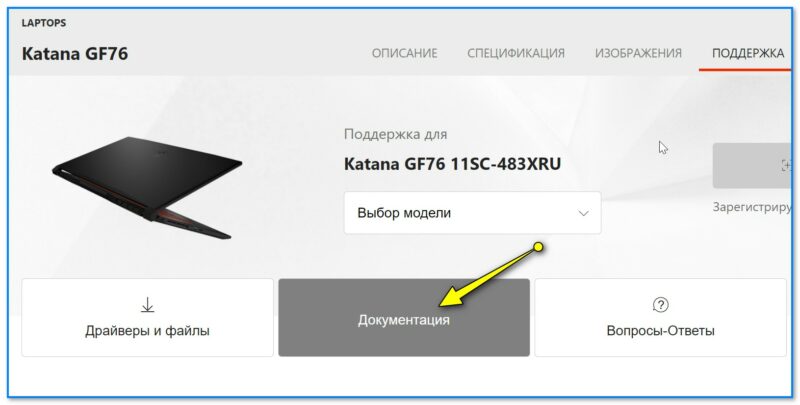
Далее открываем спецификацию
Далее загрузить спецификацию к своему устройству и в ней найти страницу с руководством по работе в BIOS (UEFI). В моем случае для ноутбука модификации MSI GF76 Katana — указана клавиша Delete (т.е. стандартная).
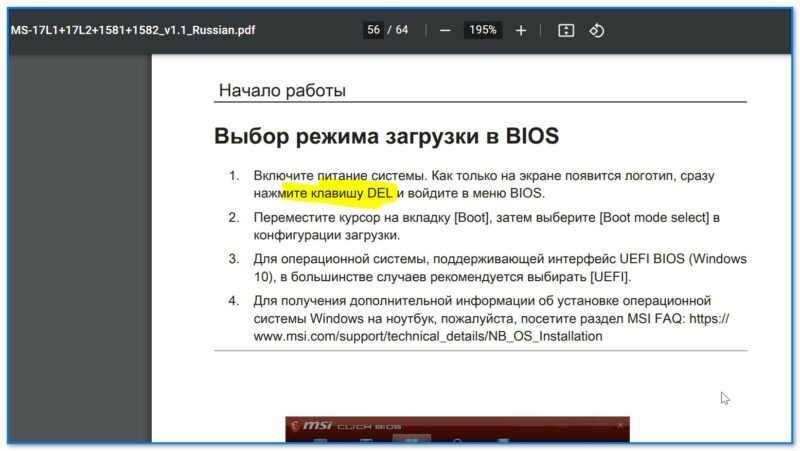
Нажмите клавишу Del
*
📌❸ Третий
Если у вас современный ноутбук (от ~2018г.) и на нем уже есть установленная Windows 10/11 — то войти в BIOS можно с помощью меню ОС. О том как это сделать — я рассказывал в одной из своих прошлых заметок, ссылка ниже. 👇
https://ocomp.info/kak-voyti-v-bios-iz-windows.html
*
📌 ❹ Четвертый (клавиши для старых устройств)
На некоторых старых устройствах встречаются неск. отличные клавиши:
- F11 (преимущественно моноблоки);
- F1;
- Ctrl + Alt + Esc.
Нажимать их нужно также после вкл. устройства.
*
📌 Пятый
Если у вас устройство уже не на гарантии (и вы знаете как его разобрать) — то (как вариант) можно просто-напросто отключить от устройства все диски и накопители. В результате после включения ноутбука, вместо загрузки Windows, — с высокой вероятностью появиться заветное меню…
*
PS
Если вопрос не решен — попробуйте пробежаться по нижеприведенной заметке. Там я изложил основные проблемы, с которыми сталкивается большинство пользователей… 👇
https://ocomp.info/ne-mogu-voyti-v-bios.html
*
Иные рекомендации и дополнения — приветствуются в комментариях ниже!
Удачи!
👌
Your computer’s BIOS displays your current hardware configuration and other related information. You can also change such settings on the BIOS.
Your PC stores the BIOS (Basic Input Output System) on the EEPROM’s BIOS chip. It loads before the Operating System. So, BIOS also offers an effective way to troubleshoot system issues without logging in to any account.
You can only access BIOS on legacy hardware. But all modern MSI motherboards have UEFI (Unified Extensible Firmware Interface) instead of BIOS.
There are two ways to access BIOS/UEFI on an MSI motherboard. Before Windows 8, you could only go to BIOS using the key. But now, you can either use the BIOS key or access BIOS from the Advanced Startup.
How to Get to BIOS Using the BIOS Key
The most convenient method of accessing BIOS on your MSI PC is to press the BIOS key on startup.
If you are using a USB keyboard, the connected USB port may not allow loading BIOS by pressing the BIOS key. Only certain ports allow this shortcut on a PC. So, reconnect the keyboard to other ports and try again in such scenario.
The necessary steps to access BIOS using the BIOS key are as follows:
- Power up or restart your PC.
- Immediately, begin hitting Del or Delete key continuously.


In some PCs, the BIOS key is F2 instead of Del, but it’s rare.
How to Get to BIOS From Windows Recovery Environment
You can also access the UEFI/BIOS on the MSI motherboard from the Advanced Startup or Windows Recovery Environment. It is the diagnostic environment you can change your startup settings. You can also repair system errors without logging in to a user account from this environment.
Access WinRE
First, you need to access the Windows Recovery Environment (WinRE). There are many ways of doing so, such as:
With Force Shutdowns
Force shutdown your PC thrice in a row. You can perform a force shutdown by pressing the Power key for a few seconds until you hear a sound. The fan should turn off, and all LED lights should go off. Also, don’t forget to power up the computer before doing the subsequent shutdowns.
On the third boot, you’ll find yourself at the Startup Repair screen. Click Advanced options to access WinRE.
From Windows Settings
To go to Advanced Startup or WinRE from your Settings,
- After signing in to your account, Press Win + I to open Settings.
- Go to System > Recovery or Update & Security > Recovery.
- Click on Restart now under Advanced startup.


Using Shift + Restart Shortcut
You can also press the Shift key while clicking the Restart button on the power menu options to access WinRE. You can use the Restart button from the Start Menu power options, security screen, or the lock screen.
Using CLI Command
The CLI command shutdown /r /o /f /t 00 or shutdown /r /o also allows you to restart your PC to WinRE. The flags indicate the following:
- /r – restart after shutdown
- /o – go to advanced boot options after the restart
- /f – forces running applications to close
- /t 00 – shutdown after 00 sec time, i.e., immediately. Default value for /t is 30 sec.
You can use this command on the Command Prompt, PowerShell, Run (Win + R). Or you can create a shortcut and use the command as the location.
Using Bootable Windows Drive
Using a bootable drive is the best option to access WinRE if you have severe system or boot errors. If your system is fully functional, the previous methods are more convenient. Here are the necessary steps:
- Boot using Windows recovery or installation drive.
- Pick your language and other preferences and click Next.
- On the Install screen, click on Repair or Repair your computer.


Access UEFI Settings
After accessing the Windows Recovery Environment, it’s time to go to the UEFI settings. Follow the instructions below to do so:
- Click on Troubleshoot and go to Advanced options.
- Select UEFI Firmware Settings and click Restart.

What Can I Do From the BIOS
There are many changes you can make from the BIOS/UEFI settings. The BIOS settings specify how your system controls and manages the hardware components. Some important configurations you can alter are as follows:
- Boot device order.
- Processor, fan, or RAM speed.
- System date, time, and language.
- Enable or disable Virtualization.
- Secure boot and TPM settings.
If you haphazardly change the BIOS settings, your system may suffer from certain issues. At such times, it’s better to reset your BIOS to the default settings. On the MSI BIOS, press F9 and select Yes to do so.
After changing BIOS setting, press F10 and select Yes to save the changes and restart your PC.
Can’t Go to BIOS/UEFI on MSI Motherboard
If you can’t go to BIOS settings using one of the methods we have provided, try the other. You should always be able to reach BIOS from the Advanced Startup as long as your OS is fully functional. But if you want to use the key shortcut but can’t, there are a few things you can try.
First, try changing the USB port if you are using a USB keyboard as we mentioned earlier.
You should also disable fast boot on your PC. Fast boot significantly decreases the startup time, so you might miss the time limit to press the BIOS key. You need to turn it off for both OS and MSI BIOS settings. For the former, we have a dedicated article on How to Disable Fast Startup on Windows. Check it out to learn the necessary steps.
And the easiest way to disable the MSI fast boot is to reset your BIOS. You can do so by removing and reinserting the CMOS battery.
The Basic Input/ Output System starts the computer with its microprocessor. It is responsible for connecting the PC’s operating system and hardware devices. It boots up the operating system. In early ages, BIOS was involved in only starting up of the computer, while modern computers troubleshoot with the BIOS.
When starting up the operating system, BIOS works to turn on all the functions of the PC. It controls the functions of the mouse, keyboard, and storage devices. BIOS is also involved in the security process of the computer. It needs security passwords to run the different functions of the computer. It also saves the boot process of the computer.
If you forget the BIOS password of your computer, then restoring that will take much time because it is the strongest and relates to the most sensitive parts of the computer. Micro-Star International company’s motherboards are the most trusted by consumers. It is a Chinese computer company. It manufactures specifically gaming motherboards. If you want to know how to get into BIOS on MSI motherboard, read this article carefully.
How to Reset BIOS to Default MSI?
MSI suggests setting the default BIOS settings. If you have customized the settings and want to have default settings again, follow this procedure.
- Power on the PC and press the DEL button when the MSI logo appears on the screen.
- When you see the BIOS menu, press F9, and a screen will appear asking for load optimized default. Say Yes to that.
- F10 will save the settings and reset them.
- Now the device will restart automatically. When it is powered on, then check for the system settings.
- The system will diagnose the repair. Wait for the process, then press restart to reboot the system.
Latest Article: How Many PCIe Slots Do I Need for Gaming & Video Rendering?
Reset MSI BIOS Manually
- For this process, you need to unscrew your laptop or computer.
- Take out the MSI motherboard carefully.
- Check for the JBAT1 jumper.
- Switch pin 1 as 2. Wait for 30 seconds, then reset pins 1 and 2.
- Now the BIOS is reset without using its password.
Read Also: Best RAM for Ryzen 7 3700X, Ryzen 5 3600, Ryzen 9 3900X
MSI Motherboard BIOS Download
MSI motherboards also offer to download BIOS from their website. You have the option to receive drivers, annuals, and software personally. Here you can find the latest BIOS for your motherboard.
- Finding your BIOS version is easy with an MSI motherboard.
- Click the start button and then Run. Now type msinfo32.
- It will take you to the Windows information.
- Pick up the BIOS version and look at your motherboard’s information.
New Post: How to Know if the Motherboard is Dead?
MSI BIOS Complete Setup
You can also access the customization of settings and read-only files from the BIOS setup. MSI BIOS menu can be accessed while pressing the DEL key when the system is booting up. Some motherboards may need to press F2 to enter the BIOS setup.
You will see a different logo of MSI on the screen. Then enter into its settings by pressing the Tab key. Visit the website and read the details for the MSI BIOS setup. MSI motherboards can also have boot passwords. You can quickly enter the BIOS setup by entering the password.
MSI BIOS Button/Key
It depends on the manufacturer what BIOS button they set on your PC. You can access the BIOS menu by pressing F1, F2, or ESC. DEL key can also be used for entering the BIOS. When booting the computer, you may follow the instructions to press the key to enter BIOS. F2 is used to enter into BIOS setup on MSI motherboard.
When starting the computer, POST diagnoses the hardware as ready to start up and beep. The computer will process the boot firmware, and the boot device will start with the operating system.
You can change the boot order if your computer cannot boot the OS. Changing the MSI boot device may also need to change the boot order. When pressing F11 on your PC having an MSI motherboard, you can enter into the boot menu.
If you restart the computer and press the Delete key, it will enter you in BIOS. While using the MSI motherboard, you must select the boot mode from the boot menu. Then click on UEFI. Pick up UEFI Hard disk and select BBS priority. This way will set Boot option#1.
MSI Motherboard BIOS Key Windows 10
There is some procedure to enter the boot menu in MSI motherboard bios key windows 10. It will help if you press F11 while starting up the windows. It will allow you to get access to the boot menu. You may also do it when Windows show on the screen.
Click the Start button, and go to the Power button. While clicking the restart button, you will have the option to Continue, use a device, troubleshoot, or turn off your PC. Select troubleshoot. Now choose advanced options. You will find the menu of advanced options.
It will have Startup repair, Startup settings, command prompt, uninstall an update, UEFI firmware, and system restore. Click to change UEFI firmware settings. Say yes to reset. Now you can enter into the MSI boot menu.
MSI B550 Gaming Plus BIOS Keys
MSI B550 motherboard has 7C56v1B1 (Beta version) of the BIOS. You can also download some more BIOS versions from the website. While reading the manual of the MSI MPG B550, you can see that it suggests saving the default setting for the BIOS. Entering BIOS requires pressing the DEL key.
- F11 will take you to the boot menu.
- You must follow the instructions for running the boot menu.
- Function keys will navigate you to the menu.
- When you need help, then press F1.
- Pressing F2 will add or remove the item you select.
- F3 will take you to your favorite menu. If you wish to enter the CPU specification menu, then press F4.
- Memory Z menu will be there on F5. F6 will get optimized load default.
- Switching between advance and EZ mode will be done with F7.
- F8 and F9 will load and save overclocking, respectively. F10 will save all the changes.
How to Enter BIOS MSI if No Key Works for that?
Nothing happens if you restart your PC and press DEL to enter BIOS setup. Then there is no crucial combination working for your motherboard. That means the MSI motherboard wont boot to BIOS.
- Now you may try to hold the power button while it is shut down. This will throw you into the BIOS setup.
- You can also switch the USB keyboard with a PS/2 keyboard.
- Then press F2 to enter into BIOS.
Another option is to click the restart button with a shift. It will open up UEFI settings. The unsafe exit state of the windows can also take you to the boot menu.
MSI BIOS Settings
MSI BIOS system offers to have the high performance of your device. You can change the settings on the boot menu according to your need. You can speed up the CPU and click CPU boost, enabling MSI built-in overclocking and tweaking abilities.
You can also change the memory settings, fan info, storage, and more. MSI also gives some customization for the kinds of fans that you are using. You can select boxed coolers, tower air coolers, and water coolers.
MSI Advanced BIOS
You can also do advanced settings with the MSI motherboard.
- You can select Overclocking settings, PCIe, integrated graphics configurations, and USB device settings.
- There are many more sections to be discovered in MSI motherboard Advanced boot menu.
- Lastly, you need to save your settings and apply them.
MSI Motherboard BIOS Update
Generally speaking, BIOS does not need to be upgraded. It can be harmful to your system. It is not as simple as updating Windows. Most users wish to upgrade their BIOS, but it is not recommended if you have an MSI motherboard. If your PC works with stability, you should not do that; otherwise, your system may fail to run.
MSI motherboards are equipped with BIOS 5. It makes tweaking and overclocking easy. MSI also designed UEFI, which is a Unified Extensible Firmware Interface. It gives easy access and intuitive controls for the operating system. It creates incredible performance for gaming.
By reading this write-up, you may know how to get into BIOS on MSI motherboard or how to access BIOS MSI. Even if the company does not recommend changing the settings, you can still customize the motherboard BIOS. The only thing to be considered is to be careful because extra upgraded functions may damage the motherboard’s BIOS.
Summarized Note
As a gamer, content creator, and storyteller, I’m here to bridge the gap between pixels and emotions, turning each gaming experience into a memorable narrative. Let’s embark on this adventure together – where every click, every joystick manoeuvre, and every victory screen brings us closer to the heart of the gaming cosmos. Personally, I love Sim Racing Games. I had started in the Radical race about 3 years ago and am currently competing in the MX5 Cup with the BRSCC. Get ready to press start on a journey that transcends screens and connects us through the shared language of gaming. Game on!