
In Windows 11, you’ll see a program called SmartScreen. It’s there to keep your computer safe. When you use Microsoft Edge, it’s automatically enabled to warn you when you enter a site where you could be a victim of phishing or that the site isn’t safe. But, if it’s something you want to disable, you’ll see the steps to do so later on.
Contents
- 1 What Does SmartScreen Do?
- 2 How to Turn off SmartScreen in Windows 11
- 2.1 How to Turn On or off SmartScreen Through Internet Properties
- 2.2 How to Turn Off/on SmartScreen on Edge Browser
- 2.3 Conclusion
What Does SmartScreen Do?
Before you turn it off, it’s best to know what it does. If, after finding out what it does and you still want to turn it off, you can continue to the next section. Besides the previously mentioned, SmartScreen will show you a warning message that the site is not safe and will give you the options to continue or to go back. It will do the same thing with the downloads.
SmartScreen has a list that compares the sites you visit. If it’s on the list of the dangerous ones, that’s when you’ll see the warning message. The good news is that you can customize SmartScreen to inspect apps/files that are not recognized.
It goes a little further than that since it can also protect you from apps on the Microsoft Store that aren’t ranked very high and that have caused other users issues. But, you might still want to disable it since maybe it’s blocking trustworthy apps, which you don’t have to deal with if you turn it off. If you still want to disable it, follow these steps.
How to Turn off SmartScreen in Windows 11
The Easiest way:
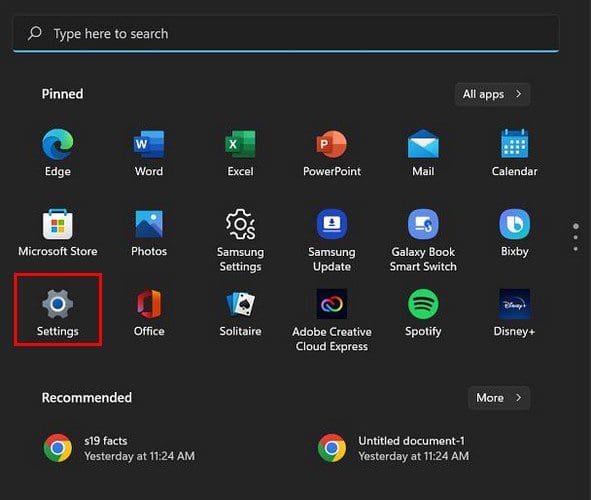
Since you have more important things to do, here is the fastest way to turn off the SmartScreen feature. You’ll need to go into Settings. You can access Settings using your preferred method or press the Windows and I keys.
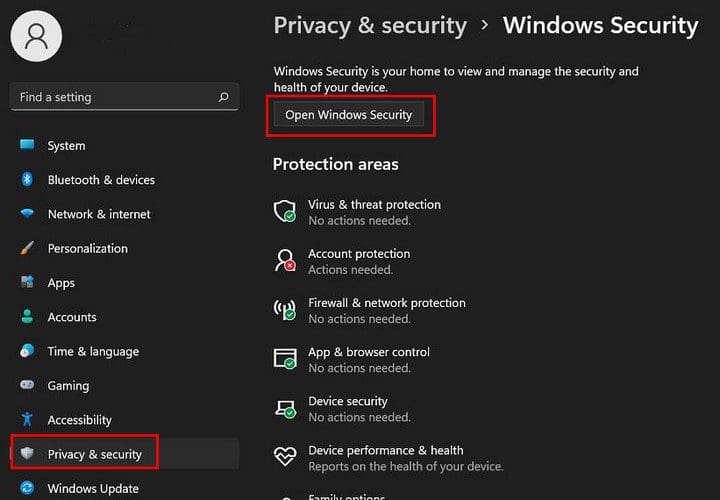
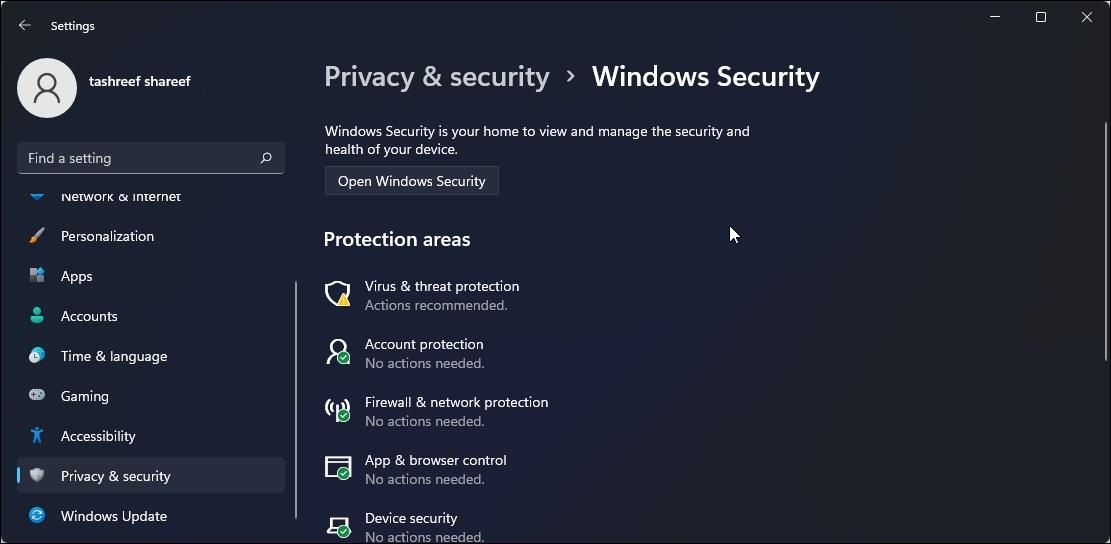
Once you are in Settings, click on Privacy and Security, followed by Windows Security. Click on the Open Windows Security option at the top, and then click on the App and browser control tab that’ll be to your left.
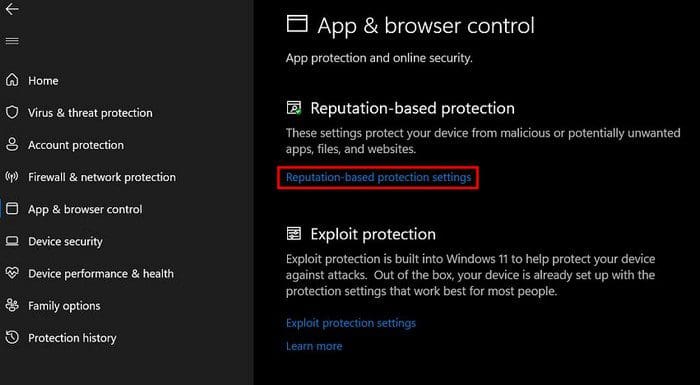
Look for a section called Reputation-based protection. Beneath that section, click on its Settings.
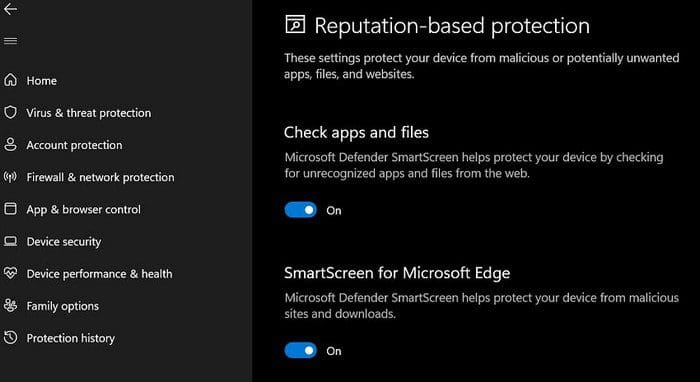
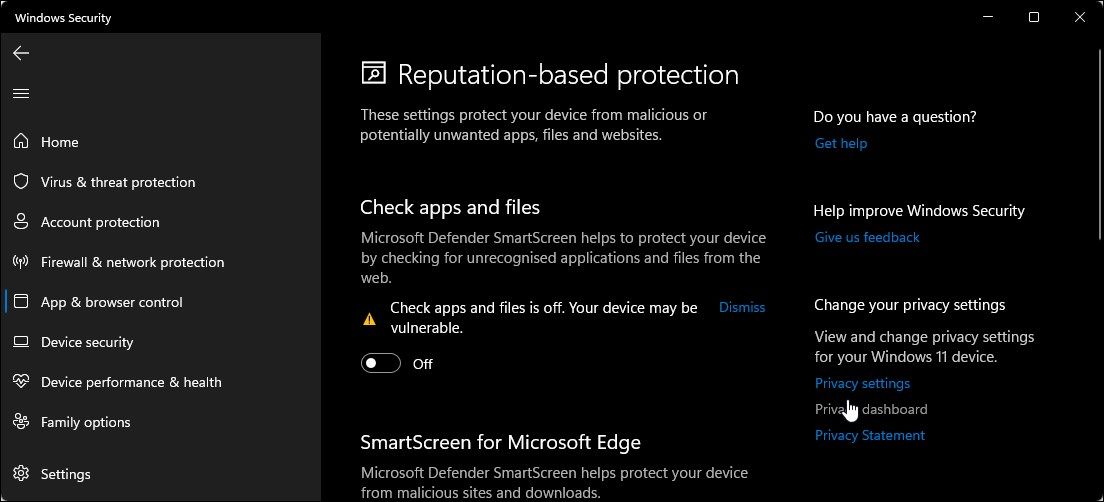
Here you’ll see all the different filters you can disable or enable. Look through them and simply toggle them on or off. Make sure to carefully read the description below them to see if that’s what you want to turn off. That’s all there is to it. You can go back and make any changes by following these steps.
How to Turn On or off SmartScreen Through Internet Properties
Note: If you are running on a newer version of Windows, you might now have the option to do the following steps.
If turning off the Windows Defender SmartScreen is easier by going through the Internet Properties, here are the following steps.
- Open Run ( Win + R)
- Type Control
- Click OK (Control Panel will open)
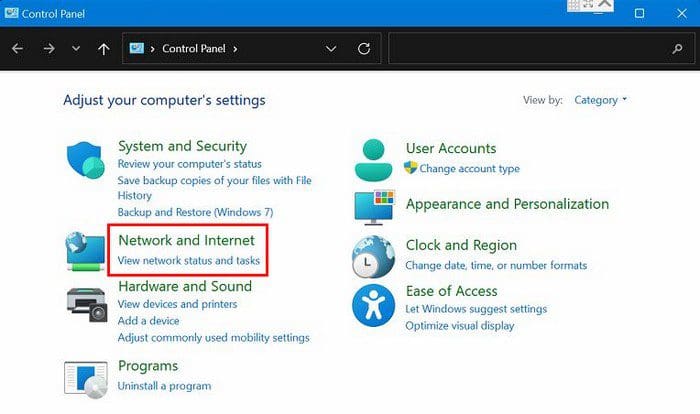
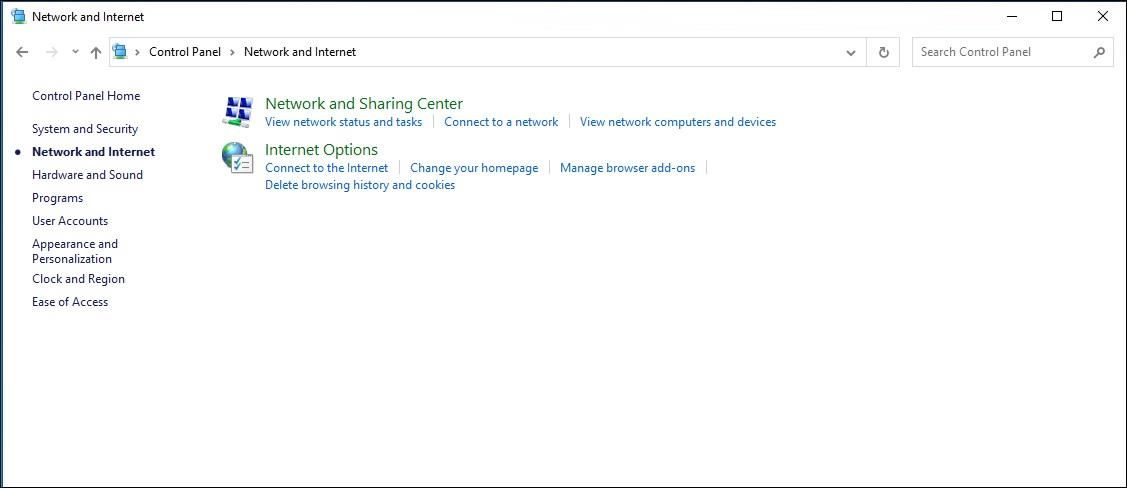
- Network and Internet
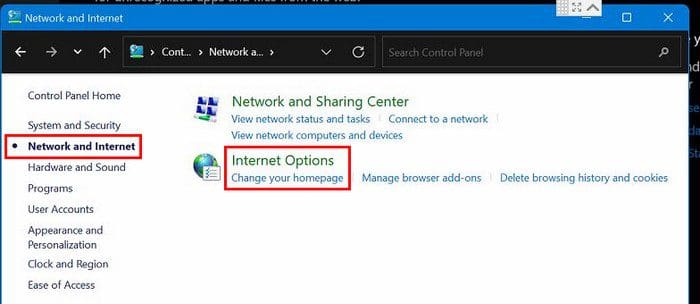
- Internet Options
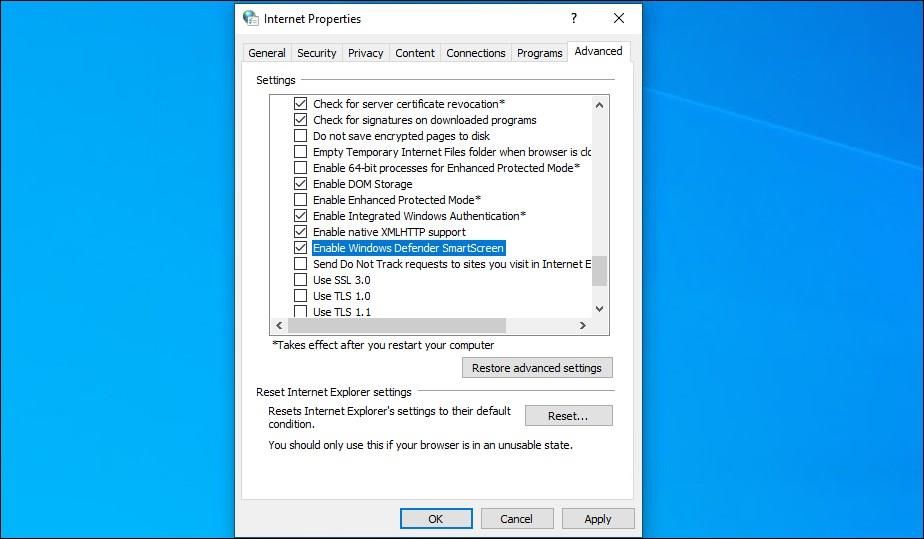
- Advanced Tab
- Go to the Security Section
- Uncheck Enable Windows Defender SmartScreen
- Click Apply and then OK
How to Turn Off/on SmartScreen on Edge Browser
You also have the option of turning it off in the Microsoft Edge Browser. You can do this by following these steps. Go to Settings by clicking on the dots at the top right.
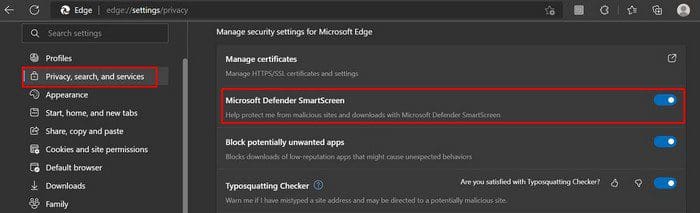
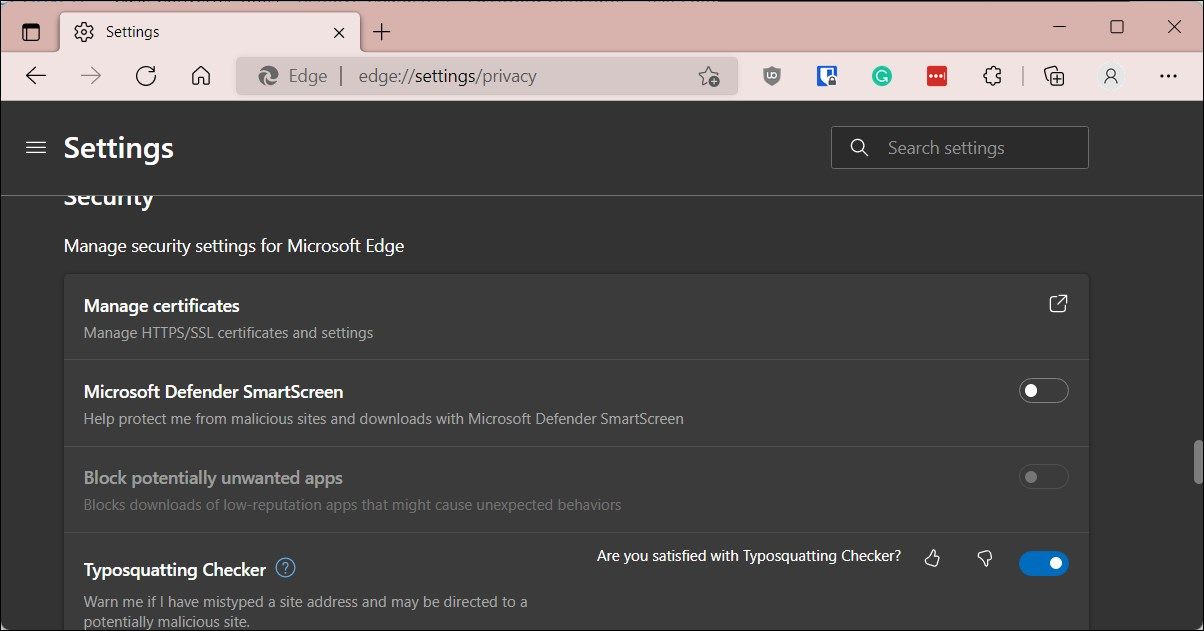
Go to Privacy, search, and services (it’ll be on your left side). Go to the Security section, where you should find the option to turn off or on the Microsoft Defender SmartScreen option.
Keep in mind that if you turn it on in the future, don’t forget to enable the Block potentially unwanted apps option.
Conclusion
The Windows Defender SmartScreen is very useful, but when it starts to block trustworthy apps, it makes you think if it’s worth keeping enabled. By following these steps, you can turn it off when you want or back on. You also have the steps to turn off this program on the Edge browser as well. How useful do you think it is? Share your thoughts in the comments below, and don’t forget to share the article with others on social media.
-
Home
-
News
- How to Enable/Disable SmartScreen on Windows 11? Here Are 3 Ways!
By Daisy | Follow |
Last Updated
SmartScreen can keep your computer safe and many users want to know how to enable/disable SmartScreen on Windows 11. If you are one of them, you can refer to this post from MiniTool. Here are 3 ways.
Microsoft Defender SmartScreen is a part of Windows Security. It helps you protect against common threats by warning against downloading or installing potentially malicious files from other computers. This feature is enabled by default in Windows. However, sometimes you may want to enable or disable SmartScreen on Windows 11 by yourself.
Tips:
Whether using SmartScreen or not, it’s recommended to back up your important data regularly to protect it since downloading malicious apps may cause your data loss. To do that, you can try the free backup software – MiniTool ShadowMaker. It can back up files, folders, systems, and disks.
MiniTool ShadowMaker TrialClick to Download100%Clean & Safe
The following part introduces 3 ways for you to enable or disable SmartScreen on Windows 11.
Way 1: Via Settings
You can go to Windows Security settings to enable or disable SmartScreen on Windows 11. Here is how to do that:
1. Press the Windows + I keys together to open the Settings application.
2. Click Privacy & security > Windows Security > Open Windows Security.
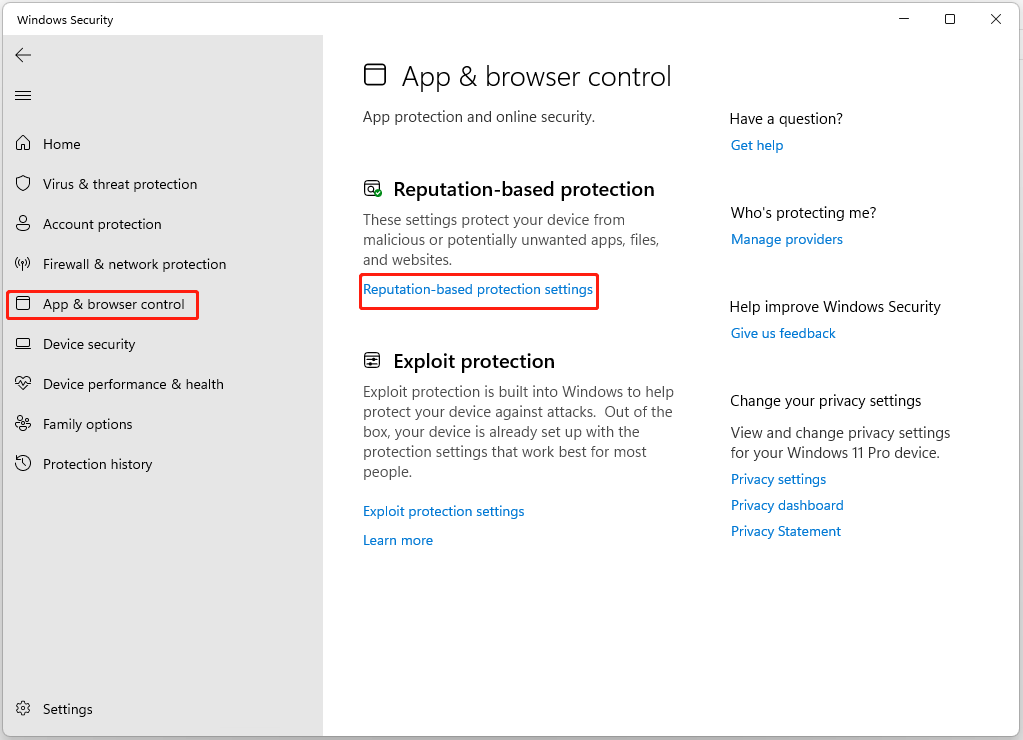
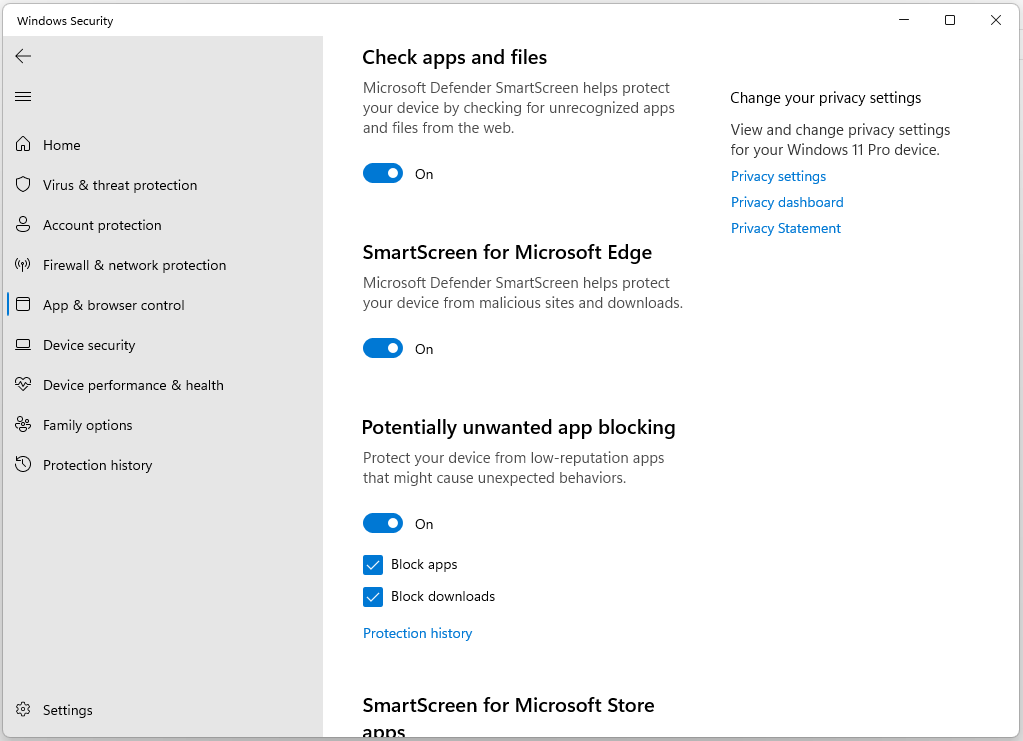
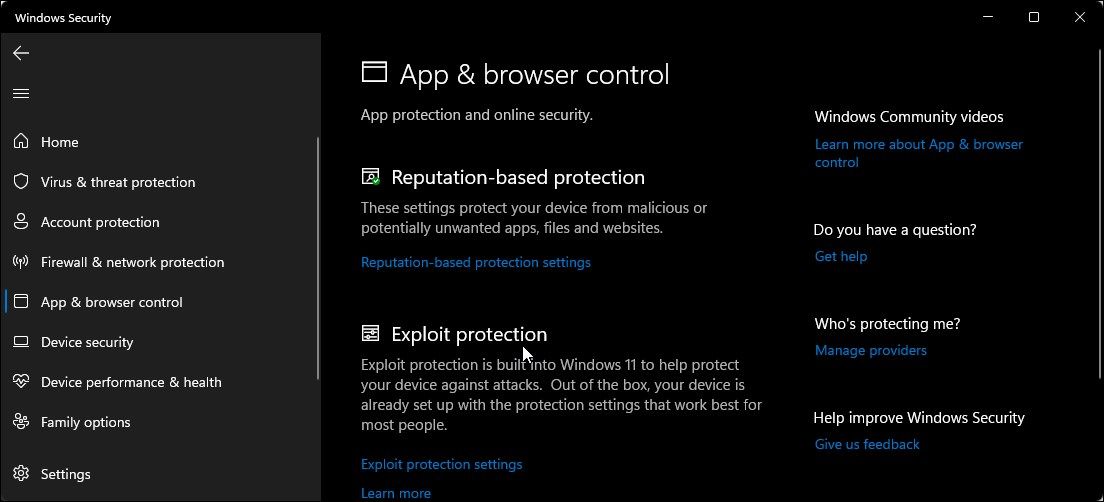
3. Go to the App & browser control part. Under Reputation-based protection, click Reputation-based protection settings.
4. Then, you can enable or disable Check apps and files and Potentially unwanted app blocking. The other two filters are for Microsoft Edge and Microsoft Store apps.
Way 2: Via Local Group Policy Editor
You can turn on or off the Windows Defender SmartScreen using Local Group Policy Editor.
1. Press Windows + R to open Run. Type gpedit.msc and click OK to open Group Policy Editor.
2. Go to the following path:
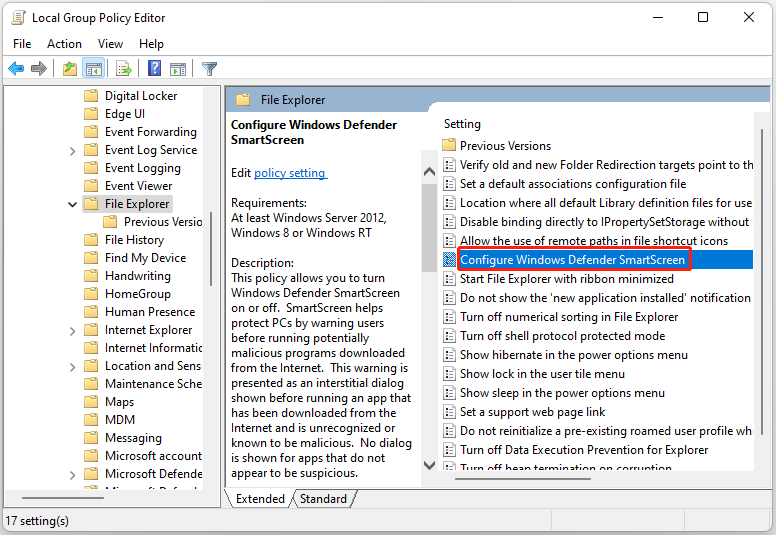
Computer Configuration > Administrative Templates > Windows Components > File Explorer
3. Find the Configure Windows Defender SmartScreen option in the right panel.
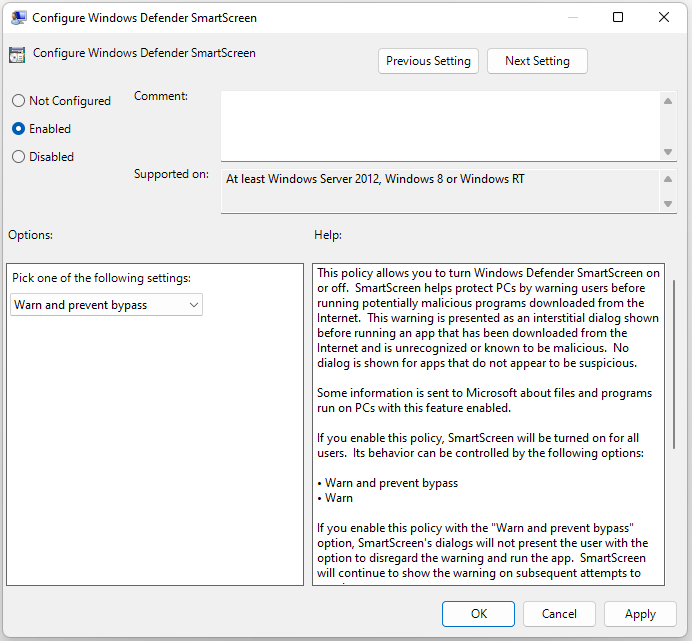
4. Double-click it. Then, you can click Enabled or Disabled and click Apply and OK to save the changes.
Way 3: Via Registry Editor
You can also turn on or off the Windows Defender SmartScreen using Registry Editor. Follow the guide below:
1. Press the Windows logo key and the R key at the same time to open the Run dialog.
2. Type regedit and then press Enter to open Registry Editor. You’ll be prompted for permission and please click Yes to open it.
3. Go to the following path:
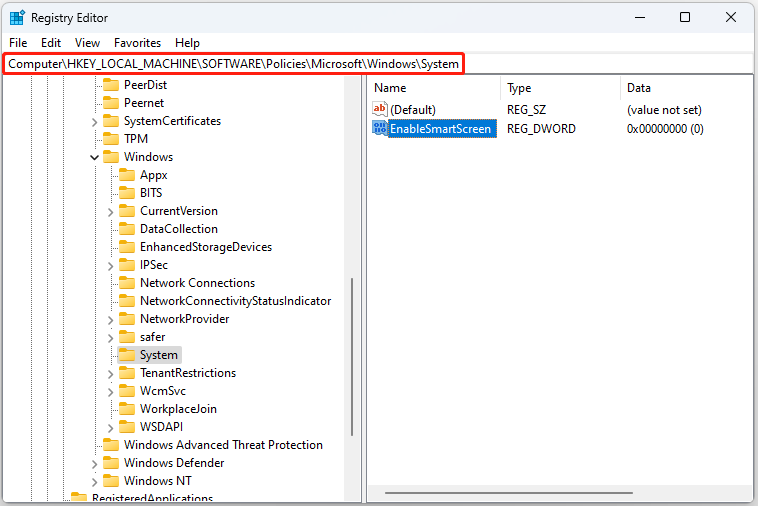
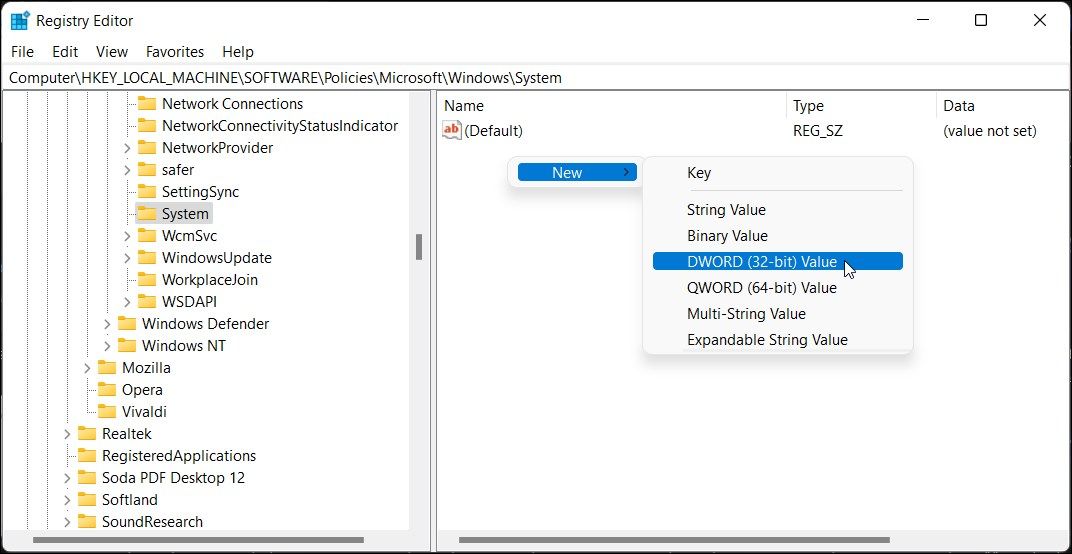
HKEY_LOCAL_MACHINE\SOFTWARE\Policies\Microsoft\Windows\System
4. From the left-hand side, right-click the System Registry key and choose New > DWORD (32-bit) value, and name it as EnableSmartScreen.
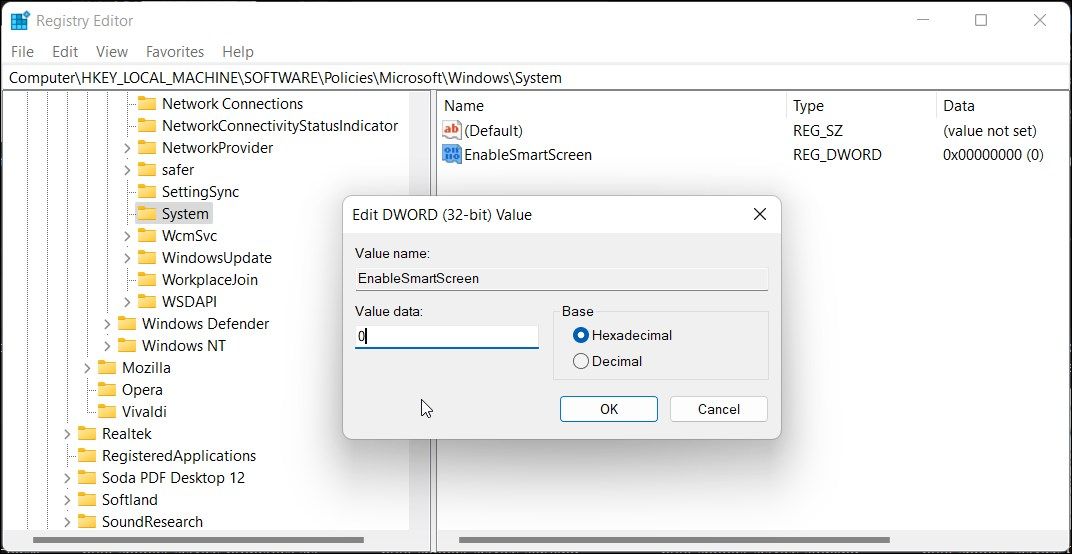
5. Then, double-click it to change its value data to 0.
Final Words
How to enable or disable SmartScreen on Windows 11? This post provides 3 ways and you can choose one of them based on your needs. I hope that this post can be useful to you.
About The Author
Position: Columnist
Having been an editor at MiniTool since graduating college as an English major, Daisy specializes in writing about data backups, disk cloning, and file syncing as well as general computer knowledge and issues. In her free time, Daisy enjoys running and going with friends to the amusement park.
Summary
- Microsoft Defender SmartScreen is enabled by default in Windows and provides reputation-based protection against malicious apps and websites. It can be disabled if it mistakenly blocks safe files.
- SmartScreen is also a part of Microsoft Edge’s security settings and can be turned off or on from the browser’s settings menu. It helps protect against phishing sites and blocks potentially unwanted apps.
- SmartScreen can be turned off or on using various methods, including the Windows Security settings, Microsoft Edge settings, Internet Properties dialog, Registry Editor, and Group Policy Editor. It is recommended to enable SmartScreen for added PC security.
Microsoft Defender SmartScreen is part of the Windows Security solution. It helps you protect against common threats by warning against downloading or installing potentially malicious files from other computers.
SmartScreen is enabled by default in Windows. However, sometimes, you may want to disable the feature if it identifies and blocks genuine apps and files as malicious. Fortunately, you can disable SmartScreen easily. Here, we show you how to disable the SmartScreen filter in Windows.
How Does Windows SmartScreen Filter Work?
SmartScreen relies on reputation-based protection to protect your device from malicious or potentially unwanted apps and websites.
When enabled, SmartScreen screens your downloads against known suspicious sites and developers. When a match is found, it blocks the download or site access and warns the user about the action taken.
You can configure it to block apps and files by checking unrecognized apps and files from the web. It can also protect you from Microsoft Store and third-party sourced apps that are low on reputation and known to cause unexpected behavior.
SmartScreen is also part of Microsoft Edge’s security settings. When enabled, it helps protect your computer against malicious and phishing sites and block downloads.
SmartScreen is enabled by default on all the Windows OS running systems. However, some experienced users may find the feature annoying as it can block safe apps, requiring additional steps to run the setup.
While we recommend you always turn the SmartScreen filter on, you can disable it easily from the Windows Security settings. Here’s how to do it.
1. How to Turn Off SmartScreen Using Windows’ Security Settings
The easiest way to turn off SmartScreen is via the Windows Settings panel. You can configure all the aspects of your system security from the Windows Security panel. Here’s how to do it.
- Press Win + I to open Settings.
- Open the Privacy and Security tab in the left pane.
-
Click on Windows Security.

-
Next, click on Open Windows Security.

- Open the App & browser control tab in the left pane.
-
Click on Reputation-based protection settings under Reputation-based protection.
-
Here, you’ll find four different SmartScreen filters you can individually enable or disable. If you want to turn off the filter for files and executables, turn off Check apps and files and Potentially unwanted app blocking filters. The other two filters are for Microsoft Edge and Microsoft Store apps.
- If you want to turn off SmartScreen completely, disable all four filters.
When you have difficulty accessing the Windows Security window, refer to our troubleshooting guide to fix a blank Windows security screen.
If any of the SmartScreen filters are grayed out with the message «this setting is managed by your administrator,» you must contact your administrator or try another method.
2. How to Disable SmartScreen for Microsoft Edge
Microsoft Edge has a built-in option to enable and disable Microsoft Defender SmartScreen. Here’s how to access it:
- Launch Microsoft Edge and click the three-dots menu icon in the top right corner.
- Click on Settings.
- Open the Privacy, search, and services tab in the left pane.
- Scroll down to the Security section.
- Toggle the switch for Microsoft Defender SmartScreen to turn it off. This will disable the Block potentially unwanted apps option as well.
- If you choose to enable SmartScreen again, you must manually enable the Block potentially unwanted apps feature.
Additionally, you can disable SmartScreen for Microsoft Edge using the Windows Security app and Registry Editor. Here’s how to do it.
Disable Microsoft Edge SmartScreen Using Windows Security
Microsoft Edge SmartScreen is for your browsing safety against phishing and malware sites and software you download. Unless an administrator manages it, you can turn it off.
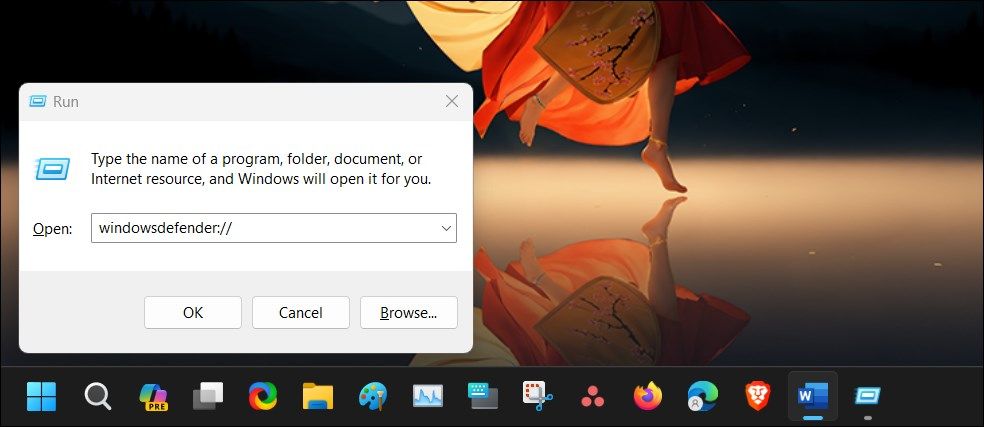
- Press Win + R to open Run.
-
Type windowsdefender:// and click OK to open the Windows Security app.

- Open the App & browser control tab in the left pane.
-
Next, click the Reputation-based protection settings link under Reputation-based protection.

- Toggle the switch for SmartScreen for Microsoft Edge to turn off Microsoft Defender SmartScreen for the Edge browser.

Disable SmartScreen for Microsoft Edge Using Registry Editor
Editing the registry entry is an alternative (but more complicated) method to disable the SmartScreen for the Edge browser permanently.
- Press Win + R to open Run.
- Type regedit and click OK to open Registry Editor.
-
Next, navigate to the following location:
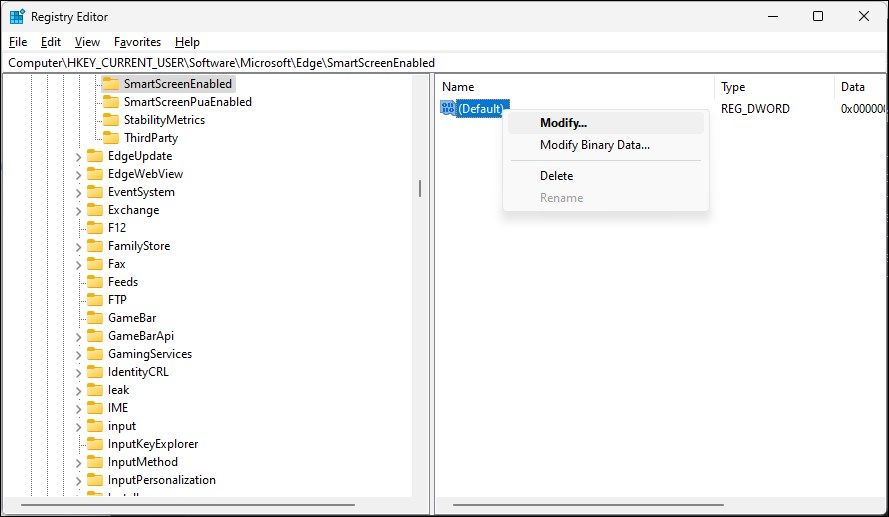
HKEY_CURRENT_USER\Software\Microsoft\Edge\SmartScreenEnabled -
In the right pane, right-click on the Default value and select Modify.

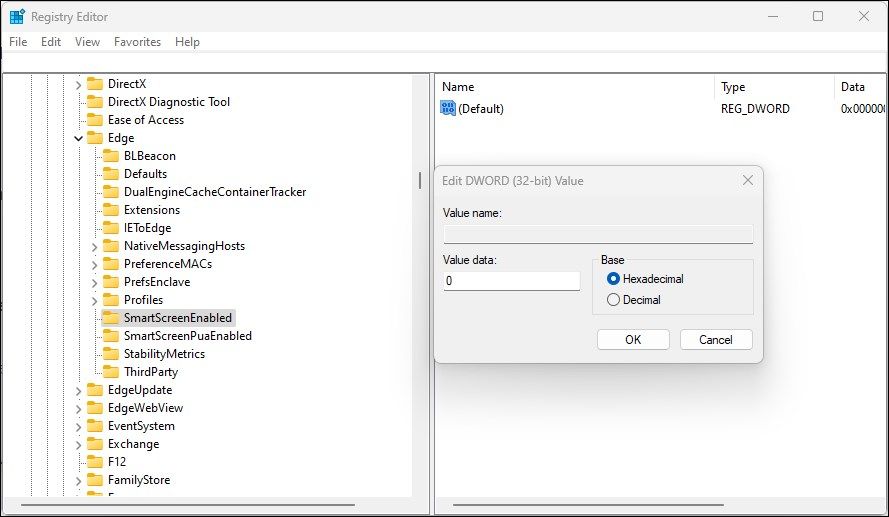
-
Type 1 in the Value data field and click OK to save the changes.
- You may need to restart your computer to see the changes live.
3. How to Turn Off Windows Defender SmartScreen Using Internet Properties
You can turn on or off Windows Defender SmartScreen using the Internet Properties dialog in Windows 10. Also known as Internet Options, it lets you configure security and access settings, add-ons, Active-X controls, and more.
Follow these steps to turn off SmartScreen using Internet Options:
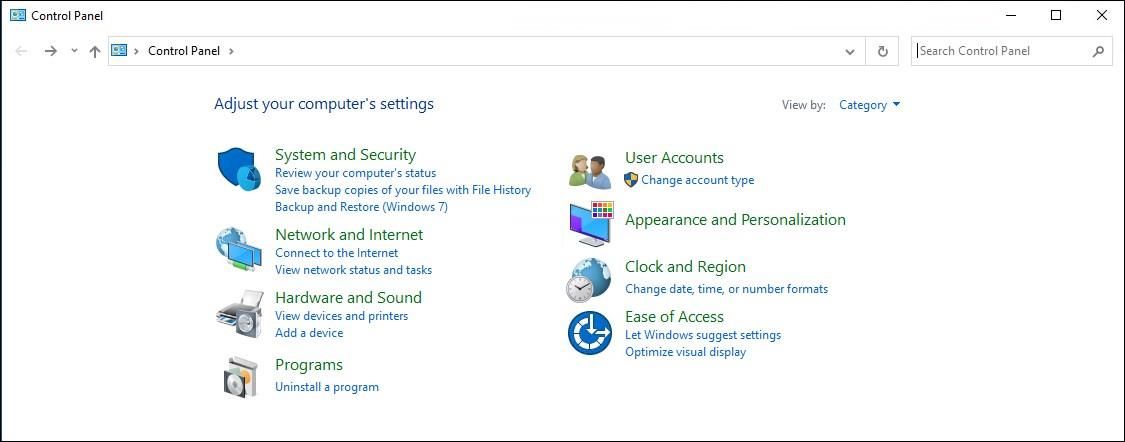
- Press Win + R to open Run.
- Type control and click OK to open the Control Panel.
-
Click on Network and Internet.

- Next, click on Internet Options.
-
In the Internet Properties window, open the Advanced tab.

-
Scroll down to the Security section.

- Uncheck the Enable Windows Defender SmartScreen option.
- Click Apply and OK to save the changes.
On a newer version of Windows, including Windows 11, you may not find any option to enable or disable Windows Defender SmartScreen in Internet Properties.
4. How to Enable or Disable SmartScreen Using Registry Editor
You can also turn the Windows Defender SmartScreen on or off using the Registry Editor. Useful if you cannot access it from the Settings app or Internet Properties.
Note that incorrect modification to the registry entries can cause system malfunction. Therefore, create a restore point before proceeding with the steps below.
- Press Win + R to open Run.
- Type regedit and click OK to open the Registry Editor. Click Yes if prompted by UAC to grant administrative privilege.
-
In the Registry Editor, navigate to the following location:
HKEY_LOCAL_MACHINE\SOFTWARE\Policies\Microsoft\Windows\System
-
In the right pane, locate the EnableSmartScreen filter value. You will need to create a new value if no value is found.

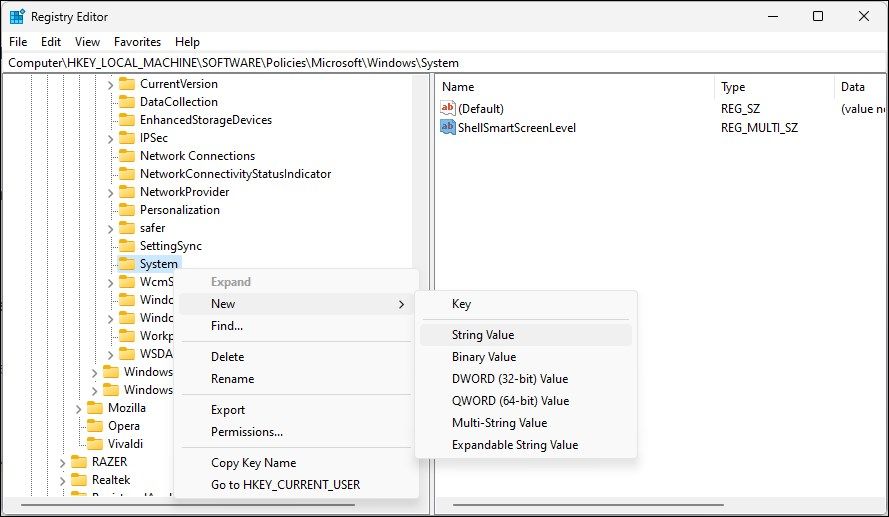
- To create a new value, right-click on the System key and select New > DWORD (32-bit) Value.
- Rename the value as EnableSmartScreen.
-
Next, right-click on the EnableSmartScreen value and select Modify.
- Type 0 in the Value data field and click OK to save the changes.
- To enable the SmartScreen filter, type 1 in the Value data field and click OK.
- Close the Registry Editor and restart your PC to apply the changes.
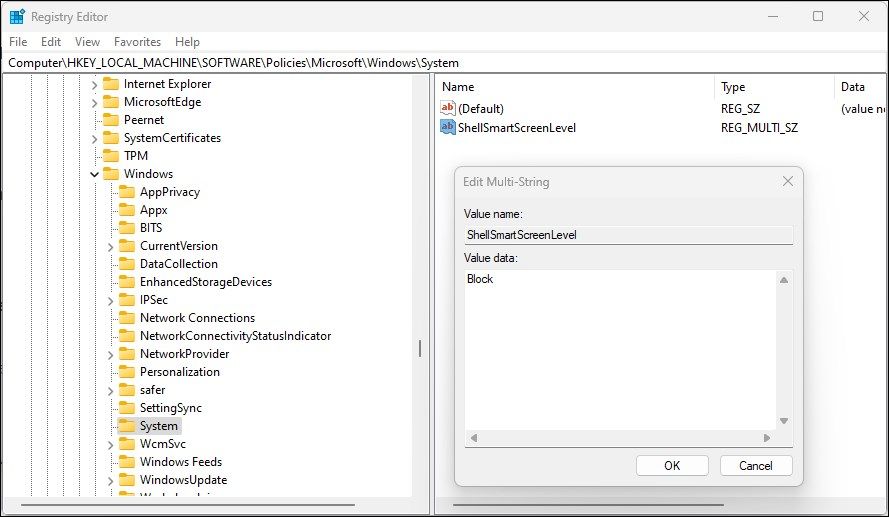
You can further tweak the registry to create a new String Value to set the blocking level to Warn or Block. Using Warn will show a SmartScreen warning with an option to proceed. In contrast, the Block option will show a warning and block the app from running on your computer.
To set a new ShellSmartScreenLevel String Value in Registry Editor:
-
Right-click on the System subkey and select New > String Value. Rename the value as ShellSmartScreenLevel.
-
Next, right-click on ShellSmartScreenLevel and select Modify.;
- Type Warn or Block depending on what you want the SmartScreen Level to do. Click OK to save the changes and exit Registry Editor.
5. How to Turn the SmartScreen Filter On or Off Using the Group Policy Editor
If you want to manage the SmartScreen filter for multiple computers at your organization, you can use the Group Policy Editor to do this task.
Note that Group Policy Editor is only available on Windows Pro, Edu, and Enterprise editions of the OS. If you are using Home, explore our guide to enable Group Policy Editor on the Windows Home edition.
To configure the SmartScreen filter using GPEdit:
- Press Win + R to open Run.
- Type gpedit.msc and click OK to open the Group Policy Editor.
-
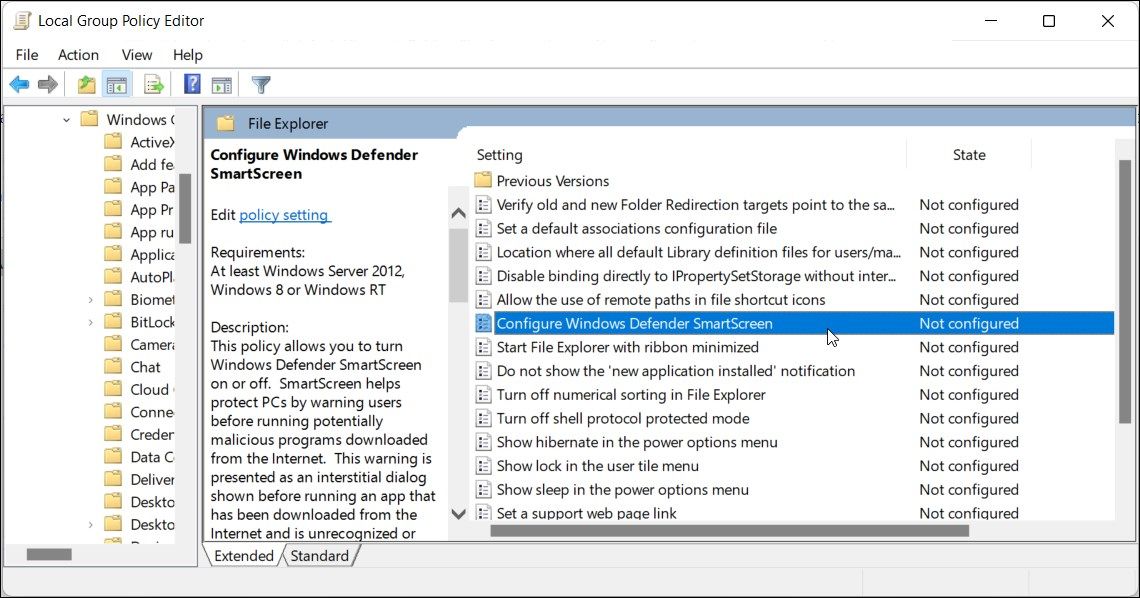
Next, navigate to the following location in Group Policy Editor:
Computer Configuration > Administrative Templates > Windows Components > File Explorer. -
In the right pane, right-click on Configure Windows Defender SmartScreen policy and select Edit.

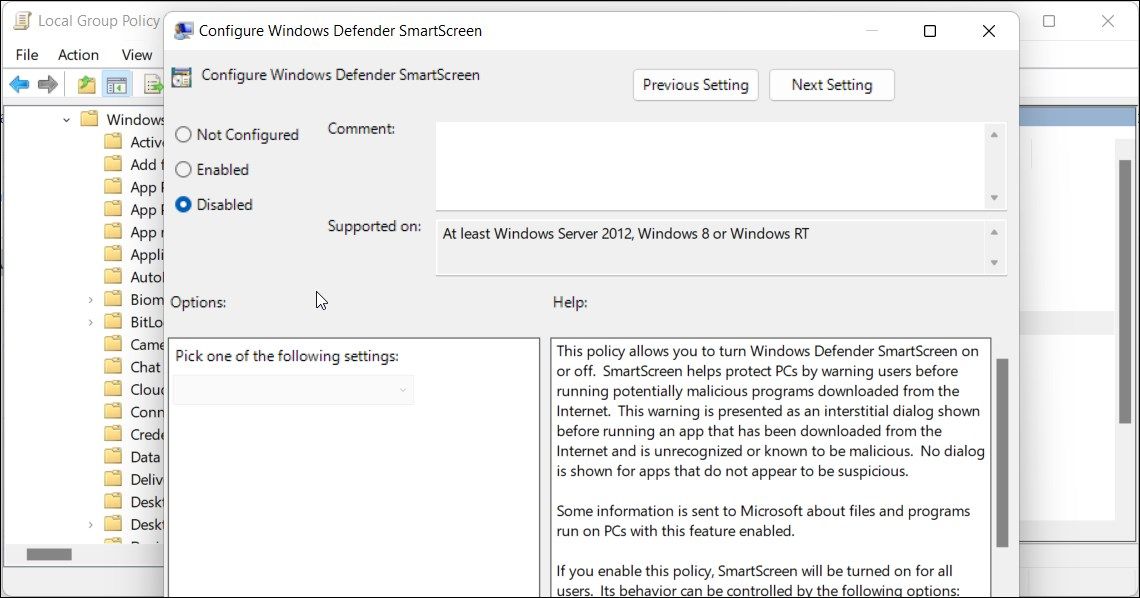
- To disable SmartScreen, select Disabled.
-
If you want to enable SmartScreen, select Not Configured or Enabled.
- Click Apply and OK to save the changes.
- Close Group Policy Editor and restart your PC.
Manage the SmartScreen Filter in Windows
While you can easily disable the SmartScreen filter in Windows, it is an extremely useful security tool. It can protect you against malicious files and programs and screen and block suspicious sites. It’s an added layer of protection to Windows Defender and helps keep your PC safe. Make sure to enable the SmartScreen filter once the task is finished.
Windows SmartScreen is a security tool on Windows 10 got from its earlier editions like Windows 7 and 8 to run your computer smartly. When you run Internet on your machine, numbers of websites try to install apps and codes. SmartScreen provides you the tool using which you can prevent these apps from installing from the web and running on your PC as well. After you enable this security tool, you are asked prior to the installation of an unrecognized application whether you confirm to run this or not.
You can use Windows SmartScreen for better security prospects and restrain and control harmful applications from running on your Windows 10 PC.
How to Enable / Disable SmartScreen on Windows 10
We are describing here 2 tips to Enable / Disable SmartScreen on Windows 10 PC below.
1] Via Windows Security app
This is a Short Process and you can enable Windows SmartScreen more easily and quickly by using this process.
- Press – Winlogo + I.
- Select – Update & Security.
- Click the – Windows Security from the left pane.
- Go to the right and click – App & browser control.
- A separate Windows Security app will prompt up, click – Reputation-based protection settings.
- To perform Windows SmartScreen disable method, you need to turn off Potentially unwanted app blocking.
- So, click on the toggle switch in this section.
- A User account control dialog will appear, select – Yes.
- If you want to enable or disable the SmartScreen for Microsoft Store then use the toggle there.
- For Apps and files checking turn off the SmartScreen through the first section.
- Similarly, disable the filter for Microsoft Edge from here.
2] Disable Windows SmartScreen through Gpedit
- Click the – Start.
- Type – Gpedit.
- Hit the – Enter.
- Navigate to –
Computer Configuration / Administrative Templates > Windows Components / File Explorer
- Double click – Configure Windows Defender SmartScreen.
- A separate window will appear, select – Disabled. To Enable,
- Click – Apply and – OK.
3] Windows SmartScreen disable via Regedit
- Press – Windows key.
- Type in – regedit.exe.
- Once the Registry Editor appears, go to
HKEY_LOCAL_MACHINE\SOFTWARE\Policies\Microsoft\Windows\
- Right-click on Windows and select – New > Key.
- Name this one – System.
- Go to the ‘right’, right click, and select – New > DWORD (32-bit) Value.
- Name this value – EnableSmartScreen.
- To enable set this value 1 and to disable change it to 0.
Methods:
1] Via Windows Security app
2] Through Gpedit
3] Via Regedit
Many times users download anonymous files from the Internet and try to run it on Windows. If you’re using Windows 8 or later, those files will not run directly, unlike earlier versions of Windows series. The reason behind this is presence of Windows SmartScreen filter.
Page Contents
Windows SmartScreen Filter In Windows 10
Windows SmartScreen is basically a security check against those files/apps which can compromise or harm your system. This feature is available in Windows 8 or later editions and runs in the background. When users run an application/file that comes from unrecognized source, Windows immediately blocks the item, so that your machine remain safe. In such case, you’ll see following message on the screen:
Windows SmartScreen prevented an unrecognized app from starting. Running this app might put your PC at risk.
[Run anyway] [Don’t run]
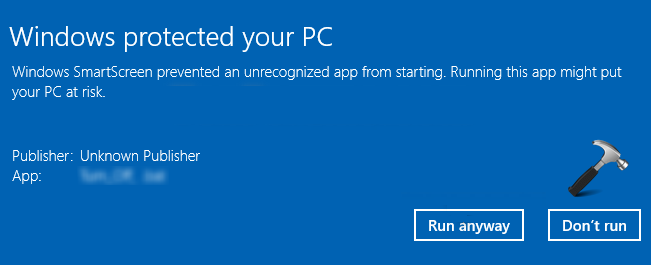
If you select Don’t run option in above message, your system will remain in default state. In case if you know that internal contents of app/file you’re trying to run and you believe that they couldn’t harm your machine, select Run anyway option.
How To Enable or Disable Windows SmartScreen Filter In Windows 10
To manage Windows SmartScreen filter settings, follow these steps:
1. Press + R key combination, type following and hit Enter:
C:\Windows\System32\SmartScreenSettings.exe
Substitute C: with your system root drive.
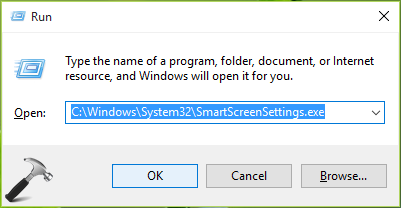
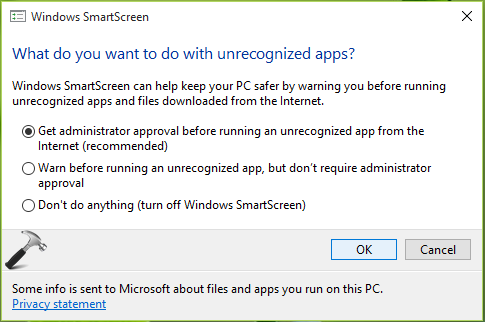
2. In the Windows SmartScreen configuration window appearing next, you can enable or disable this security feature (default is enabled). Once you’re done, click OK.
You may have to restart your machine to make your changes effective.
INFO: You can also access Windows SmartScreen configuration window from Control Panel > All Control Panel Items > Security and Maintenance > Change Windows SmartScreen settings.
FIX : Can’t Change Windows SmartScreen Filter Settings
We’ve have observed that sometimes users are not able to change Windows SmartScreen filter settings as mentioned above. This is because the options in Windows SmartScreen configuration window are greyed out (see screenshot below).
The root cause behind this may be various. In some cases, other security programs you use might block it. While on an other note, systems part of domain might get this error after domain controller’s restriction. Workaround to this problem is to change Windows SmartScreen filter settings using registry as mentioned below:
Registry Disclaimer: The further steps will involve registry manipulation. Making mistakes while manipulating registry could affect your system adversely. So be careful while editing registry entries and create a System Restore point first.
1. Press + R and put regedit in Run dialog box to open Registry Editor (if you’re not familiar with Registry Editor, then click here). Click OK.
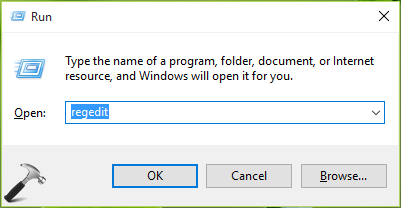
2. In the left pane of Registry Editor, navigate to following registry key:
HKEY_LOCAL_MACHINE\SOFTWARE\Microsoft\Windows\CurrentVersion\Explorer
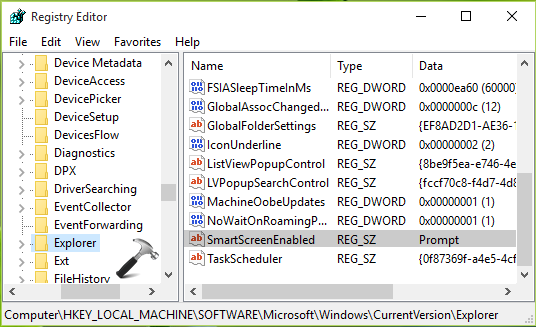
3. In the right pane of Explorer folder, look for registry string named SmartScreenEnabled. Double click on this string to modify it:
4. You can type any one (mentioned in bold) of the following to set corresponding option:
RequireAdmin (Get administrator approval before running an unrecognized app from the internet)
Prompt (Warn before running an unrecognized app, but don’t require administrator approval)
Off (Disable Windows SmartScreen feature)
Once you’re done, click OK. Close Registry Editor and reboot.
Hope you find the Windows SmartScreen filter helpful!