
Все способы:
- Способ 1: «Параметры»
- Способ 2: Быстрые команды
- Способ 3: «Панель управления»
- Способ 4:«Командная строка»
- Вопросы и ответы: 4
Способ 1: «Параметры»
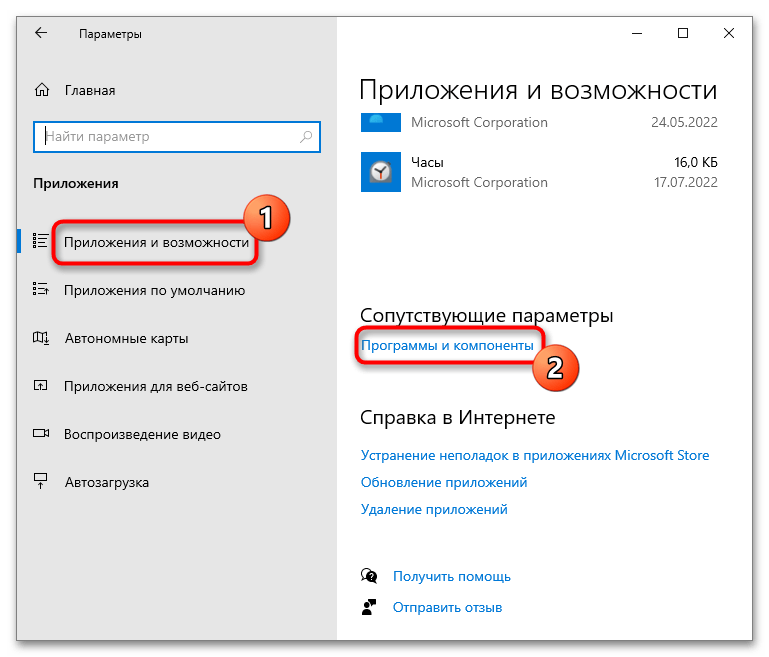
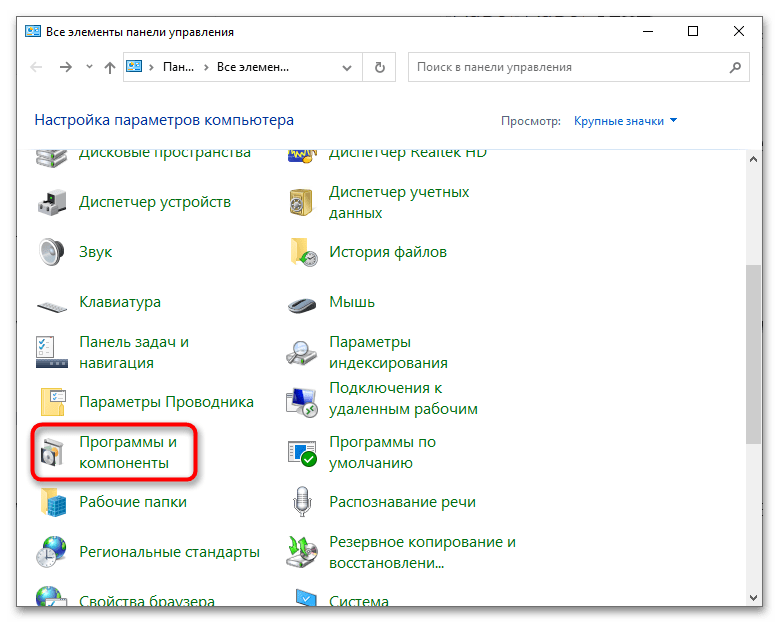
В Windows 10 пользователям доступно два типа компонентов: основные и опциональные. Получить доступ к первым и вторым в этой операционной системе можно из приложения «Параметры».
- Откройте приложение «Параметры» и перейдите в раздел «Приложения и возможности», прокрутите содержимое окна вниз и кликните по ссылке «Программы и компоненты».
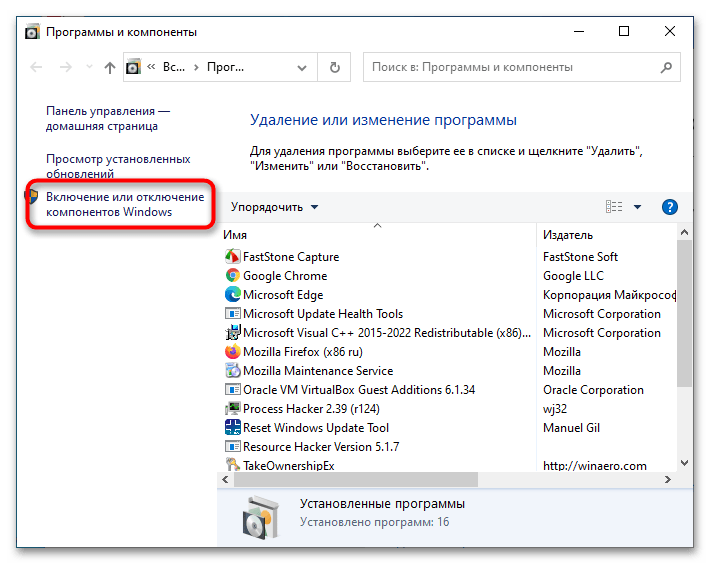
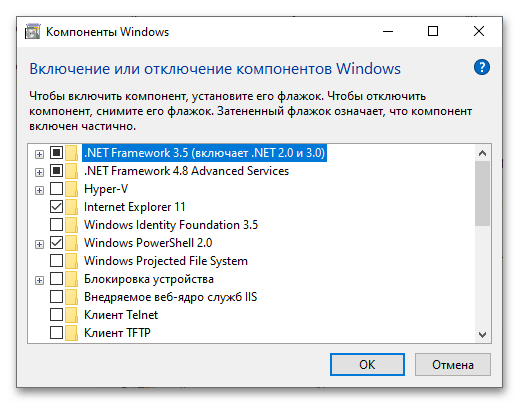
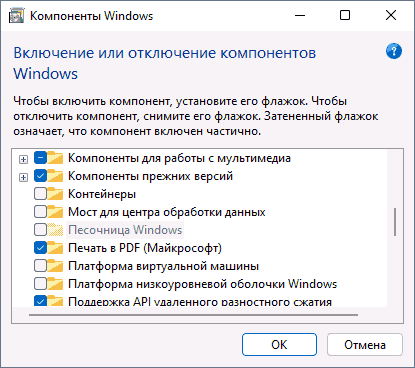
- В одноименном окне нажмите слева ссылку «Включение или отключение компонентов Windows».
- В результате откроется оснастка управления компонентами.
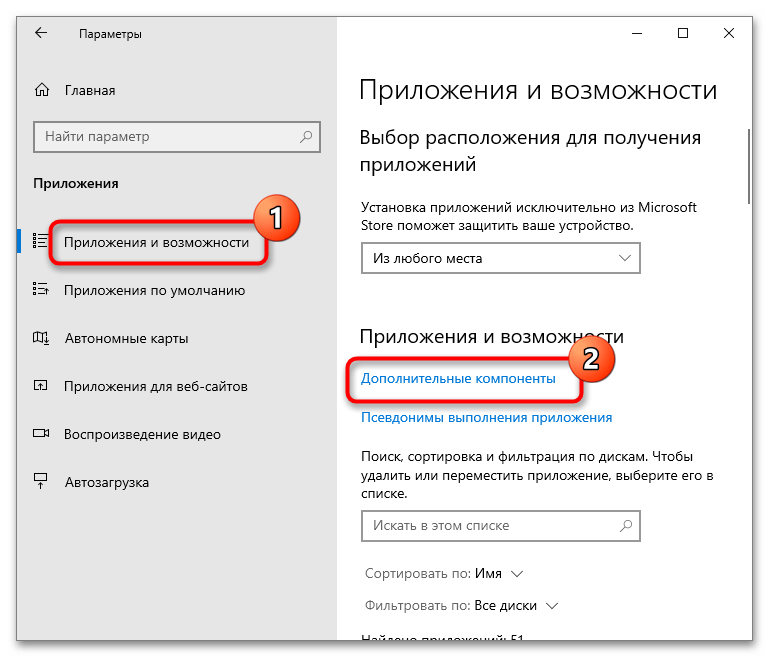
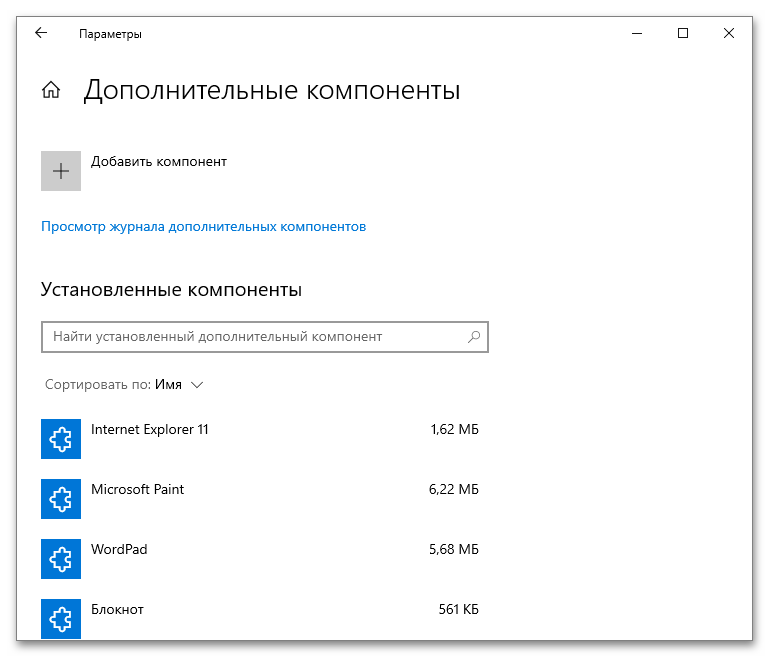
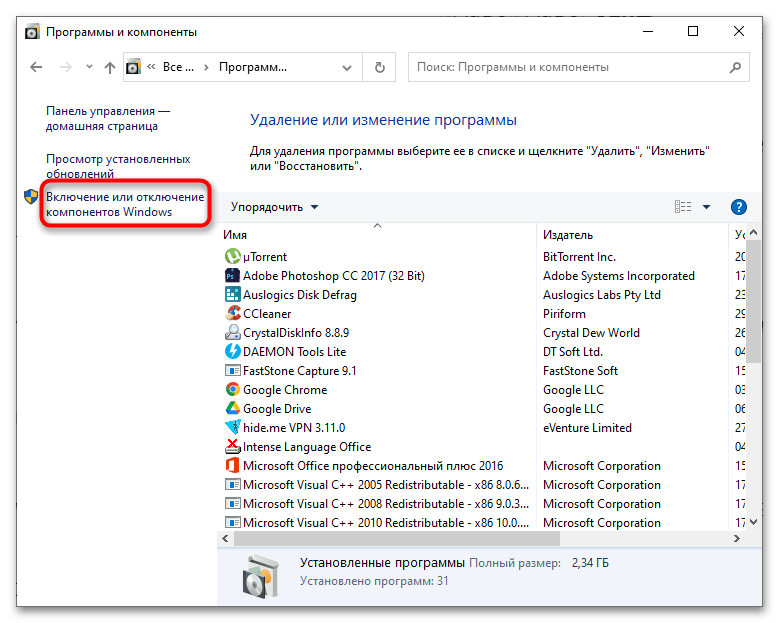
- Чтобы получить доступ к управлению дополнительными компонентами, в окне «Приложения и возможности» найдите и нажмите ссылку «Дополнительные компоненты».
- В следующем окне откроется список установленных в Windows 10 компонентов, доступных для удаления.
- Если вы хотите добавить новый компонент, нажмите в этом же окне кнопку «Добавить компонент» и выберите его в дочернем окне.
Способ 2: Быстрые команды
Если вам часто приходится обращаться к оснастке управления компонентами, удобнее использовать быстрые команды.
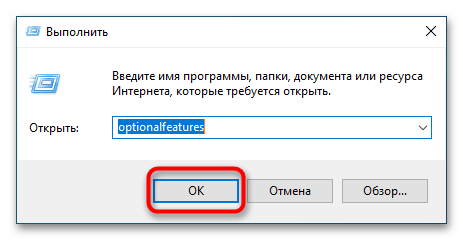
- Чтобы открыть основные компоненты, вызовите нажатием комбинации клавиш Win + R диалоговое окошко «Выполнить», введите в него команду
optionalfeaturesи нажмите клавишу ввода. - Чтобы открыть дополнительные компоненты, в этом же диалоговом окошке выполните команду
ms-settings:optionalfeatures.
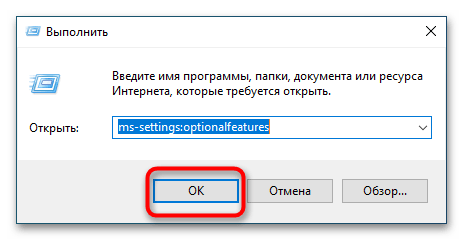
Также выполнять эти команды можно в адресной строке «Проводника» — результат будет тот же.
Способ 3: «Панель управления»
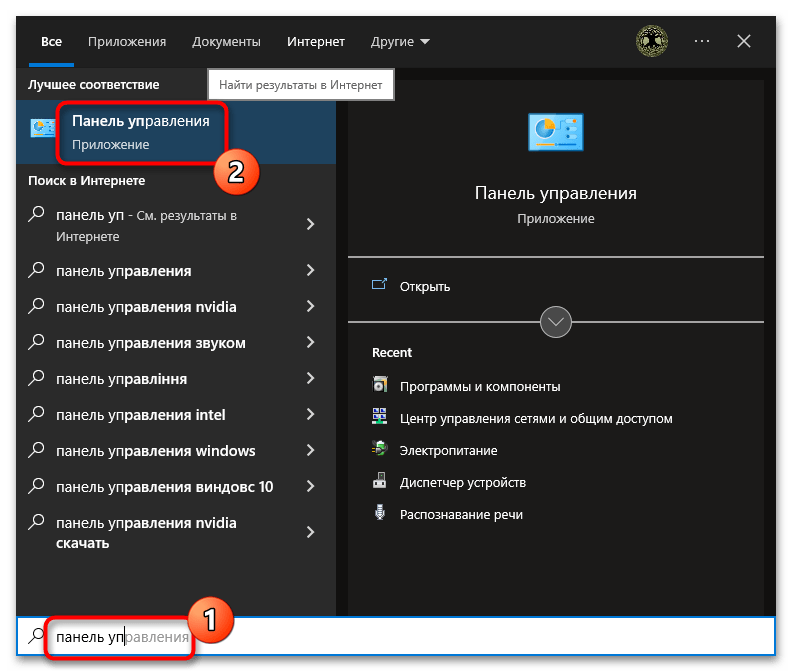
Открыть оснастку управления компонентами в Windows 10 можно также и по старинке — через классическую «Панель управления».
- Откройте классическую «Панель управления», воспользовавшись встроенным поиском Windows 10.
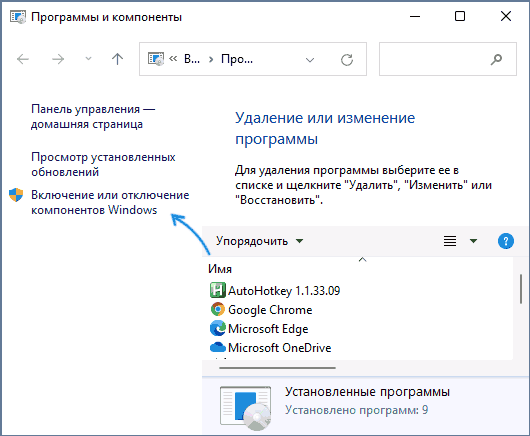
- Найдите апплет «Программы и компоненты» и запустите его.
- В меню слева нажмите ссылку «Включение и отключение компонентов Windows».
Способ 4:«Командная строка»
Этот способ вряд ли можно назвать удобным, но у него есть свои фишки, например возможность вывода список компонентов в файл.
- Откройте от имени администратора «Командную строку» или «Windows PowerShell».
- Выполните в консоли команду
Dism /online /Get-Features, чтобы вывести список доступных компонентов.
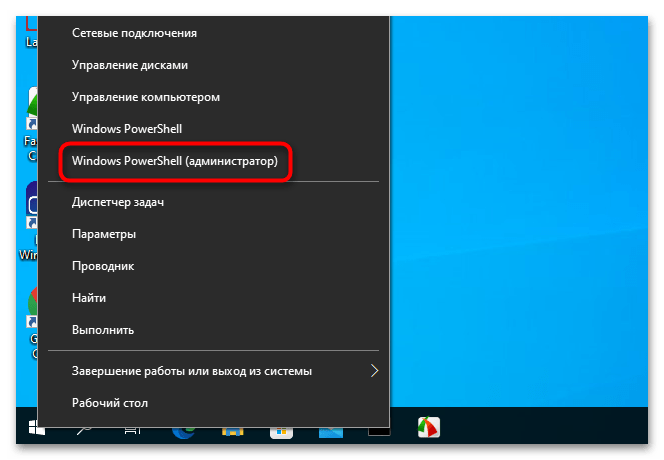

Названия модулей (имя функции) отображаются на английском языке, также указывается их статус – включен или отключен.
Наша группа в TelegramПолезные советы и помощь
In this tutorial I will show you, how to reach the Windows Features options in Windows 10 and how to use it to enable and disable Windows Features in Windows 10.
You can use the Windows Features to turn on or off the following features:
- .NET Framework 3.5
- .NET Framework 4.6
- Active Directory Lightweight Directory Services
- Embedded Shell Launcher
- Hyper-V
- Internet Information Services
- Internet Information Services Hostable Web Core
- Legacy Components
- Media Features
- Microsoft Message Queue
- MultiPoint Connector
- Print and Document Services
- Print as a PDF
- RAS Connection Manager Administration Kit
- Remote Differential Compression API Support
- RIP Listener
- Simple Network Management Protocol (SNMP)
- Simple TCPIP Services
- SMB 1.0 / CIFS File Sharing Support
- Telnet Client
- TFTP Client
- Unified Write Filter
- Windows Indentity Foundation
- Windows PowerShell 2.0
- Windows Process Activation Service
- Windows TIFF Ifilter
- Work Folders Client
- XPS Services
- XPS Viewer
Depending on your installation and device, some features might not be available or you might have more features. The above list was given as a way of showing you some features, features can change in upcoming updates.
How-to Enable or Disable Windows Features in Windows 10
1. Begin by opening the Control Panel, you can do this by typing “Control Panel” in the Cortana search bar or by right-clicking the Start logo and then choose Control Panel
2. In Control Panel click on Programs
3. Within programs click on Programs and Features
4. In the left pane you will now see the button Turn Windows Features on or off, click on that.
5. A UAC (User Account Control) message might appear, click on Yes or fill in an Administrator password.
You can now turn on and off certain features. I suggest you be careful with disabling features as Windows or your software might need them to function properly. In some cases Windows will warn you before you can disable features.
I hope this tutorial helped you to turn on or off Windows Features in Windows 10.
Managing Windows Features: A Guide for Windows 10/11
Published
5 min read
Turn Windows Features On or Off; Manage Windows Optional Features in Windows 11/10
Managing Windows features effectively can significantly enhance your computing experience, optimize performance, and customize your system to meet your specific needs. Windows 10 and Windows 11 come with a plethora of optional features that can be accessed and managed easily. This article aims to provide a comprehensive guide on turning features on or off and managing optional features in these operating systems.
Understanding Windows Features and Optional Features
Windows Features refer to built-in components of the operating system that provide additional capabilities. From Windows Media Player to Hyper-V, these features are not always enabled by default. Optional Features, on the other hand, are components and applications that can be installed or removed based on user preference. Understanding the difference between them is crucial for effective system management.
Why Manage Windows Features?
- Performance Optimization: Disabling unnecessary features can improve your system’s performance, particularly on older machines with limited resources.
- Security: Some features may introduce vulnerabilities if not actively used. Turning off unused features can reduce your attack surface.
- Storage Management: Optional features can consume storage space. Managing and disabling unused features can free up valuable disk space.
- Customization: Everyone has unique needs. Managing Windows features allows users to tailor their systems to fit their lifestyles and workflows.
Accessing Windows Features
Windows 10
-
Open the Settings Application:
- Click the Start menu (Windows icon) on your taskbar.
- Select Settings (the gear icon).
-
Navigate to Apps:
- In the Settings app, click on Apps.
-
Access Optional Features:
- In the Apps & Features section, click on Optional features at the top.
-
View Installed Features:
- You will now see a list of features installed on your system. From here, you can also add, remove, or manage these optional features.
Windows 11
-
Open Settings:
- Click on the Start menu or press the Windows key, then select Settings from the app list.
-
Go to Apps:
- In the Settings window, click on Apps in the left sidebar.
-
Select Optional Features:
- Click on Optional Features.
-
View and Manage Features:
- A list of installed optional features will be visible. You can add more by clicking on Add a feature.
Turning Windows Features On or Off
Turning features on or off can be done quickly through the ‘Turn Windows features on or off’ panel.
Accessing Windows Features Panel
-
Open Control Panel:
- Press
Windows Key + Rto open the Run dialog. - Type in
controland press Enter to open Control Panel.
- Press
-
Navigate to Programs:
- Click on Programs.
-
Turn Windows Features On or Off:
- Under the Programs and Features section, click on Turn Windows features on or off.
Manage Features
A window will pop up displaying a list of Windows Features. Here’s what you can do:
-
Enable a Feature: Check the box next to the feature you want to enable, then click OK. Windows will make the necessary changes and may require a restart.
-
Disable a Feature: Uncheck the box next to the feature you wish to turn off and click OK. Confirm any prompts that appear. Again, a restart may be necessary.
Important Windows Features to Manage
-
Windows Media Features: Enabling this allows you to play and manage digital media. If you don’t use Windows Media Player, you might want to disable it.
-
.NET Framework: Many applications require certain versions of the .NET Framework. Even if you don’t use it directly, you might want to keep it enabled for app compatibility.
-
Hyper-V: If you need to run virtual machines, enabling Hyper-V is essential. Turning it off can free up resources if you don’t use virtualization.
-
Windows Subsystem for Linux: This is valuable for developers who need to run Linux applications on their Windows machines.
-
Print and Document Services: If you don’t use printers or document services, you can turn this feature off to free up resources.
Adding Optional Features
Sometimes, you may want specific features that aren’t installed by default. Adding optional features is straightforward.
How to Add Optional Features
-
Open Optional Features:
- Follow the earlier instructions to open Optional Features in Settings.
-
Add a Feature:
- Click on Add a feature. You will see a list of the optional features available for installation.
-
Select a Feature:
- Scroll through the list or use the search bar to find a specific feature. Check the box next to the feature(s) you want to add.
-
Install the Feature:
- Click the Install button. Windows will download and install the features. You may not need to restart your computer, depending on the feature.
Notable Optional Features
-
OpenSSH Client: This feature allows you to securely connect to remote servers. Ideal for developers or IT professionals.
-
Windows PowerShell ISE: A useful feature if you’re working with PowerShell scripts.
-
Supplemental Fonts: If your work involves design, enabling supplemental fonts can be beneficial.
-
Media Features: Useful for those who utilize media applications and services.
-
XPS Viewer: If you regularly work with XPS files, consider enabling this viewer.
Removing Optional Features
Just as it is essential to add features, it’s equally important to remove those that you do not use.
Steps to Remove Optional Features
-
Access Optional Features:
- Navigate to the Optional Features as detailed previously.
-
Find the Feature:
- Scroll until you find the feature you want to remove.
-
Uninstall the Feature:
- Click on the feature, and select Uninstall. Confirm any prompts that appear.
Caution While Uninstalling
Always ensure that the features you opt to remove are not in use. Some features may be integral to system performance and functionality.
Troubleshooting Windows Features
Occasionally, you may run into issues while managing Windows features. Here are common troubleshooting steps:
-
Windows Update: Ensure your system is updated. Sometimes, certain features cannot be modified unless system updates are installed.
-
Check for Corrupted Files: Run the System File Checker (SFC) scan by opening Command Prompt as an administrator and typing
sfc /scannow. This can fix any corrupted system files that might be causing issues. -
Use DISM Tool: If SFC doesn’t solve your issue, use the DISM tool: type
DISM /Online /Cleanup-image /RestoreHealthin the Command Prompt. -
Check Permissions: Ensure you have the necessary administrative permissions to modify Windows features.
-
Restart Your Computer: Sometimes, a simple restart can resolve any lingering issues after you make changes.
Conclusion
Managing Windows features is an essential skill for every Windows user, whether on Windows 10 or 11. By understanding how to turn features on or off, add or remove optional features, and troubleshoot issues, you can greatly enhance your user experience and system performance. Tailoring your system to your preferences not only makes your computing environment more enjoyable but also efficient and secure. Regularly revisiting these settings can ensure that you’re making the most of your operating system and keeping your computer optimized.
Не все системные компоненты и даже не все стандартные программы включены в последних версиях Windows по умолчанию: для работы некоторых из них требуется установка со стороны пользователя. Это могут быть «Беспроводный дисплей», Песочница, виртуальные машины Hyper-V, .NET Framework или Telnet, Подсистема Windows для Linux, а в некоторых случаях даже такие программы как «Блокнот», которые тоже теперь относятся к опциональным компонентам.
В этой инструкции для начинающих о том, как установить дополнительные, не установленные по умолчанию, компоненты Windows 11 и Windows 10 — сейчас это выполняется сразу в двух расположениях системы.
- Установка компонентов в панели управления
- Дополнительные компоненты в Параметрах
- Установка в командной строке
Установка компонентов в панели управления
В Windows 11 и последних версиях Windows 10 установка дополнительных компонентов возможна сразу в двух расположениях: через панель управления и в параметрах. При этом компоненты в этих двух расположениях не дублируют друг друга. Сначала об установке компонентов в «Панель управления».
- Зайдите в Панель управления (можно использовать поиск в панели задач) и откройте пункт «Программы и компоненты». Второй путь попасть в нужное окно — нажать клавиши Win+R на клавиатуре, ввести appwiz.cpl и нажать Enter.
- В открывшемся окне слева нажмите «Включение или отключение компонентов Windows».

- Отметьте компоненты, которые требуется установить и нажмите «Ок».

- Дождитесь завершения установки, а при запросе на перезагрузку компьютера, выполните перезагрузку.
На этом установка требуемых компонентов будет завершена, и они должны исправно работать.
При необходимости удаления установленных описанным методом компонентов, зайдите в то же окно, снимите отметку с соответствующего компонента и нажмите «Ок»: будет выполнено удаление, для некоторых пунктов — с необходимостью последующей перезагрузки.
Как установить дополнительные компоненты в параметрах
Второе расположение, где выполняется установка дополнительных компонентов в последних версий Windows — «Параметры». Как было отмечено ранее, в списке доступных к установке элементов присутствует отличающийся от «панели управления» набор.
Установка дополнительных компонентов в Параметрах приложений Windows 11
В Windows 11 для установки дополнительных компонентов через Параметры выполните следующие шаги:
- Откройте Параметры (можно нажать клавиши Win+I) и перейдите в раздел «Приложения».
- Откройте пункт «Дополнительные компоненты». Обновление: в Windows 11 24H2 пункт «Дополнительные компоненты» находится в разделе «Система».

- В разделе «Добавление дополнительного компонента» нажмите «Посмотреть функции».

- Отметьте дополнительные компоненты, которые требуется установить и нажмите «Далее».
- Нажмите кнопку «Установить» и дождитесь завершения установки.


Опциональные компоненты в параметрах Windows 10
В Windows 10 все действия очень похожи, присутствуют лишь незначительные отличия в пути к нужным разделам параметров:
- Откройте Параметры и перейдите в раздел «Приложения».
- В пункте «Приложения и возможности» нажмите по ссылке «Дополнительные компоненты».

- Вверху следующего окна нажмите «Добавить компонент».

- Отметьте дополнительные компоненты, которые нужно установить и запустите установку кнопкой внизу окна выбора.


Установка компонентов в командной строке
Существует возможность установки дополнительных компонентов с помощью командной строке и команд Dism.exe. Получить список доступных в вашей версии Windows компонентов и их статус можно командой Dism /online /Get-Features
Последующая установка выполняется в командной строке, запущенной от имени администратора командой вида:
Dism /online /Enable-Feature /FeatureName:ИМЯ_функции /All
Более подробно об управлении дополнительными компонентами с помощью Dism можно прочитать в официальной справке на сайте Майкрософт.
You can read this article to learn the ways to enable or disable Windows features effortlessly.
Windows is an operating system rich in features. It offers a plethora of features that you may or may not need. However, only some of these optional tools are necessary for all users. You can turn these Windows features on or off depending on your requirements.
Turning off the unneeded features helps save resources and improve the computer’s performance. However, deactivating a Windows feature does not uninstall it, you can reactivate it whenever you want.
However, many users need clarification about how to activate or deactivate Windows features. You may find this article helpful if you are also one of those users.
This article guides you through quick and simple ways to turn Windows features on/off. Let us begin with them without wasting your precious time.
Easy Methods to Turn Windows Features On or Off
You can follow any of these approaches to turn Windows features on/off according to your needs.
Method 1: Use the Control Panel to turn Windows features on or off
The Control Panel in Windows allows you to change various settings on your computer, including adding or removing the optional features. Hence, here are the steps you can follow to turn the Windows on/off using the Control Panel.
Also Read: How to Get Help in Windows 10
Method 2: Use Powershell to turn on/off Windows features
Powershell is an extremely useful tool in Windows to perform various tasks, such as enabling a Windows feature if it is not installed already or disabling it. Here are the steps you can follow to get the required information about a Windows feature to activate or deactivate it.
- Firstly, right-click the Windows icon and select Windows PowerShell (Admin) from the on-screen options.
- Now, input the command Get-WindowsOptionalFeature -Online in the on-screen window and press the Enter key to get information about various features.
- If you wish to know about a particular feature, enter the command Get-WindowsOptionalFeature -Online -FeatureName *Type feature name*.
- To enable a Windows feature, input the command Enable-WindowsOptionalFeature -Online -FeatureName “Type feature name” -all.
- To disable a Windows feature, enter the command Disable-WindowsOptionalFeature -Online -FeatureName “Type feature name”.
Method 3: Turn Windows features on or off using Command Prompt
Command Prompt is another command line utility that lets you perform tasks like adding or removing Windows features. The difference between Command Prompt and Windows Powershell is that the latter does not perform feature installation if the feature is already active on your computer, saving system resources. Hence, Powershell is preferred over the Command Prompt. Still, here is how you can turn a feature on/off through the Windows Command Prompt.
Note: Above are the steps to enable a Windows feature through Command Prompt. The steps to disable Windows features slightly differ from the steps to enable a feature. We share them below.
- After opening the Command Prompt as an administrator, input the command DISM /online /get-features /format:table | find “Enabled” | more to get a list of enabled features.
- Now, copy the name of the feature you want to disable.
- Input the command DISM /online /disable-feature /featurename:[Enter the name of the feature here] -All and press the Enter key.
Also Read: Windows 11 22h2 Update: New 10 Features You Should Use
Method 4: Use Windows settings to enable/disable Windows features
You can manage your computer’s features through settings. Here is how to turn Windows features on or off through settings on Windows 10 and 11.
Enabling/disabling Windows features via settings on Windows 10
Adding/removing Windows features via settings on Windows 11
- Firstly, launch the settings app using the Windows+I shortcut.
- Now, choose Apps from the left pane and Optional features from the right section of the on-screen window.

- Now, you can remove the feature you do not want by clicking on the arrow next to it and selecting the Uninstall option.
- If you want to enable an optional feature, you can follow the path Apps>Optional features>View features>Select the feature you need to enable>Next>Install.

Summing Up
This article discussed various methods you can follow to turn Windows features on or off. You can try any of these approaches depending on your convenience. If you have any confusion, questions, or suggestions about this article, please leave us a comment.
Also Read: Windows 10 ‘News and Interests’ Taskbar Feature Rolling Out
We hope you found this article helpful. If you did find it useful, please share it with your peers who may be interested in turning Windows features on/off. We will see you in some time with another interesting article. Meanwhile, you can go through our other posts to gain more technology knowledge.