
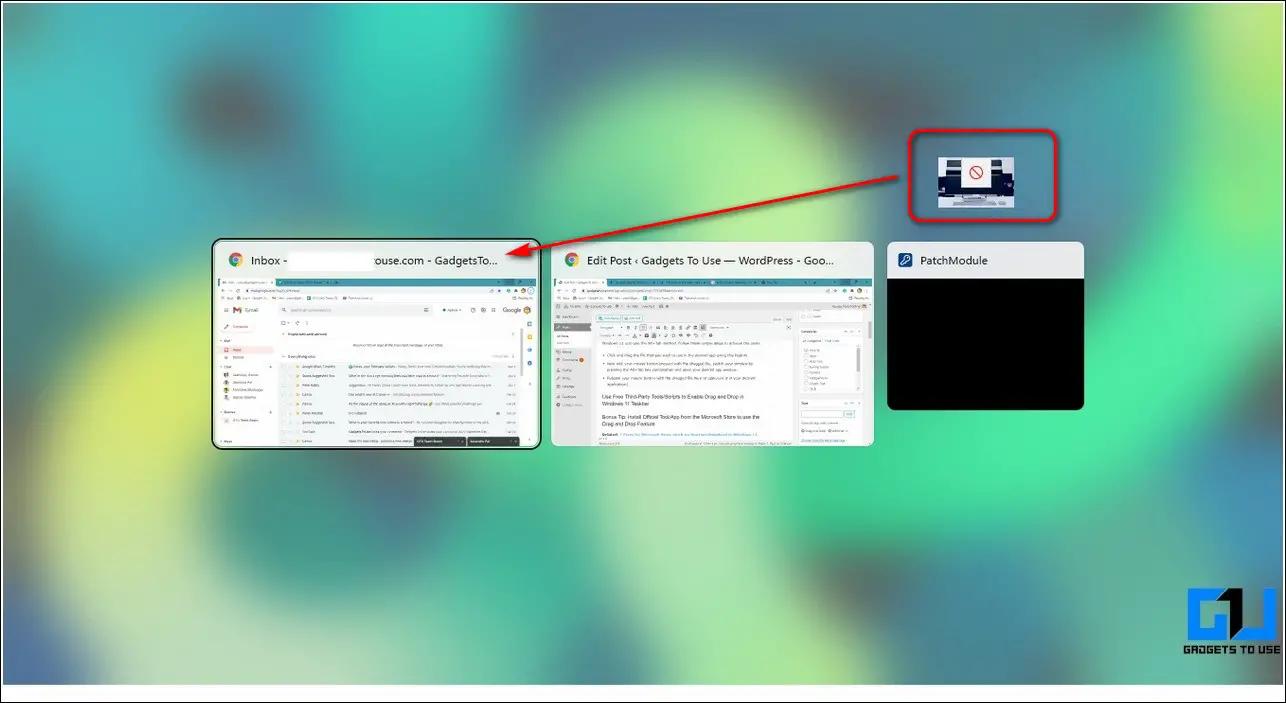
Одним из самых неприятных для меня «нововведений» Windows 11 стало отключение возможности перетаскивать файлы (Drag and Drop) на значки открытых программ в панели задач. Если ранее, отыскав в проводнике нужный файл, я мог перетащить его на значок свёрнутой программы, и она открывалась, готовая «принять» этот файл, теперь это не работает.
В предварительных сборках это можно было исправить в редакторе реестра, но этот способ больше не работает. Есть информация, что в будущих версиях ОС эту функциональность вернут. Однако для того, чтобы включить поддержку перетаскивания файлов уже сейчас, придётся прибегнуть к сторонним средствам — бесплатной утилите Windows11DragAndDropToTaskbarFix.
Включение поддержки Drag and Drop для панели задач в Windows11DragAndDropToTaskbarFix
Единственная задача бесплатной программы Windows11DragAndDropToTaskbarFix — вернуть прежнее поведение панели задач Windows 11 при перетаскивании файлов на значки открытых программ. Использование очень простое:
- Скачайте последнюю версию утилиты с официальной страницы разработчика и сохраните файл в удобное вам расположение. Учитывайте, что фильтр SmartScreen в Microsoft Edge и Windows могут блокировать загрузку и запуск файла как малоизвестного.
- Запустите программу (при сообщениях о том, что система не обнаружила файлы VCRUNTIME140_1.DLL и другие, используйте эту инструкцию). После запуска откроется окно командной строки, которое через короткое время само закроется.

- Сразу после этого вы сможете перетаскивать файлы и другие элементы на значки открытых программ в панели задач Windows 11.


Дополнительно, в папке с программой вы можете создать файл конфигурации с именем Windows11DragAndDropToTaskbarFixConfig.txt и добавить в него параметры, такие как включение автоматического запуска Windows11DragAndDropToTaskbarFix при входе в систему. Подробнее о файле конфигурации можно прочитать на официальной странице.
В моем тесте утилита исправно работает, из замеченных нюансов:
- При перетаскивании файлов всё так же отображается красный перечеркнутый значок «запрета действия» (но на работоспособность не влияет).
- В отзывах о проблемах с программой на GitHub есть информация о том, что при использовании нескольких мониторов, на втором монитора программа может работать неправильно.
При работе утилита не показывает своих значков в панели задач или области уведомлений: если вам требуется закрыть её, используйте диспетчер задач.
Quick Answer
- Another working method to enable the drag and drop feature in your Windows 11 taskbar is to use an official Microsoft app providing the same.
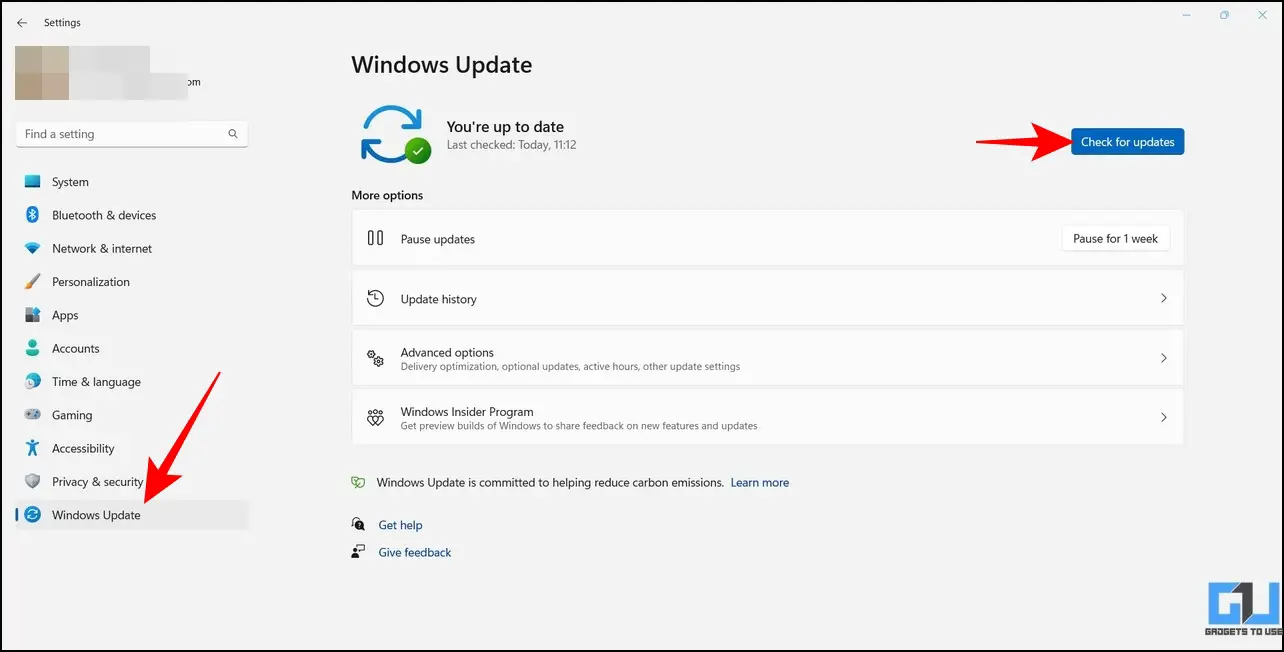
- Press the Windows + I key to open the Settings app and expand Windows Update in the left sidebar to check for new system updates.
- Try dragging a file to your taskbar and then pick the desired app window in which you wish to open it.
Despite Windows 11’s new useful features, Microsoft removed some existing ones, such as the Drag and Drop file feature, creating inconvenience for basic navigation activities. That said, if you’re unhappy about the same and wish to bring it back, this explainer has precisely what you need. In this article, we have demonstrated several effective methods to get the Drag and Drop feature on Windows 11 taskbar. Additionally, you can learn to install Windows 11 on Unsupported Systems with just a single tool.
How to Get Drag and Drop Feature on Windows 11 Taskbar
With the help of several tools and tweaks, restoring the drag-and-drop feature on Windows 11 is pretty simple. Follow these methods to achieve the same.
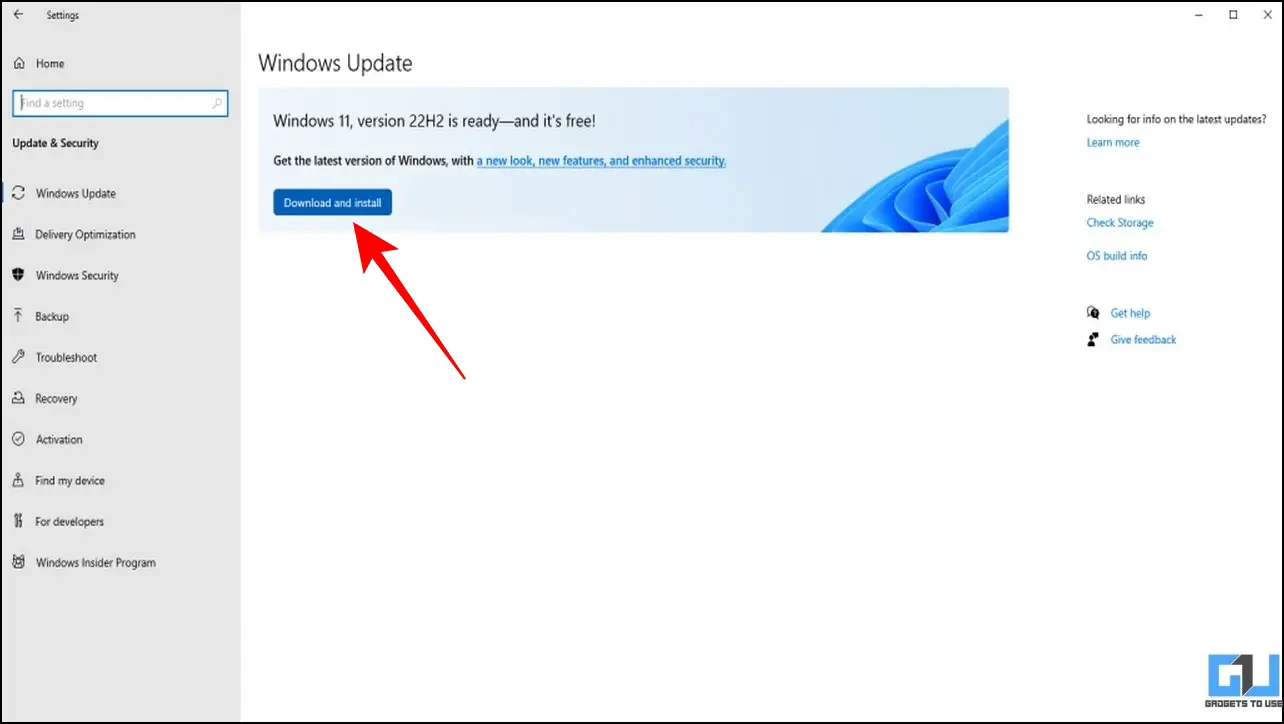
Upgrade to the Windows 11 22H2 Update
After getting a boatload of user requests to restore the drag-and-drop taskbar functionality, Microsoft has finally rolled it out in its 22H2 feature update. Here’s how you can update your system to experience it.
1. Press the Windows + I key to open the Settings app and expand Windows Update in the left sidebar to check for new system updates.
2. Wait a few seconds to receive the latest 22H2 update. Click the Download and Install button to upgrade your system.
3. If you haven’t received the 22H2 update yet, follow the next methods to achieve the same.
Try Alt+Tab Method to Simulate the Drag and Drop Feature
One of the simplest workarounds to achieve this functionality in Windows 11 is to use the Alt + Tab method. Here’s what you need to do:
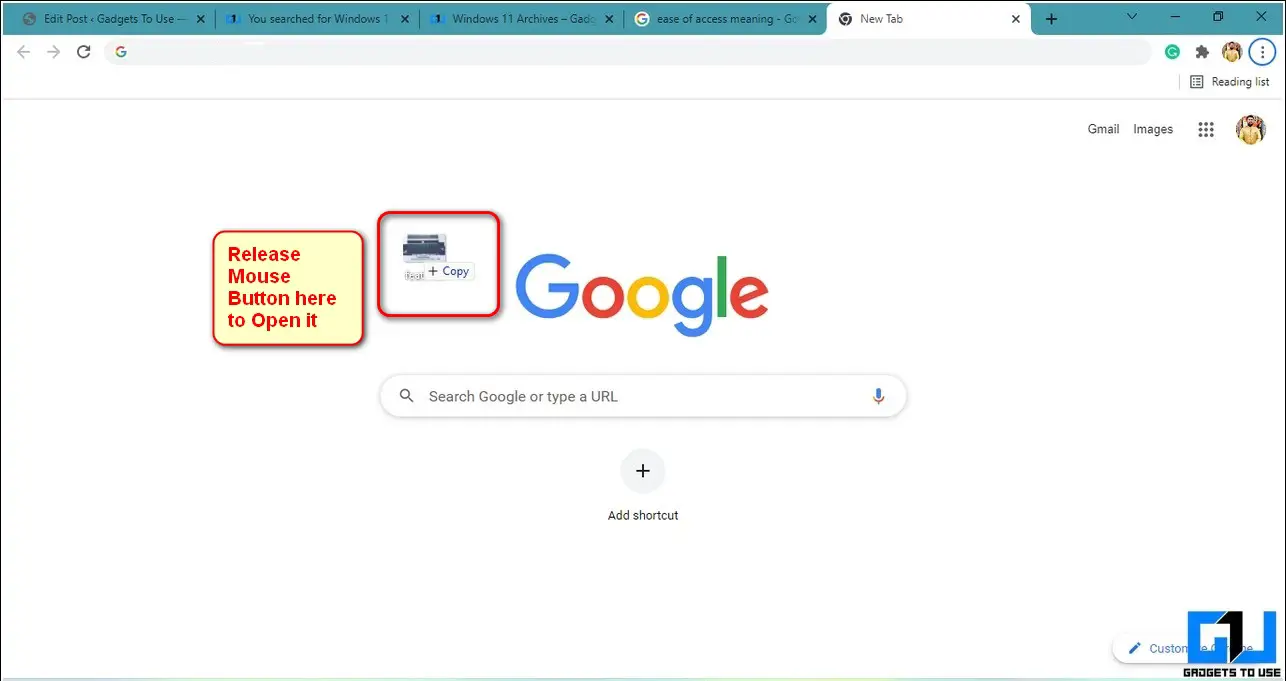
1. Click and drag the file you wish to use in the desired app using this feature.
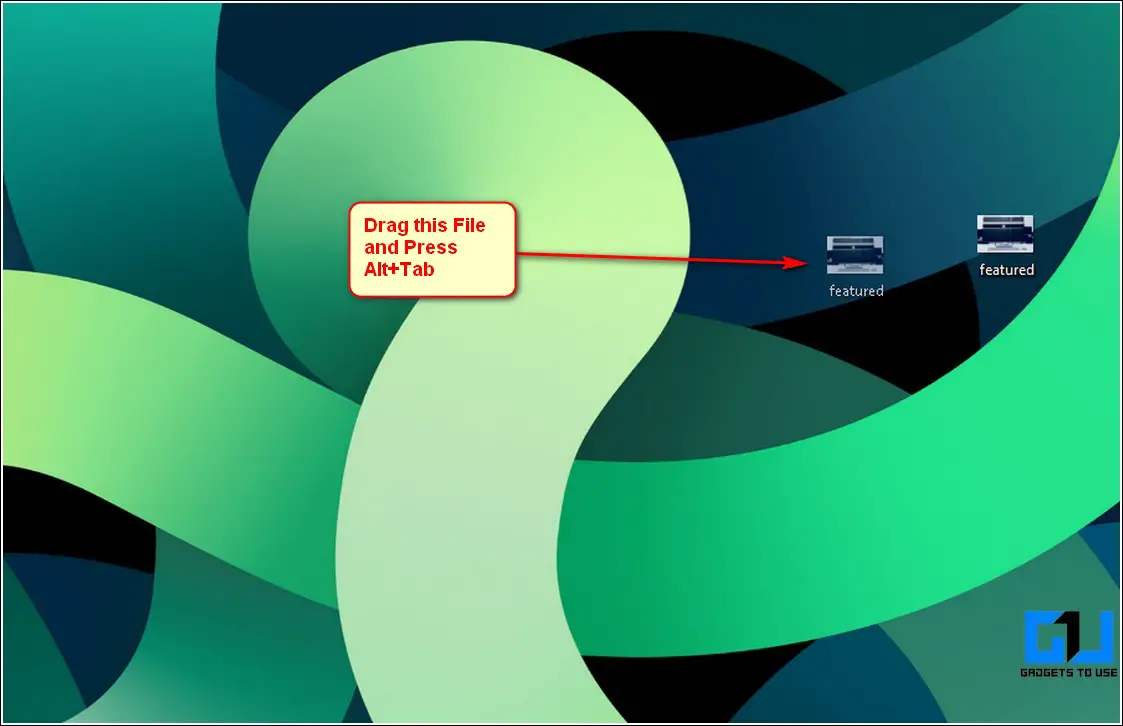
2. Now, press the mouse button and drag the file, switch your window by pressing the Alt+Tab key combination, and open your desired app window.
3. Release your mouse button with the dragged inside the opened window to open/use it in your desired application. That’s it. You’ve successfully opened your file inside your desired application using the drag and drop feature similar to taskbar functionality.
Use Free Third-Party Tools/Scripts to Enable Drag and Drop Feature
Another effective fix to enable the drag-and-drop feature in Windows 11 taskbar is to use a free tool/script available on GitHub. Follow these steps to achieve the same.
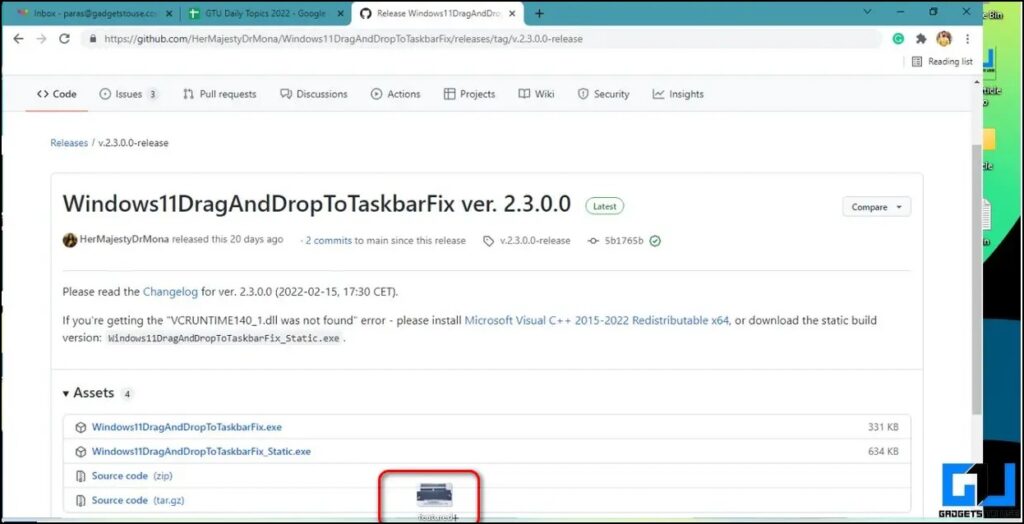
1. Access the GitHub page for the Windows 11 Taskbar Fix.
2. Next, click the Windows11DragAndDropToTaskbarFix.exe file to download it.
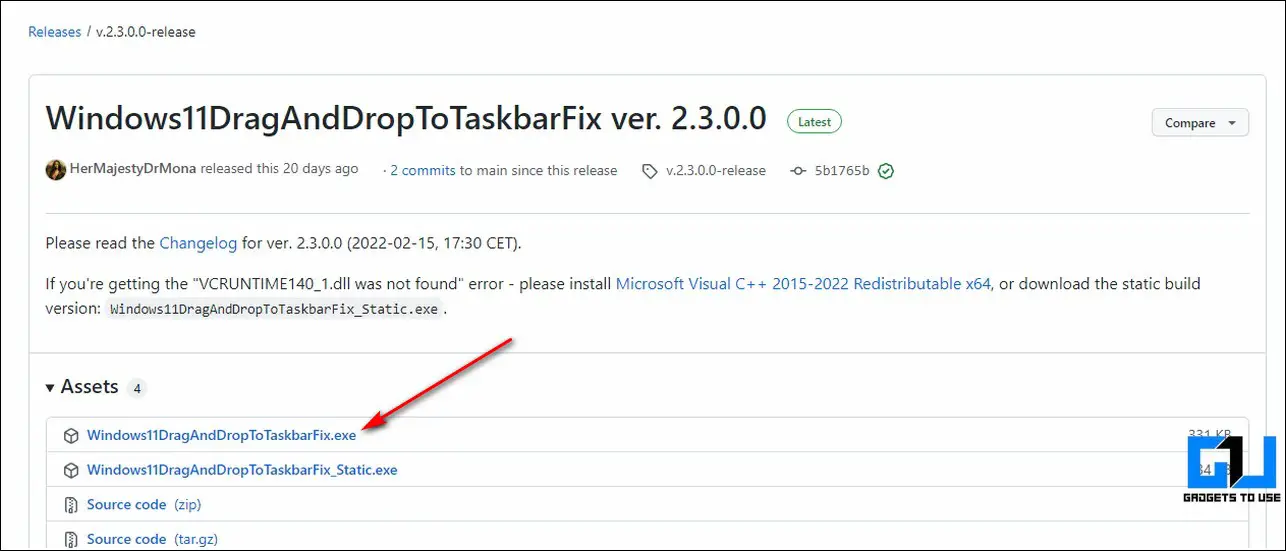
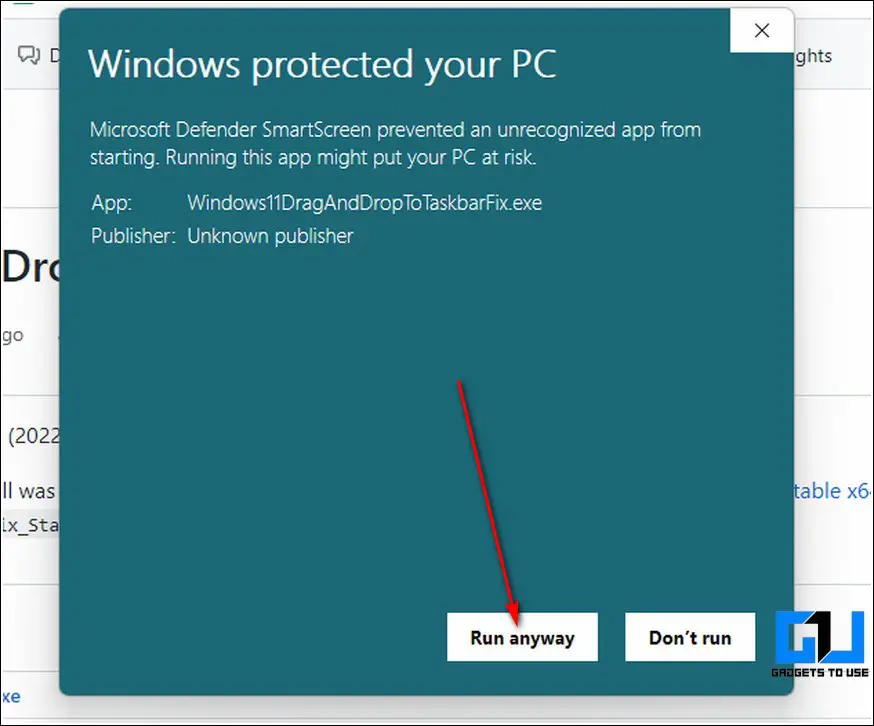
3. Double-click on the downloaded file to install it. Click on the Run Anyway button if prompted by the Microsoft Installer.
4. That’s it. The tool will now start automatically on your Windows 11 system. Try dragging a file to your taskbar and then pick the desired app window in which you wish to open it. Congrats. You can now easily use this feature in your Windows 11 taskbar.
Tweak the Windows Registry Files
Besides downloading third-party tools and scripts, you can also tweak Windows Registry files to revive the drag-and-drop taskbar feature. Here’s what you need to follow.
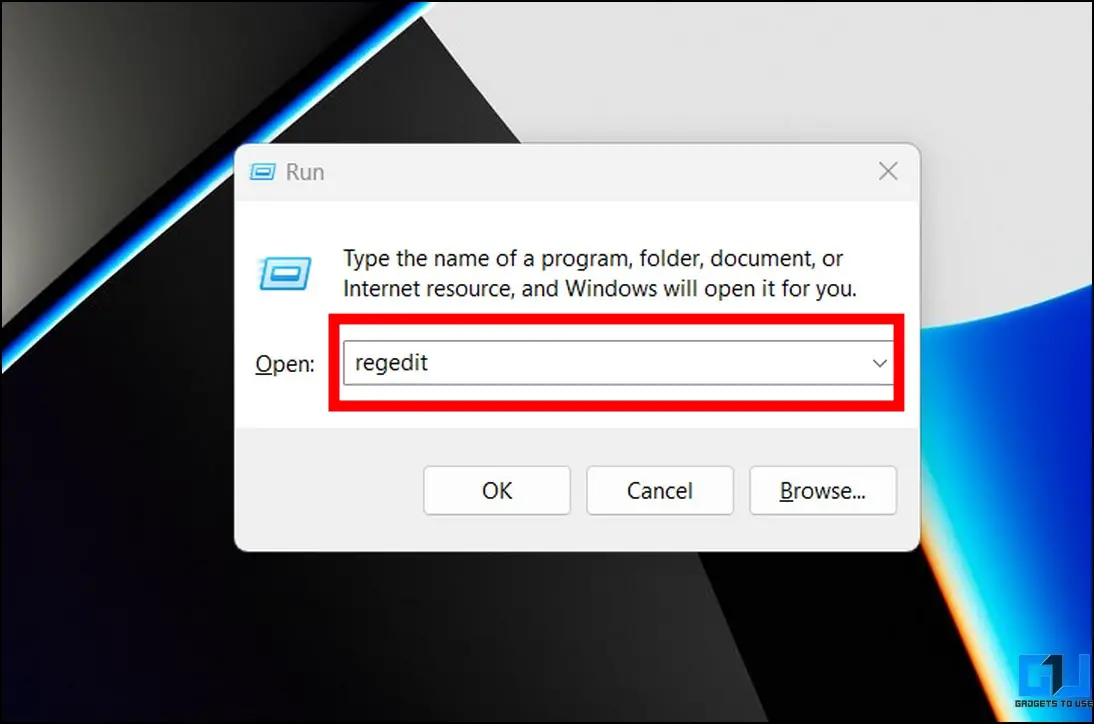
1. Open the Run window by pressing the Windows + R hotkeys and type ‘regedit‘ to run the Registry Editor window.
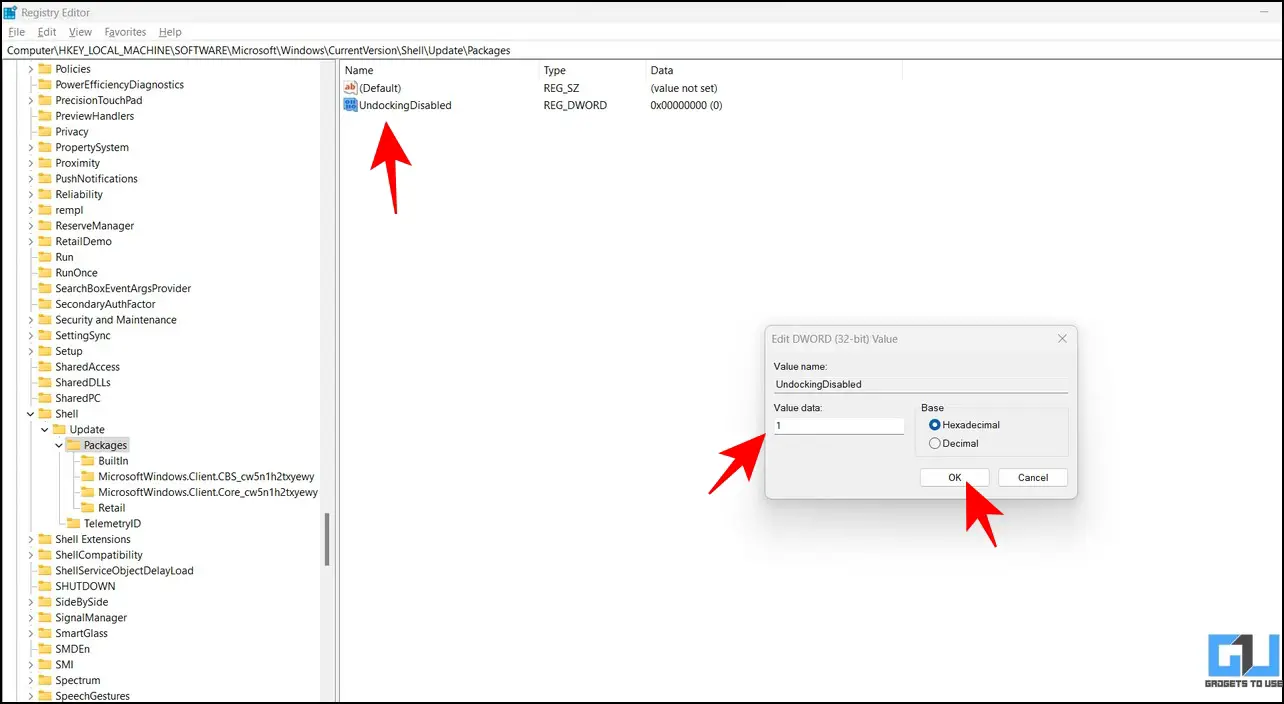
2. Next, copy and paste the following path in the navigation bar and hit the enter key.
HKEY_LOCAL_MACHINE\SOFTWARE\Microsoft\Windows\CurrentVersion\Shell \Update\Packages
3. Right-click the Packages folder to create a new DWORD (32-Bit value).

4. Name this key as ‘UndockingDisabled‘ and set its value to 1. Click the OK button to save changes.
5. Restart your system to experience changes.
Note: Enabling the drag-and-drop taskbar functionality using this method makes the Start and Search taskbar icons static, i.e., you can not click to use them. To revert changes, you can delete the created Undocking Disbaled in the Registry Editor app and reboot your system.
Install the Official Microsoft Store App to get Drag and Drop Feature
Another working method to enable the drag and drop feature in your Windows 11 taskbar is to use an official Microsoft app providing the same. Follow these steps for an easy fix.
1. Open the Microsoft Store app on your Windows 11 system.
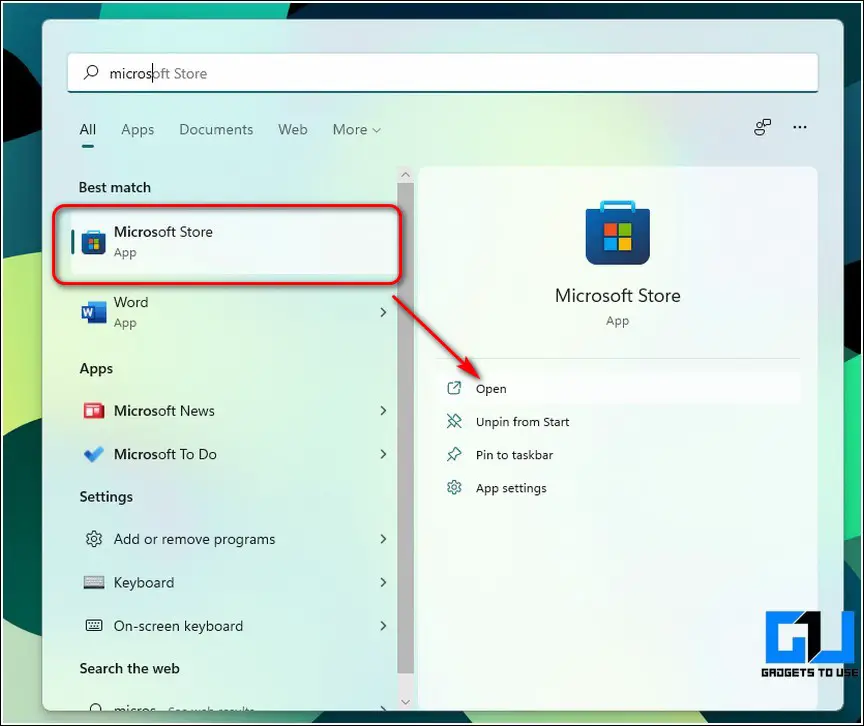
2. Next, search for the Drag and Drop Toolbar for Windows 11 app and click the Get button to install it to your system.
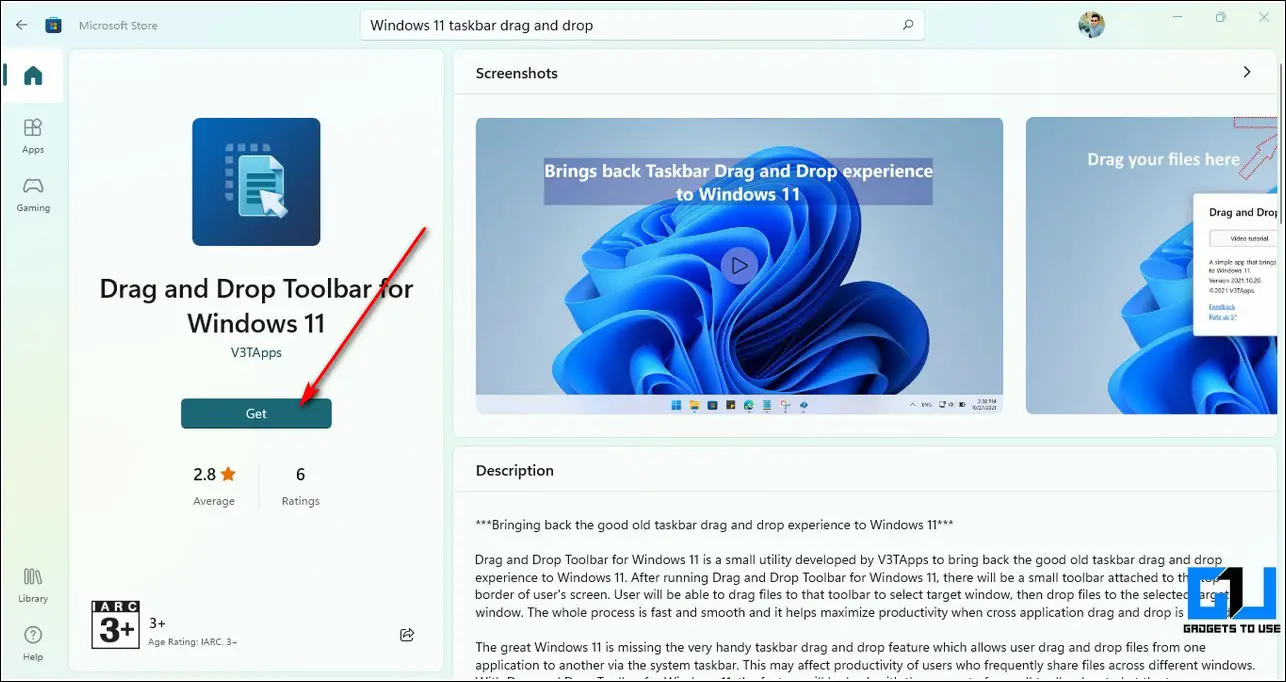
3. This app will now launch a separate notch-shaped taskbar at the top-middle center of your screen.
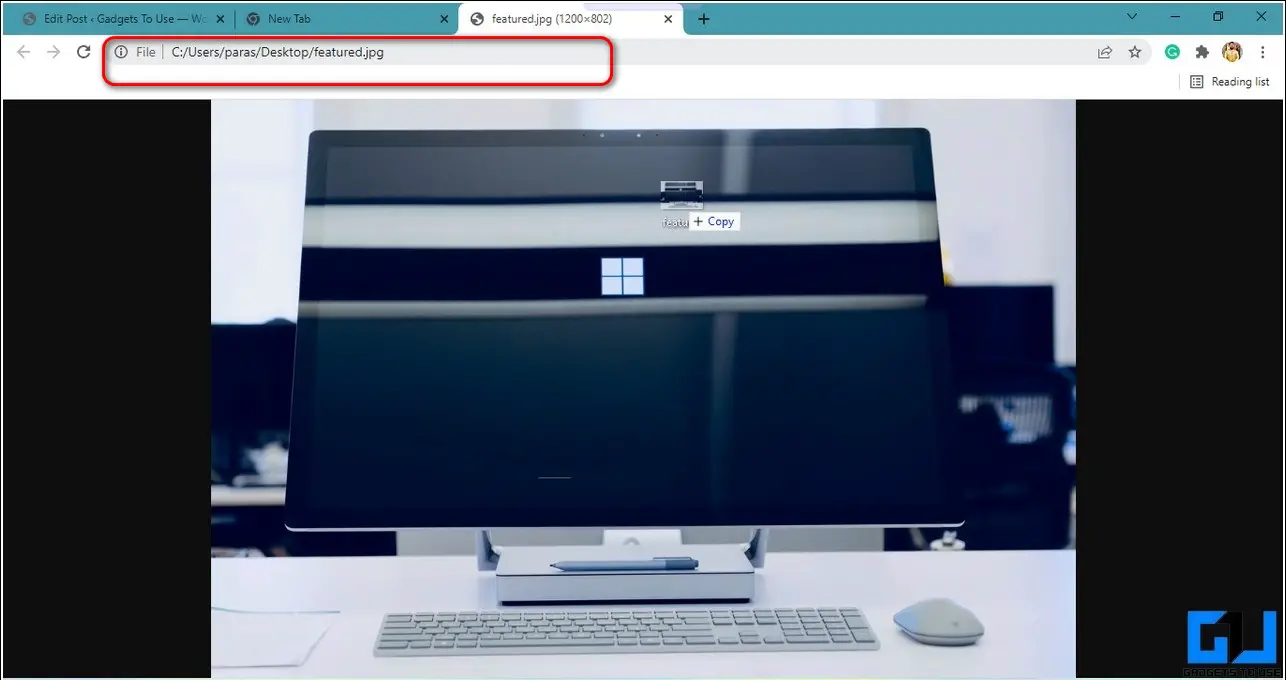
4. You can drag your file to this mini taskbar to open your file in the desired application.
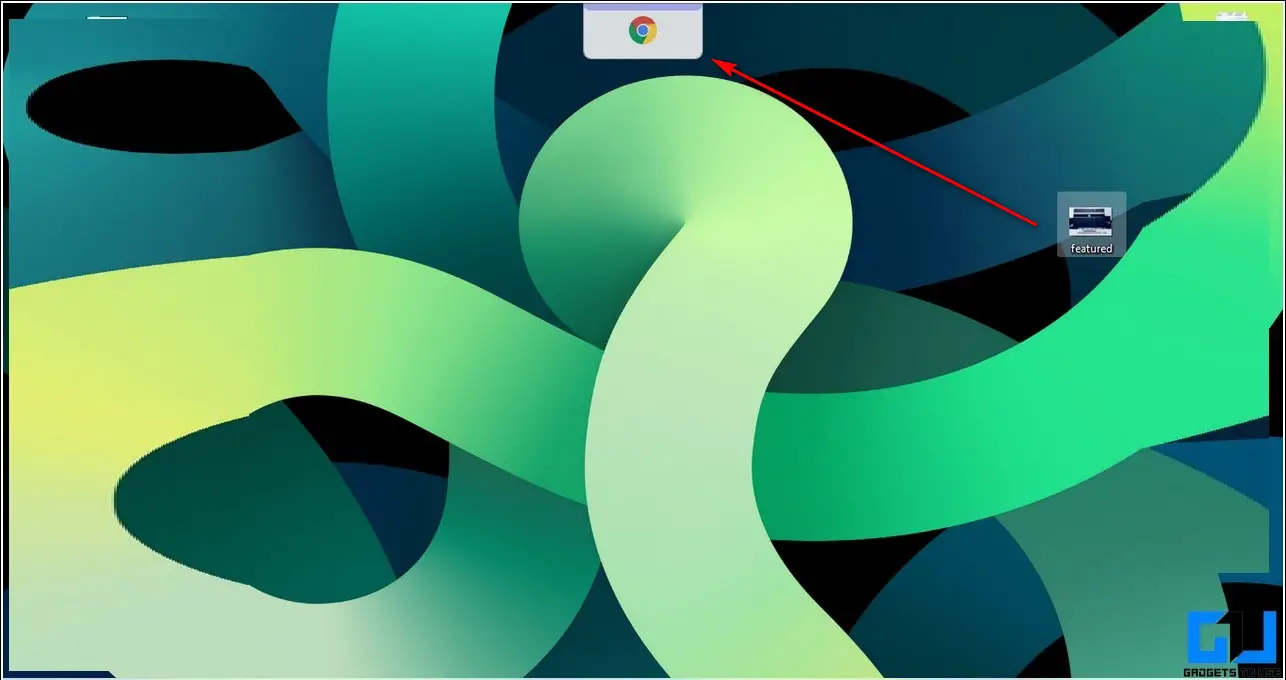
5. Your dragged file will instantly open in your chosen application.
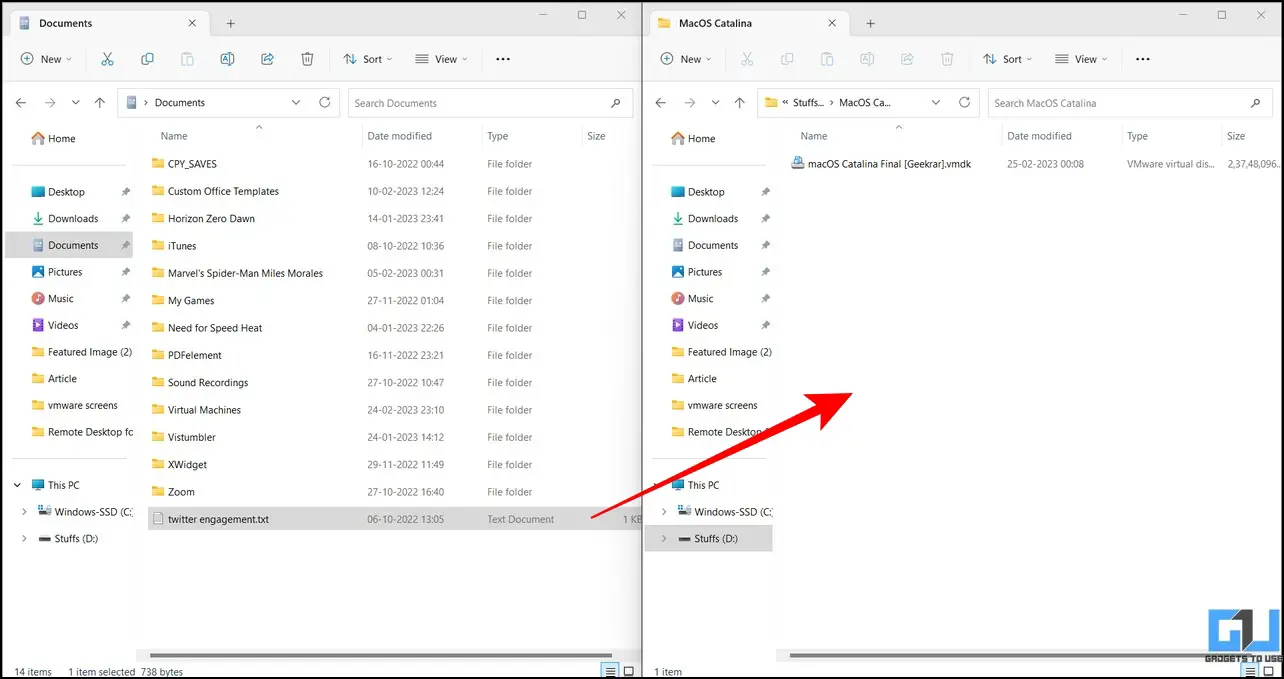
Bonus: Switch Screen Layout to Drag and Drop files Quickly
Besides using the taskbar to drag and drop files, you can switch your current screen layout on Windows 11 to open two or more folders for exchanging files. Follow these easy steps to achieve the same.
1. Open your desired folder and hover the mouse cursor over the Maximize/Minimize button to switch screen layouts.
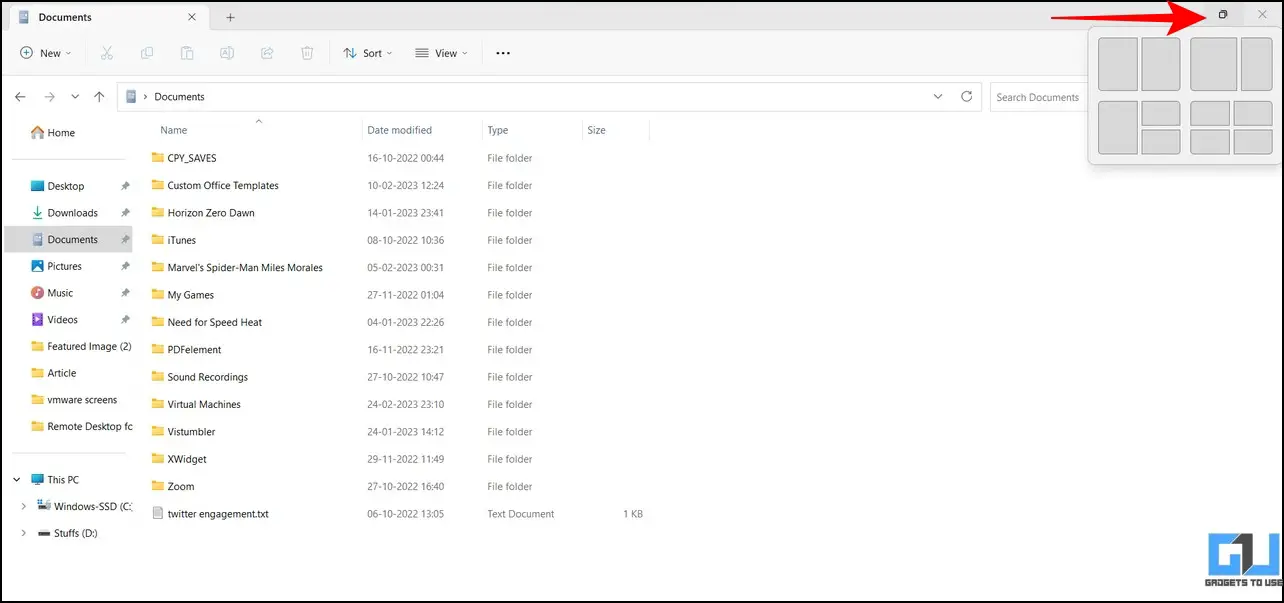
2. Pick your preferred split screen layout and open the folders to exchange files between them.
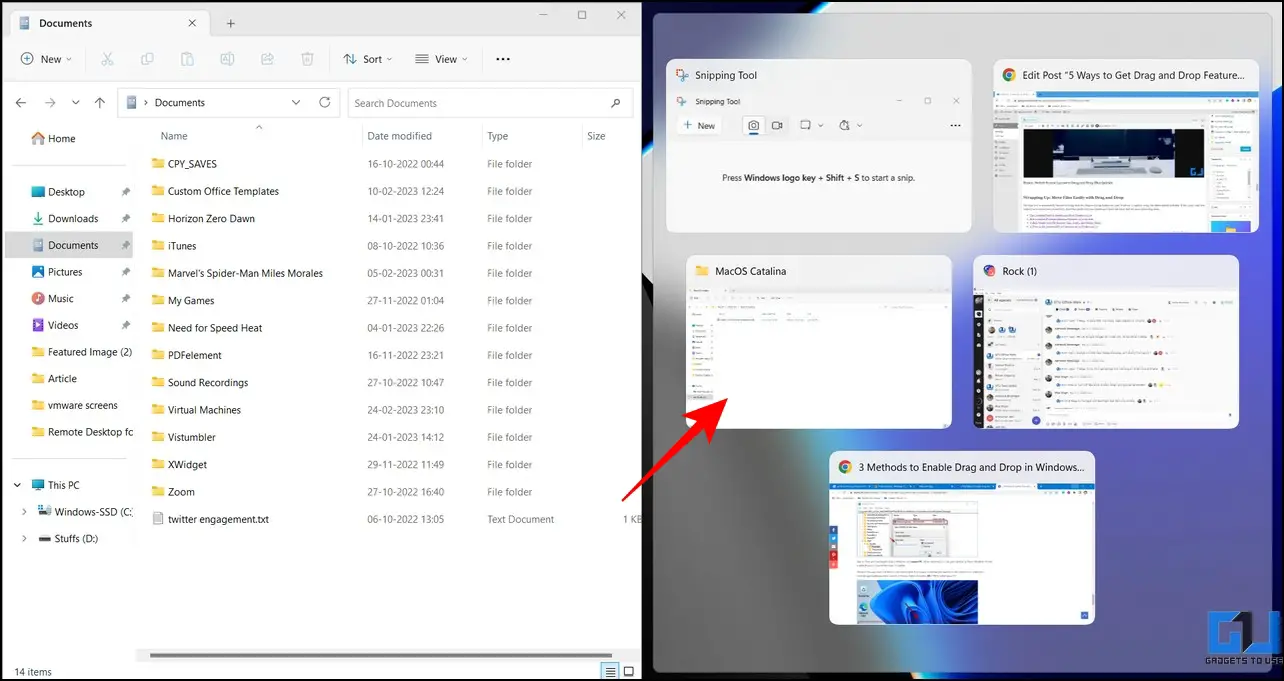
3. Finally, drag your file from one folder to another to transfer it.
FAQs
Q: How to enable the drag-and-drop feature in Windows 11 taskbar?
A: You need to install the 22H2 update of Windows 11, to get the drag-and-drop feature. In case you have not received the update, follow the other easy methods in this explainer to enable the drag-and-drop feature on Windows 11 taskbar.
Q: How to use the GitHub tool to use drag and drop on Windows 11?
A: GitHub’s taskbar fixer tool tweaks the system to make drag and drop available to Windows 11 users. For more details, refer to the method listed above.
Wrapping Up: Move Files Easily with Drag and Drop
We hope you’ve successfully learned to bring back the drag-and-drop feature on your Windows 11 taskbar using the above-tested methods. If this quick read has helped you to boost your productivity, share this guide with your friends and check the below link for more interesting reads. Stay subscribed to GadgetsToUse for more such reads.
You might be interested in the following:
- The Complete Guide to Install macOS on Windows 11/10
- 6 Ways to Pin Any App or Feature to Taskbar in Windows 11
- 15 Best Windows 11 File Explorer Tips, Tricks, and Hidden Hacks
- 11 Ways to Fix Internal SSD not showing up in Windows 10/11
You can also follow us for instant tech news at Google News or for tips and tricks, smartphones & gadgets reviews, join GadgetsToUse Telegram Group, or for the latest review videos subscribe GadgetsToUse Youtube Channel.
Was this article helpful?
YesNo
Windows 11 comes with lots of useful features and a refined user interface. One of the most anticipated changes is an improved taskbar which is based on XAML modern code.
What changes in Windows 11 Taskbar is that app icons are aligned to the center, although it’s possible for users to change app icon alignment and there are lots of changes that you might have noticed after upgrading to Windows 11.
The majority of users reported that Drag and Drop files to Taskbar functionality is not working. The same feature works flawlessly in Windows 10 and earlier versions of Windows OS.

What actually happens, when users try to drag and drop files on the Taskbar and an alert icon appears on that block file from dropping and as a result stops the action.
When Windows 11 was available in the Insider channel, it was common and the majority of users were hoping that the company will fix this when the stable build is released.
According to Microsoft, it’s not a bug but the functionality is unavailable in Windows 11. Although, they have been receiving lots of feedback from users to restore Drag and Drop functionality in Windows 11.
Microsoft has already started testing the same functionality with users but in Insider builds. And it is possible that the drag-drop feature will be available in Windows 11 soon.
As of now, the truth is that drag and drop files to Windows 11 taskbar is not working. In case, you can’t wait for Microsoft to add this functionality and want to use it right away, then there’s a third-party tool available to enable this functionality.
Let’s learn how to do that:
Download Windows11DragAndDropToTaskbarFix using this link from Github.

While downloading the app it is possible that you get a warning that it’s not safe. We have already tested it and works flawlessly.
The final decision is yours, whether you want to continue or not.

Double-click to run the executable file. Instantly console window will open up, the same will close automatically after a few seconds.

Note – In case, console window fails to open and gives you an error message that missing vcruntime140_1.dll file. In this situation, download-install vc_redist.x64.exe from the C++ runtime from Microsoft.
This confirms that Drag and Drop files to Taskbar functionality is enabled. And you can start using it.
You won’t find applications on the desktop as well as on the desktop, and in the notification area of Windows 11.

At any point, you want to exit or turn off drag-drop files to taskbar functionality, then you need to launch a Command prompt and execute this: and hit enter.taskkill /IM Windows11DragAndDropToTaskbarFix.exe /F
Customize Drag-Drop to Taskbar functionality
There’s a possibility of customizing the same program using a text file. If you’re interested, then here’s how you can do that:
Create a new folder with the name of your choice.
Place the same Windows11DragAndDropToTaskbarFix.exe file in the folder that you have created.
Now create a new text file and name it Windows11DragAndDropToTaskbarFix.txt
Depending on your choice, you can tweak the tool. Head over to this page and copy-paste one of your choices.

We want the program to run automatically on system startup. For that, copy-paste this: AutomaticallyRunThisProgramOnStartup=1in notepad file.
To Disable = 0 and Enable = 1
Once done, save the file, and from now onwards whenever you run the program it will run automatically on the start.
Following the same procedure, you can weak the tool as per your choice.
The only problem with this tool is waning icon still appears even when the drag-drop file to taskbar functionality is enabled. Although we’re ok with that and we presume you too.
Why don’t you try this tool and let us know if you find Windows11DragAndDropToTaskbarFix 1DragAndDrop useful? Let us know your opinion in the comments.
Viney Dhiman, the mind behind GeekerMag, is a seasoned content writer with over 12 years of experience. Specializing in simplifying complex tech concepts, he covers Windows OS, Android, iOS, web apps, and product reviews. His work can be found on popular tech websites like Gizmodo and The Verge, and he has been interviewed by the Microsoft Edge team.
В этой публикации, друзья, рассмотрим животрепещущий вопрос Windows 11 – как вернуть её панели задач возможность перетаскивания на неё ярлыков. У Windows 11 новая панель задач, переработанная в рамках в рамках комплексной переделки системного интерфейса на современный лад, с использованием современного производительного WinUI на базе оптимизированного ядра C++. Панель задач Windows 11 получила новые возможности типа функции групп привязки и стыковки окон, но утратила ранее былые возможности типа крепления по верхнему и боковым краям экрана, настройки разных размеров значков, перетаскивания на панель ярлыков. Последней возможностью, как оказалась, в прежних версиях Windows пользовались многие, и одним из активных пользовательских запросов по улучшению Windows 11 к компании Microsoft является возврат как раз таки этой возможности. Microsoft планирует решить этот вопрос, но аж через год. Ну а пока что решить вопрос можно путём реализации в Windows 11 классической панели задач. Это сделать, в частности, с помощью программы-твикера Winaero Tweaker и программы-кастомайзера StartIsBack.
Бесплатная программа-твикер Winaero Tweaker хороша в случае комплексного применения её возможностей, в частности, твиков по возврату в Windows 11 классических функций. Детальнее об этих функциях, о возможности включения классической панели задач смотрите в статье сайта «Winaero Tweaker для Windows 11».
Программа StartIsBack предназначена только для Windows 11, и она реализует в ней комплекс классических функций Windows – меню формата Windows 7, проводник формата Windows 10 и 7, а также классическую панель задач. Реализуемая программой панель задач не сможет, как нативная в Windows по версию 10 включительно, крепиться вверху или по бокам экрана, но будет предусматривать настройку разных размеров значков, а главное — перетаскивание на панель ярлыков.

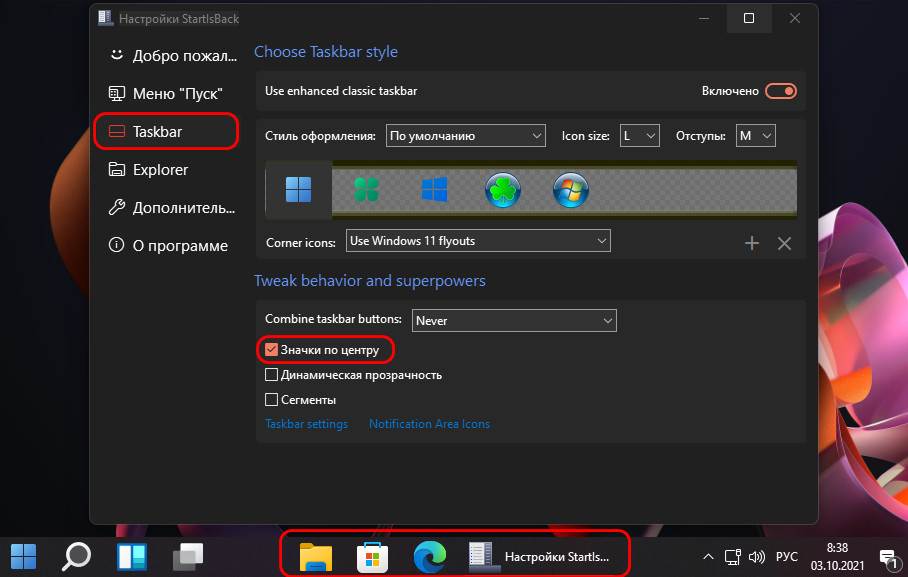
При этом такая панель задач утратит возможности нативной Windows 11. При установке StartIsBack мы автоматически получим классическую панель задач, в программных настройках она активна по умолчанию.
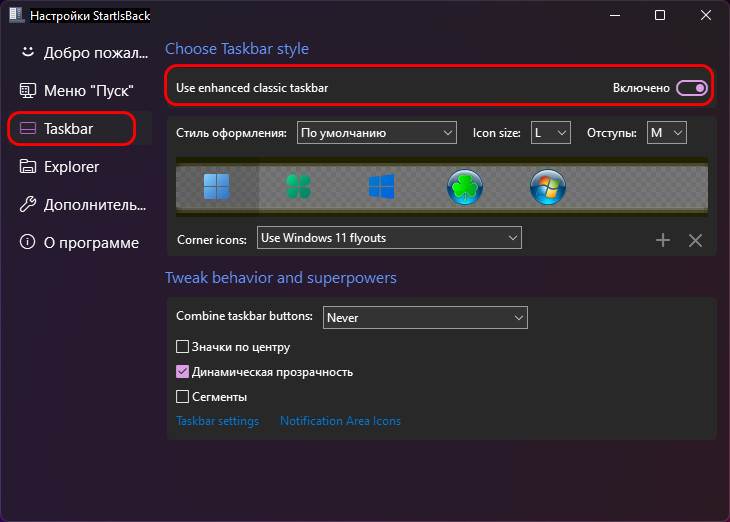
По умолчанию мы также получим классическое меню «Пуск» формата Windows 7, это основная функция StartIsBack. Если оно не нужно, просто отключаем его в настройках.

Реализуемая программой панель задач именно классическая, поэтому она предусматривает расположение кнопки «Пуск» только слева. Но в настройках панели можно сделать так, чтобы слева располагались кнопки меню, поиска, представления задач и виджетов, а ярлыки программ были центрированными.
Настройки StartIsBack появятся при первом запуске программы, позднее получить к ним доступ можно, введя в системный поиск:
Друзья, подробнее о программе StartIsBack, о её возможностях, о том, где скачать, смотрите в статье «Как сделать в Windows 11 классические меню «Пуск», панель задач и проводник с помощью StartIsBack».
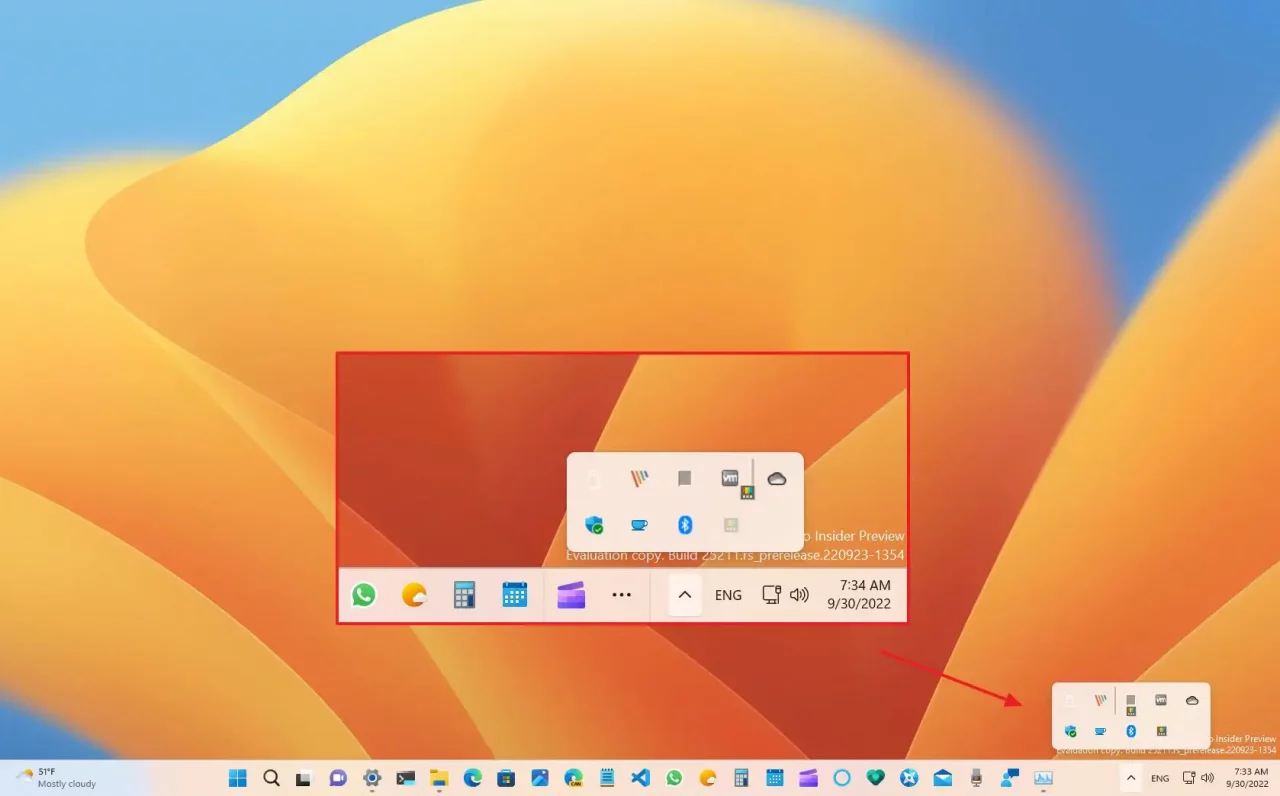
Пару недель назад Microsoft начала тестирование обновлённого системного трея на панели задач, правда на тот момент он не поддерживал изменение порядка расположения значком с помощью перетаскивания. Разработчики пообещали, что эта функция появится в одной из будущих инсайдерских сборок для канала Dev. К счастью, ждать пришлось не долго, и в сборке 25211 можно оценить экспериментальную реализацию этой возможности.
К сожалению, и обновлённый системный трей, и возможность перетаскивания значков в трее проходят A/B-тестирование, поэтому они пока доступны не всем пользователям. Если вы всё же хотите протестировать изменения, то воспользуйтесь утилитой ViVeTool для принудительного включения новшеств.
Инструкция
- Скачайте утилиту ViVeTool по этой ссылке. Это новая версия ViveTool 0.3.1, подробности о которой мы рассказали в нашем материале.
- Распакуйте скачанный архив в любое место на вашем компьютере (например, можно создать папку ViVeTool в корне диска C: и поместить файлы туда).
- Откройте командную строку от имени администратора (например, набрав CMD в поиске и выбрав соответствующий пункт).
- В командной строке перейдите в папку с ViVeTool с помощью команды cd /d <путь к папке>, после чего нажмите Enter. Например:
cd /d "C:\ViVeTool" - Введите следующие команды и нажмите Enter:
- Обновлённый системный трей:
vivetool /enable /id:26008830 /store:both - Возможность перетаскивания значков в трее:
vivetool /enable /id:38764045 /store:both
- Обновлённый системный трей:
- Убедитесь, что в командной строке появилось сообщение «Successfully set feature configuration»
- Перезагрузите компьютер для применения изменений.
Если вы захотите отключить функции, то воспользуйтесь следующими командами:
vivetool /disable /id:26008830 /store:bothvivetool /disable /id:38764045 /store:both