
Время на прочтение4 мин
Количество просмотров715K
Работа с VNC-клиентом. Материал ориентирован на неопытного пользователя.
1. Установка VNC-клиента
2. Подключение VNC-клиента к удаленному компьютеру
3. Отключение VNC-клиента от удаленного компьютера
4. Тюнинг VNC-клиента
5. Частые проблемы
Для работы с удаленным компьютером по VNC на компьютере пользователя нужно запустить программу-клиент (VNC viewer, VNC client). Эта программа передает на удаленный компьютер данные о нажатиях на клавиши и о движениях мыши, сделанных пользователем, и показывает информацию, предназначенную к выводу на экран.
1. Установка VNC-клиента
Для ОС Windows можно бесплатно скачать и инсталлировать VNC-клиент UltraVNC и TightVNC.
Mac OS X начиная с версии 10.5 имеет поддержку VNC-клиента в RemoteDesktop. Для предыдущих версий можно использовать VNC-клиенты JollysFastVNC и Chicken.
Для Linux ветви Debian (Ubuntu) VNC-клиент устанавливается из репозитория командой:
apt-get install vncviewer
Для ветви RedHat (CentOS, Fedora) — командой:
yum install vnc
Для FreeBSD VNC-клиент (TightVNC) устанавливается из пакетов командой:
pkg_add -r tightvnc
2. Подключение VNC-клиента к удаленному компьютеру
Для подключения VNC-клиента к удаленному компьютеру требуется указать его IP-адрес или DNS-имя, и номер дисплея (по умолчанию, :0) или номер TCP-порта (по умолчанию, 5900). Если VNC-сервер требует авторизации, то при подключении к нему VNC-клиент запросит пароль. Обратите внимание, что пароль доступа к VNC-серверу не связан с каким-либо аккаунтом (учетной записью пользователя) на удаленном компьютере, а служит только для ограничения доступа к дисплею VNC-сервера.
После установки соединения и открытия экрана, в зависимости от настроек VNC-сервера может потребоваться авторизация пользователя на виртуальном сервере или может быть открыта уже запущенная рабочая сессия какого-либо пользователя.
Так как на компьютере одновременно могут работать несколько VNC-серверов, для их разделения используют параметр номер дисплея. Например, один VNC-сервер может быть запущен на дисплее :0, другой — на дисплее :1. Каждому номеру дисплея соответствует номер TCP-порта, на котором VNC-сервер принимает соединения. Номер порта для дисплея получается прибавлением номера дисплея к базовому номеру порта — 5900. Дисплею :0 соответствует TCP-порт 5900, дисплею :1 — порт 5901.
3. Отключение VNC-клиента от удаленного компьютера
При закрытии окна VNC-клиента или после выхода из окружения средствами рабочего стола, в зависимости от настроек VNC-сервера, рабочая сессия пользователя может закрыться с остановкой всех используемых программ, или продолжать работу и быть доступной снова при повторном подключении к VNC-серверу.
4. Тюнинг VNC-клиента
Большое количество передаваемой на экран информации влечет за собой повышенные требования к скорости канала — к его пропускной способности и времени передачи пакетов. Нахватка пропускной способности приводит к некомфортным задержкам при больших изменениях показывамой на экране информации — открытии новых окон, скроллинге и т.д. Особенно большие задержки будут возникать при показывании фотографий и других изображений или элементов интерфейса, имеющих большое количество цветов и сложные формы.
Главный параметр, который влияет на объем передаваемых данных — алгоритм кодирования передаваемой графики. Для уменьшения объема и, соответственно, ускорения работы, рекомендуется использовать алгоритмы Tight, ZLib, ZRLE — по сравнению с несжатыми данными (Raw), они обеспечивают сжатие в десятки раз, заметно нагружая процессор. Эти алгоритмы кодирования обеспечивают комфортную работу даже на каналах со скоростью 256-512 Кбит/сек.
Для сокращения объема передаваемой по сети информации также можно устанавливать высокий уровень сжатия (Compression Level, Compression Value), низкий уровень качества JPEG (JPEG Quality) и включать режим уменьшения количества цветов (-bgr233, Restricted colors). Самый большой эффект из них при заметном снижении качества изображения дает режим уменьшения количества цветов — объем передаваемой информации уменьшается в 1.5-3 раза, соответственно, в 1.5-3 раза ускоряется отображение на экране.
JPEG применяется алгоритмом кодирования Tight для сжатия участков экрана, содержащих фотографии и другие сложные изображения с большим числом цветов. Использование Tight+JPEG сокращает в 2-5 раз объем передаваемых при этом данных. Другие алгоритмы кодирования JPEG не поддерживают.

1. Выпадающего меню «Система -> Параметры»
Объем передаваемых данных и скорость отображения на канале 1 Мбит/сек при открытии выпадающего меню «Система -> Параметры» (на рисунке меню выделено зеленым пунктиром):
| Полноцветный режим | 256 цветов (BGR233) | |||
|---|---|---|---|---|
| Объем | Время | Объем | Время | |
| ZLib | 11 Кб | 0.09 сек | 7 Кб | 0.06 сек |
| HexTile | 208 Кб | 1.6 сек | 118 Кб | 0.95 сек |
| Raw | 248 Кб | 2 сек | 128 Кб | 1 сек |
5. Частые проблемы
Не удается подключиться к VNC-серверу
Нужно проверить:
- есть ли доступ к интернету;
- отвечает ли виртуальный сервер на пинги;
- запущен ли на виртуальном сервере VNC-сервер;
- нет ли по пути файервола, закрывающего доступ к TCP-порту VNC-сервера;
- правльно ли указан номер дисплея или TCP-порт VNC-сервера (номер порта = 5900 + номер дисплея).
Медленная работа через достаточно быстрый канал
Если VNC-клиент не может согласовать с VNC-сервером использование алгоритм кодирования графики с компрессией данных, выбирается алгоритм по умолчанию — Raw, который передает данные без сжатия. Также кодирование без сжатия или с низким уровнем сжатия может автоматически выбираться VNC-клиентом при работе через быструю локальную сеть. Данную проблему можно исправить, принудительно указав в настройках VNC-клиента алгоритм кодирования с высоким уровнем сжатия — ZLib, ZRLE, Tight.
Однако, для некоторых сочетаний клиента и сервера такое решение может быть бесполезным из-за ошибок в согласовании алгоритма кодирования. Например, клиент TightVNC с сервером RealVNC часто могут работать только с кодировкой Raw. Решением в этом случае будет смена VNC-клиента или VNC-сервера.
Другие статьи этой серии:
VNC — удаленный доступ к компьютеру по сети. Введение в VNC.
Установка VNC-сервера на VDS и рекомендации по тюнингу
P.S. Если есть замечания, добавления, вопросы — пишите в комменты, по ним буду дописывать статью.
If you’re wondering how to run VNC on Windows 10, you’ve come to the right place. There are several ways to get started, but first, you need to ensure that your system has the required permissions. You need incoming port 5900 or 22 for SSH. Port numbers 0 to 1023 are reserved for system processes. If you’re using your system for business purposes, you’ll want to make sure that you allow incoming connections to your network.
First, you’ll need to enable the “Encrypt all network data” checkbox in the Remote Desktop settings. Otherwise, it won’t be able to open an SSH tunnel and will warn you to enter a password before accepting the connection. When adding a remote computer, use the IP address of the client computer to find the corresponding VNC password. If you’ve forgotten this password, you can use a view-only password to connect to the remote machine.
How Do I Start VNC Server on Windows?
To start a VNC server on Windows 10, you’ll need the software VNC. Normally, a VNC server starts on port 5900. The actual system port is 5924. If you want to use a different port, you can type in a higher one – vnc-server uses port 5901, for instance. If you want to use TightVNC, type localhost:1 into the connection details dialog of your client software.
To allow other people to connect to your VNC server, you’ll need to grant them access to the appropriate port. You can choose to allow local connections so only users from your computer can connect. Alternatively, you can set up your VNC server to require a password to prevent unauthorized access. Once you’ve installed the software, the VNC server will automatically restart if its processes are stopped. To avoid any problems or complications, make sure that the server is running and configured properly.
You can set a different display resolution if necessary. By default, the VNC Server sets the window size to 1024×768. You can change this by using the -nopw and -accept-popup-0 options. You can also set up VNC to automatically restart itself on reboot or when the server has been rebooted. You can also put it in view-only mode if you wish.
Is VNC Windows 10 Compatible?
Is VNC Windows 10 Compatible? You should find out by reading this article. If you’ve ever wanted to use virtual computer networking software on Windows 10, then you’ve come to the right place. VNC is the most popular method of remote desktop access. It allows you to share screen with other users, and is even available for Macs and iOS devices. But with all the features, how do you choose the best one for your needs?
VNC (Virtual Network Computing) is a cross-platform, free tool that enables you to control another computer via remote connections. The software works by tunneling data over VPN or SSH. There are SSH clients for both Windows and UNIX, and many freeware programs can also create instant VPN tunnels between two computers. The downside is that the remote computer may have to grant authorization to VNC, so be sure to check that before trying it.
How Do I Start VNC on Desktop?
To connect to another computer, you need to have an SSH connection to the host. Windows users can use a Putty client to connect to the host. Once the connection is established, the Putty client will save its configuration with a session and open a tunnel. This will allow Windows users to connect to the cluster desktop. Once the tunnel is open, the Windows user will be prompted to enter the VNC password.
To start the VNC server, open the command prompt, then type the command “vncserver”. The command will start up the X server as display1 on system “myhost”. It will also create a subdirectory called.vnc in the user’s home directory. The xvnc server process runs inside this directory. Xvnc is the actual VNC server process. The vncserver command starts up the X server before launching the Xvnc process.
Once the vnc server is up and running, it will start listening on port 5924. This is the same port as VNC’s X-display number, which is 24. Similarly, a VNC client will use the same port when connecting from a Mac. If you want to connect via the local network, you must enter the localhost address, followed by a colon (:).
To run VNC on Windows 10, you must have access to the incoming ports 5900 and 22 on your router. These ports are privileged. These are used by system processes. If you cannot open the ports on your router, you can try the dynamic DNS hostname. Once the server is running, you should see the desktop of the remote computer. This will allow you to see the desktop of the remote computer from your desktop.
To connect to the server, first you need to set the port number for the VNC server. The default port is 1234, but you can change this to any number. You can also use a fully qualified VNC port, which is 5900 plus the display ID. Then, type vncpasswd to change the password for the VNC server. Once you are connected, the host address will be displayed in the browser, followed by the port number.
How Do I Start VNC on Terminal?
In order to start VNC on the terminal on Windows 10, first you need to find out what kind of session you are trying to create. You can choose view-only or full access. In the latter case, you may need to create a password for the session. To make it more secure, enter a view-only password, otherwise you should create a full-access one. The vncserver command has an optional -kill option, where you will specify the number of the server. Once you’ve done this, the VNC server will quit all windows and terminate any processes running in the current VNC session. Obviously, this command should be used if you’re running more than one VNC server.
The default port for the VNC server is 5900. The remote desktop port is equal to the sum of the default port and the number of displays. If you’re using firewalld, then you’ll need to open the appropriate ports to allow the connection. If your displays are larger than three, you’ll need to open up the ports to ‘/dev/vnc/’. This step should help you get started quickly on your Windows 10 terminal.
How Do I Connect to VNC Server?
In order to connect to a VNC server, you must first install the software. You must have the viewer installed on the computer that you want to connect to, and the VNC server software on the remote computer. In Windows 10, you can install the VNC server software by double-clicking the downloaded exe file. Once you have installed the software, you must open the RealVNC viewer application on the remote computer.
When you have installed the VNC server, you need to enter its IP address and name. You can also enable encryption of the connection. If you select the Always maximum option, your connection will be encrypted with 256-bit encryption. Otherwise, you should select the Always on option. Afterwards, you can enter the password and confirm the connection. Once you’re connected, you can view the remote desktop.
Once you’ve installed the software, it’s time to configure it. TightVNC runs as a system service, which means that it runs in the background when you’re not using it. It automatically allows itself in the Windows firewall; if you use another firewall, you’ll need to enable it manually. Make sure you select a strong password. Once the software is installed, you can access it by clicking the TightVNC Service – Control Interface option in the Start menu.
Does Windows Have a VNC Client?
There’s no native VNC client for Windows 10, so you need to install the Linux version in order to use VNC. Linux provides a variety of ways to view other computer displays. You can use the command line to open a VNC session with a Linux host. After opening the session, click the File menu, then Select Settings. Once you’ve found the correct settings for your Linux host, you can start using VNC.
Before using a VNC client, you need to have incoming port 5900 or 22. Port 22 is a privileged port. Port numbers 0 to 1023 are reserved for system processes. If the host is running an older version of Windows, you can use the VNC Connect client. Chrome Remote Desktop is a free option for a Windows 10 VNC server. Both VNC and Chrome Remote Desktop are secure out of the box.
If you’re using a VNC viewer, you can connect to a machine running a VNC server without installing the server. The VNC Viewer application is free and can be downloaded and installed on your Windows computer. However, you can only connect to a computer running the VNC Server software. The same applies for a VNC Server. If you’re not running VNC, you’ll need to install the VNC Viewer software on your computer.
Learn More Here:
1.) Android Help Center
2.) Android – Wikipedia
3.) Android Versions
4.) Android Guides
n this tutorial, we are going to install VNC server on Windows 10, which can enable you to connect to your Windows 10 PC from a remote computer. The VNC (Virtual Network Computing) is a great choice if you need a free alternative to the Windows Remote Desktop (RDP).
Installing TightVNC Server On Windows 10
There are several free VNC servers available for Windows 10, we are going to use TightVNC software.
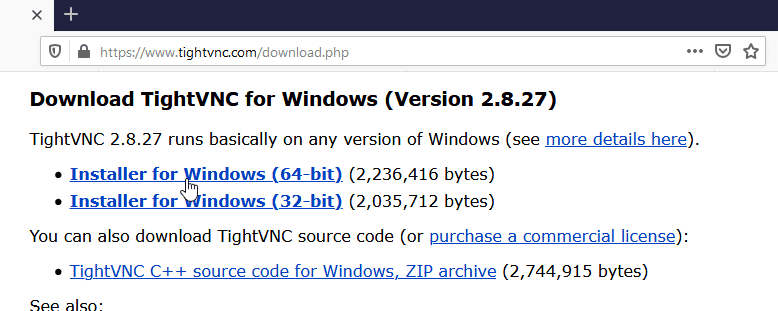
First, Download TightVNC Server from http://tightvnc.com/download.php.
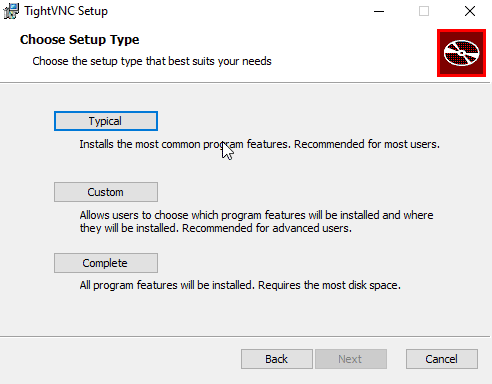
Run the setup file and continue with the Typical install option.
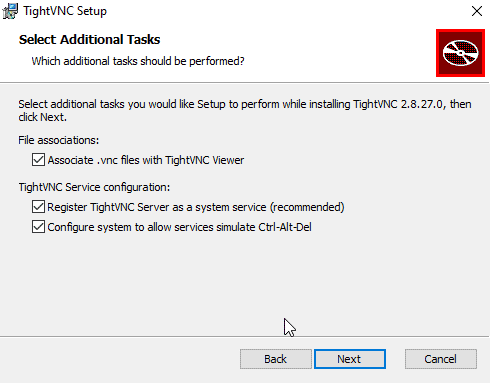
TightVNC should be set to run as a system service.
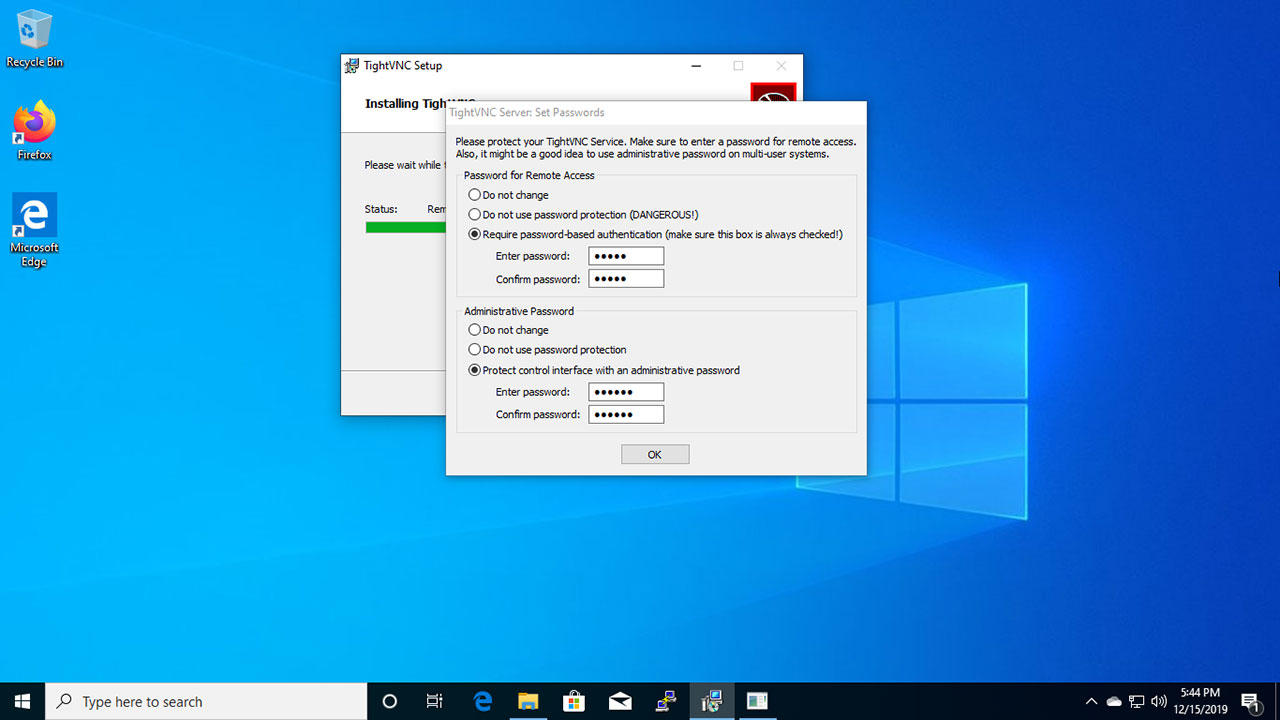
Set Passwords for Remote Access and control interface.
That’s all we need to do. VNC Server on Windows 10 listen on port 5900. The TightVNC server automatically configures Windows Firewall to allow incoming connections, so you don’t need to worry about Windows firewall.
Connecting to the desktop remotely
On the remote computer, a VNC viewer should be installed. There are several VNC viewers available, you can use the TightVNC viewer which is available for Windows, Linux and macOS.
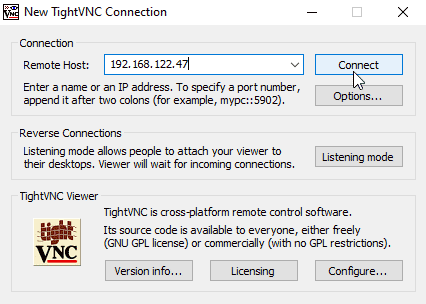
Enter your Windows 10 computer’s IP address to connect.
The user will then be prompted for their remote access password.
We can reset Remote Access password from the Control interface. Double click the VNC Tray icon to open the Control interface.
Starting and Stopping VNC Server
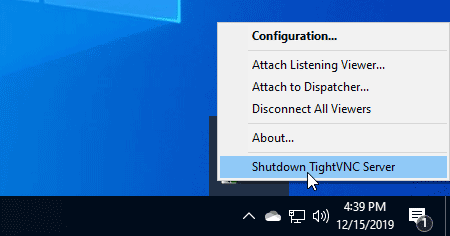
To Stop VNC Server, right click the VNC icon on the Windows tray bar and click «Shutdown TightVNC Server».
To Start VNC, Go to Start Menu and click «Start TightVNC Service».
A Quick Way To Connect RealVNC Remote Desktop on Windows 10. RealVNC is the name of the software that can be used to fully monitor small and large computer networks. In this software, facilities are provided for the network administrator to be able to remotely monitor network systems without having local access to the system. By software, you can visit the screens of all systems in the network. Using the help of this feature, a network administrator can easily be fully informed of the actions of network users and prevent them from accessing the network in the event of a problem.
With this introduction, we try to teach you how to connect realvnc Remote Desktop on Windows 10. If you need to Windows VPS server, you can see the packages available in Eldernode.
1. Download RealVNC first.
2. To install VNC software, double-click on its installation file to run the installation wizard.
Note: If the previous version is running and other systems are connected to your system and you are currently upgrading the program, then your connection will be temporarily disconnected to upgrade the program.
3. Click Next.
4. In the next step, you will see the License Agreement, which is a contract between you and the software company. Click on the first option here, I accept the agreement, which means you have accepted the contract, and click Next.
5. Now you need to specify how to use the program, which means that if you want other systems to connect to your system and be able to work with your system, the VNC Server option must be enabled. Also, if you want to connect to other systems and be able to work with those systems, the VNC Viewer option must be enabled.
The software itself suggests that you install both components on your system. If you are the administrator of a network and you want to connect to other network clients only yourself and other clients can not connect to each other, it is better for clients to just check the VNC server option and enable the VNC Viewer option for yourself.
6. In the next step, the storage location of VNC Server files should be displayed, which you can change the storage location if you want.
7. In the seventh step, you must specify the storage location of the VNC Viewer program. Then click Next.
8. In the eighth step, you can enable the Create a VNC viewer desktop icon check box to place the program icon on the Desktop screen after installation.
9. If you want to install the VNC Server component, you will encounter this step. This step tells you that this program is supposed to create a roll in your firewall so that others can remotely access your system. So if you uncheck Add an exception to the firewall for VNC Server, this role will not be created for you and you will encounter a problem when you try to remotely access this system.
10. In this step, it displays a report of what you have done in the previous steps, click on Install to install the program.
11. Finally, click on Finish.
How to connect RealVNC Remote Desktop on Windows 10
In order to remotely connect to a system using VNC software, open the VNC Viewer software in your system, and in the system you want to connect to, you must open the VNC Server software.
Note: VNC Server software cannot connect to any computer but provides an environment for other computers to connect to, but VNC Viewer software can only connect to other computers running VNC Server software.
1. On the first computer of the same system where you ran the VNC Viewer software, select New connection from the File menu.
2. In the window that opens, you must enter the information of the second computer in the VNC Server box. You must enter the IP address of the second computer on the second computer, the same computer where you run the VNC Server software.
3. You can also select a name in the Name box.
4. In the Security section, you can specify that your connection to the second computer be encrypted to increase your security.
5. There are several options in the Encryption list:
– Let VNC Server Choose
– Always maximum uses the strongest encryption power for the connection, which uses 256-bit encryption.
– Always on does not support connections that are not encrypted and uses 128-bit encryption.
– Prefer on Using an encrypted connection if possible.
– Prefer off does not use encryption for connection. This option reduces connection security.
Note: If you uncheck Update desktop preview automatically, the second computer screen preview will no longer be displayed.
6. Well now click in Ok.
7. To connect, just right-click on the computer added to the list and click Connect. In the page that opens, enter the username of the second computer in the Username field and enter the password of the second computer in the Password field.
Note: If you check the Remember password option, the next time you want to remotely connect to the second computer, it will no longer ask for your username and password.
8. Click Ok to connect to the second computer.
Then you will see the connection of the second computer screen and you can do whatever you want.
Conclusion
VNC In Windows operating systems, Remote Desktop Connection or RDC is used to communicate with a VPS server or dedicated server. VNC is often used in UNIX-like servers. With the help of VNC, you can connect to the server with a graphical interface and perform the desired operations. Because of the importance of RealVNC to network administrators, in this article we tried to teach How to connect RealVNC Remote Desktop on Windows 10.
Whether you’re working from home, assisting a friend with their computer issues, or managing servers in different locations, a reliable VNC client for Windows 10 can be a game-changer. In this guide, we’ll take you through the world of VNC, explaining what it is, why you might need it, and how to set up and use a VNC client on Windows 10.
What is a VNC Client?
Before diving into the specifics, let’s clarify what VNC is. VNC stands for Virtual Network Computing, and it’s a remote desktop protocol that allows you to control and interact with a remote computer over a network or the internet. A VNC client is the software you use to access and control a remote computer, while a VNC server is the software running on the remote computer that shares its desktop. With a VNC client, you can view the remote desktop, perform actions, and even transfer files as if you were sitting in front of the remote computer.
Why Use a VNC Client on Windows 10?
There are several scenarios where using a VNC client on Windows 10 can be incredibly beneficial:
- Remote Work: With the rise of remote work, a VNC client allows you to access your office computer from home or vice versa, ensuring you have access to all your files and applications.
- Technical Support: If you’re the tech-savvy friend or family member in your circle, a VNC client can help you provide remote technical support, troubleshoot issues, and perform repairs without physically being present.
- Server Management: If you’re responsible for server management, having a VNC client on your Windows 10 machine is a practical way to access and administer remote servers and data centers.
- Multimonitor Setup: VNC clients often support multimonitor setups, making it easier to work on multiple screens when connected to a remote computer.
- File Transfer: Many VNC clients include file transfer capabilities, allowing you to transfer files to and from the remote computer effortlessly.
- Cross-Platform Compatibility: VNC is a cross-platform protocol, so you can use a VNC client on your Windows 10 PC to access remote computers running Windows, Linux, macOS, and more.
Setting Up a VNC Client on Windows 10
To get started with a VNC client on Windows 10, follow these steps:
1. Choose a VNC Client Software
There are several VNC client software options available for Windows 10. Some popular choices include RealVNC, TightVNC, UltraVNC, and TigerVNC. Select the one that best suits your wants and preferences.
2. Install the VNC Client
Download and install your chosen VNC client software on your Windows 10 machine. The installation process is typically straightforward, following the standard Windows installation procedures.
3. Obtain Connection Details
To connect to a remote computer, you’ll need the connection details:
- IP Address or Hostname: You need the IP address or hostname of the remote computer. If it’s on a local network, use the local IP address. If it’s over the internet, use the public IP address or domain name.
- VNC Server Port: By default, VNC servers use port 5900. However, the port number may differ depending on the VNC server software and configuration. Make sure to have the correct port number.
- Password or Authentication: You may need a password or authentication credentials to connect to the remote computer. Make confirm you have this information ready.
4. Launch the VNC Client
Once the VNC client is installed, launch the application.
5. Configure the Connection
In the VNC client, you’ll find options to configure the connection. Enter the IP address or hostname of the remote computer in the “Server” or “Host” field.
If the VNC server uses a different port, specify it in the “Port” field.
Enter the password or authentication credentials, if required.
6. Connect to the Remote Computer
After configuring the connection details, click the “Connect” or “Connect/Start” button within the VNC client. The client will initiate the connection to the remote computer.
7. Control the Remote Computer
Once connected, you’ll see the remote computer’s desktop within the VNC client window. You can now control the remote desktop just as if you were sitting in front of it. You can move the mouse, type on the keyboard, open applications, and perform any necessary tasks.
8. File Transfer (If Supported)
If file transfer is supported by your VNC client, you can easily transfer files between your local Windows 10 machine and the remote computer.
Tips for Using a VNC Client Effectively
- Security: Ensure the connection is secure. If you’re accessing a remote computer over the internet, consider using a VPN or setting up an SSH tunnel to encrypt the VNC connection.
- Authentication: Use strong and unique passwords for VNC connections to prevent unauthorized access.
- Screen Resolution: Adjust the screen resolution settings within the VNC client to match your local display for a smoother experience.
- Performance: VNC client performance can vary depending on your network and the remote computer’s specifications. Experiment with different settings to optimize play performance.
- Logout or Lock: Remember to log out or lock the remote computer when you’re done to maintain security.
- Keep Software Updated: Ensure that your VNC client is up to date to benefit from security patches and improved performance.
Conclusion
Using a VNC client on Windows 10 is a valuable tool for remote work, technical support, server management, and much more. It opens up a world of possibilities, allowing you to access and control remote computers as if you were physically present. By following the steps outlined in this guide and adhering to best practices, you can harness the power of VNC to make your computing experience more flexible, efficient, and accessible from virtually anywhere.