
Quick Tips
- In most cases, restarting Windows Explorer or installing pending updates should make the File Explorer tabs appear.
- Clearing the File Explorer cache can also help resolve this issue.
- Running SFC and DISM scans can address problems caused by corrupt or missing system files.
Try Basic Fixes
- Install Windows updates: File Explorer tabs are only available on computers running Windows 11 22H2 or later. If your system is running an older version, head to Settings > Windows Update to install pending updates.
- Restart the Windows Explorer process: Windows Explorer is a system process that manages the Graphical User Interface (GUI) for File Explorer. If this process is not running correctly, File Explorer may fail to display tabs on your computer. You can try restarting the Windows Explorer process to fix any issues with it.
- Run a malware scan: It’s a good idea to run a full system scan with Windows Defender to check if your PC is infected by malware. You can also use a reliable third-party antivirus program for this.
Fix 1: Clear File Explorer History
Windows File Explorer keeps a record of your previous activities and searches in order to serve you better. If Windows is having trouble accessing this data for some reason, File Explorer might malfunction. You can try clearing the existing File Explorer history and see if that helps.
Step 1: Click the search icon on the taskbar, type in file explorer options, and press Enter.

Step 2: In the General tab, click the Clear button next to Clear File Explorer History.

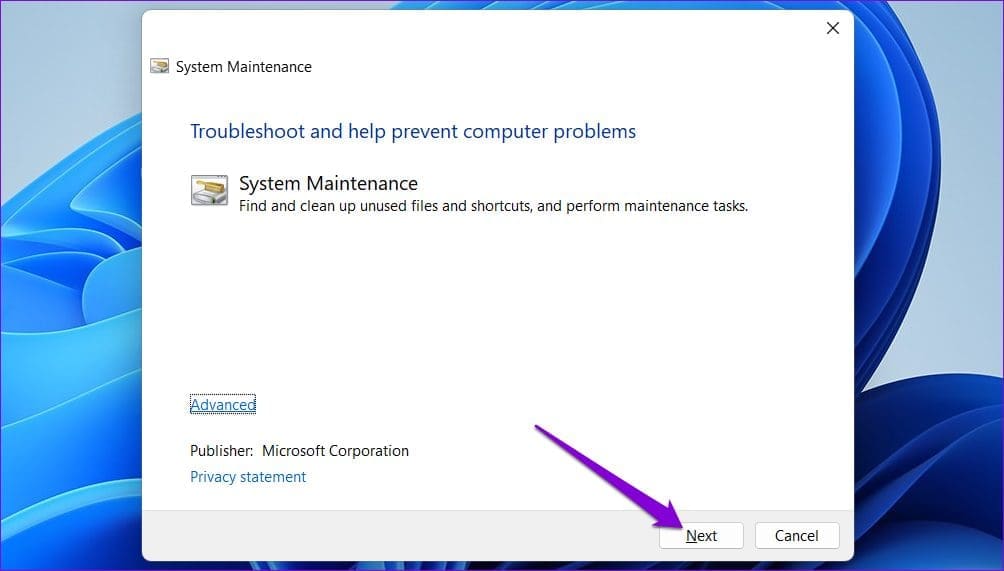
Fix 2: Run the System Maintenance Troubleshooter
Your Windows computer runs the System Maintenance Troubleshooter on a regular basis to clean up unused files, desktop shortcuts, and perform other maintenance tasks. This tool can help fix any irregularities with File Explorer and restore the missing tabs. Here’s how to run it.
Step 1: Press the Windows + S keys to open the search menu, type in control panel and press Enter.

Step 2: In the Control Panel window, use the drop-down menu at the top-right corner to select Large icons. Then, select Troubleshooting.

Step 3: Under the System and Security section, select the Run maintenance tasks option.

Step 4: Click Next and follow the on-screen instructions to run the troubleshooter. After that, check if the issue is still there.
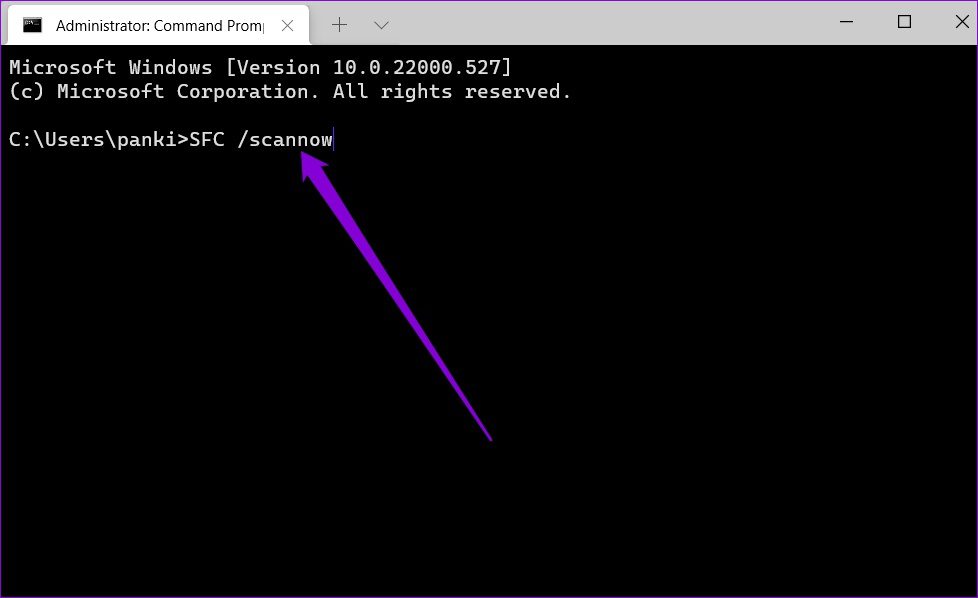
Fix 3: Check for Corrupt System Files
Another reason File Explorer might not show tabs is if some of the system files on your PC are corrupt or missing. SFC (System File Checker) and DISM (Deployment Image Servicing and Management) are two Windows tools that can help detect and repair any damaged system files. Here’s how to run them.
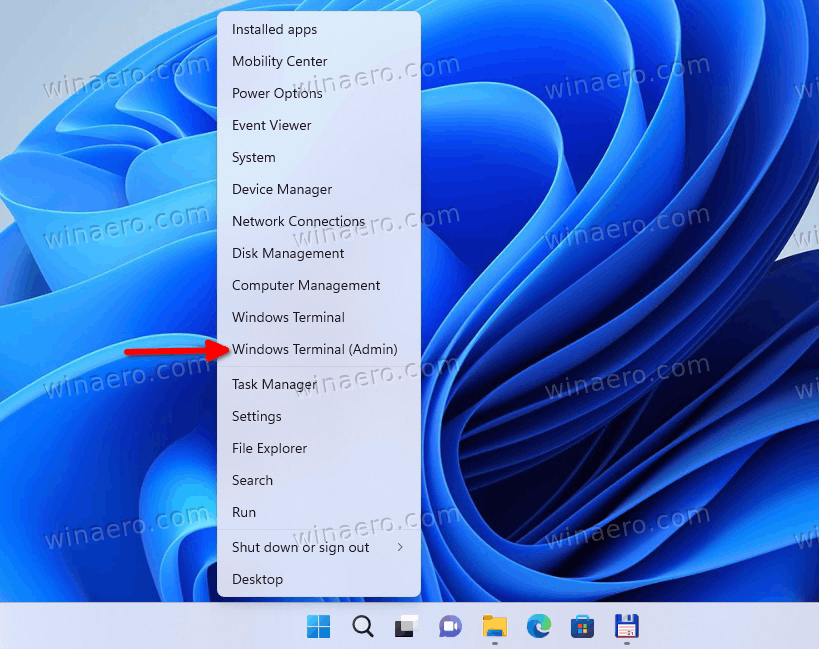
Step 1: Right-click on the Start icon and select Terminal (Admin) from the list.

Step 2: In the console, type the following command and press Enter.
SFC /scannow
After the scan is complete, you’ll see a message indicating whether or not it found any errors. You’ll also get instructions to fix the error if there is a problem.
Next, run the DISM (Deployment Image Servicing and Management) scan by typing the following commands, and pressing Enter after each of them:
DISM /Online /Cleanup-Image /CheckHealth
DISM /Online /Cleanup-Image /ScanHealth
DISM /Online /Cleanup-Image /RestoreHealth
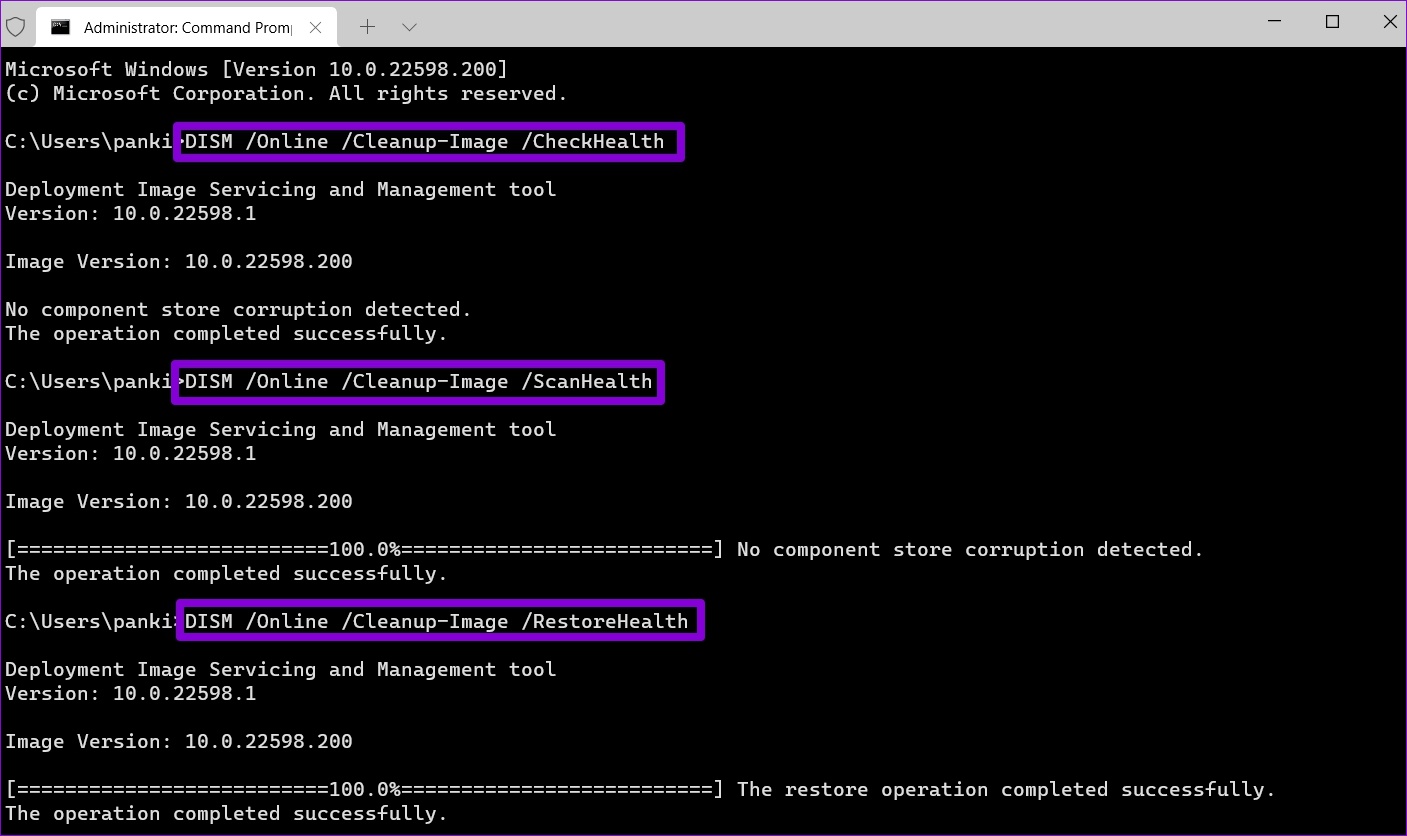
Restart your PC after the scan is complete and check if File Explorer shows tabs.
Was this helpful?
Thanks for your feedback!
The article above may contain affiliate links which help support Guiding Tech. The content remains unbiased and authentic and will never affect our editorial integrity.
The much-anticipated feature is making a comeback in Windows 11. Windows Explorer will now open multiple directories in a single Explorer window, but on different tabs, like Microsoft Edge and Google Chrome.
A similar feature was first introduced in Windows 10 in 2017 with Windows Sets. However, that didn’t pan out, and Microsoft withdrew the feature. Microsoft has introduced the tabs feature again in Windows 11 Insider Preview Build 22572 on the Dev channel.
However, the company did not officially announce this feature. This may be because it is still in the experimental phase and is not enabled by default. Tabs in File Explorer need to be enabled manually.
If you are interested in testing this feature out and reducing the dozens of File Explorer windows open simultaneously, read through this post to learn how to enable it.
Enable Tabs in Windows Explorer
You can enable tabs in Explorer using ViveTool. ViveTool is a small utility designed to enable hidden features in the Windows operating system that have not been activated by Microsoft by default.
Note: The tabs feature in File Explorer can only be enabled on the Insider Build 22572 or higher at the time of writing this post.
Here’s how to enable File Explorer tabs in Windows 11:
- Open GitHub and download the ViveTool Zip file by clicking on it.

- Now extract the contents of the compressed file.
- Launch Command Prompt with administrative rights and then use the following command to navigate to the extracted folder, while replacing PathToExtractedFolder with the complete path to the ViveTool folder:
cd /d <em>PathToExtractedFolder</em>
- Now paste the following cmdlet and hit Enter.
vivetool addconfig 34370472 2
- Now restart your computer for the changes to take place.


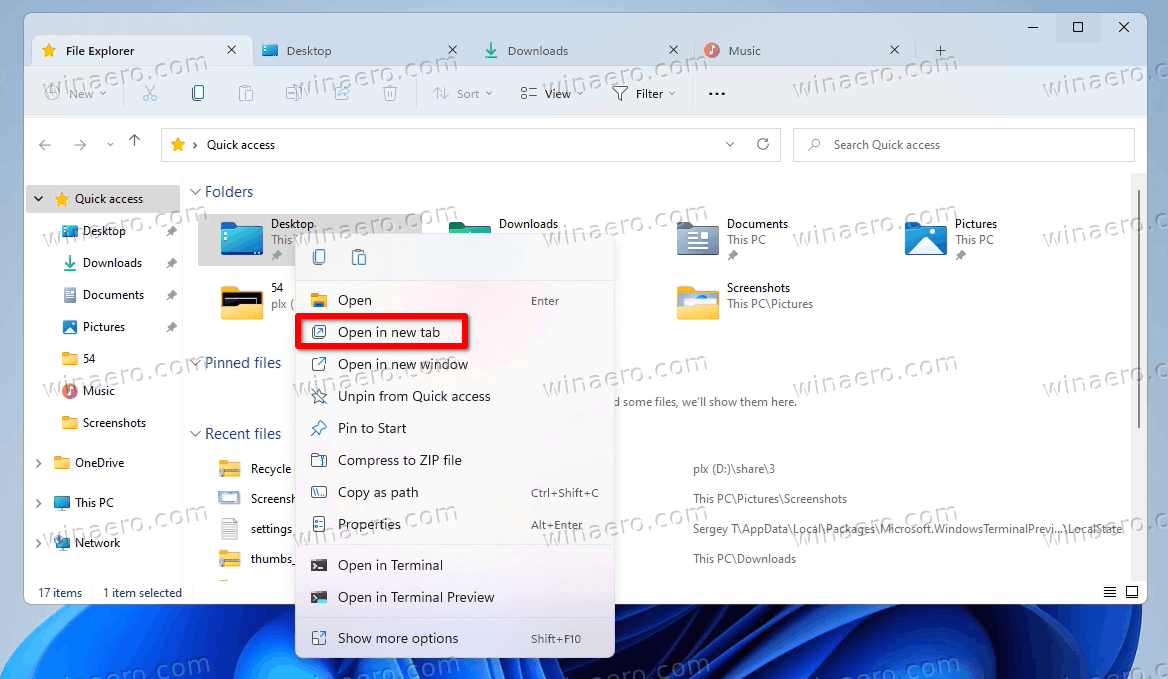
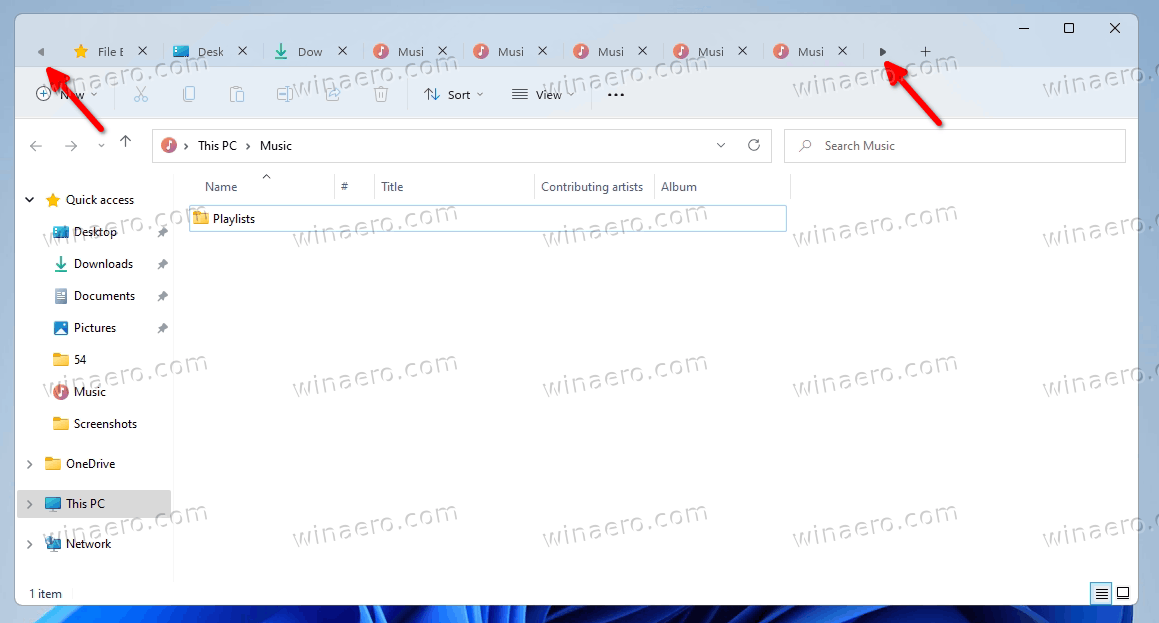
As soon as it reboots, you should now be able to open multiple tabs in File Explorer. Open File Explorer, right-click on the directory you want to open and then click Open in new tab from the context menu.

Unfortunately, unlike in web browsers, you cannot use the middle mouse button (Scroll wheel click) on a directory to open it in a new tab.
You can now open many folders in different tabs. If you open sufficient tabs, you can then scroll between them from the top of the Explorer window using your mouse scroll and the indicated buttons.

Disable Tabs in File Explorer
If you do not like the tabs feature and would rather prefer individual windows for each directory, then you can disable this feature using these steps:
- Launch Command Prompt with administrative rights.
- Navigate to the extracted ViveTool folder using the following cmdlet:
cd /d <em>PathToExtractedFolder</em>
- Now paste the following command and hit Enter:
vivetool delconfig 34370472 2

The option to “Open in new tab” in the context menu will now disappear.
Closing Thoughts
Since Microsoft has not officially announced the feature, it may or may not be included in Windows 11 22H2 official release.
Furthermore, there are also rumors that Microsoft is also working on a drag-and-drop feature for the tabs in File Explorer, using which you can drop open a directory from one Explorer window into a tab in another window. However, no visual proof of this feature is currently available in any Windows builds.
We certainly hope the tabs feature in Windows 11 will be released in the future, as it would make navigating between different directories much more convenient for everyone.
Ночью команда Windows Insider выпустила новую предварительную сборку Windows 11 под номером 25136 для канала Dev, которая принесла с собой долгожданный вкладочный интерфейс в «Проводнике». Правда оценить новшество сейчас могут не все инсайдеры, так как Microsoft проводит A/B-тестирование, и функция доступна лишь небольшой фокус-группе.
Впрочем, не стоит расстраиваться, если вы не увидели поддержку вкладок в «Проводнике» после обновления до сборки 25136 (или выше). Дело в том, что подобные функции можно активировать вручную с помощью утилиты ViVeTool. Для этого воспользуйтесь инструкцией ниже.
Инструкция
- Скачайте утилиту ViVeTool по этой ссылке. Это новая версия ViveTool 0.3.1, подробности о которой мы рассказали в нашем материале.
- Распакуйте скачанный архив в любое место на вашем компьютере (например, можно создать папку ViVeTool в корне диска C и поместить файлы туда).
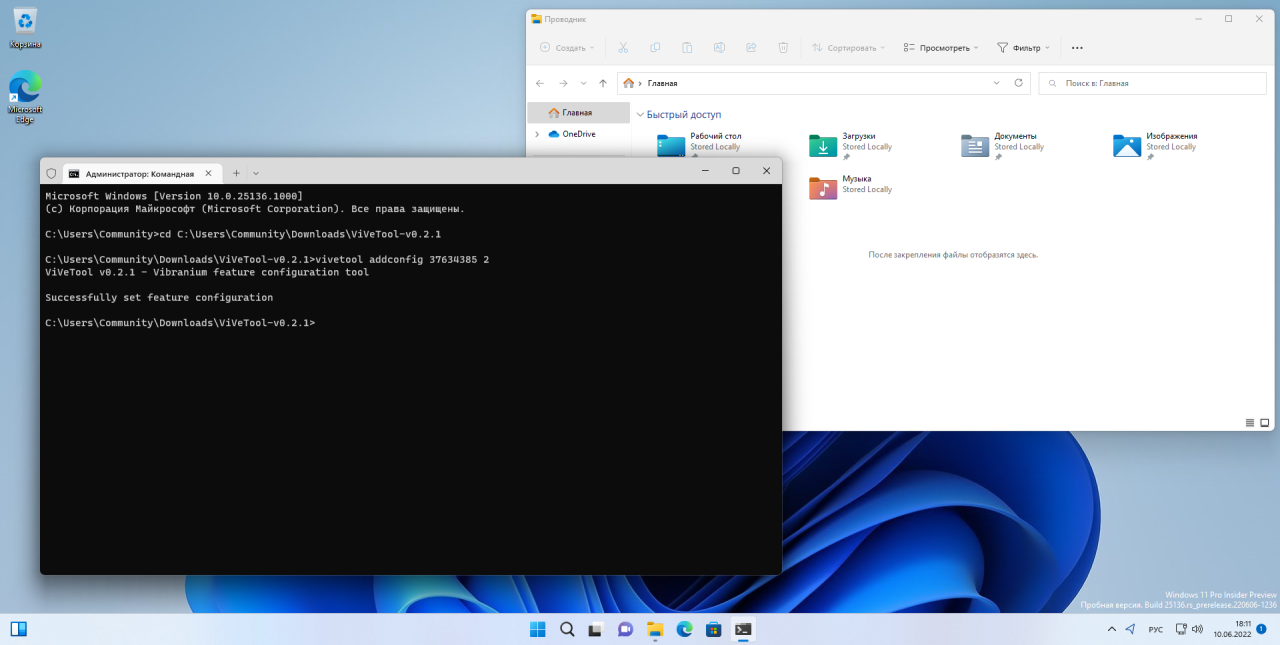
- Откройте командную строку от имени администратора (например, набрав CMD в поиске и выбрав соответствующий пункт).
- В командной строке перейдите в папку с ViVeTool с помощью команды cd /d <путь к папке>, после чего нажмите Enter. Например:
cd /d "C:\ViVeTool" - Последовательно введите команды из списка ниже, нажимая Enter после каждой из них.
- Сборка 22621.160+ (Beta):
vivetool /enable /id:39145991 /store:bothvivetool /enable /id:37634385 /store:both
- Сборка 25136+ (Dev):
vivetool /enable /id:37634385 /store:both

- Сборка 22621.160+ (Beta):
- Убедитесь, что в командной строке появилось сообщение «Successfully set feature configuration».
- Перезагрузите компьютер.
Если вы хотите отключить функцию, то воспользуйтесь следующими командами:
- Сборка 22621.160+ (Beta):
vivetool /disable /id:39145991 /store:bothvivetool /disable /id:37634385 /store:both
- Сборка 25136+ (Dev):
vivetool /disable /id:37634385 /store:both
Обновлённая панель навигации в «Проводнике»
Кроме этого, в новой сборке Microsoft обновила панель навигации в левой части окна, чтобы пользователям было проще перемещаться между избранными папками и профилями OneDrive. Это изменение также можно включить вручную по инструкции выше, подставив на шаге 5 следующие команды:
- Сборка 22621.160+ (Beta):
vivetool /enable /id:39145991 /store:bothvivetool /enable /id:36354489 /store:both
- Сборка 25136+ (Dev):
vivetool /enable /id:36354489 /store:both
Для отключения функции, соответственно, необходимо выполнить vivetool /disable /id:36354489 /store:both и vivetool /disable /id:39145991 /store:both (только для Beta)
You can now enable tabs in File Explorer on Windows 11 in the latest Insider Preview build released to the Dev Channel. It allows you to open different folders in individual tabs inside one Explorer window.
Microsoft has already experimented with tabs back in 2018. The «Sets» feature has been available Windows 10 «Redstone 4». But it was eventually excluded from the OS without a chance to reach the stable version.
Now, tabs are back. The revived UI enhancement first spotted by Rafael Rivera in today’s Windows 11 Build 22572. The official announcement didn’t mention them, as it is an experiment feature hidden deep inside the preview build.
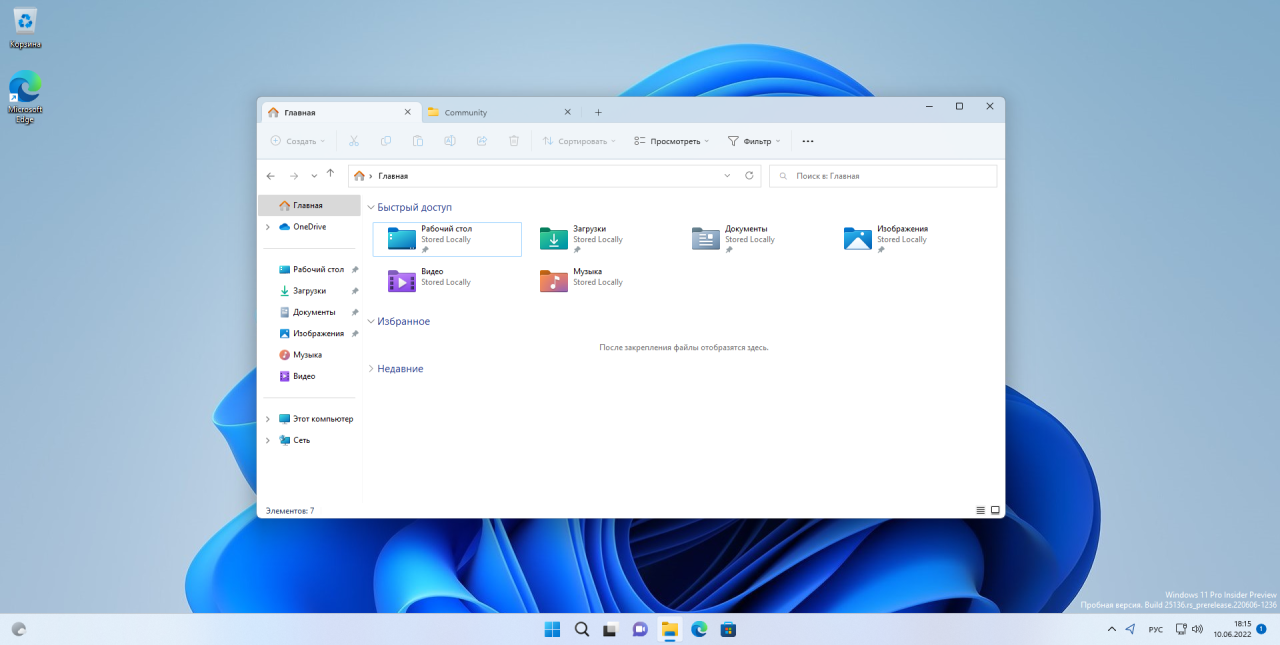
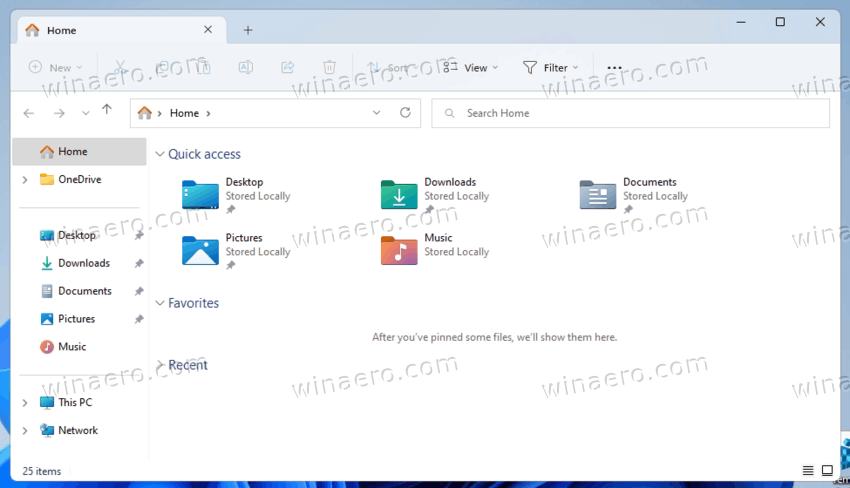
Starting in Windows 11 Build 25136, File Explorer has a newer navigation pane, that consists of three sections. In the middle, it shows frequently visited locations and pinned folders. The classic icons are at the bottom, and Home and OneDrive are in the topmost section.
💡You can find what Windows 11 build you have installed by opening the Run dialog (Win + R) and typing winver.
Tabs in File Explorer work exactly the way you could expect. You can open any folder in a new tab rather than in a new window. The appropriate option is in the context menu. There are also keyboard shortcuts to open and close tabs.
- Ctrl + T — open a new tab
- Ctrl + W — close the current tab
- Ctrl + Tab / Ctrl + Shift + Tab — switch between tabs forth and back.
Similar to the Edge tab row, File Explorer support scrolling when you open a lot of tabs. There are arrow buttons that automatically appear after the first and last tab.
Here is how to enable the File Explorer tabs feature in Windows 11 (Insider builds).
To to enable tabs in File Explorer on Windows 11, do the following.
- Download ViveTool from GitHub and extract it to some folder, e.g. c:\ViveTool.
- Press Win + X and select Windows Terminal (Administrator) to launch it elevated.

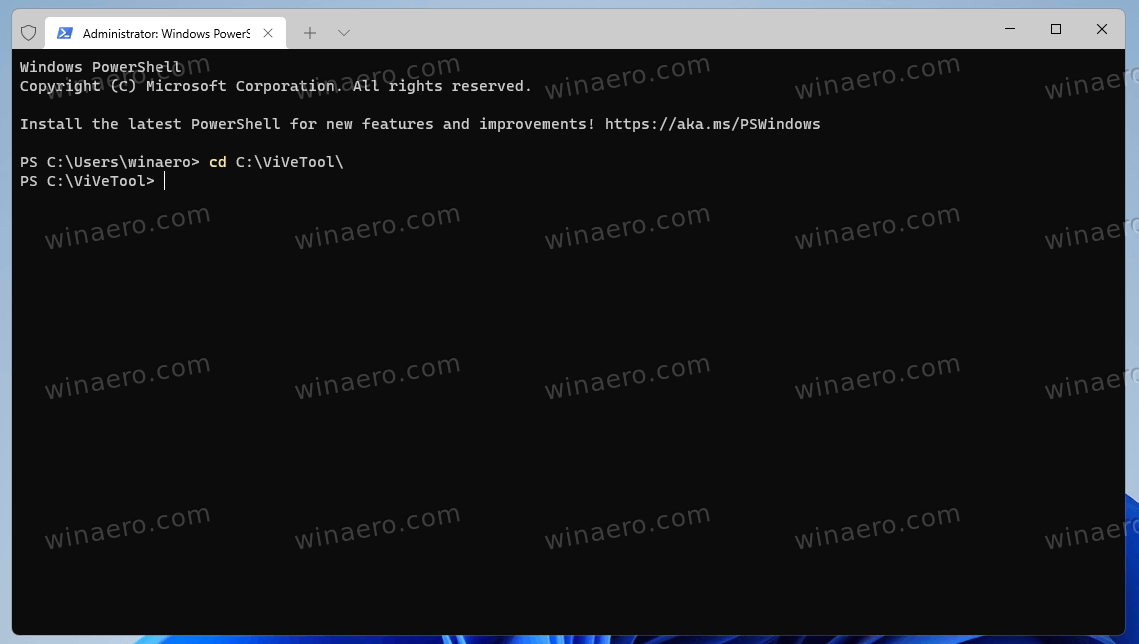
- Change the directory to the folder where you placed ViveTool using the
cdcommand, e.g.cd /d "c:\ViVeTool".
- Now, type the following commands to enable tabs in File Explorer:
- Windows 11 Build 25136 or above (Dev):
vivetool.exe addconfig 37634385 2. - Windows 11 22621.160 or above (Beta), run these three commands:
vivetool addconfig 39145991 2vivetool.exe addconfig 37634385 2vivetool.exe addconfig 36354489 2
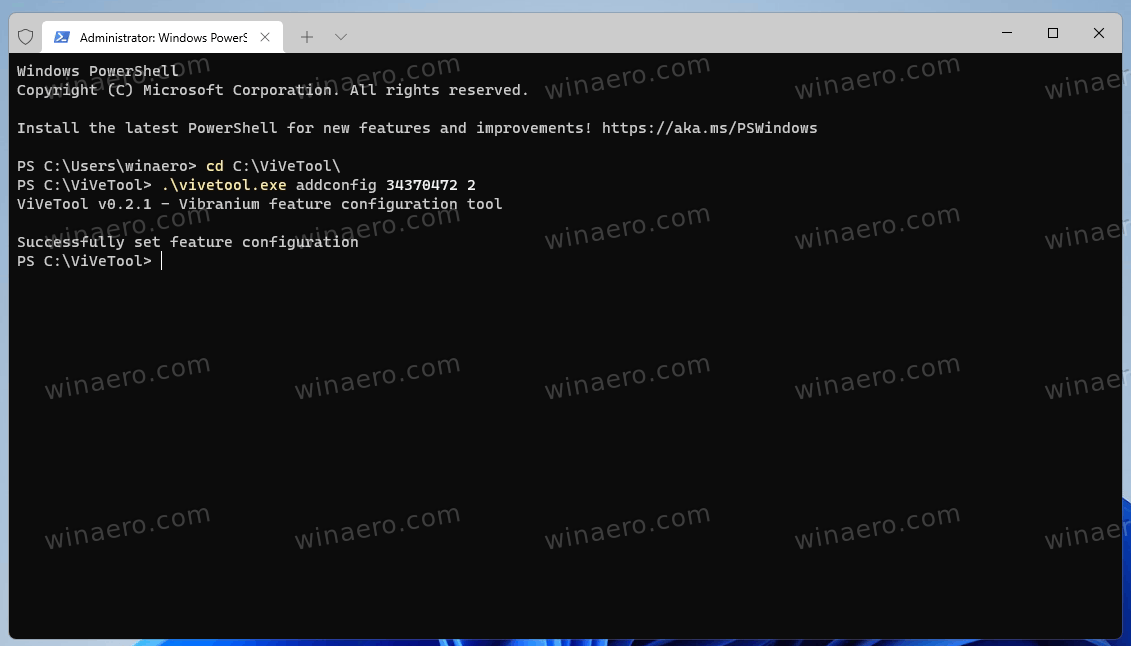
- For an older build, use the following command instead:
vivetool addconfig 34370472 2. - For the PowerShell mode in Terminal add
.\to the command, i.e..\vivetool.exe addconfig <ID> 2.
- Windows 11 Build 25136 or above (Dev):
- After you see the «Successfully set feature configuration» message, restart the computer.
Done! You now have tabs in File Explorer.
As I already mentioned above, tabs are a work-in-progress. So enabling them before the official announcement may affect the stability and reability of the OS in a bad way.
If you have issues with tabs, you can undo the change at any moment later and disable them.
Disable Tabs
To disable tabs, open Terminal as administrator, switch to the c:\ViveTool folder, and execute the following commands.
- Windows 11 Build 25136:
vivetool.exe delconfig 37634385 - Windows 11 Build 22621.160:
vivetool.exe delconfig 39145991vivetool.exe delconfig 37634385vivetool.exe delconfig 36354489
- Older builds of Windows 11:
vivetool delconfig 34370472
Once you restart Windows 11, tabs will disappear from File Explorer.
Tabs in File Explorer is one of most anticipated features in Windows. It is glad to see that Microsoft has finally listened to users. Maybe one day will have something like dual-pane mode in File Explorer. Then some of us may stop using Total Commander and similar apps.
Support us
Winaero greatly relies on your support. You can help the site keep bringing you interesting and useful content and software by using these options:
If you like this article, please share it using the buttons below. It won’t take a lot from you, but it will help us grow. Thanks for your support!
Вкладки в проводнике в Windows 11 очень долгожданное дополнение, которое ожидает просто колоссальное количество пользователей одиннадцатой версии операционной системы. Конечно, без данного дополнение вполне нормально можно использовать системы, но так уж исторически сложилось, что компания разработчик – Майкрософт постоянно рассказывает в своих анонсах, как круто и практично будет использовать вкладки и как итог, большинство людей все больше и больше хотят в живую посмотреть на данное новшество и конечно же, имеют желание его полноценно использовать. До недавнего времени такой возможности у пользователей не было, но с недавно вышедшим обновление для инсайдеров — сборка 25136 в Dev Сhannel, она появилась.
Очень важно указать, что практически все инсайдеры, скачавшие обновление, имеют беспроблемный доступ к опции «Вкладки», но есть и те, кому дополнительно придется скачать приложение «Vivetool», которое позволит активировать «Вкладки».
Как включить Вкладки в проводнике в Windows 11?
На самом деле сложностей тут не каких не имеется, единственное, что нужно сделать, так это обновить Windows 11 до сборки Windows 11 Build 25136 в Dev Channel. Отметим, что в ранее вышедших сборка (не во всех, а в некоторых), уже была активна опция «Вкладки», но в данный момент ее отключили и теперь, в обязательном порядке нужно скачивать Build 25136 в Dev Channel.
Теперь, вы должны выполнить несколько шагов: скачайте «Vivetool» расположенный в репозитории на «Github» → воспользуйтесь горячими клавишами «Win+R» и введите команду → «cmd» → далее, нужно нажать на сочетание клавиш «Ctrl+Shift+Enter», что позволит запустить «Командную строку» от имени Администратора → введите CD, где имеется путь к недавно скаченной папке «Vivetool» → нажмите на «Enter» — данном случае, путь должен выглядеть приблизительно так — «CD C:\Vivetool», но может и быть немного иным, все зависит от расположения папки «Vivetool» на вашем компьютере. Остается выполнить ввод «vivetool addconfig 37634385 2» → нажимаем на «Enter» → остается выполнить перезагрузку устройства → проверяем работоспособность «Вкладок».

Для того, чтоб проверить удалось ли вам активировать Вкладки в проводникев Виндовс 11, необходимо после запуска устройства запустить проводник и убедиться в появлении вкладок.
Как отключить Вкладки в проводнике в Windows 11?
Если вам по каким-то причинам «Вкладки» не нужны или не понравятся, а быть может с их появлением, ваша система начнет давать очень часто сбои, то в такой ситуации необходимо выполнить все вышеописанные шаги, но только одним из последних действий должен быть ввод команды «delconfig 37634385» → после чего так же нужно нажать на «Enter» → выполнить перезагрузку устройства.
P.S. Все вышеописанные действия вы выполняете на свой страх и риск, так как официально опция «Вкладки» еще не должна функционировать в обширных массах, так как она до сих пор тестируется и проверяется для того, чтоб появиться в Windows 11 в одном из ближайших обновлений совершенно без каких-то программных сбоев.