
Содержание:
- 1. Как включить VT на компьютерах Lenovo?
- 2. Как включить VT на ThinkPad ?
- 3. Способ включения VT на других марках материнских плат и ноутбуков
1. Как включить VT на компьютерах Lenovo?
А. Перезагрузите компьютер или ноутбук, при включении постоянно нажмите кнопку подсказки, чтобы попасть в BIOS. Если подсказки нету, нажмите «F1» или «F2» или «Del», на ноутбуке — «FN + F1» или «FN + F2» или «Del».
Внимание: если эти кнопки не работают, попробуйте эти — ESC, F8, F9, F10, F11, F12

В. После входа на страницу BIOS через меню переключателя «←», «→» найдите «Advanced» — «CPU Setup» (на некоторых компьютерах этой нет) — «Intel(R) Virtualization Technology», там выберите «Enabled».
После включения сохраните изменения, нажмите «F10» (на ноутбуке — «FN + F10»), появится окно «SAVE and EXIT», подтвердите.

PS: Если у вас процессор AMD, после входа на страницу BIOS найдите «Configuration» — «SVM Support», там выберите «Enabled», затем нажмите «F10» (на ноутбуке — «FN + F10»), появится окно «SAVE and EXIT», подтвердите.

2. Как включить VT на ThinkPad?
А. Перезагрузите компьютер или ноутбук, при включении постоянно нажмите кнопку подсказки, чтобы попасть в BIOS. Если подсказки нету, нажмите «FN + F1» или «FN + F2» или «Del».
Внимание: если эти кнопки не работают, попробуйте эти в сочетании с клавишей FN: ESC, F8, F9, F10, F11, F12

В. Затем появится меню «Boot Memu», нажмите клавишу «TAB», чтобы перейти в «Application menu», выберите «Setup» и нажмите «Enter» для входа. Если меню не отображается, перезагрузите компьютер, чтобы войти снова.

Б. После входа на страницу BIOS найдите «Security» — «Virtualization» — «Intel(R) Virtualization Technology», там выберите «Enabled».
После включения сохраните изменения, нажмите «F10» или «FN + F10», появится окно «SAVE and EXIT», подтвердите.


3. Способ включения VT на других марках материнских плат и ноутбуков
Как включить VT на компьютере или ноутбуке ASUS?
Как включить VT на компьютере или ноутбуке DELL?
Как включить VT на компьютере или ноутбуке HP?
Как включить VT на материнских платах MSI?
Как включить VT на материнских платах GIGABYTE?

ВКонтакте: https://vk.com/ldplayer
Эл. почта: support_ru@ldplayer.net
Many commercially available PCs allow users to manage their BIOS configuration directly from the startup screen. These step-by-step guides will help you access and adjust the BIOS settings on prebuilt PCs manufactured by Lenovo.
BIOS Setup Key
Depending on your Lenovo machine, the default BIOS setup key may be F1 or F2. Some systems require holding down the Fn key and repeatedly pressing the BIOS setup key up to ten times. You may need to try different key combinations to access BIOS settings on your machine.
Thinkpad (Intel Processor)
- Restart or boot your computer.
- Immediately press the BIOS setup key (above) to enter the BIOS Setup Utility.
- Using the arrow keys, navigate to the Security tab.
- Select Virtualization from the menu.

(Source)
- Using the arrow keys, select Intel (R) Virtualization Technology from the menu.
- Enable this feature with the left or right arrow key.
- Press F10 once more to save your configuration and exit.

AMD Thinkpad V Technology
- Restart or boot your computer.
- Immediately press the BIOS setup key (above) to enter the BIOS Setup Utility.
- Using the arrow keys, navigate to the Security tab.
- Select Virtualization from the menu.
(Source)
- Enable AMD V(TM) Techhnology with the left or right arrow key.
- Press F10 once more to save your configuration and exit.

Ideapad (Intel Processor)
- Restart or boot your computer.
- Immediately press the BIOS setup key (above) to enter the BIOS Setup Utility.
(Source)
- Using the arrow keys, navigate to the Configuration tab.
- Select Intel Virtual Technology from the menu.
- Enable this setting with the left or right arrow key.
- Press F10 once more to save your configuration and exit.

ThinkCentre (Intel Processor)
- Restart or boot your computer.
- Immediately press the BIOS setup key (above) to enter the BIOS Setup Utility.
(Source)
- Using the arrow keys, navigate to the Advanced tab.
- Select CPU Setup from the menu.
- Using the arrow keys, select Intel (R) Virtualization Technology from the menu.
- Enable this setting with the left or right arrow key.
- Press F10 once more to save your configuration and exit.

Did this answer your question?
Thanks for the feedback
There was a problem submitting your feedback. Please try again later.
Still need help?
Contact Us
Contact Us
Applies ToWindows 11 Windows 10
Поддержка Windows 10 прекратится в октябре 2025 г.
После 14 октября 2025 г. корпорация Майкрософт больше не будет предоставлять бесплатные обновления программного обеспечения из Центра обновления Windows, техническую помощь и исправления безопасности для Windows 10. Ваш компьютер по-прежнему будет работать, но мы рекомендуем перейти на Windows 11.
Подробнее
Виртуализация позволяет устройству Windows эмулировать другую операционную систему, например Android или Linux. Включение виртуализации дает доступ к более крупной библиотеке приложений для использования и установки на устройстве. Если вы обновили устройство с Windows 10 до Windows 11, эти действия помогут включить виртуализацию.
Примечание: На многих устройствах Windows уже включена виртуализация, поэтому вам может не потребоваться выполнять эти действия.
Прежде чем приступить к работе, определите модель устройства и производителя. Эти сведения потребуются позже в процессе.
Перед началом работы рекомендуется открыть эту страницу на другом устройстве. Вот как получить UEFI из Windows:
-
В приложении «Настройки» на устройстве с Windows, выберите Восстановление системных > или используйте следующий ярлык:
Выздоровление
Примечание: В Windows 10 вы можете получить доступ к обновлению & Безопасность > Восстановление
-
В разделе Параметры восстановления рядом с пунктом Расширенный запуск выберите Перезапустить сейчас.
-
Компьютер перезагрузится в среде восстановления Windows. Выберите Устранение неполадок > Дополнительные параметры > параметры UEFI > перезапуск

-
Компьютер перезагрузится снова, и вы будете использовать служебную программу UEFI. На этом шаге на компьютере может появиться UEFI, который называется BIOS.

Примечание: Эти инструкции могут применяться, если вы обновили компьютер с Windows 10 до Windows 11.
-
Нажмите кнопку Пуск , введите компоненты Windows и выберите Включить или отключить компоненты Windows в списке результатов.
-
В открывшемся окне Компоненты Windows найдите платформу виртуальных машин и выберите ее.
-
Нажмите кнопку ОК. Возможно, потребуется перезагрузить компьютер
Нужна дополнительная помощь?
Нужны дополнительные параметры?
Изучите преимущества подписки, просмотрите учебные курсы, узнайте, как защитить свое устройство и т. д.
Hardware Virtualization, also called Platform, Server virtualization is the virtualization of computers as complete hardware platforms. In this post, we will show you how to disable or enable Hardware Virtualization in Windows 11/10, via the BIOS settings.
How to enable Virtualization in Windows BIOS?
Reboot your Windows 11/10 computer and enter the BIOS. Once here, click on the Advanced Tab and press Enter to continue. Here, select Virtualization and Enable it. Finally, Save the changes and reboot the computer. We will see this in detail in this post for Acer, ASUS, Dell, HP, Lenovo, Sony, Toshiba, etc. computers.
While most recent PCs support hardware virtualization, not all computer vendors enable this feature as shipped from the factory. The setting may be called VT-x, AMD-V, SVM, Vanderpool, Intel VT-d or AMD IOMMU if the options are available.
If you are unable to find the Virtualization settings in your BIOS it may mean that your PC does not support it. Nevertheless, you can check if your Windows PC supports HAV.
If your computer doesn’t offer any options to access its BIOS before your OS loads then it is possible that it uses UEFI instead. On a UEFI-based computer, there is often no button press prompt before the OS loads. Instead, you will access these settings from within the OS.
For a Windows system; hold down the Shift key as you click Restart in Windows to reboot straight to that menu. To access the UEFI Firmware Settings, click the Troubleshoot tile, select Advanced Options, and select UEFI Firmware Settings. Click the Restart option afterward and your computer will reboot into its UEFI firmware settings screen.
Different MOBOs use different BIOS configurations – so to enable or disable Hardware Assisted Virtualization (HAV) on your Windows device, you can see the sections below for a list of the most common computer manufacturers and information regarding accessing the BIOS settings for each PC manufacturer.
Acer
Most commonly: F2 or Delete.
On older computers: F1 or the key combination CTRL+ALT+ESC.
- Turn ON the System.
- Press F2 key at startup BIOS Setup.
- Press the right arrow key to System Configuration tab, Select Virtualization Technology and then press the Enter key.
- Select Enabled and press the Enter key.
- Press the F10 key and select Yes and press the Enter key to save changes and Reboot into Windows.
Asus
Most commonly: F2.
Alternatively: Delete or Insert key, and less commonly F10.
- Turn ON the System.
- Press F2 key at startup BIOS Setup.
- Press the right arrow key to Advanced tab, Select Virtualization Technology and then press the Enter key.
- Select Enabled and press the Enter key.
- Press the F10 key and select Yes and press the Enter key to save changes and Reboot into Windows.
Read: How to disable VBS?
DELL
Newer models: F2 key whilst Dell logo is on screen.
Alternatively: F1, Delete, F12, or F3.
Older models: CTRL+ALT+ENTER or Delete or Fn+ESC or Fn+F1.
- Turn ON the System.
- Press F2 key at startup BIOS Setup.
- Press the right arrow key to Advanced tab, Select Virtualization and then press the Enter key.
- Select Enabled and press the Enter key.
- Press the F10 key and select Yes and press the Enter key to save changes and Reboot into Windows.
HP

Most commonly: F10 or ESC.
Alternatively: F1, F2, F6, or F11
On HP Tablet PCs: F10 or F12
- Turn ON the System
- Repeatedly press Esc key at startup.
- Press the F10 key for BIOS Setup.
- Press the right arrow key to System Configuration tab, Select Virtualization Technology and then press the Enter key.
- Select Enabled and press the Enter key.
- Press the F10 key and select Yes and press the Enter key to save changes and Reboot.
Lenovo
Most commonly: F1 or F2
Older hardware: the key combination CTRL+ALT+F3 or CTRL+ALT+INS or Fn+F1.
Enabling VT-x in ThinkPad (Tablets/Convertibles/Notebooks):
- Power ON the system.
- Press Enter or Tap the touch screen during Lenovo startup screen.
- Press or Tap F1 to enter into BIOS Setup.
- Navigate to Security tab, then press Enter on Virtualization.
- Select Intel(R) Virtualization Technology, Press Enter, choose Enable and press Enter.
- Press F10.
- Press Enter on YES to save the settings and boot into Windows.
Enabling VT-x in ThinkCentre (Desktops):
- Power ON the system.
- Press Enter during Lenovo startup screen.
- Press F1 key to enter into BIOS Setup.
- Navigate to the Advanced tab and press Enter on CPU Setup.
- Select Intel(R) Virtualization Technology, Press Enter, choose Enable and press Enter.
- Press F10.
- Press Enter on YES to save the settings and boot into Windows.
Sony
Sony VAIO: F2 or F3
Alternatively: F1
If your VAIO has an ASSIST key, try to press and hold it while you power on the laptop. This also works if your Sony VAIO came with Windows 8.
- With the computer turned completely off, press and hold the Assist button until the black VAIO screen appears.
Note: The location of the Assist button will be different depending on the computer model. Refer to the operating instructions supplied with the computer for the exact location of the Assist button on your model.
- At the VAIOCare | Rescue Mode screen, press the Down Arrow key until the Start BIOS setup [F2] option is highlighted, and then press the Enter key.
- In the [BIOS Name] Setup Utility screen, press the right-arrow key until the Advanced tab is selected.
- On the Advanced tab, press the down-arrow key until Intel(R) Virtualization Technology is selected and then press the Enter key.
- Use the arrow keys to select Enabled, and then press the Enter key.
- Press the right-arrow key until the Exit tab is selected.
- Press the down-arrow key until Exit Setup is selected and then press the Enter key.
- In the Save screen, verify Yes is selected and then press the Enter key.
Read: How to Start & Stop Hyper-V VM using PowerShell
Toshiba
Most commonly: F2 key.
Alternatively: F1 and ESC.
Toshiba Equium: F12
- Turn ON the System.
- Press F2 key at startup BIOS Setup.
- Press the right arrow key to Advanced tab, Select Virtualization Technology and then press the Enter key.
- Select Enabled and press the Enter key.
- Press the F10 key and select Yes and press the Enter key to save changes and Reboot into Windows.
I hope you find this post informative enough!
Should I enable Virtualization in BIOS?
If you do not plan to use any virtual machines on your PC, there is no need to enable Virtualization. However, even if you do it, it will not cause any issues.
Read next:
- Virtualization support is disabled in the firmware
- How to enable TPM in Hyper-V to install Windows 11.
- Find if your computer supports Intel VT-X or AMD-V.
Включение технологии виртуализации вам может потребоваться при необходимости использовать Android эмулятор или виртуальные машины, а, возможно, и для других задач, но не каждый начинающий пользователь знает, как именно это сделать.
В этой инструкции подробно о том, как включить виртуализацию в БИОС/UEFI и о возможных проблемах, которые могут возникнуть при её включении на компьютерах и ноутбуках с Windows 10, 8.1 или Windows 7.
- Включение виртуализации в БИОС/UEFI
- Проблемы при включении виртуализации
- Видео инструкция
Включение виртуализации в БИОС/UEFI компьютера или ноутбука
Основное действие для включения виртуализации — включить соответствующую опцию в БИОС/UEFI. Эта опция может носить название Virtualization, Intel Virtualization Technology, Intel VT-x, AMD-v и находиться в слегка разных разделах настроек БИОС, но логика действия всегда будет одной и той же:
- Зайдите в БИОС компьютера или ноутбука. Обычно на ПК это делается нажатием клавиши Del, на ноутбуке — F2 или F10 (иногда в сочетании с клавишей Fn). В Windows 10 простой вход может не получиться, тогда можно использовать способ входа в UEFI через особые варианты загрузки, подробнее: Как зайти в БИОС/UEFI Windows 10.
- После входа найдите, где включается опция виртуализации (далее будут показаны некоторые примеры), включите её (установите значение в Enabled).
- Сохраните настройки БИОС (обычно можно выбрать Save&Exit на вкладке Exit).
А теперь несколько примеров, где именно может находиться включение виртуализации на разных марках материнских плат и ноутбуков. По аналогии вы, вероятнее всего, сможете найти и у себя:
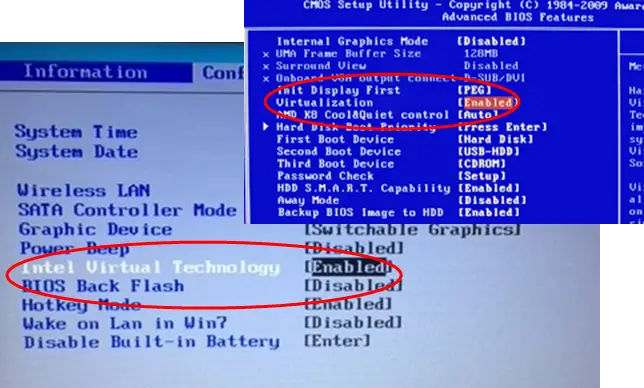
- Материнская плата Gigabyte — вкладка BIOS Features, опция Intel Virtualization Technology (еще одну опцию — VT-d тоже лучше включить).

- InsydeH2O на ноутбуках — вкладка Configuration (но, по-моему, встречал и иные варианты в этом же БИОС).

- Материнская плата Asus — раздел Advanced, либо Advanced — CPU Configuration.

- Некоторые ноутбуки Dell — раздел Virtualization support.

- Многие другие варианты БИОС — просто на вкладке Advanced Configuration, иногда далее нужно пройти в подраздел CPU Feature или CPU Configuration.


Логика расположения необходимого пункта для включения виртуализации у всех производителей похожа и, зная обычные пути включения опции, вы найдете нужный пункт даже на материнской плате другого производителя.
Проблемы при включении виртуализации
Самые распространенные проблемы, когда вы хотите включить виртуализацию на своем компьютере:
- Пункт включения Virtualization Technology не активен в БИОС
- В БИОС/UEFI нет пункта для включения виртуализации
- Виртуализация включена в БИОС/UEFI, но эмулятор или виртуальная машина в Windows 10 или 8.1 пишет, что отключена.
В первых двух случаях проблема может крыться в том, что ваш процессор не поддерживает виртуализацию. Поищите официальные спецификации вашего процессора в Интернете, обычно там есть и информация о поддержке виртуализации. Также, на некоторых ноутбуках процессор может поддерживать технологию виртуализации, но она отключена и в БИОС не предусмотрено опции для её включения — в этом случае, к сожалению, предложить не могу ничего, но можно попробовать обновить БИОС (теоретически, опцию могут добавить).
Во втором случае причина обычно заключается в том, что в Windows 10 или 8.1 включена виртуальная машина Hyper-V или Песочница. Отключите её в компонентах:
- Откройте панель управления, перейдите в «Программы и компоненты».
- Откройте слева пункт «Включение и отключение компонентов Windows».
- Отключите компоненты Hyper-V и «Песочница» (если есть).
- Примените настройки и обязательно перезагрузите компьютер.
Если указанные действия не помогли, попробуйте такой вариант: запустите командную строку от имени администратора, в ней введите команду (нажав Enter после неё)
bcdedit /set {current} hypervisorlaunchtype off
Закройте командную строку и перезагрузите компьютер.
Как включить виртуализацию — видео инструкция
Если в вашем случае не сработало, опишите в комментариях, что именно не получается, какая программа или Android эмулятор сообщают, что виртуализация не включена и что уже было сделано: возможно, решение найдется.