
Все способы:
- Способ 1: Функциональная клавиша / физический переключатель
- Способ 2: MSI Dragon Center
- Способ 3: Встроенная в Windows функция
- Способ 4: «Диспетчер устройств»
- Вопросы и ответы: 0
Способ 1: Функциональная клавиша / физический переключатель
Сейчас на многих ноутбуках, включая модели от компании MSI, функция управления веб-камерой максимально продуманная в плане конфиденциальности для пользователя. В данной ситуации ее активация осуществляется при помощи функциональной клавиши на клавиатуре. В большинстве случаев это F6, поэтому ее нужно нажать вместе с зажатой Fn, чтобы получилась комбинация Fn + F6, которая и отвечает за включение веб-камеры.
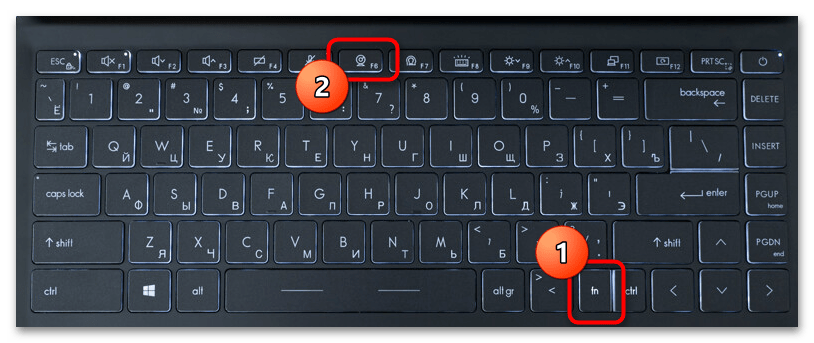
Вы должны увидеть, как справа внизу клавиши F6 появилась небольшая светящаяся точка, которая и означает, что веб-камера сейчас включена и готова к работе. Используйте этот индикатор как показатель активности камеры и при использовании других методов ее активации, если этот вдруг по каким-то причинам вас не устраивает.
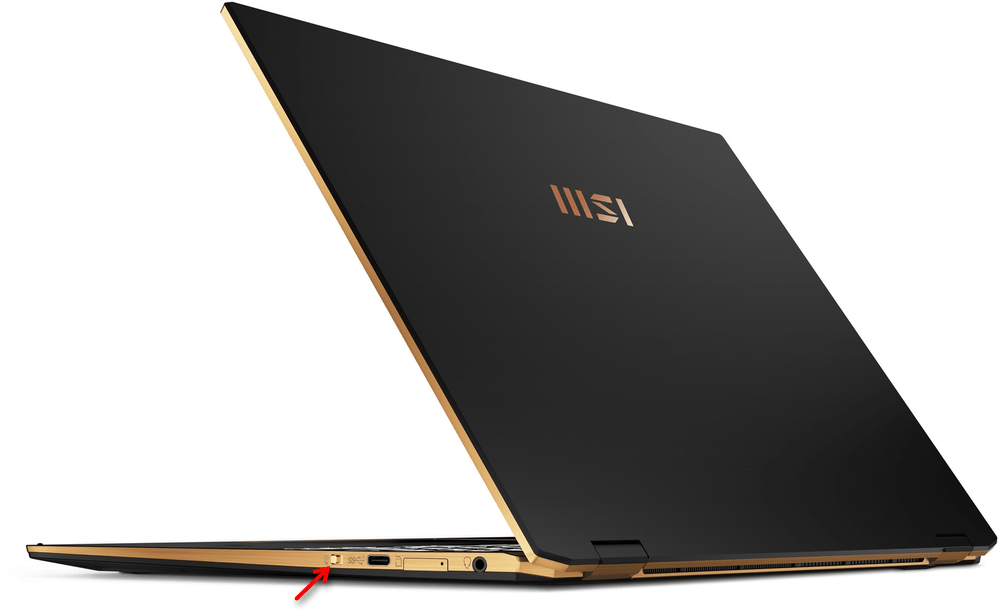
Гораздо реже, когда речь идет о бизнес-линейке новых ноутбуков от MSI, регулятор управления веб-камерой встречается на боковой панели и выполнен в виде кнопки или переключателя. Если вы посмотрели на клавиатуру и не нашли такую клавишу, о которой шла речь выше, скорее всего, на вашем устройстве реализован именно такой переключатель на корпусе. Посмотрите на боковые панели ноутбука (обычно у MSI это правая грань) и найдите этот элемент управления. Нажмите эту самую кнопку или передвиньте переключатель в положение «On».
Способ 2: MSI Dragon Center
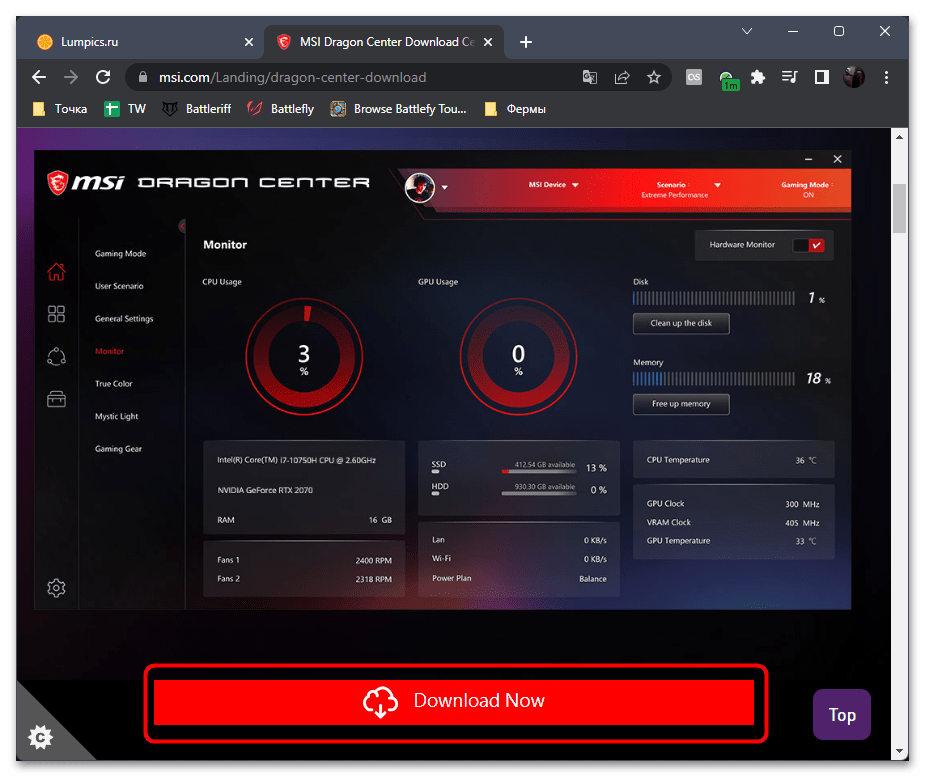
Многие ноутбуки от MSI позиционируются как игровые, поэтому не удивительно, что производитель выпускает и специализированное программное обеспечение, через которое осуществляется управление комплектующими, периферией и различными игровыми настройками. Среди них есть и переключатель, способный активировать веб-камеру. Если MSI Dragon Center еще отсутствует на вашем ноутбуке, скачайте эту программу с официального сайта по ссылке ниже и установите ее, после чего переходите к следующему шагу.
Скачать MSI Dragon Center с официального сайта
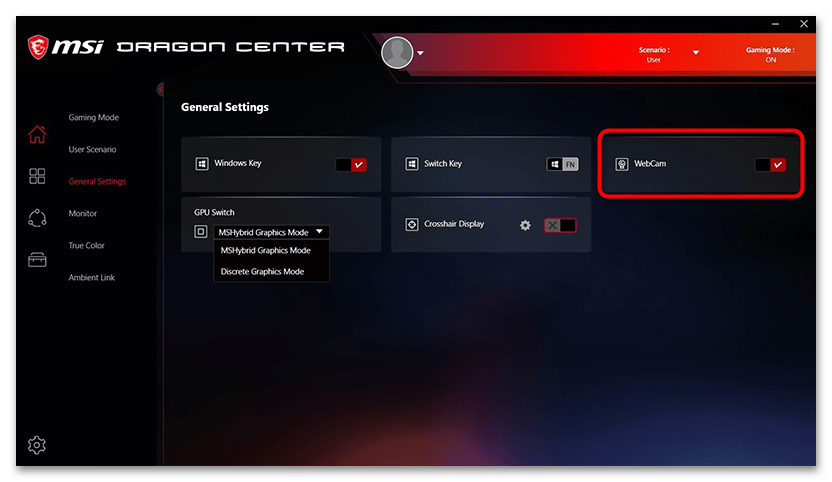
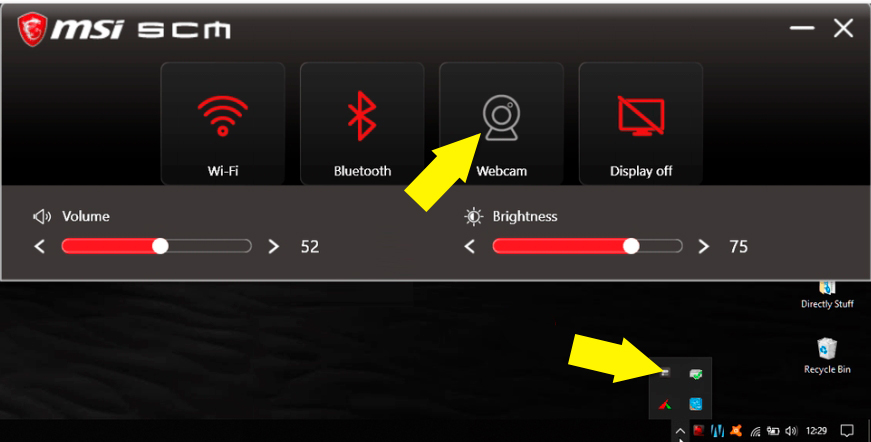
Следующий этап — открыть меню управления MSI Dragon Center и найти там необходимый переключатель для активации веб-камеры. Если ваш ноутбук поддерживает только старую версию программы, она откроется в виде небольшого окна, в котором будет всего несколько кнопок и переключателей. Отыщите в нем кнопку с названием «Webcam» и нажмите по ней, чтобы она была подсвечена красным. Это означает, что сейчас веб-камера находится в активном режиме работы.
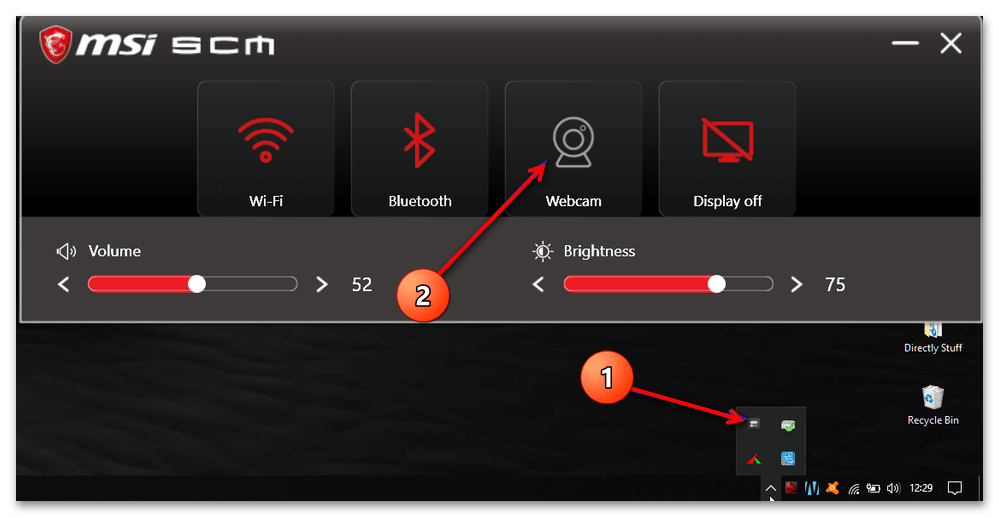
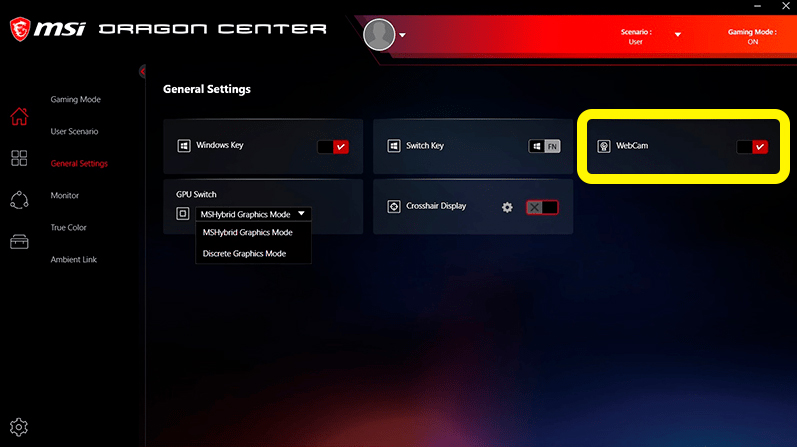
В последних версиях данного вспомогательного софта понадобится открыть раздел «General Settings», кнопка перехода в который находится на левой панели. В нем найдите пункт «WebCam» и передвиньте переключатель вправо, чтобы возле него появилась галочка. Проверьте индикатор на клавиатуре и переходите к использованию камеры в своих целях.
Дополнительно отметим, что возможности MSI Dragon Center на этом не заканчиваются. В программе есть большое количество полезных функций, которые позволяют оптимизировать работу ноутбука или активировать некоторые функции. Развернутую инструкцию по данному ПО вы найдете в другой статье на нашем сайте, перейдя по следующей ссылке.
Подробнее: Настройка и использование приложения MSI Dragon Center
Способ 3: Встроенная в Windows функция
В операционной системе тоже есть переключатели и кнопки, которые помогут пользователю управлять работой веб-камеры. При этом ее можно настроить так, чтобы она была заблокирована только в определенных приложениях. Учитывайте эту особенность и внимательно смотрите все настройки, чтобы обеспечить корректное функционирование камеры на ноутбуке MSI во всех нужных программах.
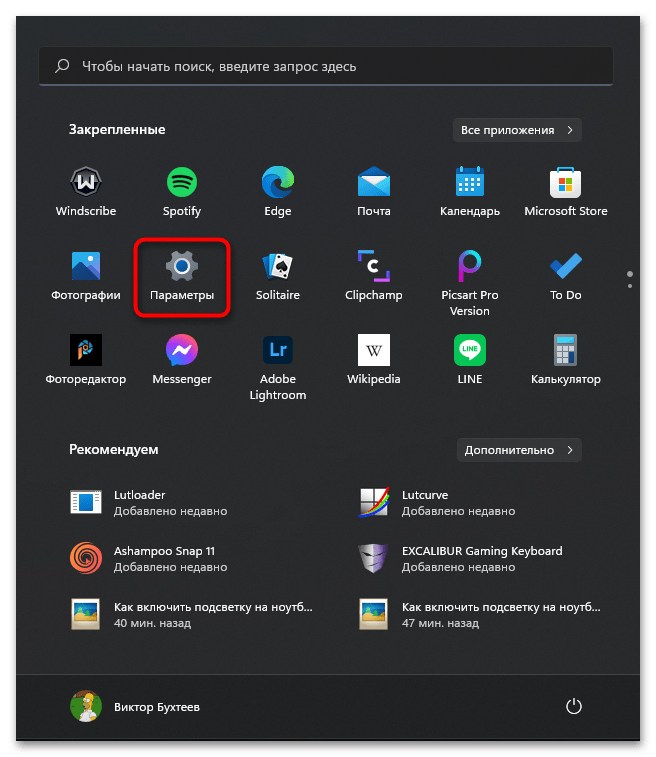
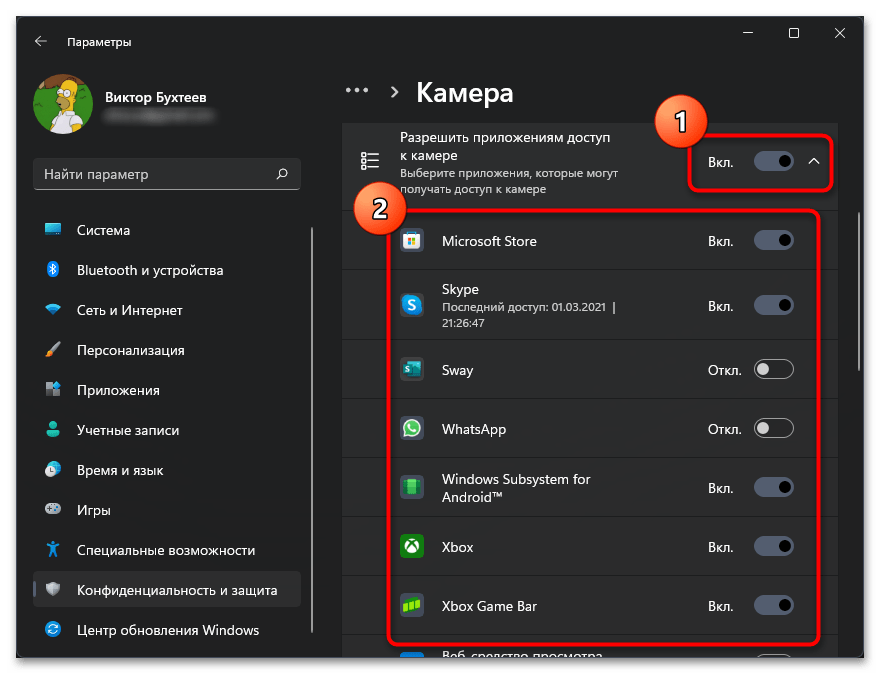
- Откройте меню «Пуск» и перейдите в «Параметры», щелкнув по значку в виде шестеренки. В Windows 10 этот значок находится на панели слева.
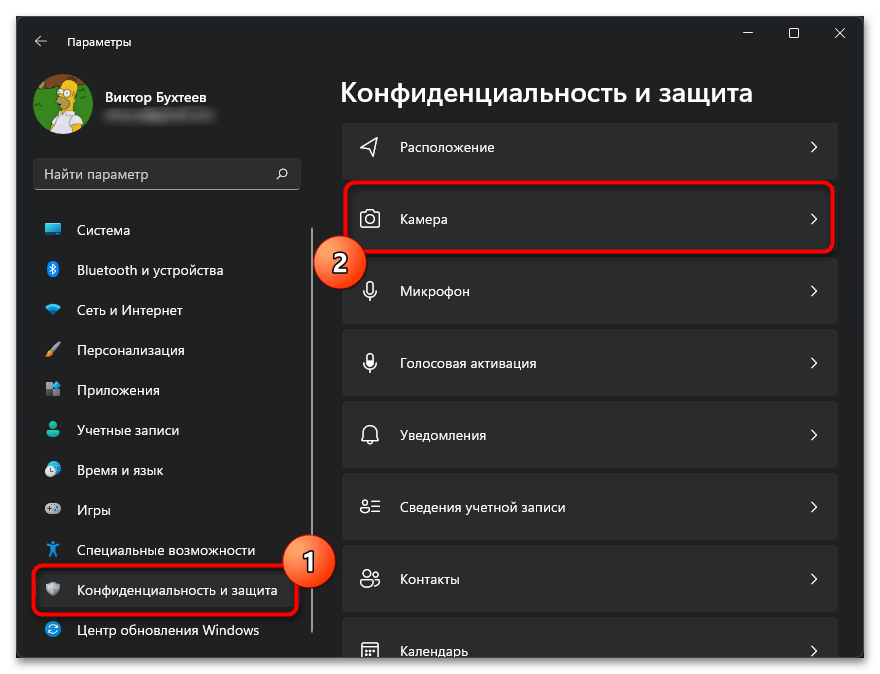
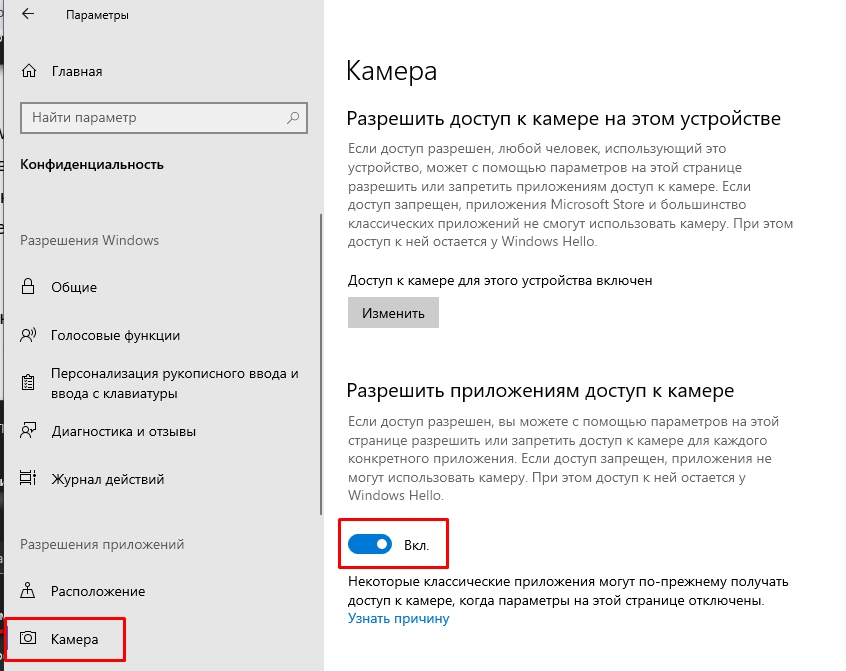
- В «Параметрах» ознакомьтесь с левой панелью и найдите в ней раздел «Конфиденциальность и защита». Выбрав его, отыщите пункт «Камера» и разверните соответствующие настройки.
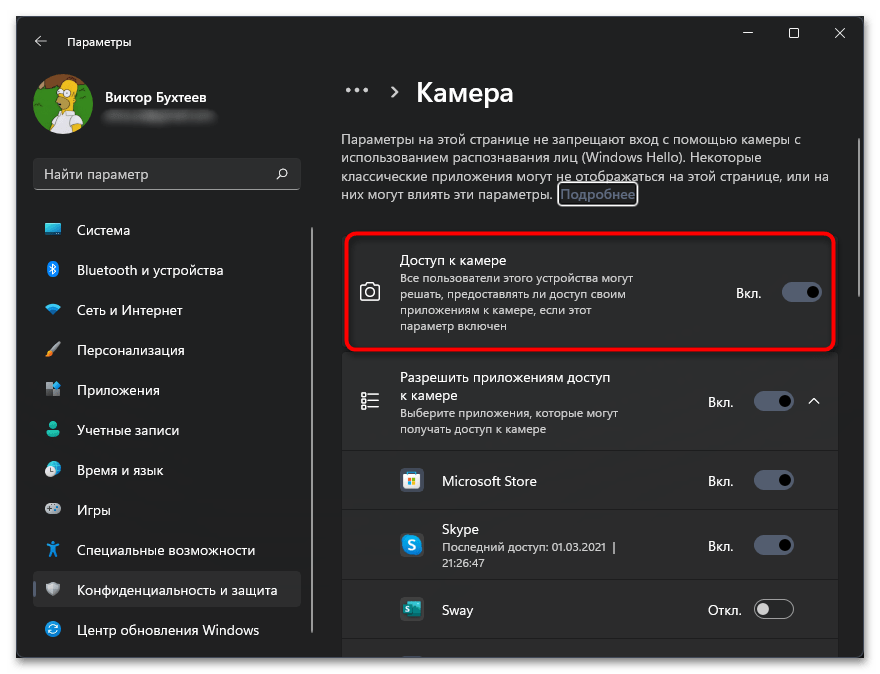
- Найдите параметр «Доступ к камере» и переключите его в значение «Вкл.», чтобы обеспечить включение веб-камеры по умолчанию для всех приложений.
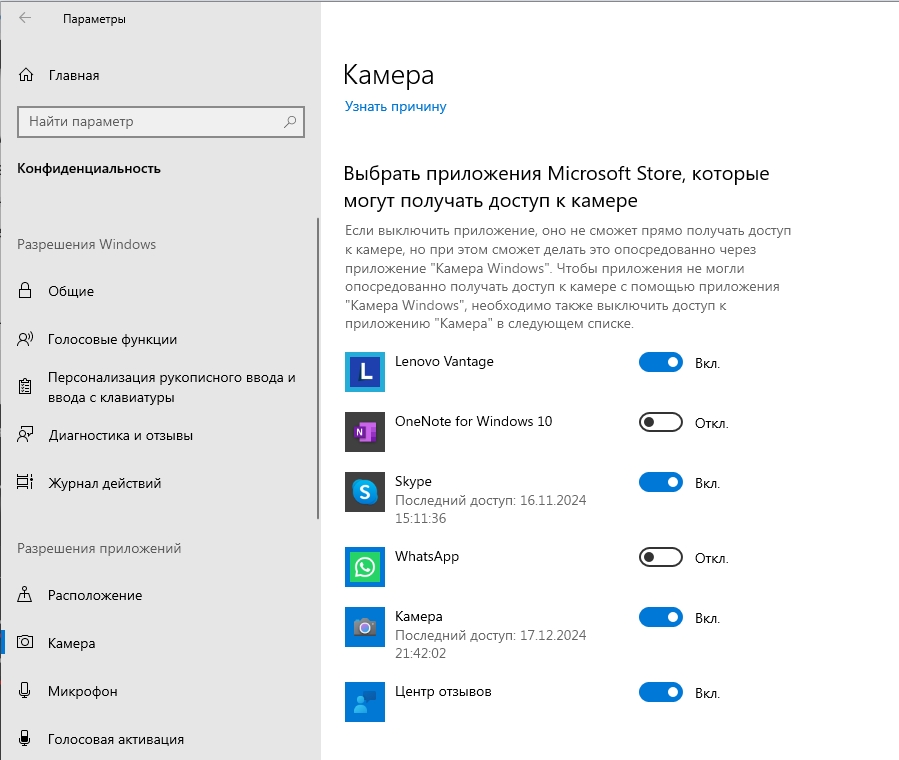
- Дополнительно предлагается настроить доступ для программ. Обязательно включите настройку «Разрешить приложениям доступ к камере», после чего посмотрите на список всех установленных программ и решите, для каких из них нужно отключить разрешение на работу с веб-камерой. В этом месте как раз можно найти приложения, которым вы ранее случайно запретили доступ к вебке.
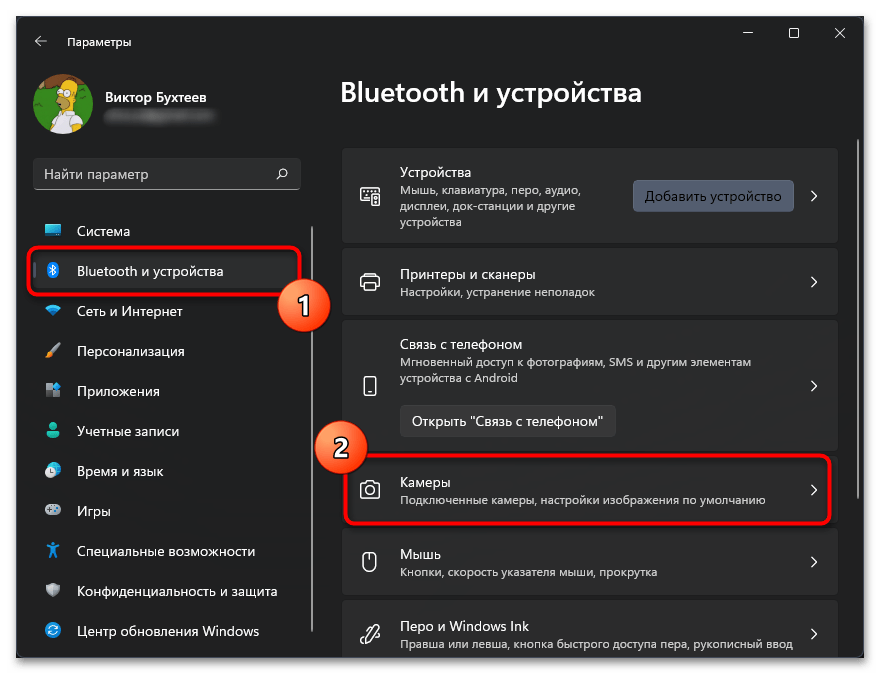
Пользователи Windows 11 могут не просто управлять приложениями и их доступом к камере, а полностью отключать или включать данное периферийное устройство, чтобы обеспечить необходимый уровень конфиденциальности. Если после произведенных выше действий камера все еще не работает, настоятельно рекомендуем проверить именно эту настройку и убедиться в том, что устройство находится во включенном состоянии.
- В том же меню «Параметры» выберите раздел «Bluetooth и устройства», после чего отыщите в списке «Камеры» и перейдите в данную категорию.
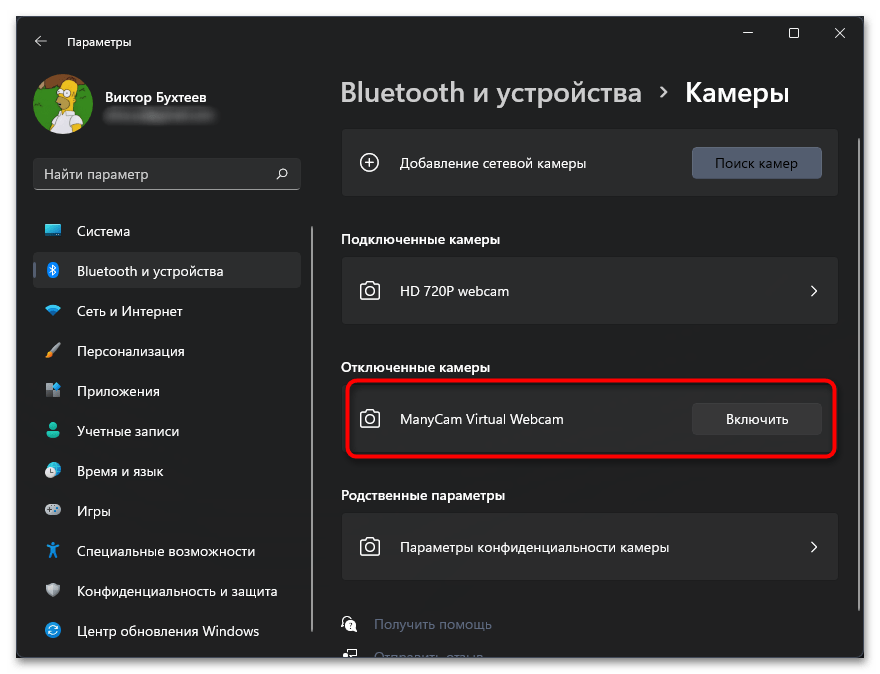
- Если в блоке «Отключенные камеры» есть веб-камера вашего ноутбука MSI, понадобится нажать кнопку «Включить», чтобы перевести ее в активный режим работы.
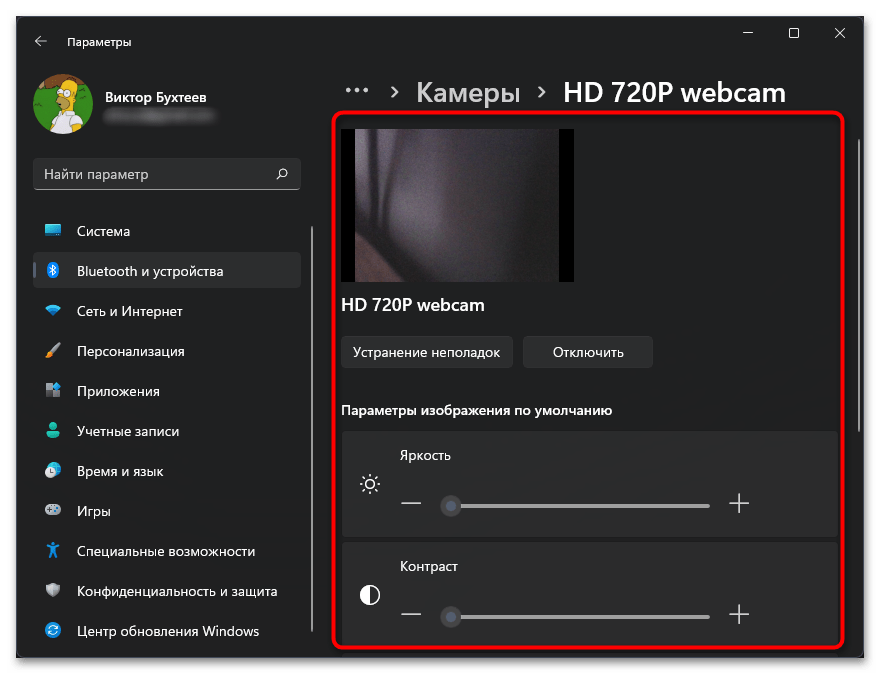
- После этого нажмите по плитке с названием камеры левой кнопкой мыши, чтобы перейти в отдельное меню управления ею. Если вы увидели изображение с нее, значит, теперь устройство работает и готово для дальнейшего взаимодействия. В этом же окне часто можно регулировать цвета, яркость и контраст камеры.
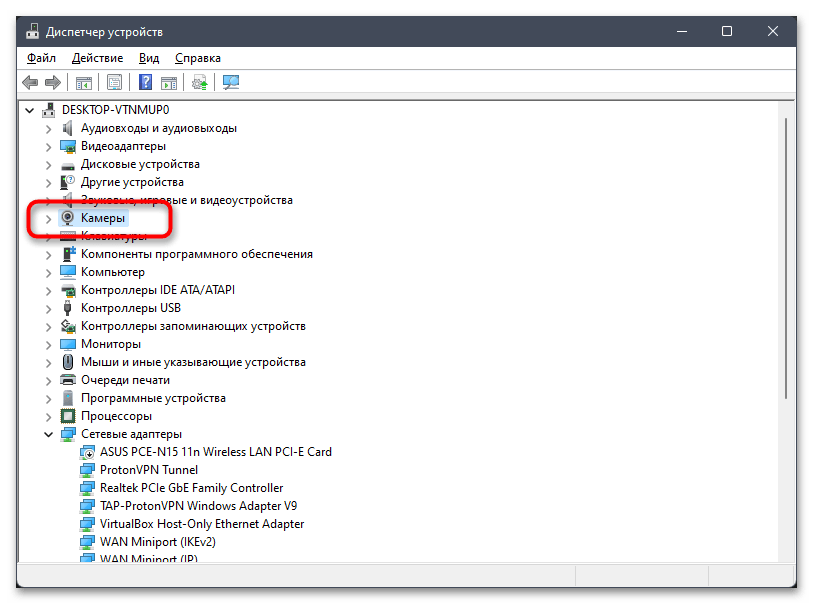
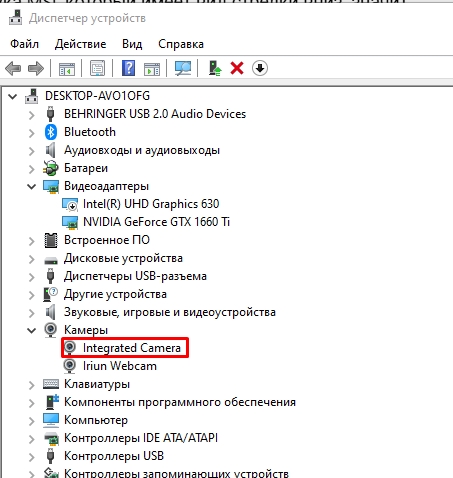
Способ 4: «Диспетчер устройств»
Мы оставили этот метод напоследок, поскольку очень редко происходит так, что веб-камера на ноутбуке MSI оказывается отключенной именно в «Диспетчере устройств». Рекомендуем переходить к выполнению следующей инструкции только в том случае, если вам не удалось добиться работоспособности периферии ни одним из перечисленных выше способов.
- Щелкните по кнопке «Пуск» правой кнопкой мыши и из появившегося контекстного меню выберите пункт «Диспетчер устройств».
- В списке устройств отыщите «Камеры» и разверните эту категорию.
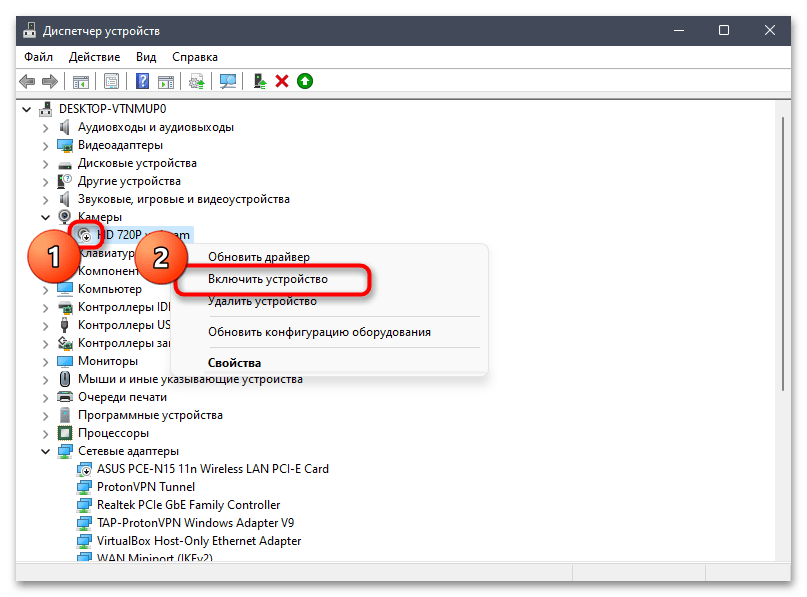
- Если вы видите значок рядом с веб-камерой ноутбука MSI, который имеет вид стрелки вниз, значит, сейчас устройство отключено. Кликните по нему правой кнопкой мыши и из появившегося меню выберите пункт «Включить устройство».
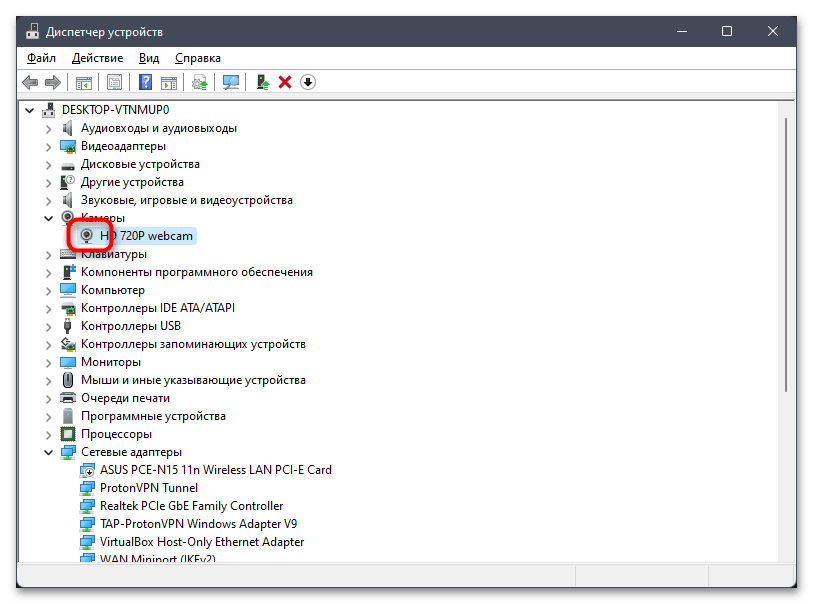
- После этого упомянутый выше значок должен пропасть. Это означает, что устройство активировано и готово к работе. Если после проверки оно все еще недоступно, попробуйте включить его одним из предыдущих методов (сначала попробовав функциональную клавишу).
Иногда ни один метод включения веб-камеры не позволяет добиться нужного эффекта и оказывается, что устройство вовсе не хочет работать. В таком случае понадобится проверить несколько причин этой неисправности: установить драйвер, изменить некоторые системные настройки или обратиться к параметрам программы, в которой собираетесь использовать веб-камеру. Обо всем этом рассказано во вспомогательных статьях на нашем сайте.
Читайте также:
Решаем проблему с неработающей камерой на ноутбуке с Windows 10
Наша группа в TelegramПолезные советы и помощь
Fix MSI laptop camera not working in Windows 10,11 error with these easy but productive solutions. To know which one can work in your case, do read the entire write-up, till the end!
MSI is an abbreviation of Micro-Star International, a Taiwanese-based computer manufacturer. MSI is one of the well-known gaming hardware peripherals manufacturers. MSI’s mid to high-advanced laptops have earned the recognition of the overall gaming community. If you also acquired an all-new MSI laptop but unable to identify a way to make its webcam functioning properly for your gaming streaming platforms.
Then, no worries, you are not all alone, there are many users out there who have reported MSI laptop camera not working issue. So, particularly, we have created this document just to explain to you those easy tactics, which you can adopt in order to fix this annoying issue.
But, before we look forward, here is one of the most obvious reasons why your MSI laptop’s camera is not performing well. Outdated camera drivers are the core culprits behind this annoyance. So, we advised you to keep your camera drivers always updated. To do so, with much ease, you can try Bit Driver Updater, which is one of the best driver updater utilities that can update all the broken drivers in just a single click of the mouse. To get it downloaded and installed on your PC for free, click on the button provided below.
Quick Solutions to Fix MSI Camera Not Working in Windows 10,11 PC
Here at TechPout, we have mentioned the four possible strategies to resolve the MSI laptop camera not working issue in Windows PC. However, you are not required to try all of them, just keep working your way down until you get the one that does a miracle for you. Without any further ado, let’s get directly to it!
Solution 1: Make Sure the Camera is Enabled
First and foremost, you can check whether the MSI camera is turned off/ disabled by default or not. If you find it disabled then you need to enable it manually so that the camera can function normally as it is supposed to do.
For enabling the MSI camera, you simply need to hit the Fn and F6 keys from your keyboard simultaneously in order to trigger the camera on your MSI laptop. There you have enabled it effortlessly, now check to ensure if the MSI camera not working resolved. If the issue still remains the same as earlier, then don’t panic, here are more solutions below to fix the issue, just try them.
Also Read: Best Free Driver Updater for Windows
Solution 2: Grant Permission to your Camera
One of the major causes because of which you can encounter the MSI built-in camera not working issue and that’s when your system or Windows 10,11 fails in recognizing the camera. But, no need to worry, in this event you need to grant permission through the Windows privacy settings. Here are steps on how to grant permission to your camera:
Step 1: Make a click on the Start button and then click on the gear icon (Settings) to trigger the Windows Settings on your PC.

Step 2: Once the Windows Settings prompt, then locate and choose Privacy from the available options.

Step 3: After this, head to the Camera tab in the left pane, then make a click on the Change button and enable camera access for this system.

Step 4: Next, turn on the button under the Allow apps to access your camera.

Now, try to access your MSI camera on your device just to ensure whether the issue is resolved or not.
Also Read: Troubleshoot Mouse Problems in Windows 10 – Fix Mouse Problems
Solution 3: Turn On WebCam On MSI Dragon Center
The next solution that worked for many users to fix the MSI camera not working on Windows 10,11 PC was enabling the webcam in the MSI Dragon Center. If you own an MSI gaming laptop, then you need to follow this procedure. The Dragon Center is a tool that allows you to get the best gaming experience on your laptop with ease. If the webcam is disabled in the settings of the tool, then you can not use the camera. Follow the steps below to know how to enable the camera:
- Run the MSI Dragon Center tool on your laptop.
- Open the tool Settings and navigate to General Settings.
- Lastly, toggle on the button across the WebCam to turn on the same.
Follow the next solution if this one fails to fix the MSI webcam not running error.
Solution 4: Update your Camera Driver
Even after giving access permission isn’t able to make the MSI camera working properly then it’s clear that there may be a driver-related issue. As we have explained above, outdated camera drivers could cause MSI camera not working in Windows 10, 11. So, to get it resolved, you must update the camera drivers to their most up-to-date version.
You can do this task via two approaches i.e, either manually or automatically. Talking about the manual approach, then either from the manufacturer’s official website or via seeking the help of the Windows in-built utility tool called Device Manager, you can get the latest camera drivers installed on your PC. But though they are manual methods hence it requires special technical skills as well as sufficient time.
Therefore, we recommend you adopt the automatic approach to install the latest camera drivers. For updating the driver automatically millions of users showed their trust upon Bit Driver Updater. Likewise, you can too trust Bit Driver Updater to ensure automatic driver updates. Be assured, with this utility you don’t need to search for the drivers manually, what you need to do is just install the utility on your system and leave it by clicking on the Scan button, after the click, Bit Driver Updater comes into the action and scans the overall PC for the faulty drivers. For better understanding, go through the steps provided below to know how swiftly Bit Driver Updater runs:
Step 1: Install the Bit Driver Updater from the button provided below.
Step 2: Thereafter, follow the wizard’s instructions to get it successfully installed on your PC.
Step 3: Launch the tool on your PC, then, find the Scan button in the left menu pane and click on it.

Step 4: After the click, Bit Driver Updater gets the command and starts scanning your PC for the drivers which need an update.
Step 5: Later on, when scanning is over, the tool provides you with a list of all the faulty or outdated drivers.
Step 6: Now, you need to see the list and find the camera drivers. Once you find the camera drivers, then click on the Update Now button which shows next to the driver.

Step 7: If you think to update other outdated drivers along with the camera driver then Bit Driver Updater allows you to do so as well. For this, you have to make a click on the Update All option instead of Update Now.

There Bit Driver Updater downloaded and installed the correct or genuine drivers on your PC quite easily & quickly. You can use the tool in two versions i.e, either free or pro. But, it is advisable to use the pro version, as it gives you access to use the high-end features of utility which consist of one-click driver update, built-in system optimizer, complete technical aid 24/7, backup & restore.
Also Read: How To Update Graphics Drivers In Windows 10 {Simple Guide}
Solution 5: Uninstall & Reinstall your Camera Driver
Due to some compatibility issues, if updating the outdated or missing camera drivers doesn’t fix the issue. Then, as a final bet, you have only one option left and that is uninstalling and then reinstalling the camera drivers. To uninstall the camera drivers you may use the Windows in-built utility tool named Device Manager. Below are the steps that your must follow in order to uninstall the camera drivers through Device Manager:
Step 1: To open Device Manager, you need to press the Windows logo key, then type the Device Manager in the search box, and choose the best-searched result of it.
Step 2: Next, when you land on the Device Manager window, locate and double click on the Imaging devices category to expand it.
Step 3: After this, click right on the Integrated Camera option to choose Uninstall device as an option.

Step 4: To affirm the uninstallation click on the Ok option.
Thereafter, start your PC again, and now the MSI laptop camera not working in Windows 10 should be resolved. Plus, the camera drivers should be installed again automatically.
Also Read: How to Fix Windows 11 Camera Not Working – Quickly and Easily
Solution 6: Rollback Driver
If none of the previous method work to fix the error, you can try rolling back the drivers to the previous versions as well. It is possible that the new driver update is not compatible with your system and causing the MSI camera not working issue. Follow the below steps to know how to roll back the driver:
- Use the Device Manager to open the Properties of your MSI webcam as did in the previous method (Up to step 3 in method 5 above)
- Click on the Driver tab and select the option to Rollback the driver if available.
Follow the on-screen instructions to roll back the driver safely.
Solution 7: Run the Camera Troubleshooter
The next thing that you can do to fix the MSI webcam not working properly is to use the device troubleshooter. The option, just like its name, allows your system to troubleshoot all the problems related to hardware. Follow the steps below to know how to use the troubleshooting:
- Press Win+S keys, type Run, and press Enter.

- Type the below command in the box and hit Enter.
msdt.exe -id DeviceDiagnostic - Follow the on-screen instructions to run the troubleshooter and fix all the errors.


Also Read: Lenovo Laptop Camera Not Working on Windows
MSI Camera Not Working in Windows PC – FIXED
So, these were the troubleshooting solutions to fix the MSI camera not working on Windows 10,11 PC. Try any one of them which fits your case, and let us know which solution worked for you in the comment box below.
Plus, if you face any kind of difficulties while implementing the steps of the above solutions, then please share them with us in the comments below. We would try to assist you in the best way possible. Additionally, you may also seek the help of the MSI support center if the problem persists.
Additionally, if you have any suggestions then tell us about them through the box. For reading more troubleshooting and downloading guides, do subscribe to TechPout. We are looking forward to your feedback.
Всем привет! Сегодня мы коротко посмотрим, как включить камеру на ноутбуке MSI. Ведь по умолчанию она может быть выключена. Также на забываем, про физическую защелку – камера при этом работает нормально, но выводит черное изображение. Все важные моменты мы рассмотрим в статье ниже.
Содержание
- Способ 1: С помощью горячих клавиш
- Способ 2: MSI Dragon Center
- Способ 3: В Windows
- Способ 4: Диспетчер устройств
- Видео
- Задать вопрос автору статьи
Способ 1: С помощью горячих клавиш

Самый просто способ включить камеру на MSI – это использовать специальные функциональные клавиши. Обычно нужно просто одновременно зажать кнопки:
Fn + F6
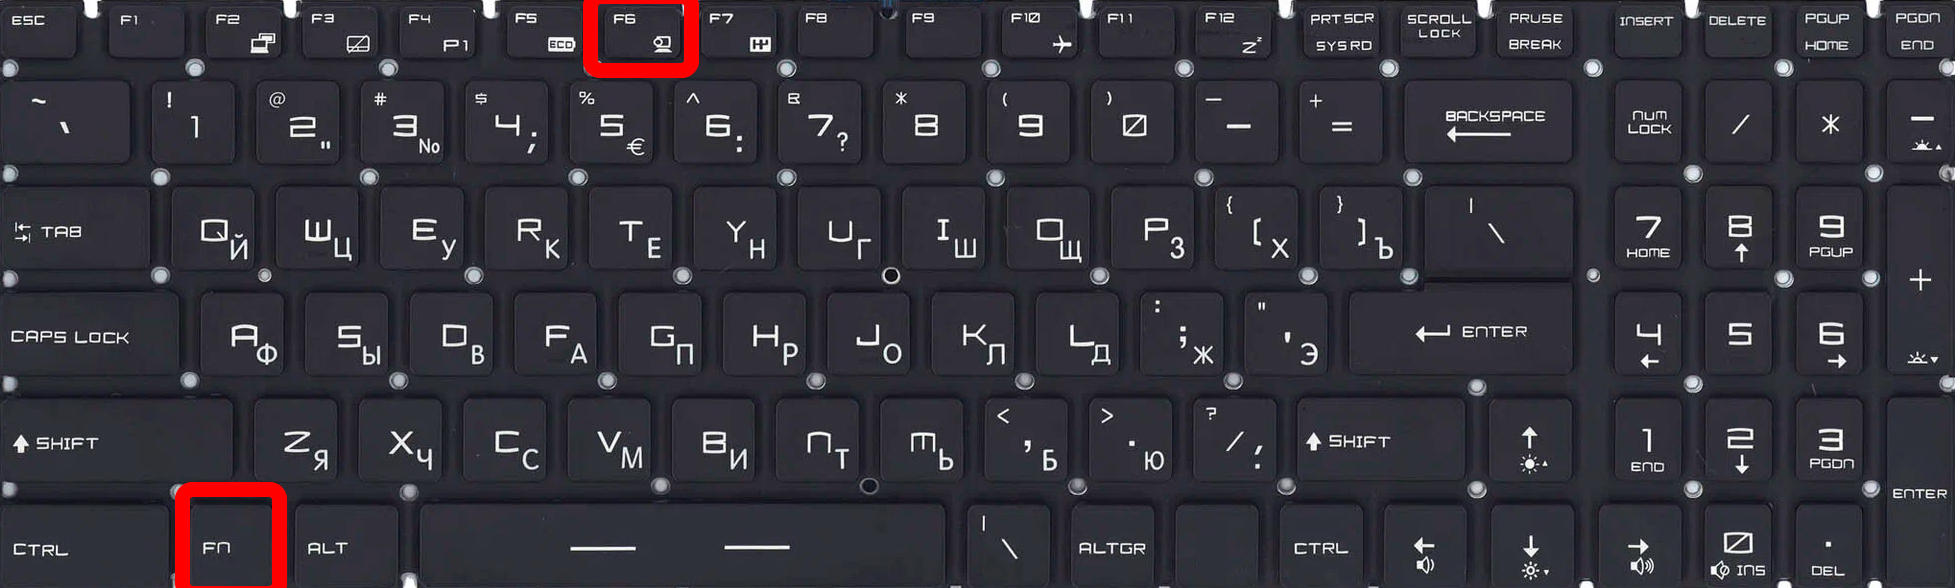
Обратите внимание, что рядом на кнопке «F6» есть специальная иконка камеры. Если её там нет, и клавиши не срабатывают, попробуйте найти, используя другую клавишу. После использования, на некоторых моделях там же загорается маленький светодиод – это значит камера работает.
Читаем – как включить камеру на Windows 10.
Напомню, что у некоторых моделей MSI есть специальная «Шторка», которая закрывает камеру, даже во включенном состоянии – проверьте, чтобы она была открыта.
Способ 2: MSI Dragon Center
MSI Dragon Center – это специальное программное обеспечение, которое позволяет управлять ноутбуком и обновлять программное обеспечение, в том числе и драйвера. Достаточно скачать приложение и установить его к себе на ноут.
Скачать MSI Dragon Center
В зависимости от версии ПО вам нужно запустить программу и найти функцию включения-отключения Web-камеры. На более старых версиях – кнопка сразу находится на главной.
В новых версиях нужно перейти в раздел «General Settings» или «Настройки», далее уже просто включаем камеру на ноутбуке МСИ.
Читаем – как включить камеру на Windows 11.
Способ 3: В Windows
Если у вас наблюдаются проблемы с включением камеры в отдельных приложениях, то можно посмотреть параметры Виндовс.
Читаем – как очистить компьютер от мусора.
- «Пуск» – «Параметры».
- Переходим в раздел «Конфиденциальность» или «Конфиденциальность и защита» в Виндовс 11.
- Переходим в подраздел «Камера» и смотрим, чтобы разрешение для камеры было включено.
- Ниже пролистайте и посмотрите, чтобы для выделенной программы аналогично было включено разрешение от системы на использование вебки. Это также касается и встроенных программ.
СОВЕТ! Для Windows 11 дополнительно слева выберите «Bluetooth и устройства», перейдите в «Камеру» и включите аппарат, если кнопка активна.
В редких случаях возникают проблемы на уровне программного обеспечения и драйверов. Иногда устройство может по каким-то причинам отключаться. Поэтому нам нужно это проверить.
- Кликаем ПКМ по кнопке «Пуск».
- Заходим в «Диспетчер устройств».
- Откройте вкладку «Камеры». Если напротив какой-то камеры есть стрелочка, указывающая вниз – кликните ПКМ и включите устройство.
- Если камеры вообще нет, то вам нужно установить драйвера. Лучше обновить вообще все дрова. Это можно сделать двумя способами. Первый – с помощью MSI Dragon Center. Скачиваем, устанавливаем, находим кнопку «Обновить драйвера» и запускаем. Второй – вы можете скачать их вручную с сайта производителя.
Читаем – как обновить все драйвера в Виндовс.
- Если камера есть, сверху никаких стрелок нет, но она не работает – кликаем ПКМ по ней и удаляем. После этого перезагружаем ноутбук. Драйвера должны встать автоматически.
Еще один момент – некоторые вирусы могут использовать камеру. Поэтому советую полностью проверить ваш ноутбук на наличие вредоносного ПО.
Последнее что мы можем сделать – это попробовать обновить BIOS. Иногда это помогает, если изначально проблема была в этом. Более подробно про обновление БИОС именно в MSI – читаем в этой инструкции (переходим по ссылке).
Видео
Readers help support Windows Report. We may get a commission if you buy through our links.
Read our disclosure page to find out how can you help Windows Report sustain the editorial team. Read more
While MSI maintains a reputation as one of the best high-end gaming laptops on the market, some streaming gamers complained about camera issues.
However, most of them claim that their MSI camera not working problems often occur when the system can’t detect it. Some of our readers also received the error code 0xA00F4292<PhotoCaptureStartTimeout>.
Why is the MSI laptop camera not working?
Firstly, issues with the camera privacy settings on your laptop can cause a black screen on the MSI camera. Meanwhile, other notable causes are:
- Outdated MSI camera driver issues: Not keeping your device’s camera driver up-to-date can cause the MSI camera not working 0xa00f4244 error. Do not hesitate to refer to our guide on how to update drivers on Windows 11.
- Outdated Windows: An outdated Windows can affect various parts of your computer. In the event that Windows is unable to finish installing updates, our guide can help you.
- Camera access is not allowed: It will be impossible for apps to use MSI cameras if they aren’t allowed in your system settings.
How can I fix the MSI laptop camera if it fails to work?
Here’s what you should keep in mind:
- Switching to an external webcam can save you the stress of constantly fixing issues when the MSI laptop camera is not working in Windows 11. There are lots of webcams you can buy for your laptop. We recommend you read our article about the best 4K webcams for your Windows 11 PCs.
1. Allow access to your camera
- Click the Start button and click on Settings to open the app.
- Select the Privacy option and navigate to the Camera tab.

- Click to turn on the Camera access for the device.
- Toggle on the Let apps access your camera option on the Camera tab.


Allowing apps to access your MSI laptop camera will revoke any settings preventing it from working.
We recommend you check out our guide on the best ways to access webcam settings in Windows 10/11 for more details.
2. Update your MSI camera driver
- Click on the Start button, type Device Manager in the search box, and press Enter.

- Navigate to Cameras and click to expand the menu.
- Right-click on the laptop camera or integrated webcam driver option from the drop-down, and tap on the Update driver option.

- Choose the Search automatically to update the drivers option.
- Restart your computer once the driver update is complete.


MSI camera driver update provides the components dependent on it with the essential patches to fix issues like webcam flickering on Windows 11.
You can also try to use an automated program that can scan and update your drivers for you more safely and quickly.
Often, your computer system might not be able to update the generic drivers for your hardware and peripherals correctly. There are vital differences between a generic driver and a manufacturer’s driver. Finding the correct driver versions for every hardware component can become tiresome.That’s why a dependable updater can help you find and update your drivers automatically. We strongly suggest the Outbyte Driver Updater, and here’s how to do it:
- Download and install the Outbyte Driver Updater app.
- Launch the software and wait for the app to detect all incompatible drivers.
- Now, it will show you a list of all outdated drivers to select the ones to Update or Ignore.

- Click on Update & Apply Selected to download and install the latest versions.
- Restart your PC to ensure the applied changes.

Outbyte Driver Updater
Maintain your device healthy by letting OutByte Driver Updater find the latest driver options.
Disclaimer: You may need to upgrade the app from the free version to perform specific actions.
3. Tweak your camera privacy settings
- Click on the Start button, input camera privacy settings in the search box, and press Enter.

- Toggle on the Let desktop apps access your MSI laptop camera option.

- Select the apps you want to allow access to your system camera, then toggle on the switch against them.


Close the camera privacy settings windows and check if you can fix the MSI camera not working issues. Alternatively, this guide on changing privacy settings on Windows may further help you.
- Microsoft’s might want to turn Copilot into a multi-modal AI chatbot
- How to Fix Errors Related to the LibGLESv2.dll File
- Razer Cortex vs. MSI Afterburner: Which one should I use?
- Omen Gaming Hub Crashing PC: 6 Ways to Fix it
- ERROR_CARDBUS_NOT_SUPPORTED: 6 Easy Ways to Fix This BSoD
4. Update your operating system
- Click the Start button.
- Select Settings and click on Windows update.
- On the Windows update page, select Check for updates (if there are any updates available, Windows will automatically search and install them).


An outdated operating system can affect many parts of the system and can result in problems like the camera function key not working or triggering the 0xa00f4244 nocamerasareattached message.
You can read more about what to do if the camera is not showing in Device Manager by clicking the link above.
Nonetheless, you should not panic if you encounter problems with your laptop. We have a detailed guide on fixing your laptop camera if it isn’t working and how to get it working correctly.
Also, check our article about what to do if you experience black screen issues with the webcam on your device.
If you have more questions or suggestions on a helpful fix that has worked for you but not included, kindly leave them in the comments section.
Henderson Jayden Harper
Windows Software Expert
Passionate about technology, Crypto, software, Windows, and everything computer-related, he spends most of his time developing new skills and learning more about the tech world.
He also enjoys gaming, writing, walking his dog, and reading and learning about new cultures. He also enjoys spending private time connecting with nature.