
Introduction
A key feature in the Windows family is to enable or disable the USB Ports. We can also use this feature in Windows 10 to enable or disable the USB Ports.
Often we have to share our laptop or PC with another person. A person who has a pen drive with viruses and infected files can inject these malicious files into the system to damage the device, and also, someone who has bad intentions can steal our important documents through a pen drive. We can never be too careful to keep our data secure. Disabling the USB Ports is a very good solution to protect our device from viruses and other vulnerabilities.
When we need to use USB Devices through USB Ports, we can enable these ports by using different methods like device manager, registry editor, and any other third-party applications.
This tutorial will show you various methods on how to Enable or Disable USB Ports in Windows 10.
Method 1. Using Registry Editor
Using the Registry Editor, you can easily enable or disable the USB Ports.
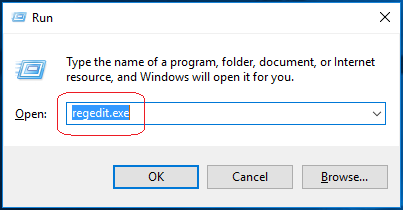
Step 1. From the Start menu, open the Run dialog box, or you can Press the «Window + R» key to open the RUN window.
Step 2. Type «regedit.exe» and press enter to open Registry Editor.
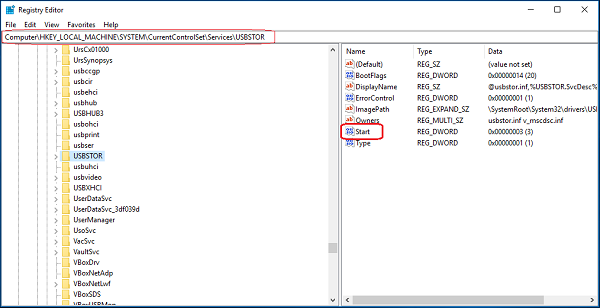
Step 3. Registry Editor Window will be opened, and Navigate the following path.
HKEY_LOCAL_MACHINE > SYSTEM > CurrentControlSet > Services > USBSTOR

Step 4. Click on the start option to open the «Edit DWORD (32-bit) Value» Window.
Step 5. Restart Your Laptop or PC to see the effects.
Method 2. Via Device Manager
You can also easily enable or disable the USB Ports through Device Manager.
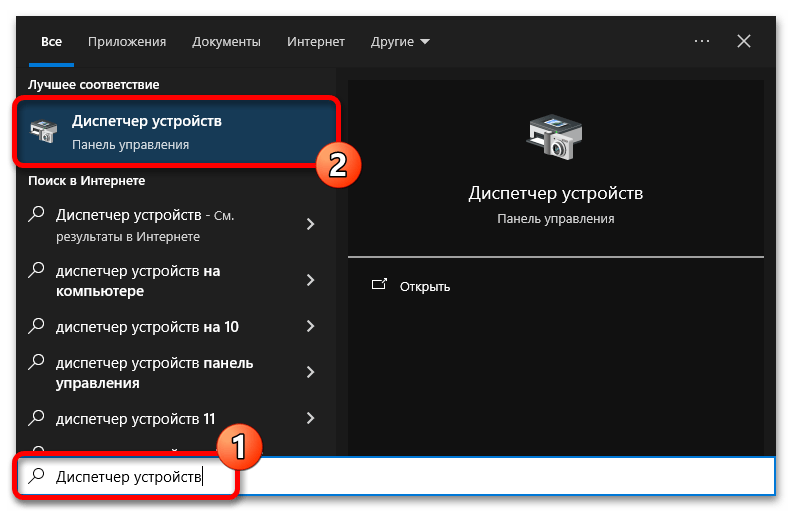
Step 1. You can click Start and type Device Manager. Then click Device Manager to open Windows Device Manager or press the «Windows + X» key and click Device Manager to open it.
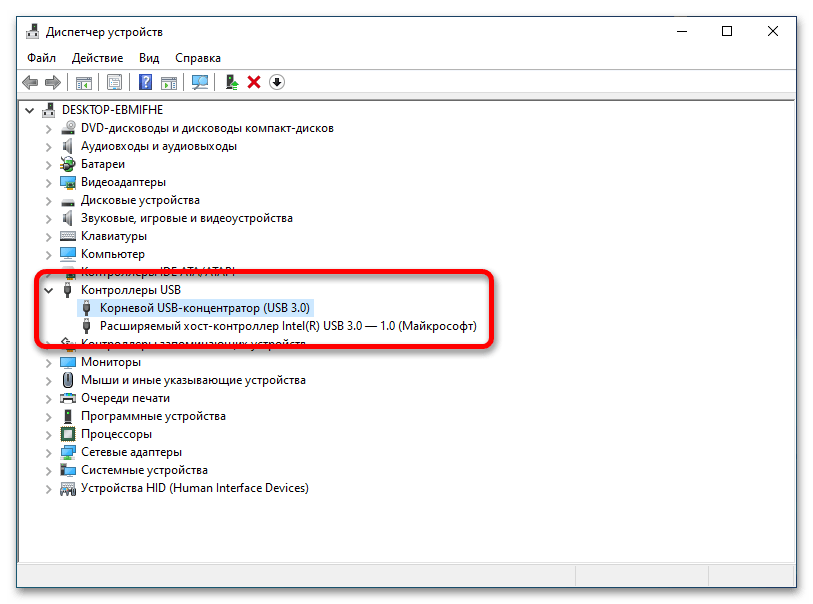
Step 2. Click on Universal Serial Bus Controllers, and you will see various device options in it.

Step 3
Conclusion
By following any of the above methods, you can enable or disable the USB Ports in Windows 10.
I hope you enjoyed this article. Follow C# Corner to learn more new and amazing things about Windows 10.
Thanks for reading this article.
There are various ways to protect your data on Windows 10 computer. One of them is to disable or enable USB ports on your computer. If you are wondering how to block USB drives to control which devices are connected to your PC, then you have come to the right place.
You can disable or enable USB drives with various methods such as using Device Manager, BIOS, Registry or third-party applications on Windows 10.
Let’s check out the methods to disable or enable USB ports in Windows 10.
1. Disable Or Enable USB Ports On Windows 10 Through Registry Editor (regedit)
Using Registry Editor is a critical way to disable or enable USB drives port on Windows 10. So, if you find using Registry Editor comfortable, go on!
Step 1: To open Registry Editor, type regedit.exe in search bar beside Start menu and press Enter.
Note: Press Windows and R and type regedit.exe to open Registry Editor.
Step 2: You will get a user account control prompt, click Yes.
Step 3: Now you will get Registry Editor window and follow this path:
HKEY_LOCAL_MACHINE\SYSTEM\CurrentControlSet\ Services\USBSTOR

Step 4: Once you get to the key, locate Start DWORD the right hand side of the window. If you want to disable USB ports, change the value from 3 to 4 and if you want to enable it, change the value to 3.

Read Also: How To Change User Account Type In Windows 10
2. Disable Or Enable USB Ports On Windows 10 Through Use Device Manager
If you don’t want to make changes to registry editor, use device manager. Upon disabling USB ports, computer will not respond to any of the devices connected to it. To get them working, you have to enable the USB ports.
Note: It is recommended to create a system restore point before making any major changes to your system.
Step 1: Go to Start button and right click on it to get a context menu. Now select Device Manager to launch it.
Step 2: Navigate USB Controllers (Universal Serial Bus Controllers). You will get list of USB options list. Right click each of the entries to Disable USB devices. Click Yes, to confirm the change.

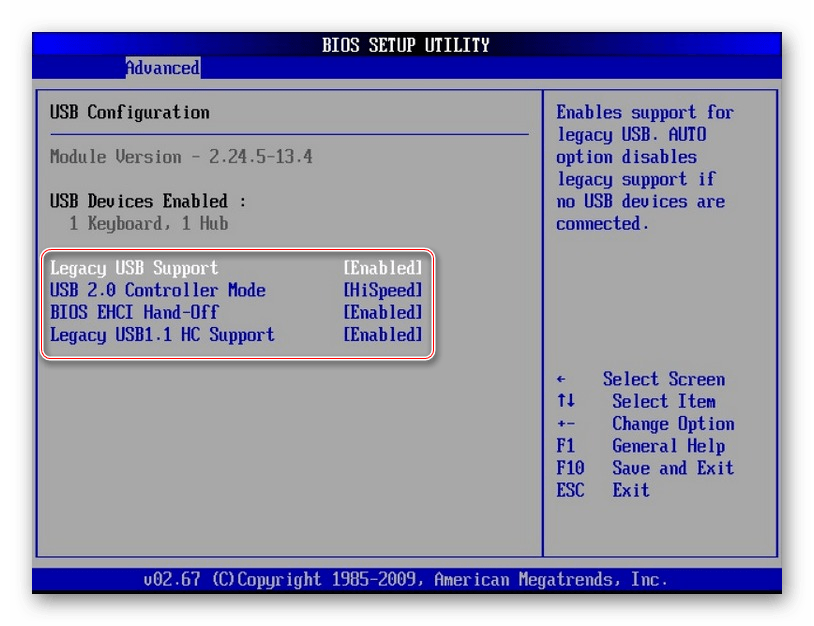
3. Enable Or Disable USB Ports On Windows 10 Through Use BIOS
Some of the computer manufacturers provide you with an option to disable or enable USB ports in BIOS. Go to BIOS mode to check out the options available to enable USB ports. If you get confused and don’t know where to locate the option, check the user manual of your computer.
4. Use Third Party Apps
- SysTools USB Blocker
If you want to use the Registry Editor or any other methods, using a third-party application is a wise option. One of the convenient options is SysTools USB Blocker. It offers to block/unblock USB ports whenever it is required. The utility restrains unwanted users from using USB devices such as flash drives on your device. To block /unblock USB ports, the tool needs to have your login credentials. The tool is simple to use and comes with an intuitive interface.

- USB Block
Another one is USB Block, which helps in quickly disabling the USB ports on your computer. USB Block helps you prevent theft and data leakage from devices such as network computers, USB Drives, and CD/DVD. If you want to create an exception for your personal USB device, then you can put that device in the Whitelist. It also monitors hack attempts & incorrect passwords. It also keeps an eye on the log of any illegal activity.

We have discussed how to disable or enable USB ports in Windows 10 using registry, device manager, bios and thrid-party apps. Try them and let us know what worked for you!
Все способы:
- Вариант 1: Средства операционной системы
- Способ 1: «Диспетчер устройств»
- Способ 2: Дополнительные параметры электропитания
- Вариант 2: BIOS / UEFI
- Вопросы и ответы: 1
Важно! USB-порты в компьютере могут быть включены, в то время как проблемы с ними будут вызваны нехваткой электропитания. В таком случае эта статья вам не поможет решить проблему, рекомендуется обратиться к другому тематическому материалу на нашем сайте. Для ознакомления с ним воспользуйтесь представленной ниже ссылкой.
Подробнее: Нехватка электропитания USB-порта в Windows 10
Вариант 1: Средства операционной системы
Включить порты USB можно путем редактирования параметров Виндовс. Нужные опции находятся в «Диспетчере устройств» и настройках электропитания. Необходимо активировать соответствующую опцию, после чего порты компьютера будут постоянно обеспечены питанием.
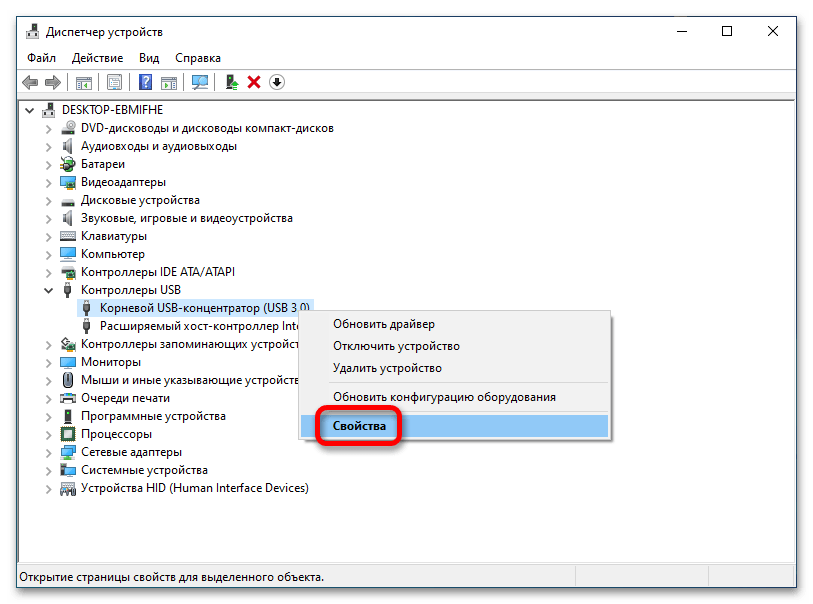
Способ 1: «Диспетчер устройств»
Включить порты USB можно посредством «Диспетчера устройств». Для этого нужно будет открыть свойства устройства и поставить галочку напротив соответствующего параметра. Делается это следующим образом:
- Запустите «Диспетчер устройств» любым доступным способом. Например, сделать это можно через поиск по системе: сначала установите курсор в поле на панели задач, введите запрос «Диспетчер устройств», а затем кликните по одноименному приложению в результатах.

Читайте также: Как запустить «Диспетчер устройств» в Windows 10
- В появившемся окне найдите в списке раздел «Контроллеры USB» и разверните его. Для этого необходимо щелкнуть по стрелочке в левой части пункта — это отобразит перечень всех контроллеров.
- Кликните правой кнопкой мыши по контроллеру USB, питание которого необходимо включить, после чего из контекстного меню выберите пункт «Свойства».
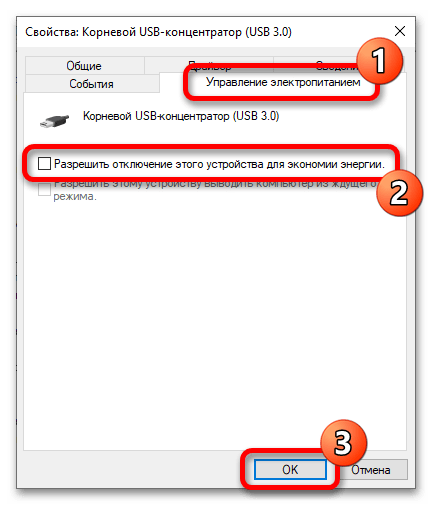
- В появившемся окне свойств устройства проследуйте на вкладку «Управление электропитанием», а затем снимите отметку напротив опции «Разрешить отключение этого устройства для экономии энергии».
- После этого проделайте те же действия со всеми оставшимися контроллерами USB, если их необходимо тоже включить.
Способ 2: Дополнительные параметры электропитания
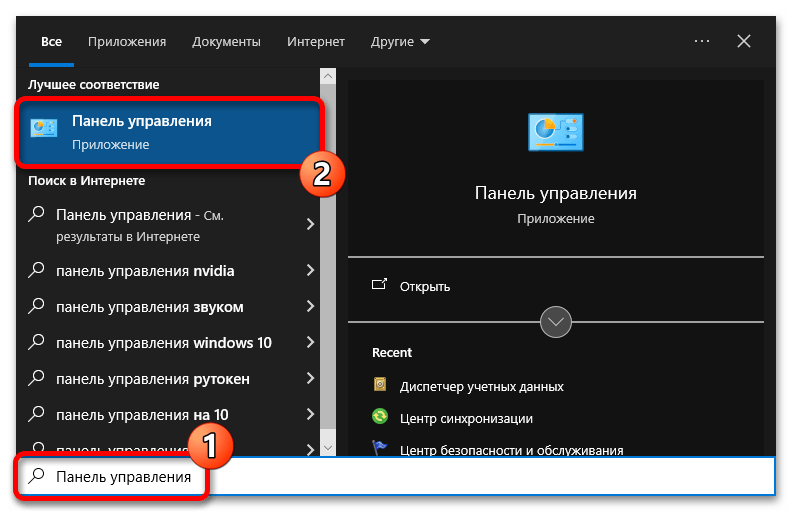
Чтобы не приходилось включать каждый порт USB по отдельности, можно воспользоваться инструментами параметров электропитания. Для этого понадобится перейти в один из подразделов «Панели управления» и изменить значение определенного параметра. Делается это следующим образом:
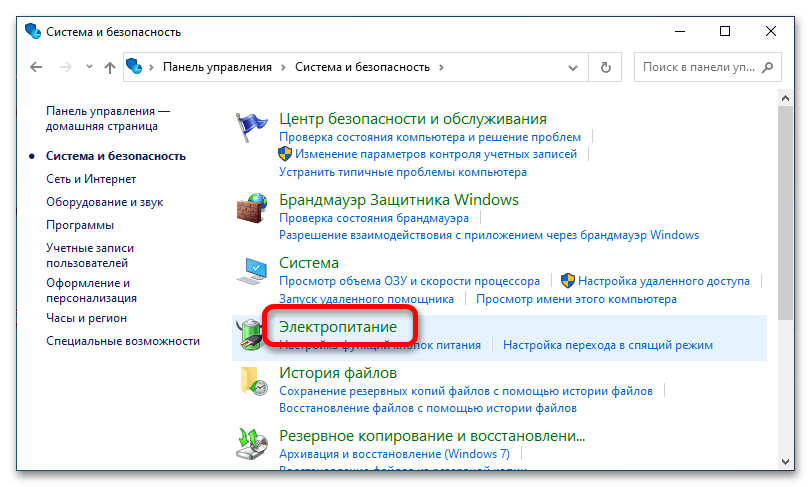
- Откройте «Панель управления», отыскав это приложение через системный поиск, и вызовите его.
Читайте также: Как открыть «Панель управления» в Windows 10
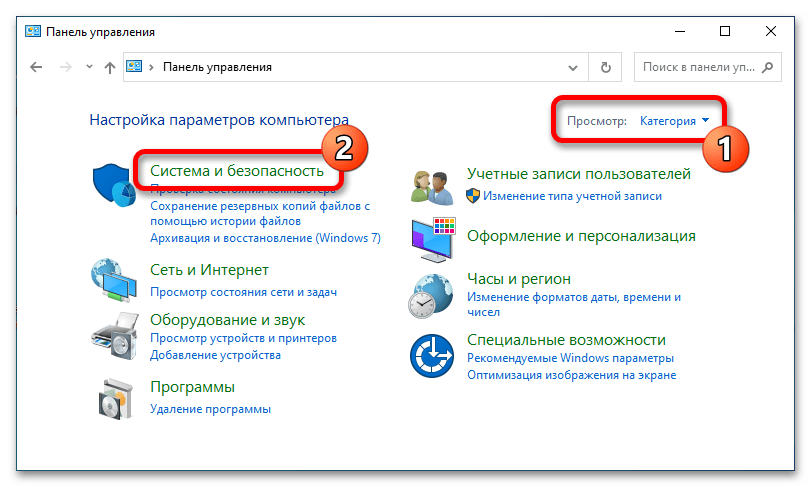
- Проверьте/измените выбранный режим отображения элементов меню — нужно, чтобы в верхнем правом углу напротив строки «Просмотр» было установлено значение «Категория». После этого нажмите по «Система и безопасность».
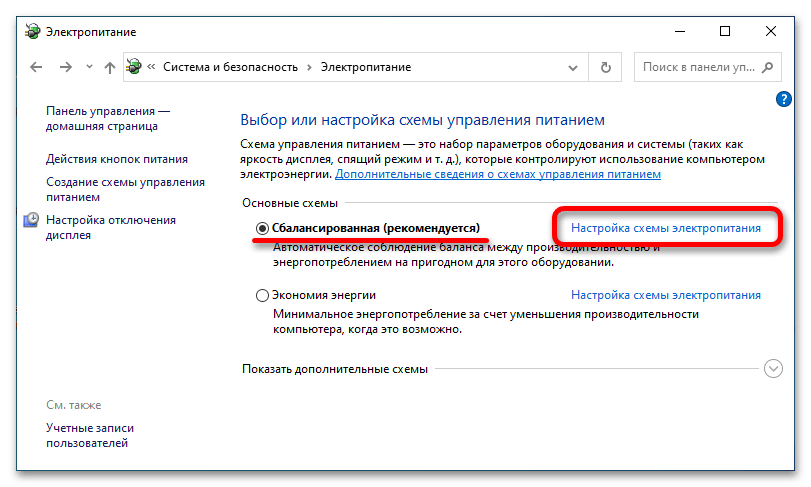
- Перейдите в раздел «Электропитание», для чего кликните по одноименной ссылке.
- Откройте настройки активной схемы электропитания, то есть той, рядом с которой установлен переключатель.
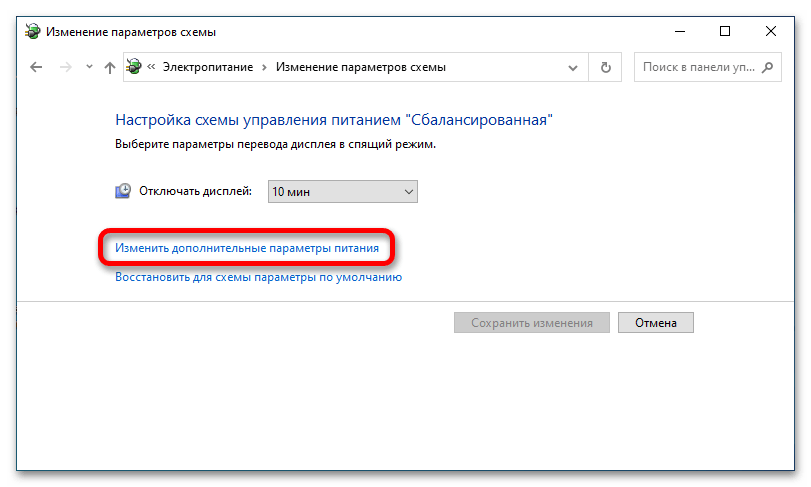
- Теперь щелкните по строке «Изменить дополнительные параметры питания».
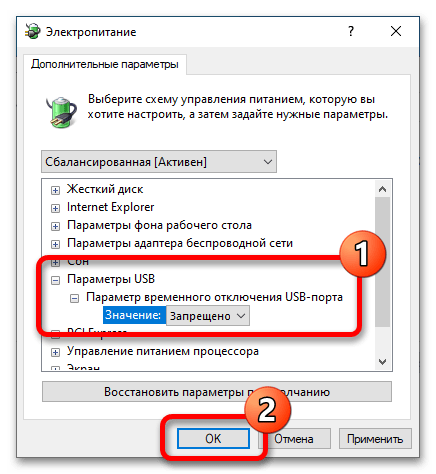
- Найдите в списке раздел «Параметры USB», затем раскройте дополнительное меню «Параметр временного отключения USB-порта» и из выпадающего списка «Значение» выберите «Запрещено». После этого кликните по кнопке «ОК», чтобы сохранить внесенные изменения.

Как только это будет сделано, рекомендуется перезапустить компьютер, чтобы новые настройки электропитания зарегистрировались в операционной системе.
Вариант 2: BIOS / UEFI
Если предыдущие способы, описанные в этой статье, не помогли в решении поставленной задачи, тогда есть вероятность, что порты USB были отключены через базовую программу ввода и вывода (BIOS). В таком случае необходимо произвести их настройку именно там. Универсальной инструкции по этой теме предоставить невозможно, так как действия зависят от модели установленной в компьютере материнской платы. Но на нашем сайте есть отдельная статья, в которой дано более подробное руководство по выполнению поставленной задачи. Чтобы с ней ознакомиться, воспользуйтесь представленной ниже ссылкой.
Подробнее: Как включить порты USB в BIOS
Наша группа в TelegramПолезные советы и помощь
You are here:
Home » Windows 10 » 5 Ways To Enable Or Disable USB Drives In Windows 10
Do you want to protect the data on your Windows 10 computer by blocking USB drives or disabling USB drives on your PC? In this guide, we will cover the five easy ways out there to enable or disable USB drives in Windows 10.
Blocking USB drives in Windows 10 can be done in many ways. You can use the Registry, BIOS or third-party utilities to enable or disable USB drives in Windows 10.

In no particular order, following are the five ways to enable or disable USB drives in Windows 10.
Method 1 of 5
If you are comfortable making changes to Windows Registry, you can enable or disable USB drives in Windows 10 by manually editing the Registry. Here is how to do that.
Step 1: Open the Registry Editor by typing Regedit.exe in the Start/taskbar search and then pressing Enter key.
Click Yes button if you see the User Account Control prompt.
Step 2: Navigate to the following key:
HKEY_LOCAL_MACHINE\SYSTEM\CurrentControlSet\ Services\USBSTOR

Step 3: Now, on the right-side, double-click on Start DWORD value and change its value to 4 to disable USB drives and USB storage devices on your Windows 10 PC. Change the Start DWORD value back to 3 to enable USB drives and storage devices on your PC.

Method 2 of 5
Enable or disable USB ports via Device Manager
Did you know that you can disable all USB ports via Device Manager? By disabling USB ports, you are preventing users from using USB ports to connect to USB drives to your PC.
When you disable USB ports, USB ports on your PC will not function, and hence no one can connect USB drives. You will need to enable USB ports again to connect a device via USB. Here is how to enable or disable USB ports via Device Manager.
IMPORTANT: We recommend you create a system restore point before disabling USB ports so that you can easily enable them again when you want.
Step 1: Right-click on the Start button on the taskbar and then click Device Manager to open the same.

Step 2: Expand Universal Serial Bus Controllers. Right-click on all entries one-after-another and then click Disable device option. Click Yes button when you see the confirmation dialog.
Method 3 of 5
Use USB Drive Disabler to enable or disable USB drives
If you don’t want to edit the Registry manually, you can use a free tool called USB Drive Disabler to quickly enable or disable USB drives on your PC. Simply download USB Disabler, run the same, and then select Enable USB drives or Disable USB drives to enable or disable USB drives on your PC.

Download USB Drive Disabler
Method 4 of 5
Disable or enable USB ports in BIOS
Some manufacturers offer an option in BIOS/UEFI to disable or enable USB ports. Boot into BIOS/UEFI and check if there is an option available to disable or enable USB ports. Check your PC’s user manual to know if an option to enable or disable USB ports is present in the BIOS/UEFI.
Method 5 of 5
Enable or disable USB drives with USB Guard
Nomesoft USB Guard is another free utility out there to block USB drives on PCs running Windows 10 and earlier Windows versions. You must this program as administrator to enable or disable USB drives.

Download Nomesoft USB Guard
Хотите защитить данные на своем компьютере под управлением Windows 10, заблокировав или отключив USB-накопители на вашем ПК? В этом руководстве мы рассмотрим пять простых способов включения или отключения USB-накопителей в Windows 10.
Блокировка USB-накопителей в Windows 10 может быть выполнена разными способами. Вы можете использовать Реестр, BIOS или сторонние утилиты для включения или отключения USB-накопителей в системе Windows 10.
Ниже приведено пять способов включения или отключения USB-накопителей в Windows 10.
Способ 1 из 5
Включение и отключение USB-накопителей в Windows 10 с помощью реестра
Если вам удобно вносить изменения в реестр Windows, вы можете включить или отключить USB-накопители в Windows 10, вручную отредактировав реестр. Вот как это сделать.
Шаг 1: Откройте редактор реестра
Шаг 2: Перейдите к следующему разделу:
HKEY_LOCAL_MACHINE\SYSTEM\CurrentControlSet\Services\USBSTOR
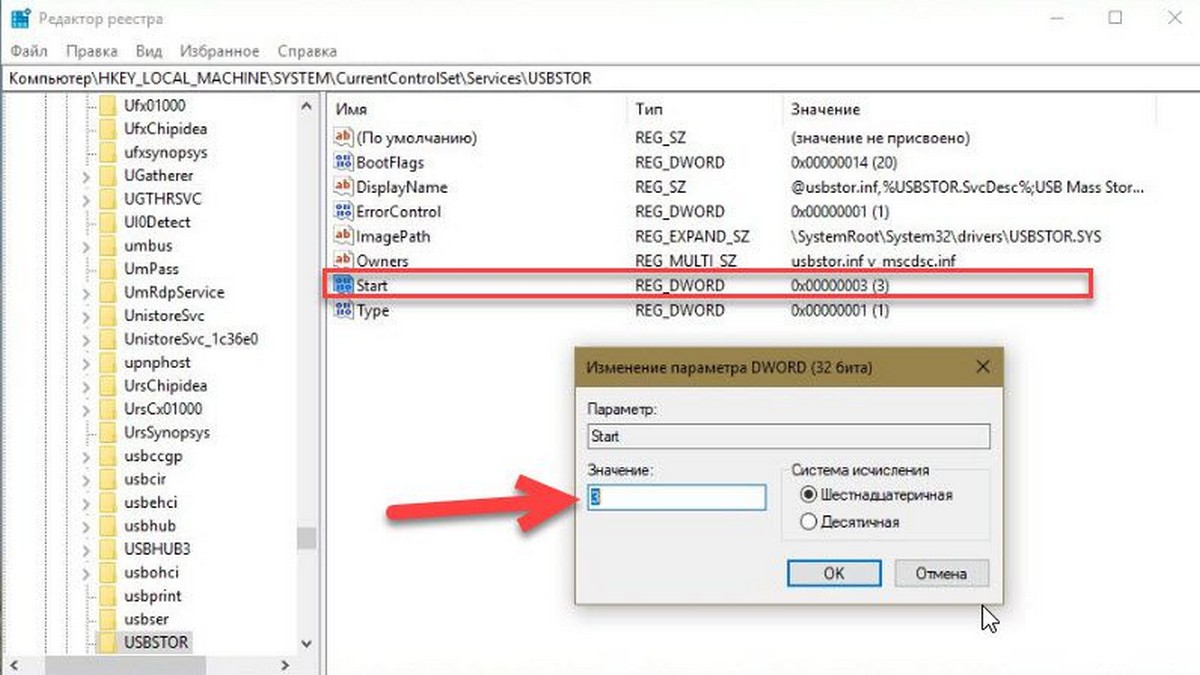
Шаг 3: Теперь с правой стороны дважды кликните параметр «Start» и измените его значение на 4, чтобы отключить USB-накопители на вашем ПК с Windows 10. Измените значение Start на 3, чтобы включить USB-накопители и устройства хранения данных на вашем ПК.
Способ 2 из 5
Включение и отключение USB-портов через диспетчер устройств
Знаете ли вы, что вы можете отключить все порты USB с помощью диспетчера устройств? Отключив USB-порты, вы запрещаете пользователям использовать USB-порты для подключения USB-накопителей к вашему компьютеру.
Когда вы отключите USB-порты, USB на вашем ПК не будут работать, и, следовательно, никто не сможет подключать USB-накопители. Вам нужно будет снова включить USB-порты для подключения устройств через USB. Вот как включить или отключить порты USB с помощью диспетчера устройств.
ВАЖНО: Мы рекомендуем создать точку восстановления системы перед отключением USB-портов, чтобы вы могли легко включить их снова, когда захотите.
Шаг 1: Кликните правой кнопкой мыши на кнопке «Пуск» на панели задач и выберите «Диспетчер устройств».
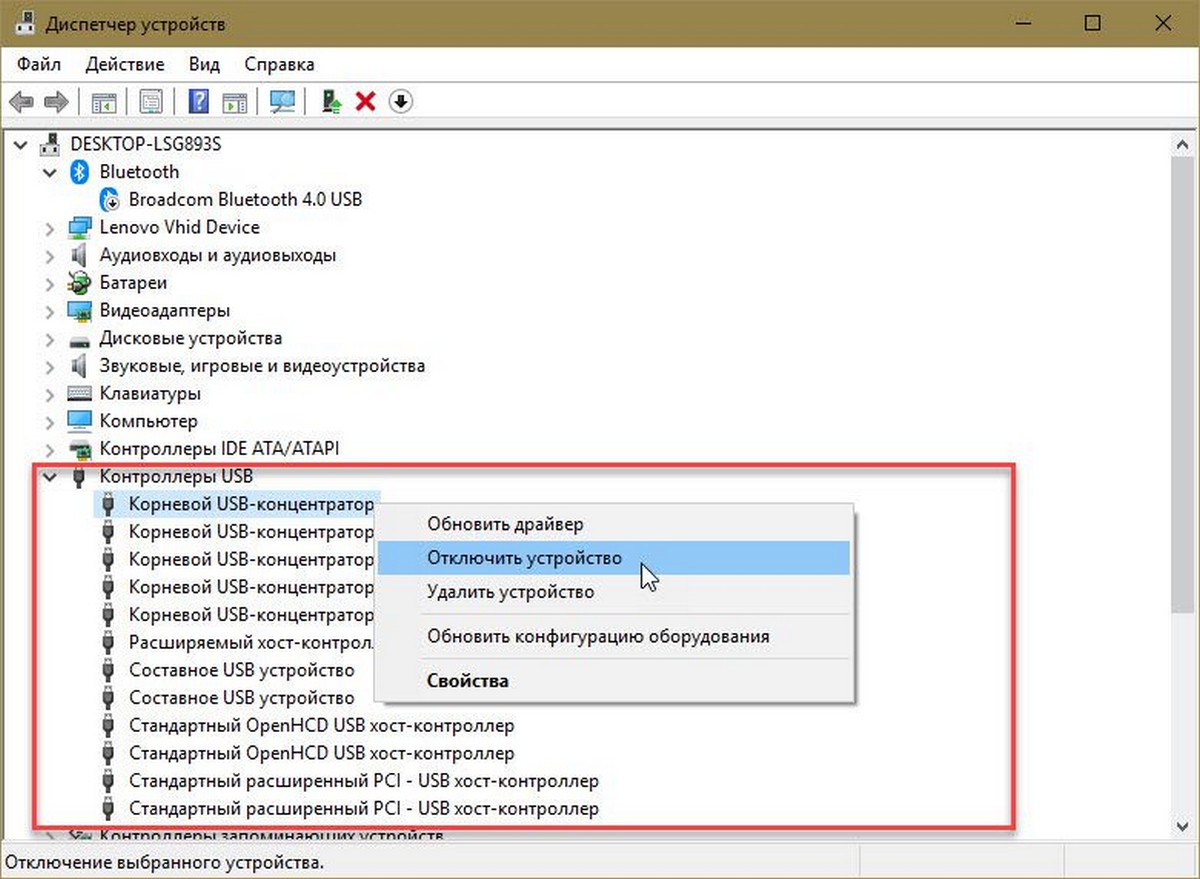
Шаг 2: Разверните Контроллеры USB. Кликните правой кнопкой мыши на все записи оду за другой, и нажмите «Отключить устройство». Нажмите кнопку «Да», когда вы увидите диалоговое окно подтверждения.
Способ 3 из 5
Используйте USB Drive Disabler для включения или отключения USB-накопителей
Если вы не хотите редактировать реестр вручную, вы можете использовать бесплатный инструмент под названием USB Drive Disabler для быстрого включения или отключения USB-накопителей на вашем ПК. Просто загрузите USB Disabler, запустите его, а затем выберите «Включить USB-диски» или «Отключить USB-диски», чтобы включить или отключить USB-накопители на вашем ПК.
Загрузить USB Drive Disabler
Способ 4 из 5
Отключить или включить USB-порты в BIOS
Некоторые производители предлагают опцию в BIOS / UEFI для отключения или включения USB-портов. Загрузите BIOS / UEFI и проверьте, есть ли опция для отключения или включения USB-портов. Проверьте руководство пользователя вашего ПК, чтобы узнать, присутствует ли опция включения или отключения USB-портов в BIOS / UEFI.
Способ 5 из 5
Включение и отключение USB-накопителей с USB Guard
Nomesoft USB Guard — еще одна бесплатная утилита для блокировки USB-накопителей на компьютерах под управлением Windows 10 и более ранних версий Windows. Вы должны использовать эту программу как администратор для включения или отключения USB-накопителей.
Скачать Nomesoft USB Guard
Если вы хотите защитить накопители USB, обратитесь к следующей статье для получения подробной информации:
Как включить защиту от записи для USB накопителей в Windows 10
Защита от записи USB дисков- может быть полезной в качестве дополнительной опции безопасности.