
Windows Server 2008 r2, работа, служба терминалов, служба удаленных рабочих столов
Установка сервера удалённых рабочих столов
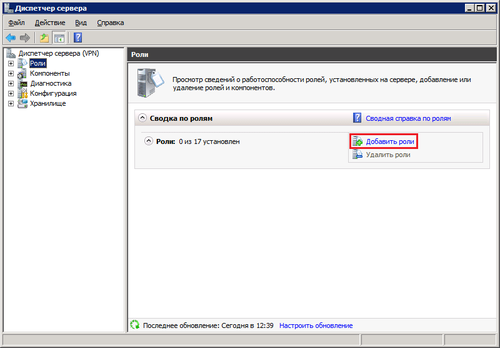
Входим на сервер с правами администратора.
Открывем «Дисппетчер сервера» -> Роли -> Добавить роль:
В списке доступных ролей сервера выбираем «Службы удалённых рабочих столов»:

В списке «Службы роли» отмечаем «Узел сеансов удалённых рабочих столов» и «Лицензирование удалённых рабочих столов». Этих служб достаточно для поддержания базовой функциональности.

Желательно устанавливать сервер терминалов до установки пользовательских приложений.
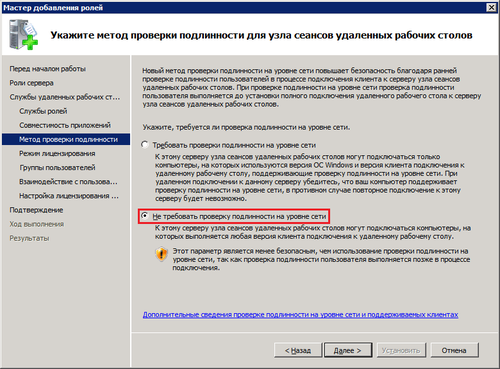
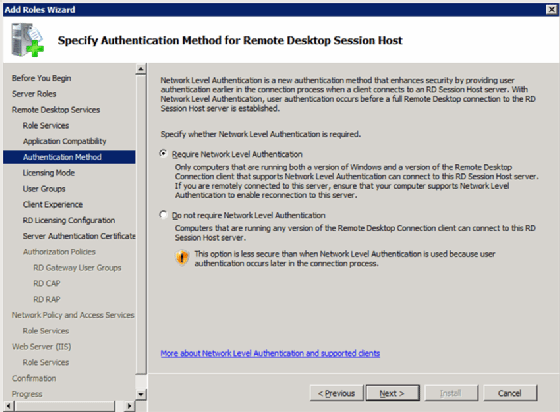
Метод проверки подлинности. «Требовать проверку подлинности на уровне сети» — эта опция обеспечивает повышенную безопасность, но в этом режиме к серверу не смогут подключаться пользователи с устаревшими клиентами (rdp 5.х и ниже), а также пользователи подключающиеся через Эксплорер (remote desktop web connection). Чтобы обеспечить поддержку клиентов всех версий, выбирайте опцию «Не требовать проверку подлинности на уровне сети».
Режим лицензирования. Желательно заранее определиться с режимом лицензирования: «на пользователя» или «на устройство». Лицензии «на пользователя» эффективны, если в организации большое количество мобильных пользователей, которым требуется доступ к серверу как из корпоративной сети, так и из удаленной (дом, другой офис). Лицензии «на устройство» эффективны, если пользователи жестко привязаны к своим рабочим местам.

Группы пользователей. Здесь вы можете сразу указать группы или отдельных пользователей, которым будет разрешен доступ к серверу терминалов. Это можно будет сделать и позднее, просто добавив нужных пользователей в группу «Пользователи удаленного рабочего стола».

Настройка сервера лицензий Windows Server 2008 r2. Если сервер не входит в домен, то вариантов особо нет:

Обзор выбранных опций перед установкой.
Далее нажимаем кнопку Установить. Система один раз перезагрузится, после чего установка будет продолжена. В итоге вы должны увидеть жизнеутверждающий экран «Установка прошла успешно»
Активация сервера терминалов
Открываем Пуск -> Администрирование -> Службы удалённых рабочих столов -> «Диспетчер лицензирования удалённых рабочих столов». В списке выбираем сервер лицензий. Делаем правый клик, и в меню выбираем пункт «Активировать сервер»:

Запускается мастер активации сервера Windows Server 2008 r2
На следующем шаге выбираем метод подключения. Можно смело выбирать «Автоподключение»:
Сведения об организации. Вводим имя, фамилию и название организации
Дополнительные сведения. Можно заполнить, а можно и проигнорировать
Через несколько секунд ваш сервер будет успешно активирован
Теперь можно преступить к установке лицензий. Следует отметить, что после активации сервера лицензий нет необходимости сразу покупать и устанавливать лицензии. При отсутствии полноценных лицензий сервер работает в демо-режиме. Пользователям выдаются временные лицензии на 120 дней.
Установка лицензий
Запускаем мастер установки лицензий. Это можно сделать сразу после активации сервера лицензий, выбрав соответствующую опцию
Далее выбираем тип соглашения. В моем случае это «Enterprise Agreement». Номер соглашения можно найти в поисковике по запросу «Enrollment Number». Например, работают: 4965437 (3325596;6565792;4526017;5296992)

Выбираем версию продукта, тип лицензии (должен совпадать с ранее выбранным типом лицензий сервера лицензий), количество лицензий

Нажимаем Далее. Если данные верны, лицензии будут успешно установлены.
Попутные вопросы:
Как разрешить новому пользователю доступ к удаленному рабочему столу?
Откройте Диспетчер сервера -> Конфигурация -> Локальные пользователи -> Пользователи. Откройте свойства пользователя, которому необходим доступ, закладка «Членство в группах». Добавьте группу «Пользователи удаленного рабочего стола»:

Можно ли под одним аккаунтом создать несколько независимых сеансов подключения?
Можно, но по умолчанию эта опция отключена (для экономии ресурсов). Откройте Диспетчер сервера -> Роли -> Конфигурация служб терминалов -> Изменить настройки (на той же странице). Двойной клик на опции открывает окно, где можно выполнить изменения:
Какой порт использует RDP по умолчанию и как его изменить?>
По умолчанию используется порт TCP 3389. Изменить его можно отредактировав реестр. Откройте ветку
HKEY_LOCAL_MACHINE\System\CurrentControlSet\Control\TerminalServer\WinStations\RDP-tcp
и измените параметр PortNumber.
Взято отсюда
На нашем сайте Вы можете взять в аренду Windows VPS.
Вы можете включить удаленный рабочий стол, выполнив следующие действия:
-
Подключиться к VPS через VNC клиент (Для этого перейдите в панели управления VMmanager на страницу «Виртуальные машины» (категория «Управления» левого меню), выберите необходимую вам VPS и нажмите кнопку «VNC» в центральном верхнем меню).
-
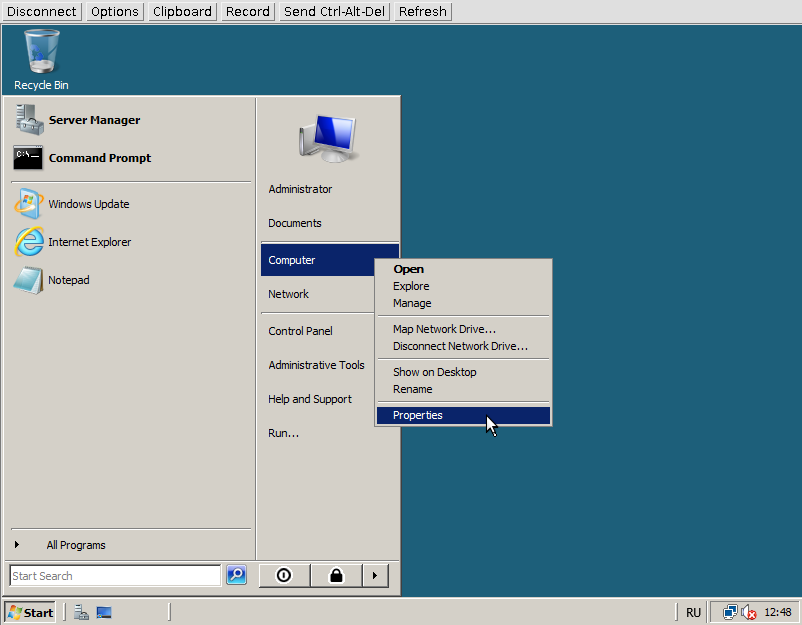
Нажать Start(Пуск), щелкнуть правой кнопкой по Computer (Мой компьютер) и в выпадающем меню выбрать Properties (Свойства):

-
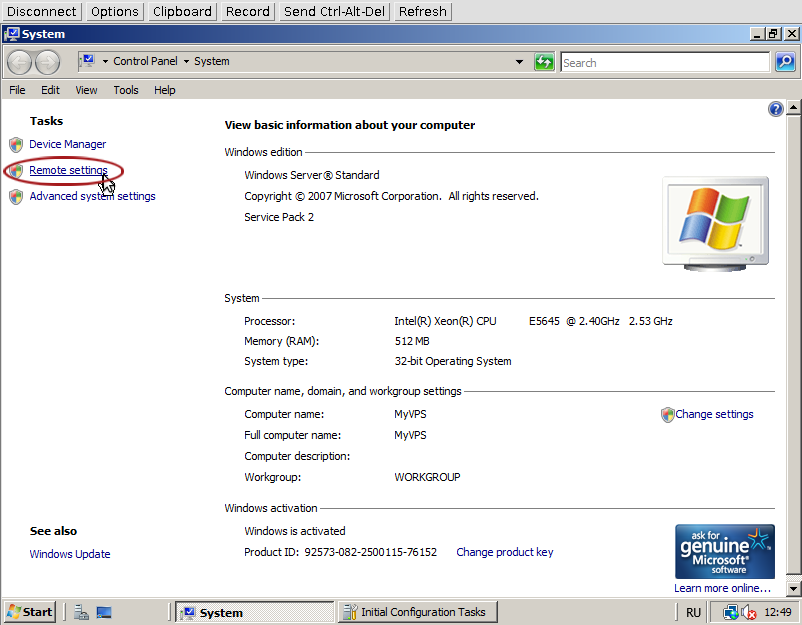
В появившемся окне выбрать вкладку Remote Settings:
-
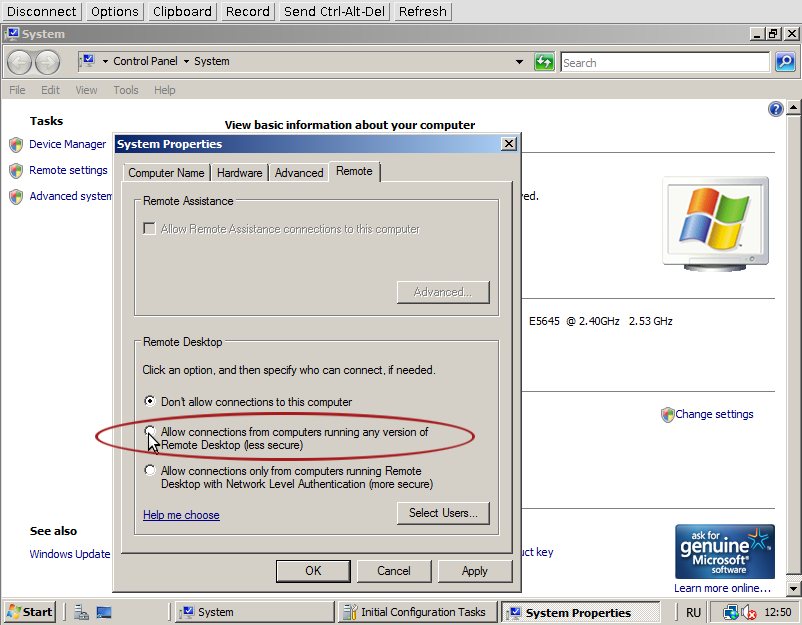
В появившемся окне выбрать пункт Allow connections from computers running any version of Remote Desktop (less secure):
-
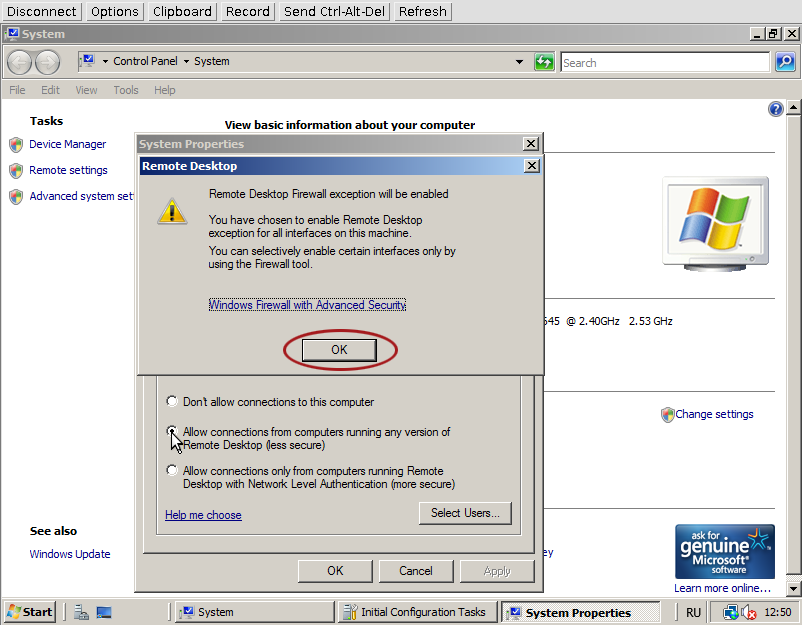
Нажать «OK» в информационном окне, которое предупреждает, что исключения для удаленного рабочего стола в firewall включены и вы можете поменять настройки firewall, используя Firewall tool:
-
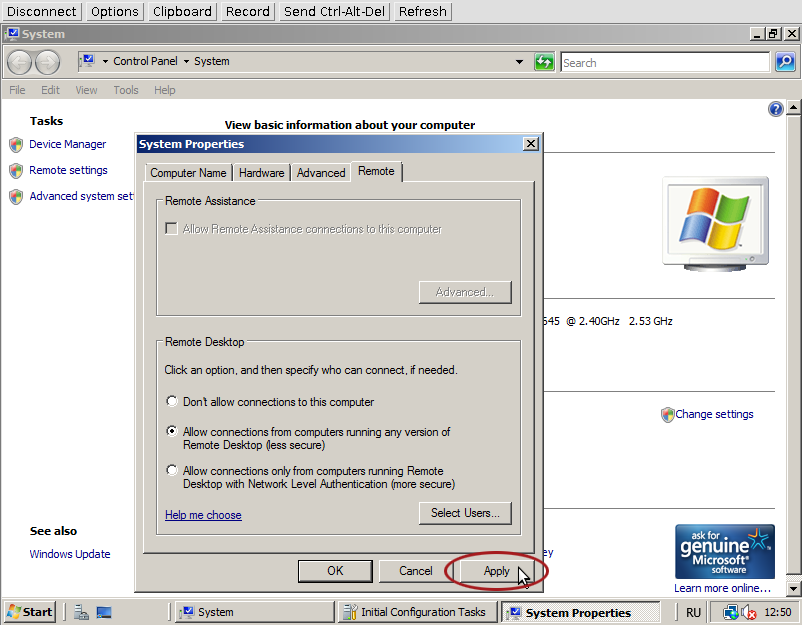
Нажать «Appaly» для применения настроек:
Теперь вы можете подключиться к VPS через удаленный рабочий стол.
Microsoft’s Remote Desktop Services Virtual Desktop Infrastructure product offers a lot of benefits, but not every IT administrator knows where to start.
As a virtual desktop administrator, you should learn the ins and outs of this VDI product to make the most of it. Learn step by step how to get Remote Desktop Services (RDS) and some of the basic RDS components up and running.
Step 1: Begin the installation
Launch Server Manager and select Server Roles. Once the roles manager screen is up, check the box for Remote Desktop Services. Some other boxes may already be checked, but this is fine — the only box you need to worry about for this step is the Remote Desktop Services box. Click the next button in the bottom right corner to proceed.
Now you should see an introduction to RDS. Select the next button at the bottom of the page.
Step 2: Select Remote Desktop Services roles you want to install
RDS includes several components and settings (Figure 1). These components can be on one machine or many.
- Remote Desktop Session Host. This is the name for Terminal Server.
- Remote Desktop Virtualization Host. This component integrates with Microsoft Client Hyper-V. This allows for the pooling of virtual machines on Hyper-V so they can serve as virtual desktops.
- Remote Desktop Connection Broker. This component bridges the user with a virtual Windows desktop, remote application or Remote Desktop Session Host session.
- Remote Desktop Licensing. This is the modern name of Terminal Server licensing server that also includes licensing for Windows Server.
- Remote Desktop Gateway. This provides a single connection point for clients to connect to a specific virtual desktop, remote app or Remote Desktop Session Host session.
- Remote Desktop Web Access. This provides clients an interface to access their virtual desktop, remote app or Remote Desktop Session Host sessions.
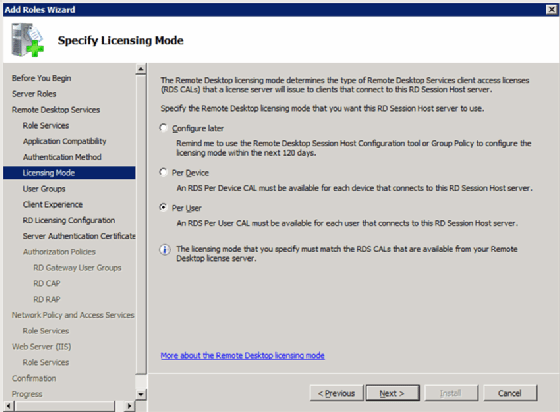
Step 3: Pick the license mode
As with past Terminal Server licensing, there are two license options: per-device and per-user (Figure 2).
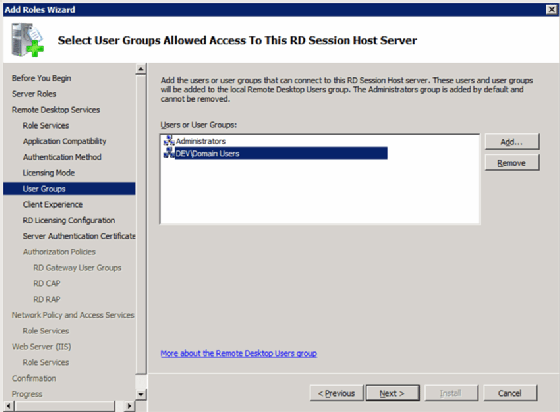
Step 4: Allow access to Remote Desktop Session Host (not required)
Select which users to grant access to the local Remote Desktop Session Host. This server component is not required for RDS to work. If you choose to install the Remote Desktop Session Host, you will get this prompt (Figure 3).
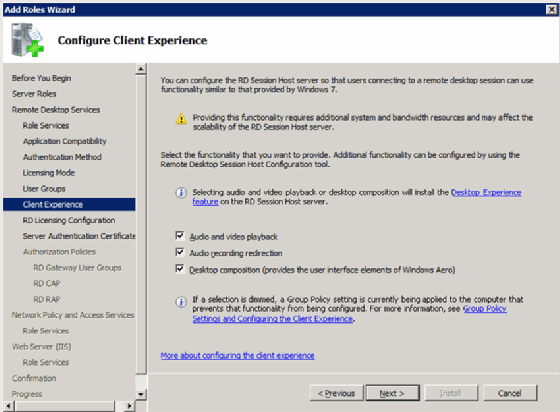
Step 5: Configure the client experience
The next screen is called Configure Client Experience (Figure 4). This is where you set the defaults for the end-user experience with the VDI system and remote desktop.
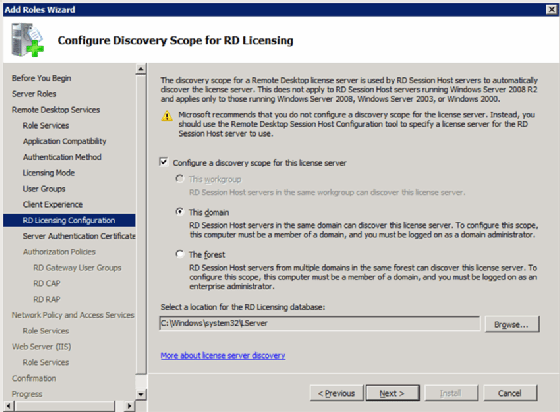
Step 6: Configure license scope
Just as with Terminal Server of the past, you can configure the scope of the Remote Desktop Session Host license server. You have the following two options:
- Domain. This limits the licensing to only servers in the domain (Figure 5).
- Active Directory Forest. This allows any Remote Desktop Session Host server in the Active Directory Forest — the highest-level container in a set of servers — to attain a license.
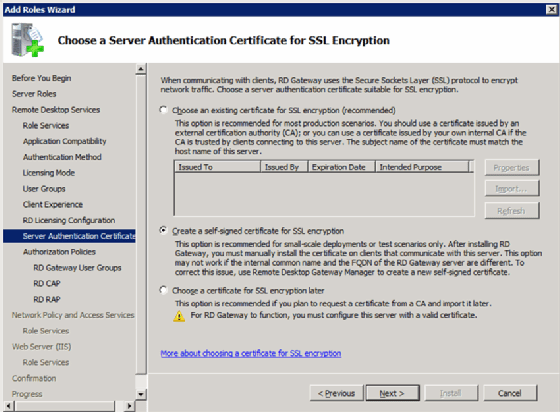
Step 7: Assigning the SSL certificate for Remote Desktop Gateway
The Remote Desktop Gateway uses Secure Sockets Layer (SSL) to tunnel and encrypt traffic from the client. This functionality requires a certificate. There are two options for certificates:
- Specify a certificate from the certificate store.
- Produce a self-signed certificate.
In either case, the client must trust the certificate (Figure 6).
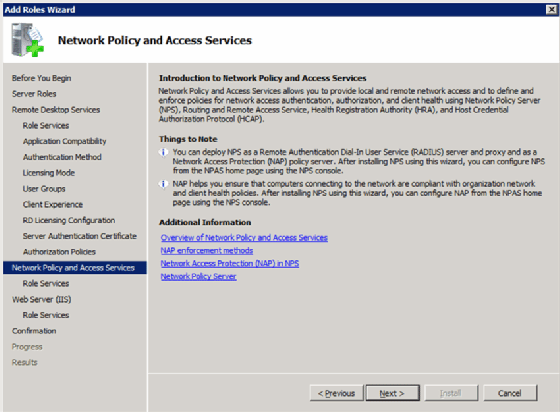
Step 8: Configure network access protection (optional)
These next few screens go beyond the scope of RDS but are related, so this article will just cover the basics.
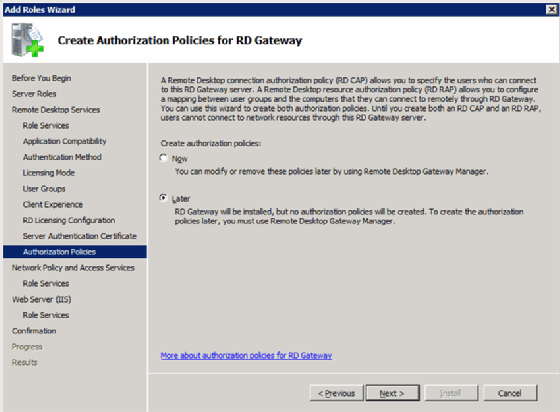
Create authorization policies
This is where you would configure a policy that states who is allowed to establish a desktop connection to the Remote Desktop Gateway
(Figure 7).
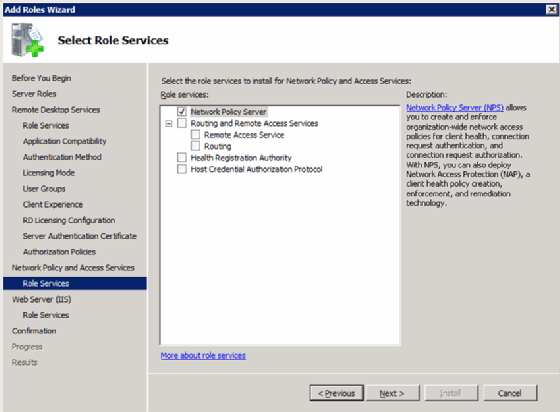
Install and configure network access and protection policies
You can use this to configure and enforce network access policies such as Internet Protocol Security (IPsec) and network access protection from the client (Figure 8).
You can also use this feature to define different policies based on users’ connectivity (Figure 9).
Step 9: Install IIS and Remote Desktop Web Access
Remote Desktop Web Access requires Internet Information Services (IIS), so the next two screens are for installing and configuring IIS. First, there is the overview screen (Figure 10).
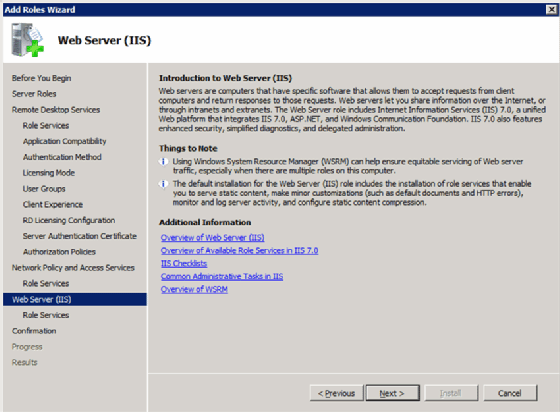
The second screen is the configuration screen (Figure 11).

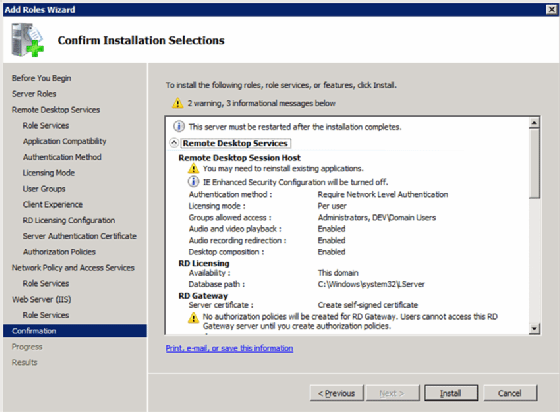
Step 10: The final steps
At this point, you’re done. The last two screens just let you know what you’re installing (Figure 12).
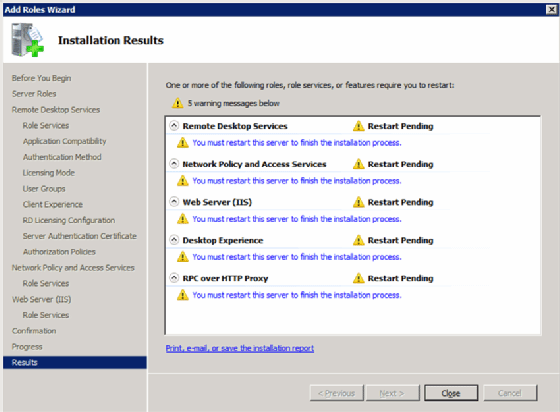
There is also the final screen that lets you know whether any additional steps like rebooting are required (Figure 13).
Now that you have installed and configured RDS, you can start using Remote Desktop Session Host and Remote Desktop Gateway Manager.
| Previous | Table of Contents | Next |
| Configuring BitLocker Drive Encryption on Windows Server 2008 R2 | Adding New GPT and MBR Disks to Windows Server 2008 R2 Systems |
<google>BUY_WINSERV_2008R2</google>
Windows Server 2008 R2 is, as the name suggests, a server operating system. In the real world this means that systems running Windows Server 2008 R2 will most likely be located in large rack systems in a server room. As such, it is highly unlikely that system administrators are going to want to have to physically visit each of these servers to perform routine administrative tasks such as system configuration and monitoring. A far preferable scenario involves these administrators remotely logging into the servers from their own desktop systems to perform administrative tasks. Fortunately Windows Server 2008 R2 provides precisely this functionality through Remote Desktop and the remote administration features of the Server Manager. In this chapter we will look at the steps necessary to remotely administer Windows Server 2008 R2 systems using each of these approaches.
Contents
Contents
|
||
Remote Administration Using Server Manager
The Windows Server 2008 R2 Server Manager tool provides the ability to perform some administrative tasks on a remote server. Unfortunately, the administrative tasks that can be performed using this approach are quite restrictive and, as such, the following activities are disabled:
- Addition or removal of roles
- Addition or removal of features
- Modification of Windows Update settings
- Modification of network configuration
- Modification of domain settings
- Alteration of computer name
- Configuration of Internet Explorer security settings
- Execution of Security configuration wizard
- Management of Remote Desktop configuration settings
- System Properties configuration
In order to enable remote administration using the Server Manager, remote administration must first be enabled on the remote server. This can be achieved by launching Server Manager on the remote server and selecting the Configure Server Manager Remote Management link located in the Server Summary section. Within the resulting dialog, ensure that the option to Enable remote management of this server from other computers check box is selected before clicking on the OK button:
Once remote administration using Server Manager has been enabled, launch Server Manager on another computer located on the same domain or workgroup as the remote server, launch Server Manager and select the Action -> Connect to Another Computer menu option. Within the resulting dialog box, enter the name of the remote server to which you wish to connect and click on the OK button. A progress dialog will be displayed as the connection to the remote server is established. After a short delay the name of the current computer in the left hand pane of the Server Manager will change from the local computer to the remote server. Once the connection has been established, all the information displayed by Server Manager relates to the remote system. As you explore the various options you will begin to notice that a number of options are missing. For example, in the following figure there are no options listed to add or remove roles from the remote server:
In order to perform a wider range of remote administrative tasks than those provided by the Server Manager, it is necessary to use Remote Desktop access.
What is Remote Desktop?
Remote Desktop allows the graphical interface of a remote Windows system to be displayed over a network onto a local system. In addition, keyboard and mouse events on the local system are transmitted to the remote system enabling the local user to perform tasks on the remote system as if they were physically sitting at the remote system. Conversely, resources (such as printers and disk drives) on the local system can be made available to the remote system for the duration of the connection. This remote control can be established in a number of ways, including over wide area networks (WAN), local area networks (LAN) or over the internet.
In the case of Windows Server 2008 R2, this service is provided by Remote Desktop Services (known as Terminal Services in previous versions of Windows Server) running on the remote system and the Remote Desktop Connection (RDC) client on the local system.
Remote Desktop Services run in two different modes, Administration and Virtual Session. Remote Desktop for Administration provides full administration functionality to the remote administrator (including access to the console session and visibility of notification messages). Remote Desktop for Administration is the equivalent to working directly at the remote system’s console. In virtual session mode the user is subject to some limitations such as the ability to install applications and view console notification messages.
Windows Server 2008 R2 imposes some administrator logon restrictions. Specifically, a maximum of two administrators may be logged on at any one time, either two logged on remotely, or one local and one remote administrator. This assumes, however, that different accounts are being used to log on. In other words, the same user may not log on locally and remotely simultaneously.
Enabling Remote Desktop Administration on the Remote Server
As mentioned previously, remote desktop functionality on the server is provided by Remote Desktop Services. It is important to note, however, that Remote Desktop Services do not have to be explicitly enabled on the server in order to support Remote Desktop Administration. In fact, all that needs to be done is to enable Remote Desktop Administration. This is configured by opening the Control Panel from the Start menu and selecting the System and Security icon followed by the System icon. In the section in the top left hand corner of the System page select Remote settings to display the following properties window:
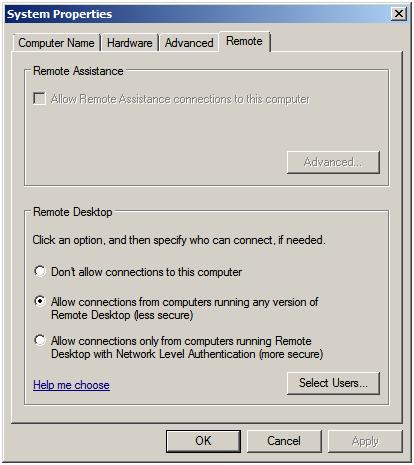
The Remote properties dialog provides a number of options. The default setting is to disallow remote connections to the computer system. The second option allows remote desktop connections from any version of the Remote Desktop client. The third, and most secure option, will only allow connections from Remote Desktop clients with Network Level Authentication support. This typically will only allow access to systems providing secure network authentication such as Windows Vista, Windows 7 and Windows Server 2008.
If the Windows Firewall is active, the act of enabling Remote Desktop administration also results in the creation of a firewall exception allowing Remote Desktop Protocol (RDP) traffic to pass through on TCP port 3389. This default port can be changed by changing this setting in the Registry key:
HKEY_LOCAL_MACHINE\System\CurrentControlSet\Control\TerminalServer\WinStations\RDP-tcp\PortNumber.
The easiest way to locate this registry key value is to execute regedit from the Run window or a command prompt, select Edit — > Find and enter RDP-tcp. In the resulting list, scroll down until you reach the PortNumber entry and double click on it to change the current value.
Controlling Remote Desktop Access
<google>WIN28BOX</google>
The default configuration for Remote Desktop is to allow all members of the Administration group to connect remotely. Active Directory also contains a Remote Desktop Users group to which users may be added to provide Remote Desktop access privileges. To provide users with remote desktop access, open the Control Panel -> System and Security -> System -> Remote settings panel and click on the Select Users button to invoke the Remote Desktop Users dialog illustrated in the following figure:
Note that users with administrative privileges do not need to be added to this list; by default they already have Remote Desktop access. To add additional users click on the Add… button to display the Select Users dialog. Enter the name of the user in the text box entitled Enter object names to select and click on Check names to list names that match the name entered. Select the appropriate name from the list. The following example shows user Bill on server winserver-2:

Click on OK to apply the change. The new user will now appear in the list of users with Remote Desktop access on the Remote Users screen. Click OK to close this screen and click on Apply in the System Settings screen. The specified user will now have remote desktop access to the system.
Starting the Remote Desktop Client
With the appropriate configuration tasks completed on the remote system the next step is to launch the Remote Desktop Client on the local system. The client can be run in either administration mode which provides full integration with the console of the remote server, or virtual session mode which provides some administrative privileges but does not provide console access or allow applications to be installed.
To invoke the Remote Desktop Client in virtual session mode either select Start -> All Programs -> Accessories -> Remote Desktop Connection or enter the following in the Run dialog or at a command prompt:
mstsc
To start the Remote Desktop Client in administrator mode run the following command:
mstsc /admin
In either case the following initial screen will appear requesting details of computer to which the client is to connect:

This can either be an IP address or a computer name. If previous connections have been established the User name field will be populated with the user name used in the preceding session. If you need to log in as a different user this option will be provided on the next screen which appears after the Connect button is pressed:
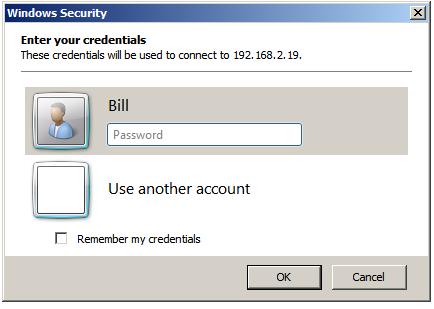
In this screen enter the password for the selected user (note that remote desktop access is only available for user accounts which are password protected). If a user other than the one displayed is required, simply click on the Use another account link and enter the necessary details. Click on OK to establish the connection. After a short delay the remote desktop will appear on the local computer screen.
Remote Desktop Client Configuration Options
The Options>> button displayed on the initial screen of the Remote Desktop Client provides six tabs, each containing a range of configuration options:
- General — Allows login credentials to be configured and session information to be saved.
- Display — Configures the resolution and color settings to be used when displaying the remote desktop on the local system.
- Local Resources — Specifies which local resources (sound, disk drives, printers etc) are to be made accessible to the remote system during the Remote Desktop session. This page also provides options to control the situations under which special key combinations such as Ctrl-Alt-Del are interpreted by the local or remote systems.
- Programs — Allows specified programs to be automatically invoked each time a remote sessions is established.
- Experience — Controls which desktop features are enabled or disabled for the Remote Desktop session. For example, over a slow dial-up connection it is unwise to have the desktop background displayed and font smoothing enabled. Either select the connection type and speed to see recommended settings, or use Custom to configure your own settings. This particular screen also provides the option to have the connection automatically re-established in the event that a session is dropped.
- Advanced — Enables and disables remote server verification. This ensures that the remote server to which you are connected is indeed the server you wanted. Also available are TS Gateway settings. By default the Remote Desktop Client is configured to automatically detect TS Gateway settings.
Remote Session Tracking
With Remote Desktop access implemented it is often useful to find out at times who is logged into a system. This can be achieved using the quser command-line tool. To obtain details of logged in users on a local system simply run quser at a command prompt or in a Run dialog:
C:Users\Administrator> quser
 USERNAME              SESSIONNAME        ID  STATE   IDLE TIME  LOGON TIME
 administrator                             1  Disc         3:18  7/11/2008 12:36 PM
 bill                  rdp-tcp#0           2  Active          .  7/14/2008 9:11 AM
 nas                   console             3  Active      none   7/11/2008 12:58 PM
To obtain information for a remote system simply run quser with the /server:<hostname> command-line option. For example:
C:\Users\Administrator> quser /server:winserver-2
 USERNAME              SESSIONNAME        ID  STATE   IDLE TIME  LOGON TIME
 administrator                             1  Disc         3:22  7/11/2008 12:36 PM
 bill                  rdp-tcp#0           2  Active          .  7/14/2008 9:11 AM
 nas                   console             3  Active      none   7/11/2008 12:58 PM
Logging out from a Remote Desktop Session
When the Remote Desktop Client is exited by pressing the ‘X’ on the control panel the remote session continues to run on the server even though no client is connected. Next time the user connects the desktop session will appear exactly as it was left before.
To end the session select Start in the remote desktop session, click on the right arrow button in the bottom right hand corner of the menu and select Log Off. This will close down the remote desktop session and close the remote desktop client.
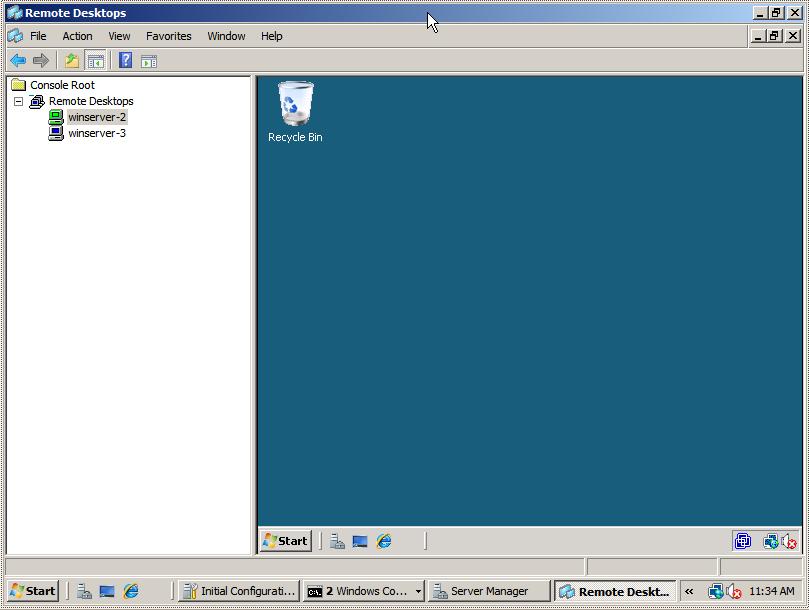
Running Multiple Remote Desktops
Multiple concurrent remote desktops can be run and managed within a single window using the MMC Remote Desktops snap-in. This may either be snapped into the MMC or launched from the command-line or a Run dialog by typing:
tsmmc.msc
Once launched, right click on the Remote desktops item in the tree in the left hand panel and select Add a new connection from the menu. Once selected the Add New Connection dialog will appear as follows:
In this dialog enter the IP address or computer name of the remote system together with the User name and the name to be assigned to this connection (this is essentially the name by which this connection will be listed and administered inside the Remote Desktops snap-in). For an administrative session (as opposed to a virtual session) set the Connect with /admin box. Click OK to add the session to the snap-in. Once added, the session will appear in the left hand panel under Remote Desktops. Repeat these steps to add connections to any additional remote systems required.
To establish a remote desktop connection, right click on the name of the session from the left hand panel and select Connect from the menu. The remote session will appear in the window. To start another session simply right click on the session name and once again select Connect. To switch between sessions simply click on the name of the session in the left hand panel and the corresponding desktop will be displayed. The following figure illustrates two sessions running in Remote Desktops:
To change configuration options for each session right click on the desired session in the left hand panel and select Properties. This panel has a number of tabs which enable credentials, screen size and program start properties to be defined.
<google>BUY_WINSERV_2008R2_BOTTOM</google>
Remote Desktop is a useful feature that allows users to access their Windows Server 2008 R2 system from another computer. This can be particularly helpful for IT administrators or individuals who need to manage their server remotely. If you’re wondering how to enable Remote Desktop on your Windows Server 2008 R2, follow these steps:
Step 1: Open the Start menu on your server and click on «Control Panel.«
Step 2: In the Control Panel window, select «System and Security.«
Step 3: Under the System and Security section, click on «System.«
Step 4: In the System window, select «Remote settings» from the left sidebar.
Step 5: In the System Properties window that opens, navigate to the «Remote» tab.
Step 6: In the Remote tab, you will find two options: «Allow connections from computers running any version of Remote Desktop (less secure)» and «Allow connections only from computers running Remote Desktop with Network Level Authentication (more secure).» Choose the option that best suits your security requirements.
Step 7: Click on «Apply» and then «OK» to save your changes.
Now that you have enabled Remote Desktop on your Windows Server 2008 R2, you can access it remotely using a Remote Desktop client from another computer on the same network or through the internet. Simply launch the Remote Desktop client, enter the IP address or hostname of the server, and provide your credentials to establish a connection.
| Pros | Cons |
|---|---|
| 1. Allows remote management of Windows Server 2008 R2, providing flexibility and convenience. | 1. Potential security risks if not configured properly or accessed from untrusted devices. |
| 2. Provides access to server resources and applications from anywhere with an internet connection. | 2. Requires a stable and reliable network connection for optimal performance. |
| 3. Helps streamline server administration and troubleshooting tasks. | 3. May require additional configuration and firewall settings to allow remote connections. |
Enabling Remote Desktop on Windows Server 2008 R2 can greatly enhance your ability to manage and access your server remotely. However, it is important to ensure that proper security measures are in place to protect your system from unauthorized access. Consider configuring firewall settings and utilizing strong passwords to maintain the security of your remote connections.
Video Tutorial:How to enable RDP via command line?
How to install RSAT on Windows Server 2008 R2?
Installing RSAT (Remote Server Administration Tools) on Windows Server 2008 R2 is a straightforward process. Here are the steps:
1. Verify the compatibility: Before proceeding with the installation, ensure that your system meets the requirements to run RSAT. Make sure you have administrative rights and that your server is running Windows Server 2008 R2.
2. Download RSAT: Visit the Microsoft Download Center website and search for «Remote Server Administration Tools for Windows Server 2008 R2.» Locate the appropriate version, either 32-bit or 64-bit, depending on your system architecture. Download the RSAT package.
3. Run the installer: Once the download is complete, navigate to the download location and run the installer. The installation wizard will open.
4. Select the desired tools: In the installation wizard, you’ll be presented with a list of available tools. Choose the specific tools within RSAT that you want to install. You can select multiple tools by holding the Ctrl key while clicking.
5. Complete the installation: After selecting the desired tools, click on the «Install» button to begin the installation process. The installer will extract and install the selected tools on your system.
6. Configure RSAT: Once the installation is complete, you need to configure RSAT to enable and access the installed tools. This involves navigating to the «Control Panel» and finding the «Programs» section. Locate the «Turn Windows features on or off» option and click on it.
7. Enable RSAT features: In the «Windows Features» dialog box, scroll down to find the «Remote Server Administration Tools» section. Expand it to reveal more options. Check the box corresponding to the specific tools you installed in step 4. Click «OK.«
8. Restart if necessary: In some cases, enabling or disabling certain Windows features may prompt a system restart. If required, restart your server to apply the changes and make the RSAT tools accessible.
9. Access RSAT: Once the server restarts (if necessary), you can access the RSAT tools by searching for them in the Start Menu or from the Administrative Tools folder. Each tool will have its own interface and usage instructions.
Remember to refer to official documentation, such as Microsoft’s documentation for RSAT, for more detailed steps or troubleshooting guidance if needed.
To enable Windows Server Remote Desktop, follow these steps:
1. Log in to your Windows Server using an administrative account.
2. Click on the «Start» menu and type «Remote Desktop» in the search bar.
3. In the search results, click on the «Remote Desktop Connection» application to open it.
4. In the Remote Desktop Connection window, type the name or IP address of the server you want to connect to in the «Computer» field.
5. Click on the «Show Options» button to expand additional settings.
6. In the expanded options, you can configure settings like display, local resources, and experience. Make the necessary adjustments based on your preferences or requirements.
7. Once you’ve made the appropriate settings, click on the «Connect» button to start the remote desktop session.
8. If it’s your first time connecting to the server, you may be prompted to verify the server’s identity or enter your credentials. Follow the on-screen instructions to complete the connection.
9. After successful authentication, you should now have remote access to the Windows Server desktop.
Please note that enabling Remote Desktop on a Windows Server may have security implications, so it’s vital to ensure proper security measures are in place, such as strong passwords, firewall configurations, and limiting access to authorized users. It’s also recommended to keep your server and Remote Desktop client software up to date to mitigate potential risks.
How to run as administrator command line Windows Server 2008 R2?
Running commands as an administrator on Windows Server 2008 R2 allows users to perform administrative tasks and make system-level changes. Here’s how you can do it:
1. Launch the Command Prompt: Click on the «Start» button, type «cmd» in the search box, and press Enter to open the Command Prompt.
2. Run as administrator: Right-click on the Command Prompt icon in the search results and select «Run as administrator.» If prompted for permission, click «Yes.«
3. User Account Control (UAC) prompt: If UAC is enabled, a prompt may appear asking for confirmation to run the Command Prompt as an administrator. Click «Yes» to continue.
4. Elevated Command Prompt: After successfully running Command Prompt as an administrator, the title bar of the Command Prompt window should display «Administrator: Command Prompt» to indicate that you have elevated privileges.
5. Execute commands: You can now run any command that requires administrative privileges. Simply type the desired command and press Enter to execute it.
Note: Exercise caution while running commands as an administrator, as system-level changes can affect the stability and performance of the Windows Server if not executed correctly. It’s advisable to have a good understanding of the commands you intend to run and their potential impact on the system.
It’s important to keep in mind that this answer is written as a tech blogger and not as an technical blogger.
How to check Remote Desktop users in Windows Server 2008?
To check Remote Desktop users in Windows Server 2008, you can follow these steps:
1. Open the «Start» menu and go to «Administrative Tools» and then select «Remote Desktop Services.«
2. Under «Remote Desktop Services,» choose «Remote Desktop Session Host Configuration.«
3. In the console tree, expand the «Connections» folder.
4. Right-click on the name of your RDP connection (e.g., «RDP-Tcp«) and select «Properties.«
5. In the «Properties» window, go to the «Permissions» tab.
6. Here, you can see the list of users who have permissions to connect through Remote Desktop to your Windows Server 2008.
7. You can further modify the permissions by clicking the «Advanced» button and selecting «Advanced Permissions.«
Please note that these steps are specifically for Windows Server 2008, and the process may vary slightly on different Windows Server versions.
How to enable Remote Desktop in Windows Server 2008?
To enable Remote Desktop in Windows Server 2008, you can follow the steps below:
1. Open the Start menu and go to «Control Panel«.
2. In the Control Panel, click on «System and Security» or «System and Maintenance» depending on your Control Panel view.
3. In the new window, find and click on «System«. This will open the System Properties.
4. In the System Properties window, click on the «Remote settings» link on the left-hand side. This will open the Remote tab.
5. Under the Remote Desktop section, you will see two options: «Don’t allow connections to this computer» and «Allow connections from computers running any version of Remote Desktop (less secure)«. Select the second option if you want to allow remote connections.
6. If you want to restrict remote connections to specific users, click on the «Select Users» button and add the desired users to the list.
7. Click «OK» to save the changes.
8. If you have a firewall enabled, make sure to allow Remote Desktop connections through the firewall. Check your firewall settings or consult the Windows Server 2008 documentation for specific instructions on how to do this.
After applying these steps, Remote Desktop should be enabled on your Windows Server 2008. You can now access the server remotely using a Remote Desktop client.
How do I enable remote management in Windows Server 2008 R2?
Enabling remote management in Windows Server 2008 R2 involves several steps. Here’s how you can accomplish it:
1. Launch Server Manager: Log in to the Windows Server 2008 R2 machine, click on the Start button, and open the Server Manager console.
2. Add the Remote Server Administration Tools (RSAT) feature: In the Server Manager window, click on the «Features» section in the left-hand pane. Then, click on the «Add Features» link in the main pane. A new window will open, and you need to select the «Remote Server Administration Tools» checkbox. Click «Next» to proceed.
3. Select the desired remote management tools: In the Remote Server Administration Tools window, expand the «Role Administration Tools» section and then expand the «AD DS and AD LDS Tools» option. Here, you can select the specific tools you want to enable for remote management, such as «Active Directory Administrative Center» or «Group Policy Management.» Once you’ve made your selections, click «Next.«
4. Confirm the installation selections: Review the summary of your installation selections and click «Install» to begin the installation process. The required files and features will be downloaded and installed on your Windows Server machine.
5. Enable remote management: After the installation completes, return to the Server Manager window, and in the left-hand pane, expand the «Configuration» section and select «Local Server.» In the main pane, locate the «Remote Management» option and click on the disabled status.
6. Configure remote management settings: A new window called «System Properties» will open. Click on the «Remote» tab and select the checkbox labeled «Allow remote connections to this computer.» You can also choose to enable remote management settings for specific users or groups by clicking on the «Select Users» button.
7. Firewall configuration: By default, the Windows Firewall blocks remote management connections. To allow remote management connections, you need to configure the firewall to permit them. In the Server Manager window, click on «Configuration» in the left-hand pane, and then select «Windows Firewall with Advanced Security.» From there, you can create inbound and outbound rules to allow remote management traffic.
8. Test remote management: Once you’ve completed the above steps, you can test remote management by connecting to the Windows Server 2008 R2 machine from another computer using remote management tools like Windows PowerShell or Remote Desktop.
It’s important to note that these instructions assume you have administrative access to the Windows Server 2008 R2 machine and are familiar with basic Windows Server administration concepts. Additionally, ensure that remote management is in compliance with your organization’s security policies and guidelines.