
Все способы:
- Видео инструкция
- Включаем Intel Turbo Boost
- Включение в BIOS
- Включение через схему электропитания
- Вопросы и ответы: 25
Технология Intel Turbo Boost позволяет CPU самостоятельно разгонять тактовую частоту в пределах безопасных значений. Прирост может составить до 1,4 ГГц, как у флагманского i9-9900K, или несколько меньше, если речь идёт о серверных процессорах. Способы включения Turbo Boost у процессора Intel будут рассмотрены в рамках данной статьи.
Видео инструкция
Включаем Intel Turbo Boost
По умолчанию технология «саморазгона» на компьютерах всегда включена, однако настройки изредка сбиваются или же сами пользователи могут ненароком отключить их. За функционирование Turbo Boost отвечают параметры процессора в BIOS и настройки схемы управлением питания.
Включение в BIOS
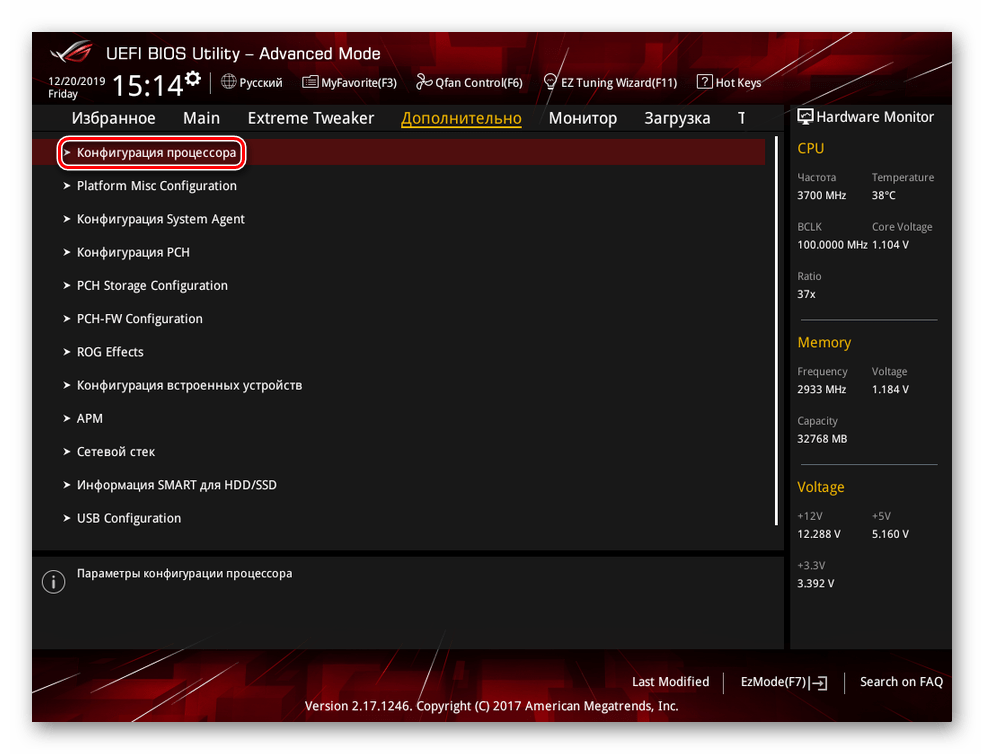
Основной переключатель, отвечающий за «турборежим» CPU располагается в настройках процессора в BIOS или UEFI. Для того чтобы его активировать, зайдите в BIOS своего компьютера и выполните такие действия:
Читайте также:
Как войти в BIOS на компьютере
Как настроить BIOS на компьютере
Настройка UEFI BIOS Utility
- Найдите строку «Конфигурация процессора» и нажмите «Enter».
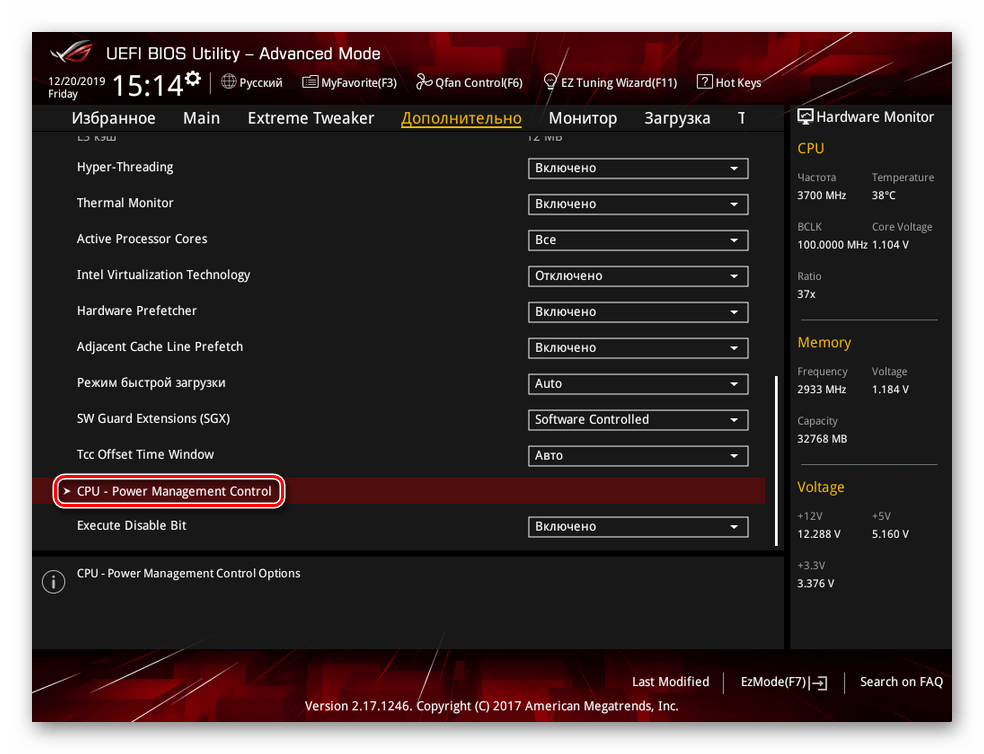
- Войдите в раздел «CPU – Power Management Control».
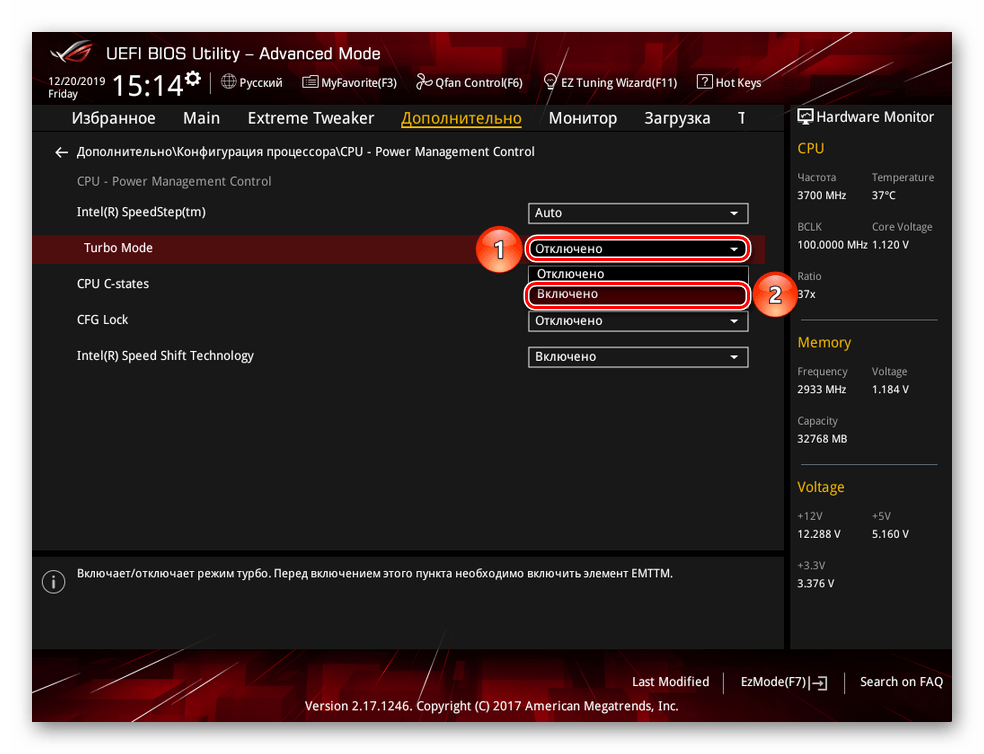
- Выберите сточку «Turbo Mode» и установите значение «Включено» с помощью клавиши «Enter».
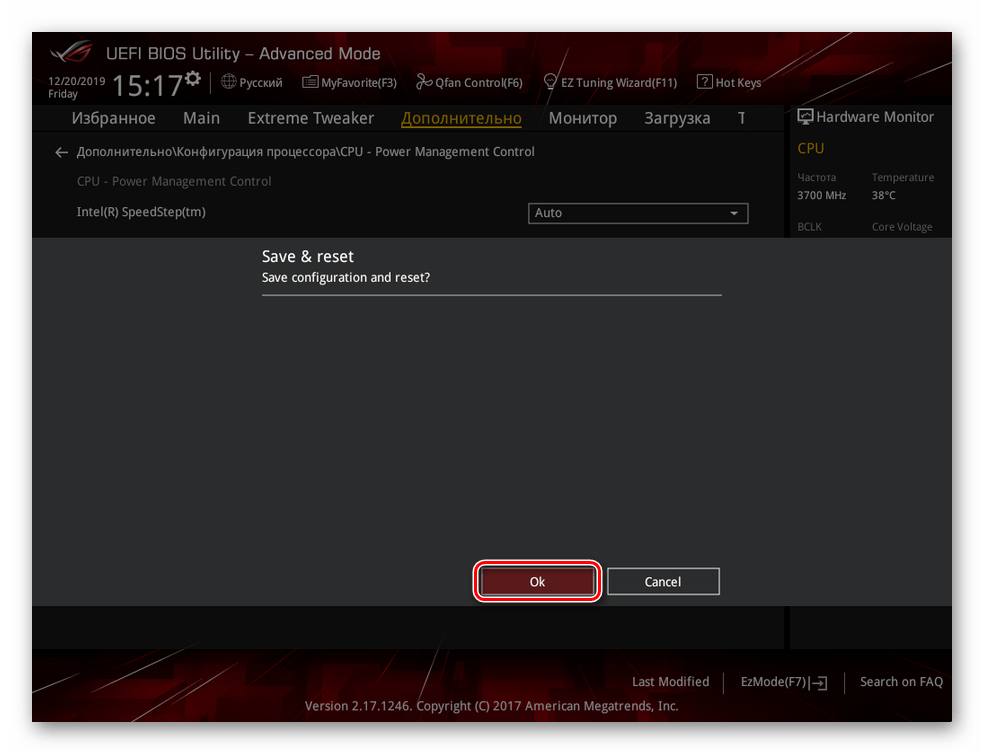
- Сохраните изменения с помощью горячей клавиши или в меню выхода BIOS и перезагрузите компьютер, нажав на кнопку «Ok».
Данный алгоритм, хоть и был описан для русифицированного UEFI, в обычном сине-белом и английском BIOS всё почти так же. Разница в том, что вместо строки «Конфигурация процессора» будет «Advancer CPU Core Features», а имя технологии там будет написано полностью: «Intel Turbo Boost Tech.», и тогда надо просто переключить значение «Disabled» на «Enabled».
Читайте также:
Как сделать BIOS на русском языке
Как узнать, BIOS или UEFI используется в компьютере

Таким образом, вы сможете включить Turbo Boost, если тот был отключён в настройках BIOS с UEFI или без.
Включение через схему электропитания
Включение турборежима процессора может также регламентироваться настройками электропитания в самой Windows. Если системе указано не направлять на CPU 100% требуемой мощности, то Turbo Boost не будет задействован, а тактовая частота ЦПУ останется на базовом уровне при любой нагрузке. Для того чтобы это исправить, сделайте следующее:
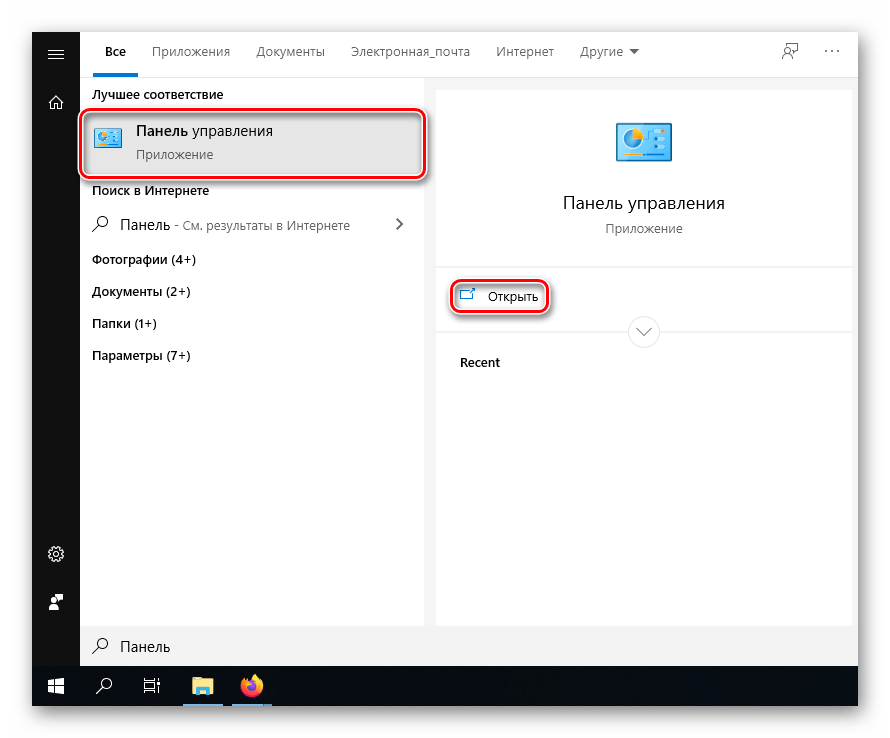
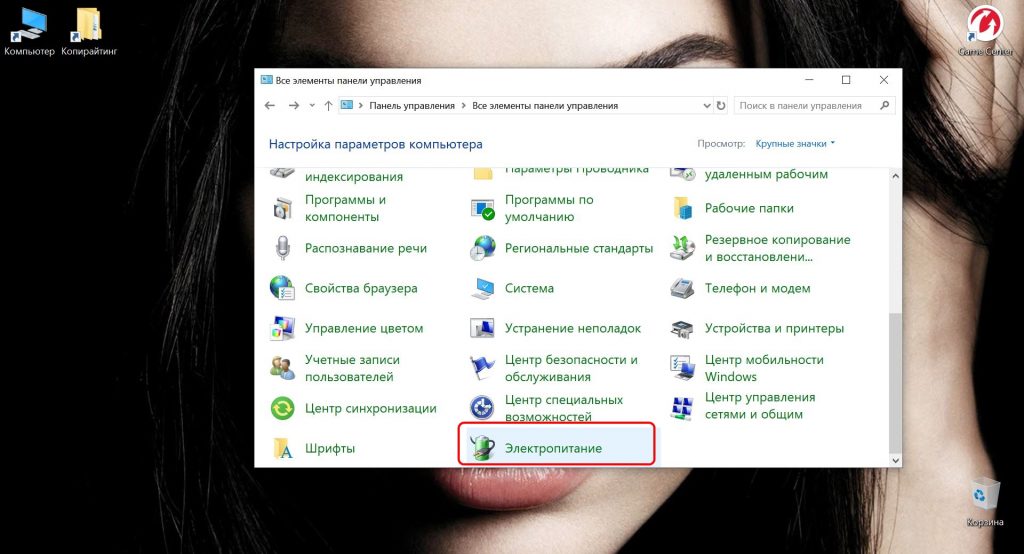
- С помощью поиска в меню «Пуск» найдите и перейдите в «Панель управления».
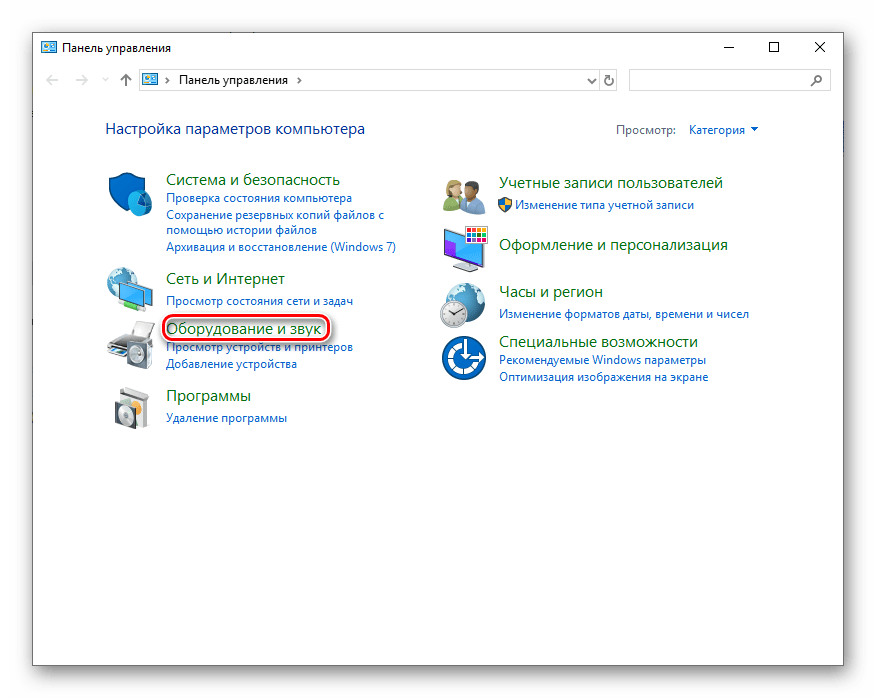
- Нажмите на «Оборудование и звук».
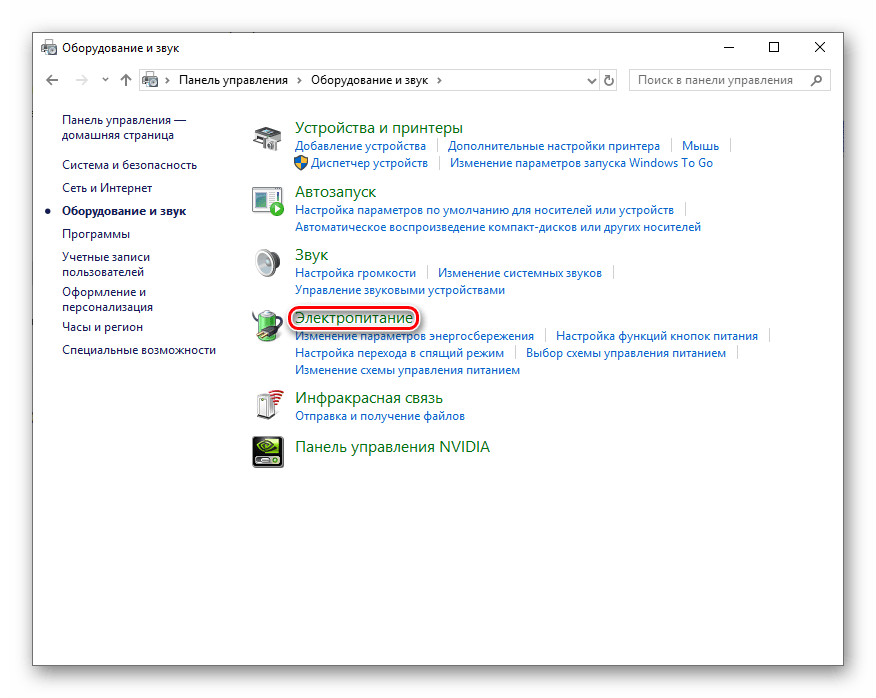
- Выберите «Электропитание».
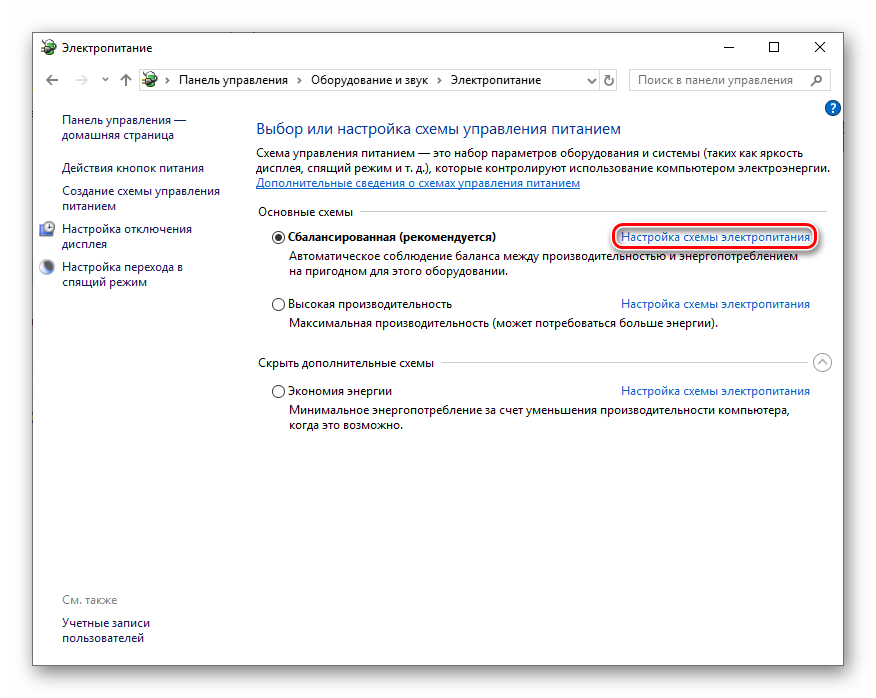
- Кликните левой кнопкой мыши по той конфигурации из раздела «Настройка схемы электропитания», которая действует на вашем компьютере.
- Нажмите на «Изменить дополнительные параметры питания».
- Разверните настройки «Управление питанием процессора», после чего откройте «Максимальное состояние процессора» и установите максимальное значение «100», а в завершение последовательно нажмите кнопки «Применить» и «ОК», чтобы сохранить изменения.


Даже если на процессор направляется 90 или 99% требуемой энергии, он не будет ограниченно использовать возможности турборежима, а просто откажется от неё, поэтому важно следить за тем, чтобы CPU был запитан на 100%.
Мы рассмотрели два способа, как включить Intel Turbo Boost на процессоре Intel. Имейте в виду, по умолчанию турборежим у него всегда включён и отсутствие саморазгона означает, что сбились соответствующие настройки в BIOS или схеме электропитания Windows.
Наша группа в TelegramПолезные советы и помощь
Download Article
A comprehensive guide on getting the most out of your Intel CPU
Download Article
- Turning Turbo Boost On or Off
- Should I turn Turbo Boost On?
- Video
- Q&A
|
|
|
This wikiHow teaches you how to enable Turbo Boost Technology on your Intel i5-equipped PC. Turbo Boost should be on by default, but you may need to make a quick change in your BIOS to get it to work. Unless you have issues with your PC overheating, it’s best to leave Turbo Boost on since it allows your CPU to run at a higher speed to perform more demanding tasks.
Quick Steps
- Boot your PC into the BIOS to access your motherboard’s settings.
- In the System Utilities screen, find the Power and Performance Options.
- Turn the Turbo Boost setting on if it isn’t already enabled.
- Restart your PC, and Turbo Boost will remain enabled.
-

The easiest way to do this in Windows 10 and Windows 11 is just to hit your PC’s setup key, often F2 or Del, repeatedly while booting your machine. If the bootup process happens too quickly, you can also enter the BIOS/UEFI from within Windows. Here’s how to do it:
-
The BIOS will look different depending on who manufactured your motherboard. In most cases, the setting for Turbo Boost will be in a menu called CPU Specifications, CPU Features, Advanced Core Features, or something similar.
- Use the arrow keys on the keyboard to navigate the BIOS, and press ↵ Enter to make your selections.
- Press Esc to go back a screen.
- While the BIOS menu options may differ from manufacturer to manufacturer, this process is the same for Intel’s i5, i7, and i9 chips.
- Struggling to find the right menu options in your BIOS? Some motherboard manufacturers make things a little confusing in their BIOS. You can find a list of all user guides for all Intel-supported motherboards here.
Advertisement
-
You’ll usually see either ″Enabled″ or ″Disabled″ beside it. If you see ″Enabled,″ you don’t need to change anything in the BIOS.
- Turbo Boost should be on by default. If it’s not, you may have one of the few motherboards that turns it off, or you’ve enabled a BIOS profile that turns it off to preserve power.
-
-
The exact key to press should appear at the bottom of the BIOS. In most cases, it’ll be F10.
-
Press Esc and then follow the on-screen instructions to restart. When your PC comes back up, Turbo Boost will be enabled.
- Just FYI, you’re unlikely to notice a giant boost in performance, although your computer will definitely run a little faster when performing memory-intensive tasks.


Advertisement
-
Turbo Boost automatically adjusts the clock speed (how fast your CPU can perform tasks) of your CPU based on how much work is being performed. Turbo Boost will allow the CPU to work beyond its normal parameters when running memory-intensive programs or completing complex tasks. So long as this doesn’t cause your PC to overheat, this is no big deal.[1]
- How do I know if my PC is overheating? Download a program like Core Temp for free. It’ll monitor the temperature of your CPU and GPU.
-
What is considered too hot for a CPU? It depends on the wattage and clock speed of your CPU, but generally speaking, your CPU should not reach or exceed 80–90 °C (176–194 °F). Anything around 40–50 °C (104–122 °F) is considered “normal” while 35–40 °C (95–104 °F) is perceived as ideal.[2]

Add New Question
-
Question
I’m assuming this will make the CPU run warmer?
Yes, overclocking a CPU will increase the heat at which it runs and also make it more prone to «heat throttling.» Ensure that your setup has sufficient cooling, or you may end up overheating the system, or causing it to run less efficiently.
Ask a Question
200 characters left
Include your email address to get a message when this question is answered.
Submit
Advertisement
Video
Thanks for submitting a tip for review!
About This Article
Article SummaryX
1. Reboot into the BIOS.
2. Open the CPU configuration settings.
3. Set «Intel Turbo Boost Technology» to Enabled.
4. Save your changes and reboot.
Did this summary help you?
Thanks to all authors for creating a page that has been read 292,615 times.
Is this article up to date?
How to Enable or Disable Intel Turbo Boost in Windows 10
When you enable turbo boost windows 10 , you’ll probably notice an option for Intel Turbo Boost Technology, but what is it? How do you enable it? In this article, I’ll walk you through the steps to enable or disable the feature. Once you’ve done that, reboot your PC to re-enable Turbo Boost. To disable Turbo Boost, disable it in the BIOS, Pcode, or Hardware.
Disabling Intel Turbo Boost in Windows 10 has many benefits. It can improve performance, improve battery life, and reduce power consumption. However, if you want to turn off this feature, you must know what it is, and how to disable it. Fortunately, these steps are easy and can be reverted if you don’t want to use it. To disable Intel Turbo Boost in Windows 10, open your BIOS settings and go to “General” > “Intel Turbo Boost Google.”
Generally, Intel Turbo Boost is enabled by default, and you can disable it in the BIOS. You must restart your computer to make the changes. Alternatively, you can disable Turbo Boost in the Advanced Power Management option in the BIOS. However, this will require a BIOS update. If you’re using a newer PC, you can disable Intel Turbo Boost in Windows 10 manually by following the instructions provided by the manufacturer.
How To Disable Intel Turbo Boost In BIOS:
To turn off Intel Turbo Boost, open the BIOS of your computer. You will likely find the option labeled Enabled or Disabled. Click on the Enabled or Disabled option and restart the PC. It should now be enabled. To enable or disable Intel Turbo Boost in BIOS for Windows 10, select the corresponding option under the Power Options tab in the BIOS.
You can also disable Intel Turbo Boost manually by visiting your BIOS and checking for the “Intel Turbo Boost” option. This option is generally enabled by default. For additional information, contact your motherboard’s manufacturer for detailed instructions. Then, follow the instructions to disable the Intel Turbo Boost technology. This should prevent your PC from causing any damage to your system. In this way, you will get the most out of your machine’s performance.
How To Disable Intel Turbo Boost In Code:
If you have a modern laptop, it is probably not able to cope with the additional heat generated by Turbo Boost. Disabling this technology will help your computer run cooler, extend battery life, and increase efficiency. Disabling Intel Turbo Boost in BIOS will help you maintain a cooler operating system and improve your laptop’s performance. This can also prevent heat throttling and overheating and help your system last longer.
If you want to disable Intel Turbo Boost, you need to modify the powercfg attributes. It is possible to disable Turbo Boost by changing the p-code. This way, the operating system will learn about it and re-enable it. Disabling Intel Turbo Boost in Pcode can be a good solution to battery life concerns. The problem with Turbo Boost is that it increases the temperature, which can significantly affect battery life.
How To Disable Intel Turbo Boost In Hardware:
You cannot disable Intel Turbo Boost by core, but you can disable it by processor. Normally, the processor turns on this feature when it is loaded. It automatically adjusts its voltage to its highest frequency. For moderate over clockers, leaving it alone is enough. But if you want to disable it completely, you should use a program that will turn it off for you. You can download a free version of this software from the internet.
One of the first steps in disabling Turbo Boost is to force-quit all applications that use it. This will disable the feature and prevent overheating. Afterward, you can turn off the feature if you want. The reason why many people choose to disable the feature is because they are annoyed by the frequent system reboots. However, you may want to enable Turbo Boost if you’re having problems with performance.
Screen Select System Configuration:
- On the System Utilities screen,
- Select System Configuration > BIOS/Platform Configuration (RBSU) > Performance Options > Intel (R)
- Turbo Boost Technology and press Enter. Select a setting and press Enter.
- Enabled – Enables logical processor cores on processors supporting hyperthreading technology.
To disable Intel Turbo Boost, either press F10 or open Control Panel. From here, select Advanced power settings and find Processor power management. Make sure that the On battery and connected is set to 99 percent. Also, make sure that you’ve enabled the setting for the Maximum processor state. This will disable the Turbo Boost feature on your system. If you’re still experiencing problems, check your motherboard’s manual for instructions.
The use of Intel Turbo Boost has sparked in the last couple of years. If you’re one of those people who love processing upgrades, then you’d surely love Intel’s Turbo Boost technology. In today’s article, we shall be giving you guys a brief guide on how you can enable Intel Turbo Boost on your Windows 10 PC. Before we jump to our step-by-step procedure, let us first give the newbies out there a background check of Intel Turbo Boost.
What is Intel Turbo Boost?
Intel’s Turbo Boost technology aims to give you a faster and better computing experience by providing extensive support to your PC’s processor. Usually, your processor runs at its default marked frequency. However, with the application of Intel Turbo Boost, your processor’s core would run at a relatively improved frequency. This results in faster computing and much better graphics, but to a limited extent.
Sounds all good, right? Well, this improved processing comes at a cost. Intel’s Turbo Boost technology has a requirement. Unless your computer system meets this requirement, expect your CPU to run at its marked frequency. For Intel Turbo to run freely, your system’s processor should be operating in the specified conditions of TDP (Thermal Design Power).
Now overburdening the processor might sound like asking for unnecessary heating problems in the CPU. This is exactly why Intel came up with the specified temperature and power limits to ensure the processing does not cause the system to overheat. Furthermore, Intel has not specified a fixed boost of frequency. Instead, the processor’s frequency rate may vary depending upon usage, environment, hardware, and other relevant factors.
Enabling Intel Turbo Boost
Fortunately, Intel Turbo Boost comes automatically enabled on all supported processors by default. It can still be disabled/enabled by peaking into the BIOS configuration. There is no other way of disabling/enabling Intel Turbo Boost. Before we start with our procedure, we would recommend our readers keep Intel Turbo Boost enabled at all times.
- Access the BIOS configuration through the System Utilities screen. Now click on “System Configuration”.
- From here, you need to go to “BIOS/Platform Configuration (RBSU)”.
- Click on “Performance Options” then on “Intel Turbo Boost Technology”.
- Here you’ll be given two options to choose from. Either enable or disable Intel Turbo Boost Technology.
- After you’ve made your choice, press the F10 key from your keyboard to save your changes.
Do You Need Intel Turbo Boost?
Intel’s Turbo Boost tech is quite useful since it helps gamers, developers, designers to push their computer system’s processing power to its limits. The best part is that you don’t have to worry about overheating or turning it on and off. With slightly more room for processing, you’ll only find Intel Turbo Boost assisting you in your computing needs. The bottom line is that there are only benefits and no drawbacks.
Conclusion
We all can use some Turbo Boost whenever we’re short of CPU power. Intel takes care of that without having you worry about buying additional supportive hardware. Rest assured, our guide is all you would need to learn how to enable/disable Intel Turbo Boost on your Windows 10 PC.
Процессоры компании Intel, разменявшие уже десятое поколение, из года в год получают новые опции, при этом сохраняя прежний технический функционал. Так, технология Intel Turbo Boost, представленная еще в 2008 году, успешно применяется в процессорах поколения Ice Lake в версии Turbo Boost 2.0. Зачем она нужна и как ее включить?
Intel (R) Turbo Boost – фирменная процессорная технология, позволяющая системе в автоматическом режиме повысить частоту процессора до определенного предела, тем самым увеличив мощность компьютера для определенных задач. Фактически же Turbo Boost представляет собой легальный разгон процессора, не требующий от пользователя каких-либо действий или манипуляций с «железом». В этой статье мы рассмотрим как включить режим турбо в процессоре intel.
Данная технология поддерживается исключительно процессором. Тем самым, если вы приобрели компьютер с процессором Intel без Turbo Boost, то включить, дополнительно установить или при помощи специального «костыля» активировать технологию не получится. При этом не стоит путать ее с монитором технологии Intel Turbo Boost, так как это фирменная утилита компании Intel, показывающая работу этой технологии в действии.
Как включить Intel Turbo Boost?
По умолчанию технология автоматически включена в системе и используется по необходимости при выполнении ресурсоёмких задач. Но в ОС Windows можно «заставить» работать процессор в режиме Turbo Boost практически постоянно. Для этого нужно сделать следующее.
Открываем Панель управления и переходим в пункт Электропитание.
Выбираем режим Высокая производительность и закрываем страницу.
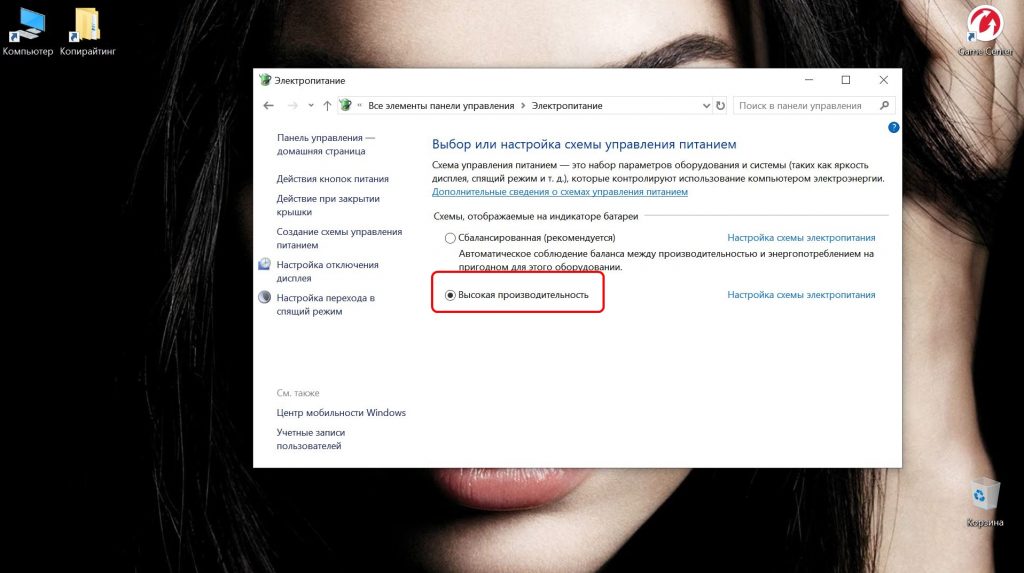
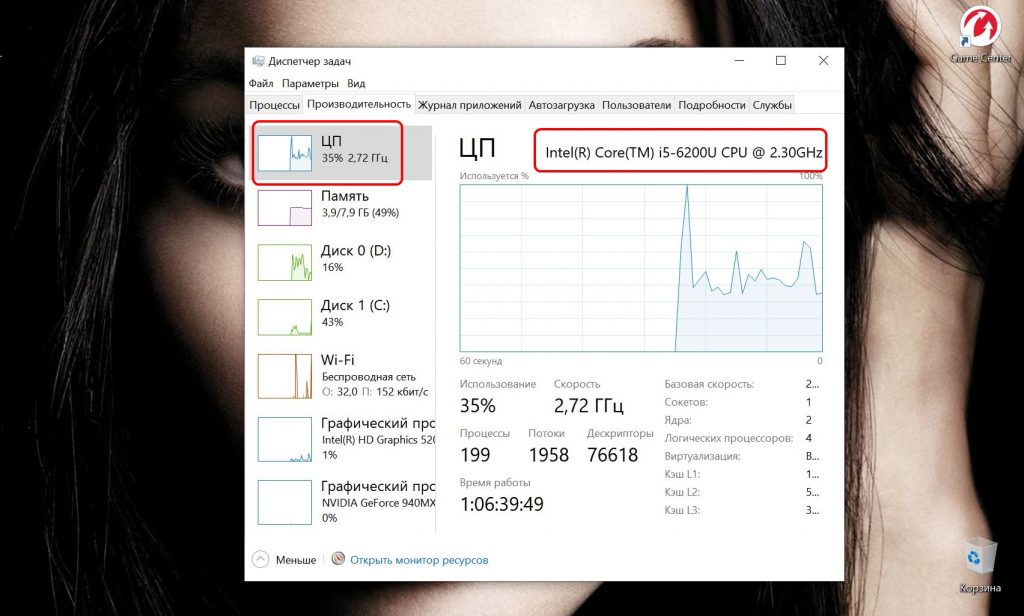
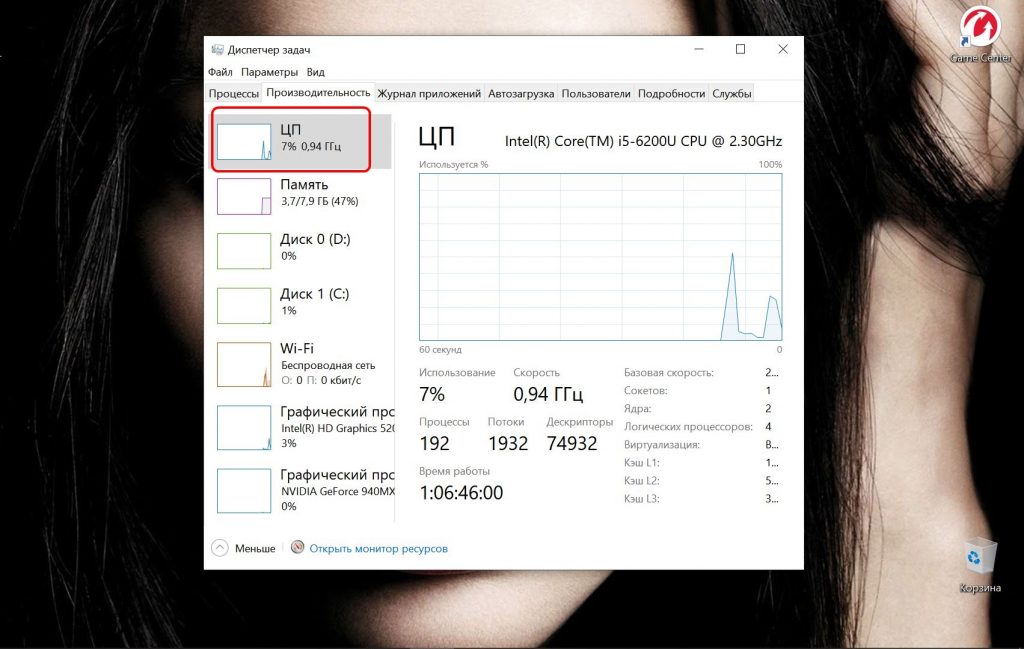
В таком режиме процессор постоянно использует максимально возможные частоты. В случае с процессором Intel i5-6200U при номинальной частоте в 2,3 ГГц, он разгоняется и стабильно работает на 2,7 ГГц.
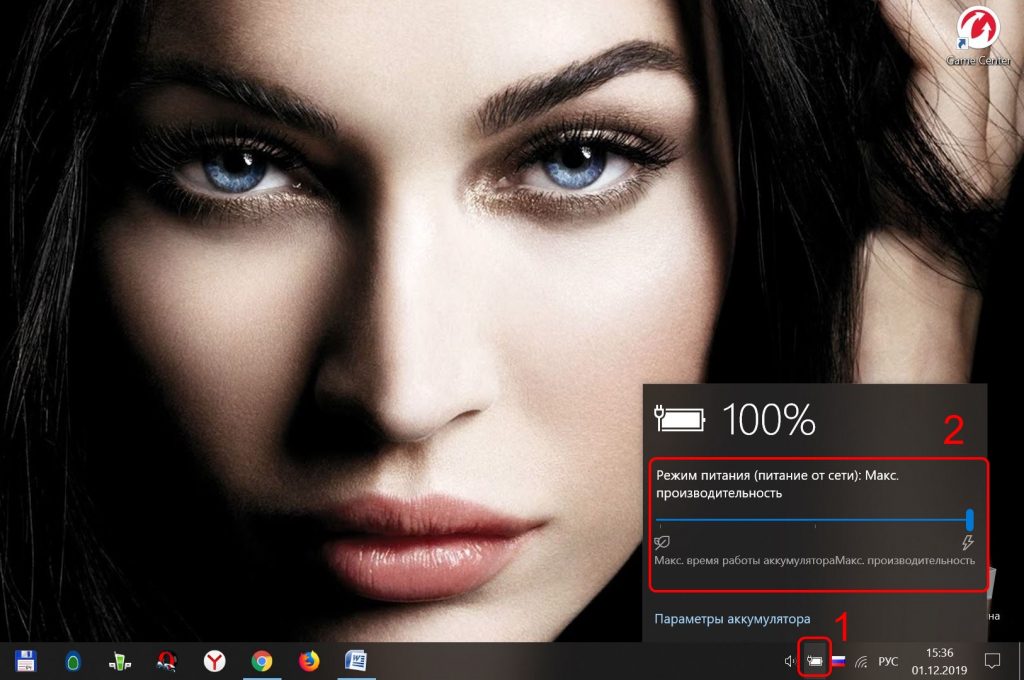
Если же у вас ноутбук с процессором, поддерживающим Turbo Boost, то проще пойти другим путем. Кликните на иконку батареи в нижнем трее и сдвиньте ползунок вправо, выбрав режим Максимальная производительность.
Однако, если вам не нужна максимальная производительность компьютера в постоянном режиме, то лучше разрешить системе самостоятельно распоряжаться частотой процессора. Тем самым, лишь в редких случаях частота будет достигать пиковых пределов.
Как включить Turbo Boost в BIOS?
В редких случаях возникают ситуации, когда пользователь задается вопросом как включить turbo boost intel core i5 через BIOS. Правда, стоит уточнить, что не во всех BIOS есть опция включения/отключения процессорной технологии.
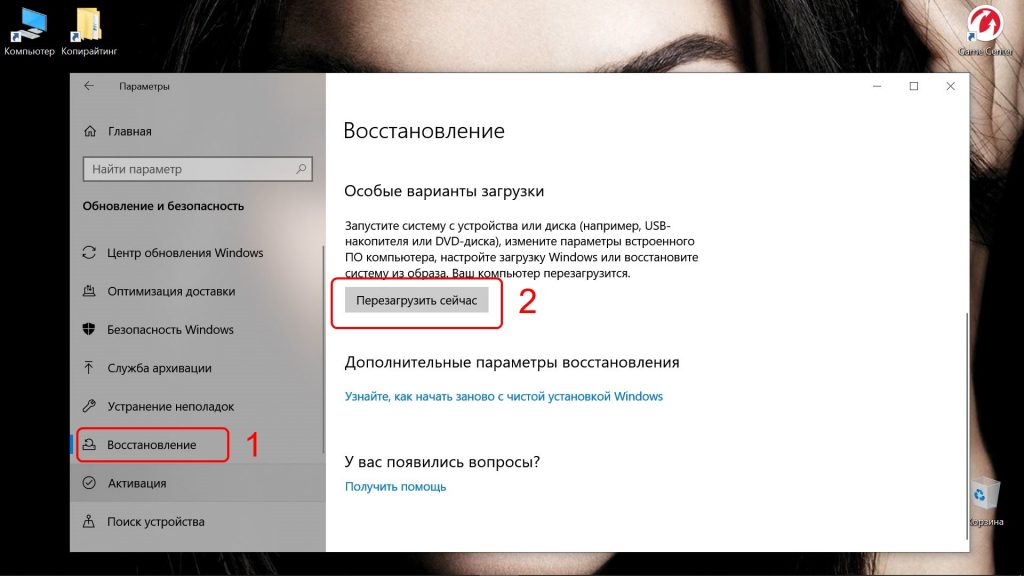
Для начала перейдите в BIOS при загрузке компьютера клавишами F2 или Delete. Если ноутбук или компьютер с Windows 10 не реагирует на нажатия клавиш, то откройте панель управления и перейдите в раздел Обновление и безопасность. После чего выберите вкладку Восстановление и в разделе Особые варианты загрузки кликните Перезагрузить сейчас.
В одной из вкладок BIOS найдите пункт Intel (R) Turbo Boost Tech и Turbo Mode, в данном случае на вкладке AI Tweaker и переключите в режим Enabled.
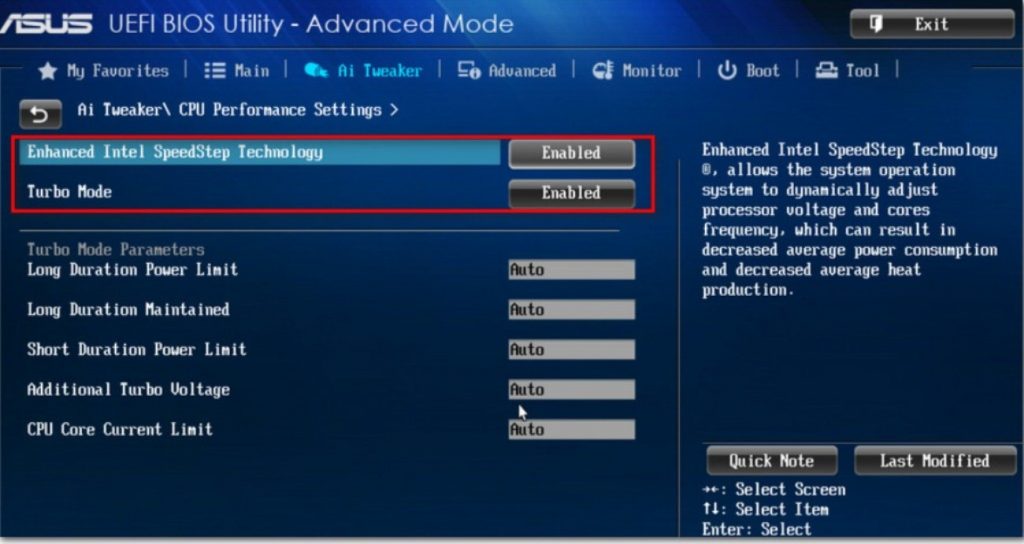
После чего выйдите из BIOS, не забыв нажать кнопку F10 для сохранения настроек. Если вы задаетесь вопросом как отключить турбо буст на процессоре intel, то надо для этих же опций в BIOS установить значение Disabled и сохранить настройки.
Была ли эта статья полезной?
ДаНет
Оцените статью:
(4 оценок, среднее: 5,00 из 5)
Загрузка…