
2024-06-25
#TLS
# HTTPS
# Windows 10
TLS 1.3 — это новейший протокол безопасности, который улучшает TLS 1.2 с точки зрения безопасности и производительности. TLS 1.3 все еще не широко используется во всех приложениях, установленных в Windows 10.
Нажмите здесь, чтобы узнать больше о том, какие версии протокола TLS следует использовать при подключении к сетевому хранилищу ASUSTOR NAS.
В Windows 11 по умолчанию включен TLS 1.3, менять настройки в Windows 11 не требуется.
По умолчанию в Windows 10 протокол TLS 1.3 не включен. Если вы используете сетевые приложения, которые требуют или поддерживают TLS 1.3, вам следует включить TLS 1.3 в Windows 10.
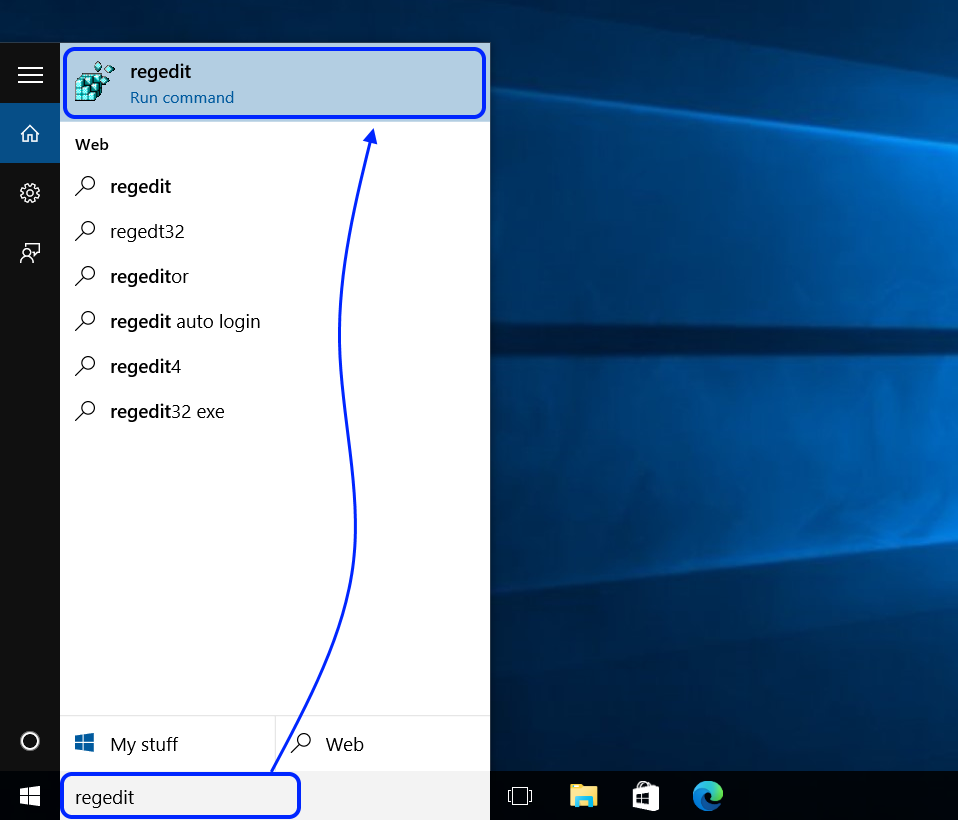
- В Windows 10 нажмите [Поиск] на [Панели задач].
- Введите [regedit], после чего вы найдете [Редактор реестра].
- Нажмите [Открыть].
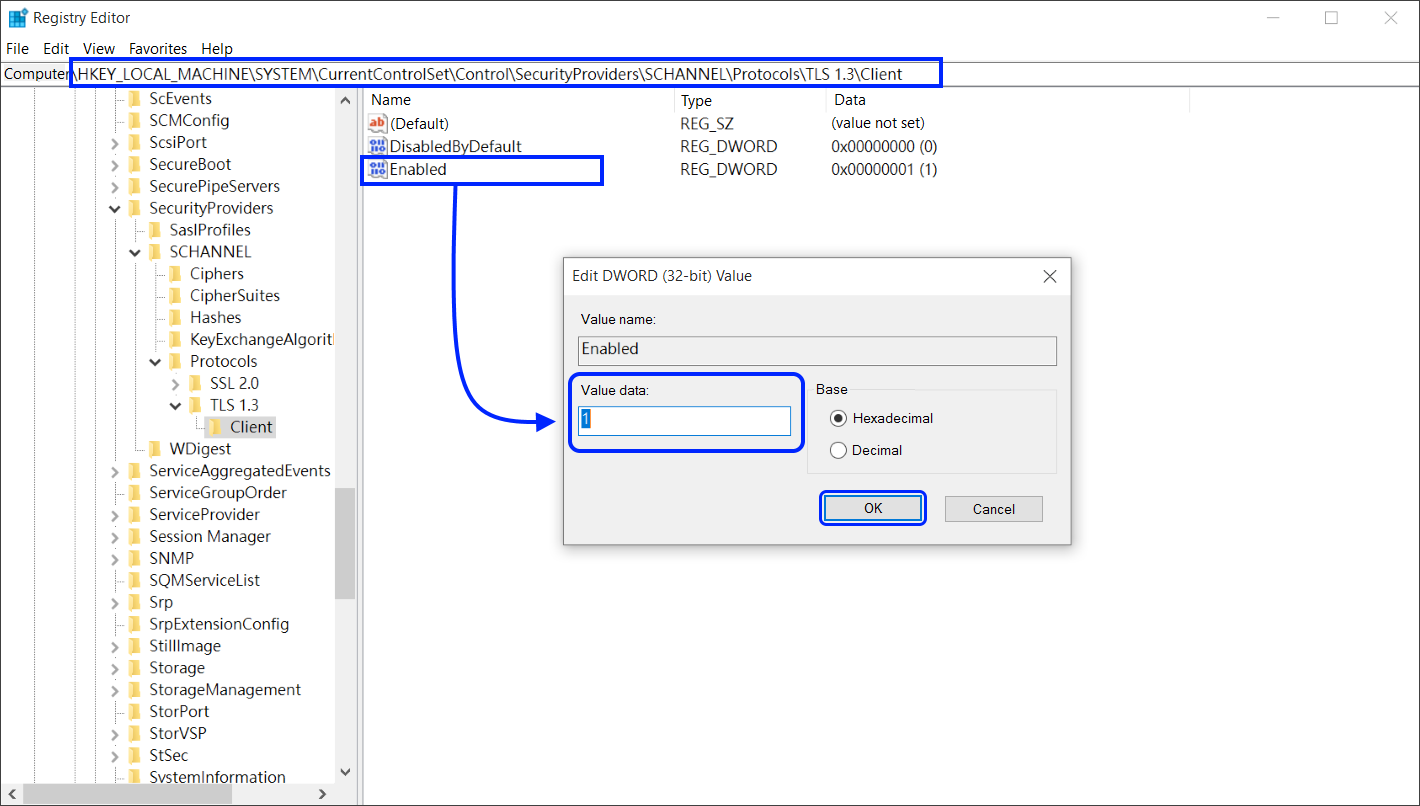
Включите TLS 1.3:
- Найдите следующий путь в левой панели Редактор реестра:

[HKEY_LOCAL_MACHINE\SYSTEM\CurrentControlSet\Control\SecurityProviders\SCHANNEL\Protocols\TLS 1.3\Client]
- Дважды щелкните [Enabled].
- В поле [Данные значения] измените число на [1] и нажмите [OK].
Примечание: Если вы не можете найти вышеуказанный путь в Windows 10, пожалуйста, щелкните правой кнопкой мыши на правой панели в соответствии с этим путем, создайте [TLS 1.3] и [Client] ключевой путь по очереди, а затем создайте 2 DWORD (32-битных) значения [DisabledByDefault] и [Enabled] со значением по умолчанию 0.
Вы можете нажать здесь, чтобы загрузить регистрационный файл Windows для создания пути ключа и значения по умолчанию, а затем изменить их. (MD5: b003f9e7fd0b825fafd02f915d7de0ca)
Однако если некоторые приложения, которые вы используете в Windows 10, не поддерживают TLS 1.3, возможно, эти приложения не будут работать должным образом при включенном TLS 1.3, и вам следует отключить TLS 1.3 в Windows 10.
Отключите TLS 1.3:
- Найдите следующий путь в левой панели Редактор реестра:
[HKEY_LOCAL_MACHINE\SYSTEM\CurrentControlSet\Control\SecurityProviders\SCHANNEL\Protocols\TLS 1.3\Client]
- Дважды щелкните [Enabled].
- В поле [Данные значения] измените число на [0] и нажмите [OK].
См. также
Была ли эта статья полезной? Да / Нет
Не связано с моей проблемой
Слишком сложно
Неправильная информация
Недостаточно информации
У вас есть другое отзывы об этой статье?
Предложите тему
В этой статье мы рассмотрим, как включить протокол Transport Layer Securit (TLS 1.2) в различных версиях Windows, в том числе для приложений .Net и WinHTTP. Протоколы TLS 1.0 и TLS 1.1 являются устаревшими, и если вы мигрировали все ваши сервисы на TLS 1.2 или TLS 1.3, вы можете отключить поддержку старых версий протоколов на клиентах и серверах Windows (Отключение TLS 1.0 и TLS 1.1 с помощью групповых политик). Но перед этим, вам нужно убедиться, что на всех ваших клиентах поддерживается протокол TLS 1.2.
В современных версиях Windows (Windows 11/10/8.1 и Windows Server 2022/2019/2016/2012R2) протокол TLS 1.2 включен по-умолчанию. А вот в предыдущих версиях Windows (Windows 7, Windows Server 2008R2/2012), чтобы включить TLS 1.2, придется выполнить ряд предварительных настроек.
Windows XP и Vista не поддерживают TLS 1.2.
Например, чтобы включить TLS 1.2 в Windows 7 нужно:
- Убедится, что у вас установлен Windows 7 SP1;
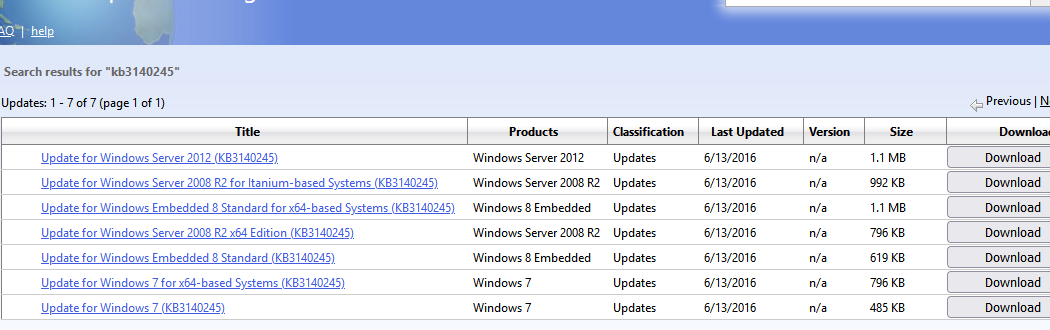
- Скачать и вручную установить MSU обновление KB3140245 из Microsoft Update Catalog (https://www.catalog.update.microsoft.com/search.aspx?q=kb3140245);

- Далее нужно скачать и установить патч MicrosoftEasyFix51044.msi (патч добавляет в реестр параметры, которые обеспечивают поддержку TLS 1.2 в Windows 7/2008R2/2012);
- Перезагрузите компьютер.
Эти параметры реестра описаны в статье Update to enable TLS 1.1 and TLS 1.2 as default secure protocols in WinHTTP in Windows (https://support.microsoft.com/en-us/topic/update-to-enable-tls-1-1-and-tls-1-2-as-default-secure-protocols-in-winhttp-in-windows-c4bd73d2-31d7-761e-0178-11268bb10392).
На компьютере появятся следующие REG_DWORD параметры реестра в ветке
HKLM\SYSTEM\CurrentControlSet\Control\SecurityProviders\SCHANNEL\Protocols\TLS 1.2\Client\
и
HKLM\...Protocols\TLS 1.2\Servers
:
- DisabledByDefault = 0
- Enabled = 1
Чтобы протокол TLS 1.2 использовался по-умолчанию для приложений на WinHttp API, нужно добавить REG_DWORD параметр
DefaultSecureProtocols = 0x00000A00
в ветку HKEY_LOCAL_MACHINE\SOFTWARE\Microsoft\Windows\CurrentVersion\Internet Settings\WinHttp (на 64 битной версии Windows в ветке HKEY_LOCAL_MACHINE\SOFTWARE\Wow6432Node\Microsoft\Windows\CurrentVersion\Internet Settings\WinHttp).
Возможные значения параметра DefaultSecureProtocols, который определяет разрешенные протоколы для WinHTTP подключений:
- 0x00000A0 – значение по умолчанию, которое разрешает только SSL 3.0 и TLS 1.0 для WinHTTP;
- 0x0000AA0 — разрешить использовать TLS 1.1 и TLS 1.2 в дополнении к SSL 3.0 и TLS 1.0;
- 0x00000A00 – разрешить только TLS 1.1 и TLS 1.2;
- 0x00000800 – разрешить только TLS 1.2.
Начиная с Windows 10 и Windows Server 2016, все версии Windows поддерживают TLS 1.2 для коммуникаций через WinHTTP.
Вы можете использовать следующий PowerShell скрипт чтобы создать эти параметры реестра:
$reg32bWinHttp = "HKLM:\SOFTWARE\Microsoft\Windows\CurrentVersion\Internet Settings\WinHttp"
$reg64bWinHttp = "HKLM:\SOFTWARE\Wow6432Node\Microsoft\Windows\CurrentVersion\Internet Settings\WinHttp"
$regWinHttpDefault = "DefaultSecureProtocols"
$regWinHttpValue = "0x00000800"
$regTLS12Client = "HKLM:\SYSTEM\CurrentControlSet\Control\SecurityProviders\SCHANNEL\Protocols\TLS 1.2\Client"
$regTLS12Server = "HKLM:\SYSTEM\CurrentControlSet\Control\SecurityProviders\SCHANNEL\Protocols\TLS 1.2\Server"
$regTLSDefault = "DisabledByDefault"
$regTLSValue = "0x00000000"
 $regTLSEnabled = "Enabled"
$regTLSEnableValue = "0x00000001"
# Для Windows x86
$test = test-path -path $reg32bWinHttp
if(-not($test)){
New-Item -Path $reg32bWinHttp
}
New-ItemProperty -Path $reg32bWinHttp -Name $regWinHttpDefault -Value $regWinHttpValue -PropertyType DWORD
# Для Windows x64
$test = test-path -path $reg64bWinHttp
if(-not($test)){
New-Item -Path $reg64bWinHttp
}
New-ItemProperty -Path $reg64bWinHttp -Name $regWinHttpDefault -Value $regWinHttpValue -PropertyType DWORD
New-Item -Path "HKLM:\SYSTEM\CurrentControlSet\Control\SecurityProviders\SCHANNEL\Protocols\TLS 1.2”
New-Item -Path $regTLS12Client
New-Item -Path $regTLS12Server
New-ItemProperty -Path $regTLS12Client -Name $regTLSDefault -Value $regTLSValue -PropertyType DWORD
New-ItemProperty -Path $regTLS12Client -Name $regTLSEnabled -Value $regTLSEnableValue -PropertyType DWORD
New-ItemProperty -Path $regTLS12Server -Name $regTLSDefault -Value $regTLSValue -PropertyType DWORD
New-ItemProperty -Path $regTLS12Server -Name $regTLSEnabled -Value $regTLSEnableValue -PropertyType DWORD
Перезагрузите компьютер:
Restart-Computer
Осталось включить поддержку TLS 1.2 для приложений .NET Framework. Для этого нужно в реестре включить принудительное использование системных протоколов шифрования для приложений .NET 3.5 и 4.x. Если вы используете старые версии NET Framework 4.5.1 или 4.5.2 на Windows Server 2012 R2/2012 или Windows 8.1, сначала установите последние обновления для .Net Framework 4.5.1 (они добавят поддержку TLS 1.2 в .Net).
Ниже указаны параметры реестра, которые нужно настроить для различных версий .Net:
для .Net 3.5 и 2.0
[HKEY_LOCAL_MACHINE\SOFTWARE\Microsoft\.NETFramework\v2.0.50727]
"SystemDefaultTlsVersions"=dword:00000001
[HKEY_LOCAL_MACHINE\SOFTWARE\Wow6432Node\Microsoft\.NETFramework\v2.0.50727]
"SystemDefaultTlsVersions"=dword:00000001
[HKEY_LOCAL_MACHINE\SOFTWARE\Microsoft\.NETFramework\v2.0.50727]
"SchUseStrongCrypto"=dword:00000001
[HKEY_LOCAL_MACHINE\SOFTWARE\Wow6432Node\Microsoft\.NETFramework\v2.0.50727]
"SchUseStrongCrypto"=dword:00000001
для .Net 4.х
[HKEY_LOCAL_MACHINE\SOFTWARE\Microsoft\.NETFramework\v4.0.30319]
"SystemDefaultTlsVersions"=dword:00000001
[HKEY_LOCAL_MACHINE\SOFTWARE\Wow6432Node\Microsoft\.NETFramework\v4.0.30319]
"SystemDefaultTlsVersions"=dword:00000001
для .Net 4.6
[HKEY_LOCAL_MACHINE\SOFTWARE\Microsoft\.NETFramework\v4.0.30319]
"SchUseStrongCrypto"=dword:00000001
[HKEY_LOCAL_MACHINE\SOFTWARE\Wow6432Node\Microsoft\.NETFramework\v4.0.30319]
"SchUseStrongCrypto"=dword:00000001
Например, без этих параметров вы не сможете подключиться к репозиториям PSGallery из консоли PowerShell на Windows Server 2012 R2 с ошибками:
- Install-Module: Unable to download from URI
- Unable to resolve package source
Проблема тут в в том, что по-умолчанию PowerShell пытается использовать протокол TLS 1.0 для подключения к PSGallery. С апреля 2020 года PowerShell Gallery разрешает подключение к NuGet провайдеру только с помощью TLS 1.2.
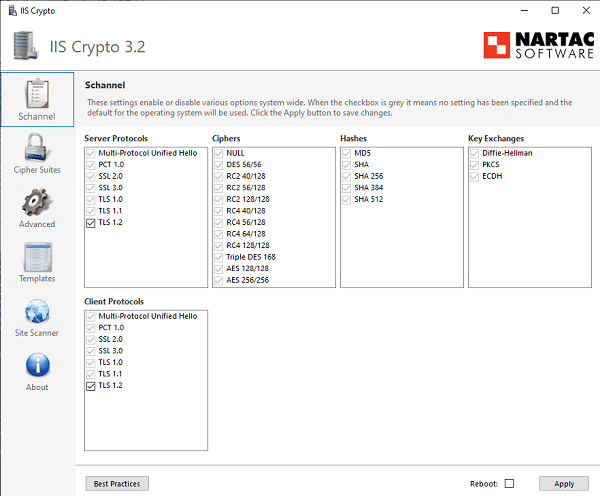
Также существует бесплатная утилита IISCrypto, которая позволяет включить/выключить различные протоколы TLS/SSL и настройки Schannel через графический интерфейс (https://www.nartac.com/Products/IISCrypto/). Здесь вы можете выбрать какие версии протоколов TLS хотите настроить. Если все галки напротив протоколов Schannel серые, значит в Windows используются стандартные настройки. В моем примере я включил протокол TLS 1.2 для клиента и сервера с помощью PowerShell скрипта, рассмотренного ранее. Утилита IISCrypto теперь показывает, что протокол TLS 1.2 включен вручную.
IISCrypto не позволяет изменить настройки TLS для .NET и WinHTTP.
For communication securities, Windows uses Transport Layer Security (TLS) protocols. With the help of TLS standard level authentication protocols, your Windows system can securely communicate to Internet websites. You can learn more and in detail about TLS on Wikipedia. Mainly there are 3 TLS protocol versions Windows have at the moment. These are TLS 1.0, TLS 1.1 and TLS 1.2 versions.
You can enable or disable either of these TLS protocol versions as per your requirement. There are two ways, in which you can configure TLS protocol settings on your Windows 10. Both ways are mentioned below, try them as per your convenience,
Page Contents
How To Configure TLS Settings In Windows 10
WAY 1 – Via Internet Properties
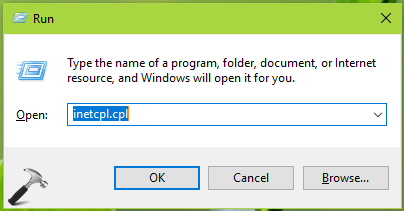
1. Press + R and type inetcpl.cpl in the Run dialog box, to open Internet Properties.
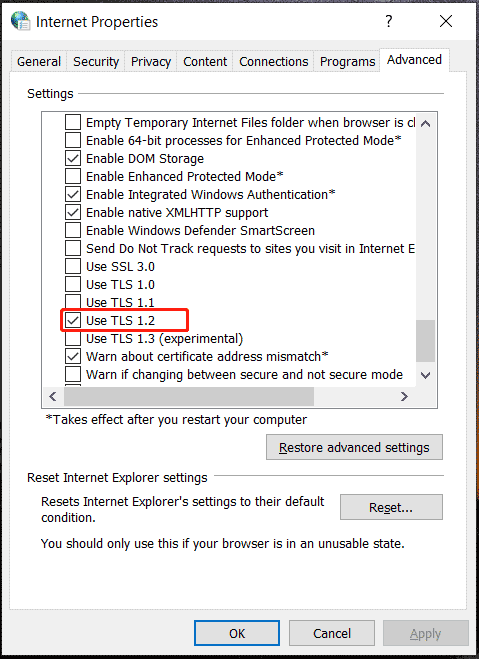
2. In Internet Properties window, switch to Advanced tab. Under Settings, scroll to Security heading. Beneath it, you’ll find Use TLS 1.0, Use TLS 1.1, Use TLS 1.2 options. You can enable/disable these options to allow/prevent corresponding TLS protocol.
3. Once you’re done with your selection, click Apply followed by OK to save your settings.
Now let us see, how to use registry to configure TLS settings on your Windows 10.
WAY 2 – Via Registry
Registry Disclaimer: The further steps will involve registry manipulation. Making mistakes while manipulating registry could affect your system adversely. So be careful while editing registry entries and create a System Restore point first.
1. Press + R and put regedit in Run dialog box to open Registry Editor (if you’re not familiar with Registry Editor, then click here). Click OK.

2. In left pane of Registry Editor window, navigate to following registry key:
HKEY_LOCAL_MACHINE\SYSTEM\CurrentControlSet\Control\SecurityProviders\SCHANNEL\Protocols
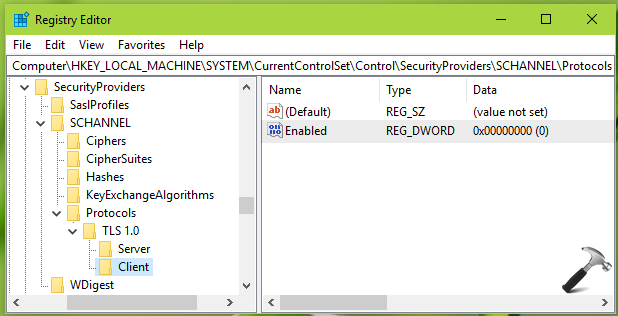
3. Right click Protocols registry key, select New > Key. Name the newly created sub-key as TLS 1.0. Similarly create two sub-keys to TLS 1.0 registry key and name them as Server and Client. Now in the right pane of Client registry key (HKEY_LOCAL_MACHINE\SYSTEM\CurrentControlSet\Control\SecurityProviders\SCHANNEL\Protocols\TLS 1.0\Client), right click and select New > DWORD Value. Name the newly created registry DWORD (REG_DWORD) as Enabled. Double click on this DWORD to modify its Value data:
4. Finally, set the Value data to 1 to enable TLS 1.0 protocol. Click OK. If you want to allow TLS 1.0 to server side as well, create Enabled registry DWORD and set it to 1, for Server registry key (HKEY_LOCAL_MACHINE\SYSTEM\CurrentControlSet\Control\SecurityProviders\SCHANNEL\Protocols\TLS 1.0\Client) as well.
5. You can follow similar way for other TLS protocols such as TLS 1.1 and TLS 1.2 versions. Create TLS 1.1, TLS 1.2 registry sub-keys to Protocols registry key, and then create Client, Server specific registry sub-keys and then add Enabled DWORD to control the corresponding TLS version. Once you’re done, close Registry Editor and make sure to reboot the machine to make changes effective.
TIP: You can configure SSL protocol versions (SSL 2.0, SSL 3.0) in the same way. However, SSL is now deprecated and it is predecessor of TLS. You can create SSL 2.0 and SSL 3.0 registry sub-keys to Protocols (HKEY_LOCAL_MACHINE\SYSTEM\CurrentControlSet\Control\SecurityProviders\SCHANNEL\Protocols) registry key. The proceed similarly for client and server specific registry sub-keys.
In this way, you can configure to TLS settings in Windows 10.
That’s it!
RELATED ARTICLES
-
Home
-
News
- How to Enable TLS 1.2 in Windows 10/11, Windows 7 & Server 2012
How to Enable TLS 1.2 in Windows 10/11, Windows 7 & Server 2012
By Vera | Follow |
Last Updated
Is TLS 1.2 enabled by default on Windows? How to enable TLS 1.2 Windows 10/11 and Windows 7 & Server 2012? The steps are different based on different systems. From this post, you can find details given by MiniTool.
What Is TLS
TLS, short for Transport Layer Security, is a cryptographic protocol to ensure communication security over a network in computing. It primarily secures the connection between a web application and a network using data encryption to prevent eavesdropping and tampering. TLS has multiple versions like TLS 1.0, TLS 1.1, TLS 1.2, and TLS 1.3 (the latest one currently).
Nowadays TLS 1.2 is the widely used version and today we will show you how to enable TLS 1.2 in some Windows versions.
Tips:
If you need to keep PC data secure, you can use MiniTool ShadowMaker to back up files. Just get this free backup software via the download button below.
MiniTool ShadowMaker TrialClick to Download100%Clean & Safe
Is TLS 1.2 Enabled by Default on Windows
Usually, protocol usage is controlled at 3 levels – the application level, the framework or platform level, and the operating system level.
At the operating system level (in Windows 11/10/8/1/Windows Server 2012R2/2016/2019/2022), TLS 1.2 is enabled by default. In some old Windows versions like Windows 7 and Windows Server 2012, they require you to configure some settings before enabling TLS 1.2. Windows Vista and XP don’t support TLS 1.2.
Sometimes the protocol may be disabled due to some reason and you need to re-enable it. See how to do it in the following part.
How to Enable TLS 1.2 Windows 11/10/7/Server
Enable TLS 1.2 Windows 10/11
If you are running Windows 10 or 11, follow these steps below to do this thing:
Step 1: Press Win + I to open Run, type inetcpl.cpl, and click OK to open the Internet Properties window.
Step 2: Under the Advanced tab, scroll down to find Use TLS 1.2. If it is not selected, check the box and tap on Apply. If you want to also enable TLS 1.3, check Use TLS 1.3.
Enable TLS 1.2 in Windows 7 and Server 2012
If you use a PC that runs an old version like Windows 7 or Server 2012, they don’t enable TLS 1.2 by default. You need to install the KB3140245 update and modify some registry values.
Tips:
Before editing Windows Registry, you had better create a restore point using the System Restore feature or back up registry keys since mistaken operations can lead to an unbootable PC.
Step 1: Visit https://catalog.update.microsoft.com/search.aspx?q=kb3140245, click the Download button based on your system architecture, and tap on the download link to get the installation file. Double-click on the .msu file to install this KB update.
Step 2: Open Windows Registry Editor by typing regedit to the search box.
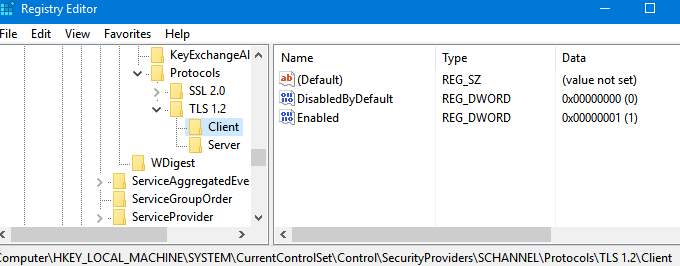
Step 3: Go to check if there is the registry key –HKEY_LOCAL_MACHINE\SYSTEM\CurrentControlSet\Control\SecurityProviders\SCHANNEL\Protocols\TLS 1.2\Client and see if its key DisabledByDefault has been set to 0. If not, you should create the Client folder and the DisabledByDefault DWROD value to configure it.
Besides, check HKEY_LOCAL_MACHINE\SYSTEM\CurrentControlSet\Control\SecurityProviders\SCHANNEL\Protocols\TLS 1.2\Servers and make sure Enabled is set to 1.

Step 4: To use TLS 1.2, you are required to add it to the default secure protocols list for WinHTTP.
Navigate to HKEY_LOCAL_MACHINE\SOFTWARE\Microsoft\Windows\CurrentVersion\Internet Settings\WinHttp or HKEY_LOCAL_MACHINE\SOFTWARE\Wow6432Node\Microsoft\Windows\CurrentVersion\Internet Settings\WinHttp. Then, verify the value of the DefaultSecureProtocols registry key (DWORD) is 0xAA0.
Step 5: Finally, install NET Framework like version 4.6 to support TLS 1.2. Just download it from this link – https://www.microsoft.com/en-US/download/details.aspx?id=48137. Then, double-click on this .exe file to install.
Verdict
That’s the detailed guide on how to enable TLS 1.2 in Windows 7/10/11 and Windows Server 2012. Follow the steps above to easily perform this task if you need. Hope this tutorial can help you a lot.
About The Author
Position: Columnist
Vera is an editor of the MiniTool Team since 2016 who has more than 7 years’ writing experiences in the field of technical articles. Her articles mainly focus on disk & partition management, PC data recovery, video conversion, as well as PC backup & restore, helping users to solve some errors and issues when using their computers. In her spare times, she likes shopping, playing games and reading some articles.
To enable TLS 1.2 on Windows 10, you can follow these steps:
1. Open the Control Panel
2. Click on “System and Security”
3. Select “Administrative Tools”
4. Double click on the “Local Security Policy” icon
5. Expand Local Policies and select Security Options
6. Scroll down to find “System cryptography: Use FIPS compliant algorithms for encryption, hashing and signing”
7. Right-click it, and choose Properties
8. Set it to ‘Enabled’
9. Scroll down to find “Protocols for TLS 1.2″
10 . Double click on it to open a window
11 . Check all of the boxes under Protocols for TLS 1.2 12 . Click OK once done 13 . Restart your computer for the settings to take effect It is also recommended that you keep your system updated with the latest security patches as this will help make sure that your system is secure against any potential threats or vulnerabilities that may arise in future versions of TLS protocols such as TLS 1.3
Is TLS 1.2 enabled by default on Windows 10?
How do I know if TLS 1.2 is enabled Windows 10?
To check whether TLS 1.2 is enabled on your Windows 10 device, you can follow these steps:
1. Open the Run command by pressing Windows key+R or right-clicking the Start menu and selecting Run.
2. Type “regedit” in the Run command window and press Enter to open the Registry Editor window.
3. Navigate to Computer\HKEY_LOCAL_MACHINE\SYSTEM\CurrentControlSet\Control\SecurityProviders\SCHANNEL\Protocols
4. Look for a subfolder called TLS 1.2, if it exists then TLS 1.2 is enabled on your machine, if not then it is disabled by default and must be enabled manually (see instructions below).
5. To enable TLS 1.2 manually create a new folder under Protocols called TLS 1.2 and add two DWORD values named Client and Server with value 0x00000300 for each of them respectively as shown in the screenshot below:
How do I enable TLS 1.2 and 1.3 in Windows 10?
Enabling TLS 1.2 and 1.3 in Windows 10 is a relatively simple process. To begin, open the Control Panel by typing ‘Control Panel’ into the Windows search bar and selecting the appropriate result. Once you have opened the Control Panel, select ‘Network & Internet’ then select ‘Internet Options’ from the list of options on the left-hand side of your screen. After that, select the ‘Advanced’ tab at the top of your screen and scroll down to find ‘Security’ in this menu. Here you will be able to enable TLS 1.2 and 1.3 by ticking both boxes next to their respective titles and clicking Apply at the bottom right of your screen before selecting OK to save these changes. It is important to note that some older applications may not support TLS 1.2 or higher so please make sure that any programs which require secure communication are tested after enabling it on your system before using them online or sending sensitive data over them as they may not function correctly with new versions of TLS enabled on your system due to compatibility issues between old applications and newer security protocols like TLS1.2/1.3
Where can I see if TLS 1.2 is enabled?
To determine if TLS 1.2 is enabled, you can use a website such as SSL Labs (https://www.ssllabs.com/ssltest/) to check the security of your website’s SSL/TLS configuration. This will provide detailed information on whether or not TLS 1.2 is enabled and what other protocols are being used in your configuration. You can also use the diagnostic tools available in web browsers such as Chrome, Firefox, Edge, and Safari to see what version of TLS is being used for a specific website. Additionally, you may be able to check server logs or ask your hosting provider directly to determine which version of TLS is enabled on your server environment.
Where is TLS settings in Windows 10?
The TLS settings in Windows 10 can be found by navigating to the Control Panel, then clicking on Network and Internet, followed by Network and Sharing Center. From there, you can click on Change Adapter Settings and select your active network connection. Right-click on the connection and choose Properties. In the properties window, scroll down until you find Internet Protocol Version 4 (TCP/IPv4) or Internet Protocol Version 6 (TCP/IPv6). Select either of those options then click Properties again to open another window. Finally, scroll down to find an option for «Advanced» in which you will see an entry for TLS settings.
Is TLS 1.2 automatically enabled?
No, TLS 1.2 is not automatically enabled; however, it can be enabled by following a few simple steps. First, check your system configuration to make sure that TLS 1.2 is supported. If it is supported, you can then install and configure the related security protocols for your web server or other application. Additionally, ensure that any applications on your system are updated with the latest version of TLS 1.2 as well as any relevant patches and updates from the vendor. Finally, test your configuration to ensure everything is working correctly before making it live in production environments.
How do I check my TLS settings?
In order to check your TLS settings, you will need to first make sure that you have the necessary software installed on your local machine. Once the software is installed, use a tool like OpenSSL to connect to a remote server and run a TLS handshake. During this handshake, the remote server will provide information about its TLS configuration and settings. Additionally, you can verify your settings by running an online scan such as SSL Labs’ SSL Server Test (https://www.ssllabs.com/ssltest/). This test will analyze the server’s configuration and give you detailed results about any potential security or compatibility issues with regards to TLS protocol versions, cipher suites and other related components. Finally, if you are still unsure of what steps to take or how best to configure your system for optimal performance and security, it is recommended that you consult with an experienced IT professional who can guide you through the process.
How to disable SSL 2.0 and 3.0 and enable TLS 1.2 in Windows?
In order to disable SSL 2.0 and 3.0 and enable TLS 1.2 in Windows, you will need to make a few changes in the registry editor. Please note that making any changes in the registry can have an effect on your system’s performance, so it is important to create a backup of the registry before proceeding with these steps:
1. Open the Run dialog box (Windows Key + R) and type “regedit” and press Enter. This will open up the Registry Editor window.
2. Navigate to HKEY_LOCAL_MACHINE\SYSTEM\CurrentControlSet\Control\SecurityProviders \SCHANNEL
3. Expand SCHANNEL by double-clicking on it and then right-click on Protocols folder present inside SCHANNEL folder > New > Key
4. Name this new key as TLS 1.2
5. Select this newly created TLS 1.2 key and right-click it > New > DWORD (32-bit) Value
6. Name this new value as Enabled and set its data value to 0x00000001 (hexadecimal). This will enable TLS 1.2 protocol security support for your Windows system
7. Now scroll down further inside SCHANNEL folder until you reach Protocols subfolder present there
8 .Inside Protocols subfolder select SSL 2,0 folder if present there, right click it > Delete
9 .Similarly delete SSL 3,0 folder from Protocols subfolder if present there 10 .Now close the Registry Editor window by clicking File > Exit option from Menu bar 11 .Restart your computer for these changes to take effect 12 Once computer reboots check if all versions of SSL are disabled & TLS version 1 is enabled or not using command prompt by typing “Schannel” & pressing enter