
Enabling secure boot on Windows 11 Gigabyte is a straightforward process that involves accessing the BIOS settings on your computer. You’ll need to locate and modify the secure boot option to ensure that your system boots securely, protecting it from potential risks such as malware and viruses. Let’s dive in and get your system secured!
Before we start with the steps, it’s important to know that enabling secure boot helps in preventing unauthorized software from running during the system startup process. This feature is particularly essential to maintain the integrity of your operating system.
Step 1: Enter the BIOS settings
Power on your computer and press the «Del» key on your keyboard to enter the BIOS settings.
The BIOS key may vary depending on the manufacturer. For Gigabyte motherboards, it’s usually the «Del» key, but it can also be the «F2» or «F10» key. Make sure to press the key repeatedly as soon as your computer starts up to access the BIOS.
Step 2: Navigate to the Boot menu
Use the arrow keys to navigate to the «Boot» menu within the BIOS settings.
The «Boot» menu is typically located in the top menu bar or within the advanced settings options. Once you’ve located it, you can use the arrow keys to highlight the option and press «Enter».
Step 3: Enable Secure Boot
Find the «Secure Boot» option and change the setting to «Enabled».
The «Secure Boot» option might be within a sub-menu called «Security» or «Boot Options». Once you’ve found it, you may need to press «Enter» to modify the setting and then use the arrow keys to change it to «Enabled».
Step 4: Save and exit the BIOS
Save your settings and exit the BIOS by pressing the «F10» key and selecting «Yes» to confirm.
Make sure you save the settings before exiting, or the changes will not take effect. Confirm any prompts that appear to ensure a proper save and exit procedure.
Once you’ve completed these steps, your computer will boot with secure boot enabled, offering enhanced security for your system.
What Happens After Enabling Secure Boot
After enabling secure boot, your Windows 11 Gigabyte computer will only boot with software that has been signed by Microsoft or the hardware manufacturer. This adds an extra layer of security to your system, reducing the risk of boot-time malware infections.
Tips for Enabling Secure Boot on Windows 11 Gigabyte
- Make sure your operating system and drivers are up to date before enabling secure boot.
- If you’re having trouble accessing the BIOS, consult the user manual for your Gigabyte motherboard for specific instructions.
- Disable CSM (Compatibility Support Module) if it’s enabled, as it may interfere with secure boot.
- Remember to backup your important data before making changes to the BIOS settings.
- If you experience issues after enabling secure boot, such as hardware not working properly, you may need to update your device drivers to versions that support secure boot.
Frequently Asked Questions
What is Secure Boot?
Secure Boot is a security standard that helps ensure that your PC boots using only software that is trusted by the PC manufacturer.
Can I still boot from a USB drive with Secure Boot enabled?
Booting from a USB drive is still possible with secure boot enabled, but the drive must contain software that is signed and recognized by the motherboard’s firmware.
Can enabling Secure Boot cause any issues?
In some cases, enabling secure boot can cause issues with hardware or software that isn’t compatible. But these issues can usually be resolved with updates or driver installations.
What if I can’t find the Secure Boot option in my BIOS?
If you can’t find the secure boot option, your motherboard may not support it, or it may be located in a different section of the BIOS. Refer to your motherboard’s manual for guidance.
How do I disable Secure Boot if I need to?
To disable secure boot, you’ll follow similar steps to access the BIOS settings, navigate to the secure boot option, and change the setting to «Disabled».
Summary
- Enter the BIOS settings.
- Navigate to the Boot menu.
- Enable Secure Boot.
- Save and exit the BIOS.
Conclusion
Enabling secure boot on Windows 11 Gigabyte is a key step in safeguarding your computer against unauthorized software and potential threats. By following the simple steps outlined in this article, you can easily adjust your BIOS settings and enjoy a more secure boot process. Remember to keep your system up to date and always back up your data before making changes to your BIOS. With secure boot enabled, you’ll have the peace of mind knowing that your system is protected right from the start. If you have any doubts or run into issues, don’t hesitate to consult your motherboard’s manual or reach out to Gigabyte’s customer support for assistance. Happy computing, and stay secure!
Matt Jacobs has been working as an IT consultant for small businesses since receiving his Master’s degree in 2003. While he still does some consulting work, his primary focus now is on creating technology support content for SupportYourTech.com.
His work can be found on many websites and focuses on topics such as Microsoft Office, Apple devices, Android devices, Photoshop, and more.
Ensuring the security of your Windows 11 Gigabyte system is of utmost importance in today’s digital landscape. One effective way to enhance security is by enabling Secure Boot on your Windows 11 Gigabyte device. Secure Boot is a feature that ensures only trusted software can run during the boot process, protecting your computer from malicious software and unauthorized access.
To enable Secure Boot on your Windows 11 Gigabyte system, you first need to access the UEFI settings. Restart your computer and repeatedly press the designated key to enter the UEFI setup, which is typically Del, F2, or F12. Once you’re in the UEFI settings, navigate to the «Security» or «Boot» section, depending on your motherboard model. Look for the «Secure Boot» option and set it to «Enabled.» Save your changes and exit the UEFI setup. Congratulations! You have successfully enabled Secure Boot on your Windows 11 Gigabyte system, enhancing its security.
To enable Secure Boot on a Gigabyte motherboard running Windows 11, follow these steps:
- Restart your computer and enter the BIOS settings by pressing the designated key (usually Del or F2) during startup.
- Navigate to the «Security» or «Boot» tab in the BIOS menu.
- Find the «Secure Boot» or «UEFI Secure Boot» option and enable it.
- Save your changes and exit the BIOS setup.
- Restart your computer.

Introduction to Secure Boot in Windows 11 with Gigabyte Motherboard
Secure Boot is a feature in Windows 11 that helps protect your system from malware and unauthorized operating systems during the boot process. With Secure Boot enabled, your computer will only boot with trusted software and drivers that have a valid signature from the manufacturer. This ensures that your system is secure and helps prevent malicious code from running at startup.
If you have a Gigabyte motherboard and are looking to enable Secure Boot on Windows 11, this guide will walk you through the process step by step. Secure Boot is an essential security measure and is highly recommended for all Windows 11 users. By following these instructions, you can enhance the security of your system and protect against unauthorized access and potential threats.
1. Check Compatibility and BIOS Version
Before enabling Secure Boot on your Gigabyte motherboard, it’s crucial to ensure that your system meets the compatibility requirements for Windows 11 and that you have the latest BIOS version installed. Secure Boot requires UEFI firmware and a compatible BIOS version to function correctly.
To check if your system is compatible with Windows 11, you can use the PC Health Check tool provided by Microsoft. This tool will assess your system’s hardware and provide information on its compatibility with Windows 11. If your system meets the requirements, you can proceed with enabling Secure Boot.
Additionally, it’s essential to ensure that your Gigabyte motherboard has the latest BIOS version installed. BIOS updates often include improvements, bug fixes, and enhanced compatibility. Visit the Gigabyte website and navigate to the support section for your specific motherboard model to download and install the latest BIOS version.
Once you have confirmed compatibility with Windows 11 and updated your BIOS, you’re ready to proceed with enabling Secure Boot.
1.1 Check Windows 11 Compatibility
Windows 11 has specific hardware requirements that must be met for the operating system to work correctly. To check your system’s compatibility, follow these steps:
- Download and install the PC Health Check tool from the official Microsoft website.
- Launch the PC Health Check tool.
- Click on the «Check now» button to start the compatibility assessment.
- The tool will analyze your system and provide information on whether it meets the requirements for Windows 11.
1.2 Update BIOS to the Latest Version
Updating your Gigabyte motherboard’s BIOS to the latest version is necessary to ensure compatibility with Windows 11 and to enable Secure Boot. Here’s how to update your BIOS:
- Visit the Gigabyte website and navigate to the support section for your motherboard model.
- Download the latest BIOS version for your motherboard.
- Extract the downloaded file to a USB drive.
- Restart your computer and access the BIOS settings by pressing the appropriate key during startup (usually Del, F2, or F12).
- In the BIOS settings, navigate to the BIOS update section. The exact location and interface may vary depending on your motherboard model.
- Select the option to update the BIOS from a USB drive.
- Choose the file you extracted earlier from the USB drive.
- Follow the on-screen instructions to complete the BIOS update process.
Once you have successfully updated the BIOS, you can proceed with enabling Secure Boot on your Gigabyte motherboard.
2. Enable Secure Boot in UEFI BIOS
Once you have confirmed compatibility with Windows 11 and updated your BIOS, you can proceed with enabling Secure Boot in the UEFI BIOS settings of your Gigabyte motherboard. Here’s how to do it:
Note: The exact steps may vary slightly depending on your Gigabyte motherboard model and BIOS version, but the overall process should be similar.
Follow these steps to enable Secure Boot:
- Restart your computer and access the UEFI BIOS settings by pressing the appropriate key during startup (usually Del, F2, or F12).
- In the BIOS settings, navigate to the Security or Boot section.
- Locate the option for Secure Boot and set it to Enabled.
- If available, select the option to Enable Secure Boot with Custom Keys or Custom Mode.
- Save the changes and exit the BIOS settings.
After enabling Secure Boot, your Gigabyte motherboard will only boot with trusted operating systems and software that have a valid signature. This helps protect your system from malware and unauthorized access during the boot process.
2.1 Configuring Secure Boot with Custom Keys or Custom Mode
Some Gigabyte motherboards may offer additional options to configure Secure Boot with Custom Keys or Custom Mode. These options allow you to specify trusted keys or customize the Secure Boot behavior. Here’s how to configure Secure Boot with Custom Keys or Custom Mode:
- Access the UEFI BIOS settings of your Gigabyte motherboard.
- In the BIOS settings, navigate to the Security or Boot section.
- Locate the option for Secure Boot and set it to Enabled.
- Select the option for Custom Keys or Custom Mode.
- Follow the on-screen instructions to import or manage trusted keys or customize Secure Boot settings.
- Save the changes and exit the BIOS settings.
3. Installation and Verification of Secure Boot
After enabling Secure Boot in your Gigabyte motherboard’s UEFI BIOS settings, it’s essential to verify its installation and ensure that it is functioning correctly. Here’s how to validate Secure Boot:
Note: These steps are for informational purposes and may vary depending on your system configuration.
To verify Secure Boot installation:
- Restart your computer and access the UEFI BIOS settings.
- Navigate to the Security or Boot section.
- Locate the Secure Boot option and check that it is still set to Enabled.
- Ensure that the Secure Boot Mode is set to Standard or Custom Mode, depending on your configuration.
- Review any additional settings related to Secure Boot and customize them if necessary.
- Save the changes and exit the BIOS settings.
Once you have verified that Secure Boot is enabled and correctly configured, your Gigabyte motherboard will only boot with trusted operating systems and software, providing an additional layer of security.
3.1 Troubleshooting Secure Boot Issues
In some cases, enabling Secure Boot on a Gigabyte motherboard may cause compatibility issues or prevent the system from booting correctly. If you encounter any problems after enabling Secure Boot, here are some troubleshooting steps you can try:
- Check for BIOS updates: Visit the Gigabyte website and download the latest BIOS version for your motherboard. Updating the BIOS can often resolve compatibility issues with Secure Boot.
- Reset BIOS settings: If you have made other changes in the BIOS settings, try resetting them to their default values. This can help resolve conflicts and ensure a clean configuration for Secure Boot.
- Disable Secure Boot: If the issues persist, you may need to disable Secure Boot temporarily until a solution becomes available. However, keep in mind that this will lower the security level of your system.
- Seek professional assistance: If you are unsure about the process or encounter persistent issues, it may be helpful to consult an expert in Gigabyte motherboards or contact Gigabyte’s customer support for further assistance.
Conclusion
Enabling Secure Boot on your Gigabyte motherboard is an effective way to enhance the security of your system and protect against unauthorized access and malicious software during the boot process. By following the steps outlined in this guide, you can ensure that only trusted operating systems and software are allowed to run on your system, providing peace of mind and a higher level of security.

Enabling Secure Boot on Gigabyte Windows 11
Secure Boot is a feature in Windows 11 that enables the system to load only digitally signed and trusted software during the boot process. To enable Secure Boot on a Gigabyte motherboard running Windows 11, follow these steps:
- Access the BIOS or UEFI settings by restarting your computer and pressing the appropriate key (usually Del, F2, or F12).
- Navigate to the «Security» or «Boot» section of the BIOS/UEFI settings.
- Locate the «Secure Boot» option and set it to «Enabled».
- Save your changes and exit the BIOS/UEFI settings.
- Reboot your computer.
- After restarting, Windows 11 should detect that Secure Boot is enabled and automatically configure the necessary components.
Please note that the steps may vary slightly depending on your Gigabyte motherboard model and BIOS/UEFI version. It is always recommended to refer to your motherboard’s user manual or Gigabyte’s support website for specific instructions tailored to your system.
Key Takeaways: How to Enable Secure Boot Windows 11 Gigabyte
- Secure Boot is a security feature that helps protect your computer from unauthorized software.
- Gigabyte is a popular motherboard manufacturer that provides the option to enable Secure Boot.
- To enable Secure Boot on a Gigabyte motherboard, you need to access the BIOS settings.
- In the BIOS settings, navigate to the «Boot» or «Security» section to find the Secure Boot option.
- Once you find the Secure Boot option, enable it and save your changes before exiting the BIOS settings.
Frequently Asked Questions
Here are some commonly asked questions related to enabling Secure Boot on Windows 11 Gigabyte:
1. What is Secure Boot in Windows 11 Gigabyte?
Secure Boot is a security feature in Windows 11 Gigabyte that ensures only trusted and authorized operating systems and bootloaders are loaded during the boot process. It helps protect against malware and unauthorized modifications to the system.
To enable Secure Boot, follow the steps below:
2. How do I access the Secure Boot settings in Windows 11 Gigabyte?
To access the Secure Boot settings in Windows 11 Gigabyte, follow these steps:
1. Restart your computer and enter the BIOS or UEFI settings by pressing the required key during startup (typically, Del or F2).
2. Navigate to the «Boot» or «Security» section (the exact name may vary).
3. Look for the «Secure Boot» option and select it.
4. Enable Secure Boot by switching it from «Disabled» to «Enabled».
5. Save the changes and exit the BIOS or UEFI settings.
3. Can I enable Secure Boot on any Gigabyte motherboard with Windows 11?
Secure Boot is supported by most modern Gigabyte motherboards. However, it’s important to check the motherboard’s specifications or consult the user manual to confirm if Secure Boot is available and supported.
If your motherboard supports Secure Boot, you can follow the steps mentioned earlier to enable it.
4. What are the benefits of enabling Secure Boot on Windows 11 Gigabyte?
Enabling Secure Boot on Windows 11 Gigabyte provides the following benefits:
1. Protection against unauthorized modifications to the boot process and system files.
2. Improved security against malware and other malicious software.
3. Ensures that only trusted and authorized operating systems and bootloaders are loaded.
4. Adds an additional layer of security to your system.
5. Are there any drawbacks to enabling Secure Boot on Windows 11 Gigabyte?
Enabling Secure Boot on Windows 11 Gigabyte does come with some potential drawbacks:
1. Compatibility issues with older operating systems or bootloaders that may not be signed or certified.
2. Difficulty in troubleshooting and fixing boot-related issues due to the increased security measures.
However, in most cases, the benefits of enabling Secure Boot outweigh the potential drawbacks.
To enable Secure Boot on Gigabyte motherboards running Windows 11, follow these steps:
- Access the BIOS settings by restarting your computer and pressing the designated key (usually Del, F2, or F12) during bootup.
- Navigate to the «Security» tab in the BIOS menu.
- Select «Secure Boot» or «UEFI Secure Boot» and set it to «Enabled».
- Save the changes and exit the BIOS settings.
By enabling Secure Boot on your Gigabyte motherboard, you add an extra layer of security to your Windows 11 system. This feature ensures that only trusted and digitally signed operating system and driver software are allowed to boot, protecting your computer from unauthorized access and malicious software.
Enabling Secure Boot on a Gigabyte motherboard for Windows 11 ensures that your system only runs trusted software. First, access the BIOS settings by restarting your computer and pressing the DEL key. Then, navigate to the Secure Boot option and enable it. Lastly, save your settings and reboot your computer.
Before diving in, know that enabling Secure Boot ensures your computer only loads trusted software, increasing overall security.
Step 1: Restart Your Computer
Restart your computer to access the BIOS settings.
When you restart your PC, watch closely. As soon as the Gigabyte logo appears, start pressing the DEL key repeatedly. If done correctly, you’ll enter the BIOS settings menu.
Step 2: Access BIOS Settings
Press the DEL key during startup to enter BIOS settings.
Entering BIOS can be tricky if you’re not quick enough. If you miss it, don’t worry; just restart and try again. Once in, you’ll find yourself in a blue or black screen with plenty of options.
Step 3: Navigate to the BIOS Features Tab
Go to the BIOS Features tab using the arrow keys.
In the BIOS menu, use the arrow keys to navigate. Look for the “BIOS Features” tab—it’s usually at the top. This tab holds the settings we need to adjust.
Step 4: Find and Select Secure Boot
Locate Secure Boot and set it to Enabled.
Once you’re in the BIOS Features tab, scroll down to find the “Secure Boot” option. It might be nested under another setting like CSM (Compatibility Support Module). Change the Secure Boot setting from Disabled to Enabled.
Step 5: Save and Exit
Save changes and exit the BIOS settings.
Press F10 to save your changes and exit. Your computer will restart, and Secure Boot will be enabled.
After completing these steps, your computer will only load trusted software, ensuring greater security. You might notice that some old or unsigned software won’t run. If you face issues, you can always go back and disable Secure Boot.
Tips for Enabling Secure Boot on Windows 11 Gigabyte
- Double-check Compatibility: Ensure your motherboard and graphics card support Secure Boot.
- Update BIOS: An outdated BIOS can cause issues. Update it to the latest version from Gigabyte’s website.
- Backup Data: Before tweaking BIOS settings, it’s a good idea to back up important data.
- Avoid Multiple Changes: Only change Secure Boot settings and avoid altering other settings unless necessary.
- Consult Manual: Your motherboard manual can provide specific instructions for your model.
Frequently Asked Questions
Can I enable Secure Boot without entering BIOS?
No, you need to access the BIOS settings directly to enable Secure Boot.
What if I can’t find the Secure Boot option?
Ensure your BIOS is updated. Sometimes, older versions might not have the Secure Boot option.
Will enabling Secure Boot erase my data?
No, enabling Secure Boot won’t erase any data on your storage drives.
Can I disable Secure Boot if needed?
Yes, you can disable Secure Boot by accessing the BIOS settings and adjusting the Secure Boot option.
Why is Secure Boot important for Windows 11?
Secure Boot increases security by ensuring only trusted software and drivers load during startup, which is a requirement for Windows 11.
Summary
- Restart your computer.
- Access BIOS settings by pressing the DEL key.
- Navigate to the BIOS Features tab.
- Find and enable Secure Boot.
- Save and exit.
Conclusion
Enabling Secure Boot on a Gigabyte motherboard for Windows 11 might seem like a tech-heavy task, but it’s more straightforward than you think. By following these steps, you can ensure your system operates with enhanced security, keeping malicious software at bay. So, take a few minutes to tweak these settings and enjoy a more secure computing experience.
Not only does this simple change help meet Windows 11’s security requirements, but it also adds a robust layer of protection to your daily activities. If you’re curious about more ways to optimize your system, consider reading up on additional BIOS features or exploring other security measures you can implement. Happy computing!
Matthew Burleigh has been writing tech tutorials since 2008. His writing has appeared on dozens of different websites and been read over 50 million times.
After receiving his Bachelor’s and Master’s degrees in Computer Science he spent several years working in IT management for small businesses. However, he now works full time writing content online and creating websites.
His main writing topics include iPhones, Microsoft Office, Google Apps, Android, and Photoshop, but he has also written about many other tech topics as well.
Read his full bio here.
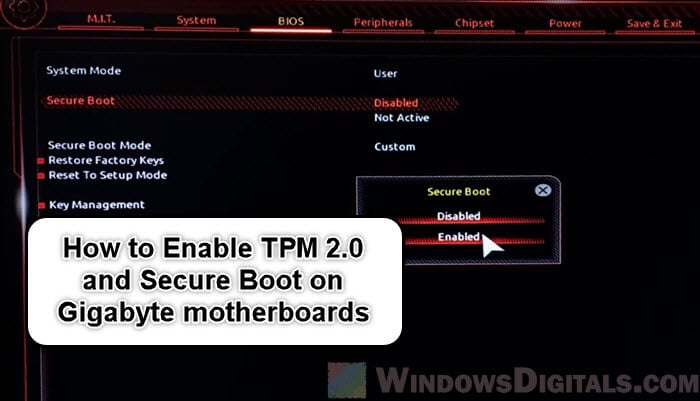
Turning on TPM 2.0 (Trusted Platform Module) and Secure Boot are sometimes needed for certain software or games (like Riot’s Valorant) to actually be able to launch and work. They are generally some security features that slowly becoming the norm for most computers. However, these options are not enabled by default. In this guide, we’ll show you how to enable TPM 2.0 and Secure Boot on your Gigabyte motherboard.
Also see: How to Enable TPM 2.0 and Secure Boot on ASRock
What actually are TPM 2.0 and Secure Boot?
Trusted Platform Module (TPM) 2.0 is a hardware-based security feature that protects your data and makes sure your computer only starts up with trusted hardware.
Secure Boot is another feature in your computer’s UEFI that checks each piece of software before allowing it to run when you start your computer. This helps stop harmful software, like viruses or ransomware, from getting in during the boot process.
Many modern apps, especially games from Riot like Valorant, need these security settings to work or even launch. They help ensure the game operates in a safe environment, free from cheats or hacks that could spoil the game for others.
Learn more: Can’t find TPM 2.0 and Secure Boot options in BIOS?
Open the UEFI Settings on a Gigabyte motherboard
The first step to enable TPM 2.0 and Secure Boot on a Gigabyte motherboard is to access the UEFI settings. UEFI (Unified Extensible Firmware Interface) is the upgraded version of the old BIOS system, and is the place for your motherboard’s settings.
- Start by restarting your computer. You need to press a specific key during the initial boot phase to enter the UEFI settings.
- Keep an eye out for a message that tells you which key to press to enter the UEFI settings as your computer restarts. On most Gigabyte motherboards, this is usually the Del key. Press it repeatedly as soon as your computer starts up. If you miss the correct timing and your operating system begins to load, just restart and try again.
- Once you’ve successfully entered the UEFI settings, you’ll see a graphical interface that is much more user-friendly than the old BIOS interfaces. You’ll use your keyboard and possibly your mouse to navigate through various settings.

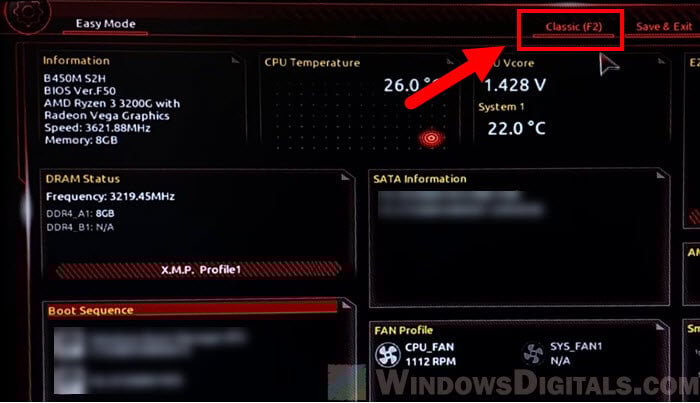
- If you’re not seeing the screen as shown in the screenshot above, and you’re on the screen called “Easy Mode”, click on “Classic” or press F2.

The UEFI interface can differ slightly depending on your specific Gigabyte motherboard model. If you find yourself unsure of where to go next, you should check your motherboard’s manual for specific guidance (you can download its soft copy manual from the manufacturer’s website).
Related resource: How to Uninstall & Disable Gigabyte App Center from BIOS
How to turn on TPM 2.0 on your Gigabyte motherboard
After getting into the UEFI settings, follow the steps below to enable TPM 2.0 on your Gigabyte motherboard.
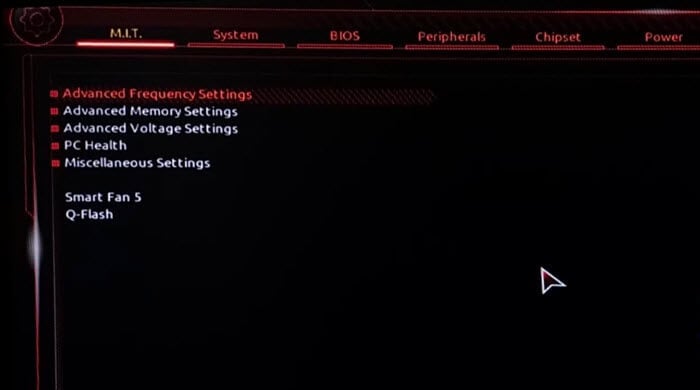
- In the UEFI interface, find a tab or option in the UEFI menu called “Peripherals.” It might also be called “Security,” “Advanced,” or something similar. This is where you’ll usually find the TPM settings. If you can’t find it, check your motherboard’s manual for help.
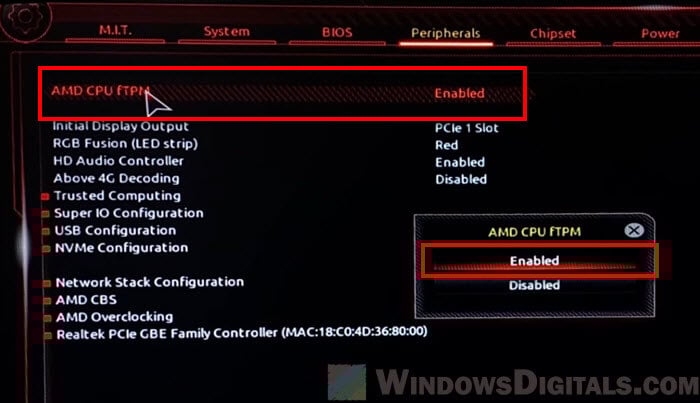
- Look for an option called “AMD CPU fTPM,” “TPM Device,” “TPM Security,” or “Intel PTT” if you have an Intel processor. Change this setting to “Enabled.”
- After turning on TPM, if you need to enable Secure Boot as well, go to the next step. If not, make sure to save your settings. You usually do this by pressing F10 or choosing “Save & Exit” from the UEFI menu. Your computer will restart with TPM 2.0 turned on.
If you’re using an older Gigabyte motherboard and can’t find TPM 2.0, you might need to update your BIOS/UEFI firmware. Check the Gigabyte website for updates if TPM 2.0 doesn’t appear in the settings but you’re sure it supports it.
Pro tip: In-place Upgrade of Windows 11 on Unsupported Hardware
How to enable Secure Boot on a Gigabyte motherboard
After turning on TPM 2.0, the next step is to enable Secure Boot on your Gigabyte motherboard. Secure Boot is a UEFI feature that makes sure your PC only boots software that the motherboard manufacturer trusts. This option is sometimes required for some apps or games like Valorant to work. The following steps will show you how to activate Secure Boot.
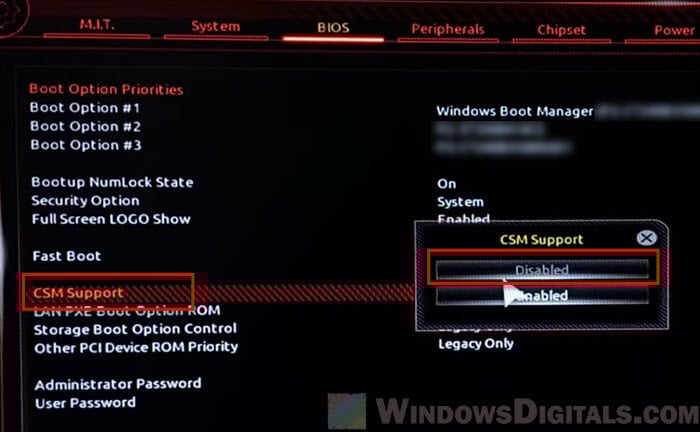
- In the UEFI settings, find the “BIOS” tab or a similar section.
- In the BIOS options, find the “CSM Support” setting and set it to “Disabled“.

- This change is necessary to make the Secure Boot option available.

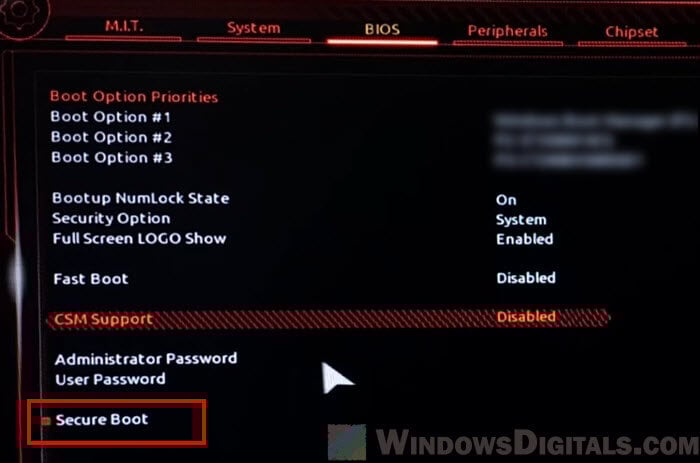
- Change the “Secure Boot” setting from “Disabled” to “Enabled“.

- If you can’t change the Secure Boot setting, save and exit, then restart your computer. Return to the same UEFI setting to activate it.

- Like with the TPM setting, remember to save your changes. This is usually done by pressing F10 or selecting “Save Changes and Exit” from the Exit menu. Your computer will reboot with Secure Boot turned on.


You should also know that, in some cases, turning on Secure Boot might cause issues with older operating systems or software that aren’t UEFI compliant. If you’re using a dual-boot system or older software, check that everything is compatible with Secure Boot before turning it on.
Linked issue: Virtualbox Windows 11: This PC doesn’t meet the requirements
Some final notes
One of the main reasons why you need to enable TPM 2.0 and Secure Boot on your Gigabyte motherboard is to make sure your PC is compatible with games and apps that require them. This is especially true for games that always try to reduce cheating and hacking, such as Valorant – a popular FPS genre game.
This requirement isn’t just limited to gaming, some modern software also relies on those security features to work. The purpose is just all about protecting data and being safe from hacking and other bad stuff.
Thus, even if you don’t play any of these games or use any app that requires them, turning on TPM and Secure Boot should generally help make your computer even safer.
Одним из системных требований Windows 11 является наличие безопасной загрузки Secure Boot. Эта функция является частью UEFI и предназначена для проверки запускаемых операционных систем. Secure Boot проверяет цифровую подпись и в случае ошибки блокирует загрузку ОС. Это позволяет защититься от некоторых видов вредоносных программ и контролировать список ОС, которые могут загружаться на компьютере.
После анонса Windows 11 начали интересоваться включением данной опции, чтобы подготовить компьютер к обновлению до новой операционной системы. В этой статье мы расскажем, как включить Secure Boot в BIOS на материнских платах Gigabyte и Gigabyte AORUS.
Для работы Secure Boot диск должен быть в формате GPT. Поэтому, перед включением Secure Boot нужно проверить формат диска и если диск в MBR, то его нужно сконвертировать в GPT. Подробнее:
- Как узнать в каком формате жесткий диск MBR или GPT
- Как преобразовать MBR в GPT в Windows 10
Процесс включения Secure Boot может сильно отличаться от одной материнской платы к другой. Точную информацию для вашей конкретной материнской платы можно получить в инструкции. Ниже мы рассмотрим несколько типичных вариантов для BIOS на платах Gigabyte и Gigabyte AORUS.
Для того чтобы включить Secure Boot на материнских платах Gigabyte или Gigabyte AORUS нужно зайти в настройки BIOS и открыть раздел «BOOT» или «BIOS». Содержимое этих разделов похожее, но в зависимости от модели платы, название может отличаться.


Дальше нужно отключить функцию «CSM Support» если она включена. CSM или Compatibility Support Module – это функция эмуляции старого BIOS, позволяющая загружать операционную систему с жестких дисков с разметкой MBR. Без отключения CSM вы не сможете включить Secure Boot.

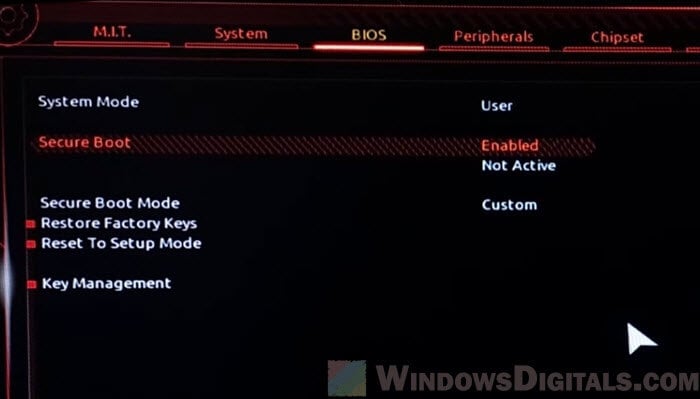
После этого нужно открыть раздел «Secure Boot». Обратите внимание, если функция «CSM Support» включена, то раздел «Secure Boot» может не отображаться в меню.

И включить опцию «Secure Boot Enable». После этого необходимо сохранить настройки BIOS и перезагрузить компьютер.

После включение Secure Boot можно проверить ее состояние с помощью программы «Сведения о системе», которая доступна в Windows 10. Для этого нажмите комбинацию клавиш Win-R и выполните команду «msinfo32».

В открывшемся окне нужно найти строки «Режим BIOS» и «Состояние безопасной загрузки». Если все было сделано правильно, то здесь должно быть указано «UEFI» и «Включено», как на скриншоте вверху.
Возможно вам будет интересно:
- Как включить TPM 2.0 в BIOS на GIGABYTE и AORUS.
Посмотрите также:
- Как проверить совместимость компьютера с Windows 11
- Что такое Secure Boot для Windows 11
- Программа для проверки совместимости с Windows 11
- Запуск Windows 11 на этом компьютере невозможен
- Как включить Secure Boot в BIOS на MSI
Автор
Александр Степушин
Создатель сайта comp-security.net, автор более 2000 статей о ремонте компьютеров, работе с программами, настройке операционных систем.
Остались вопросы?
Задайте вопрос в комментариях под статьей или на странице
«Задать вопрос»
и вы обязательно получите ответ.