
Все способы:
- Шаг 1: Проверка функций
- Статус Secure Boot
- Статус TPM-модуля
- Шаг 2: Активация функций
- Включение Secure Boot
- Включение TPM
- Шаг 3: Настройка технологии шифрования ОС
- Вопросы и ответы: 5
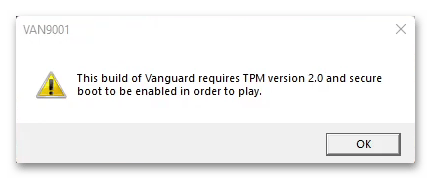
Обратите внимание! Окно с ошибкой «VAN 9001» обычно появляется на компьютерах с ОС Windows 11 и сообщает о том, что безопасная загрузка и доверенный платформенный модуль, необходимые для запуска Valorant, отключены. Мы разделим инструкцию по решению этой проблемы на несколько шагов, но если какой-нибудь из них вы уже выполнили, пропустите его.
Шаг 1: Проверка функций
TPM-модуль и Secure Boot должны быть на всех компьютерах с Windows 11, где запускается Valorant. И даже несмотря на то, что эти требования можно обойти прямо во время установки системы, технологию безопасности «Vanguard», видимо, не обманешь, а значит, в первую очередь нужно убедиться, что компьютер поддерживает эти функции, а заодно проверить их текущий статус.
Статус Secure Boot
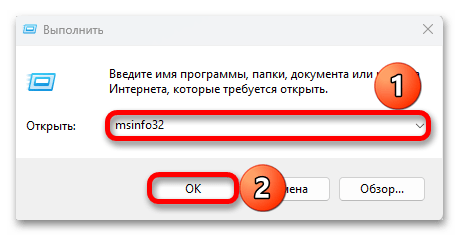
- Нажимаем «Windows+R», вводим команду
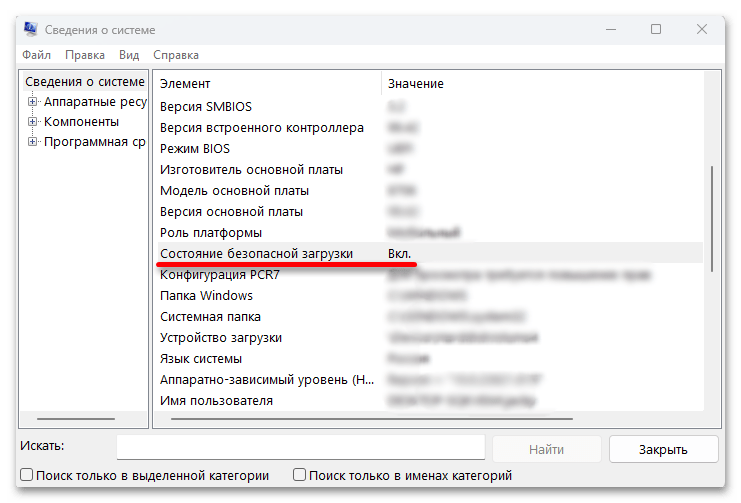
msinfo32и жмем «Enter». - В открывшемся окне находим позицию «Состояние безопасной загрузки» и смотрим статус справа от нее. У нас функция активна, но если у вас она выключена, переходите к следующему шагу.
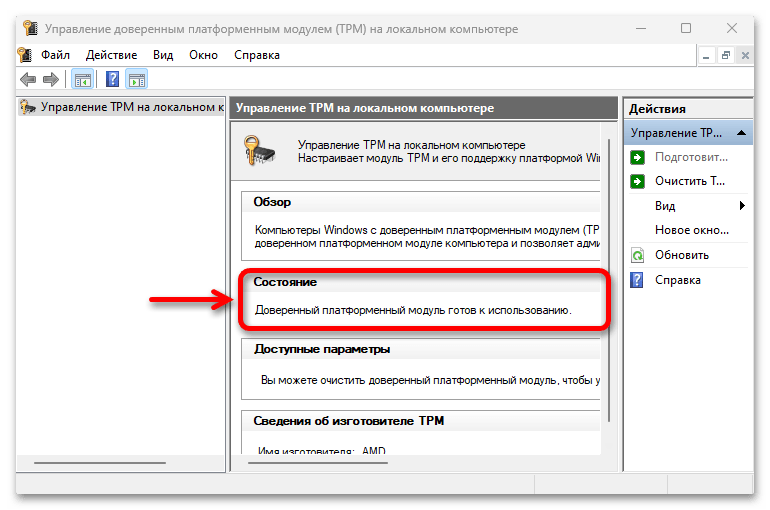
Статус TPM-модуля
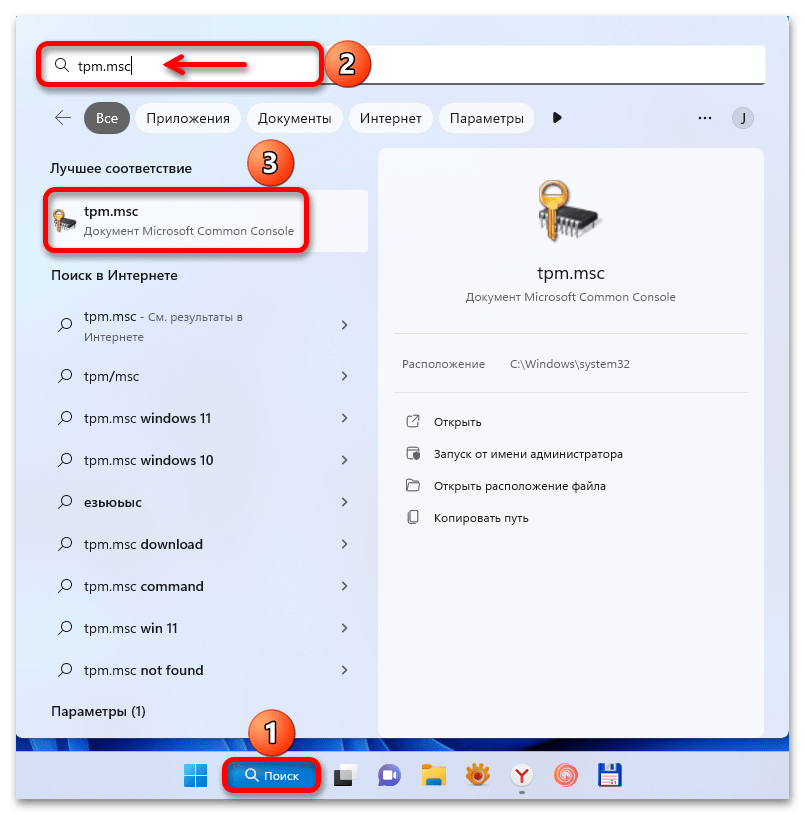
- В поиске Виндовс 11 вводим
tpm.mscи открываем консоль. - Проверяем состояние доверенного модуля. Скриншот ниже показывает ситуацию, когда он включен. Если TPM 2.0 не обнаружен, значит, он не поддерживается или его нужно включить в BIOS.
Шаг 2: Активация функций
Включение технологий будем рассматривать на примере ноутбука HP, но и в моделях других брендов нужно будет действовать похожим образом.
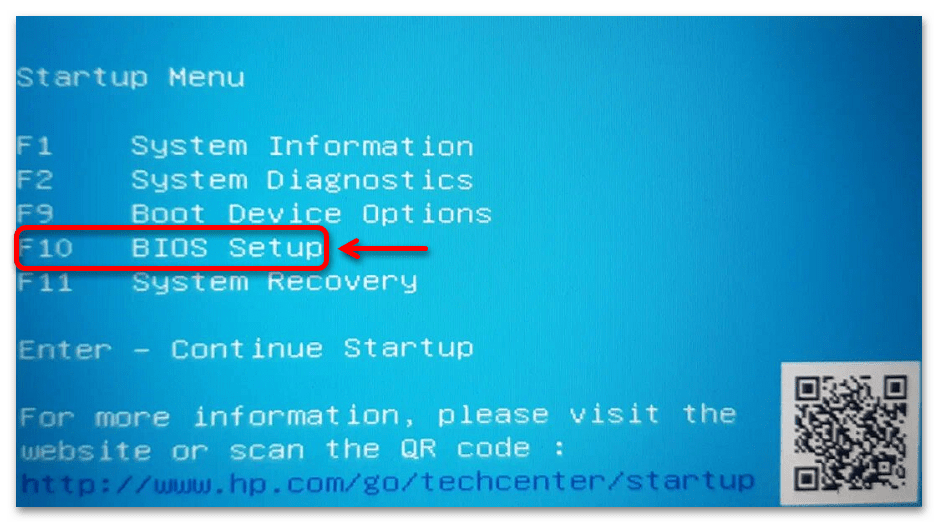
В обоих случаях необходимо войти в BIOS. На нашем устройстве это делается через загрузочное меню. Перезагружаем систему, несколько раз жмем клавишу «Esc», а затем «F10».
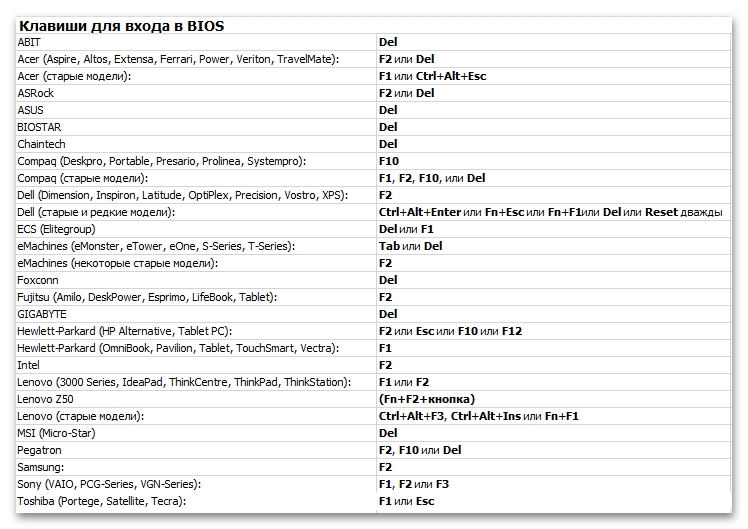
На других ноутбуках и персональных компьютерах процедура будет немного отличаться. Получить подробную информацию можно на сайте производителя или в наших специальных статьях на эту тему.
Подробнее:
Как попасть в BIOS на компьютере
Как попасть в BIOS на ноутбуке
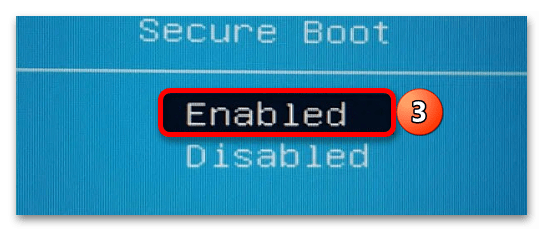
Включение Secure Boot
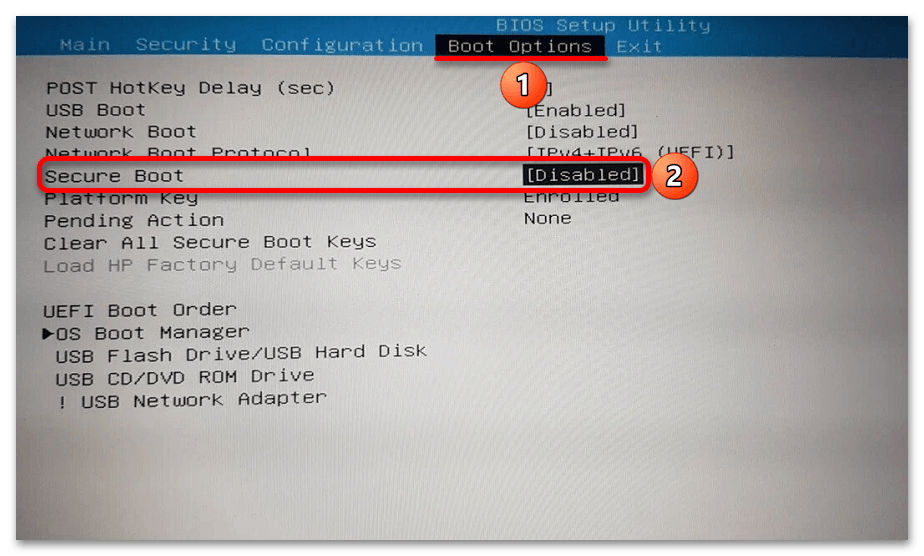
- Учитывая, что Secure Boot защищает устройство от запуска несанкционированных образов, следует в первую очередь искать разделы «Boot Option», «Security» и т.д. Если стоит значение «Disabled», как на скриншоте ниже, вызываем меню функции

и включаем ее.
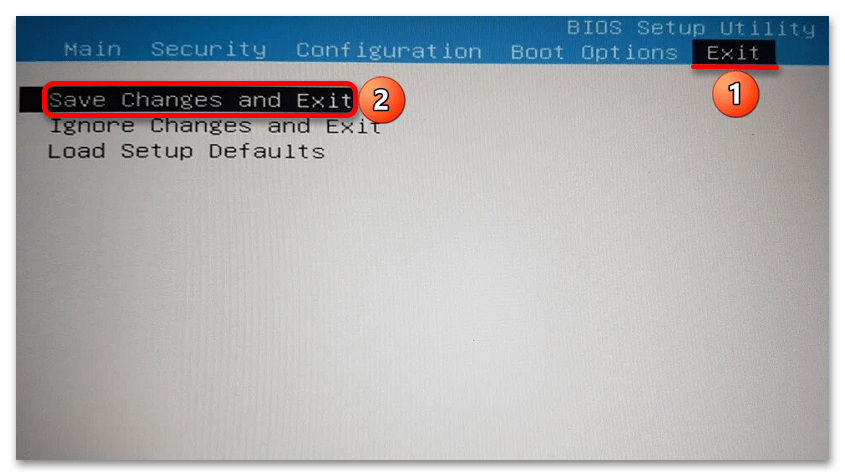
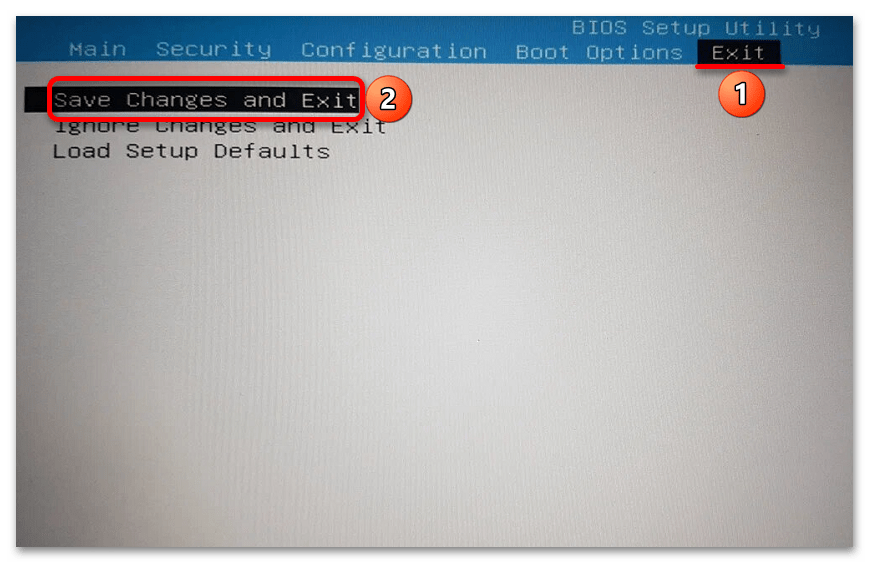
- Теперь переходим во вкладку «Exit», которая должна быть во всех BIOS/UEFI, жмем «Save Changes and Exit»

и подтверждаем перезагрузку в штатном режиме.

Если вы до сих пор не нашли, как включить безопасную загрузку, вам может пригодиться наша статья с инструкциями по ее отключению на ноутбуках разных производителей и материнской плате Gigabyte.
Подробнее: Как отключить Secure Boot в BIOS
Включение TPM
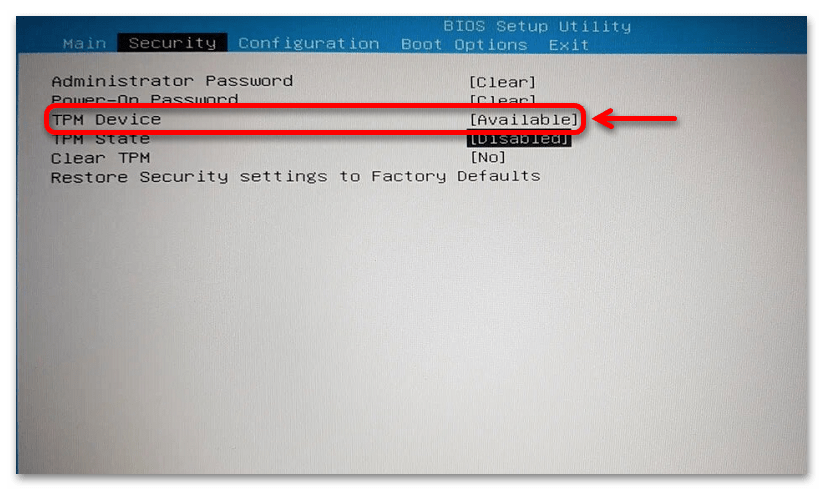
- Trusted Platform Module – еще одно средство обеспечения безопасности компьютера, поэтому также ищем раздел «Security» или что-то похожее. Если обнаружите пункт «TPM Device» со значением «Hidden», значит, опция управления доверенным модулем скрыта. В этом случае выбираем эту запись, нажимаем «Enter» и устанавливаем значение «Available».
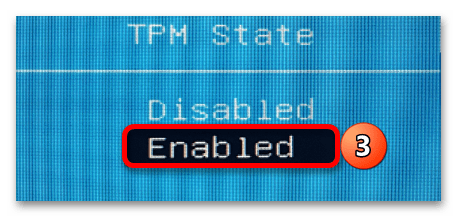
- В любом случае ищем пункт «TPM State», «Security Chip», «fTPM», «Trusted Platform Module» и похожие,

а затем убеждаемся, что установлено значение «Enabled».
- После этого сохраняем изменения и перезагружаем ПК.

Если вы самостоятельно не нашли, как включить TPM 2.0, подробные инструкции, а также информация о поддержке модуля должны быть на официальном сайте производителя вашего ноутбука или материнской платы.
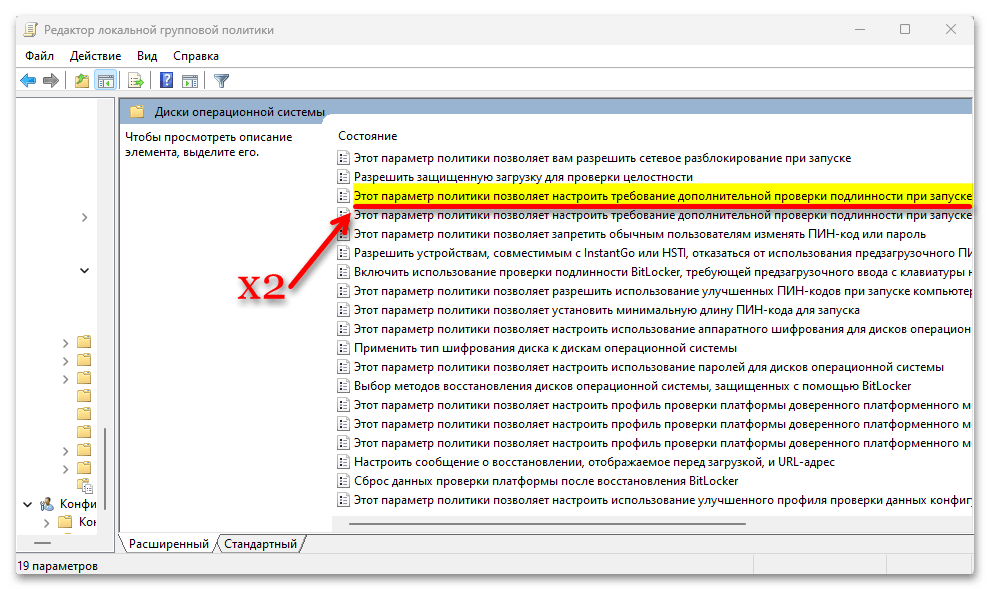
Шаг 3: Настройка технологии шифрования ОС
Обычно после первых двух шагов все начинает работать, но бывают случаи, когда даже при включенном в BIOS TPM-модуле Windows, а, следовательно, и Vangard не могут его определить. Этот способ подходит только для системы версии «PRO» и выше, так как функция шифрования «Битлокер» и «Редактор локальной групповой политики», где будем менять ее параметры, домашнее издание не поддерживает.
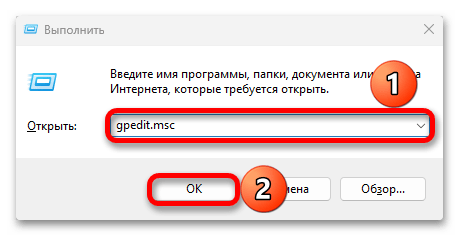
- Снова вызываем оснастку «Выполнить» («Windows+R») вводим
gpedit.mscи нажимаем «OK».
Читайте также: Запуск «Редактора локальной групповой политики» в Windows 11
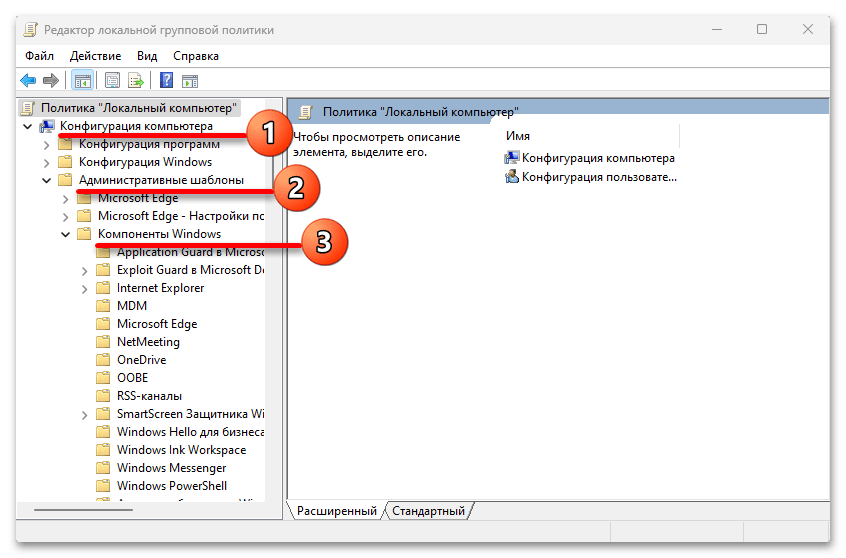
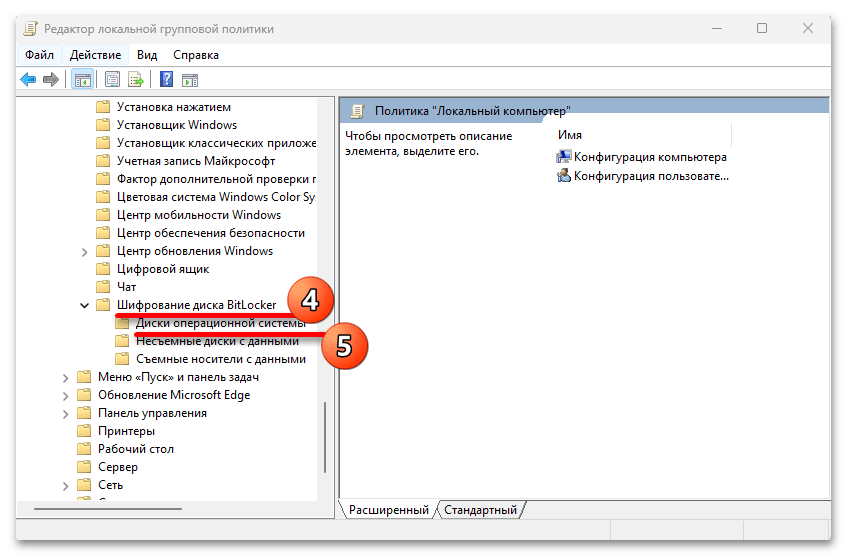
- Переходим в раздел с компонентами Windows так, как показано на скриншоте ниже:
Конфигурация компьютера/Административные шаблоны/Компоненты Windows
находим папку «Шифрование диска Битлокер» и кликаем «Диски операционной системы».
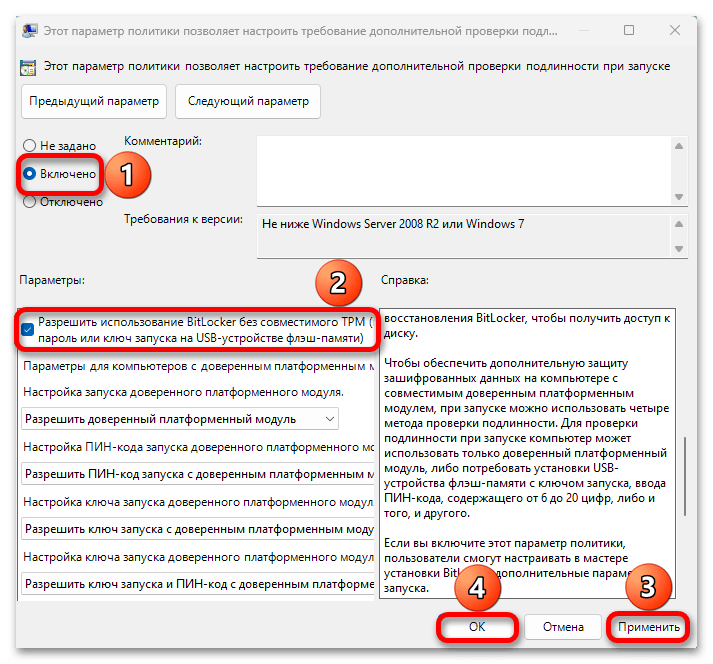
- Здесь нас интересует параметр для настройки требования дополнительной проверки подлинности при загрузке. Находим его и открываем двойным кликом.
- Включаем опцию, затем в ее параметрах ниже разрешаем использовать Битлокер без совместимого TPM-модуля, принимаем новые настройки, закрываем окно, сам «Редактор» и перезагружаем ОС.
Наша группа в TelegramПолезные советы и помощь
Enabling Secure Boot for Valorant in Windows 11 ensures that your PC meets the security standards required to play this popular game. You need to go into your BIOS settings and make a few changes. Here’s a quick guide on how to get it done.
These steps will guide you through enabling Secure Boot on your Windows 11 computer so you can dive into Valorant without any security issues.
Step 1: Access BIOS Settings
To start, restart your computer and press the key specific to your manufacturer (usually F2, F12, Delete, or Esc) to enter BIOS.
The key you need to press might appear briefly during startup, but you can also check your computer’s manual or search online for your specific model.
Step 2: Navigate to the Boot Menu
Once you’re in the BIOS, use the arrow keys to find the Boot menu or tab.
The Boot menu can have different names depending on your BIOS version, but it’s usually labeled «Boot» or «Advanced Boot Options.»
Step 3: Enable UEFI Mode
Step 3: Switch the boot mode from Legacy to UEFI.
UEFI mode is necessary for Secure Boot, so make sure you select it if it isn’t already selected.
Step 4: Enable Secure Boot
Find the Secure Boot option and set it to «Enabled.»
This option might be under the Security or Boot tab, depending on your BIOS. Just look for the term «Secure Boot.»
Step 5: Save and Exit
Press the key to save changes and exit BIOS (usually F10).
Your computer will restart, and Secure Boot will be enabled, setting your system up to meet Valorant’s security requirements.
After completing these actions, your computer will restart, and Secure Boot will be enabled. You’ll be able to play Valorant without encountering any security-related issues.
Tips for Enabling Secure Boot for Valorant in Windows 11
- Make sure your BIOS is up-to-date to avoid any compatibility issues.
- If you can’t find the Secure Boot option, check your motherboard’s manual or manufacturer’s website for guidance.
- Be cautious while navigating BIOS settings to avoid unintentional changes.
- Always save your BIOS settings before exiting to ensure changes take effect.
- If your computer doesn’t restart correctly, you can always revert the changes by re-entering BIOS.
Frequently Asked Questions
What is Secure Boot?
Secure Boot is a security feature that ensures only trusted software runs during your computer’s startup.
Why do I need Secure Boot for Valorant?
Valorant requires Secure Boot to ensure a fair and secure gaming environment by preventing cheating software.
What if I can’t find the Secure Boot option?
Consult your motherboard manual or the manufacturer’s website, as BIOS layouts can vary widely.
Will enabling Secure Boot affect my other programs?
No, it should not affect the performance or functionality of other programs.
Can I disable Secure Boot after enabling it for Valorant?
Yes, but you may encounter issues when trying to play Valorant if Secure Boot is disabled.
Summary
- Restart and press the BIOS key.
- Navigate to the Boot menu.
- Switch to UEFI mode.
- Enable Secure Boot.
- Save and exit.
Conclusion
Enabling Secure Boot in Windows 11 for Valorant is a straightforward process that ensures your gaming experience remains secure and fair. By following the steps outlined in this guide, you’ll not only meet Valorant’s security requirements but also bolster your system’s overall safety.
Taking a few moments to navigate your BIOS settings and enabling Secure Boot can make a significant difference in your gaming experience. This action doesn’t just help with Valorant but also offers additional protection against malicious software at startup.
For more detailed information on BIOS settings or other security features, consider looking into your computer’s specific setup. Remember, staying secure while gaming is just as important as your in-game strategies. So, secure that boot and get ready to head into battle with peace of mind!
Matt Jacobs has been working as an IT consultant for small businesses since receiving his Master’s degree in 2003. While he still does some consulting work, his primary focus now is on creating technology support content for SupportYourTech.com.
His work can be found on many websites and focuses on topics such as Microsoft Office, Apple devices, Android devices, Photoshop, and more.
Enabling Secure Boot for Windows 11 and Valorant ensures that your system only runs firmware trusted by your PC manufacturer, enhancing security. To enable Secure Boot, you’ll need to access your BIOS settings, toggle the Secure Boot option, and save the changes. Here’s a simple guide to help you through the process.
Step-by-Step Tutorial: Enabling Secure Boot for Windows 11 Valorant
Enabling Secure Boot involves accessing your PC’s BIOS and making a few adjustments. Follow these steps to ensure your system is secure and ready to run Valorant without issues.
Step 1: Restart Your PC
Start by restarting your computer.
Restarting your computer is the first step because accessing the BIOS settings usually requires you to enter a specific key during the boot-up process. Keep an eye on the screen for the prompt indicating the key to press, often Del, F2, F10, or Esc.
Step 2: Enter BIOS/UEFI Settings
Press the required key to enter BIOS/UEFI settings during the boot-up.
BIOS settings are where you can make fundamental changes to your computer’s configuration. This step is crucial as it allows you to navigate to the Secure Boot option. Be prepared to press the key multiple times if you miss it on the first try.
Step 3: Navigate to Secure Boot Option
Locate the Secure Boot option in the BIOS menu.
Once inside the BIOS, you’ll need to use the arrow keys to navigate through the menus. The Secure Boot option is typically found under the “Security,” “Boot,” or “Authentication” tab, depending on your BIOS version.
Step 4: Enable Secure Boot
Change the Secure Boot option to “Enabled.”
Enabling Secure Boot ensures that your system only runs trusted firmware. Use the Enter key to select the Secure Boot option and change its status to “Enabled.” This action adds an extra layer of protection against malware and unauthorized code.
Step 5: Save and Exit BIOS
Save your changes and exit the BIOS.
After enabling Secure Boot, you need to save your settings. Look for the “Save & Exit” option, typically found in the exit tab of the BIOS menu. Confirm your changes, and your PC will reboot with Secure Boot enabled.
After completing these steps, your system will be more secure, and you should be able to play Valorant on Windows 11 without any Secure Boot-related issues.
- Backup Your Data: Before making any BIOS changes, it’s always a good idea to back up your important files.
- Update BIOS: Ensure your BIOS is up-to-date to avoid any compatibility issues.
- Check Compatibility: Not all motherboards support Secure Boot; check your motherboard’s manual.
- Use Manufacturer’s Resources: Consult your PC manufacturer’s website for specific instructions if you encounter issues.
- Seek Professional Help: If unsure, consider seeking help from a professional to avoid misconfiguring BIOS settings.
Frequently Asked Questions
What is Secure Boot?
Secure Boot is a security feature that helps prevent unauthorized firmware, operating systems, or drivers from loading during the startup process.
Why do I need to enable Secure Boot for Valorant?
Valorant’s anti-cheat system, Vanguard, requires Secure Boot to ensure a secure environment, minimizing cheating and hacking risks.
Can I disable Secure Boot after enabling it?
Yes, you can disable Secure Boot by returning to the BIOS and changing the setting back to “Disabled,” but this may affect your system’s security.
Will enabling Secure Boot affect my system’s performance?
No, enabling Secure Boot does not impact your system’s performance. It only affects the startup process to ensure security.
What if my BIOS doesn’t have a Secure Boot option?
If your BIOS lacks a Secure Boot option, your system might be too old to support it. Consider updating your hardware to meet modern security standards.
Summary
- Restart your PC.
- Enter BIOS/UEFI settings.
- Navigate to Secure Boot option.
- Enable Secure Boot.
- Save and exit BIOS.
Conclusion
Enabling Secure Boot for Windows 11 to run Valorant not only ensures compliance with the game’s security requirements but also enhances your system’s overall protection. Taking these steps might seem daunting at first, but they are relatively straightforward once you dive in. It’s like locking the front door of your house; you wouldn’t want just anyone waltzing in, right?
For further reading, you might want to check out your motherboard’s manual or the manufacturer’s website, as they often provide detailed, model-specific instructions. And if you run into a snag, there’s no shame in asking for help—better safe than sorry. So, go ahead and secure your system; your gaming experience will be much smoother and safer for it!
Matthew Burleigh has been writing tech tutorials since 2008. His writing has appeared on dozens of different websites and been read over 50 million times.
After receiving his Bachelor’s and Master’s degrees in Computer Science he spent several years working in IT management for small businesses. However, he now works full time writing content online and creating websites.
His main writing topics include iPhones, Microsoft Office, Google Apps, Android, and Photoshop, but he has also written about many other tech topics as well.
Read his full bio here.
For countless PC gamers, VALORANT has become one of the most compelling tactical shooters on the market. Riot Games’ free-to-play title consistently draws millions of active players, largely thanks to its competitive depth, regular content updates, and a robust anti-cheat mechanism known as Vanguard. Yet, while the game is a technical marvel in many ways, those running it on Windows 11 have recently been beset by a confounding roadblock: the enigmatic VAN9003 error. As it turns out, this stubborn issue is more about system security than software bugs, catching even seasoned users by surprise after a routine upgrade to Microsoft’s latest operating system.

What Is the VAN9003 Error in VALORANT?
The VAN9003 error typically rears its head during attempts to launch VALORANT on a PC running Windows 11. While users on Windows 10 rarely—if ever—encountered this code, the Windows 11 landscape has made it a frequent topic of discussion within gaming forums and social media circles. The stark message provided by Vanguard, VALORANT’s anti-cheat tool, offers little guidance, simply announcing that the system is “not meeting security requirements.” For users, this is both confusing and frustrating, especially since the game often ran flawlessly prior to the OS upgrade.
After some investigation, experts and affected gamers have pinpointed VAN9003’s cause: one, or both, of the system’s core security features—Secure Boot and TPM 2.0—are disabled or unavailable. These settings, while familiar to enterprise users, have only recently entered mainstream gaming consciousness thanks to the widespread adoption of Windows 11, which requires both for full functionality.
What Are Secure Boot and TPM 2.0?
To grasp the root of the problem, it’s critical to understand what Secure Boot and TPM 2.0 actually do:
- Secure Boot: An essential UEFI feature, Secure Boot ensures only trusted operating systems can load during PC startup. It helps prevent bootkits and other malicious software from taking control before Windows itself even loads. Most motherboards shipped within the past five to six years support Secure Boot, although it’s not always activated by default.
- TPM 2.0 (Trusted Platform Module): This cryptographic security chip manages encryption keys and bolsters system integrity against low-level attacks. Because Windows 11 mandates TPM 2.0 for installation, most modern PCs include the chip. However, it often needs manual activation via UEFI firmware settings (formerly known as BIOS).
Vanguard, Riot’s anti-cheat system, leverages both Secure Boot and TPM 2.0 to prevent sophisticated cheat loaders from operating before or during game launch. If either is disabled, VAN9003 is triggered and gameplay is blocked.
Why Windows 11 and Not Windows 10?
Windows 10 did not require TPM 2.0 or Secure Boot on a hardware level, which is why most VALORANT players never encountered VAN9003 in the previous OS era. With Windows 11’s arrival, Microsoft prioritized a “zero-trust” approach, elevating hypervisor-protected code integrity and baseline security requirements. Vanguard embraced these changes to uphold the competitive integrity of VALORANT, making the game unplayable without these two features enabled.
As a result, upgrading to Windows 11 frequently “wakes up” dormant hardware requirements. Users often report that VALORANT worked seamlessly on their rig minutes before upgrading, only to be met with VAN9003 on reboot—even though the game itself hasn’t changed.
Diagnosing VAN9003: Are You Affected?
You’ll see the VAN9003 error if Secure Boot or TPM 2.0 are disabled, incorrectly configured, or unavailable on your motherboard. The symptoms typically present as follows:
- VALORANT launches Vanguard, then abruptly halts, displaying the recurring VAN9003 message.
- System information tools or Windows Security settings indicate Secure Boot and TPM 2.0 are “Off,” “Disabled,” or missing.
It’s important to note that console players (Xbox and PlayStation) and most Windows 10 users are exempt. VAN9003 is a Windows 11-specific issue, a point confirmed in official Riot support documentation and echoed by reputable technology outlets.
For those affected, hardware age is rarely the issue unless their motherboard predates 2016 or is otherwise incompatible. In that scenario, a hardware upgrade may be necessary—though this is considered a last resort.
How to Fix VAN9003: Step-by-Step Solution
The most effective remedy for VAN9003 is enabling Secure Boot and TPM 2.0. While this may seem daunting for those unfamiliar with firmware interfaces, the process is relatively straightforward with a bit of guidance.
1. Restart Your PC
Simple but essential. Begin by fully restarting your system, ensuring no residual system processes or updates interfere with BIOS access.
2. Enter BIOS/UEFI Firmware
During system reboot, immediately press the designated BIOS key (usually F2, F10, F11, F12, or Delete—your motherboard’s manual or splash screen will specify). Persistence is crucial: timing is everything in catching this narrow window before Windows boots.
3. Enable Secure Boot
Within the firmware menu:
- Navigate to the «Boot» or «Boot Options» tab.
- Locate the Secure Boot setting.
- Set it to Enabled.
- If the option is grayed out, check that your system is set to use UEFI (Unified Extensible Firmware Interface) rather than legacy BIOS. Switching to UEFI may require reinstalling Windows—a consideration to weigh carefully.
4. Enable TPM 2.0
- Move to the “Security,” “Advanced,” or “Trusted Computing” tab.
- Find TPM, Intel Platform Trust Technology (for Intel), or AMD fTPM (for AMD).
- Ensure it’s activated (“Enabled”).
- Some older boards label it as “Security Device Support.” Confirm that this is set to On.
5. Verify Boot Protocol is UEFI
Secure Boot only works in UEFI mode—not in Legacy or Compatibility Support Module (CSM) mode. Adjust this setting if prompted.
6. Save and Exit
After making changes, save your settings (usually via F10) and confirm the reboot. Your PC will restart with Secure Boot and TPM 2.0 now enabled.
7. Attempt to Launch VALORANT
Upon returning to Windows, start VALORANT. If the settings were correctly applied, the game should now launch—bypassing the VAN9003 error.
Troubleshooting Tips
- If these settings don’t appear, consult a guide or user video specific to your motherboard brand (ASUS, MSI, Gigabyte, ASRock, etc.).
- Some systems hide advanced options by default. You may need to activate “Advanced Mode” or supply an administrator password.
- For PCs built before 2015, motherboard limitation may necessitate hardware upgrades to meet requirements.
What If You Still See VAN9003?
- Double-check that both Secure Boot and TPM 2.0 are in fact enabled. Windows Device Security (findable from the Start Menu) can confirm this status.
- Ensure all Windows and motherboard firmware updates have been applied.
- If changes within BIOS/UEFI fail to save, your motherboard’s CMOS battery could be failing—or UEFI firmware might be corrupted.
- Uninstall and reinstall Vanguard, as remnants of misconfigured startup settings can linger even after a successful hardware change.
- Consider a clean install of Windows 11 set to UEFI mode.
Alternate Options for Affected Players
For users who simply cannot meet VAN9003’s demands—whether due to legacy hardware or technical barriers—other avenues for enjoying VALORANT remain:
- VALORANT Mobile (Pre-Registration): Riot is actively developing a mobile version, allowing gamers to keep playing on smartphones or tablets.
- Console Versions: The game is now available on Xbox and PlayStation, with full cross-progression and cosmetic carryover, minimizing disruption to your in-game experience.
While these options may not suit purists who prefer mouse-and-keyboard precision, they enable continued access to the VALORANT ecosystem while you plan a system upgrade.
A Critical Examination of Secure Boot and TPM 2.0 Requirements
Key Strengths
1. Enhanced Cheating Deterrence
Secure Boot and TPM 2.0 together provide a formidable barrier against advanced cheat loaders, which often attempt to compromise systems before or during the OS boot process. By leveraging Microsoft’s baseline security posture and integrating it with its own proprietary systems, Riot Games has set a new standard for anti-cheat rigor—mirrored by competitors like Easy Anti-Cheat and BattleEye in select titles.
2. System Integrity Beyond Gaming
The implementation of these technologies extends beyond gaming: Secure Boot and TPM 2.0 contribute to more resilient protection against bootkits, ransomware, and credential theft for all users, not just gamers. As cyberattacks grow ever more sophisticated, this is a net positive for the broader Windows 11 user base.
3. Future-Proofing the Competitive Ecosystem
By enforcing these requirements, Riot Games helps future-proof its competitive integrity, minimizing disruptions from known vectors of system-level attack. This alignment with Microsoft’s vision of “zero-trust security” amplifies VALORANT’s reputation as a fair, secure, and progressive esports platform.
Potential Risks and Drawbacks
1. Exclusion of Older Hardware
Not every gaming enthusiast has the latest motherboard or UEFI firmware. Players using slightly older but otherwise performant systems may discover that their hardware simply cannot meet the Secure Boot and TPM 2.0 benchmarks, forcing them into costly upgrades or out of the community altogether. While unavoidable as technology marches forward, this can be a bitter pill for cash-strapped or eco-conscious users.
2. Complex Configuration Barriers
Entering a system’s BIOS/UEFI firmware to toggle obscure settings can be terrifying for newcomers. A single misclick risks unbootable configurations or data loss, underscoring the importance of thorough research and, where possible, seeking the guidance of experienced hands or manufacturer support. Potential damage from misconfigured settings cannot be discounted.
3. Transitional Frustration
For many, the sudden appearance of VAN9003 after an otherwise smooth upgrade to Windows 11 feels both arbitrary and opaque. The sparse error messaging from Vanguard compounds frustration, and players may not know where to begin unless they find a reliable step-by-step guide or official Riot Games support resources.
4. Privacy and Trust Debates
Requiring system-level security features induces a necessary conversation around privacy, vendor trust, and platform neutrality. While Secure Boot and TPM 2.0 have proven their worth in enterprise and security contexts, some advanced users remain wary of technologies that limit system customization or cede control to third-party root-of-trust authorities.
Official Statements and Community Consensus
Both Riot Games and Microsoft have publicly articulated the necessity of Secure Boot and TPM 2.0 to protect against increasingly sophisticated threats—both to games and the operating system more broadly. Riot’s support channels and release notes make clear their commitment to enforcing VAN9003 as a baseline requirement, citing game fairness and user safety as primary motivators.
Independent testing by technology journalists and enthusiast forums confirms that enabling Secure Boot and TPM 2.0 reliably resolves the error, provided the underlying hardware is compliant. Community guides, expert blog posts, and YouTube videos echo this consensus, providing further comfort to wary upgraders and those troubleshooting for the first time.
It’s worth noting, however, that some anecdotal claims on fringe forums about “circumventing” the error by rolling back firmware or employing boot loaders have not been verified by reputable sources and often expose users to additional, substantial risks. Following the manufacturer’s and Riot’s prescribed solution remains the safest and most future-proof path.
Best Practices When Upgrading or Troubleshooting
- Always back up important data before entering BIOS/UEFI or toggling boot settings. Even minor misconfigurations can occasionally require a full OS reinstallation.
- Double-check motherboard documentation for specific language around Secure Boot and TPM 2.0—settings are sometimes relabeled or hidden by default.
- Leverage official support resources: Both Microsoft and Riot Games maintain up-to-date knowledgebases that can provide device-specific troubleshooting tips.
- Keep firmware and Windows updates current, as new releases may enhance compatibility or clarify ambiguous settings.
- Avoid untested third-party utilities that promise rapid fixes—these can corrupt firmware and sometimes introduce malware.
The Broader Impact: What Does VAN9003 Mean for PC Gaming?
VAN9003 is more than an isolated bug—it’s a bellwether for the future of gaming security on Windows. As games evolve into ever more complex, connected ecosystems, and as cheaters and malicious actors turn to deeper system manipulation, expect industry leaders to further embrace hardware-based safeguards. For most modern users, this transition is a simple, if momentarily inconvenient, procedural step. But for legacy hardware users or those unfamiliar with firmware menus, it’s a reminder that “just working” often requires a little more technical fluency in the Windows 11 era.
For its part, Riot Games has opted for uncompromising security standards, even at the risk of some user friction. The success of this approach will likely influence how both game developers and operating system vendors enforce baseline requirements in the years to come.
Final Thoughts
The VALORANT VAN9003 error exemplifies the growing intersection of gaming, security, and modern operating system requirements. While the initial appearance of this error post-Windows 11 upgrade can be frustrating and opaque, the underlying fix—enabling Secure Boot and TPM 2.0—is straightforward with a methodical approach. For those with compatible hardware, the process rewards players with a more secure system and a seamless gaming experience. For others, it may signal that a hardware refresh lies on the horizon—a challenging but inevitable facet of ever-advancing security paradigms.
The industry’s migration to hardware-backed protection is both a promise and a challenge: a promise of fairer, safer games, and a challenge for those whose systems are running on borrowed time. As always, knowledge, preparation, and a willingness to adapt remain the best armor in the PC gamer’s toolkit.
Source: Inven Global How to fix the VAN9003 error in VALORANT
Secure Boot, или “безопасная загрузка” по-русски — цифровой протокол проверки электронной цифровой подписи, используемый Microsoft. После обновления античита Vanguard, многие игроки в VALORANT, использующие систему Windows 11, столкнулись с ошибками, потому что теперь античит гораздо строже следит за безопасностью системы. Чтобы их устранить, потребуется активировать Secure Boot и поддержку протокола TPM 2.0 на своей системе.
Для этого нужно поменять настройки компьютера в BIOS. Это несложно, даже если вы раньше никогда не интересовались “железом” и не знаете интерфейса.
- Перезагрузите свой компьютер.
- Зажмите клавишу, которая отвечает за вход в BIOS на вашей системе. В зависимости от модели материнской платы это может быть F10, F11, F12 или Del. Обычно она упоминается во время загрузки системы, или же можно получить информацию по модели в сети;
- Когда откроются настройки BIOS, зайдите в панель Boot (“загрузка”);
- Включите Secure Boot (“безопасная загрузка”);
- Загляните в раздел Security (“безопасность”) и убедитесь, что TPM включён, а Boot Protocol (“протокол загрузки”) установлен, как UEFI.
Один из вариантов BIOS
Зачем VALORANT потребовалась безопасная загрузка и TPM?
Secure Boot и TPM используются интегрированной в VALORANT античит-системой Vanguard. Так как современные читы перехватывают данные на уровне ядра системы, Vanguard следит за BIOS и предотвращает неавторизованные модификации, которые эксплуатируют уязвимости ради нечестной игры.
Не все игроки могут удовлетворить эти требования, но есть способы поиграть в VALORANT и на системах без Secure Boot и TPM 2.0. Один из способов — установить на свой компьютер дополнительную операционную систему, Linux или Windows 10. В отличие от 11 версии, в 10 используется спецификация TPM 1.2, подходящая для более старого “железа”.
Другим вариантом будет остаться на Windows 11, но обновить “железо”. Это более дорогой и сложный вариант, но устойчивый в долгосрочной перспективе, ведь поддержка старого оборудования при переходе на новое программное обеспечение со временем прекращается или становится невозможной по техническим причинам.
Напомним, что недавнее научное исследование, посвящённое читам в онлайн-играх показало, что VALORANT — одна из самых защищённых от читеров игр.