
Если для какой-либо цели вам потребовалось вызвать синий экран BSoD на компьютере или ноутбуке с Windows, вы можете это сделать вручную, при этом никак не навредив системе. Зачем это может быть нужно? Например, для проверки сохранения дампов памяти, или, к примеру, для того чтобы сделать скриншот такого экрана в виртуальной машине, возможно, найдутся и другие причины.
В этой инструкции два простых метода ручного вызова стандартного системного BSoD встроенными средствами системы или с помощью стороннего инструмента для инициации сбоя с синим экраном.
- Вызов синего экрана средствами Windows
- Сторонние утилиты для инициации BSoD (NotMyFault)
- Видео инструкция
Создание сбоя на синем экране средствами Windows
Внимание: несмотря на то, что этот и следующий методы в целом безопасны, не следует запускать синий экран во время активной работы, при записи данных на накопители — это хоть и искусственно вызванный сбой, но всё-таки сбой, а не его имитация.
Осуществить задуманное возможно, не прибегая к каким-либо сторонним средствам, метод сгенерировать сбой с BSoD предусмотрен в самой системе, метод должен работать в Windows 10, 8.1 и Windows 7:
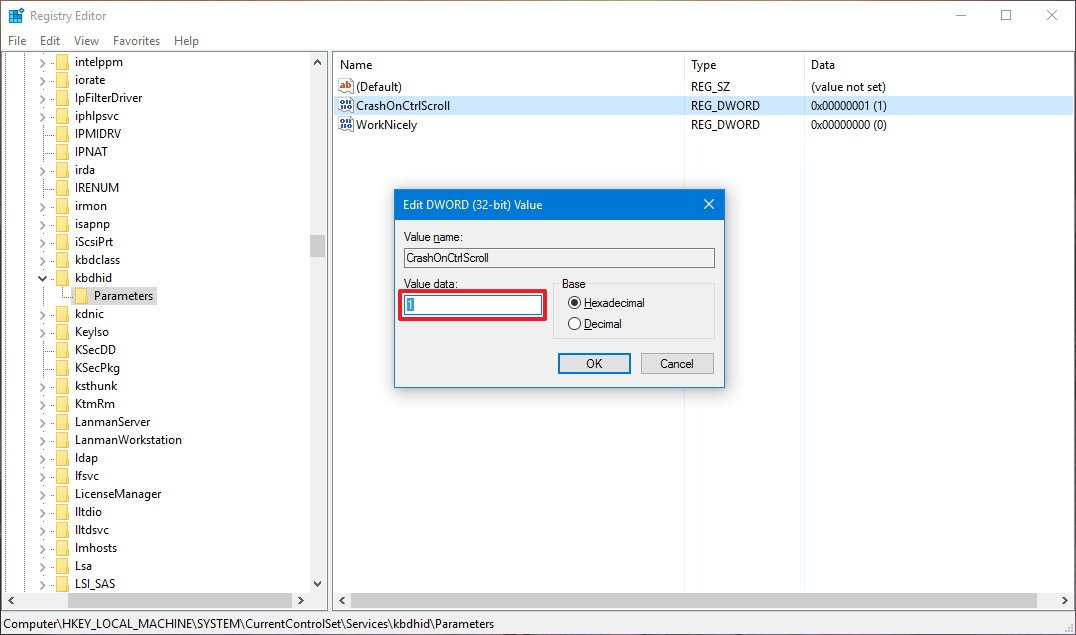
- Зайдите в редактор реестра (Win+R — regedit).
- Перейдите в раздел
HKEY_LOCAL_MACHINE\SYSTEM\CurrentControlSet\Services\kbdhid\Parameters
если вы используете USB-клавиатуру (или беспроводную). На современных ноутбуках обычно именно такой вариант клавиатуры.
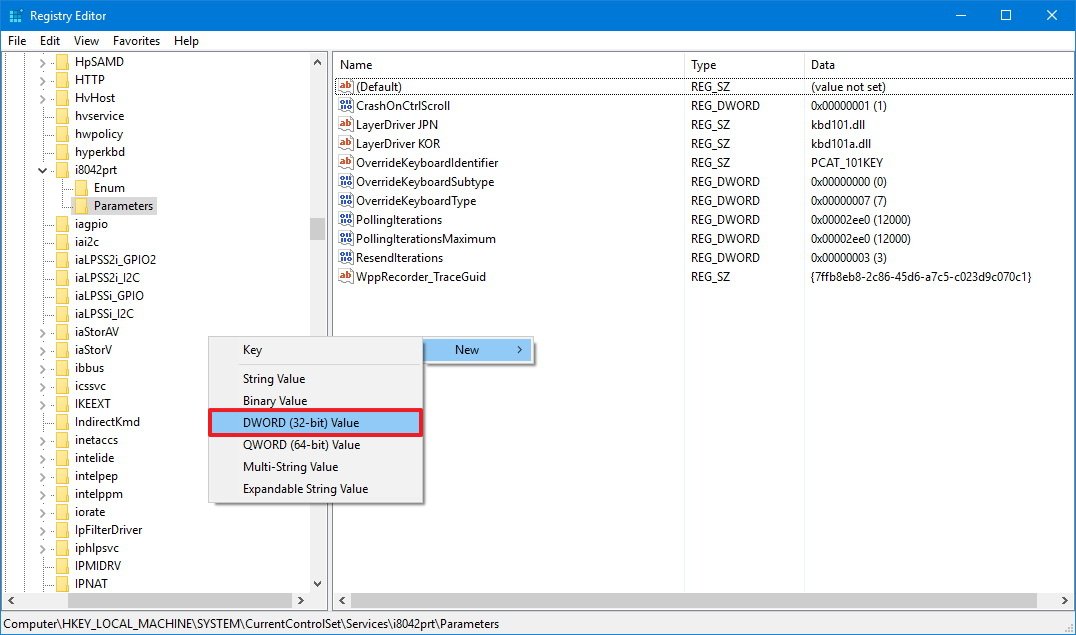
- В раздел
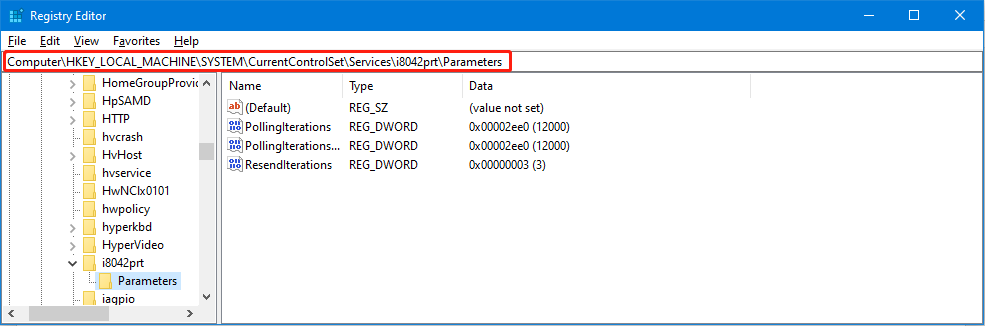
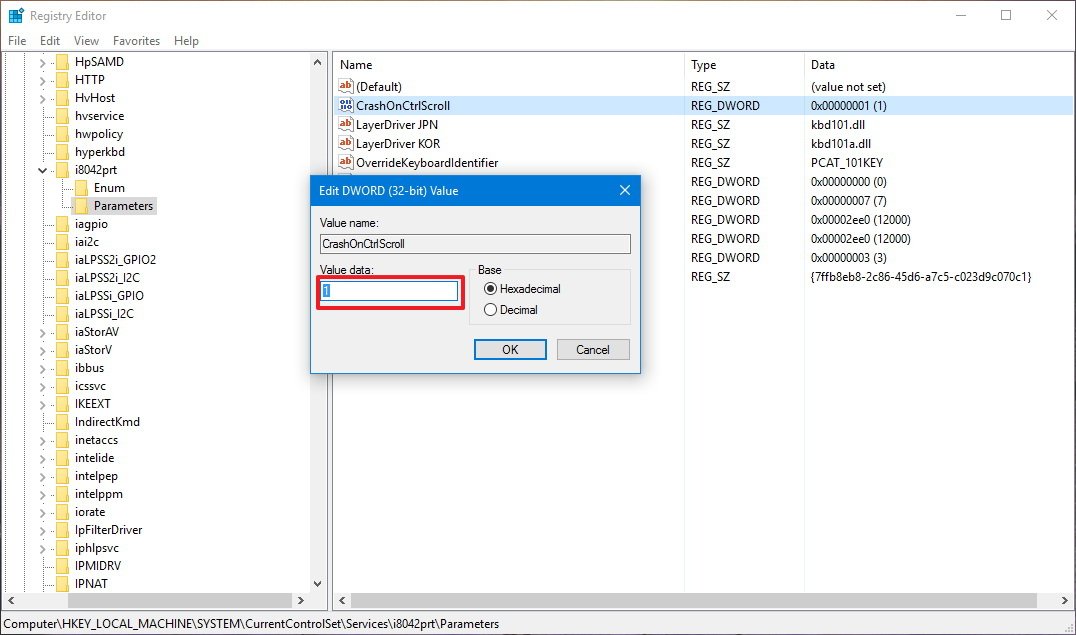
HKEY_LOCAL_MACHINE\SYSTEM\CurrentControlSet\Services\i8042prt\Parameters
если используется PS/2 клавиатура
- В раздел
HKEY_LOCAL_MACHINE\SYSTEM\CurrentControlSet\Services\hyperkbd\Parameters
для виртуальной машины Hyper-V.
- В этом разделе нажмите правой кнопкой мыши в пустой области правой панели редактора реестра и создайте новый параметр DWORD (32-бит) с именем CrashOnCtrlScroll, затем дважды нажмите по параметру и задайте значение 1 для него.


Чтобы перейти непосредственно к вызову синего экрана после проделанных действий перезагрузите ПК или ноутбук, а затем:
- Нажмите и удерживайте правую клавишу Ctrl.
- Дважды нажмите клавишу Scroll Lock (ScrLk). На некоторых клавиатурах, например, на ноутбуке такой отдельной клавиши может не быть, в этом случае она обычно нажимается путем нажатия Fn и клавиши, где есть альтернативная функция Scroll Lock, обычно — C, K или S, но иногда в верхнем ряду F-клавиш (соответствующая подпись обычно присутствует).
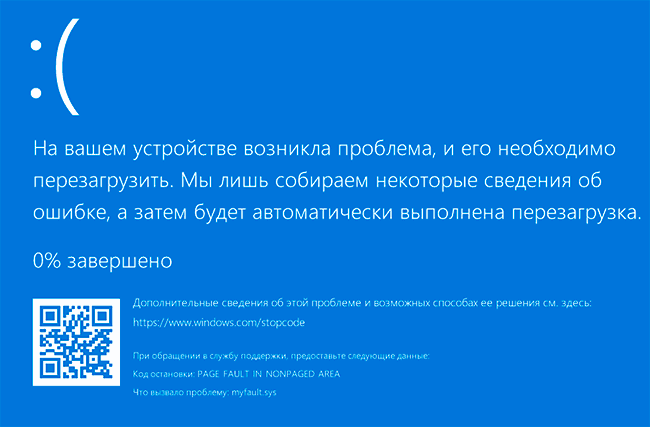
- В результате вы увидите синий экран MANUALLY INITIATED CRASH, будет создан дамп памяти, а через короткое время произойдет автоматическая перезагрузка компьютера.


Есть и другие возможности, например, мы можем создать настоящий сбой CRITICAL_PROCESS_DIED, если в командной строке от имени администратора введем команду TASKKILL /IM svchost.exe /F
Инициация BSoD с помощью утилиты NotMyFault
Существуют сторонние бесплатные утилиты, позволяющие вручную вызвать синий экран с ошибкой, например, StartBlueScreen (похоже не работает в последних версиях Windows) или NotMyFault, доступная в Microsoft Sysinternals на странице https://docs.microsoft.com/en-us/sysinternals/downloads/notmyfault
Для использования утилиты достаточно скачать её, распаковать файлы, запустить исполняемый файл (отличаются по разрядности, файлы, имя которых оканчивается на «c» работают в интерфейсе командной строки). После этого на вкладке Crash в программе выбираем тип сбоя и нажимаем кнопку «Crash».
В итоге получаем синий экран с выбранной ошибкой и причиной в файле драйвера myfault.sys (после сбора данных и сохранения дампа памяти компьютер будет автоматически перезагружен).
С помощью этой же утилиты вы можете вызвать зависания системы (вкладка Hang) или утечку памяти (вкладка Leak) примерно, как в случае, описанном в статье Невыгружаемый пул занимает всю память.
Видео инструкция
Если вы целенаправленно искали такую инструкцию, буду рад, если сможете поделиться в комментариях, для чего именно вам потребовалось вызывать BSoD.
Want to know how to force a Blue Screen of Death on Windows 11/10? You can use the Registry Editor, Task Manager, or Windows PowerShell to get a blue screen on your PC. In this article, MiniTool Software will introduce these 3 ways in detail.
What Is a Blue Screen of Death on Windows 11/10?
The Blue Screen of Death (BSoD) is known as a Stop error or Blue Screen error that usually happens on a Windows computer. When your Windows 11/10 computer has a fatal system error, your system will be interrupted and show a blue screen with an error code.
When you see a blue screen, it means that your system is crashed and can no longer operate safely. The causes of the Blue Screen of Death are various. Hardware failure or unexpected termination of a crucial process could be the main reason.
How to Force a Blue Screen of Death on Windows 11/10?
Of course, you’d better not encounter a Blue Screen of Death when using a computer. But at times, you may need to force a Blue Screen of Death on Windows 11/10 for a bug check. For example, when you want to test the system or a program you’re developing or play a prank on someone, you can want to manually trigger a Blue Screen of Death.
How to get a Blue Screen of Death screen on Windows 11/10?
Here are 3 ways:
- You can edit the Registry key to force a Blue Screen of Death on Windows 11/10.
- You can use Task Manager to force a Blue Screen of Death on Windows 11/10.
- You can run a special command in PowerShell to force a Blue Screen of Death on Windows 11/10.
How do I trigger a Blue Screen of Death on Windows using these 3 methods? This article will introduce these 3 methods.
What to Do before You Force a Blue Screen of Death on Windows 11/10?
Back up your data in advance
To protect your files and system, we think you’d better back up your computer. You can use MiniTool ShadowMaker, professional data backup software for Windows, to back up your computer to an external hard drive.
This Windows backup software is specially designed to back up files, folders, partitions, disks, and systems. You can also use it to sync files and folders. It supports schedule and event trigger backup, differential and incremental backup schemes.
MiniTool ShadowMaker trial edition allows you to use it for free within 30 days. You can click the following download button to directly get it on your device.
MiniTool ShadowMaker TrialClick to Download100%Clean & Safe
It is very easy to use this backup tool to back up your files and system.
After downloading and installing this software on your device, you can use these steps to make a backup:
Step 1: Open MiniTool ShadowMaker and you will see its Home page.
Step 2: Switch to the Backup panel.
Step 3: Select the source files/folders/partitions/disk and the destination drive to save the backup.
Step 4: Click the Back Up Now button to start the backup process.

It will take a while to finish the whole backup process. You need to wait until the whole process ends. You can click Manage from the left menu to view the backup process.
In addition, you can click the Options button to set up the backup according to your requirements.
Close the running programs and save your documents
To get out of the Blue Screen of Death screen that is created by yourself, you need to restart your computer. So, before you use the following methods to force a Blue Screen of Death, you need to close the running programs and save your documents.
Now, we will continue introducing how to force a blue screen on Windows 11/10 using the 3 methods mentioned above.
Way 1: Use the Registry Editor to Force a Blue Screen of Death
Here is a reminder:
Editing the registry key is risky. If you make a mistake, there may be irreversible damage to your system. To protect your computer, you should back up your registry key in advance.
When everything is prepared, you can follow this guide to get a blue screen via Registry Editor:
Step 1: Press Windows + R to open the Run dialog.
Step 2: Type regedit in the Run dialog and press Enter to open the Registry Editor.
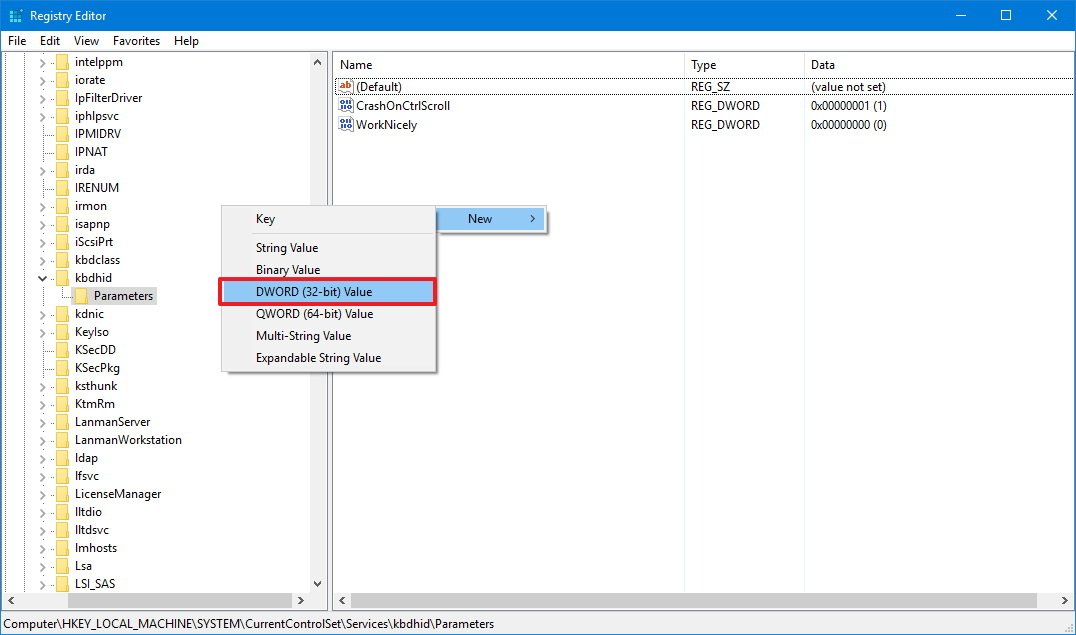
Step 3: If you are using a USB keyboard, you need to go to this path:
HKEY_LOCAL_MACHINE\SYSTEM\CurrentControlSet\Services\kbdhid\Parameters

Step 4: Right-click the Parameters key and go to New > DWORD (32-bit) Value.
Step 5: Name the new DWORD key CrashOnCtrlScroll. Then, double-click the newly created DWORD key to access it. Then, change its value from 0 to 1.
Step 6: Click the OK button to save the change.
Step 7: (Optional) If you are using a legacy PS/2 keyboard, you need to go to this path:
HKEY_LOCAL_MACHINE\SYSTEM\CurrentControlSet\Services\i8042prt\Parameters
You can directly copy and paste the path to the address bar in the Registry Editor.
Step 8: Right-click on the right side of the interface, then go to New > DWORD (32-bit) Value.
Step 9: Name the new DWORD CrashOnCtrlScroll.
Step 10: Double-click the newly created DWORD and change its value from 0 to 1.
Step 11: Click the OK button to save the change.
Step 12: (Optional) If you are using the Hyper-V keyboard on a virtual machine, you can go to the following path:
HKEY_LOCAL_MACHINE\System\CurrentControlSet\Services\hyperkbd\Parameter
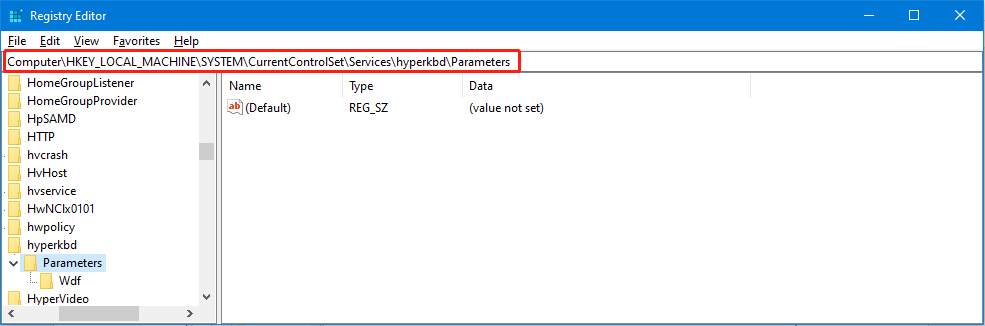
This key is only available on devices with Hyper-V already enabled.
Step 13: Right-click on the right side, then go to New > DWORD (32-bit) Value.
Step 14: Name the new DWORD CrashOnCtrlScrol.
Step 15: Double-click the newly created DWORD and change its value from 0 to 1.
Step 16: Click the OK button to save the change.
Step 17: Close Registry Editor and restart your computer.
Step 18: Press and hold the right Ctrl key and then press the Scroll Lock key twice to trigger a Blue Screen of Death.
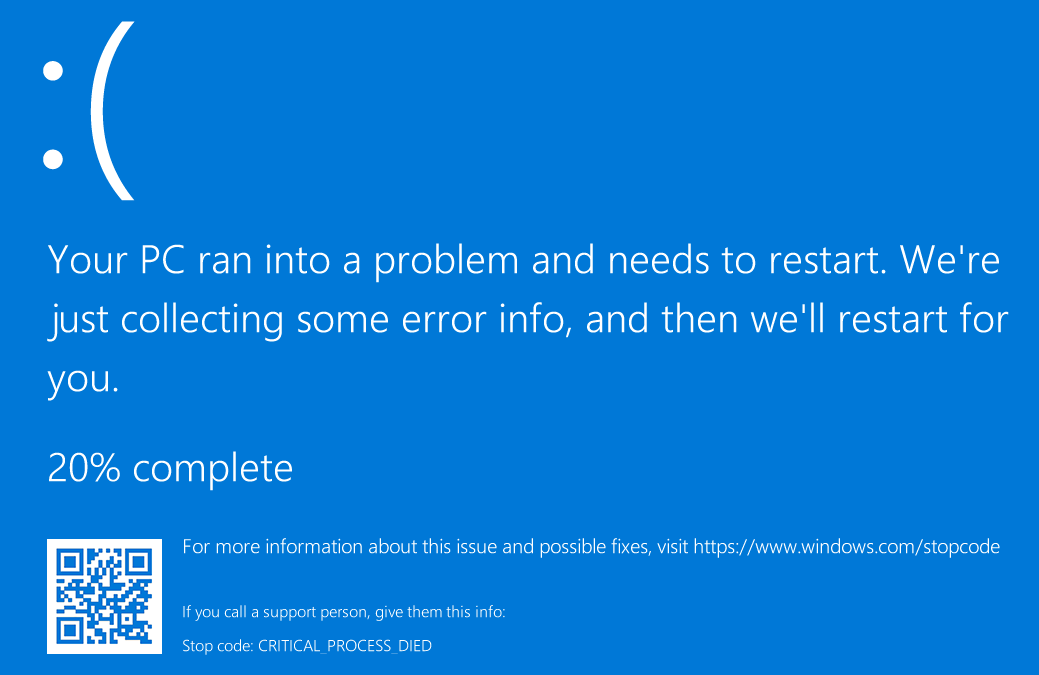
After these steps, the system will trigger a KeBugCheck and then show a 0xE2 error displaying a bugcheck with a MANUALLY_INITIATED_CRASH message. Your Windows 11/10 computer will also generate a dump file for further debugging.
If you want to undo the changes, you can restart your computer and delete the CrashOnCtrlScroll DWORD keys in the above three paths.
Way 2: Use Task Manager to Get a Blue Screen of Death
You can also make some operations in Task Manager to trigger a Blue Screen of Death. Here are the steps:
Step 1: Right-click the taskbar and select Task Manager.
Step 2: Click More details if you only see a few options.
Step 3: Switch to the Details tab.
Step 4: Scroll down and find wininit.exe, then select it and click the End task button to close this service.
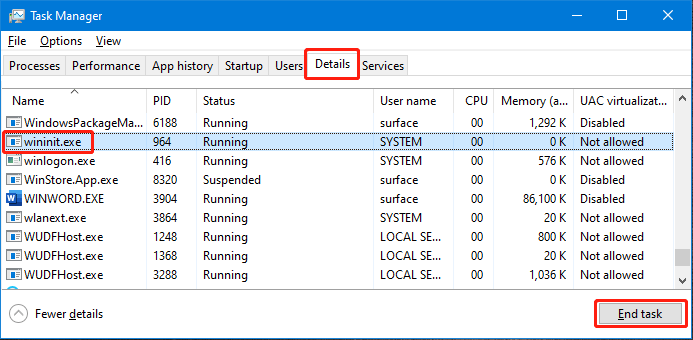
Step 5: Wait and you will see a dialog box. Then, select the Abandon unsaved data and shut down option and click Shut Down.
After these steps, you will see the blue screen. To get rid of the blue screen, you can just restart your computer.
Way 3: Use Windows PowerShell to Trigger a Blue Screen of Death
To use Windows PowerShell to trigger a Blue Screen of Death, you can use these steps:
Step 1: Click the search icon in the taskbar and search for PowerShell.
Step 2: Right-click Windows PowerShell from the search results and select Run as administrator.
Step 3: Type wininit into PowerShell and press Enter to run this command.
Then, the blue screen will appear with some error messages.
If you encounter a true Blue Screen of Death error, you can use the methods mentioned in the following two articles to fix Blue Screen of Death on Windows 11/10:
- How to Recover Data after BSOD & How to Fix Blue Screen of Death
- What Is Windows 11 Blue Screen? How To Fix BSOD Error On Your PC
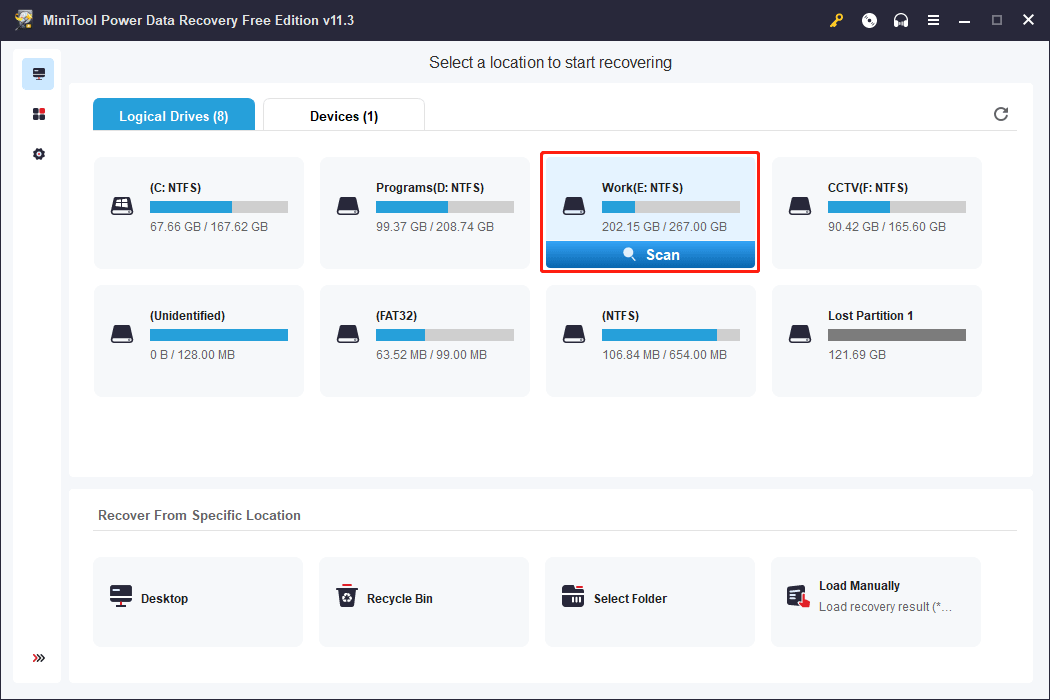
If some of your important files get lost or deleted by mistake, you can use the professional data recovery software, MiniTool Power Data Recovery, to get them back.
MiniTool Power Data Recovery is a free file recovery tool. You can use it to recover files from different types of data storage devices. This software can run on all versions of Windows, including Windows 11, Windows 10, Windows 8.1/8, and Windows 7.
This Windows data recovery program has a free edition. To check if this software can find and recover your files, you can use this free edition to scan the target drive and see if the files you want to recover are included in the scan results.
MiniTool Power Data Recovery FreeClick to Download100%Clean & Safe
After downloading and installing this MiniTool data recovery software on your PC, you can use these steps to scan for drives and recover data:
Step 1: Open MiniTool Power Data Recovery Free Edition.
Step 2: Select the drive you want to recover from and click the Scan button to start scanning that drive. You can also switch to the Devices tab and select the whole disk to scan.
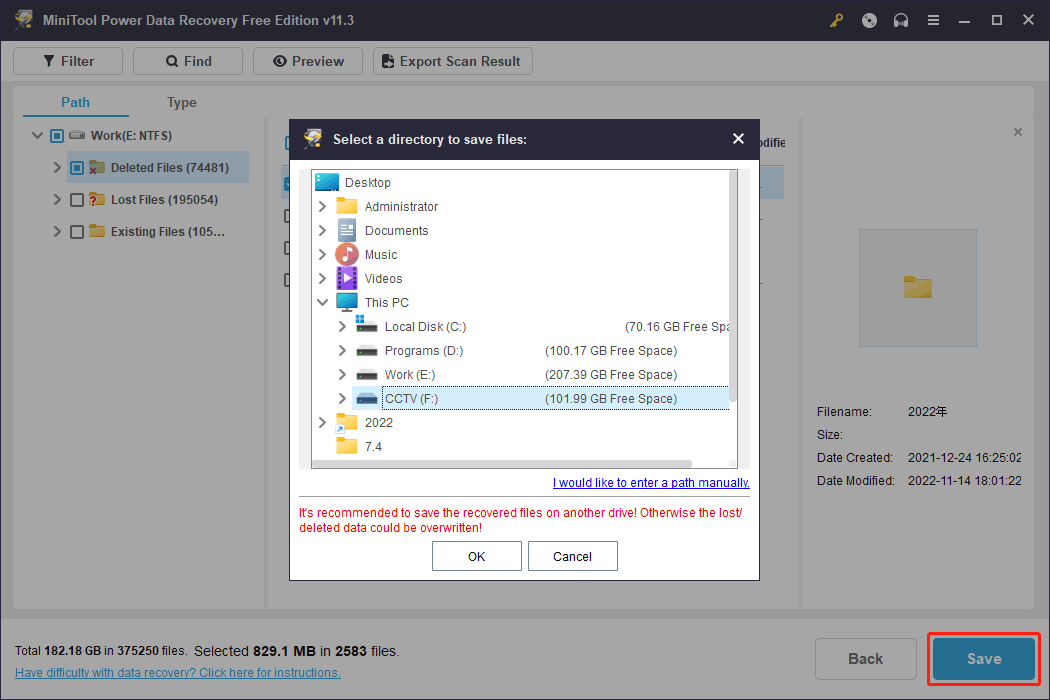
Step 3: After scanning, you will see the scan results. You can open each path to find your needed files. You can also switch to the Type tab and find your files by type. If you still remember the name of the file you want to recover, you can click the Find button, type the file’s name, and press Enter to directly locate that file.
Step 4: Choose your needed files and click the Save button to select a suitable location to save the selected files.
If you want to use this software to recover more files, you need to use a full edition.
Recover Data from Computer that Won’t Boot Normally
If your computer can’t boot normally, you need to use MiniTool Power Data Recovery bootable edition to rescue your files. Since your computer is unbootable now, you should save files to an external hard drive. So, you need to prepare an external hard drive that has enough space to store your files.
Step 1: Create a bootable medium using MiniTool Media Builder.
Step 2: Boot your computer from the bootable medium that is created by yourself.
Step 3: Enter the MiniTool data recovery software interface and select the target drive to scan.
Step 4: Select your needed files and save them to your connected external hard drive.
Wrap Things up
Want to force a Blue Screen of Death screen on your Windows 11 or Windows 10 computer? There are 3 ways and you can find them in this article. You can select a suitable method according to your situation.
Additionally, when you want to recover your lost and deleted files, you can try MiniTool Power Data Recovery.
Should you have other related issues, you can let us know in the comments. you can also contact us via [email protected].
Download Article
Download Article
- Editing the Registry
- Task Manager
- PowerShell
- Video
- Q&A
- Tips
- Warnings
|
|
|
|
|
|
It is extremely rare that you would ever want to force the Blue Screen of Death, or BSoD, on your PC. The Blue Screen of Death is an error screen in Windows that signifies a fatal system error and intentionally forcing your computer to bring up the BSoD can cause serious problems with your computer and even loss of data. However, there are some advantages to forcing this infamous screen when attempting to test the capabilities of a remote management and recovery tool. Before proceeding, it is very important that you save your work because the only way to unlock your screen once you have forced the BSoD will be rebooting your computer.
-

Save your work. Forcing a Blue Screen on your computer will cause you to lose any unsaved changes, therefore it is very important for you to save anything you were working on before continuing.
-
Search «regedit.» To do this, go to Start and then enter it in the search bar without the quotation marks. If you have Windows XP, go to «Run,» type «regedit,» and then press «Enter.»
Advertisement
-
HKEY_LOCAL_MACHINE\SYSTEM\CurrentControlSet\services\i8042prt\Parameters if you are using a PS/2 keyboard. If you are using a USB keyboard, select HKEY_LOCAL_MACHINE\SYSTEM\CurrentControlSet\Services\kbdhid\Parameters).[1]
- You can tell whether you have a PS/2 or USB keyboard by looking at the plug that connects it to your computer. A PS/2 keyboard will have a round plug whereas a USB keyboard will have a rectangular plug.
-
You can do this by selecting «Edit» and then going to «New.» Enter «CrashOnCtrlScroll» without the quotation marks and make sure the value below it is set to 1. Your default may already be set to this option.[2]
-
Close the Registry Editor and restart your computer in order for the changes to take effect.
-
You can do this by holding down the furthest most right «Control» key then pressing the «Scroll Lock» key twice. Once this is completed, a blue screen should pop up. If you are using Windows 8 or later, the Blue Screen is slightly different. Rather than lines of code, Windows 8 (and later) presents you with a sad emoticon and an error message. This, however, is still the BSoD.[3]


Advertisement
-
Forcing a Blue Screen on your computer will cause you to lose any unsaved changes, therefore it is very important for you to save anything you were working on before continuing.
-
Open the Task Manager. This method will only work for Windows 8 and lower. You can open Task Manager by right-clicking on the taskbar at the bottom of your screen and finding «Start Task Manager» in the drop down menu that appears.
-
If you are prompted for an administrator password, enter the password and click OK.
-
Once you have done so, select «End Task.» (be sure you press processes from all users if you are using Windows 7 or earlier)
-
In this dialog box, tick the box next to «Abandon unsaved data and shut down» and click «Shut Down.»
-
You can get rid of the blue screen by restarting your computer.


Advertisement
-
1
Save your work. Forcing a Blue Screen on your computer will cause you to lose any unsaved changes, therefore you need to save anything you were working on before continuing.
-
2
Run PowerShell as an Administrator. Right-click the Start button (the leftmost icon in the taskbar), and select «Windows PowerShell (Administrator)». If prompted, click Yes in the User Account Control dialog box.
- If you are using Windows 11, click «Terminal (Administrator)». Windows Terminal loads PowerShell by default. If it doesn’t, click the arrow next to the plus button, and select Windows PowerShell.
-
3
Wait for it to load and type «wininit» and hit enter.
-
You can get rid of the blue screen by restarting your computer.
Advertisement
Add New Question
-
Question
Can I do this in a safe way?
It is safe, unless you have unsaved work or, in rare circumstances, your startup files were corrupted in the process. You can also do it in a virtual machine if you want to not damage your own computer.
-
Question
What happens if I end csrss.exe and can’t boot again?
It sounds like the OS was doing a major file transfer, and the files got corrupted. The only thing you can do is reinstall the operating system.
-
Question
How do I do it without being an admin?
You can’t, it is only an admin thing.
See more answers
Ask a Question
200 characters left
Include your email address to get a message when this question is answered.
Submit
Advertisement
Video
-
You can make a bat file with content «taskkill /f /im csrss.exe» and save it to anything.bat. Then when you want a BSoD, you must run it as administrator. Enjoy your BSoD!
-
If you are running Windows 8 or up, you can terminate Service Host: DCOM Server Process Launcher, which also causes a BSoD.
- Note in Windows 8.1 or up, if you terminate csrss.exe, it will not cause a BSoD, it will just hang the system, though it will still simulate a computer crash.
Tips from our Readers
The advice in this section is based on the lived experiences of wikiHow readers like you. If you have a helpful tip you’d like to share on wikiHow, please submit it in the field below.
- You can also use an app called «NotMyFault».
Thanks for submitting a tip for review!
Advertisement
-
Make sure you are editing the right path in the Registry. Editing or deleting the wrong entries may cause stability problems or even prevent you from booting in the first place.
-
In Windows 8 and up, doing so will prevent Fastboot from working on the next boot and make Windows to load slower.
-
The registry edit only works for Windows 2000 and up for PS/2 keyboards and for the following if using a USB keyboard:[4]
- Windows Server 2003 with Service Pack 1 with KB 244139 installed or with Service Pack 2 installed.
- Windows Vista or Server 2008 with Service Pack 1 with KB 971284 installed or with Service Pack 2 installed.
- Windows 7 or above installed.
- Performing this using a USB keyboard on Windows XP will not work.
Advertisement
References
About This Article
Article SummaryX
1. Press Control + Alt + Del.
2. Click Task Manager.
3. Click the Details tab.
4. Select wininit.exe.
5. Click End task.
6. Follow the on-screen shutdown instructions to see the blue screen.
Did this summary help you?
Thanks to all authors for creating a page that has been read 647,252 times.
Reader Success Stories
-
Vulket Humster
May 28, 2017
«I was trying to break a Virtual Machine to see how fast I could do it. The rules were: BSoD counts as broken. So…» more
Did this article help you?

A «stop error,» commonly known as the Blue Screen of Death (BSoD), is a nasty error that appears after a serious system crash. It’s almost always a terrible thing to come across. However, there are rare times when you may need to force a blue screen error to test your system or an application’s resiliency (or if you want to play a prank to a friend).
Whatever the reason, Microsoft actually has a documented process to modify the Registry to use a keyboard shortcut sequence to force a Blue Screen of Death on your Windows 10 computer using a PS/2 or USB keyboard with a Scroll Lock key.
If you landed on this guide, but you’re hoping to fix a BoSD error, check our guide to troubleshoot the Blue Screen of Death on Windows 10.
In this Windows 10 guide, we’ll walk you through the steps to force a BoSD error on your PC.
How to force a Blue Screen of Death error
Warning: This is a friendly reminder to let you know that editing the Registry is risky, and it can cause irreversible damage to your installation if you don’t do it correctly. We recommend making a full backup of your PC and saving all of your work before proceeding.
- Use the Windows key + R keyboard shortcut to open the Run command.
- Type regedit, and click OK to open the registry.
- Browse the following path:
HKEY_LOCAL_MACHINE\SYSTEM\CurrentControlSet\Services\kbdhid\Parameters - Right-click on the right side, select New, and then click on DWORD (32-bit) Value.
- Name the new DWORD CrashOnCtrlScroll and press Enter.
- Double-click the newly created DWORD and change its value from 0 to 1.
- Click OK to confirm the new value.
- Browse the following path:
HKEY_LOCAL_MACHINE\SYSTEM\CurrentControlSet\Services\i8042prt\Parameters - Right-click on the right side, select New, and then click on DWORD (32-bit) Value.
- Name the new DWORD CrashOnCtrlScroll and press Enter.
- Double-click the newly created DWORD and change its value from 0 to 1.
- Click OK to confirm the new value.
- Restart your computer to apply the new settings.
Once you complete these steps, you can use your keyboard to intentionally crash your computer by holding down the (right) Ctrl key, and pressing the Scroll Lock twice.
Windows 10 will then trigger a KeBugCheck and generate a 0xE2 error displaying a BSoD with a «MANUALLY_INITIATED_CRASH» message. This will also create and save a crash dump to your computer that can be used for debugging purposes.
All the latest news, reviews, and guides for Windows and Xbox diehards.
If you no longer need to force a Blue Screen of Death, you can use the same steps mentioned above to revert the changes, but on step No. 3 and step No. 8, right-click and delete the CrashOnCtrlScroll DWORD.
Although we’re focusing this guide on Windows 10, the same steps will work in Windows 8.1 and Windows 7.
More Windows 10 resources
For more help articles, coverage, and answers to common questions about Windows 10, visit the following resources:
- Windows 10 on Windows Central – All you need to know
- Windows 10 help, tips, and tricks
- Windows 10 forums on Windows Central
Mauro Huculak has been a Windows How-To Expert contributor for WindowsCentral.com for nearly a decade and has over 15 years of experience writing comprehensive guides. He also has an IT background and has achieved different professional certifications from Microsoft, Cisco, VMware, and CompTIA. He has been recognized as a Microsoft MVP for many years.