
In today’s digital age, having a functional and reliable WiFi connection is essential. Whether you’re at home, in the office, or on the go, being able to connect your device to the internet wirelessly is convenient and efficient. However, there are instances where you may encounter restrictions or limitations that prevent you from enabling your WiFi adapter on a Windows 10 device without administrator rights. This can be frustrating, especially when you urgently need to connect to a network. In this blog post, we will explore different methods and steps on how to enable your WiFi adapter on Windows 10 without requiring administrator rights. By following these methods, you can regain control of your WiFi connection and stay connected wherever you are.
Video Tutorial:
What’s Needed
Before we dive into the methods, let’s discuss what you will need to successfully enable your WiFi adapter on Windows 10 without administrator rights. Here are the things you will need:
1. A Windows 10 device: This method is specifically tailored for Windows 10 users. Make sure you have access to a Windows 10 device to follow the steps outlined in this blog post.
2. Device permissions: While administrator rights are typically required to enable or disable a WiFi adapter, there are ways to work around this limitation. However, keep in mind that certain limitations or security policies may prevent you from enabling the WiFi adapter without administrator rights. Make sure you have the necessary permissions to perform the methods described in this blog post.
What Requires Your Focus?
When attempting to enable your WiFi adapter on Windows 10 without administrator rights, there are a few key areas you need to focus on:
1. User Account Control (UAC) settings: User Account Control is a security feature in Windows that helps prevent unauthorized changes to your computer. By adjusting the UAC settings, you can potentially bypass certain restrictions and gain control over your WiFi adapter.
2. Command Prompt: Command Prompt is a powerful tool in Windows that allows you to execute commands and perform various tasks. Some of the methods we will explore in this blog post involve using Command Prompt to enable your WiFi adapter without administrator rights.
3. Registry Editor: The Registry Editor is a Windows utility that enables you to view and modify system settings and configurations. Modifying certain settings related to the WiFi adapter through the Registry Editor can potentially restore your ability to enable it without administrator rights.
4. Third-party software: In some cases, using third-party software may provide a workaround to enable your WiFi adapter without requiring administrator rights. We will explore a few software options that can help you achieve this.
Now that we understand the necessary background information and the areas that require our attention, let’s delve into the different methods to enable your WiFi adapter on Windows 10 without administrator rights.
Method 1. How to Enable WiFi Adapter via Device Manager
The Device Manager in Windows allows you to manage and control the various hardware devices connected to your computer. By accessing and modifying device settings through the Device Manager, you can potentially enable your WiFi adapter without administrator rights. Here’s how:
1. Press the Windows key + X on your keyboard and select «Device Manager» from the menu that appears.
2. In the Device Manager window, locate the «Network adapters» category and expand it.
3. Right-click on your WiFi adapter and select «Enable» from the context menu. If the «Enable» option is not available, proceed to the next method.
Pros | Cons
—- | —-
1. Easy and straightforward method. | 1. Requires the necessary permissions to access Device Manager.
2. Does not require any additional software. | 2. Not always effective, depending on the system configuration.
Method 2. How to Enable WiFi Adapter via Command Prompt
Command Prompt is a powerful tool that allows you to execute commands and perform various tasks in Windows. By using Command Prompt, you can potentially enable your WiFi adapter without administrator rights. Follow these steps:
1. Press the Windows key + X on your keyboard and select «Command Prompt (Admin)» from the menu. If the «Command Prompt (Admin)» option is not available, proceed to the next method.
2. In the elevated Command Prompt window, type the following command: `netsh interface show interface`
3. Look for the entry that corresponds to your WiFi adapter. It will likely be named «Wireless Network Connection» or something similar.
4. Type the following command to enable the WiFi adapter: `netsh interface set interface «YOUR_WIFI_ADAPTER_NAME» admin=enabled`
Replace «YOUR_WIFI_ADAPTER_NAME» with the name of your WiFi adapter as displayed in the previous step.
5. Press Enter to execute the command. If successful, your WiFi adapter should be enabled.
Pros | Cons
—- | —-
1. Allows enabling the WiFi adapter using built-in Windows tools. | 1. Requires administrative privileges to open Command Prompt (Admin).
2. Does not require any additional software. | 2. Not always effective if there are system limitations or security policies in place.
Method 3. How to Enable WiFi Adapter via Registry Editor
The Registry Editor is a powerful utility in Windows that allows you to view and modify system settings and configurations. By modifying certain registry entries related to your WiFi adapter, you may be able to enable it without administrator rights. Here’s how:
1. Press the Windows key + R on your keyboard to open the «Run» dialog box.
2. Type «regedit» (without quotes) and press Enter to open the Registry Editor.
3. In the Registry Editor, navigate to the following location: `HKEY_LOCAL_MACHINE\SYSTEM\CurrentControlSet\Control\Class\{4d36e972-e325-11ce-bfc1-08002be10318}`
4. Under the «{4d36e972-e325-11ce-bfc1-08002be10318}» key, you will find several subkeys starting with «0000,» «0001,» and so on. Expand each subkey and look for the one that corresponds to your WiFi adapter. You can identify it by checking the «DriverDesc» value on the right-hand side.
5. Once you’ve located the correct subkey, double-click on the «Attributes» value.
6. Change the value data to «1» (without quotes) and click OK.
7. Close the Registry Editor and restart your computer. After the restart, your WiFi adapter should be enabled.
Pros | Cons
—- | —-
1. Provides a potential solution by modifying system settings. | 1. Requires advanced knowledge of the Registry Editor.
2. Does not require any additional software. | 2. Modifying registry entries can have unintended consequences if done incorrectly.
Method 4. How to Enable WiFi Adapter via Third-Party Software
In some cases, using third-party software can provide a workaround to enable your WiFi adapter without requiring administrator rights. There are several software options available that specialize in managing network connections and adapters. Here’s an example of how to enable your WiFi adapter using one of these software options:
1. Download and install the third-party network management software of your choice. One popular option is «NetSetMan,» which can be found at https://www.netsetman.com/.
2. Launch the software and locate the option to enable or disable your WiFi adapter.
3. Enable the WiFi adapter using the provided option.
4. Once enabled, your WiFi adapter should be ready for use.
Pros | Cons
—- | —-
1. Provides an alternative solution when built-in Windows methods are ineffective. | 1. Requires downloading and installing third-party software.
2. Can provide additional features and functionality compared to built-in Windows tools. | 2. Software options may vary in terms of compatibility and performance.
Why Can’t I Enable WiFi Adapter?
There can be several reasons why you are unable to enable your WiFi adapter without administrator rights. Here are some common reasons and their respective solutions:
1. Limited user permissions: If you are using a restricted user account without administrator rights, you may not have the necessary privileges to enable the WiFi adapter. In this case, consult with the system administrator or the person in charge to grant you the necessary permissions.
2. Group policies or security restrictions: Your organization or network administrator may have implemented group policies or security restrictions that prevent you from enabling the WiFi adapter. In such cases, reach out to the appropriate IT department or network administrators to resolve the issue.
3. Driver or software compatibility issues: Outdated or incompatible drivers or software can cause issues with enabling the WiFi adapter. Ensure that you have the latest drivers and software installed for your specific WiFi adapter. Visit the manufacturer’s website or use appropriate driver update software to ensure compatibility.
Implications and Recommendations
When enabling your WiFi adapter without administrator rights, it’s essential to consider the implications and follow some recommendations. Here are a few suggestions:
1. Respect network policies: Even if you manage to enable your WiFi adapter without administrator rights, it’s crucial to respect any network policies or restrictions that may be in place. Avoid connecting to unauthorized or unsecured networks and adhere to any guidelines set by your organization.
2. Communicate with the network administrators: If you face ongoing issues or limitations with enabling your WiFi adapter, it’s best to reach out to your network administrators or IT department. They can provide guidance, troubleshoot any problems, and ensure that your network connection is secure and functional.
3. Regularly update your drivers and software: To prevent compatibility issues and ensure optimal performance, regularly update your WiFi adapter drivers and any associated software. Check the manufacturer’s website or use a trusted driver update software to stay up to date.
5 FAQs about Enabling WiFi Adapter
Q1: Can I enable my WiFi adapter without administrator rights on any Windows 10 device?
A: Enabling your WiFi adapter without administrator rights may not be possible on every Windows 10 device. Certain restrictions, group policies, or security settings implemented by your organization or network administrators can limit this functionality.
Q2: What should I do if the methods mentioned in this blog post don’t work for me?
A: If the methods described in this blog post are ineffective, it’s recommended to reach out to your organization’s IT department or network administrators. They can provide further guidance and assistance based on your specific setup and limitations.
Q3: Are there any risks associated with modifying the Registry Editor?
A: Modifying the Registry Editor can have unintended consequences if done incorrectly. It’s essential to exercise caution and ensure that you follow the steps correctly. Create a backup of your registry before making any changes and consult official documentation or expert resources if you’re unsure.
Q4: Are there any benefits to using third-party software to enable my WiFi adapter?
A: Third-party software can provide alternative solutions, additional features, and enhanced functionality compared to built-in Windows tools. However, it’s important to choose reputable software from trusted sources to ensure security and reliability.
Q5: Can I revert the changes made to enable the WiFi adapter without administrator rights?
A: Yes, you can revert the changes made through the methods described in this blog post. For example, you can disable the WiFi adapter through the Device Manager, revert the Registry Editor modifications, or uninstall any third-party software that was used. However, exercise caution and consult appropriate resources or experts if needed.
Final Words
Enabling your WiFi adapter without administrator rights on a Windows 10 device may seem challenging at first, but with the right methods and knowledge, you can regain control of your WiFi connection. In this blog post, we explored various methods, including using the Device Manager, Command Prompt, Registry Editor, and third-party software. Each method has its pros and cons, and effectiveness may vary depending on your specific system configuration and limitations. Remember to respect network policies, communicate with network administrators if needed, and keep your drivers and software up to date. By following these steps and recommendations, you can stay connected to WiFi even without administrator rights on your Windows 10 device.
|
|
|
andrey76 8 / 8 / 0 Регистрация: 04.12.2012 Сообщений: 415 |
||||
Включить / отключить сетевой адаптер от имени оператора сети без ввода пароля13.05.2016, 18:05. Показов 11870. Ответов 11 Метки нет (Все метки) Добрый день уважаемые форумчане !!! Тема уже не раз была Сильно не пинайте — Я с другой стороны к этому вопросу хотел бы подойти … Есть пользователь user включенный в группу операторы сети и этот пользователь имеет пароль «123» Данную команду знаю
Но для того чтобы она работала нужно Запустить батник от имени админа — то есть разгласить пароль. С другой стороны пользователь user через панель управления прекрасно — включает / отключает сетевой адаптер Но при этом его запаривает вводить пароль — Совсем убрать пароль не вариант … Есть ли какой батник чтобы пользователь на него нажал — соединение выключилось И при этом все пароли были бы прописаны в батничке … Есть такой Батник ?
0 |
|
21 / 19 / 4 Регистрация: 15.01.2015 Сообщений: 202 |
|
|
14.05.2016, 12:12 |
|
|
Выполняйте команды через планировщик задач. Там можно выставить от чьего имени запускать пароль придется ввести только один раз и пользователь не сможет его узнать.
1 |
|
8 / 8 / 0 Регистрация: 04.12.2012 Сообщений: 415 |
|
|
14.05.2016, 16:19 [ТС] |
|
|
yagami2 Спасибо за отклик !!! Ат души !!! Уважение !!! Сообщение от yagami2 Выполняйте команды через планировщик задач. Там можно выставить от чьего имени запускать пароль придется ввести только один раз и пользователь не сможет его узнать. — Это не подойдет братулец … Задача в том чтобы пользователь сам (самостоятельно и при этом не зная пароля админа) мог —Включить / отключить сетевой адаптер от имени оператора сети без ввода своего пароля так как это его запаривает …— Заранее огромное спасибо !!!
0 |
|
Почетный модератор 28047 / 15783 / 983 Регистрация: 15.09.2009 Сообщений: 67,753 Записей в блоге: 78 |
|
|
14.05.2016, 16:24 |
|
|
bat2exe конвертер?
1 |
|
21 / 19 / 4 Регистрация: 15.01.2015 Сообщений: 202 |
|
|
14.05.2016, 17:18 |
|
|
Сообщение от andrey76 Задача в том чтобы пользователь сам А что мешает пользователю самому запустить выполнение задачи планировщика? Сообщение от magirus bat2exe конвертер? Штука прикольная, но если пользователь прошаренные то легко вытащит из exe`шника исходный батник.
1 |
|
8 / 8 / 0 Регистрация: 04.12.2012 Сообщений: 415 |
|
|
14.05.2016, 17:59 [ТС] |
|
|
magirus, yagami2 Спасибо за отзывчивость братульцы !!! Ат души !!! Уважение !!! Сообщение от magirus bat2exe конвертер? — Такую программу не знал. Но чтобы скомпилировать в ехе нужно будет батничек написать. В котором было бы прописано что пользователь user с паролем 123 выключает сетевое подключение … Как такой батник написать? Сообщение от yagami2 А что мешает пользователю самому запустить выполнение задачи планировщика? — Нужно чтобы это делалось в любое время когда ему заблагаразумется … Сообщение от yagami2 Штука прикольная, но если пользователь прошаренные то легко вытащит из exe`шника исходный батник. — и как я понял что если я поставлю галочку запускать от имени админа — то пользователю все равно нужно будет вводить пароль админа Батник то такой в природе существует — пользователь user (оператор сети) вкл / выкл сетевой адаптер прописав свой пароль в батнике ? Заранее огромное спасибо !!!
0 |
|
8 / 8 / 0 Регистрация: 04.12.2012 Сообщений: 415 |
|
|
19.05.2016, 14:06 [ТС] |
|
|
апну … Может кто знает все же …
0 |
|
21 / 19 / 4 Регистрация: 15.01.2015 Сообщений: 202 |
|
|
19.05.2016, 15:45 |
|
|
Сообщение от andrey76 — Нужно чтобы это делалось в любое время когда ему заблагаразумется … Пользователь может запускать задачу когда ему вздумается. Достаточно открыть планировщик и запустить задачу. В свойствах задачи поставьте «выполнять вне зависимости от регистрации пользователя» и забейте туда логин и пароль от чьего имени будет выполняться задача.
1 |
|
alpap 4339 / 2129 / 661 Регистрация: 26.04.2015 Сообщений: 6,823 |
||||
|
19.05.2016, 15:58 |
||||
|
Или запустить задачу из bat:
.
1 |
|
andrey76 8 / 8 / 0 Регистрация: 04.12.2012 Сообщений: 415 |
||||||||||||
|
20.05.2016, 15:45 [ТС] |
||||||||||||
|
Сообщение от alpap Или запустить задачу из bat:
. Борода при использовании батника Сообщение от andrey76
В планировщике с запуском от имени администратора — запускается и пользователем и админом Но чтобы в планировщик зайти нужно опять же пароль пользователю вводить а если использовать Сообщение от alpap
и от админа и от пользователя борода Ошибка. учетные данные пользователя не разрешены на локальном компьютере Причем если консоль от имени админа запускать тоже такая же ошибка Как быть ? Может в повершеле есть возможность написать батничек ? и насколько на ваш взгляд это трудозатратно ? Заранее огромное спасибо !!!
0 |
|
alpap 4339 / 2129 / 661 Регистрация: 26.04.2015 Сообщений: 6,823 |
||||||||||||
|
20.05.2016, 16:58 |
||||||||||||
|
Сообщение было отмечено andrey76 как решение Решениеandrey76,
другой такой же на включение, например, не важно.
для запуска этой задачи на локальном комьютере. И после этого как обстоят дела? Добавлено через 7 минут
и галочку от имени админа
1 |
|
8 / 8 / 0 Регистрация: 04.12.2012 Сообщений: 415 |
|
|
20.05.2016, 17:49 [ТС] |
|
|
alpap Ат души !!! Сообщение от alpap Windows Batch file Schtasks /run /i /tn "SAdapter" — вот так заработало … без учетных данных ( /u Mydomain\Vasya /p 12345 ) Но заработало только в том случае если выполнять задание в планировщике от имени админа с наивысшими правами … Если в качестве пользователя в планировщике указать юзера (опять же с наивысшими правами .. — к стати чтобы это сделать надо пользователя добавить во вход в качестве пакетного задания) то даже в планировщике ничего не происходит … Точно можно выполнить задание с батником Сообщение от alpap Windows Batch file netsh interface set interface name="Local Area Connection" admin=DISABLED от имени пользователя с наивысшими правами и все будет работать ? Заранее огромное спасибо !!!
0 |
|
BasicMan Эксперт 29316 / 5623 / 2384 Регистрация: 17.02.2009 Сообщений: 30,364 Блог |
20.05.2016, 17:49 |
|
Помогаю со студенческими работами здесь Как запустить программу от имени рута без ввода пароля? Как отключить ввод кода, чтобы в систему входить без ввода пароля. Запуск приложения от имени админа без ввода пароля под юзером Отмена настройки запуска программ от имени администратора без ввода пароля Ситуация такая, есть домен, в нем заведена учетка с правами обычного пользователя, компьютер так же… Файл pgpass, запуск psql от имени другого пользователя без ввода пароля Искать еще темы с ответами Или воспользуйтесь поиском по форуму: 12 |
|
Новые блоги и статьи
Все статьи Все блоги / |
||||
|
POCO, ACE, Loki и другие продвинутые C++ библиотеки
NullReferenced 13.05.2025 В C++ разработки существует такое обилие библиотек, что порой кажется, будто ты заблудился в дремучем лесу. И среди этого многообразия POCO (Portable Components) – как маяк для тех, кто ищет. . . |
Паттерны проектирования GoF на C#
UnmanagedCoder 13.05.2025 Вы наверняка сталкивались с ситуациями, когда код разрастается до неприличных размеров, а его поддержка становится настоящим испытанием. Именно в такие моменты на помощь приходят паттерны Gang of. . . |
Создаем CLI приложение на Python с Prompt Toolkit
py-thonny 13.05.2025 Современные командные интерфейсы давно перестали быть черно-белыми текстовыми программами, которые многие помнят по старым операционным системам. CLI сегодня – это мощные, интуитивные и даже. . . |
Конвейеры ETL с Apache Airflow и Python
AI_Generated 13.05.2025 ETL-конвейеры – это набор процессов, отвечающих за извлечение данных из различных источников (Extract), их преобразование в нужный формат (Transform) и загрузку в целевое хранилище (Load). . . . |
Выполнение асинхронных задач в Python с asyncio
py-thonny 12.05.2025 Современный мир программирования похож на оживлённый мегаполис – тысячи процессов одновременно требуют внимания, ресурсов и времени. В этих джунглях операций возникают ситуации, когда программа. . . |
|
Работа с gRPC сервисами на C#
UnmanagedCoder 12.05.2025 gRPC (Google Remote Procedure Call) — открытый высокопроизводительный RPC-фреймворк, изначально разработанный компанией Google. Он отличается от традиционых REST-сервисов как минимум тем, что. . . |
CQRS (Command Query Responsibility Segregation) на Java
Javaican 12.05.2025 CQRS — Command Query Responsibility Segregation, или разделение ответственности команд и запросов. Суть этого архитектурного паттерна проста: операции чтения данных (запросы) отделяются от операций. . . |
Шаблоны и приёмы реализации DDD на C#
stackOverflow 12.05.2025 Когда я впервые погрузился в мир Domain-Driven Design, мне показалось, что это очередная модная методология, которая скоро канет в лету. Однако годы практики убедили меня в обратном. DDD — не просто. . . |
Исследование рантаймов контейнеров Docker, containerd и rkt
Mr. Docker 11.05.2025 Когда мы говорим о контейнерных рантаймах, мы обсуждаем программные компоненты, отвечающие за исполнение контейнеризованных приложений. Это тот слой, который берет образ контейнера и превращает его в. . . |
Micronaut и GraalVM — будущее микросервисов на Java?
Javaican 11.05.2025 Облачные вычисления безжалостно обнажили ахиллесову пяту Java — прожорливость к ресурсам и медлительный старт приложений. Традиционные фреймворки, годами радовавшие корпоративных разработчиков своей. . . |
Наверх
В этой статье показаны действия, с помощью которых можно включить или отключить сетевой адаптер (адаптеры) в операционной системе Windows 10.
Сетевой адаптер (Network Interface Card, NIC) — это аппаратный компонент компьютера, который подключает компьютер к компьютерной сети, известной как сетевое подключение и позволяет компьютеру взаимодействовать с другими устройствами в сети.
Чтобы включить или отключить сетевой адаптер, необходимо войти в систему с правами администратора
Содержание
- Как включить или отключить сетевой адаптер используя «Сетевые подключения»
- Как включить или отключить сетевой адаптер используя «Диспетчер устройств»
- Как включить или отключить сетевой адаптер используя Windows PowerShell
- Как включить или отключить сетевой адаптер используя утилиту netsh
- Как включить или отключить сетевой адаптер используя команды WMIC
Как включить или отключить сетевой адаптер используя «Сетевые подключения»
Чтобы отключить сетевой адаптер, нажмите на клавиатуре сочетание клавиш + R, в открывшемся окне Выполнить введите ncpa.cpl и нажмите клавишу Enter ↵.

В открывшемся окне «Сетевые подключения», чтобы отключить сетевой адаптер, щелкните правой кнопкой мыши на нужном сетевом адаптере и в появившемся контекстном меню выберите пункт Отключить.

Чтобы включить сетевой адаптер, в окне «Сетевые подключения» щелкните правой кнопкой мыши на нужном (отключенном) сетевом адаптере и в появившемся контекстном меню выберите пункт Включить.

Как включить или отключить сетевой адаптер используя «Диспетчер устройств»
Откройте диспетчер устройств используя любой способ.
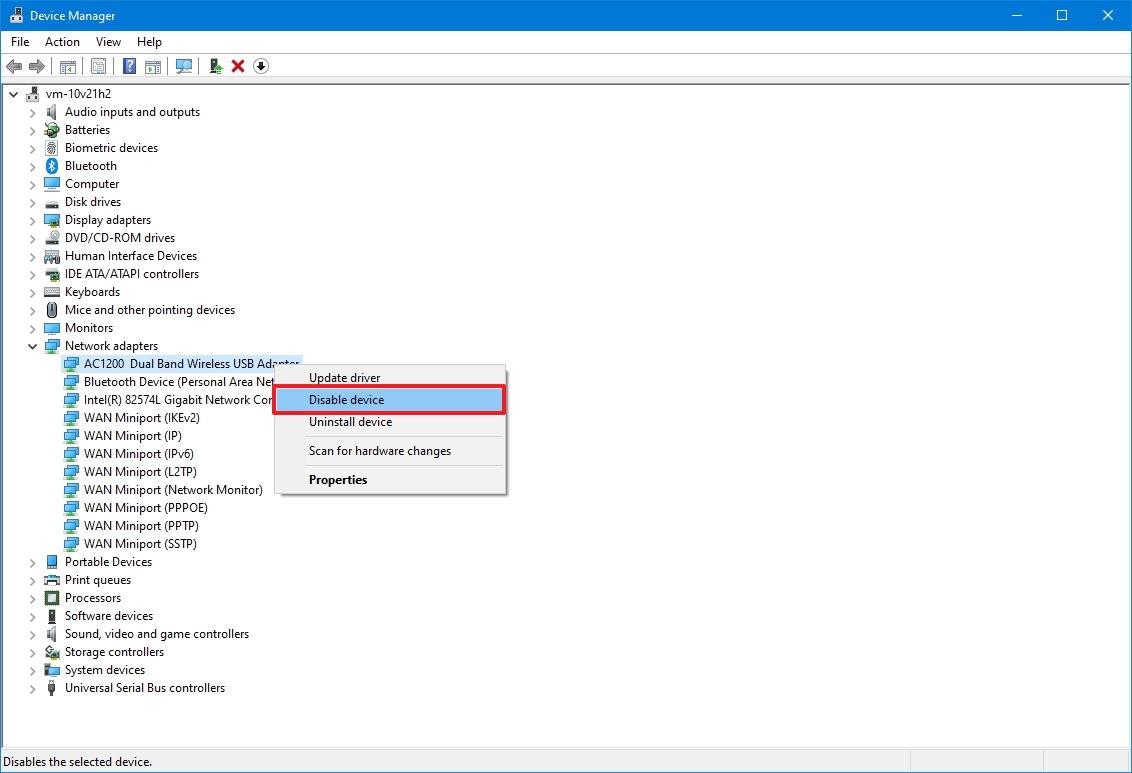
Чтобы отключить сетевой адаптер, в окне диспетчера устройств разверните узел Сетевые адаптеры, затем щелкните правой кнопкой мыши сетевой адаптер который вы хотите отключить и в появившемся контекстном меню выберите пункт Отключить устройство.

В появившемся окне подтвердите отключение устройства нажав кнопку Да.
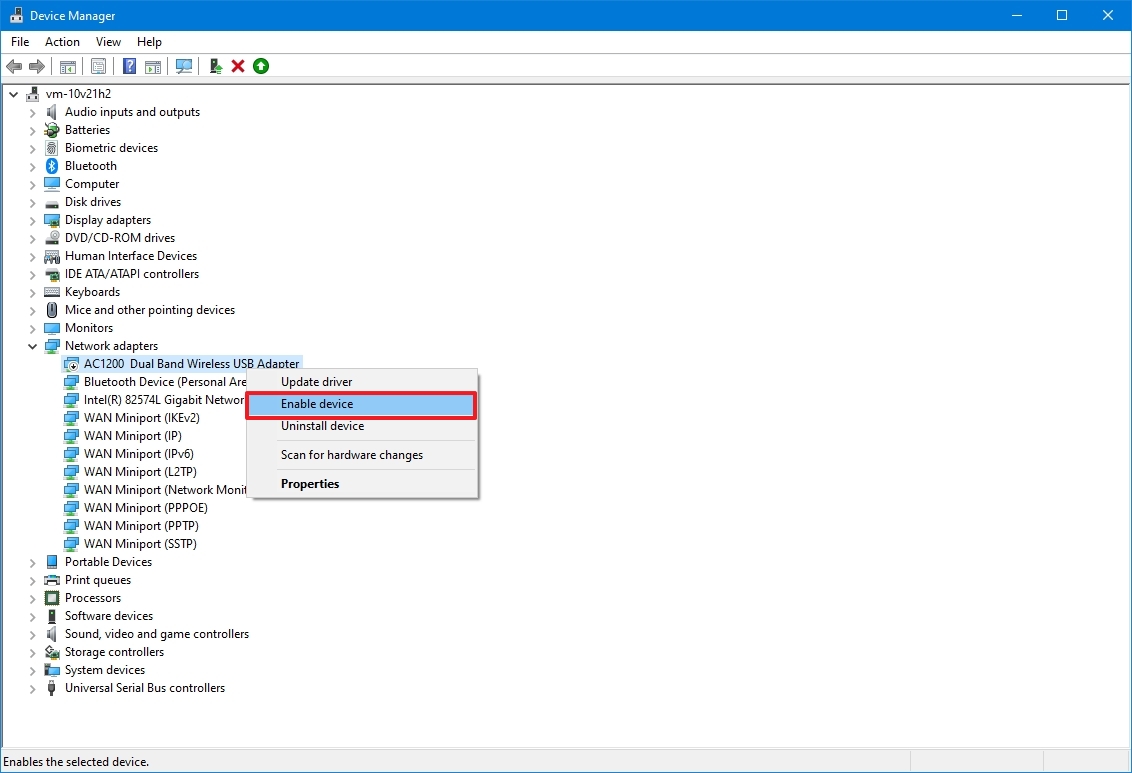
Чтобы включить сетевой адаптер, в окне диспетчера устройств разверните узел Сетевые адаптеры, затем щелкните правой кнопкой мыши по отключенному сетевому адаптеру и в появившемся контекстном меню выберите пункт Включить устройство.

Как включить или отключить сетевой адаптер используя Windows PowerShell
Данный способ доступен только в Windows 8.1 и Windows 10.
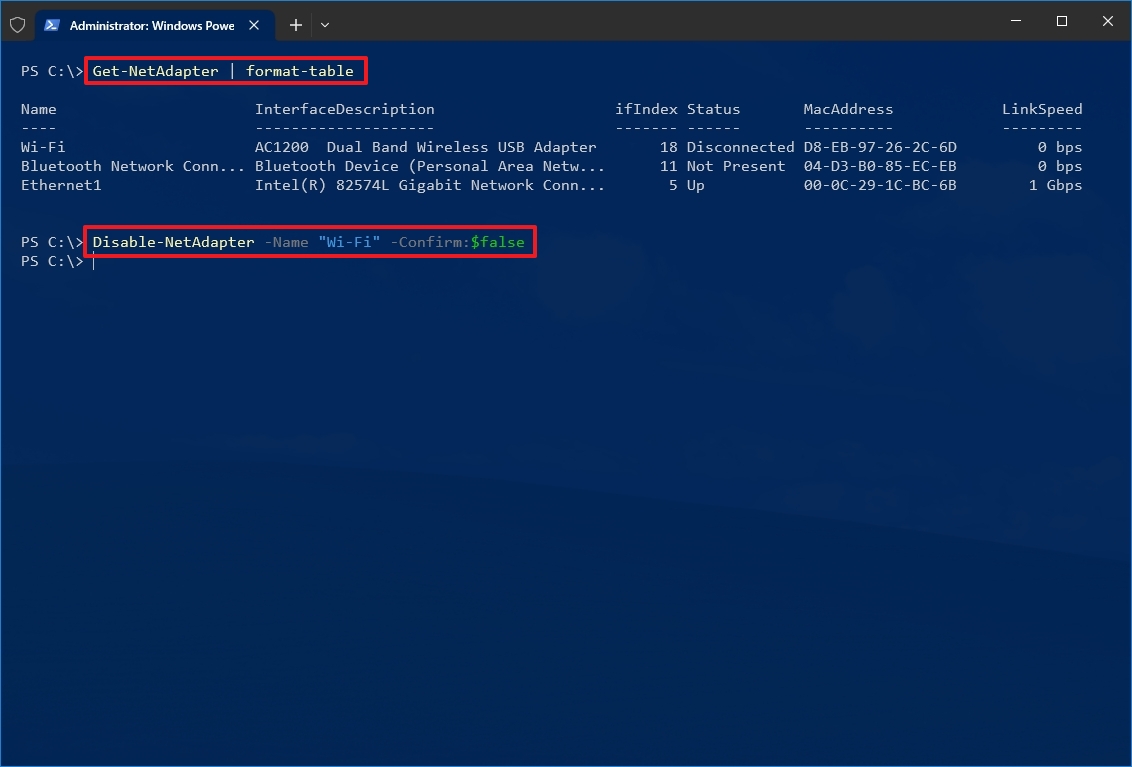
Первое что нужно сделать, это узнать имя сетевого адаптера, для этого запустите консоль Windows PowerShell от имени администратора и выполните следующую команду:
Get-NetAdapter | format-list
В строке Name отображено имя сетевого адаптера. Запомните имя сетевого адаптера который необходимо включить или отключить (в данном примере Ethernet).

Чтобы отключить нужный сетевой адаптер, в консоли PowerShell выполните команду следующего вида:
Disable-NetAdapter -Name «Имя сетевого адаптера» -Confirm:$false
Замените Имя сетевого адаптера в команде выше фактическим именем сетевого адаптера который вы хотите отключить (например Ethernet). В данном примере команда выглядит следующим образом:
Disable-NetAdapter -Name «Ethernet» -Confirm:$false

Чтобы включить нужный сетевой адаптер, в консоли PowerShell выполните команду следующего вида:
Enable-NetAdapter -Name «Имя сетевого адаптера» -Confirm:$false
Замените Имя сетевого адаптера в команде выше фактическим именем сетевого адаптера который вы хотите включить (например Ethernet). В данном примере команда выглядит следующим образом:
Enable-NetAdapter -Name «Ethernet» -Confirm:$false

Как включить или отключить сетевой адаптер используя утилиту netsh
Данный способ использует команды утилиты командной строки netsh (network shell — сетевая оболочка) которая позволяет отображать или изменять конфигурацию сети компьютера.
Первым делом нам нужно узнать имя сетевого интерфейса, для этого запустите командную строку от имени администратора и выполните следующую команду:
netsh interface show interface
Запомните имя сетевого интерфейса который необходимо включить или отключить (в данном примере Ethernet).

Чтобы отключить сетевой адаптер, выполните команду следующего вида:
netsh interface set interface «Имя интерфейса» disable
Замените Имя интерфейса в команде выше фактическим именем сетевого адаптера который вы хотите отключить (например Ethernet). В данном примере команда выглядит следующим образом:
netsh interface set interface «Ethernet» disable

Чтобы включить сетевой адаптер, выполните команду следующего вида:
netsh interface set interface «Имя интерфейса» enable
Замените Имя интерфейса в команде выше фактическим именем сетевого адаптера который вы хотите включить (например Ethernet). В данном примере команда выглядит следующим образом:
netsh interface set interface «Ethernet» enable

Как включить или отключить сетевой адаптер используя команды WMIC
Данный способ использует команды инструментария управления Windows.
Сначала узнаем номер индекса сетевого адаптера, для этого запустите командную строку от имени администратора и выполните следующую команду:
wmic nic get name, index
Запомните номер индекса сетевого адаптера (в данном примере 8).

Чтобы отключить сетевой адаптер, выполните команду следующего вида:
wmic path win32_networkadapter where index=Номер индекса call disable
Замените Номер индекса в команде выше фактическим номером сетевого адаптера который вы хотите отключить (например 8). В данном примере команда выглядит следующим образом:
wmic path win32_networkadapter where index=8 call disable

Чтобы включить сетевой адаптер, выполните команду следующего вида:
wmic path win32_networkadapter where index=Номер индекса call enable
Замените Номер индекса в команде выше фактическим номером сетевого адаптера который вы хотите включить (например 8). В данном примере команда выглядит следующим образом:
wmic path win32_networkadapter where index=8 call enable

Обновлено:
Опубликовано:
Графический интерфейс
Командная строка
CMD
Powershell
Графический интерфейс
В правом нижнем углу кликните правой кнопкой мыши по значку сети — выберите Центр управления сетями и общим доступом
В меню слева найдите и кликните по Изменение параметров адаптера
В открывшемся окне нажмите правой кнопкой мыши по значку того сетевого адаптера, который нужно включить / отключить. В контекстном меню будет возможность выбрать соответствующее действие. В данном примере включаем сеть с названием Ethernet
Командная строка
Рассмотрим варианты с использованием командных строк — классической cmd и Powershell.
CMD
Открываем командную строку от имени администратора. Вводим команду для показа всех сетевых интерфейсов, которые есть в системе:
netsh interface show interface
Результат будет, примерно, следующий:
Состояние адм. Состояние Тип Имя интерфейса
———————————————————————
Разрешен Подключен Выделенный Ethernet 2
Разрешен Подключен Выделенный Ethernet
* в данном примере в системе есть два интерфейса — Ethernet и Ethernet 2.
Теперь, чтобы отключить интерфейс, например, «Ethernet 2», вводим:
netsh interface set interface «Ethernet 2» disable
А для включения вводим:
netsh interface set interface «Ethernet 2» enable
Powershell
Открываем от имени администратора консоль Powershell и вводим команду для просмотра сетевых интерфейсов:
Get-NetAdapter | format-table Name, InterfaceDescription, Status
Теперь для отключения сетевого адаптера вводим:
Disable-NetAdapter -Name «Ethernet 2» -Confirm:$false
Для включения:
Enable-NetAdapter -Name «Ethernet 2» -Confirm:$false
Была ли полезна вам эта инструкция?
Да Нет
(Image credit: Future)
A network adapter is a crucial part of your computer as it connects it to the local network and internet. However, there may be times when you may need to enable or disable Wi-Fi and Ethernet network adapters for reasons such as conserving battery life or keeping your device offline.
Although the Settings app on Windows 10 can manage network settings, it lacks the ability to enable or disable network adapters.
This how-to guide will walk you through the steps to disable and enable a network adapter using a graphical interface and commands.
How to enable or disable network adapters using Control Panel
On Windows 10, you can use Control Panel to disable and enable your network adapters as necessary.
Disable adapter
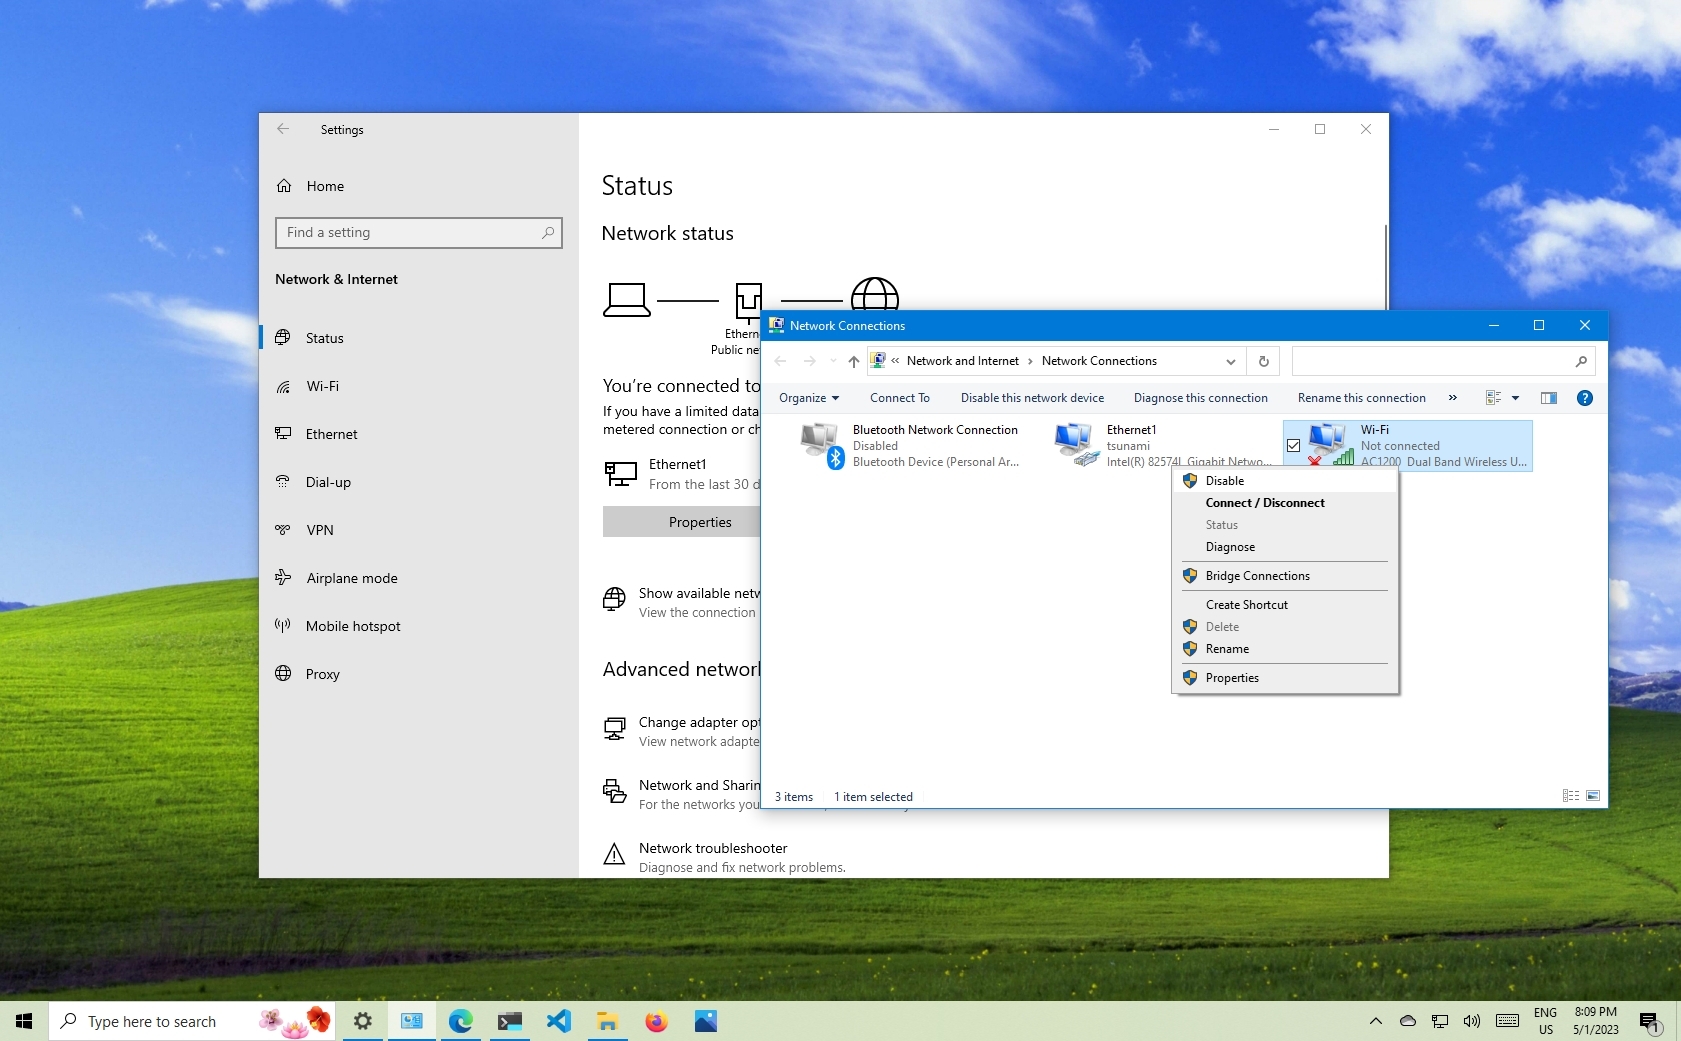
To disable a network adapter using Control Panel, use these steps:
- Open Settings.
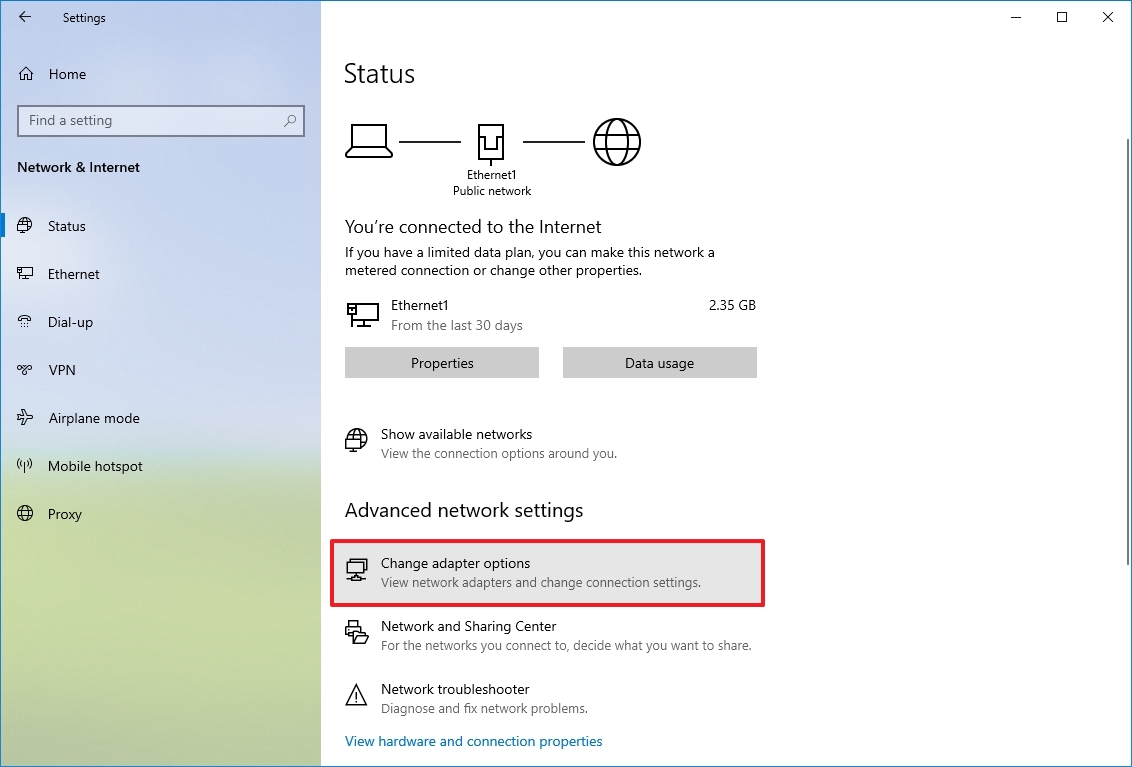
- Click on Network & Security.
- Click on Status.
- Quick tip: You can also quickly access these settings by right-clicking the network icon in the taskbar and selecting the «Network & Internet settings» option.
- Click on «Change adapter options.»
- Right-click the network adapter and select the Disable option.
Enable adapter
All the latest news, reviews, and guides for Windows and Xbox diehards.
To enable a network adapter with Control Panel on Windows 10, use these steps:
- Open Settings.
- Click on Network & Security.
- Click on Status.
- Click on «Change adapter options.»
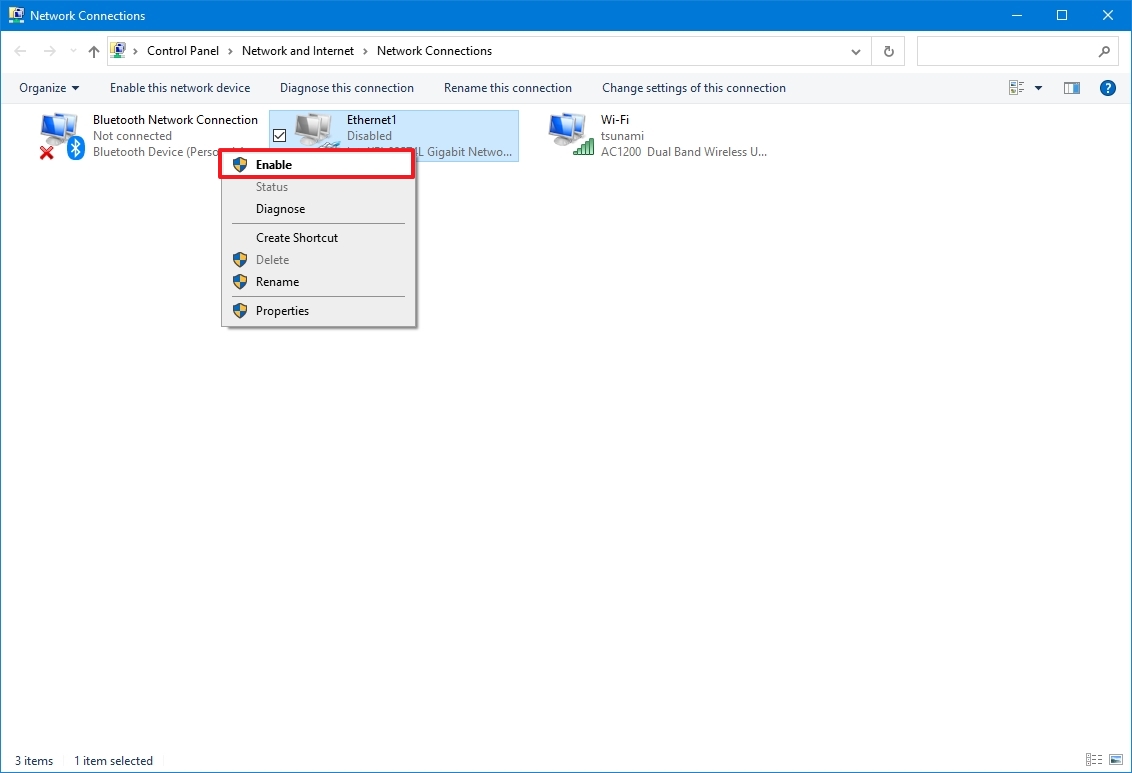
- Right-click the network adapter and select the Enable option.
How to enable or disable network adapters using Device Manager
It’s also possible to use Device Manager to enable or disable network adapters you don’t need.
Disable adapter
To disable a network adapter using Device Manager, use these steps:
- Open Start.
- Search for Device Manager, and click the top result to open the app.
- Expand the Network adapters category.
- Right-click the adapter you want, and select the Disable device option.
- Click the Yes button.
Enable adapter
To enable a network adapter using Device Manager, use these steps:
- Open Start.
- Search for Device Manager, and click the top result.
- Expand the Network adapters category.
- Right-click the adapter you want, and select the Enable device option.
How to enable or disable network adapters using Command Prompt
You can also use the netsh command on Windows 10 to disable or re-enable network adapters on your device.
Disable adapter
To disable a network adapter with the netsh command, use these steps:
- Open Start.
- Search for Command Prompt, right-click the top result, and select the Run as administrator option.
- Type the following command to identify the name of the adapter you want to disable and press Enter: netsh interface show interface
- Type the following command to disable the Wi-Fi or Ethernet adapter and press Enter: netsh interface set interface «YOUR-ADAPTER-NAME» disable

In the command, remember to specify the name of the adapter you want to disable. The quotation marks are only required if there are spaces within the name.
Enable adapter
To enable a network adapter with the netsh command, use these steps:
- Open Start.
- Search for Command Prompt, right-click the top result, and select the Run as administrator option.
- Type the following command to identify the name of the adapter you want to enable and press Enter: netsh interface show interface
- Type the following command to disable the wireless or wired network adapter and press Enter: netsh interface set interface «YOUR-ADAPTER-NAME» enable

In the command, specify the name of the adapter you want to enable. The quotation marks are only required if there are spaces within the name.
How to enable or disable network adapters using PowerShell
Alternatively, you can use PowerShell commands to disable or enable any network adapters you don’t use on your computer.
Disable adapter
To disable a Wi-Fi or Ethernet network adapter on Windows 10 using PowerShell, use these steps:
- Open Start.
- Search for PowerShell, right-click the top result, and select the Run as administrator option.
- Type the following command to identify the name of the adapter you want to disable and press Enter: Get-NetAdapter | format-table
- Type the following command to disable the Wi-Fi or Ethernet adapter and press Enter: Disable-NetAdapter -Name «YOUR-ADAPTER-NAME» -Confirm:$false
In the command, specify the name of the adapter you want to disable. The quotation marks are only required if there are spaces within the name.
Enable adapter
To enable a network adapter on Windows 10 from PowerShell, use these steps:
- Open Start.
- Search for PowerShell, right-click the top result, and select the Run as administrator option.
- Type the following command to identify the name of the adapter you want to enable and press Enter: Get-NetAdapter | format-table
- Type the following command to disable the Wi-Fi or Ethernet adapter and press Enter: Enable-NetAdapter -Name «YOUR-ADAPTER-NAME» -Confirm:$false

In the command, specify the name of the adapter you want to enable. The quotation marks are only required if there are spaces within the name.
Although the Settings app doesn’t offer a complete set of network settings, you will still find many ways to manage network adapters on your device.
It’s important to note that using the network flyout to turn on or off wireless connections doesn’t disable your Wi-Fi adapter. It only disconnects the device from the network.
This guide focuses on wireless and wired adapters, but Bluetooth is also a networking device, which means that you can use the same instructions to enable or disable the adapter.
More resources
For more helpful articles, coverage, and answers to common questions about Windows 10 and Windows 11, visit the following resources:
- Windows 11 on Windows Central — All you need to know
- Windows 10 on Windows Central — All you need to know
Mauro Huculak has been a Windows How-To Expert contributor for WindowsCentral.com for nearly a decade and has over 15 years of experience writing comprehensive guides. He also has an IT background and has achieved different professional certifications from Microsoft, Cisco, VMware, and CompTIA. He has been recognized as a Microsoft MVP for many years.