Ensuring secure boot on your Windows 11 device is crucial for protecting your system from unauthorized access and malware. But did you know that you can enable secure boot without having to access the BIOS settings? This convenient method provides an alternative solution that is user-friendly and doesn’t require technical expertise.
To enable secure boot on Windows 11 without accessing the BIOS, you can simply follow a few easy steps. Begin by opening the Settings app on your computer. Then, navigate to the «Update & Security» section and click on «Advanced startup» under the Recovery tab. From there, choose the «Restart now» option, which will reboot your device into the Advanced Startup settings. Here, select «Troubleshoot,» then «Advanced options,» and finally «UEFI Firmware Settings.» Once you’re in the UEFI settings, locate the «Secure Boot» option and enable it. Save your changes, exit the settings, and your Windows 11 device will now have secure boot enabled, providing enhanced protection for your system.
To enable Secure Boot on Windows 11 without accessing the BIOS, follow these steps:
- Click on the Start button and select «Settings».
- In the Settings menu, click on «Update & Security».
- Choose «Recovery» from the left-hand side menu.
- Under the «Advanced startup» section, click on «Restart now».
- Your computer will restart and boot into the Advanced startup options.
- Select «Troubleshoot», then «Advanced options».
- Click on «Startup Settings» and then «Restart».
- After the restart, you will see a list of options. Press the number corresponding to «Enable Secure Boot» (usually F10 or F12).
- Your computer will now boot with Secure Boot enabled.
Enabling Secure Boot in Windows 11 Without BIOS
Secure Boot is a feature that helps protect the integrity of the operating system during the boot process by ensuring that only trusted software is loaded. In Windows 11, Secure Boot provides an additional layer of security, but enabling it typically requires accessing the BIOS settings. However, there is a method to enable Secure Boot in Windows 11 without accessing the BIOS, which can be helpful if your computer’s BIOS does not support Secure Boot or if you face difficulties accessing it. In this article, we will guide you on how to enable Secure Boot in Windows 11 without BIOS.
Method 1: Using the Command Prompt
The first method for enabling Secure Boot in Windows 11 without BIOS involves using the Command Prompt utility. Here are the steps:
- Open the Start menu and type «cmd» to search for the Command Prompt.
- Right-click on Command Prompt and select «Run as administrator» to open it with administrative privileges.
- In the Command Prompt window, type the following command and press Enter:
shutdown /r /fw - Your computer will restart and boot into the UEFI firmware settings.
- Navigate to the «Secure Boot» or «Security» section in the UEFI firmware settings.
- Enable Secure Boot by changing the setting from «Disabled» to «Enabled».
- Save the changes and exit the UEFI firmware settings.
- Your computer will restart, and Secure Boot will be enabled in Windows 11 without accessing the BIOS.
Benefits of Method 1
Using the Command Prompt to enable Secure Boot without BIOS has its advantages:
- Bypasses BIOS limitations: If your computer’s BIOS does not have the option to enable Secure Boot, this method provides an alternative solution.
- Simplifies the process: Many users find accessing and navigating the BIOS settings complex or intimidating. Using the Command Prompt streamlines the process.
- Can be performed without restarting: With Method 1, you can enable Secure Boot without the need to manually restart your computer and access the BIOS.
Method 2: Using the System Configuration (msconfig) Tool
The second method for enabling Secure Boot in Windows 11 without BIOS involves using the System Configuration (msconfig) tool. Here are the steps:
- Open the Start menu and type «msconfig» to search for the System Configuration tool.
- Click on «System Configuration» or «msconfig» to open the tool.
- In the System Configuration window, navigate to the «Boot» tab.
- Under the «Boot options» section, check the box next to «Safe boot» and select «Minimal».
- Click on «Apply» and then «OK».
- Restart your computer.
- Your computer will boot into Safe Mode. Open the Start menu, type «msconfig», and open the System Configuration tool again.
- In the System Configuration window, navigate to the «Boot» tab.
- Under the «Boot options» section, uncheck the box next to «Safe boot».
- Click on «Apply» and then «OK».
- Restart your computer again.
- Your computer will boot normally, and Secure Boot will be enabled in Windows 11 without BIOS.
Benefits of Method 2
Using the System Configuration (msconfig) tool to enable Secure Boot without BIOS offers the following benefits:
- Simplifies the process: The System Configuration tool provides a user-friendly interface to enable Secure Boot, making it easier for users.
- Minimal system changes: Method 2 allows you to enable Secure Boot without making extensive changes to your computer’s settings.
- No BIOS access required: By using the System Configuration tool, you can enable Secure Boot without the need to access and navigate the BIOS.
Conclusion
Enabling Secure Boot in Windows 11 without BIOS is possible using either the Command Prompt or the System Configuration (msconfig) tool. These methods provide alternatives for users who face BIOS limitations or difficulties navigating the settings. By following the steps outlined in this article, you can enhance the security of your Windows 11 operating system and ensure that only trusted software is loaded during the boot process.

Enabling Secure Boot Windows 11 Without Bios
Secure Boot is a feature that enhances the security of your operating system by ensuring that only trusted software is loaded during the boot process. In Windows 11, enabling Secure Boot usually requires accessing the BIOS settings. However, there are alternative methods available to enable Secure Boot without accessing the BIOS:
- Use the Windows Security app: Open the Windows Security app and go to «Device security». Under «Core isolation», enable the «Memory integrity» option. This will enable Secure Boot without BIOS access.
- Use Command Prompt: Open Command Prompt as an administrator and enter the following command:
bcdedit /set {current} secureboot on. Restart your computer to enable Secure Boot without BIOS. - Use Group Policy Editor: Press Windows + R, type «gpedit.msc», and hit Enter. Navigate to «Computer Configuration» > «Administrative Templates» > «System» > «Device Guard» > «Turn on Virtualization Based Security». Enable this option to enable Secure Boot without BIOS access.
Key Takeaways
- Secure Boot can be enabled in Windows 11 without accessing the BIOS.
- Ensure your PC meets the necessary requirements for Secure Boot.
- Update your computer’s firmware to the latest version.
- Go to the Windows 11 settings and open the «Recovery» section.
- Click on «Restart now» under the «Advanced startup» section.
Frequently Asked Questions
Here, we have provided answers to some commonly asked questions about enabling Secure Boot in Windows 11 without accessing the BIOS settings.
1. Can I enable Secure Boot on Windows 11 without accessing the BIOS?
Yes, it is possible to enable Secure Boot on Windows 11 without accessing the BIOS settings. Windows 11 provides an alternative method to enable Secure Boot through the Control Panel.
To do this, go to the Control Panel and navigate to the «System and Security» section. Then, click on «BitLocker Drive Encryption» and select «Turn on BitLocker» for the system drive.
2. Will enabling Secure Boot without accessing the BIOS affect my system’s performance?
No, enabling Secure Boot without accessing the BIOS will not have any adverse effects on your system’s performance. Secure Boot is designed to enhance the security of your system by preventing unauthorized code from running during the boot process.
Enabling Secure Boot without BIOS access simply utilizes the built-in Windows 11 security features to enable this protection.
3. Are there any specific requirements for enabling Secure Boot without accessing the BIOS in Windows 11?
Yes, there are a few requirements to enable Secure Boot without accessing the BIOS in Windows 11:
— Your system must have UEFI firmware supporting Secure Boot.
— You should be using a version of Windows 11 that supports Secure Boot.
— The system drive (usually C:\) should be encrypted using BitLocker.
4. How can I check if Secure Boot is enabled on my Windows 11 system?
You can check if Secure Boot is enabled on your Windows 11 system by following these steps:
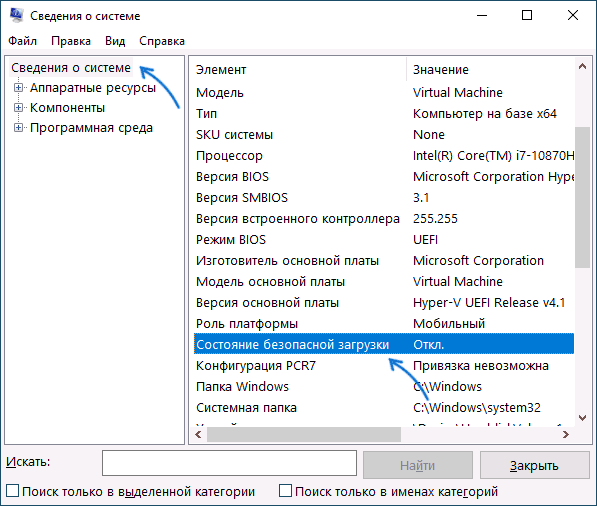
— Open the «System Information» window by pressing the Windows key + R, then typing «msinfo32» and pressing Enter.
— In the «System Information» window, look for the «Secure Boot State» under the «Security» section. If it says «On», Secure Boot is enabled.
5. Can I disable Secure Boot if I enabled it without accessing the BIOS in Windows 11?
Yes, you can disable Secure Boot even if you enabled it without accessing the BIOS in Windows 11. To disable Secure Boot, follow these steps:
— Go to the Control Panel and navigate to the «System and Security» section.
— Click on «BitLocker Drive Encryption» and then select «Turn off BitLocker» for the system drive.
In conclusion, enabling Secure Boot in Windows 11 without accessing the BIOS is a straightforward process that ensures enhanced security for your system. By following the steps outlined in this guide, you can enable Secure Boot through the Windows system settings.
Remember to check if your device meets the requirements for Secure Boot and update your Windows 11 version if needed. Once enabled, Secure Boot provides protection against unauthorized software and ensures that only trusted software can run during the boot process, safeguarding your system from potential threats.
Ensuring the security of your operating system is crucial in today’s digital landscape. While BIOS has traditionally been the go-to method for enabling Secure Boot on Windows, there is actually a way to achieve it without relying on BIOS. This exciting alternative opens up new possibilities for users who want to enhance the security of their Windows 11 experience.
By leveraging the UEFI firmware, Windows 11 offers a pathway to enable Secure Boot without the need for BIOS. This approach allows users to strengthen the protection of their system against unauthorized firmware and software during the boot process. With this method, users can have peace of mind knowing that their Windows 11 installation is fortified against potential security threats.
To enable Secure Boot in Windows 11 without accessing the BIOS, follow these steps: 1. Press the Windows key + I to open the Settings app. 2. Click on «Update & Security» and then select «Recovery». 3. Click on «Restart now» under the «Advanced Startup» section. 4. Once the computer restarts, select «Troubleshoot» and then «Advanced options». 5. Choose «UEFI Firmware Settings» and click on «Restart». 6. When the computer restarts again, go to the «Security» or «Boot» tab in the BIOS settings. 7. Enable Secure Boot and save the changes. Restart the computer to apply the settings. Enjoy a more secure Windows 11 experience!

Enabling Secure Boot in Windows 11 Without BIOS
Secure Boot is a feature provided by modern computer systems that ensures the integrity and security of the operating system during the boot process. It verifies the digital signature of each component before allowing it to load, protecting against malware and unauthorized modifications. While enabling Secure Boot traditionally requires accessing the BIOS settings, Windows 11 introduces a convenient method to enable Secure Boot without the need for BIOS access. This article will guide you through the process of enabling Secure Boot in Windows 11 without BIOS.
Check Compatibility and Pre-requisites
Before proceeding with the steps to enable Secure Boot in Windows 11 without BIOS access, it is crucial to verify the compatibility and ensure that all pre-requisites are met. Here are a few key points to consider:
- Make sure your computer supports UEFI firmware with Secure Boot capability.
- Ensure that your computer is running Windows 11, as Secure Boot settings may vary across different versions of Windows.
- Disable any third-party antivirus or security software temporarily to prevent conflicts with Secure Boot.
- Ensure you have administrative privileges on your Windows 11 computer.
- Take a backup of all important files and data to avoid any potential data loss during the process.
Step 1: Verify UEFI Firmware and Secure Boot Support
To enable Secure Boot without BIOS access, your computer must support UEFI firmware with Secure Boot capabilities. Here’s how you can check for compatibility:
| 1. | Press Windows key + R to open the Run dialog box. |
| 2. | Type msinfo32 and press Enter to open the System Information window. |
| 3. | In the System Information window, look for the «BIOS Mode» under the «System Summary» section. |
| 4. | If the BIOS Mode is listed as «UEFI», it means your computer is using UEFI firmware. |
Once you have confirmed that your computer is using UEFI firmware, you can proceed to verify if Secure Boot is enabled or disabled:
| 1. | Press Windows key + I to open the Settings app. |
| 2. | Click on System and then select About from the left pane. |
| 3. | Scroll down to the «Secure Boot» section. |
| 4. | If the status is listed as «On», it means Secure Boot is already enabled. |
| 5. | If the status is listed as «Off», proceed to the next step to enable Secure Boot without BIOS access. |
Step 2: Enable Secure Boot without BIOS Access
With Windows 11, Microsoft has introduced a simplified method to enable Secure Boot without accessing the BIOS settings. Follow these steps:
- Open the Settings app by pressing Windows key + I.
- Navigate to System and select Advanced system settings from the left pane.
- In the System Properties window, go to the Hardware tab and click Device Installation Settings.
- In the Device Installation Settings window, select Yes and click Save Changes.
- Restart your computer and enter the UEFI firmware settings (often accessed by pressing a specific key during boot, such as F2 or Del).
- Navigate to the Secure Boot section, and use the provided options to enable Secure Boot.
- Save the changes and exit the UEFI firmware settings.
- Once the computer restarts, Windows 11 will enable Secure Boot without requiring BIOS access.
Benefits of Secure Boot
Secure Boot offers several benefits and plays a crucial role in maintaining the security of your Windows 11 system. Here are some key advantages:
- Protection against boot-level malware: Secure Boot ensures that only digitally signed and trusted components are loaded during the boot process, preventing bootkits and other boot-level malware.
- Data and system integrity: By verifying the integrity of the operating system and its components, Secure Boot protects against unauthorized modifications that can compromise your system’s security and stability.
- Enhanced system trust: Secure Boot enhances the overall trustworthiness of the system by ensuring that every component in the boot chain is verified and secure.
- Prevention of unauthorized operating systems: Secure Boot allows you to only run approved operating systems, reducing the risk of running tampered or malicious versions of the OS.
Conclusion
Enabling Secure Boot in Windows 11 without BIOS access provides a convenient method to enhance the security and integrity of your system. By following the steps outlined in this article, you can easily enable Secure Boot and enjoy the benefits it offers. Remember to regularly update your system and keep your anti-malware software up to date for maximum protection.

Enabling Secure Boot in Windows 11 without BIOS
Secure Boot is an essential security feature that protects your computer from booting unauthorized software or malware during startup. By default, Windows 11 requires Secure Boot to be enabled in the BIOS for system integrity. However, if your device does not support BIOS or does not have Secure Boot settings in the BIOS, there is still a way to enable it.
- First, make sure your device meets the minimum system requirements for Windows 11 and the TPM (Trusted Platform Module) is enabled.
- Open the «Settings» app in Windows 11 and navigate to «System» -> «About».
- Click on «Advanced system settings» and go to the «Startup and Recovery» section.
- Click on the «Settings» button next to «Startup and Recovery».
- In the Startup and Recovery settings, under «Default operating system,» click on the drop-down menu and select «Windows 11».
- Check the «Time to display list of operating systems» box and set the time to 0 seconds.
- Click «OK» to save the changes and exit the Startup and Recovery settings.
- Restart your computer for the changes to take effect.
By following these steps, you can enable Secure Boot on your Windows 11 device without accessing the BIOS. It is important to note that while this method may enable Secure Boot, it may not provide the same level of security as enabling it through the BIOS. If possible, it is recommended to enable Secure Boot through the BIOS settings for optimal security.
Key Takeaways: How to Enable Secure Boot Windows 11 Without Bios
- Secure Boot is an essential security feature that helps protect your computer and data.
- Windows 11 provides a streamlined process to enable Secure Boot without accessing your BIOS settings.
- To enable Secure Boot, you need to have a compatible hardware and UEFI firmware.
- First, ensure that your device meets the minimum requirements for Windows 11.
- Next, check if Secure Boot is supported and enabled in your UEFI firmware settings.
Frequently Asked Questions
In this section, we will answer some common questions about how to enable secure boot on Windows 11 without accessing the BIOS.
1. Can I enable secure boot on Windows 11 without accessing the BIOS?
Yes, you can enable secure boot on Windows 11 without accessing the BIOS. Microsoft has introduced a new method to enable secure boot through the Windows 11 settings.
To enable secure boot without BIOS, follow these steps:
2. How do I enable secure boot on Windows 11 without BIOS?
To enable secure boot on Windows 11 without accessing the BIOS, you can use the following steps:
Step 1: Open the Start Menu and click on the «Settings» icon.
Step 2: In the Settings window, click on «System» and then select «Update & Security».
Step 3: From the left panel, click on «Recovery» and then click on «Restart now» under the Advanced startup section.
Step 4: After your computer restarts, click on «Troubleshoot» and then select «Advanced options».
Step 5: In the Advanced options menu, click on «UEFI Firmware Settings» and then click on «Restart».
Step 6: Your computer will restart again, and this time it will boot into the UEFI firmware settings.
Step 7: In the UEFI firmware settings, navigate to the «Security» or «Boot» menu, depending on your motherboard.
Step 8: Look for an option called «Secure Boot» and enable it.
Step 9: Save the changes and exit the UEFI firmware settings.
Step 10: Your computer will restart, and secure boot will be enabled on Windows 11 without accessing the BIOS.
3. What if I can’t find the «UEFI Firmware Settings» option in the Advanced options menu?
If you can’t find the «UEFI Firmware Settings» option in the Advanced options menu, it’s possible that your computer doesn’t support this feature. Some older models or custom-built PCs may not have the option to access the UEFI firmware settings directly from the Advanced options menu.
In this case, you may need to access the BIOS to enable secure boot on Windows 11. Consult your computer’s manual or manufacturer’s website for specific instructions on how to access the BIOS.
4. Why is secure boot important on Windows 11?
Secure boot is important on Windows 11 as it helps protect your computer from unauthorized software and malware. When secure boot is enabled, only trusted software and operating systems that have been digitally signed by relevant entities can run on your computer. This adds an extra layer of security and ensures that your system is protected from potentially harmful software.
By enabling secure boot, you can prevent the installation of malicious software or unauthorized modifications to your system, thereby enhancing the overall security of your computer.
5. Are there any prerequisites for enabling secure boot on Windows 11 without BIOS?
To enable secure boot on Windows 11 without accessing the BIOS, there are a few prerequisites:
— Your computer should be running Windows 11.
— The UEFI firmware of your computer should support secure boot.
If these prerequisites are met, you can proceed with the steps mentioned earlier to enable secure boot on Windows 11.
To enable Secure Boot on Windows 11 without accessing the BIOS, you can utilize the Device Manager and System Configuration tool. By following these simple steps, you can enhance the security of your system and protect it from unauthorized firmware and malware attacks.
First, open the Start menu and search for «Device Manager.» Locate the «System devices» category and expand it. Right-click on «System Firmware» and select «Properties.» In the Properties window, go to the «Driver» tab and click «Update driver.» Next, select «Browse my computer for drivers» and then «Let me pick from a list of available drivers on my computer.» Finally, choose «Trusted Platform Module 2.0» and click «Next» to complete the driver update process.
Download Article
Plus, how to check your Secure Boot status outside of BIOS
Download Article
- Check if Secure Boot is Already Enabled
- Enabling Secure Boot
- Disabling Secure Boot
|
|
Are you trying to turn on Secure Boot on your Windows PC? Whether you have a Windows 10 computer and you’re trying to upgrade to Windows 11 or you have a Windows 11 PC and you just want to turn Secure Boot on, it’s a quick and easy process that can be completed in just a few minutes. Keep reading to learn how.
Quick Steps
- Open Windows settings.
- Navigate to Update & Security > Recovery.
- Click Restart now.
- Navigate to Troubleshoot > Advanced options > UEFI Firmware settings.
- Press Restart if prompted.
- Find and enable Secure Boot (usually found in Boot or Security).
- Press F10 to save, then exit the BIOS and restart your PC.
-

If Secure Boot is already enabled but you didn’t know it, this can save you a little time. The steps are quick and easy:
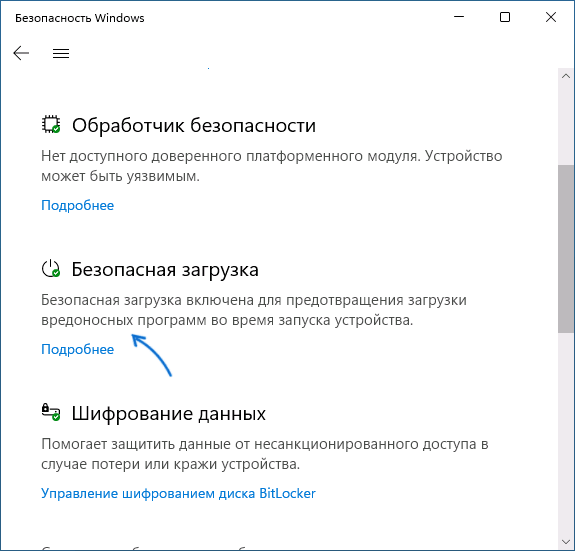
- Type sysinfo in the taskbar search bar.
- Locate the line that says «Secure Boot State.» It will say On (which means Secure Boot is enabled) or Off (which means Secure Boot is disabled).

Advertisement
-
To do this, click the Windows (Start) button in the lower-left corner of the screen, then click the cogwheel icon.
- Alternatively, you can restart your PC and press the BIOS/UEFI access key (which is usually Del or F2) when the motherboard logo flashes on your screen to access BIOS/UEFI. However the timing is hard to get right, so the steps below will guarantee that you can get into the BIOS/UEFI.
-
This option will be towards the end of the list of options. It has an icon of two arrows going in a circle.
- On Windows 11, this option is called System instead.
-
It’s near the middle of the menu options, and has an icon of a thin rectangle with a circular arrow above it.
-
This will immediately restart your PC, so make sure to save any open files before restarting to avoid losing any data or changes to them.
-
Картинка с сайта: www.wikihow.com


Once your PC restarts, you will be presented with a blue screen and several options to choose from.

If your computer immediately restarts and enters BIOS, you can move to the next step. If not, click Restart and select BIOS setup, which will restart your computer into BIOS.[1]
- If you have a Restart button but not a BIOS setup button, follow these instructions:
- Navigate to Settings > Advanced > Windows OS Configuration. Depending on your computer, these menu items may have different names, but they should be similar.
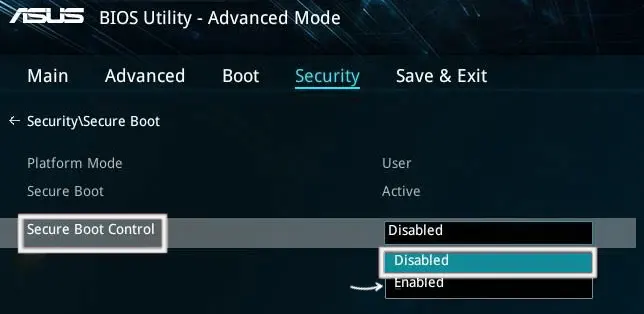
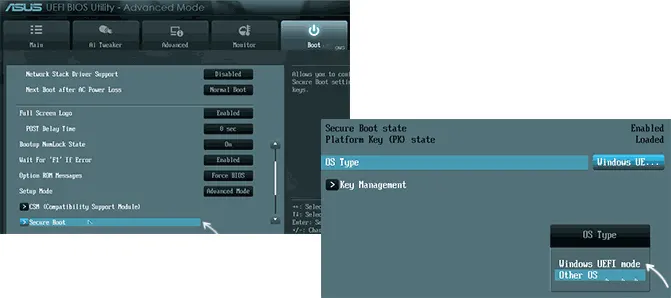
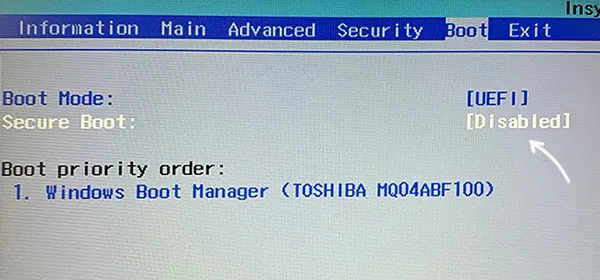
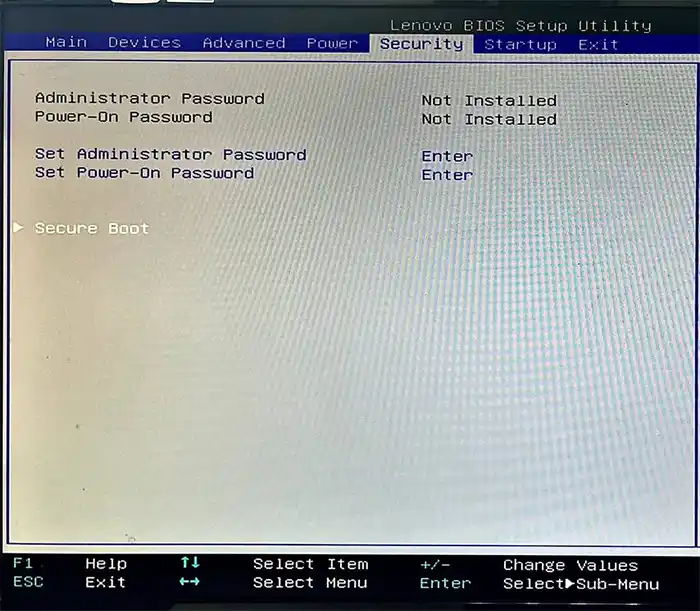
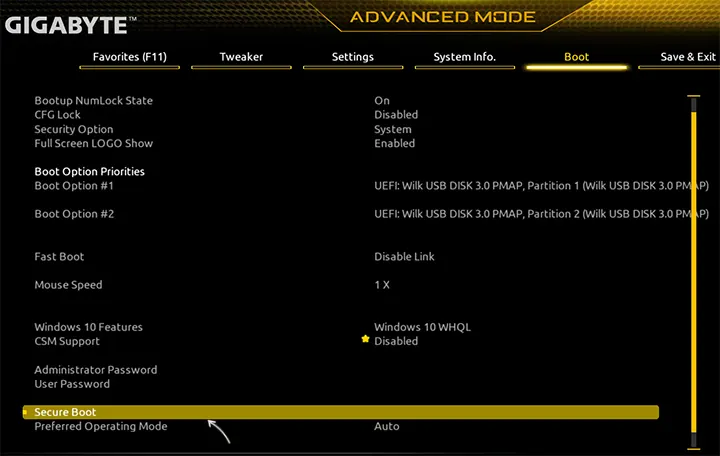
- Select Secure Boot and enable the Secure Boot setting, then restart your computer.

The Secure Boot setting is usually found in the Security or Boot/Boot options tab, but each motherboard’s BIOS is laid out slightly differently. If you aren’t sure where to find the Secure Boot setting, check your computer’s manual or the manufacturer’s website.
- To navigate the BIOS, use the arrow keys.

If you are enabling Secure Boot to update to Windows 11, do not exit BIOS just yet, as you will also need to enable TPM 2.0. If you do not need to enable TPM 2.0, you can exit the BIOS and restart your computer.
- Open the Security tab. You’ll need to use the arrow keys to navigate the BIOS.
- Look for the TPM setting. This option may say «TPM,» «Intel Platform Trust Technology (IPTT),» «AMD CPU fTPM», or «Trusted Platform Module (TPM).»
- Enable TPM 2.0. Press the Enter button to toggle on TPM 2.0.
- Press F10 to save your settings. You can now exit BIOS and restart your computer.[2]
Advertisement
-
Follow the instructions above to access the BIOS/UEFI of your computer.
-
The Secure Boot setting is usually found in the Security or Boot/Boot options tab, but each motherboard’s BIOS is laid out slightly differently. If you aren’t sure where to find the Secure Boot setting, check your computer’s manual or the manufacturer’s website.
- To navigate the BIOS, use the arrow keys.
-
Once you’ve saved your BIOS settings, you can exit the BIOS and allow your computer to restart.


Advertisement
Ask a Question
200 characters left
Include your email address to get a message when this question is answered.
Submit
Advertisement
Thanks for submitting a tip for review!
About This Article
Thanks to all authors for creating a page that has been read 17,675 times.