
How to Enable and Use Windows 10’s Built-in FPS Counter on Your PC
FPS refers to the frequency rate at which frames appear on display. But, how do you know how many frames per second you’ve got? This article will show you how to enable and use the native FPS counter found in Xbox Game Bar.
With the October 2019 Game Bar update, Microsoft rolled out the built-in FPS counter in the Xbox Game Bar. Windows 10’s built-in FPS counter is compatible with both third-party and Microsoft Store games.
In addition to monitoring your FPS rate, the ‘Performance’ widget of this app also allows you to see your PC’s CPU, GPU, and memory usage. It’s a great alternative to often clunky, resource-intensive third-party applications.
Since the Xbox Game Bar update was released in October 2019, you may already have it on your computer. But, if you have Windows automatic updates disabled, you have to update it from the Microsoft Store manually.
Xbox Game Bar’s FPS counter is a lightweight application that many users have been waiting for. However, some seem to struggle with setting up the FPS counter. Well, you’ve come to the right place, as we have prepared an in-depth guide that will help you set it up. Please follow the guide below to enable the native FPS counter on your PC.
Video on How to Enable Windows 10 FPS Counter:
Table of Contents:
- Introduction
- How to Set up Windows 10 Native FPS Counter
- Video on How to Enable Windows 10 FPS Counter
Download Computer Malware Repair Tool
It is recommended to run a free scan with Combo Cleaner — a tool to detect viruses and malware on your device. You will need to purchase the full version to remove infections. Free trial available. Combo Cleaner is owned and operated by Rcs Lt, the parent company of PCRisk.com read more.
How to Set up Windows 10 Native FPS Counter
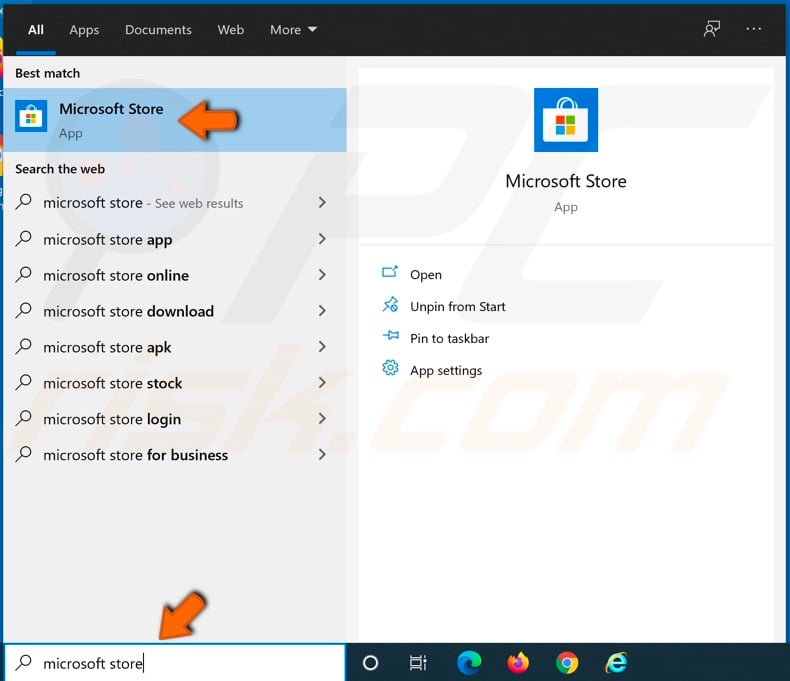
1. If you have Windows automatic updates disabled, Type Microsoft Store in the Windows search bar and open it.
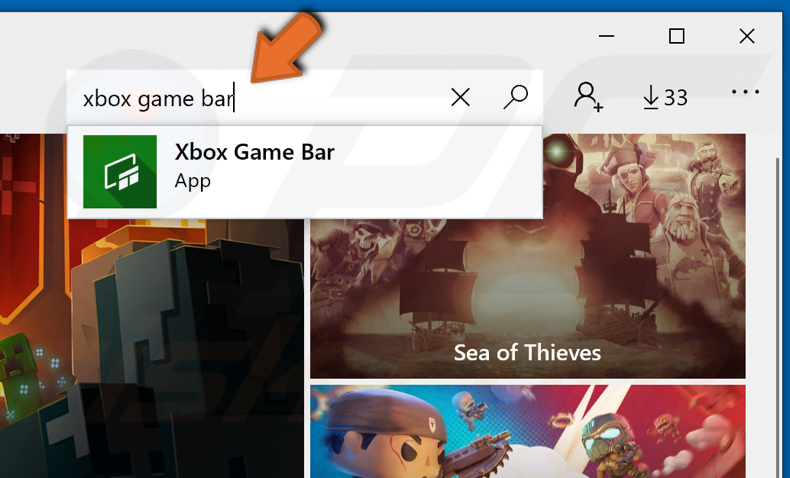
2. In the Microsoft Store’s search bar, type Xbox Game Bar and hit Enter.
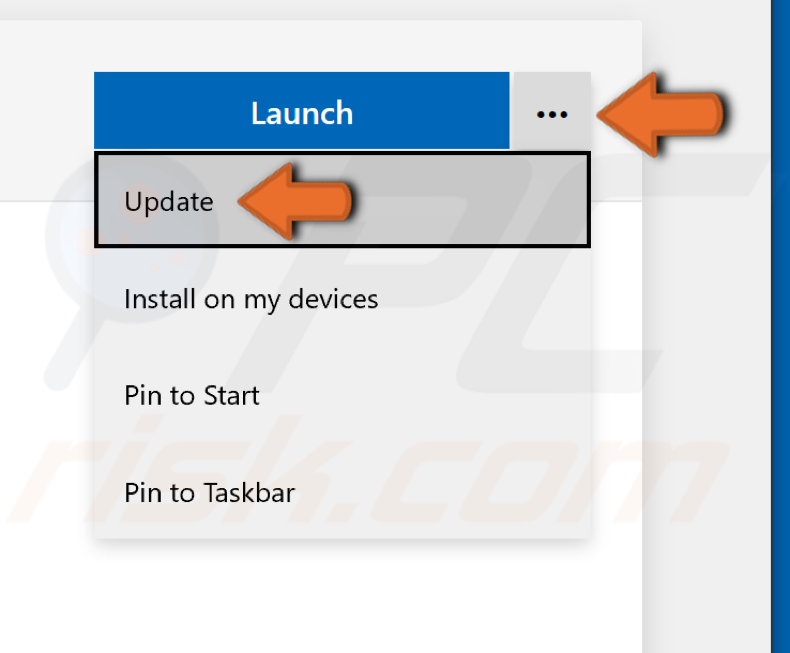
3. Click the More options button and click Update.
4. When the update is complete, hold down Windows+G keys to open Xbox Game Bar.
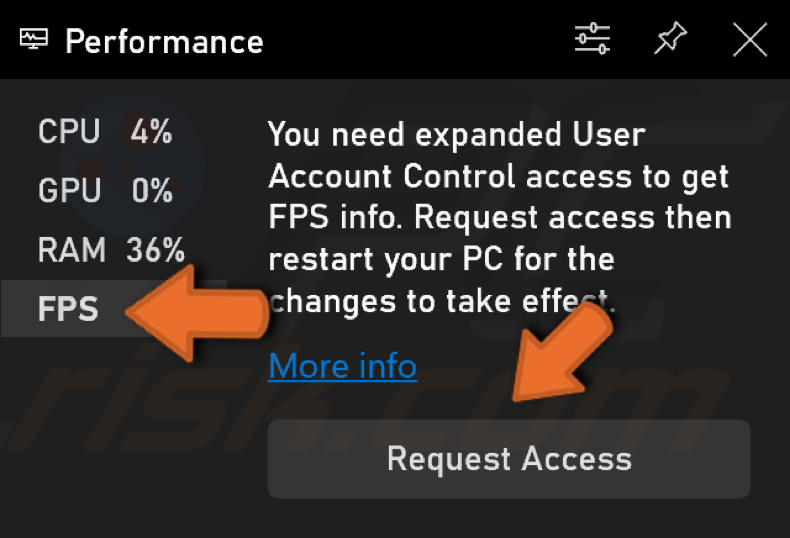
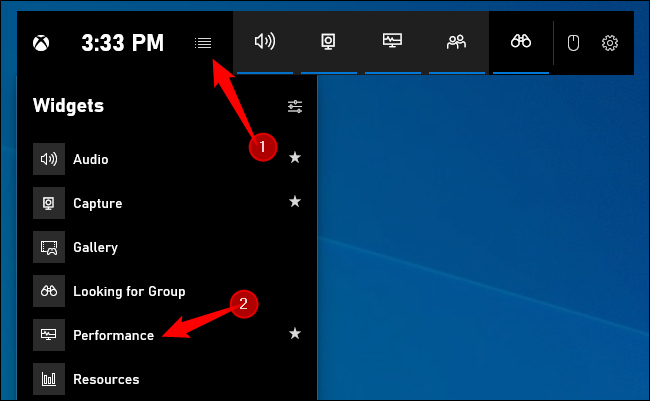
5. Then, go to the Performance widget and select the FPS section.
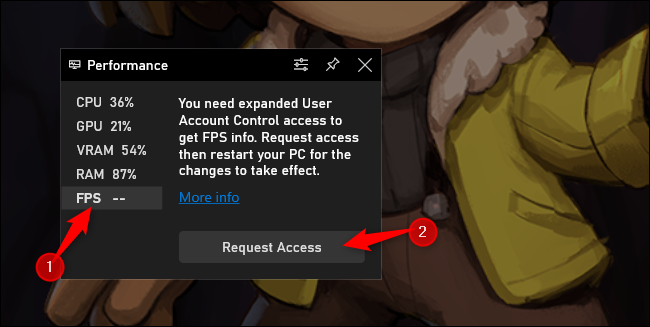
6. A prompt requiring you to expand User Account Control access will appear.
7. Click the Request Access button and reboot your PC.
8. After the reboot, launch any game and hold down Windows+G.
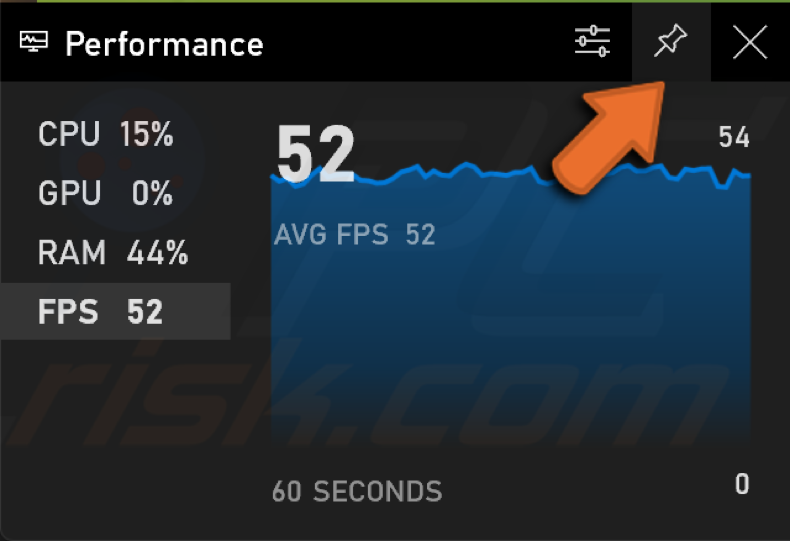
9. Navigate to the Performance widget and pin it anywhere you want on the screen. Now you will be able to monitor your FPS while gaming.
[Back to Top]
Sign in to your How-To Geek account
Windows 10 has a built-in FPS counter hidden in its little-known Xbox Game Bar. Despite its name, the Xbox Game Bar is a powerful full-screen overlay you can use in PC games. Here’s how to show your frames per second (FPS) in games.
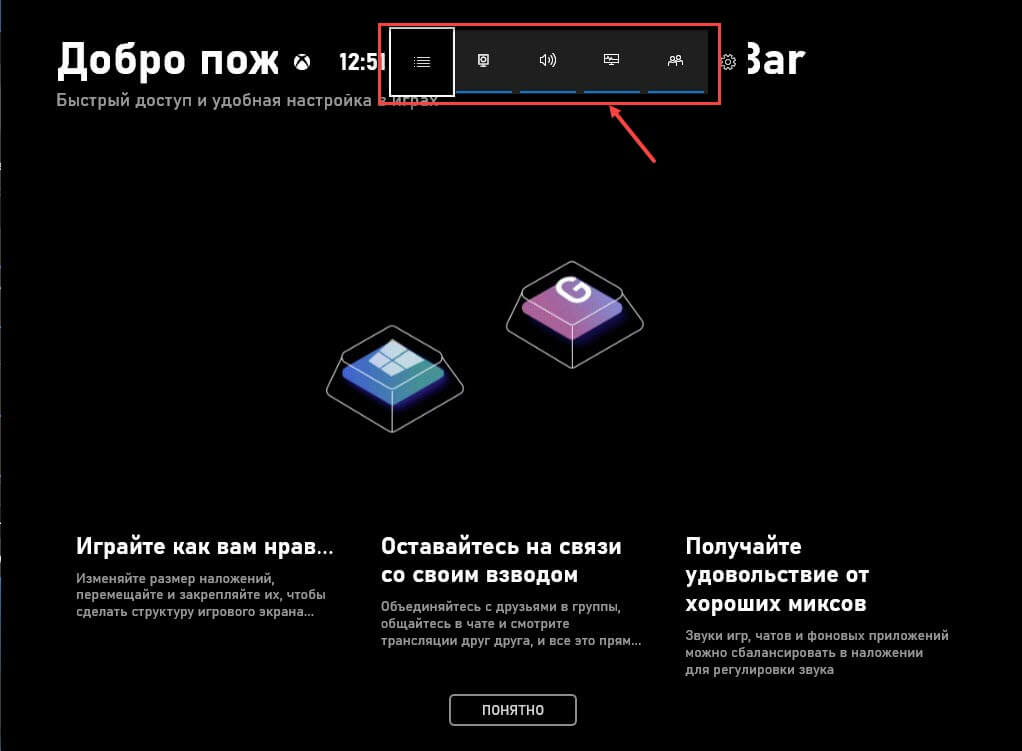
This feature is part of the Game Bar. To open it, press Windows+G. (If the Game Bar doesn’t appear, head to Settings > Gaming > Xbox Game Bar and ensure that it’s toggled to «On.» You can also choose a custom keyboard shortcut for launching it from here.)
Look for the floating «Performance» widget in the Game Bar overlay.
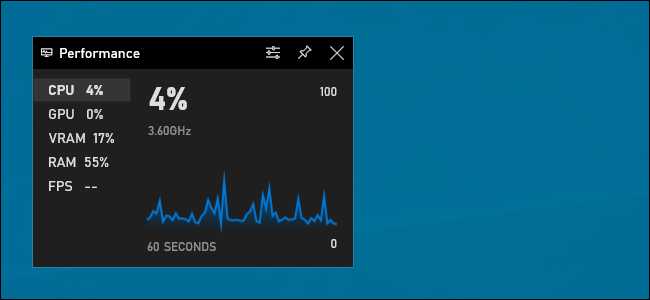
If you don’t see the floating Performance panel, click the menu button on the bar at the top of your screen and click «Performance» to show it.
Click the «FPS» option in the floating Performance window. The first time that you click this option, you’ll see a message saying that you need expanded User Account Control access to get FPS info about PC games.
Click «Request Access» to continue. You’ll be prompted to agree to a User Account Control prompt.
After confirming the UAC prompt, you’ll need to restart your PC to enable this feature. The FPS meter will not function until your reboot.
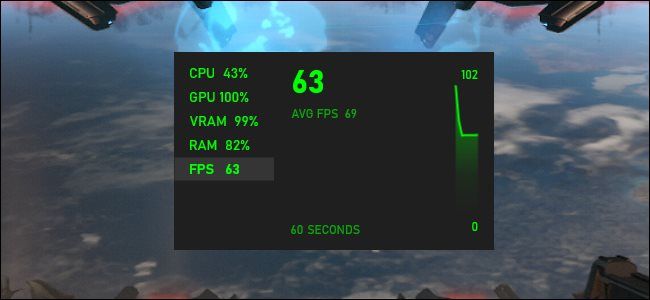
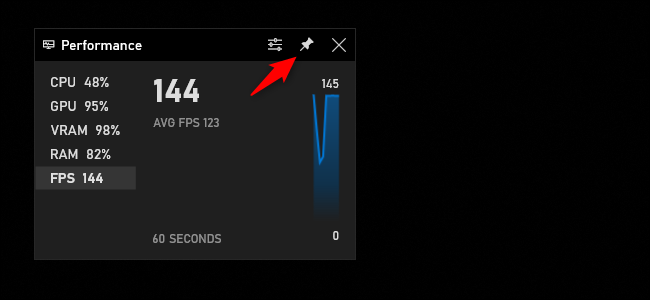
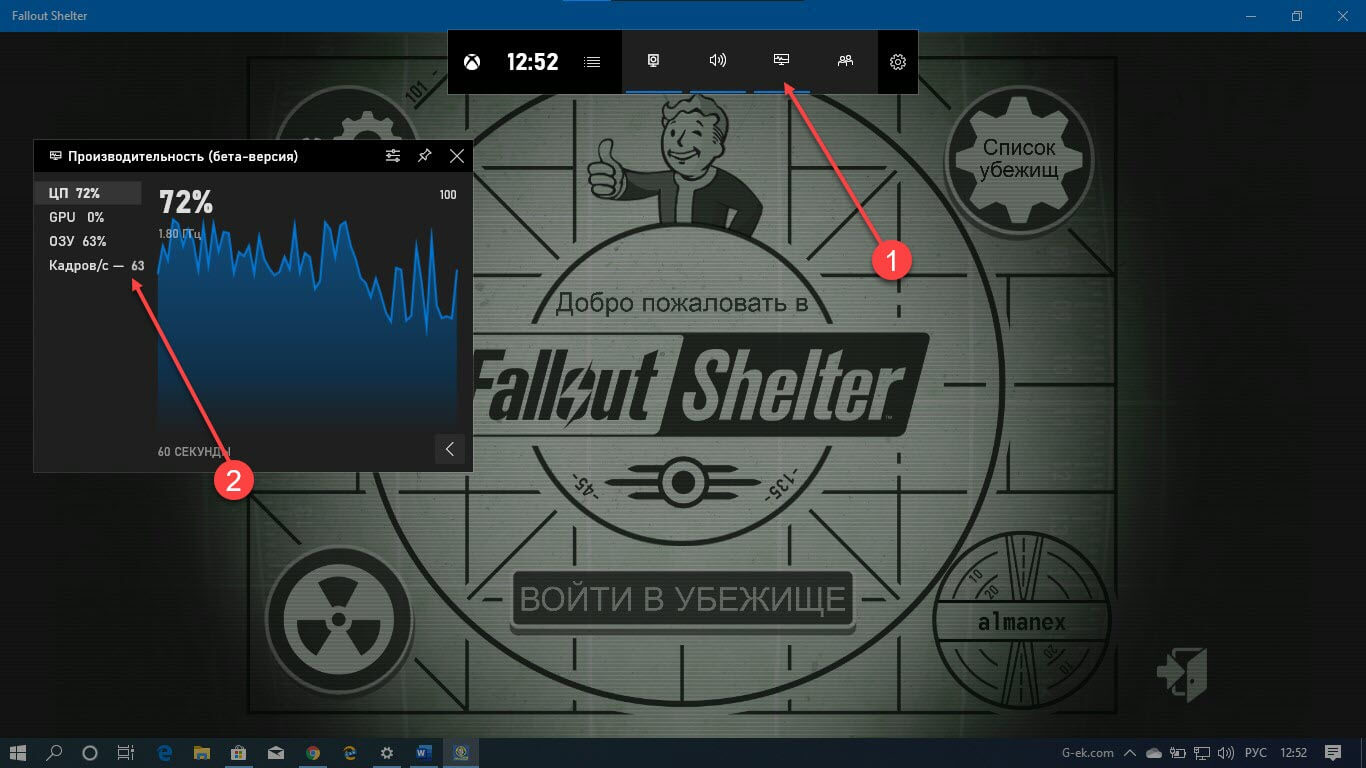
After restarting your PC, launch a PC game and open the Game Bar. The Performance widget will show your frames per second (FPS) along with your CPU, GPU, VRAM (video RAM), and RAM usage.
To see a graph of the FPS over time, click the «FPS» category. You may need to hover your mouse cursor over the widget and click the right arrow («>») button to show the graph if the floating widget is in its small form.
To keep the FPS meter always on-screen at all times, click the «Pin» icon at the top of the floating widget in the Game Bar interface. Now, even when you hide the Game Bar, it will stay on your screen and always appear on top of your gameplay until you unpin it.
You can reposition the floating window on your screen by dragging it around in the Game Bar overlay. You can also choose its size.
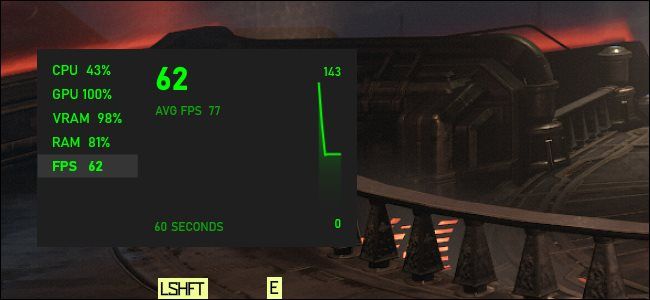
To get rid of the floating Performance window, go back to the Game Bar overlay (Windows+G) and click the «Unpin» button. It will then only appear when you pull up the Game Bar overlay.
Readers help support Windows Report. We may get a commission if you buy through our links.
Read our disclosure page to find out how can you help Windows Report sustain the editorial team. Read more
The number of frames that appear per second on your screen is generally known as FPS (frames-per-second).
A higher frame rate will help you to play the best Windows 10 games without any problem. This is ideal for both hardcore gamers and casual players.
Does Windows 10 have an FPS counter?
PC gamers previously relied on third-party FPS counters for purpose of finding out how many FPS per second appear.
However, Windows 10 users always longed for a built-in FPS counter to allow them to check their frames per second. Here is how a player asked about the same in a Reddit thread:
My kids have started playing the Windows 10 version and I can’t seem to find a way to show the fps. Any idea? Is there a / command or something?
Fortunately, Microsoft listened to the popular demand of the gaming community. The Redmond giant has announced the addition of frames per second (FPS) in Xbox Game Bar:
We heard you loud and clear, the Performance overlay needed a framerate counter. With the October 2019 Game Bar update, we’re introducing the highly requested frames per second (FPS) counter to the Performance overlay on Xbox Game Bar.
That being said, read on to find out how to check the FPS on your Windows device.
How can I show FPS on Windows 10?
-
1. Before you can use the Xbox Game Bar to show the FPS on your device, you must first install it on your device. If you already have it installed, skip to step 5.
-
2. Navigate to the Microsoft Store and search for the Xbox Game Bar application.
-
3. Wait for the Xbox Game Bar update to be installed on your system. You are required to accept some additional Windows permissions.

-
4. Reboot your system to apply the changes.
-
5. Launch a game in which you want to find out how many FPS you have.
-
6. Press the Windows + G keys at the same time on the keyboard to open the Xbox Game Bar overlay.
-
7. Go to the Performance section to see the framerate counter.

-
8. A small box on your screen will display the performance data for your device. You can see the CPU, GPU, VRAM and RAM usage, as well as the FPS.
You can move the Performance box wherever you want on the screen, in case its default position is not appropriate.


The FPS frame rate counter should be available automatically on all Windows 10 PCs as a part of the October 2019 Update for the Xbox Game Bar.
However, if you are using an older Windows 10 version, you still have the option to check for updates directly from the Microsoft Store.
You can keep track of the changing game performance with the help of a graph available under the Performance section. On top of that, the update brings some additional options that allow you to track RAM, GPU and CPU usage.
In the past, it seemed like the new feature was restricted to only a subset of Windows Insiders. There were multiple reports on social media that the updates were not available for them.
Those users needed to wait for a few more weeks before getting the FPS counter, once the new Xbox Game Bar experience was made available for all users.
- How to increase FPS on laptop in Windows 10 [Step-by-Step]
- How to fix Windows 10/11 low FPS issues
- How to Fix FPS Drops and Stuttering in PC Games
We hope you managed to check the FPS on your Windows 10 device using the built-in Xbox Game Bar. The method is simple and gets the job done within a few clicks, as you can see from the guide above.
Let us know in the comments section whether you encountered any issues while attempting to show the FPS with this app.
Milan Stanojevic
Windows Toubleshooting Expert
Milan has been enthusiastic about technology ever since his childhood days, and this led him to take interest in all PC-related technologies. He’s a PC enthusiast and he spends most of his time learning about computers and technology.
Before joining WindowsReport, he worked as a front-end web developer. Now, he’s one of the Troubleshooting experts in our worldwide team, specializing in Windows errors & software issues.
As a gamer, casual or pro, or advanced, you need to take a peek at the FPS or frames per second to make sure there are no unwanted lags happening. But how do you enable the FPS counter on your Windows 10/11 gaming computer? Well, there are a few ways, and depending on your setup and level of gaming, you can choose one. We will cover how to add and view FPS on Windows to track frame drops using built-in and dedicated apps.
Let’s begin.
1. Enable FPS Counter on Windows Using FRAPS (Basic)
FRAPS is one of the oldest and also the lightest FPS monitoring tool for gamers. On my Windows 11, it takes less than 5MB of space and does a jolly good job of displaying the current FPS. FRAPS is a basic benchmarking software that’s good for PC with or without a dedicated GPU.

Once you install and launch FRAPS, it will display FPS in a bright yellow font in the upper corner of the screen. Apart from that, you can also use it to take screenshots or do video recordings while gaming.
Pros:
- Light-weight client
- Take screenshots
- Record videos
- No setup required
Cons:
- Need to register to customize some settings
Download FRAPS
2. Enable FPS Counter on Windows in Steam (Beginners)
Steam is the OG gaming store for Windows users. Pretty much every game that you want to play is available on it. But it is not just a gaming store to buy and play games. One of the many features of Steam is an FPS counter.
1. Simply open the Steam client if you already have it or download and install it within moments.
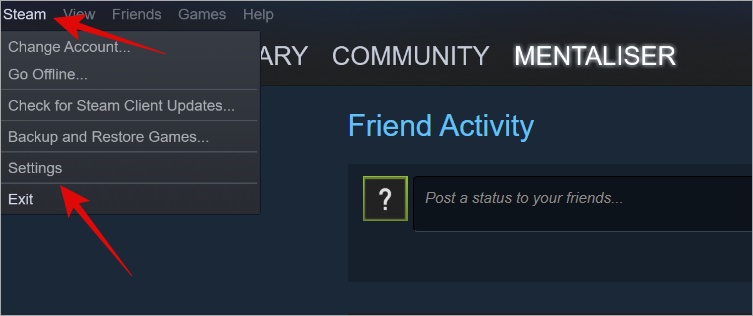
2. Click on the Steam button at the top-right corner and select Settings from the drop-down menu.
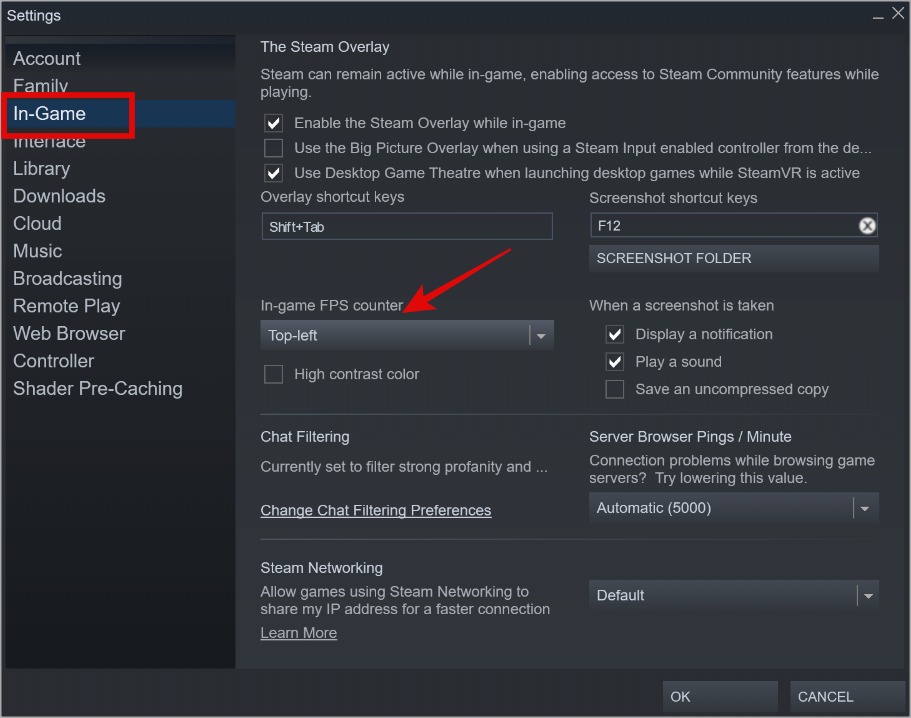
3. Under the In-Game tab in the left corner, select where you want to display the FPS counter while playing games on your Windows gaming computer. Click on OK at the bottom when done.
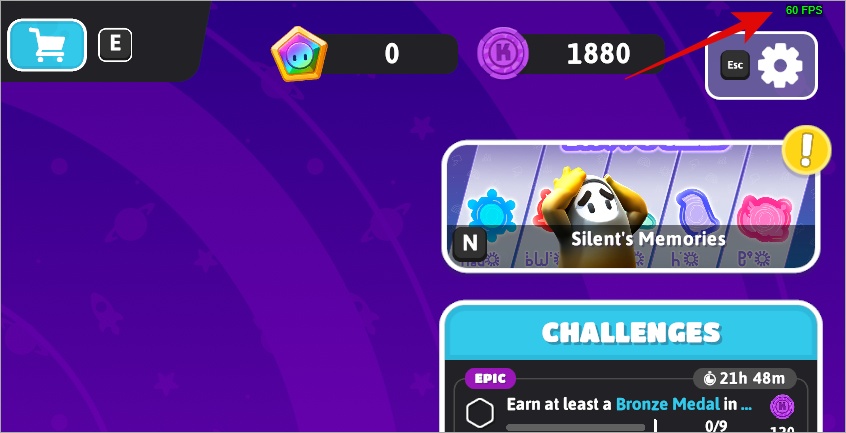
This is the best option for casual and beginner gamers who aren’t looking for advanced stats but just want to track their FPS performance on a new gaming computer.
Do you want to play retro games on Steam and relive your childhood? Learn how right now.
Pros:
- Change position where FPS is displayed on the screen
- Take screenshots
- Chat with fellow Steam users
- Trade cards for money
- Enable high contrast to change counter font color
Cons:
- FPS counter is small and can be hard to see
- Can’t record videos
Download Steam
3. Enable FPS Counter on Windows in Nvidia (Casual)
If you have Nvidia graphics card, your Windows 10/11 computer would have come pre-installed with NVIDIA GeForce Experience.
1. Search for Nvidia GeForce Experience in Windows Search (Windows+S) and launch.

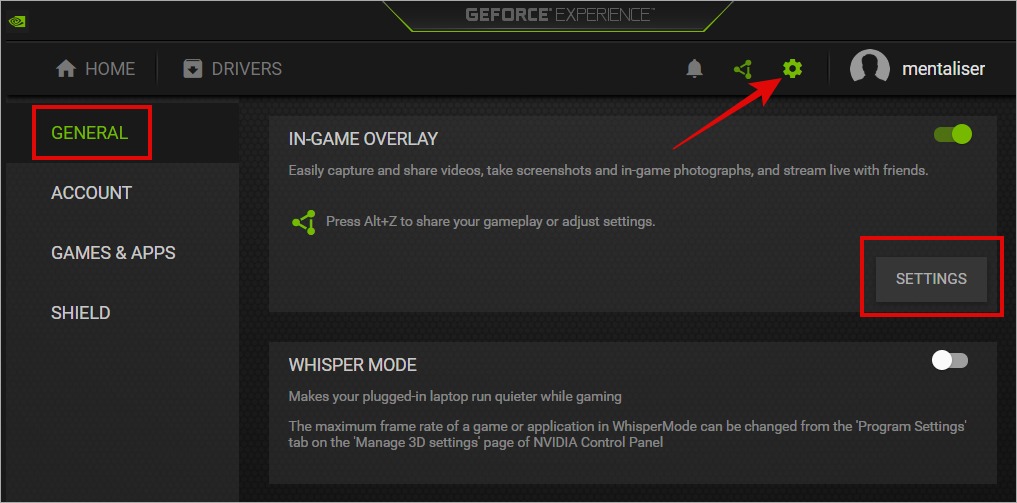
2. Click on the cog icon to select Settings and then select the General tab on the left. Now scroll a little and click on Settings button under In-Game Overlay section.
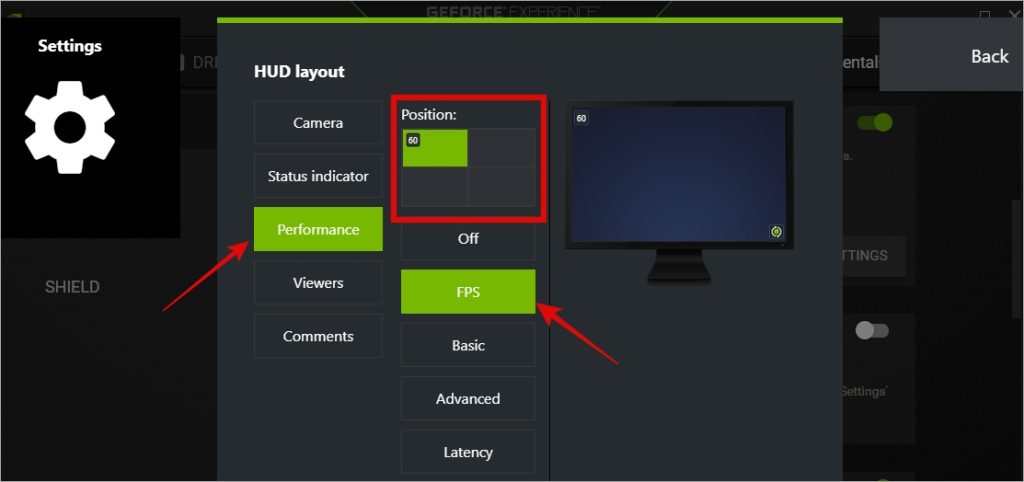
3. In the pop-up that follows, click on HUD Layout.

4. In yet another pop-up, under the Performance tab, select FPS, and then you can choose one of the four corners of the screen to display the FPS counter while playing games on Windows. Then click on the Back button.
5. Click on Done to save changes.
You should now see FPS counter while playing games on your Windows gaming computer. The font size is quite small and there are no customization options available at the time of writing this article.

Pros:
- Accurate reading
- Can select corner of the screen to display FPS counter
- Show advanced stats like latency, CPU and GPU usage, GPU clock speed, GPU temperature, fan speed, etc.
- Record and broadcast gameplay
- Keyboard shortcuts
Cons:
- Small font, no customizations for display
Download GeForce Experience
4. Enable FPS Counter on Windows in NZXT CAM (Pros)
Weird name but a cool piece of gaming counter software for Windows 10 and 11 users. The UI is beautiful and so simple to use. Probably the best I have seen among all FPS counter apps for Windows gaming. NZXT Cam’s default settings are good to go.

The FPS counter is easily viewed thanks to a dark background. However, you can also use it to, as the name suggests, you can use it to record your gameplay as well as take screenshots.
Pros:
- Beautiful and functional UI
- Display CPU and GPU temperature, RAM, CPU and GPU performance, etc.
- Control size and transparency
- Overclock and create profiles
- IFTTT integration to automate actions
Cons:
- None
Download NZXT Cam
5. Enable FPS Counter in MSI Burner and Riva Tuner (Advanced)
This is for advanced users who call gaming their life. The setup process can be a bit too much and UI is nothing to write home about. MSI Burner and Riva Tuner are two separate apps and need to work in tandem only adding to the complexity. But if you are an OG, you won’t settle for anything less.
Honestly, Afterburner is overkill if you are simply looking for an FPS counter or any other counter for that matter. Same goes for Rivatuner. They were designed to overclock the hell out of your GPU settings so you can give hell back to your enemies while gaming.

Pros:
- Overclock GPU precisely
- One-click overclocking
- Customize look, position, etc. in overlay
- Control fan speed
- Create profiles for overclocking, fan speed, etc.
- Disable certain hardware buttons
- Manage latency and control apps that use them
- Capture video of gameplay
Cons:
- Overwhelming for new users
Download MSI Burner and Riva Tuner
Adding FPS Counter to Windows
We started with FPS counter apps but slowly progressed to many complex apps that add a new dimension to how you collect and view gameplay data and computer hardware stats. Each app listed here is designed for a user base, from beginners to pros and everyone in between. I prefer NZXT Cam but you won’t go wrong with any of them, honestly.
Short on space on your battle station? Here are some of the finest but small gaming keyboards to add to your arsenal.
Gaurav Bidasaria
Gaurav is an editor here at TechWiser but also contributes as a writer. He has more than 10 years of experience as a writer and has written how-to guides, comparisons, listicles, and in-depth explainers on Windows, Android, web, and cloud apps, and the Apple ecosystem.
He loves tinkering with new gadgets and learning about new happenings in the tech world.
He has previously worked on Guiding Tech, Make Tech Easier, and other prominent tech blogs and has over 1000+ articles that have been read over 50 million times.
Если вы давно не проверяли игровую панель Microsoft Xbox для Windows 10, недавно приложение обзавелось двумя новыми полезными функциями, которые являются частью обновления игровой панели. Прежде всего, виджет «Производительность» получил счетчик частоты кадров, который отображает текущую частоту кадров вашей игры, а также историю частоты кадров за последние 60 секунд.
«Для любителей производительности мы также даем вам больше контроля над тем, какие системные ресурсы отслеживаются и отображаются на экране, а также добавили графические опции, чтобы вы могли настроить внешний вид наложения (включая прозрачность!)»
— Xbox Команда
Microsoft выпускает новое обновление для Windows 10 — Xbox Game Bar, которое включает в себя новый счетчик FPS. Microsoft наконец-то осознала, что Windows 10 требуется собственное решение и более плавный способ контроля производительность игр.
Это давно назревший шаг, который порадует геймеров, использующих Windows в качестве системы для игр.
Счетчик FPS для Windows 10
Встроенный счетчик FPS в Windows 10 для приложения Xbox Game Bar появился в октябре 2019 года, его можно открыть, нажав комбинацию клавиш Win + G. Панель игры также позволяет пользователям быстро проверить использование процессора, видеокарты и памяти.
Microsoft заявляет, что новая версия Game Bar будет загружаться и устанавливаться автоматически, но вы можете проверить наличие обновлений в Магазине Windows и загрузить обновление вручную. Для работы счетчика FPS не требуется участие в программе Windows Insider и установки предварительных сборок.
Чтобы включить счетчик FPS в Windows 10, вам необходимо обновить приложение и согласиться на дополнительные разрешения Windows после запуска. После предоставления разрешений может потребоваться перезагрузка системы для завершения установки.
Счетчик FPS отображается только когда вы находитесь в игре. Все игры, включая традиционные игры для ПК, Windows Store и даже эмуляторы, поддерживаются счетчиком FPS, который отслеживает последние 60 секунд игрового процесса.
Добавление встроенного счетчика частоты кадров в Windows 10 — фантастический шаг со стороны Microsoft. В связи с тем, что компания хочет привлечь больше игроков в Windows Store, особенно с ПК с Xbox Game Pass, добавление хардкорных геймерских функций является обязательным.
Microsoft также добавила несколько опций для настройки взаимодействия. Например, вы можете изменить положение графика, настроить прозрачность задней панели и выбрать собственный цвет для акцента.
Вторая новая функция, добавленная в игровую панель — это достижения в играх для ПК, которые их поддерживают. У Xbox One уже была похожая функция, так что приятно видеть, что она появится на ПК с Windows 10 используя игровую панель.
«В ближайшие месяцы у нас будет масса новых вещей для вас», — дразнила сегодня команда Xbox, и мы с нетерпением ждем возможности увидеть другие новые функции. Чтобы убедиться, что у вас установлена последняя версия игровой панели Xbox, вы можете просто проверить наличие обновлений в Магазине Microsoft.
Рекомендуем: Сочетание клавиш для Игровой Панели Windows 10.