
Основная цель, с которой включают режим разработчика обычные пользователи Windows 11 — установка UWP приложений не из магазина Microsoft Store, хотя этим его функциональность не ограничивается.
В этой простой пошаговой инструкции подробно о том, как включить режим разработчика Windows 11 в Параметрах или альтернативными способами: в редакторе реестра, PowerShell или командной строке.
Включение режима разработчика в Параметрах Windows 11
Базовый способ включения режима разработчика — использование соответствующего раздела параметров:
- Откройте Параметры, для этого можно использовать сочетание клавиш Win+I
- Перейдите в раздел «Конфиденциальность и защита» и откройте пункт «Для разработчиков».

- В разделе «Режим разработчика» включите переключатель «Установка приложений из любого источника, включая свободные файлы».

- Подтвердите включение режима разработчика.


По сути, на этом действия закончены, хотя на этой же странице настроек представлены и другие опции:
- Портал устройств
- Обнаружение устройств
- Ряд настроек, имеющих отношение к представлению файлов в проводнике, работе удаленного рабочего стола, терминала по умолчанию и возможности выполнения неподписанных скриптов PowerShell
Более подробная информация доступна на официальной странице Майкрософт.
Дополнительные методы включения режима разработчика
За возможность установки приложений из любого источника отвечает соответствующая локальная групповая политика, изменить которую можно в редакторе локальной групповой политики или редакторе реестра.
В Windows 11 Pro и Enterprise удобнее использовать редактор локальной групповой политики:
- Нажмите правой кнопкой мыши по кнопке «Пуск», выберите пункт «Выполнить», введите gpedit.msc и нажмите Enter.
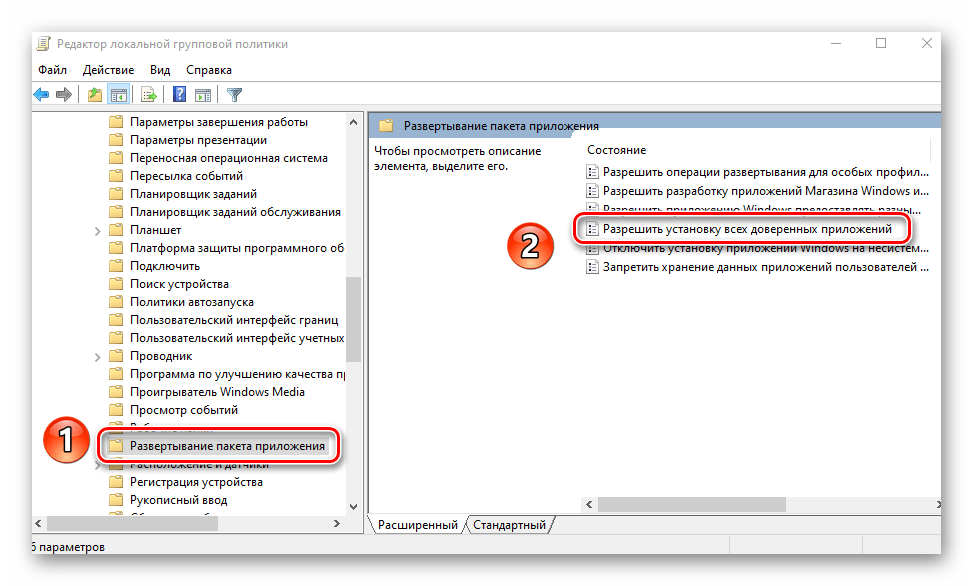
- Перейдите к разделу Конфигурация компьютера — Административные шаблоны — Компоненты Windows — Развертывание пакета приложения.
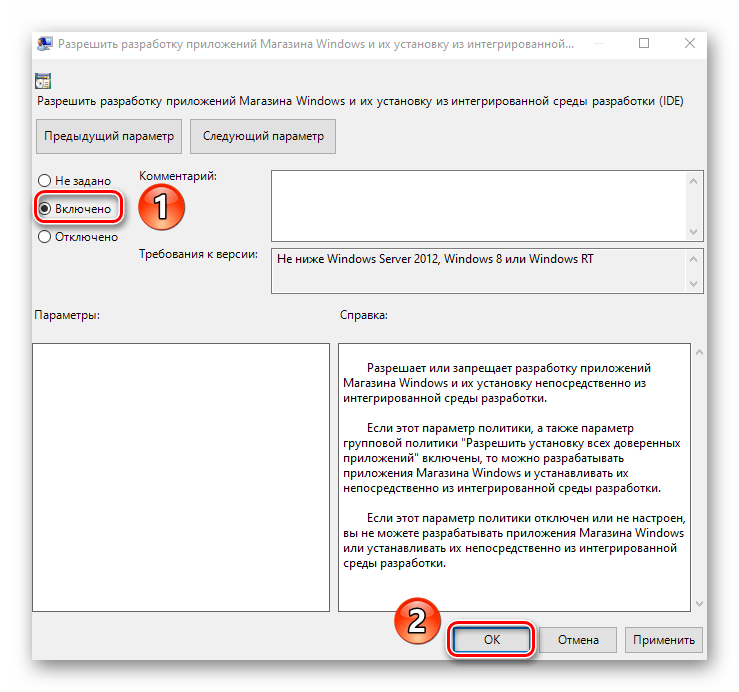
- В правой панели редактора нажмите дважды по политике «Разрешить разработку приложений Магазина Windows и их установку из интегрированной среды разработки (IDE)».
- Установите «Включено» и примените настройки.


При отсутствии редактора локальной групповой политики (в Windows 11 Домашняя) можно использовать редактор реестра:
- Нажмите клавиши Win+R, введите regedit и нажмите Enter.
- Перейдите к разделу реестра
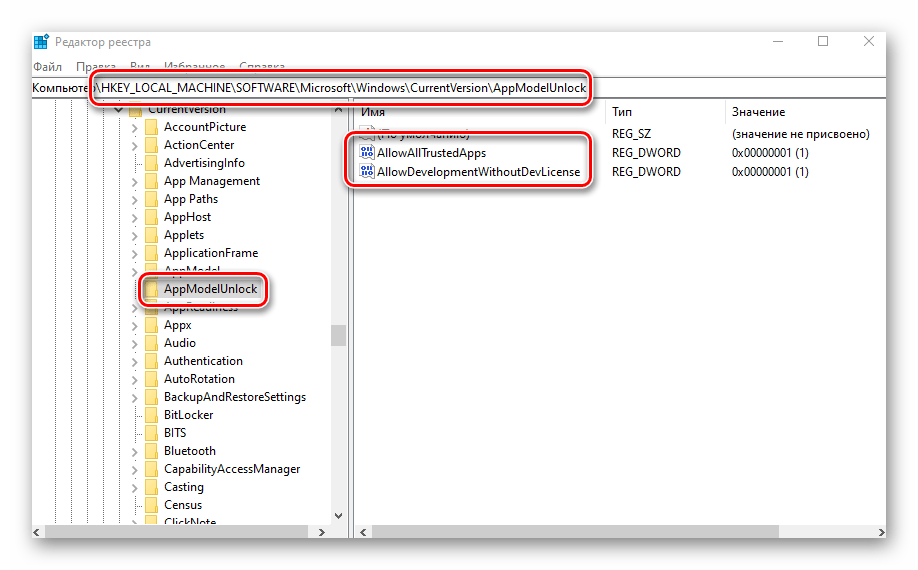
HKEY_LOCAL_MACHINE\SOFTWARE\Microsoft\Windows\CurrentVersion\AppModelUnlock
а при его отсутствии — создайте этот раздел.
- В этом разделе создайте параметр DWORD32 с именем AllowDevelopmentWithoutDevLicense и значением 1 (если параметр уже присутствует — дважды нажимаем по нему и изменяем значение с 0 на 1). Также может иметь смысл изменить значение параметра AllowAllTrustedApps в этом разделе на 1 (разрешает установку неопубликованных приложений, отдельно от включения режима разработчика).

- Готово, режим разработчика включен.

То же самое можно сделать в командной строке или PowerShell (требуется запуск от имени администратора), по порядку выполнив следующие две команды:
reg add "HKEY_LOCAL_MACHINE\SOFTWARE\Microsoft\Windows\CurrentVersion\AppModelUnlock" /t REG_DWORD /f /v "AllowAllTrustedApps" /d "1"
reg add "HKEY_LOCAL_MACHINE\SOFTWARE\Microsoft\Windows\CurrentVersion\AppModelUnlock" /t REG_DWORD /f /v "AllowDevelopmentWithoutDevLicense" /d "1"
На этом всё. Если остаются вопросы, жду их в комментариях к статье.
Когда заходит речь о том, что в используемой большинством пользователей операционной системе имеется «Режим разработчика» многие сразу начинают представлять, что это какая-то сложная программная среда, которая предназначена только для тех, кто имеет профессиональное образования в области ОС и ПК. Вот только на самом деле, все немного не так… Именно по этой причине, мы сегодня решили затронуть данную тему и рассказать вам, для чего именно необходим Режим разработчика в Windows 11 и как его возможно активировать.
Для чего нужен Режим разработчика в Windows 11?
На самом деле все элементарно, так как фактически есть два основных направления, каждое из которых имеет свои непосредственные плюсы для пользователей:
- Установка UWP приложений, который были скачены пользователями не из магазина Microsoft Store. Это позволяет не ограничивать себя при использовании операционной системе и конечно же, расширять количество используемого ПО;
- Возможность использовать дополнительные системные настройки, который скрыты от среднестатистического пользователя и как следствие, не дают ему свободу в плане действий. При активизации «режима», появляется гораздо больше простора к действиям — настройкам, что невероятно практично.
Как включить Режим разработчика в Параметрах Windows 11?
При использовании данного варианта включения все элементарно, так как мы с вами будем обращаться к внутрисистемным настройкам без каких-то дополнительных телодвижений. Этот способ более приоритетен для тех, кто только начинает изучать свой ПК или же, не желает углубляться в специализированные настройки.
- Заходим в раздел «Параметры» для этого одновременно нажимаем на Win+I → идем в «Конфиденциальность и защита» → переходим в «Для разработчиков» → в разделе «Режим разработчика» нужно переместить переключатель в положение «Включено» напротив «Установка приложений из любого источника, включая свободные файлы» → остается только подтвердить активацию «Режима разработчика».


Как включить Режим разработчика через редактор локальной групповой политики в Windows 11?
Нужно понимать, что данный способ подходит не для всех редакций операционных систем, а только для Windows 11 Pro и Windows 11 Enterprise, так как именно у них имеются встроенные настройки, которых нет в других редакциях ОС.
- Наводим курсор мыши на меню «Пуск» и кликаем правой кнопкой мыши → переходим в «Выполнить» и вводим команду — gpedit.msc → нажимаем на «Enter» → отправляемся в раздел «Конфигурация компьютера» → открываем «Административные шаблоны» → теперь, нас интересуют «Компоненты Windows» → заходим в «Развертывание пакета приложения»→ обратите свое внимание на правую панель, где имеется политика с названием «Разрешить разработку приложений Магазина Windows и их установку из интегрированной среды разработки (IDE)» — по ней нужно выполнить двойной клик мыши → перемещаем переключатель в положение «Включено» → применяем внесенные настройки.

Как включить Режим разработчика через Редактор реестра Windows 11 Home?
В данном случае, акцент делается на Windows 11 Home не просто так, а потому, что у данной системы Режим разработчика отсутствует в том формате в котором он имеет место быть в «старших редакциях» систем – «Pro» и «Enterprise», а значит, тут и действовать придется совершенно иначе.
- Одновременно нажимаем на Win+R и вводим команду regedit → нажимаем на «Enter» → теперь, идем по следующему пути — HKEY_LOCAL_MACHINE\SOFTWARE\Microsoft\Windows\CurrentVersion\AppModelUnlock, если последнего раздела нет, его придется создать → создание параметра в последнем разделе выглядит следующим образом: создаем параметр DWORD32 → задаем ему имя AllowDevelopmentWithoutDevLicense → задаем значение «1», если уже установлено значение «0», то кликаем по нему два раза и меняем его на «1». Так же, стоит изменить цифровое значение AllowAllTrustedApps – меняем на «1» — этот шаг позволит устанавливать неопубликованные в Магазине приложения без включения Режима разработчика.

- Аналогично вышеописанному, все можно сделать в «Командной строке» или «PowerShell», но только нужно запустить программные инструмент «от имени администратора», ну, а далее, вводим две команды поочередно:
- reg add «HKEY_LOCAL_MACHINE\SOFTWARE\Microsoft\Windows\CurrentVersion\AppModelUnlock» /t REG_DWORD /f /v «AllowAllTrustedApps» /d «1»
- reg add «HKEY_LOCAL_MACHINE\SOFTWARE\Microsoft\Windows\CurrentVersion\AppModelUnlock» /t REG_DWORD /f /v «AllowDevelopmentWithoutDevLicense» /d «1»
Все способы:
- Методы активации режима разработчика
- Способ 1: «Параметры» ОС
- Способ 2: «Редактор локальной политики»
- Способ 3: Изменение ключей реестра
- Способ 4: «Командная строка»
- Вопросы и ответы: 2
Относительно недавно в последнюю версию ОС Windows интегрировали «режим разработчика». Его активация добавляет в ОС отдельную среду для написания и отладки программного кода. Из данной статьи вы узнаете о том, как задействовать упомянутый режим в Windows 10.
Методы активации режима разработчика
После активации режима вы сможете инсталлировать на компьютер любое ПО (даже не имеющее подписи Microsoft), локально запускать сценарии PowerShell и пользоваться оболочкой разработки Bash. Это лишь малая часть всех возможностей. Теперь поговорим о самих методах активации. Всего можно выделить 4 способа, позволяющих правильно задействовать режим разработчика.
Способ 1: «Параметры» ОС
Начнем с самого легкодоступного и очевидного метода. Для его реализации мы будем использовать окно основных параметров Виндовс 10. Выполните следующие действия:
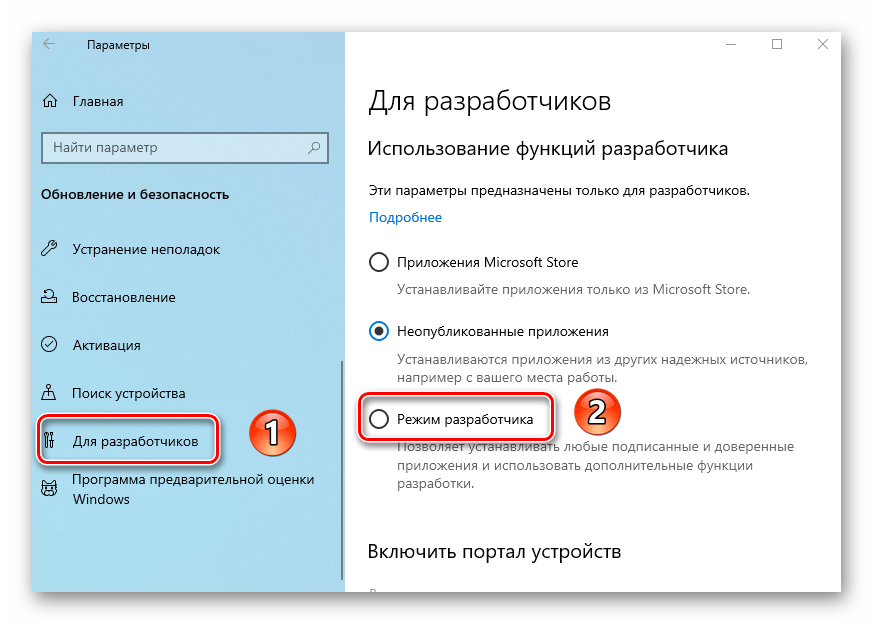
- Разверните окно «Параметры» путем нажатия комбинации клавиш «Win+I». Из него перейдите в категорию «Обновление и безопасность».
- Далее зайдите в подраздел «Для разработчиков». Список подразделов вы увидите в левой половине окна. Затем поставьте отметку возле строки «Режим разработчика».
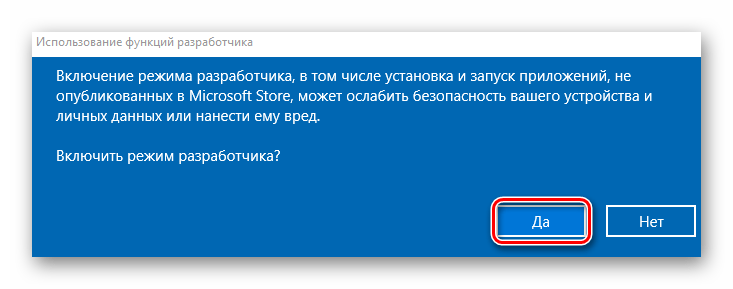
- На экране появится уведомление о преимуществах и недостатках включаемого режима. Для продолжения операции нажмите «Да» в окне уведомления.
- После этого, под строчкой «Режим разработчика», появится описание процессов, выполняемых системой. Ей необходимо будет найти и установить специальный пакет обновлений. По окончании инсталляции вам нужно в обязательном порядке перезагрузить устройство.


Способ 2: «Редактор локальной политики»
Сразу отметим, что данный метод не подойдет пользователям, которые используют Windows 10 Home. Дело в том, что в этой редакции попросту отсутствует нужная утилита. Если вы в их числе, просто используйте другой способ.
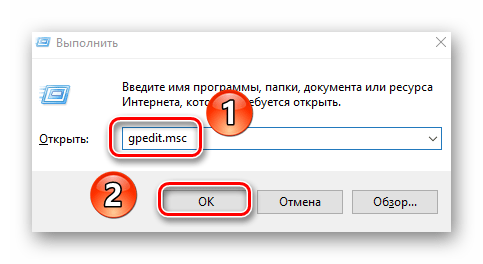
- Запустите окно утилиты «Выполнить», нажав одновременно «Win» и «R». В него введите команду
gpedit.msc, после чего кликните по кнопке «OK», расположенной ниже.
Читайте также: Запуск «Редактора локальной политики» в Windows 10
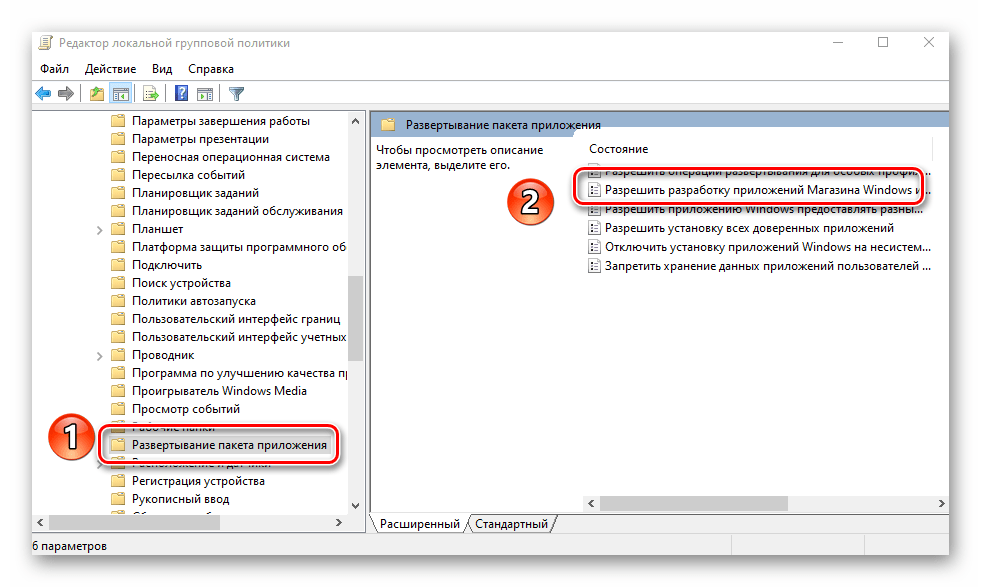
- В левой половине открывшегося окна вы увидите древовидное расположение папок. Отыщите каталог «Развертывание пакета приложений», поочередно открывая такие директории:
Конфигурация компьютера / Административные шаблоны / Компоненты Windows / Развертывание пакета приложенийВ указанной папке найдите файл, отмеченный на скриншоте ниже. Откройте его двойным нажатием ЛКМ.
- Установите отметку возле строки «Включено» в верхней части окна. Тут же нажмите кнопку «OK» для применения настроек.
- Аналогичным образом следует «включить» файл «Разрешить установку всех доверенных приложений» из того же списка.
- После выполнения действий закройте окна и перезагрузите систему.
Способ 3: Изменение ключей реестра
Для правильного запуска режима разработчика посредством «Редактора реестра» выполните следующий ряд действий:
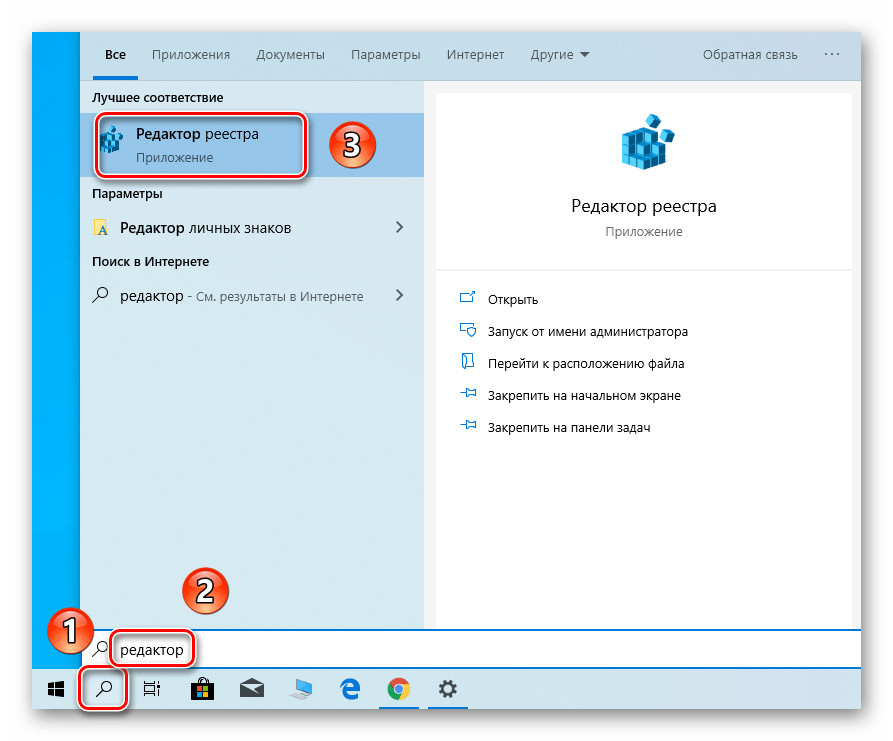
- Откройте системное окно поиска и в него введите запрос «редактор». В предложенном перечне совпадений кликните по пункту «Редактор реестра».

Читайте также: Как открыть Редактор реестра в Виндовс 10
- Посредством дерева каталогов в открывшемся окне доберитесь к указанной ниже директории:
HKEY_LOCAL_MACHINE \ SOFTWARE\ Microsoft\ Windows\ CurrentVersion\ AppModelUnlockВ каталоге «AppModelUnlock», с правой стороны, должны находиться следующие ключи:
- «AllowAllTrustedApps»
- «AllowDevelopmentWithoutDevLicense»
Откройте их поочередно и измените значение каждой на цифру «1». Закройте все открытые окна, предварительно применив внесенные изменения.
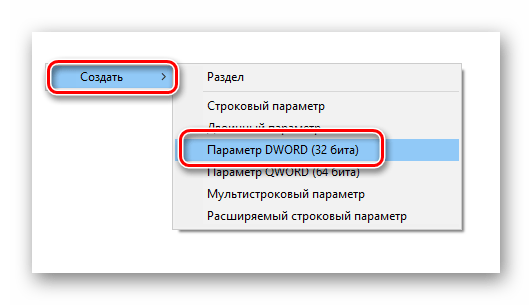
- Если таких файлов вы не обнаружите, тогда просто создайте их вручную. Нажмите в любом месте ПКМ, после чего выберите последовательно в контекстном меню строки «Создать» и «Параметр DWORD (32 бита)». Дайте им имена, указанные выше, после чего пропишите значение «1».
Способ 4: «Командная строка»
Этот метод, по сути, выполняет те же самые действия, что и предыдущий, вот только все манипуляции укладываются в одну строчку. Выглядит процесс следующим образом:
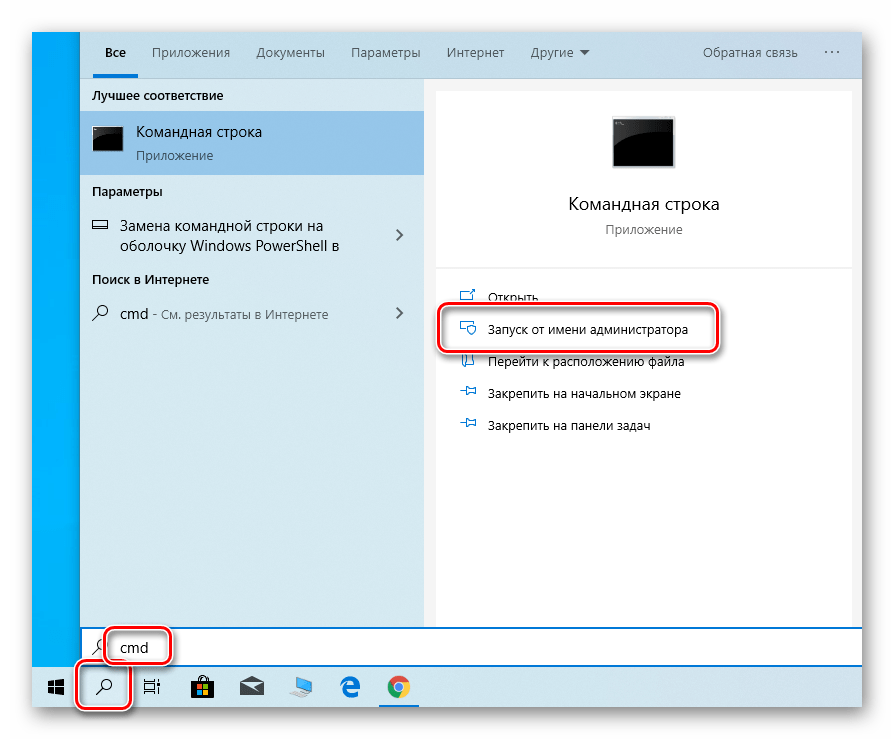
- Откройте системное окно поиска, нажав на «Панели задач» специальную кнопку. В поле для ввода запросов пропишите слово
cmd. Среди найденных совпадений будет искомая «Командная строка». Выберите подпункт «Запуск от имени администратора», который будет находиться правее строки с названием программы.
Читайте также: Методы вызова «Командной строки» от имени администратора
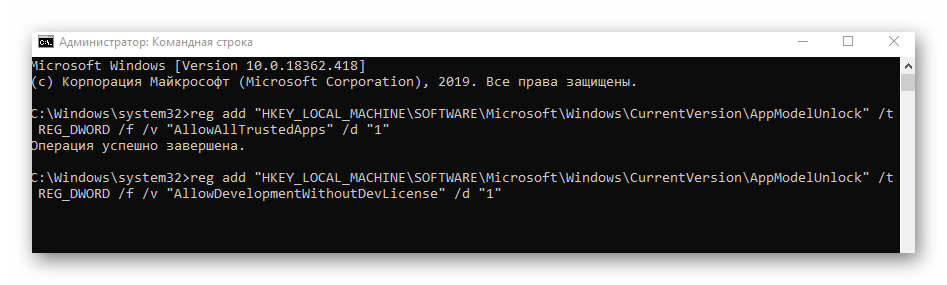
- Теперь скопируйте текст, указанный ниже, вставьте его в поле «Командной строки», а после этого используйте «Enter» для обработки запроса:
reg add "HKEY_LOCAL_MACHINE\SOFTWARE\Microsoft\Windows\CurrentVersion\AppModelUnlock" /t REG_DWORD /f /v "AllowAllTrustedApps" /d "1" - Спустя несколько секунд появится строка уведомления о корректном завершении процедуры. Скопируйте и введите второй запрос:
reg add "HKEY_LOCAL_MACHINE\SOFTWARE\Microsoft\Windows\CurrentVersion\AppModelUnlock" /t REG_DWORD /f /v "AllowDevelopmentWithoutDevLicense" /d "1"Снова используйте «Enter» для начала обработки пакета.
- Выполнив обе команды, закройте «Командную строку», и перезапустите устройство.

Вы узнали из текущей статьи о методах, позволяющих задействовать режим разработчика в Windows 10. Обратим внимание на тот факт, что во время его активации иногда появляются ошибки. Причина этого зачастую кроется в работе специальных утилит для деактивации встроенной телеметрии Microsoft. Если вы использовали ПО, о котором мы писали в статье по ссылке ниже, откатите изменения и попытайтесь включить режим разработки снова.
Подробнее: Программы для отключения слежки в Виндовс 10
Наша группа в TelegramПолезные советы и помощь

Enable Windows 11 Developer Mode : Developer Mode in Windows 11 is a setting that allows users to access features and tools specifically designed for developers. When Developer Mode is enabled, it provides additional capabilities and options to customize the Windows environment for development purposes like Windows Subsystem for Linux(WSL), App Development , Performance Monitoring , and more. Developers can also customize their development environment more extensively, such as enabling additional debugging options, accessing developer-focused settings , and configuring developer-specific features. The following are the simple steps involved in this process.
- Go to Windows Settings using the shortcut Win Key + I.
- From the left pane, click on System.

System
- Scroll down and locate the For Developers option.

For Developers
- Toggle the Developer Mode Switch to ON.
- Use Developer Features dialogue box will display the risks of enabling Developer Mode in Windows 11. If you are okay with the terms, click YES.

Use Developer Features
- That is it. Developer Mode is now enabled in the Windows 11 OS.


IMPORTANT
Turning on developer mode, including installing and running apps from outside the Microsoft Store, could expose your device and personal data to security risks or harm your device.
Exploring Windows 11 Developer Mode:
Developer Mode in Windows 11 empowers developers and IT professionals to create, test, and optimize software applications effectively by providing access to essential tools, developer settings, and performance monitoring capabilities within the Windows 11 operating system.

-
Windows Subsystem for Linux (WSL): With Developer Mode enabled, you can utilize WSL to run a Linux distribution alongside Windows. This feature is valuable for developers who work with Linux-based tools and environments. Check out: How to Enable Windows Subsystem for Linux in Windows 11?
Windows Terminal : It grants access to Windows Terminal, a modern command-line tool that integrates multiple shells and command-line interfaces (CLI) in one application. It provides a more efficient and customizable command-line experience. - Sideload Apps : Developer Mode allows you to install and test apps from sources other than the Microsoft Store, which is useful for app development and testing purposes.
- Developer Settings : It provides access to developer-specific settings and configurations , allowing developers to fine-tune their development environment according to their needs.
- Debugging Options : The mode includes debugging tools and options for troubleshooting and debugging applications, making it easier to identify and resolve issues during development.
- Developer-Focused Features : Enabling Developer Mode unlocks additional features and functionalities that cater specifically to developers, such as advanced networking options, virtualization support, and system configuration tools.
- Custom Environment Setup : Developers can customize their development environment by installing developer tools, SDKs, frameworks, and libraries , creating an environment tailored to their development workflows.
- Integration with Development Tools : It integrates seamlessly with development tools like Visual Studio , Visual Studio Code , and other IDEs , providing a cohesive development experience on Windows 11.
Take away:
Developer Mode in Windows 11 enhances productivity and enables developers to create, test, and optimize software applications efficiently. However, it comes with its own risk, It is advisable to use it accordingly. As the name suggests, this mode is more suitable for Developers, and hence normal users, think twice before you turn this feature in your Windows 11. Happy Coding! Peace out!
If you don’t already know, Windows comes with a “Developer Mode” that allows developers to experiment and test Windows Store applications or run their own apps on the Windows platform. This feature is present in both Windows 10 and 11, but needs to be manually enabled.
If you are a regular computer user, then do not worry. You probably do not need to enable this feature, and it is probably of no use to you either. However, if you are a developer who likes to mess around with Universal Windows Platform (UWP) apps, then this article is for you.
Today we will be discussing what exactly Developer Mode is, how to enable or disable it, and what it offers.
Table of Contents
What is Developer Mode in Windows
Developer Mode is a feature in Windows that allows you to perform additional testing and debugging of the Windows Store as well as third-party applications. Furthermore, it also introduces some new tools to the Windows environment designed to help the developers with their testing.
Turning on Developer Mode also helps the user experience issues with Remote Desktop, Windows PowerShell, and File Explorer, which is otherwise restricted by default.
Developer Mode was first introduced in Windows 10 in 2016 and has since made its way to all the following Windows versions. When enabled, it offers the following additional tools for the developers to use:
- Installing and debugging uncertified Windows Store applications.
- Device Portal
- Device Discovery
Not only that, this mode improves the following Windows tools for an optimized developer experience:
- File Explorer
- Remote Desktop
- Windows PowerShell
Let us now show you how to enable Developer Mode in Windows.
Enable Developer Mode in Windows 11
Follow these steps to activate Developer Mode in Windows 11:
-
Navigate to the following:
Settings app >> Privacy and Security >> For developers
-
Here, toggle the slider under “Developer Mode” into the On position.

Turn on Developer Mode -
When asked for a confirmation, click Yes.
Yes to confirm


This will turn on the Developer Mode. You can simply toggle the sliders under “Device Portal” and “Device Discovery” to enable them too. This is discussed in detail further down this post.
Furthermore, you will find additional settings for File Explorer, Remote Desktop, and PowerShell on the same Settings page, from which you can select and then Apply the changes.
Enable Developer Mode in Windows 10
Follow these steps to activate Developer Mode in Windows 10:
-
Navigate to the following:
Settings app >> Windows Update >> For developers
-
Here, toggle the slider under “Developer Mode” into the On position.

Turn on Developer Mode -
When asked for a confirmation, click Yes.
Yes to confirm


Developer Mode will now be enabled. If you want to disable it in the future, simply toggle the slider under Developer Mode again into the Off position.
Similar to Windows 11, you can simply toggle the sliders under “Device Portal” and “Device Discovery” to enable them too. This will be discussed in detail further down this post.
Furthermore, you will find additional settings for File Explorer, Remote Desktop, and PowerShell on the same Settings page, from which you can select and then Apply the changes.
However, unlike in Windows 11, the Windows 10 “For developer” page does not give you any options on Windows Terminal.
That said, you can now sideload third-party applications or use existing Microsoft Store apps to begin your testing.
What is Device Portal
Device Portal is a tool that can be installed on your PC after enabling Developer Mode. Once that is enabled, you can then enable the Device Portal from the “For developers” settings page.
The Windows Device Portal allows you to manage your PC remotely through a locally-installed web server. Using the server’s web interface, you can then connect to this computer remotely over the network and manage it how you please. For this reason, when the Device Portal is enabled, your PC also changes the Windows Firewall.
The Device Portal provides advanced diagnostics of the PC, as well as real-time performance data. However, not every developer may need this tool.
The Device Portal is mostly useful for testing applications on remote Windows devices, such as Xbox, Hololens, etc.
You can set up credentials and other information for the Device Portal from the “For developers” settings page.

What is Device Discovery
Windows Device Discovery is another developer feature that needs to be manually enabled. Its primary function is to pair a remote Windows device so it can be connected to this PC remotely.
Once the Device Portal is enabled, you can pair a device with it using a simple code through Device Discovery.

Other Developer Mode Enhancements
As we mentioned earlier, enabling Developer Mode in Windows enhances a few pre-existing Windows tools. The sections below briefly describe what options the user can choose from.
Windows Explorer
You can manage what File Explorer now displays directly from the Settings app. However, these are only a handful of options. You can select any or all of the following options:
- Change settings to show file extensions
- Change setting to show hidden and system files
- Change settings to show full path in title bar
- Change policy to show Run as a different user in Start
- Change settings to show empty drives

Remote Desktop
The following enhancements are offered for a Remote Desktop Connection to this PC once the Developer Mode is turned on:
- Change settings to allow remote connections to this computer.
- Change settings to allow connection only from computers running Remote Desktop with Network Level Authentication.
- Change settings so that the PC never goes to sleep when plugged in

Windows PowerShell
With Developer Mode, you can set whether or not to allow running scripts in PowerShell using the following option:
- Change execution policy to allow local PowerShell scripts to run without signing. Require singing for remote scripts.

Troubleshoot Enabling Developer Mode in Windows
Users often report that they are unable to enable Developer Mode due to one reason or the other, and become frustrated when they cannot find a solution. If you experience similar issues, refer to the solutions suggested below and perform them to mitigate the issue.
Change User Account Type to Administrator
It may be possible that your user account is a standard user that does not have any administrative rights. In that case, you must convert your user account to an administrative account, or enable the Developer Mode from an account that is an administrator on your PC.
Here are 6 ways to convert your existing account into an administrative account.
Allow Trusted Apps to Install using Group Policy
Another problem could be that Windows blocks apps to install, rendering the Developer Mode and its associated tools incapable of a successful installation. In that case, you can allow trusted apps to be installed on your PC using the following steps:
-
Open the Group Policy Editor by typing in gpedit.msc in the Run Command box.

gpedit msc -
Now navigate to the following from the left pane in the Editor:
Computer Confiuration >> Administrative Templates >> Windows Components >> App Package Deployment
-
Here, double-click on the policy “Allow all trusted apps to install” in the right pane.

Open policy -
From the pop-up policy, select the Enabled radio button, then click Apply and OK.

Enable the policy -
Now open the Command Prompt with elevated rights and run the following cmdlet to implement the changes.
GPUpdate /Force
gpupdate force latest


Once this is done, try re-enabling Developer Mode and check if the issue persists.
Undo Recent Changes
If the Developer Mode was working just fine before and has suddenly encountered an error, something that was recently changed has likely affected it, making Developer Mode unable to run properly.
This change could be a new software installation, a new Windows update that was installed, or any other insignificant changes.
In that case, you can try to uninstall any recently-installed apps through Programs and Features in the Control Panel. If you believe it was caused by a Windows update, try uninstalling the update. If you made multiple changes to the operating system or do not recall any changes made, try restoring your PC to an earlier state to undo any changes.
Disable Windows Telemetry
Windows Telemetry is used to collect and track data and activity on your PC so it can be reported back to Microsoft, which is useful for them so they can work on improving the user experience.
However, this service can also prevent you from accessing certain Windows features, such as the Developer Mode. Therefore, disabling telemetry and data collection just might fix the problem.
Here are 6 ways to disable telemetry on a Windows PC.
Final Thoughts
Windows Developer Mode is an excellent tool for developers who like playing around with custom UWP and Microsoft Store apps. It gives you the ability to test their limits.
Moreover, if you want to try out the new features in the latest Developer options, you can subscribe to the Windows Insider channel and try out these new (yet somewhat unstable) features in the Developer Mode.