
What Is 0x80070057?
Error 0x80070057 is one of the frequent Windows errors. It can appear during updates, but this time, it is raised when launching Windows Sandbox. Failure to run it indicates a problem in some service or process that the Sandbox requires.
What causes Windows Sandbox error 0x80070057?
Below are given some of the errors that can develop this type of error:
- Faulty registry entries
- Outdated drivers or software
- Recently installed problematic Windows update
- Malware infection and/or compatibility issues.
How to Resolve Windows Sandbox Error 0x80070057
Here are some of the ways you can try to bring it back into action.
1. Rename the SoftwareDistribution Folder
The SoftwareDistribution folder saves temporary files concerning updates. Renaming it might refresh update components and resolve this error.
- Press Windows + R to open the Run dialog.
- Type in
%systemroot%and press Enter. - Find the SoftwareDistribution folder, and rename it as
SoftwareDistribution.old. - Restart and check if the error is fixed when opening the Windows Sandbox.
2. Disable and Re-enable Windows Sandbox
Well, this might seem like a no-brainer. But sometimes, the problem can be resolved by simply turning it off and then on again.
- Press Windows + R keys and type
appwiz.cpl. Press the Enter key. - In the Programs and Features window, click on Turn Windows features on or off.
- Under this section, uncheck Windows Sandbox. Then restart your computer.
- Open Turn Windows features on or off again and enable Windows Sandbox.
3. Update Your Computer’s BIOS
BIOS update is a little riskier and can theoretically help resolve the compatibility issues that may be causing 0x80070057 error.
- In the Windows search box, type
msinfo, then open System Information. - Under the System Model and BIOS Version, jot down the information or open Command Prompt as an administrator, then type
wmic bios get biosversionto show the BIOS version. - To go to your manufacturer’s website, download the latest version of the BIOS, and follow the instructions carefully.
- Only update your BIOS if the one on the website is newer than your currently installed version. Make sure that, in the update process, the power supply will not be disrupted.
Now, after updating, you most likely would want to enable features like Hyper-V and download Windows updates along with the Cumulative Patch. If the outdated drivers are among those factors which contribute to system instability, then it may be a good idea to use Outbyte Driver Updater and have the drivers updated automatically.
People Also Ask
Read about common Windows Errors:
Windows error code 0xc0000001
Windows Update Error 0x80070003
Error Code 0xc0000185 on Windows 10
Windows Update Error 0x80070005
Error Code 0x800701b1
FAQs
What does error 0x80070057 mean?
It usually indicates a problem with system files or services, particularly during updates or when running specific Windows features like Sandbox.
Why can’t Windows Sandbox start?
Issues like corrupted registry files, outdated software, or BIOS conflicts can prevent Sandbox from launching.
Can I fix error 0x80070057 without updating the BIOS?
Yes, other methods like renaming the SoftwareDistribution folder or re-enabling Windows Sandbox may work without updating BIOS.
Do I need to disable antivirus software to fix this?
It’s not required, but you may temporarily disable antivirus if it’s interfering with Sandbox or updates.
Being an avid Windows 10 user, you may encounter multiple error messages on your system every now and then. The issues can occur by the 3rd party software you are using or the existing ones crashing down. But out of so many complications that people face in the computing world, one that hits nowadays are Windows 10 Sandbox Problems.
Well, for those who have no idea about Windows Sandbox, it is a built-in small desktop environment in order to safely running applications in isolation. It has been launched last year and just generates a new lightweight (100MB) installation of Windows to run a program. Now, let’s see how to fix some of the Sandbox errors that have been around for quite some time now.
Windows 10 Sandbox Problems
Here is How to fix Windows 10 Sandbox Problems –
1] Windows 10 Sandbox Mode Missing
To run Windows 10 Sandbox on your system, ensure that the device is running Windows 10, version 1903. But users are continuously reporting of missing this important feature. So, in order to get hands on to this tool, it has to be manually activated. Before you proceed with the activating, ensure that CPU virtualization is enabled. It is one of the most critical hardware-based functions that is required to operate this new feature of Windows.
Hence, first, you need to find out whether CPU virtualization is activated, if not, then enable it. Here is the sequence of steps to activate Windows Sandbox –
Check Status of CPU Virtualization
- Right-click on the taskbar, and then select Task Manager.
- Now, switch to the Personalization tab and select CPU on the left pane. On the lower right hand of the screen check to see if Virtualization is Enabled (Essential to run Windows 10 Sandbox).
- If the Virtualization is Enabled, you are good to go. If not you will have to start up the BIOS to enable it and this is how you need to proceed further.
Enable CPU Virtualization in BIOS
- Press Win logo+I hotkey simultaneously to open Windows Settings application.
- Click Update & Security.
- Go to Recovery subsection on the left sidebar.
- Switch to the right pane and beneath the Advanced startup heading, click Restart now.
- Choose Troubleshoot.
- Perform a click on Advanced Options.
- Select UEFI Firmware Settings.
- Hit Restart. Find Advanced menu or tab. (In some computers, you will find it as Configuration or Advanced Mode).
- Lastly, look for the setting that displays Virtualization in its name and turn it ON.
Turn On Windows Sandbox
- Open the Start Menu and type Windows Features.
- Select “Turn Windows features on or off” from the list of results.
- On the dialog box that pops up, look for the Windows Sandbox feature.
- Check on the box beside the name Windows Sandbox to enable it. Click OK.
- Your system will now activate the feature, hence, wait for the process to end.
- Restart your system and try to open Windows 10 Sandbox.
Once you successfully activate the Windows 10 Sandbox on your PC, use it as per your need. If at all anything goes wrong, try to update your system and it will fix the issues.
2] Windows Sandbox item is grayed out
Yet another issue that we would discuss is that under the Windows Features box, the list with the name Windows Sandbox is grayed out and does not allow to make any changes whatsoever. You can open the Windows Features by following the below sequence of steps. There are certain things that you can give an attempt to overcome this problem.
- Type Windows Features on the taskbar search and go ahead with the option “Turn Windows features on or off“.
- Windows Features dialog will become visible.
- The item Windows Sandbox is dimmed out as you can see in the given snapshot. As it is grayed out, you cannot use it to test programs.
- To bypass this weird problem, open the BIOS of your computer system. To do so, you need to press the DEL or ESC key constantly while the system is booting. (However, every machine has a different key to get into BIOS, please verify with the manufacturer before you proceed).
- Make sure all these options are configured as below –
-
- Hyper-V: Enabled
- Data Execution Prevention: Enabled
- Virtualization Technology (VTX): Enabled
- VM Monitor Mode Extensions: Yes
- Second Level Address Translation (VT-d or RVI): Enabled.
- 6. Save all the changes and Restart Windows 10 PC.
- 7. Open Windows Features to check the Windows Sandbox option again.
After mitigating the issue, you can easily check or uncheck the box to enable or disable the feature.
3] Error 0x80070015 – Windows Sandbox failed to start
Check Services
This issue occurs when the supporting devices to run the Windows Sandbox is not enabled and also when the OS is not up-to-date. Thus you will have to enable it manually from the Windows Service Manager. Here are the steps to open the Windows Service Manager and enable the services –
- Press “Win logo + R” on the keyboard to open Run dialog box on your system.
- Type services.msc and hit Enter.
- Search for the options in the list as given below and make the necessary changes.
Network Virtualization Service: (Startup type: Manual)
Virtual Disk: (Startup type: Manual)
Hyper – V Virtual Machine: (Startup type: Manual)
Hyper – V Host Compute Service: (Startup type: Manual)
Container Manager Services: (Startup type: Automatic)
- Apply all the settings, close the Services window and try running the Windows 10 Sandbox again.
Perform Windows Update
- Another method that you can try is by updating your system. So go to Start Menu and click the cog icon.
- Select Update & Security.
- Go to Windows Update subsection on the left pane. Click on ‘Check for Updates‘.
- If updates are available, click on the Download to update the system.
- Finally, reboot the device.
Hopefully, this will fix the error and now you can try starting the Windows Sandbox once again.
4] Error 0x80070057 – The parameter is incorrect
For this issue or error, you can follow the same procedure as an above set of errors.
Check for Updates
- Get access to Start menu and click gear icon to launch Settings.
- Click Update & Security.
- Perform a hit on Check for updates. Wait for the system to scan and list down all the updates.
- Click Download to grab and if they require a reboot, carry it out to install the updates.
Make Sure Windows Sandbox Supports your System
Here are some of the criteria that your device should fulfill in order to prevent any Sandbox errors –
- Virtualization is enabled.
- Turn ON Hyper-V.
- Your CPU supports SLAT.
You can check out the above configurations by navigating to the BIOS settings of your device.
Simply reboot the system after making all these changes and the problem will not occur anymore the next time you start Windows Sandbox.
5] Fix Error 0xc030106
This error is caused due to the supporting virtualization components encountering some issues. Well, as we discussed the Windows Sandbox will only work on certain components that are enabled. Any changes made to it can be the reason that it is failing to start. Here are some of the methods that you can give a go to fix Windows 10 Sandbox problem.
Run Windows Sandbox with Admin Authorities
- Open Start Menu and scroll down to Windows Sandbox.
- Once you see it, do a right-click on it and choose “Run as Administrator”.
- Select YES, if prompted by User Account Control.
- This will certainly open the Windows Sandbox without any error.
Restart Certain Services
The post-installation of Hyper-V and turn-on of virtual hard disk requires you to restart some of the services. Please do them in the following given order to avoid any further complications –
- Go to the taskbar search box and insert the command services.msc.
- Hit Enter and on the Services window, restart the below list of services in the same sequence.
- Do a right-click on the service name and select Restart and wait for it to complete.
Network Virtualization Service
Virtual Disk
Hyper-V Virtual Machine Manager
Hyper-V Host Compute Service
Container Manager Services
This was pretty easy to run the tool on the system. Some of the other issues that you can check by making sure all the properties are enabled in the BIOS of your system as mentioned above. Also, download all the Windows updates on the computer and then restart it. It is most likely to fix any issue related to Windows Sandbox.
Conclusion
The major factors that need to be taken into consideration to fix Windows 10 Sandbox Problems are by making sure all the system components are up-to-date. Moreover, some of the options available on the BIOS of the system especially Virtualization and Hyper-V must be enabled to run the tool.
If at all any other error messages appear on the screen, these are the basic methods that you can always try to fix any issue in the future.
Some more posts on Windows Sandbox –
1] How to Manage Sandbox in Windows 10
2] How to Turn on Windows Defender Sandbox in Windows 10
Methods:
1] Windows Sandbox Mode Missing
2] In Windows Features, Sandbox item is greyed out
3] Windows Sandbox failed to start, Error 0x80070015
4] Error 0x80070057 – Windows Sandbox failed to start, The parameter is incorrect
5] Error 0xc030106 – Windows Sandbox failed to start
That’s all!!
Ошибка с кодом 0x80070057 «Параметр задан неверно», «Не удалось отформатировать раздел» и другие варианты ошибки с этим кодом могут возникнуть при разных обстоятельствах: при чистой установке Windows и при обновлении системы, при установке компонентов или приложений, в некоторых случаях —при использовании конкретных программ.
В этой инструкции подробно о разных сценариях появления ошибки 0x80070057 и способах исправить её в Windows 11, 10 и других версиях системы.
Ошибка 0x80070057 при чистой установке Windows с флешки

Первый и один из наиболее распространенных случаев появления ошибки 0x80070057 — сообщение о ней при попытке форматировать раздел диска при чистой установке Windows на компьютере или ноутбуке. Текст сообщения об ошибке «Не удалось форматировать раздел на диске» или «Не удалось произвести форматирование выбранного раздела».
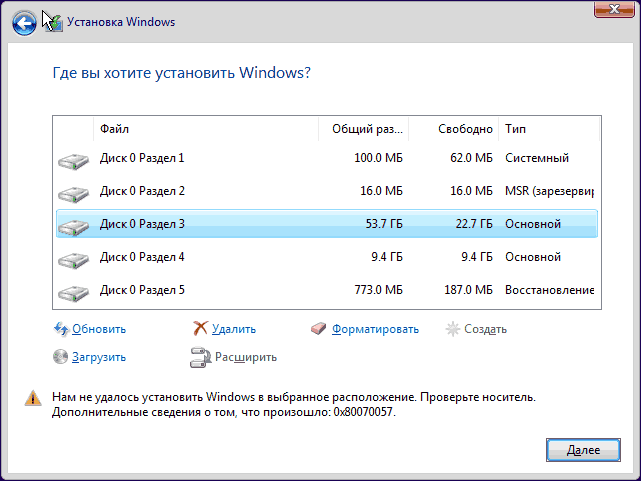
И второй вариант ошибки с этим же кодом — «Нам не удалось установить Windows в выбранное расположение. Проверьте носитель. Дополнительные сведения о том, что произошло: 0x80070057» при выборе раздела для установки и нажатии кнопки «Далее».
Здесь можно попробовать следующие подходы к решению:
- В случае, если сообщение об ошибке появляется внизу после выбора раздела, при этом предварительно вы меняли структуру разделов, например, в командной строке по Shift+F10, просто нажмите по ссылке «Обновить» внизу слева списка разделов, заново выберите раздел и нажмите «Далее».
- Вместо форматирования раздела, удалите все разделы, включая системные, с выбранного диска (например, «Диск 0»), при условии, что на нем (на всем физическом диске) отсутствуют важные данные — все они будут удалены.

- Если кнопка «Удалить» не работает, вы можете использовать командную строку: нажмите Shift+F10 на этапе выбора разделов (на некоторых ноутбуках — Fn+Shift+F10), и в открывшейся командной строке по порядку используйте команды (заменив N на номер очищаемого диска)
diskpart
list disk
select disk N
clean
exit
после чего закройте командную строку и нажмите «Обновить» в программе установки Windows.
- Выберите «Незанятое пространство на диске» и нажмите «Далее» для продолжения установки. Если вам требуется создать дополнительные разделы на диске, это можно сделать уже после завершения установки Windows.


Предложенный способ может и не помочь и в такой ситуации следует учитывать следующие возможные причины, которые могут приводить к ошибке 0x8007005 в рассматриваемом сценарии:
- Неисправность диска или проблемы с его подключением: например, неисправный кабель SATA или плохой контакт. Можно попробовать использовать кабель от другого устройства, например, от привода оптических дисков при его наличии.
- Недостаток питания для работы дисков и других компонентов — нередкая ситуация на старых компьютерах, где фактическая мощность блока питания может быть заметно ниже номинальной.
- Неисправность других подключенных накопителей: возможна ситуация, когда при наличии более одного жестких дисков или SSD и при нестабильной работе одного из них, второй так же начинает работать с ошибками. Можно попробовать выполнить установку, отключив все необязательные в её процессе диски и оставив подключенным только системный.
- На старых компьютерах в БИОС попробуйте переключить режим работы дисков с IDE на AHCI или в обратном порядке — иногда это срабатывает, для современных систем это не актуально.
- Попробуйте использовать другой инструмент для создания загрузочной флешки, а по возможности —и другой накопитель.
При установке обновлений или при установке Windows из запущенной системы путем обновления
Если ошибка появляется при установке обновлений Windows 11, Windows 10 или других версий или при использовании утилиты обновления ОС от Майкрософт, попробуйте следующие способы исправить ошибку 0x80070057:
- Очистите кэш обновлений Windows.
- Используйте средство устранения неполадок обновлений Windows 11 или Windows 10 и другие способы исправить ошибки Центра обновлений.
Возможен вариант, что ошибка 0x80070057 при установке обновлений вызвана какими-либо сбоями со стороны Майкрософт и со временем устранится сама, пропадет после перезагрузки компьютера или после повторной попытки скачать и установить обновление.
В Microsoft Store и при установке игр Xbox
Ещё один возможный сценарий появления рассматриваемой ошибки — при установке приложений из Microsoft Store или приложения Xbox. Возможные решения:
- Для Microsoft Store — запустить команду wsreset.exe из командной строки, запущенной от имени Администратора. Также можно использовать опции исправления и сброса приложения Microsoft Store в Параметры — Приложения — Microsoft Store — Дополнительные параметры.

- Для Xbox — официальная рекомендация Майкрософт (при условии, что ошибка не пропадает сама со временем) — поменять место установки игр на другой диск в настройках приложения Xbox.

При создании резервной копии встроенными средствами системы
Если ошибка 0x80070057 «Параметр задан неверно» возникает при резервном копировании, при этом вы уверены, что целевой накопитель исправен, не имеет ошибок файловой системы или проблем с питанием, попробуйте внести изменения в реестр следующим способом:
- Нажмите клавиши Win+R, введите regedit и нажмите Enter.
- Перейдите к разделу реестра
HKEY_LOCAL_MACHINE\SOFTWARE\Policies\Microsoft\Windows\System
При отсутствии раздела — создайте его.
- Создайте параметр DWORD с именем CopyFileBufferedSynchronousIo в этом разделе реестра, дважды нажмите по нему и задайте значение 1 для параметра.

- Закройте редактор реестра и перезагрузите компьютер.

После перезагрузки проверьте, выполняется ли архивация Windows теперь.
Дополнительные возможные варианты появления ошибки 0x80070057 и способы исправления:
- Если ошибка возникает в КриптоПро («Не удалось создать подпись»), попробуйте использовать официальную справку по ошибке, а также форум поддержки.
- Основные причины ошибки E_INVALIDARG 0x80070057 в VirtualBox — недостаточное количество места на диске хоста для виртуальной машины, несоответствия доступной оперативной памяти и заданной в настройках виртуальной машины, повреждения целостности файла виртуальной машины OVA (представляющего собой, по сути, архив), например, из-за сбоев при передаче или ошибок файловой системы на диске.
- Проверьте системный и другие диски на ошибки файловой системы.
- Есть сообщения, что изменения знака разделителя десятичных разрядов может исправить ошибку. Нажмите клавиши Win+R, введите intl.cpl и нажмите Enter. Нажмите кнопку «Дополнительные параметры», а на следующем экране измените знак «Разделитель целой и дробной» с запятой на точку, примените настройки.

- Если до недавнего времени ошибка не появлялась и есть точки восстановления системы, используйте их. Подробно: Точки восстановления Windows 11, Точки восстановления Windows 10.
- Выполните проверку и восстановление целостности системных файлов.
- Если ошибка не связана с обновлениями, выполните установку последних обновлений Windows: например, некоторое время назад ошибка 0x80070057 наблюдалась при подключении к сетевым папкам на некоторых версиях Windows и была исправлена в очередном обновлении системы.
- Убедитесь, что в Windows выставлены верные дата и время.
- Выполните проверку компьютера на вирусы и наличие вредоносных программ, например, с помощью бесплатной утилиты Kaspersky Virus Removal Tool или LiveCD Dr.Web CureIt!
- Проверьте, возникает ли ошибка при использовании чистой загрузки Windows — если в этом случае всё работает без сбоев, причину следует искать в сторонних службах или фоновом ПО.
- Создайте нового пользователя Windows, дайте ему права администратора, зайдите под новой учетной записью и проверьте — появляется ли ошибка в этом случае.
- Проверьте, появляется ли ошибка, если отключить сторонний антивирус (при его наличии).

И ещё один вариант на случай, если другие подходы не помогают, и вы считаете, что дело в Windows — автоматическая переустановка ОС, в том числе и с сохранением данных, об этом в статьях: Как сбросить Windows 11, Как сбросить Windows 10.
Пользователи Windows нередко сталкиваются с ошибками, которые могут поставить в тупик даже опытных владельцев ПК. Одна из таких — ошибка 0x80070057. Она может проявляться в самых разных ситуациях, например, во время установки системы с сообщением:
«Программа установки Windows 11. При установке Windows произошла непредвиденная ошибка. Код ошибки: 0x80070057 — 0x4002F».

Однако это не единственный случай: ошибка встречается и при обновлении системы, установке приложений из Microsoft Store, работе с резервными копиями или даже при использовании некоторых программ, таких как КриптоПро или VirtualBox. В этой статье мы разберём все основные сценарии появления ошибки 0x80070057 и предложим пошаговые решения для Windows 11, 10 и других версий системы.
Приобрести оригинальные ключи активации Windows 11 можно у нас в каталоге от 1690 ₽
Ошибка 0x80070057 при чистой установке Windows с флешки
Один из самых распространённых случаев, когда пользователи видят ошибку 0x80070057, — это процесс чистой установки Windows с загрузочной флешки. Обычно проблема возникает на этапе выбора или форматирования раздела диска. Программа установки выдаёт сообщение вроде «Не удалось форматировать раздел на диске» или «Не удалось произвести форматирование выбранного раздела». Это может быть связано с особенностями диска, настройками или самой флешки. Вот как можно попробовать решить эту проблему:

Удаление разделов и установка в незанятое пространство
Если вы устанавливаете Windows на диск, где нет важных данных, самый простой способ обойти ошибку — полностью очистить диск от разделов. На экране выбора разделов в программе установки:
— Выделите каждый раздел на нужном диске (например, «Диск 0») и нажмите кнопку «Удалить». Это сотрёт все данные, включая системные разделы, так что убедитесь, что информация с диска вам не нужна.

— Если кнопка «Удалить» неактивна или процесс зависает, откройте командную строку прямо в установщике, нажав Shift + F10 (на некоторых ноутбуках — Fn + Shift + F10). В появившемся окне введите следующие команды по порядку, заменив N на номер вашего диска (узнать его можно в списке):
diskpart
list disk
select disk N
clean
exit

— После выполнения закройте командную строку, нажмите «Обновить» в окне установки, и вы увидите «Незанятое пространство на диске». Выберите его и нажмите «Далее» — установщик сам создаст нужные разделы и продолжит процесс. Если вам позже понадобятся дополнительные разделы, их можно настроить уже из установленной системы через «Управление дисками».

Дополнительные причины и решения
Если предложенный метод не сработал, стоит рассмотреть другие возможные причины ошибки 0x80070057 с пояснением «Параметр задан неверно». Вот что можно проверить:
— Неисправность диска или подключения: возможно, проблема в самом накопителе (HDD или SSD) или его кабеле. Попробуйте заменить кабель SATA на другой, например, взять его от привода DVD, если такой есть. Также проверьте, нет ли плохого контакта в разъёмах.
— Недостаток питания: на старых компьютерах блоки питания со временем теряют мощность, и это может мешать нормальной работе дисков. Если есть возможность, протестируйте установку с другим блоком питания или отключите второстепенные устройства (например, лишние диски или периферию).
— Проблемы с другими накопителями: если к системе подключено несколько дисков, неисправность одного может влиять на работу другого. Отключите все лишние накопители, оставив только тот, на который устанавливаете Windows, и повторите попытку.
— Режим работы дисков в BIOS: на старых ПК зайдите в BIOS (обычно клавиши Del или F2) и переключите режим работы дисков между IDE и AHCI. Это иногда помогает, хотя для современных систем с UEFI такой подход редко актуален.

— Проблемы с флешкой: возможно, загрузочный носитель создан некорректно. Попробуйте использовать другой USB-накопитель или программу для записи (например, Rufus вместо Media Creation Tool).
Ошибка при установке обновлений или обновлении системы
Ещё один частый сценарий — ошибка 0x80070057 при установке обновлений через Центр обновления Windows или при обновлении системы с помощью утилиты от Microsoft (например, для перехода с Windows 10 на 11). В таких случаях проблема обычно связана с кэшем обновлений или временными сбоями. Вот что можно сделать:
— Очистка кэша обновлений:
Откройте командную строку от имени администратора (Win + X → Командная строка (Администратор)) и выполните:
net stop wuauserv — остановка службы обновлений.

ren C:\Windows\SoftwareDistribution SoftwareDistribution.old — переименование папки кэша.

net start wuauserv — запуск службы обратно.

Перезагрузите компьютер и снова запустите обновление. Это создаст новый кэш и устранит возможные повреждения.
— Средство устранения неполадок:
В Windows 11 или 10 зайдите в Параметры → Система → Устранение неполадок → Другие средства устранения неполадок. Выберите «Центр обновления Windows», запустите проверку и следуйте подсказкам. Это может автоматически исправить ошибки.


— Ожидание или повторная попытка:
Иногда ошибка возникает из-за сбоев на серверах Microsoft. Перезагрузите ПК и попробуйте установить обновление позже — проблема может исчезнуть сама собой.
Ошибка в Microsoft Store и при установке игр Xbox
Ошибка 0x80070057 может мешать установке приложений из Microsoft Store или игр через приложение Xbox. Вот как её устранить:
— Для Microsoft Store:
— Запустите командную строку от администратора и введите wsreset.exe. Это очистит кэш магазина. После выполнения откроется пустое окно — дождитесь его закрытия.

— Альтернатива: зайдите в Параметры → Приложения → Установленные приложения → Microsoft Store → Дополнительные параметры и нажмите «Сброс». Затем перезапустите Store и попробуйте снова.


— Для Xbox:
— Откройте приложение Xbox, зайдите в настройки и измените диск для установки игр на другой (например, с C: на D:). Microsoft рекомендует этот способ, если ошибка сохраняется. Временные сбои также могут пройти сами — подождите и повторите попытку.
Ошибка при создании резервной копии
Если ошибка 0x80070057 с пояснением «Параметр задан неверно» возникает при использовании встроенного инструмента резервного копирования Windows, и вы уверены, что целевой диск исправен (нет ошибок файловой системы или проблем с питанием), попробуйте изменить настройки реестра:
1. Нажмите Win + R, введите regedit и нажмите Enter.

2. Перейдите в раздел HKEY_LOCAL_MACHINE\SOFTWARE\Policies\Microsoft\Windows\System.

— Если раздела System нет, создайте его: правый клик по Windows → Создать → Раздел → назовите System.
3. В разделе System создайте параметр: правый клик → Создать → Параметр DWORD (32-бит) → назовите CopyFileBufferedSynchronousIo.
4. Дважды щёлкните по параметру, установите значение 1 и нажмите OK.

5. Закройте редактор реестра, перезагрузите компьютер и проверьте, работает ли резервное копирование.
Дополнительные сценарии и решения
Ошибка 0x80070057 может проявляться и в других ситуациях, требуя индивидуального подхода. Вот несколько дополнительных примеров и способов их устранения:
— В КриптоПро: если ошибка возникает при создании подписи («Не удалось создать подпись»), обратитесь к официальной документации КриптоПро или форуму поддержки. Часто помогает переустановка программы или обновление сертификатов.
— В VirtualBox (E_INVALIDARG): ошибка может быть связана с нехваткой места на диске хоста, несоответствием заданной и доступной оперативной памяти или повреждением файла виртуальной машины (.ova). Проверьте свободное место, настройки VM и целостность файла (перекачайте его, если нужно).
— Проверка дисков: выполните chkdsk C: /f /r в командной строке от администратора, чтобы найти и исправить ошибки файловой системы.

— Изменение разделителя: зайдите в Win + R → intl.cpl → Дополнительные параметры, смените разделитель десятичных с запятой на точку и примените. Иногда это решает проблему.


— Точки восстановления: если ошибка появилась недавно, используйте восстановление системы (Win + R → rstrui).


— Восстановление файлов: проверьте целостность системы командами DISM /Online /Cleanup-Image /RestoreHealth и sfc /scannow.


— Обновления: установите последние апдейты Windows — некоторые старые ошибки (например, с сетевыми папками) уже исправлены.
— Дата и время: убедитесь, что они верны (Параметры → Время и язык).
— Проверка на вирусы: используйте утилиты вроде Kaspersky Virus Removal Tool или Dr.Web CureIt.
— Чистая загрузка: отключите сторонние службы (Win + R → msconfig → Службы → Скрыть службы Microsoft → Отключить все) и проверьте.


— Новый пользователь: создайте нового администратора (Параметры → Учётные записи → Другие пользователи) и протестируйте.


— Антивирус: временно отключите сторонний антивирус, если он есть.
— Переустановка: если ничего не помогает, выполните сброс Windows с сохранением данных (Параметры → Восстановление → Сбросить этот ПК).


Ошибка 0x80070057 — это многогранная проблема, возникающая при установке Windows, обновлениях, работе с приложениями или резервным копированием. Для чистой установки удалите разделы или проверьте оборудование, для обновлений — очистите кэш, в Store и Xbox — сбросьте настройки. Резервное копирование можно наладить через реестр, а в сложных случаях помогут восстановление системы или переустановка. Следуя этим шагам, вы сможете разобраться с ошибкой и вернуть Windows в рабочее состояние!
What is ‘Windows Sandbox error 0x80070057’ in Windows 10?
In this post, we are going to discuss on ‘How to Fix Windows 10 Sandbox error 0x80070057’. You will be guided with easy steps/methods to resolve the error. Let’s starts the discussion.
‘Windows Sandbox’: Starting with Windows 10 May 2019 update version 1903, Windows Sandbox is available as part of Windows 10. This tool is designed to run untrusted applications inside a lightweight isolated environment running independently from your main installation.
Windows Sandbox is virtual machine created using ‘Micosoft’s Hypervisor’ using the same Windows OS image that one on your computer. When you run Windows Sandbox feature in your computer, it runs a new clean installation of Windows 10, and when you finish testing an application and close ‘Windows Sandbox’, everything gets deleted automatically.
To use Windows Sandbox feature, it is necessary to meet hardware and software requirements before using this. You can check hardware and software requirement for using Windows Sandbox – virtual machine in your Windows 10 computer on Microsoft Official source and then you can use the feature.
‘Windows Sandbox error 0x80070057’: It is common Windows problem considered as Windows Sandbox error. This error indicates that Windows Sandbox feature is failed to start in Windows 10 due to incorrect parameter. In most cases, Error code 0x80070057 is occurred due to its dependencies on numerous components of Windows 10 that are related to Hyper-V and Virtualization mainly.
Windows 10 Sandbox error code 0x80070057 is occurred due to some unsupported Windows services including Network Virtualization, HV Host, Container Manager, Virtual Disk, Hyper -V Virtual Machine, or Host Computer Service. In such case, you can disable these services by run ‘Services’ window in Windows 10, and then re-enable them in order to fix the issue.
This error can also be occurred due to some required permission for using Windows Sandbox feature like Windows Sandbox is not configured to run as Administrator. Some programs/features like Windows Sandbox requires running with Administrator. You can configure Windows Sandbox to run as administrator in order to resolve the error.
Another possible reason behind this error can be corruption in system files or registry, corrupted hard disk image or drives, outdated Windows OS, disabled Windows Sandbox or problem with Windows Sandbox Feature itself, and other reasons. Let’s go for the solution.
How to fix Windows 10 Sandbox error 0x80070057?
Method 1: Fix ‘Windows 10 Sandbox error’ with ‘PC Repair Tool’
If this error is occurred due to some problems in your Windows computer, then you can try to resolve the issue with ‘PC Repair Tool’. This software offers you to find and fix BSOD errors, EXE errors, DLL errors, problems with programs, malware or viruses issue, system files or registry errors, and other system issues with just few clicks. You can get this tool through button/link below.
⇓ Get PC Repair Tool
Method 2: Run Windows Sandbox as Administrator
One possible way to resolve the error is to run Windows Sandbox as Administrator.
Step 1: Type ‘Windows Sandbox’ in ‘Windows Search Box’
Step 2: From the results appeared, right-click on ‘Windows Sandbox’ and select ‘More > Run As Administrator’
Step 3: Click on ‘Yes’ button if asked for confirmation to run Windows Sandbox.
Step 4: Restart your computer once done and check if the error is resolved.
Method 3: Disable and then re-enable Windows Sandbox’s dependencies services
This error can also be occurred if certain services or processes are not functioning properly in your computer. You can disable certain services and then re-enable it in order to fix the error.
Step 1: Press ‘Windows + R’ keys on keyboard, type ‘services.msc’ in the opened ‘Run’ dialog box and hit ‘OK’ button to open ‘Services’ window
Step 2: In ‘Services’ window opened, find the following services one-by-one
- Network Virtualization Service
- HV Host
- Virtual Disk.
- Hyper – V Virtual Machine.
- Hyper – V Host Compute Service.
- Container Manager Services
Step 3: Right-click on each service and select ‘Stop’ option and after few seconds, right-click on it again and select ‘Start/Restart’ option
Step 4: Once done, restart your computer and check if the error is resolved.
Method 4: Run SFC Scan and DISM Scan in Windows 10
You can run SFC scan to repair system files and run DISM scan to repair hard disk image issue in order to fix ‘Windows 10 Sandbox error 0x80070057’ error.
Step 1: Press ‘Windows + X’ keys on keyboard and select ‘Command Prompt as Administrator’
Step 2: Run DISM Scan. Type the following command one-by-one and hit ‘Enter’ key after each to execute
DISM.exe /Online /Cleanup-image /Scanhealth
DISM.exe /Online /Cleanup-image /Restorehealth
DISM.exe /online /cleanup-image /startcomponentcleanup
Step 3: Once executed, run SFC scan. Type ‘sfc /scannow’ command and hit ‘Enter’ key to execute
Step 4: Once executed, restart your computer and check if the error is resolved.
Method 5: Update Windows 10 OS
This error can also be occurred due to outdated Windows 10 OS or any pending Windows update. You can update Windows 10 OS in order to fix the error.
Step 1: Press ‘Windows + I’ keys on keyboard to open ‘Settings’ App in Windows 10
Step 2: Go to ‘Update & Security > Windows Update’ and click on ‘Check for updates’ button.
Step 3: This will automatically download and install the available Windows update in computer. Click on ‘Download’ or ‘Install’ on pending Windows update if any. Once done, restart your computer to see the changes and check if the error is resolved.
Method 6: Disable Windows Sandbox and then re-enable it in Windows 10
Another possible way to resolve this error is to disable Windows Sandbox feature and then re-enable it in your computer.
Step 1: Open ‘Control Panel’ in Windows 10 and go to ‘Uninstall a Program > Programs & Features’
Step 2: In the opened page, click on ‘Turn Windows Feature ON or OFF’ in left pane
Step 3: Now in the opened page ‘Windows Features’, find and untick ‘Windows Sandbox’ checkbox
Step 4: Finally, click on ‘Ok’ button to save the changes and restart your computer
Step 5: After restart, open ‘Windows Features’ window again using ‘step 1 and step 2’ and tick ‘Windows Sandbox’ checkbox. Re-installation process will begin automatically.
Method 7: Uninstall problematic Windows update (Recent Windows 10 Cumulative Updates)
Users reported that this error is started occurring after installing recent Windows 10 cumulative updates. You can update the latest update in order to fix the issue.
Step 1: Open ‘Settings’ App and go to ‘Update & Security > Windows Update’
Step 2: In right pane, select ‘View Update History’ and click on ‘Uninstall Updates’
Step 3: Find the latest patch-up file or Windows update according installation date and KB Number
Step 4: Right-click on it and select ‘Uninstall’. Follow on-screen instructions to finish uninstall process.
Step 5: Once done, restart your computer and check if the error is resolved.
Conclusion
I hope this post helped you on How to fix Windows 10 Sandbox error 0x80070057 with several easy steps/methods. You can read & follow our instructions to do so. If the post really helped you, then you can share the post with others to help them. That’s all. For any suggestions or queries, please write on comment box below.