Прозрачное оформление окон, приглянувшееся многим пользователям в Windows 7, пропало еще при выходе «восьмерки». До релиза Windows 10 был шанс, что технология Aero снова появится среди визуальных эффектов(ведь вернули разработчики долгожданную кнопку «Пуск»), однако этого не произошло.
Компания Microsoft в Windows 10 решила не возвращаться к старым методам оформления, благополучно забыв о технологии Aero. Но мириться с таким порядком необязательно: вы можете самостоятельно добавить в систему эффект прозрачных окон.
Используя программу Aero Glass
Раз нет встроенных инструментов, позволяющих решить вопрос, как включить Aero в Windows 10, то придется прибегнуть к возможностям сторонней программы. Знакомьтесь – Aero Glass, приложение, позволяющее реализовать эффект стекла для классического интерфейса Windows 10.
Aero Glass разработана для Windows 8.1, но её последняя версия корректно работает и на «десятке».
Совет! Перед установкой Aero Glass и изменением интерфейса рекомендуется создать дополнительную точку восстановления.
Давайте посмотрим, как активировать Aero в Windows 10 с помощью указанной утилиты:
- На официальном сайте в разделе «Download» скачайте последнюю версию программы.
- Запустите инсталлятор, примите условия лицензионного соглашения и выберите место для установки.
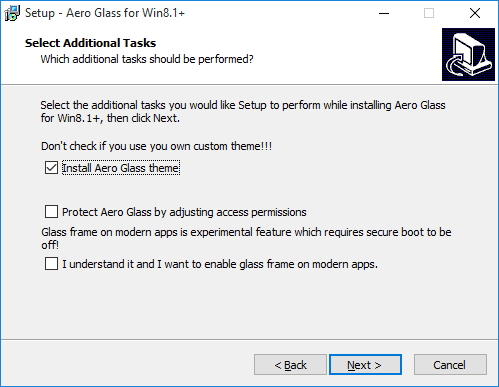
- Проверьте, чтобы была отмечена только инсталляция Aero Glass theme. Ниже расположено еще два пункта, генерирующие прозрачные заголовки для универсальных приложений, однако они требуют внесения потенциально опасных изменений, поэтому лучше не отмечать эти опции.
- Нажмите «Next» и дождитесь окончания установки.
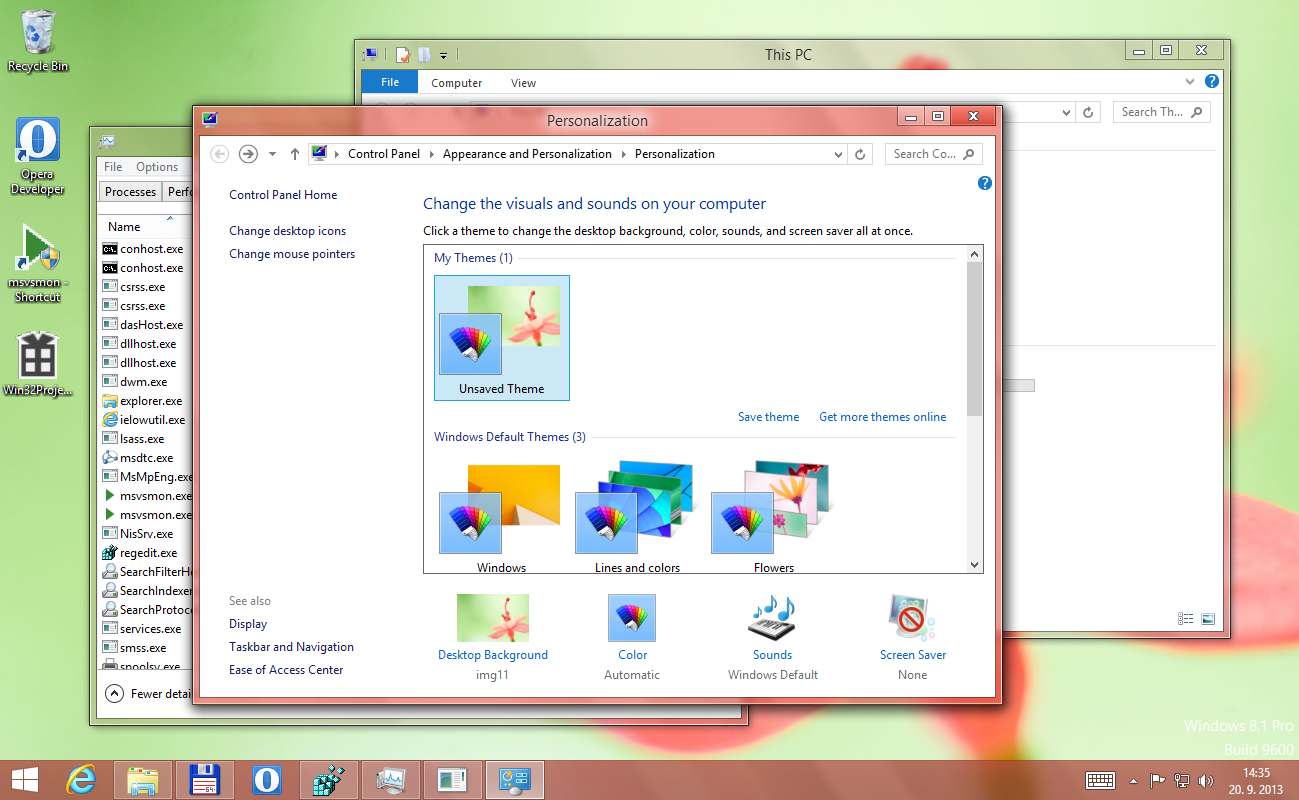
После завершения работы мастера установки вы увидите, что окна стали прозрачными. Изменения будут внесены автоматически, вам не нужно менять тему, чтобы включить Aero.
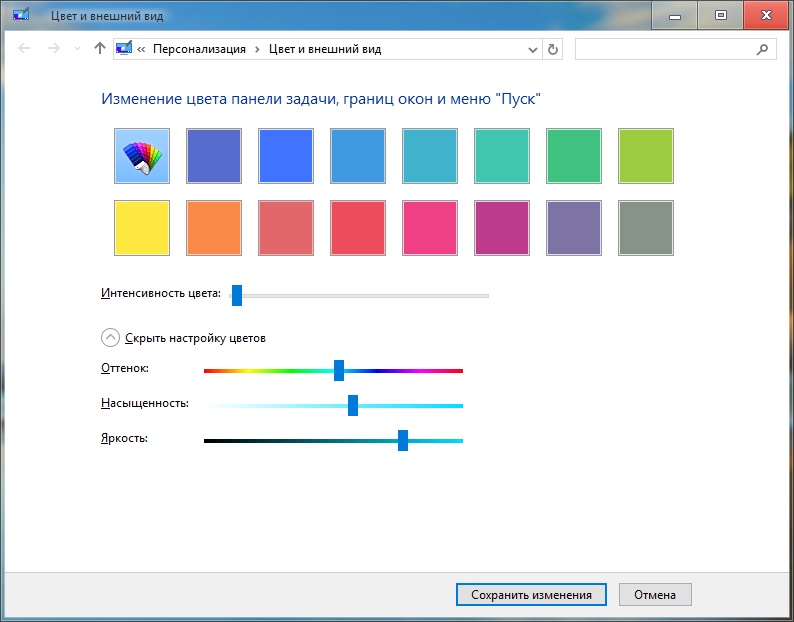
Для того, чтобы поменять степень прозрачности, нажмите Win+R и введите команду “rundll32.exe shell32.dll,Control_RunDLL desk.cpl,Advanced,@Advanced”. Появится окно изменения цвета, где меняя уровень интенсивности, меняется и уровень прозрачности.
После установки программы, в правом нижнем углу экрана, появляется водяной знак.
Видео
Для наглядности предлагаем посмотреть видео инструкцию, с подробным описанием включения эффекта прозрачности окон.
Вывод
Решая проблему, как активировать Windows 10 Aero, не забывайте о стабильной работе компьютера. Использование твиков и внесение потенциально опасных изменений может привести к потере данных. Поэтому при установке Aero Glass не активируйте распространение эффекта на универсальные приложения и не забывайте о создании точки восстановления для быстрого отката системы.
The Aero theme is probably the most loved in Windows history. The success of Windows 7 was due to many different factors and the Aero theme was definitely one of them. The Aero theme gave a glass-like look to the title bar and the start menu. The Aero theme was the signature look of Windows 7.
Those users who have only used Windows 8 and onwards are probably wondering why they haven’t seen this amazing theme in Windows 8 or 10. Well, it’s not your fault because Microsoft removed this theme for Windows 8 onwards.
In Windows 10, Aero theme is not available even though it’s the most requested theme. It doesn’t look likely that Microsoft will bring back this theme in Windows 10 anytime soon. However, there are other ways you can experience the Aero Glass for Windows 10.
In this article, we have those other methods that you can use to enable Windows Aero in Windows 10.
You may also like to check out this article on minimize maximize close buttons not working on Windows 10 .
We have shown a VIDEO walk through at the end of the post for easy solution.
Why In Windows 10 Aero Was Removed By Microsoft?
Before we discuss the methods to enable Aero in Windows 10, it’s important to understand the reason Microsoft removed it for Windows 8 onwards and still hasn’t brought it back even after facing such criticism from the userbase.
Microsoft removed the Aero theme as a way to create a unified UI for battery-powered devices like smartphones, tablets, and laptops. The target was to create the Windows more battery efficient for such devices. This way all the different Microsoft devices can be run on the same Windows.
Now, coming back to the main topic on how to enable the Aero Windows 10 title bar, frames, etc. Bringing back the Aero theme is not just about the nostalgia of using it again but the simple reason that it was just a good and well-optimized theme.
To enable and enjoy Aero in Windows again, try the methods given below.
1) Use The Registry Editor
Some users got specific updates from Microsoft for testing the Aero glass in Windows frames and title bars as a way to get feedback from users. However, only very few users got this update and the majority of the users didn’t get it.
If you are one of those users who got this update, you can try this method for enabling the Aero Glass for Windows 10 transparent theme. Just follow the steps given below to do it:
- Open the Run utility by pressing the Windows + R keys.
- Type regedit and click on Enter. The Registry Editor will open on your screen.
- Navigate to the following folder:
HKEY_CURRENT_USER\SOFTWARE\Microsoft\Windows\CurrentVersion\Themes\Personalize
Or just copy-paste it on the address bar of Registry Editor.
- Now, locate the DWORD entry EnabledBlurBehind. If the DWORD doesn’t exist, then create a new one of 32 bit and name it EnabledBlurBehind.
- Double-click on the DWORD and enter 1 in the Value data section.
- Finally, press OK to save the changes and restart your computer.
After the computer restarts, the Aero glass theme should be enabled. However, if this doesn’t work, then try the next method.
2) Use Aero Glass For Win 8.X+
Before you try this step, you should create a system restore point so that you can return the state of your computer if case of a mishap. To download and install the Aero glass them for Windows 10, follow the steps given below.
- Visit this website and download the Aero glass theme for your Windows.
- Now, install the app. During the installation, make sure to check the Install Aero Glass theme box.
- Keep following the instructions on your screen to finish the installation.
- After the application has installed, right-click on the Desktop and select the Personalize option.
- Select the Go to Themes option in the Preview your changes section.
- Click on the unsaved Desktop theme and activate it.
Now, the Aero Windows 10 transparent theme should be active on your computer. However, you have probably noticed the watermark that somewhat takes away the feeling of using the Aero theme. You can pay to remove the watermark, or you can try the next method.
3) Use Glass 2k
Another method you can use to experience the Aero glass theme in Windows 10 is to use the Glass 2k application. To use the Glass 2k application, follow the steps given below:
- Download Glass 2k from this website and open it. No installation is required for this application.
- After opening Glass 2k, check the Auto-Load Glass 2k every time Windows starts box and select the Taskbar Transparency as you prefer.
- You may want to disable the Transparency Popup also as it can interfere when you use the right-click menu.
- Finally, click on Save.
After saving the settings, you will have full control over the different transparency settings of the separate elements of your device. To adjust the transparency, press the Ctrl + Shift + (0-9) keys on your keyboard on any Window.
We liked using the Glass 2k app as it provides in Windows 10 Aero glass-like theme pretty well. Also, the option to customize the transparency is a great addition.
Wrapping Up
So, there you have it. Now you know how to enable the Windows 10 Aero theme on your computer. Although these methods are great, who doesn’t want the original Aero theme back from Microsoft? Hopefully, shortly we will get an official update on the Aero theme in Windows 10. Leave your comments below sharing your views on this article and also mention if the above methods worked for you or not.
Windows Aero — одна из функций, представленных в Windows Vista и 7. Она предоставляет пользователям потрясающие графические эффекты на рабочих столах Windows. Однако Microsoft решила не включать эту функцию в выпущенные на данный момент Windows 10 и 11. Теперь вы, вероятно, ищете способ включить Aero в Windows 7, 10 или 11. Что ж, к счастью, вы нашли эту страницу! В этом посте представлены 2 способа включения темы Aero в Windows 7/10/11. Исследуйте их прямо сейчас!
Часть 1. Как настроить DWM перед установкой Aero Glass
Как пользователь Windows 7, вы можете столкнуться с проблемой, когда захотите включить тему Aero Glass, и внезапно вы получите сообщение об ошибке, сообщающее, что вам необходимо сначала установить или включить диспетчер окон рабочего стола (DWM). Что ж, если вы столкнулись с этим и ищете ответ. Что ж, ниже мы представляем его работоспособное решение! Выполните шаги сейчас:
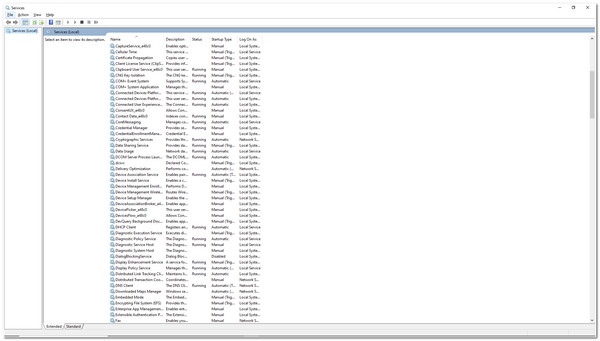
Шаг 1Получите доступ к вашему компьютеру Панель управления выполнив поиск в своей Windows панель поиска. После этого найдите Администрирование/Административные инструменты на Панель управленияпанели поиска, щелкните ее и выберите Услуги вариант.
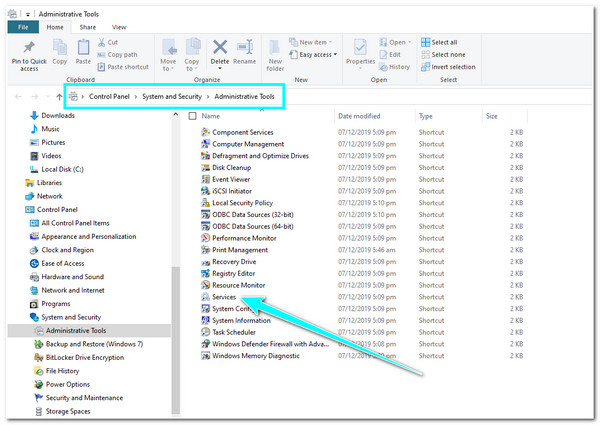
Шаг 2Далее, на Услуги окно, просмотрите вниз и выберите Диспетчер окон рабочего стола Диспетчер сеансов вариант. Затем щелкните правой кнопкой мыши, чтобы выбрать варианты, включая «Перезагрузить». После этого перезапустите ПК.
Часть 2. Как включить тему Aero в Windows 7/10/11
Вот как вы устанавливаете и включаете диспетчер окон рабочего стола (DWM) на своем компьютере с Windows. В следующей части вы увидите, как включить Aero Theme. Однако, как уже упоминалось выше, Microsoft решила не включать эту функцию в текущие версии Windows, то есть Windows 10 и 11. Но мы предлагаем реальные способы испытать удивительные графические элементы Aero на ваших Windows 10 и 11! Итак, без лишних слов, давайте погрузимся!
Windows 7
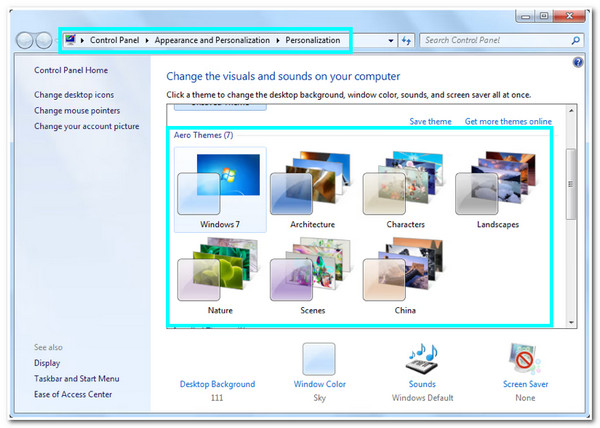
Поскольку тема Aero доступна в Windows 7, включить ее проще простого. Для этого щелкните правой кнопкой мыши по экрану и выберите Персонализация вариант. После этого ищите Аэро Темы и выберите тот, который, по вашему мнению, соответствует вашему вкусу.
Windows 10 и 11
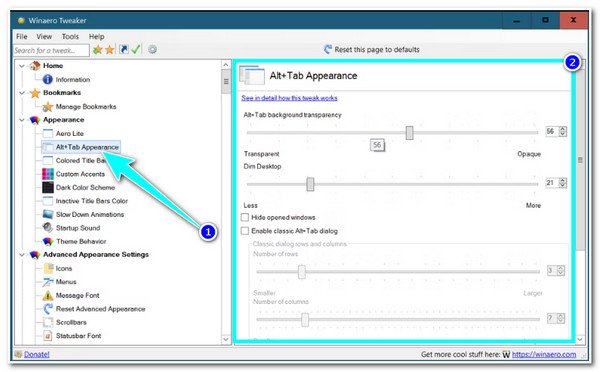
В отличие от Windows 7, вы можете получить Aero Theme в Windows 10/11, загрузив сторонний инструмент, например Винаэро Твикер. Этот инструмент предлагает пакет красивых пользовательских интерфейсов, которые позволяют вам изменить интерфейс Windows 10, который Microsoft забрала у вас. Он позволяет применять к вашему компьютеру дополнительные функции, такие как Aero Theme. Как использовать Wianero Tweaker для включения темы Aero? Вот чему вы должны следовать:
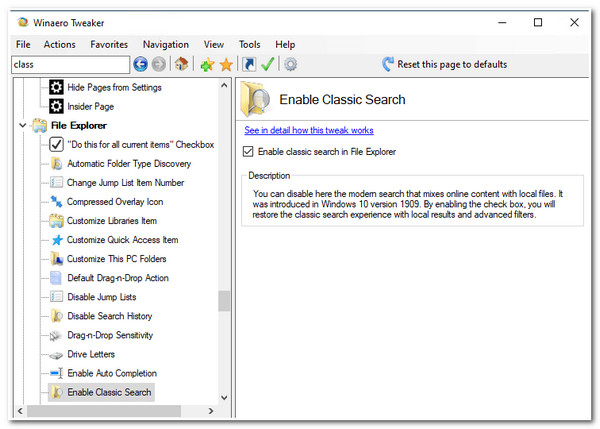
Шаг 1Загрузите Винаэро Твикер на официальном сайте распакуйте скачанный файл ZIP-файл, пройдите процесс установки и согласитесь с условиями лицензии.
Шаг 2После этого отправляйтесь в левая панель, выберите Появление вариант и нажмите Аэро Лайт. На правая панель, включите Aero Lite, отметив Включить Aero Lite (по умолчанию).
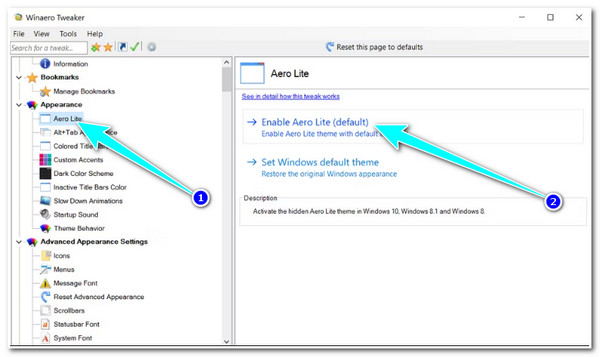
Шаг 3Затем, снова на левая панель, нажмите кнопку Alt+Tab Внешний вид вариант. Эта опция позволяет настроить прозрачность Альт+Таб. Кроме того, вы также можете применить изменения к другим параметрам, доступным в разделе «Внешний вид» Alt+Tab.
В противном случае, если вы по какой-то причине не хотите загружать сторонний инструмент, вы можете включить Aero Theme, используя те, которые доступны на вашем компьютере. Однако вы ограничены несколькими вариантами выбора, в отличие от того, что есть в Windows 7. Но с их помощью вы все равно можете получить графические эффекты на своем компьютере с Windows. Итак, как получить доступ к этим темам Aero и включить их в Windows 10/11? Вот шаги, которые вам необходимо предпринять:
Шаг 1Отправляйтесь в свой Проводник файлов и получить доступ к Тема папку, следуя этому пути хранения: C:WindowsResourcesThemes. Затем выберите тему, скопируйте ее и вставьте на рабочий стол.
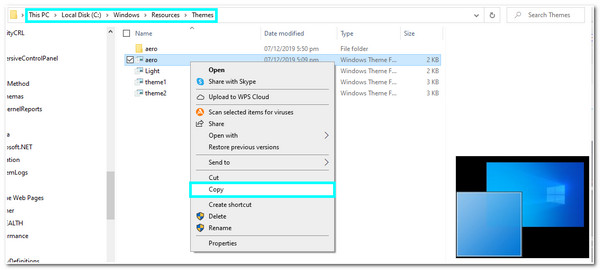
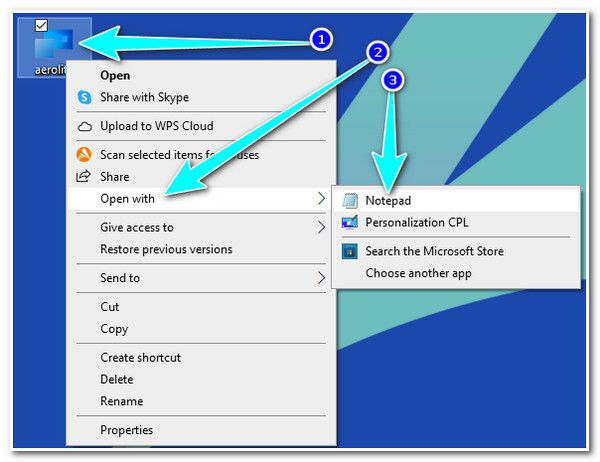
Шаг 2После этого щелкните файл правой кнопкой мыши и Переименовать это из аэро к аэролит. Затем щелкните его правой кнопкой мыши еще раз и откройте его с помощью Блокнот.
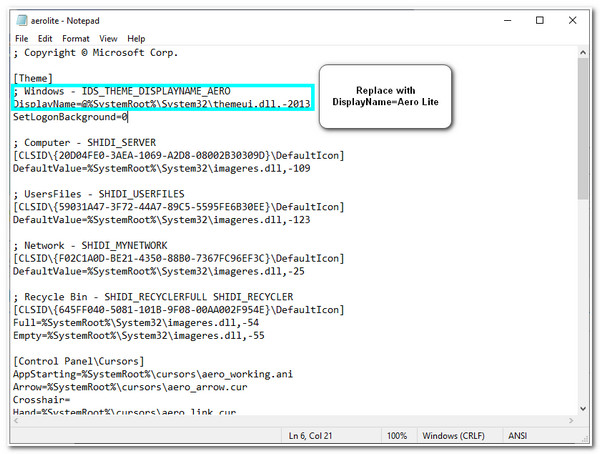
Шаг 3Далее замените эти строки; Windows — IDS_THEME_DISPLAYNAME_AERO DisplayName=@%SystemRoot%System32 hemeui.dll,-2013 с DisplayName=Aero Lite
Шаг 4Затем вы должны заменить эту строку Path=%ResourceDir%ThemesAeroAero.msstyles в Path=%ResourceDir%ThemesAeroAerolite.msstyles
Шаг 5После завершения замены строк отметьте галочкой Файл вкладку и выберите Сохранять вариант. После этого дважды щелкните значок Аэролит.тема файл, чтобы включить его.
Часть 3. Часто задаваемые вопросы о DWM Aero в Windows
-
Какие элементы интерфейса я могу изменить с помощью Aero Theme?
Аутентичная, энергичная, светоотражающая и открытая (Aero) тема позволяет изменять цвет фона, прозрачность, яркость и заставку рабочего стола вашего компьютера. Он позволяет использовать множество анимаций и эффектов прозрачности.
-
Как отключить тему Aero в Windows 11?
Если вы хотите изменить или отключить тему Aero, вам необходимо получить доступ к своим настройкам, выбрать опцию «Персонализация» и нажать «Темы». После этого перейдите к теме Aero, щелкните правой кнопкой мыши и выберите «Удалить».
-
Почему моя функция Aero Theme не работает?
Возможно, это связано с отключением диспетчера Windows на рабочем столе и прозрачности. Если DWM отключен, это не поможет вам включить в ОС вашего компьютера использование визуальных эффектов. С другой стороны, если прозрачность вашего компьютера отключена, Aero не запустится, поскольку не может использовать эффекты прозрачности.
Заключение
Привлекательный интерфейс рабочего стола — отличный способ обеспечить максимальное удобство работы с пользователем. А с помощью Aero Theme вы можете добиться желаемой прозрачности рабочего стола, анимации, цвета фона и т. д. Однако, если эта функция не включена на вашем компьютере с Windows, это помешает вам добиться желаемого внешнего вида рабочего стола. К счастью, в этой статье мы представляем лучшие пошаговые руководства по включению Aero Theme и наслаждению удивительными эффектами, которые они могут обеспечить в ваших интерфейсах Windows 7/10/11.
Статьи по Теме
How To Enable Windows Aero In Windows 10. In this article, you will read why Aero theme was removed from Windows 10 and how to enable Windows 10 Aero theme. Aero theme is the most loved theme in Windows history. Aero theme gave a glass-like look to the title bar and the start menu and is one of the main reasons for the success of Windows 7. However, Microsoft should have introduced it in Windows 8 and 10. But, you can experience the Aero Glass for Windows 10 in other ways. Here. I have mentioned some methods to enable Windows Aero in Windows 10.
Why In Windows 10 Aero Theme Was Removed By Microsoft?
Microsoft removed the Aero theme to create a unified UI for battery-powered devices like smartphones, tablets, and laptops. The purpose behind this was to save the battery for such devices, so all types of devices can be run on the same Windows.
How To Enable Windows Aero In Windows 10?
Aero theme is a very good and well-optimized theme. Follow the methods below to bring it back to your Windows screen.
Method 1 – By Using The Registry Editor:
To enable the Aero Glass for Windows 10 transparent theme, follow the steps:
1.Open the Run utility by pressing the Windows + R keys.
2.Type regedit.
3.Click on Enter.
4.The Registry Editor will open on your screen.
5.Navigate to the following folder:
HKEY_CURRENT_USER\SOFTWARE\Microsoft\Windows\CurrentVersion\Themes\Personalize
6.Or just copy-paste it on the address bar of Registry Editor.
7.Now, locate the DWORD entry EnabledBlurBehind.
8.If the DWORD doesn’t exist, then create a new one of 32 bit.
9.Name it EnabledBlurBehind.
10.Double-click on the DWORD and enter 1 in the Value data section.
11.Finally, press OK to save the changes.
12.Restart your computer.
13.The Aero theme will get enabled, if don’t then try out the next method.
Method 2 – Use Aero Glass:
To download and install the Aero glass them for Windows 10:
1.Visit this website www.glass8.eu/download.
2.Download the Aero glass theme for your Windows.
3.Now, install the app.
4.During the installation, make sure to check the Install Aero Glass theme box.
5.Follow the instructions on your screen to finish the installation.
6.After the application has installed, right-click on the Desktop .
7.Select the Personalize option.
8.Select the Go to Themes option in the Preview your changes section.
9.Click on the unsaved Desktop theme.
10.Activate it.
11.The theme will get activated on your Windows.
Method 3 – Use Glass 2k:
For using the Aero glass theme in Windows 10, use the Glass 2k application. To use the Glass 2k application:
1.Download Glass 2k from this website.
2.Open it.
3.No installation is required for this application.
4.After opening Glass 2k, check the Auto-Load Glass 2k every time Windows starts box.
5.Select the Taskbar Transparency as you prefer.
6.Disable the Transparency Popup, because it will interfere when you use the right-click menu.
7.Finally, click on Save.
8.To adjust the transparency, press the Ctrl + Shift + (0-9) keys on your keyboard on any Window.
You are here: Home/ Windows/ How To Enable Aero In Windows 10 – Three Easy Methods
The Aero theme was one of the most requested features in Windows 10 insider previews. It was the glass like theme applied to the title bar and the start menu that gave Windows 7 it’s signature look. However, it was removed by Microsoft from Windows 8 and above and Microsoft received a ton of hate following that.
Why Aero?
Removing Aero theme was part of Microsoft creating unified UI targeting battery-powered devices like tablets, laptops, and smartphones, and had to make the OS more battery efficient. So they removed the Aero theme in order to create a more battery efficient UI.
We have shown a VIDEO walk through at the end of the post for easy solution.
Shifting back to the Aero theme brings back the good old vibes that existed with possibly the most successful Windows OS. If you are someone who misses the Aero theme, here I’ll list 3 methods that will help you get the Aero theme for Windows 10.
# Method 1 (Using Registry Editor)
For testing purposes and get feedback from users, Microsoft has been testing Aero glass for implementing it in window frames, title bars, etc. this wasn’t done for most users, and only some of them got this update. For these users, you may try this or these users; you may try this method to enable Aero Glass transparency with blur effects in Windows 10.
1) Open Run by pressing Win + R. Type regedit and press enter to open Registry Editor
2) Copy this path in the address bar of the Registry Editor and navigate to it:
HKEY_CURRENT_USER\SOFTWARE\Microsoft\Windows\CurrentVersion\Themes\Personalize
3) On the right pane, find the DWORD entry titled EnableBlurBehind. If it does not exist, create a new DWORD (32-bit) Value and name it EnableBlurBehind.

4) Double click it to modify, and set its value to 1.

5) Restart your PC for the changes to take effect.
This should enable the Aero Glass theme in Windows 10.
- Note: This setting may not work with the new 19H1 update as it brings an overhaul in the visual aesthetics. If the update doesn’t bring the Aero theme to your device, use one of the next steps to enable transparent toolbars like Aero glass theme.
# Method 2 (Using Aero Glass For Win 8.X+)
Aero Glass offers experimental support as of now, and may not work as expected. Create a system restore point before making changes to your system so that you can fall back to that in case any mishap happens.
1) Download Aero glass for Windows 10 from glass8.eu/download
2) Install the application in a writable location, let it install in C:\AeroGlass if that shows up as default location.
3) In the third screen, ensure that you check the Install Aero Glass theme. Click

4) When install finishes, go to Personalize and select Themes. Select the unsaved Desktop theme to activate Aero Glass theme.

If you like the new look of your desktop, you can keep it installed to have aero glass theme in Windows 10. however there is a persistent watermark that can be annoying. Here is another method to install aero glass in Windows 10.
# Method 3 (Using Glass2K)
Glass2K does not state that it is compatible with Windows 10, but we found it running with 32 and 64-bit devices.
1) Visit https://www.softpedia.com/get/Desktop-Enhancements/Other-Desktop-Enhancements/Glass2k.shtml to download the client software. No installation is required; open the file to run the app.
2) In the settings box, you’ll find options to auto load the tool as Windows starts, and remember the transparency settings.

3) Disable (optional) the transparency pop-up as it can interfere with your right-click menu. Press Save.
4) Now you have control over the transparency settings of various separate elements of your device.
5) In any window, use the keyboard short cut Ctrl + Shift + (0-9) to adjust the transparency.
Glass2K gives a good Aero like effect for Windows 10. You have control over the transparency and can set the blur option to resemble the Windows 7 look.
Conclusion
So there you have it. now you know how to get the Aero theme for Windows 7 and get transparent title bar. Although these are workarounds, I really want Windows to restore the much wanted Aero theme. The case they make about making the devices battery-efficient is compelling; however, there are a lot of devices that run high powered CPUs and GPUs that can run the Aero theme with ease. Here is to sincerely hoping that Microsoft listens to the users and adds the beloved feature back. Comment below if you found this post useful.

