
This post introduces 4 ways to allow you to run CHKDSK on startup in Windows 10 to check and fix computer hard drive errors. It also explains how to stop CHKDSK from running at startup if you find that CHKDSK runs at every startup in Windows 10. Best free CHKDSK alternative and hard drive data recovery services from MiniTool are also offered.
If you’d like to run CHKDSK on startup in Windows 10 to scan and repair hard disk errors, you can check the solutions below. This post also includes ways to run Windows 10 disk check on startup when your PC or laptop won’t turn on.
Besides, if you feel troublesome that CHKDSK runs at every startup in Windows 10, you can also easily stop CHKDSK on startup in Windows 10 by following the operation below.
Hard disk errors often cause some data loss. So, MiniTool Software will also introduce professional data recovery software to help you recover your lost and deleted files in all versions of Windows.
Also read: Discover the essential steps for successful hard drive recovery in this informative article.
How to Run CHKDSK on Startup Windows 10 – 4 Ways
- Run CHKDSK on Startup from Command Prompt
- Run CHKDSK on Startup from Advanced Options Screen
- Run CHKDSK on Startup with Recovery Disk/USB
- Run CHKDSK on Startup with Installation Media
How to Run CHKDSK on Startup Windows 10 – 4 Ways
If your computer can boot and you want to scan the Windows system C drive (where the OS is installed) or other system related drives, you need to run CHKDSK in Windows 10 before boot since CHKDSK can’t run if the drive is in use. Check how to run CHKDSK before booting into Windows below.
1. How to Run CHKDSK on Startup from Command Prompt
- Press Windows + R, type cmd, press Ctrl + Shift + Enter to open elevated Command Prompt in Windows 10.
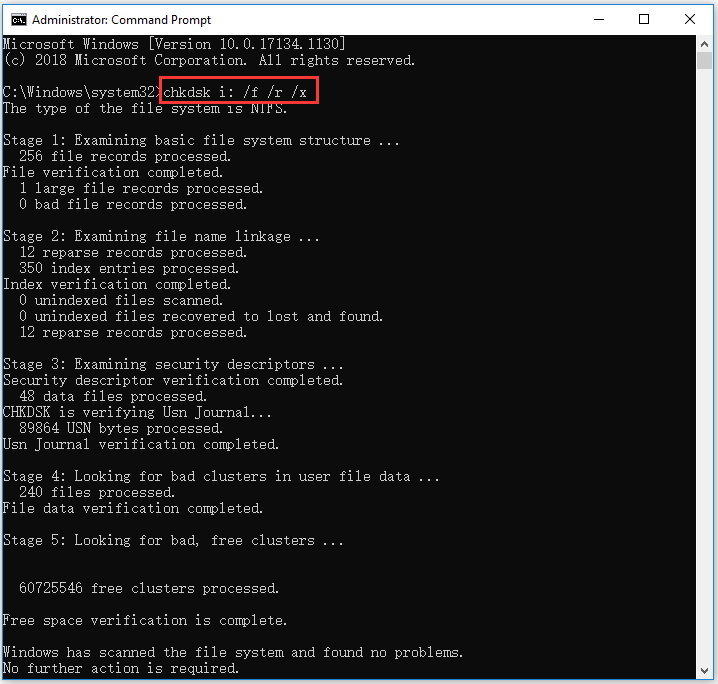
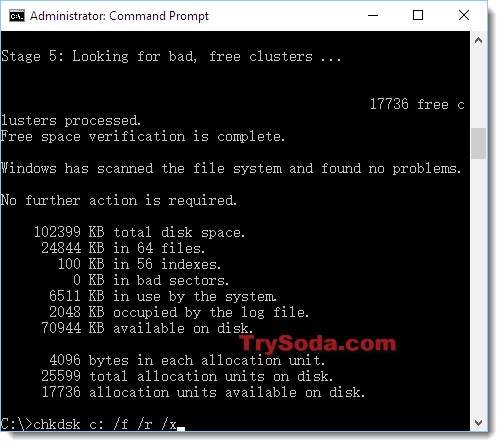
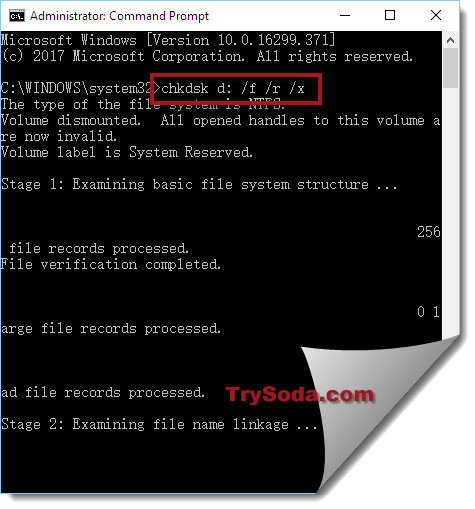
- In command Prompt, type this command: chkdsk C: /f /r /x, and press Enter. Replace “C” with the drive letter of the target drive. Please do not miss the spaces in this command.
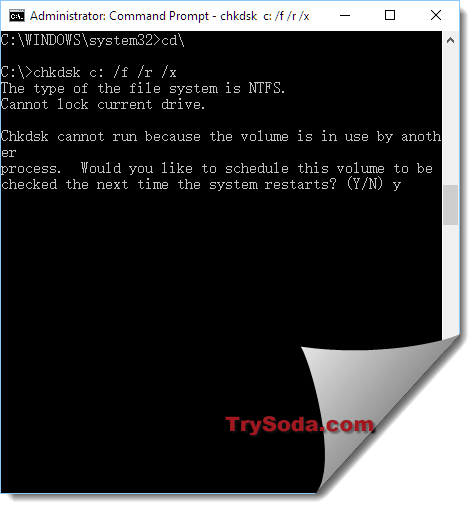
- If you are trying to scan the system C drive, CHKDSK will pop up a message saying that cannot lock current drive, the volume is in use by another process, and asking you if you want to schedule this volume to be checked the next time the system restarts. You can type Y and press Enter.
- Restart your computer and Windows will automatically run CHKDSK on reboot to scan and fix hard drive errors.
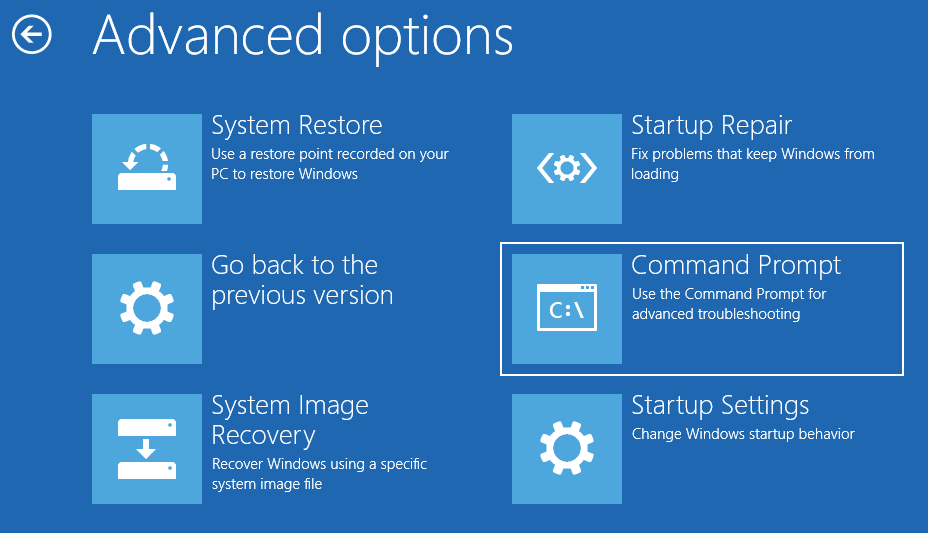
2. How to Run Windows 10 Disk Check on Startup from Advanced Options Screen
If you know how to access advanced startup options in Windows 10, you can select Command Prompt in Advanced options screen to boot your computer into Command Prompt window. And then you can run CHKDSK command in Command Prompt window to check and fix computer hard drive errors before booting into Windows.
3. How to Run CHKDSK on Startup with Recovery Disk/USB
If your Windows 10 computer can’t boot, but if you know how to create a Windows 10 recovery USB drive or disk, you can then use the recovery USB or disk drive to boot your Windows 10 computer into Windows Recovery Environment (Windows RE). Then you can click Troubleshoot -> Advanced options, click Command Prompt in the blue Advanced options screen and use it to run chkdsk /f /r command.
4. How to Run CHKDSK on Startup with Installation Media
If you don’t have a Windows 10 installation media at hand, you can check how to create an installation media with Windows 10 media creation tool. After you get the installation USB or disc, you can use it to boot your computer into WinRE and get into Advanced options screen to choose Command Prompt option. Then you can run CHKDSK command in Command Prompt to scan and fix disk errors.
Instead of struggling to run CHKDSK on startup, you can use third-party free disk check tool like MiniTool Partition Wizard to easily check and fix disk errors.
MiniTool Partition Wizard is an all-in-one disk partition manager for Windows. Aside from scanning and fixing disk errors and checking disk bad sectors, you can also use it to easily create/resize/format/delete/wipe partitions, copy disk, migrate OS, convert partition format, analyze disk space usage, test hard drive speed, etc.
Free download and install MiniTool Partition Wizard on your Windows computer, and check the guide below for how to use it to check and fix disk errors as well as how to detect bad sectors on hard drive.
MiniTool Partition Wizard FreeClick to Download100%Clean & Safe
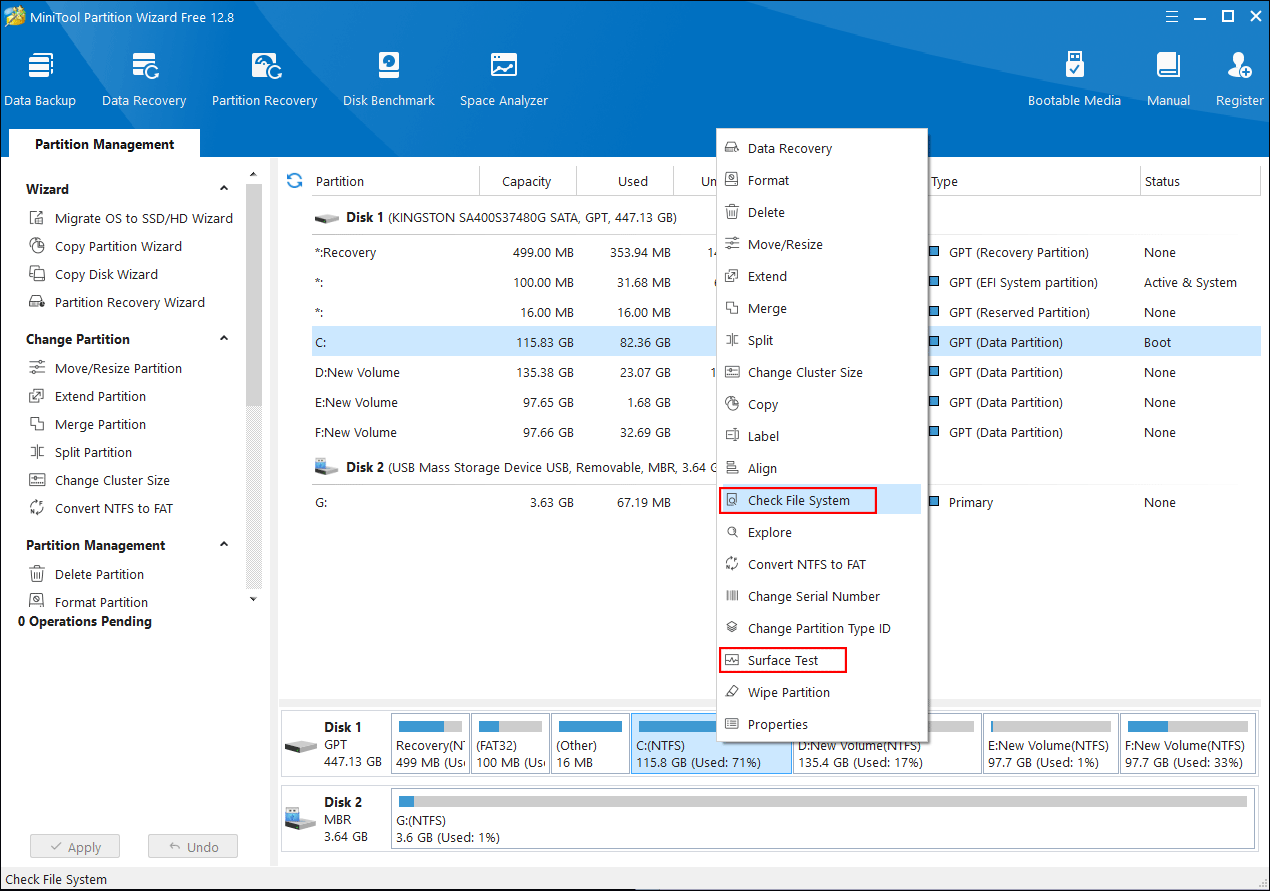
Step 1. Launch MiniTool Partition Wizard and click Yes if it pops up the User Account Control window to enter into the main interface of the software. Locate the target hard drive and the target partition which you want to check disk errors.
Step 2. Right-click the target partition and select Check File System option. In the new window, you can click check & fix file system error option, and click Start button. MiniTool Partition Wizard will automatically scan and fix detected file system errors on the disk.
Step 3. To diagnose if the hard drive has bad sectors, you can go back to the main interface, and right-click the target partition to choose Surface Test option. Click Start Now button to begin checking bad sectors on the disk.
Click to tweet
How to Stop CHKDSK on Startup Windows 10 – 3 Ways
- Press Any Key to Cancel the Disk Check
- Stop CHKDSK on Startup via Command Prompt
- Disable CHKDSK on Startup with Registry Editor
How to Stop CHKDSK on Startup Windows 10 – 3 Solutions
Some users have the problem that CHKDSK always runs at startup. CHKDSK scanning can be very time-consuming. If you want, you can stop CHKDSK from running at startup in Windows 10. Check the solutions below.
Solution 1. Press Any Key to Cancel the Disk Check
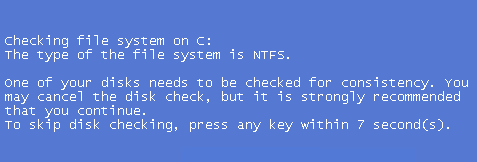
If your computer didn’t shut down properly, Window CHKDSK may automatically run when you start your computer next time. It will appear a message on booting saying that one of your disks needs to be checked for consistency. It advises you to conduct the disk check, but also gives an option to cancel the disk check by pressing any key within several seconds. You can press any key to stop CHKDSK on startup in Windows 10.
Solution 2. Stop CHKDSK on Startup via Command Prompt
By using solution 1, you can skip the CHKDSK scanning for once. But if you restart your computer next time, CHKDSK may automatically run again since it thinks one of your computer hard drive still needs to be checked. If CHKDSK runs at startup in every restart, you can use Command Prompt to disable it if you want.
- Press Windows + R, type cmd, and press Ctrl + Shift + Enter to open elevated Command Prompt.
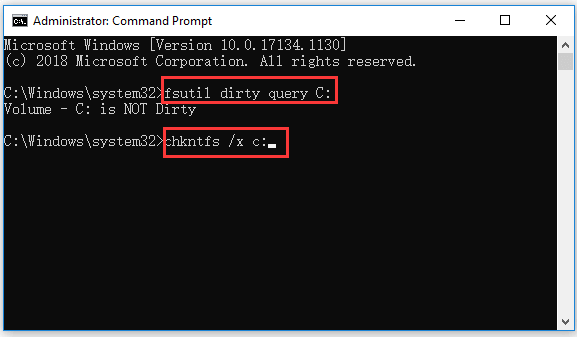
- Optional action: Type the command fsutil dirty query C: in Command Prompt, and press Enter to execute the command. This can help check if the drive has been marked with a dirty bit value, since CHKDSK will automatically check the disk that is marked as dirty.
- Next you can type chkntfs /x c: command, and press Enter to disable CHKDSK from scanning C drive on startup.
- If you want to stop CHKDSK on startup for several drives, you can add the drive letters in the command, e.g. chkntfs /x c: d: e:. Please do not forget the spaces in the command line.
Solution 3. Disable CHKDSK on Startup with Registry Editor
You can also stop check disk on startup by using Registry Editor.
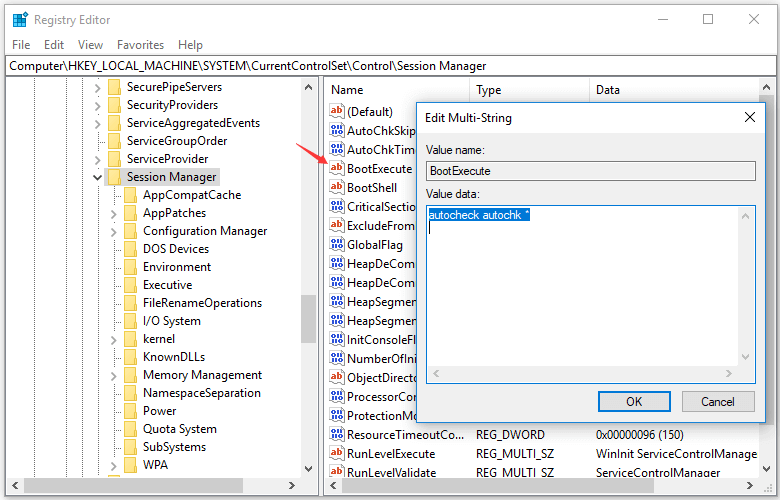
- Press Windows + R, type regedit in Run box, and press Enter to open Registry Editor in Windows 10.
- Navigate the following path in Registry Editor: HKEY_LOCAL_MACHINE\SYSTEM\CurrentControlSet\Control\Session Manager.
- Double-click BootExecute key in the right window. And delete all lines under Value data except autocheck autochk *.
- Close Registry Editor and restart your computer to check if CHKDSK runs at startup.
How to Recover Lost/Deleted Files from Windows 10 PC or Laptop
In case you lost some important data after CHKDSK scan or lost some important files due to hard drive failures or other reasons, here we introduce an easy and fast way to help you recover any lost or deleted files from Windows 10 computer and other storage devices.
MiniTool Power Data Recovery is best free data recovery software for Windows. You can use this tool to easily recover lost/deleted files from Windows PC or laptop, external hard drive, SSD, USB flash drive, SD memory card, etc. in simple steps. Various data loss situations are covered.
It delivers fast scan speed, high recovery result, and keeps original file. Extremely easy-to-use and 100% safe. Download and install MiniTool Power Data Recovery in your Windows 10 computer, and check how to recover data from Windows 10 computer below.
MiniTool Power Data Recovery FreeClick to Download100%Clean & Safe
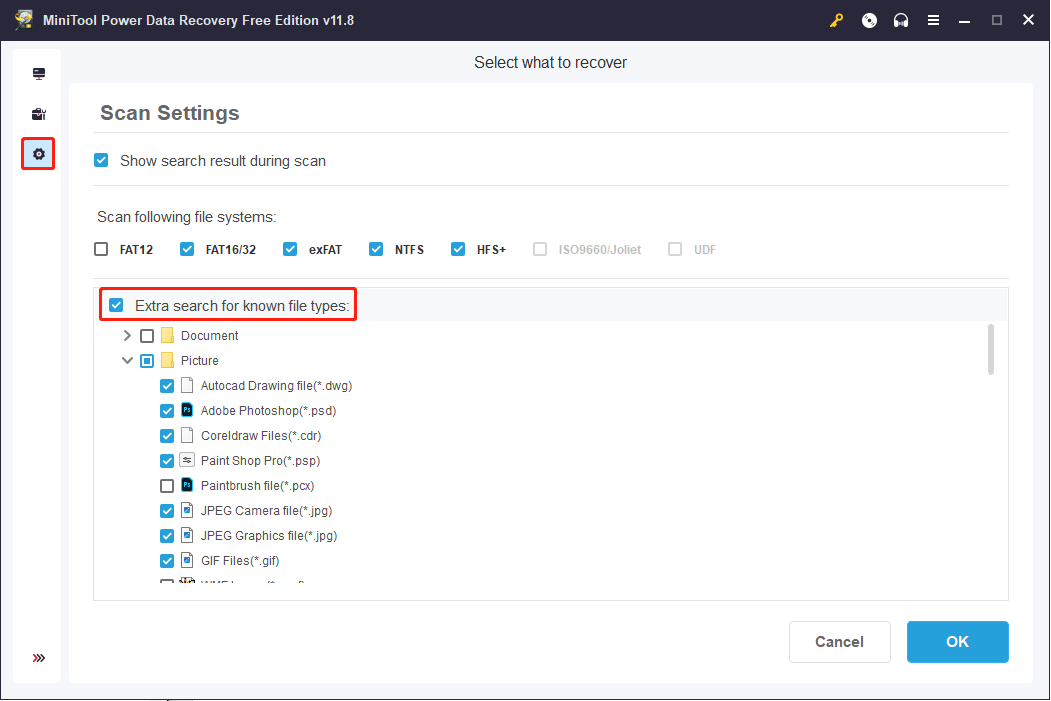
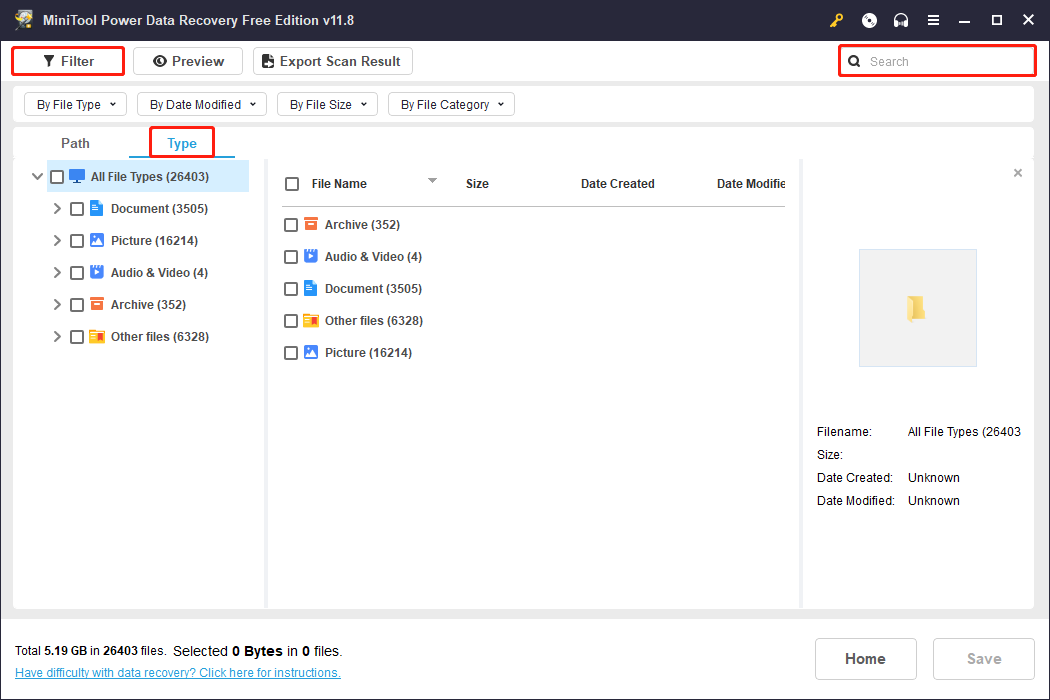
Step 1. Launch MiniTool Power Data Recovery. Optionally, before starting the scanning process, you can also click the Scan Settings button in the left menu bar to select specific file types and click OK to save the change.
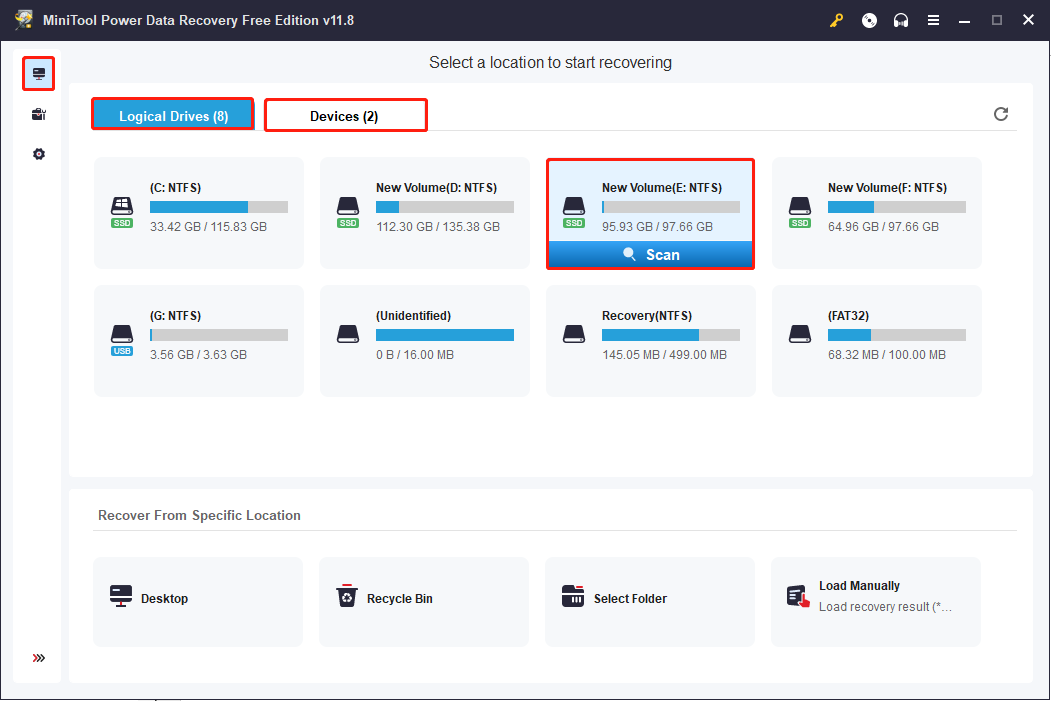
Step 2: Return to This PC interface, choose the target partition that contains your lost/deleted files, and click the Scan button. If you want to select the whole disk to scan, you can click the Devices tab and choose the disk.
Step 3: The software will list files according to their paths on the result page. You can shift to the Type tab to discover wanted files by their types. To help you locate wanted files quickly, the Filter and Search features work significantly.
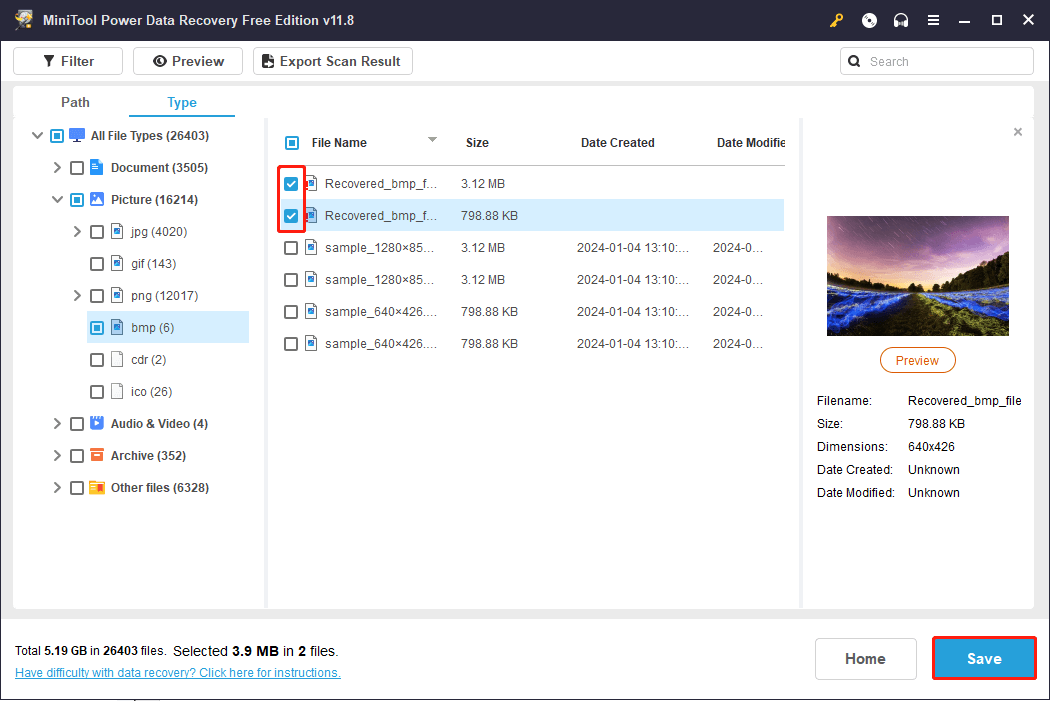
Step 4: Tick the needed files and click the Save button to choose a new destination path to store the recovered files.
Conclusion
This tutorial explains how to run or stop CHKDSK on startup in Windows 10. If you have other questions about how to use MiniTool Partition Wizard or MiniTool Power Data Recovery, please contact [email protected].
Click to tweet
Why does CHKDSK run on startup?
If your computer runs CHKDSK on startup, it might because of improper computer shutdown, hard drive failures, disk file system errors caused by malware/virus infection, etc. You can let CHKDSK perform the disk check and it may cost some time. You can also use one of the 3 solutions in this post to stop CHKDSK on startup in Windows 10 if you want.
How do I stop CHKDSK from running at startup Windows 10?
This tutorial explains 3 solutions to let you stop CHKDSK on startup in Windows 10. You can try one of them.
Is it safe to stop CHKDSK?
Generally you can’t stop CHKDSK process once it starts. It’s not safe to stop CHKDSK while it’s still scanning. It may cause file system corruption and data loss if you shut down the computer during the disk check process.
How to stop CHKDSK in progress Windows 10?
- Press Ctrl + Shift + Esc to open Task Manager.
- Find CHKDSK in Task Manager window, right-click it and click Details to find out PID of the CHKDSK task.
- Next you can press Windows + R, type cmd, and press Ctrl + Shift + Enter to open elevated Command Prompt.
- Then type the command taskkill /F PID PID number in Command Prompt window, and press Enter. Replace “PID number” with the PID of CHKDSK.
You may use this way to force stop CHKDSK if the scanning and repairing drive gets stuck in Windows 10. However, it’s not a good idea to force stop CHKDSK in progress after you manually run chkdsk /f /r command in Windows 10. It may cause damage to the hard disk and cause data loss. So it’s not recommended.
CHKDSK is a command used in Command Prompt to scan, check, and repair hard drives in our computers. In Windows 11 or Windows 10, using chkdsk is no different from using it in any previous version of Windows. However, you will need to give the Command Prompt (CMD) administrative privileges to use the chkdsk command.
Run CHKDSK in Windows 11/10 from Command Prompt
If your target hard drive is not a boot drive, meaning that the drive isn’t where your Windows is located, using CHKDSK in Command Prompt will scan and repair the target drive immediately.
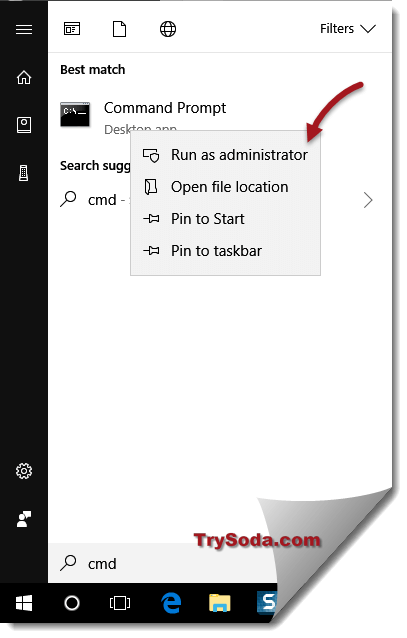
- Go to Start Menu. Type CMD.
- From the search result, right click Command Prompt, then click Run as administrator.

- If “User Account Control” ask for permission, click Yes to proceed.
- In the command prompt, type:
chkdsk [driveletter] /f /r /x
- For example:
chkdsk C: /f /r /x

- Chkdsk will then run to scan the selected disk for errors and repair them automatically. It may take hours if you have a huge and messy drive.
Why do we need the parameters “/f /r /x” when doing chkdsk?
- If you enter CHKDSK without the parameters, the command itself will only scan the disk and show you the disk’s status. It won’t repair anything. To allow it to fix errors it finds, “/f” is needed.
- If you want it to also locate bad sectors on the drive and recover readable information, “/r” is needed.
- To force it to dismount the drive before checking the disk, “/x” is needed. This is recommended to make sure there is no running application in that particular drive that may interfere with the CHKDSK process.
- If you need more info on other parameters you can use, go to this chkdsk docs from microsoft.
Run CHKDSK in Windows 10/11 Before Boot
If you want to CHKDSK your primary drive where you store and boot your Windows, usually C: drive, CHKDSK will need to run before booting into Windows. This is because CHKDSK cannot be run if the drive is in use, especially if there are any system core files on the drive that Windows relies on to work.
Note: If you cannot even boot into Windows, skip this method and go to the next one.
Here’s how you can set CHKDSK to run before boot in Windows 11/10:
- Follow step 1-4 in the instruction above.
- In the command prompt, enter chkdsk commands with the parameters. For example:
chkdsk C: /f /r /x
- If chkdsk detects that the drive you want to scan is a boot drive, it will shows “Cannot lock current drive. Chkdsk cannot run because the volume is in used by another process“, and ask if you would like to schedule the drive to be checked the next time you reboot/restart your computer.
- Type and enter Y.
- Restart your computer.
- Chkdsk will run automatically during your next boot before booting into Windows.
If you cannot even boot into Windows
If you are facing a serious issue where you can’t even boot into Windows, you can force your PC to boot into recovery mode and open Command Prompt from the recovery mode.
For more info about how to launch CMD on boot, read: How to Startup Repair Windows 11/10 using Command Prompt.
When do you need to run chkdsk for your drives?
You can run CHKDSK gradually and as frequently as you like. Unlike defragmenting, CHKDSK won’t harm your drive in any way no matter how frequently you run it. If you have not run it for a while, it’s recommended that you run CHKDSK for each of your hard drives once a month.
If you encounter freezes, hangs, drives, or CPU running at 100% all the time in Windows, run CHKDSK. There may be errors on the disk that cause all the problems.
Why is chkdsk stuck at a certain percentage for a long time?
CHKDSK may take some time to finish. We are talking about several hours here depending on the size of the disk and how much space it was used. Try to wait it out. We usually let our system run CHKDSK overnight.
If CHKDSK is still stuck at a certain percentage even after 10 hours of running, try to restart the run. It may indicate that your drive is starting to fail. Backup immediately and replace the drive as soon as possible before it completely breaks down.
Рассмотрим интегрированную в любую систему Windows утилиту chkdsk, позволяющую проверять жесткий диск, на наличие ошибок или поврежденных bad-секторов. К тому же утилита предпринимает шаги, направленные на устранение неисправностей, или же блокирует сектора с повреждениями, чтобы на них не смогла попасть новая информация.
Почему повреждается файловая система
Содержание
- Почему повреждается файловая система
- Запуск chkdsk
- Способ 1.
- Способ 2.
- Этапы проверки
- Параметры утилиты
Есть несколько ответов на этот вопрос:
- перебои с электроэнергией. Здесь лишь остается сказать, чтобы вы в обязательном порядке использовали стабилизаторы и источники бесперебойного питания;
- проблемы в «начинке» компьютера;
- наличие вредоносных программ, которые разрушают систему.
Запуск chkdsk
Для профилактики лучше пользоваться chkdsk время от времени, проверяя систему на наличие неисправностей.
Способ 1.
Зайти в «Компьютер», затем жмем с помощью правой кнопки мыши на диск, который будет проверяться, заходим в «Свойства». Затем следует вкладка «Сервис», где отмечаем «Проверка тома на наличие ошибок». Выбираем «Выполнить проверку».

Отмечаем 2 галочки и жмем «Выполнить».
Способ 2.
Для запуска программы chkdsk, нужна командная строка (Пуск – Все программы. Далее выбираем «Стандартные» и нажимаем «Командная строка»). Этот вариант подходит для Windows XP, Vista или 7.
Если у вас Windows 8 или 10, ищите через меню поиска.

Запускается командная строка.
После того, как откроется окно, набираем: chkdsk c: /f (либо другой параметр, об этом ниже). И жмем «Enter».
Поясним:
c: – буква диска, что надо проверить.
/f – параметр, позволяющий устранить ошибки в системе файлов и отыскать поврежденные сектора.
Если надо проверить раздел системы, к примеру, диск С, где находится операционка, появится предупреждение, которое укажет на то, что нельзя сейчас проверить данный том, потому что в данный момент на нем запущены системные файлы. Чтобы все-таки запустить проверку, надо перезагрузить систему и нажать «Y» в знак подтверждения.
Когда система будет перезагружена, утилита запустится в автоматическом режиме и проведет проверку тома.
Этапы проверки
Непосредственно проверка с помощью рассматриваемой утилиты идет поэтапно:
- проверяет файлы;
- проверяет индексы;
- проверяет дескрипторы безопасности;
- проверяет сектора;
- проверяет есть ли свободное место на диске.
После того, как проверка закончится, на экране появятся ее итоги.
Параметры утилиты
Рассмотрим все ключи запуска утилиты. Сhkdsk, кроме того, что может полностью проверить систему (/R), делает следующее:
- Ключ /F проверяет есть ли ошибки и их автоматически их устраняет;
- Ключ /V – во время проверки диска показывает полные пути и названия файлов, которые «лежит» на диске. Для дисков, что содержат разделы NTFS, утилита тоже выводит сообщения о том, что произведена очистка;
- Ключ /X – если надо, том отключится перед его проверкой. Вслед за этим все текущие дескрипторы для этого тома не будут работать. В данном случае обязательно к использованию ключ /F;
- Ключ /I применяется, если нет надобности строгой проверки индексных составляющих. Может применяться лишь в системе файлов NTFS. Это повышает скорость проверки, однако делает ее не такой доскональной;
- Ключ /C используют, если нет необходимости в проверке циклов в самой структуры папок. Работает в системе NTFS, что повышает скорость проверку, однако она становится не такая детальная;
- Ключ /L:размер – при проверке изменится объем файла журнала до прописанной величины (в килобайтах). Если размер не будет прописан, выводится текущая величина файла. Возможен к использованию лишь при файловой системе NTFS.
Однако, в большинстве случаев, достаточно применять ключ /F, потому что при использовании /R начинается полная проверка жесткого диска, на что уходит достаточно много времени (зависит от размера и объема данных, что хранятся на нем).
Это основные моменты использования утилиты chkdsk.
5
2
голоса
Рейтинг статьи
Загрузить PDF
Загрузить PDF
Программа Chkdsk проверяет ваш жесткий диск и составляет отчет о работе файловой системы. Мы расскажем, как пользоваться утилитой chkdsk в системе Windows, а также в системе Mac OS X.
-

Выберите Мой компьютер или Компьютер. Откроется список ваших дисков. Найдите диск, который нужно проверить.
-

Выберите Свойства. Перейдите на вкладку Инструменты. Это основные инструменты для работы с диском. Тут можно запустить утилиту chkdsk, нажмите Проверить сейчас… (Check Now)
-
Вы можете поставить опцию исправления ошибок и восстановления поврежденных секторов. Поставьте галочку напротив нужных полей. После проверки диска вам нужно будет перезагрузить компьютер.
- Вы должны войти в учетную запись с правами администратора.
Реклама


-
Продолжайте жать кнопку F8, пока не появится окно с опциями загрузки системы. Вы можете открыть здесь командную строку, не входя в Windows.
-
Выберите опцию “Безопасный режим с командной строкой (Safe Mode with Command Prompt).” Компьютер загрузит систему в безопасном режиме. Откроется командная строка.
-
Введите “chkdsk” и нажмите Еnter для того, чтобы проверить текущий диск, не исправляя ошибки.
- Чтобы проверить диск и исправить ошибки, наберите “chkdsk c:/f” замените букву “c” на любую другую букву диска.
- Чтобы запустить chkdsk и исправить ошибки, исправить поврежденные секторы и восстановить данные, введите “chkdsk c:/r” Замените “c” на любую другую букву диска, если надо.
- Вам может понадобиться перезагрузка компьютера. Нажмите Y, если появится сообщение о перезагрузке.
Реклама


-
Эта программа несет ту же функцию, что и chdsk в системе Windows. Вам понадобится установочный диск с Mac OS X.
-
Зажмите клавишу “C”. Загрузится программа установки Mac OS. Выберите язык.
-
Выберите нужный диск. Нажмите Исправить.
- Если проверка и исправление ошибок прошло успешно, проверьте остальные диски, если надо.
Реклама


Об этой статье
Эту страницу просматривали 19 785 раз.
Была ли эта статья полезной?
Вы статье вы найдете руководство по использованию chkdsk, ссылки на программы, позволяющее всесторонне протестировать жесткий диск, а также инструкции к ним. Кроме того, в статье рассказывается, как выполнить проверку разделов жесткого диска с помощью встроенных средств Windows.
На этой странице
- Утилита проверки диска Windows (chkdsk)
- Запуск проверки диска из графического интерфейса
- Запуск проверки диска из командной строки
- Запуск проверки диска, если система не загружается
- Просмотр результатов проверки диска
- Диагностика жесткого диска сторонними программами
- Утилиты производителей жестких дисков
- Victoria
- MHDD
- Диск в полном порядке — что дальше?
Утилита проверки диска Windows (chkdsk)
В ОС Windows имеется собственная утилита проверки дисков. Ее можно запускать из графического интерфейса или из командной строки.
Запуск проверки диска из графического интерфейса
Откройте окно Мой компьютер, щелкните правой кнопкой мыши по диску или разделу, который вы хотите проверить, и выберите из контекстного меню пункт Свойства. В окне свойств диска перейдите на вкладку Сервис и нажмите кнопку Выполнить проверку.
В следующем окне нажмите кнопку Запуск.
Проверка несистемного раздела начнется сразу. Если вы производите проверку системного раздела Windows 7, вы можете увидеть сообщение о том, что сейчас ее невозможно выполнить.
Это нормально, поскольку системный раздел используется операционной системой. Нажмите кнопку Расписание проверки диска. Чтобы запустить проверку, необходимо перезагрузить компьютер. После перезагрузки компьютера проверка диска будет выполнена до запуска операционной системы.
Запуск проверки диска из командной строки
Пример запуска проверки раздела C на SSD или HDD из командной строки (ее необходимо запускать с правами администратора).
chkdsk c: /f
Пример запуска проверки раздела C на HDD с целью поиска и исправления плохих секторов.
chkdsk c: /r
На SSD это не имеет смысла, а ключ /r включает в себя /f.
Как и в случае с проверкой системного раздела из графического интерфейса, после выполнения этой команды вы увидите сообщение о невозможности выполнения проверки.
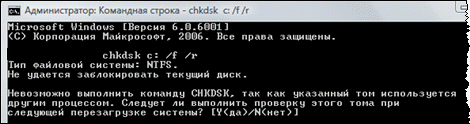
Введите Y и перезагрузите компьютер, чтобы начать проверку.
Дополнительную информацию о параметрах командной строки утилиты chkdsk вы можете получить, запустив ее с ключом /?, либо на этой странице.
Запуск проверки диска, если система не загружается
Если операционная система не загружается из-за ошибок на диске, проверку диска можно осуществить с помощью установочного диска Windows.
Windows 7, 8.1, 10
- Загрузитесь в среду восстановления и откройте командную строку (инструкции для Windows 8 и новее, Windows 7)
- В командной строке введите команду
chkdsk c: /r
Windows XP
Если проблема возникла в Windows XP, используйте консоль восстановления. Загрузившись с установочного диска в консоль, выполните команду
chkdsk c: /r
Дополнительную информацию о консоли восстановления вы найдете в статьях базы знаний Microsoft:
- Описание консоли восстановления Windows XP
- Установка и использование консоли восстановления в Windows XP
- Включение автоматического входа администратора в систему при использовании консоли восстановления
Просмотр результатов проверки диска
Читайте Как увидеть результаты проверки диска chkdsk одной командой.
Диагностика жесткого диска сторонними программами
Если после проверки жесткого диска утилитой chkdsk у вас продолжают возникать критически ошибки, связанные с оборудованием, стоит произвести более тщательное тестирование с помощью специализированных программ. Как правило, для диагностики используются утилиты производителей жестких дисков, либо такие программы, как Victoria или MHDD.
Вниманиe! Перед тестированием жесткого диска с помощью сторонних программ необходимо сделать резервное копирование всех данных.
Утилиты производителей жестких дисков
Диагностические утилиты могут находиться на компакт-диске, входящем в комплект поставки жесткого диска. В любом случае их можно загрузить с сайта производителя жесткого диска. Ссылки на страницы загрузки некоторых производителей приводятся ниже.
- Western Digital: Data Lifeguard Tools (необходимо выбрать модель диска).
- Seagate: SeaTools.
- Hitachi: Drive Fitness Test.
- Samsung: Hutil.
Диагностические средства других производителей можно найти на их сайтах.
Victoria
Программу Victoria, предназначенную для глубокого тестирования состояния жесткого диска, можно найти на официальном сайте http://hdd.by/victoria.html
Дополнительную информацию вы найдете по следующим ссылкам:
- Старая справка к программе Victoria
- Тема на форуме
MHDD
Программа MHDD также способна всесторонне протестировать жесткий диск и исправить ошибки на нем. Вы можете загрузить ее по этой ссылке с сайта MHDD.ru.
Дополнительную информацию вы найдете по следующим ссылкам:
- Справка к программе MHDD
Диск в полном порядке — что дальше?
Если ошибок на жестком диске не выявлено, он, скорее всего, не является причиной возникновения критических ошибок. Не исключено, что проблема кроется в неисправной оперативной памяти или блок питания имеет недостаточную мощность для обеспечения работы всех устройств. Вы можете проверить оперативную память и драйверы, как описано в статьях по ссылкам ниже.