
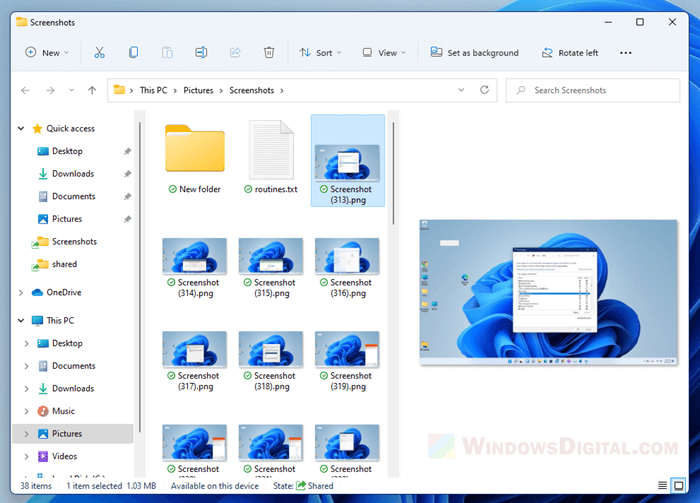
In Windows 11, you can enable the preview pane which will appear as a column on the right in File Explorer. The preview pane is able to show a preview of currently selected photo, video, text file, PDF file, word document, and other supported file type. This short tutorial will show you how to enable the preview pane in File Explorer on Windows 11.
Unlike thumbnail preview which has a fixed size depending on which view mode is selected, the preview pane is a resizable column which allows users to preview media in a much larger size.
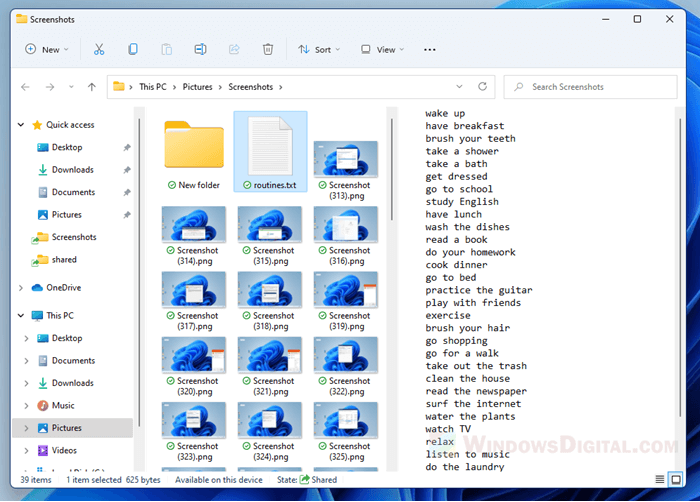
Below are a few screenshots that show how it looks like to preview images, videos and text file via preview pane in File Explorer on Windows 11.
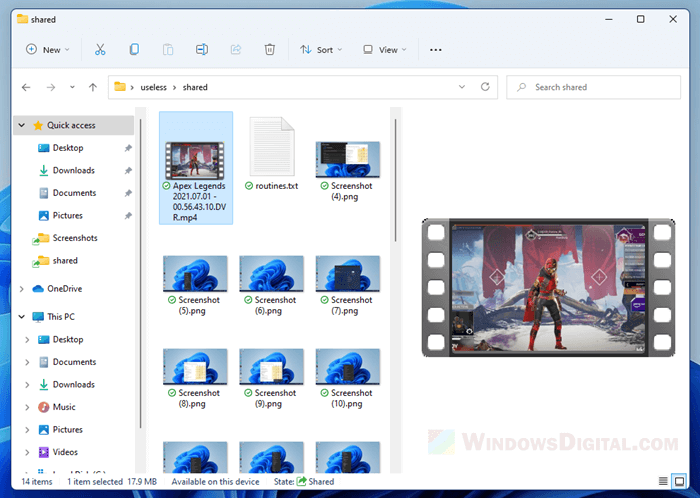
Note that video preview this way will only show a still image randomly taken from around the start of a video. It does not play the video in the preview pane.
How to preview files and medias in folder on Windows 11
To preview files, photos, videos and other supported file type directly in the folder without opening them, you need to first enable the preview pane in Windows 11 File Explorer. Follow the steps below to do so.
- In Windows 11, open File Explorer.
- On the menu bar, click on View.
- Next, hover your mouse over the Show option.
- Then, click on Preview pane.

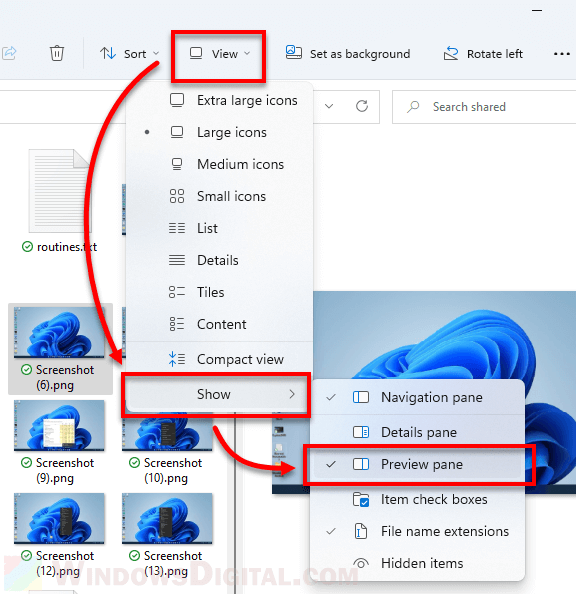
A new pane will appear on the right side in the File Explorer window. When you select a file in the current folder, a preview will be shown in the preview pane. Now try to select/highlight any file in any folder, a preview of the selected item will be shown in the preview pane, provided if the file type is supported.
How to preview photos and videos thumbnails in File Explorer
Another method to preview media files in file explorer is by simply enabling thumbnail viewing and change the view mode to larger icons such as “Large icons” or “Extra large icons” mode.
The view mode is saved separately in each folder/directory. This means that if you change view mode in folder A, it won’t affect the view mode in folder B.
To change the view mode of a folder in File Explorer, browse to the folder, click on View on the menu bar, and then select a view mode you want to change to.
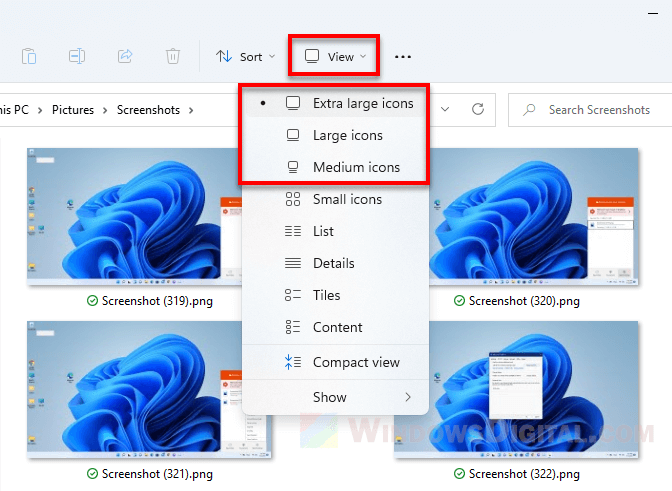
Thumbnails of files are only viewable in “Extra Large icons”, “Large icons” and “Medium icons” mode. Other view modes will only display the icon of the app used to open the file type. The extra large icons mode is the largest view mode you can set for thumbnails in Windows 11 File Explorer.
File Explorer shows app icons instead of thumbnails for images and videos
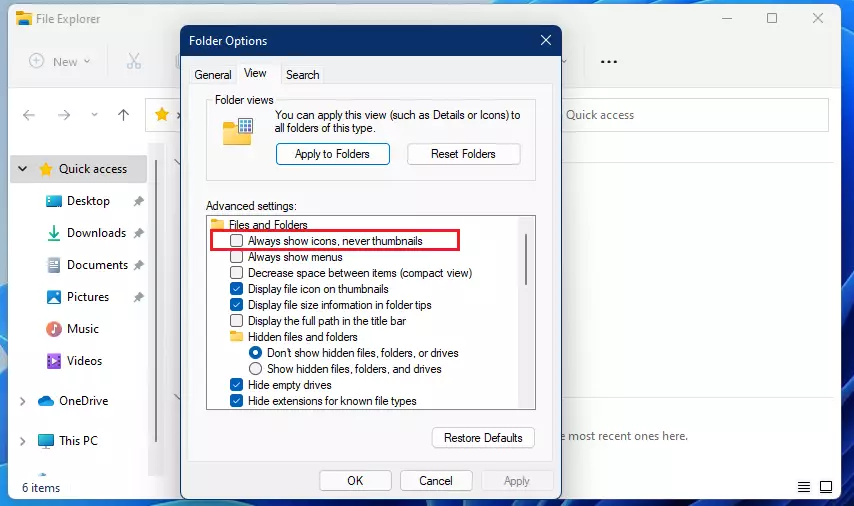
If you see app icons instead of the actual thumbnails of the image or video files, for example, all image files shows Photos app icon (the default app to open the image file) instead of the actual images as the thumbnails, here’s what you need to do.
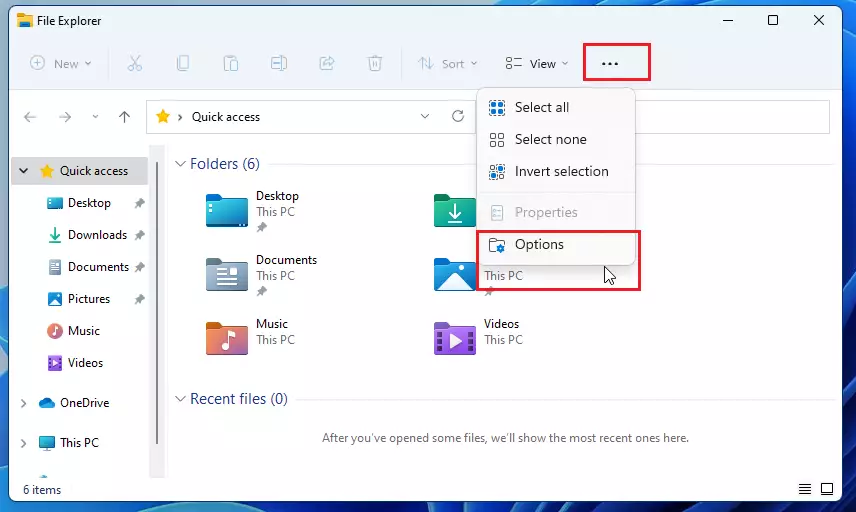
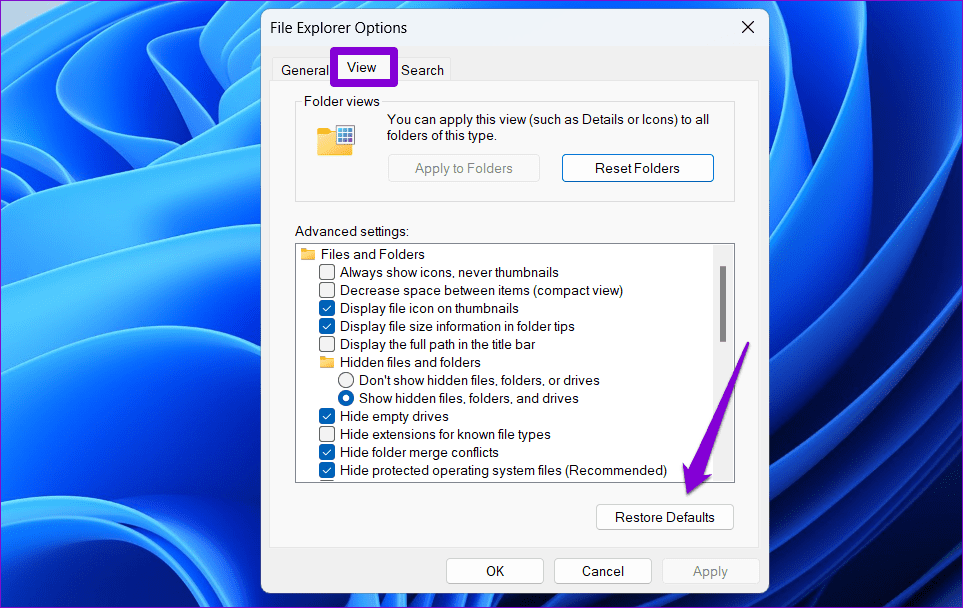
In File Explorer, click on the triple dotted icon on the menu bar, then select Options.
In the Folder Options window, click on View tab. Under Advanced settings, uncheck the checkbox for “Always show icons, never thumbnails” option. Click Apply, then OK to save the changes.
The thumbnails of the media files should show the correct images now.
For video files that still fail to show the thumbnails but instead showing the app icon of the video player, it likely indicate that the video file type does not support displaying thumbnail in File Explorer. To solve this, you may need to install video codec packs to add supports for displaying the thumbnail of various video file types. We recommend K-lite Codec Pack by codecguide.com.
Одним из самых разочаровывающих изменений в Windows 11 стал отказ от иконок папок в «Проводнике», отображающих превью содержимого в них. Вероятно, Microsoft отказалась от этой полезной опции в угоду новому дизайнерскому стилю. Как бы там ни было, энтузиаст разработал собственную утилиту Windows Thumbnail Generator с открытым исходным кодом, которая исправляют эту проблему.
- В тему: Всё о Windows 11 — секреты, инструкции, лайфхаки и полезные статьи
Написанная на C# программа использует ImageMagick (библиотека Magick.NET) для генерирования ярлыков с миниатюрами файлов, находящихся в папке. На данный момент утилита ограничена только мультимедийными форматами (JPG, PNG, MP4, MOV и прочими), поскольку другие типы файлов (документы, таблицы и подобные) имеют вертикальное отображение — оно не подходит под текущую реализацию.

Windows Thumbnail Generator работает крайне просто: пользователю нужно лишь открыть утилиту, выбрать нужную папку, указать порядок (обычный или обратный) и нажать на «Старт». Программа автоматически сгенерирует ярлык папки с миниатюрами и заменит исходную иконку на новую. Разработчик отметил, что изначально он создал эту утилиту для себя, но решил поделиться со всеми — он рассчитывает только на конструктивную критику.
This article explains how to turn thumbnail previews on or off in File Explorer in Windows 11.
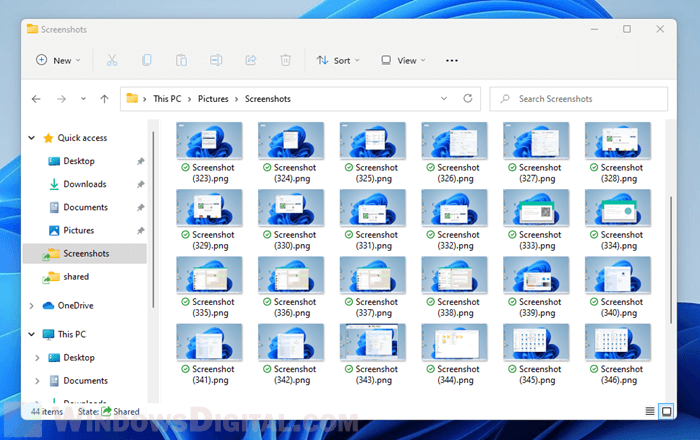
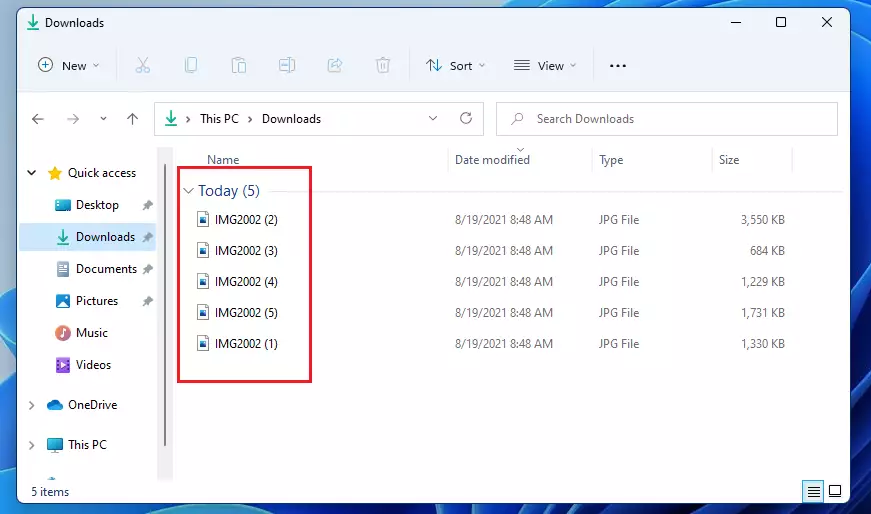
File Explorer in Windows 11 displays files and folders as a list by default. Even images will be displayed as a list.
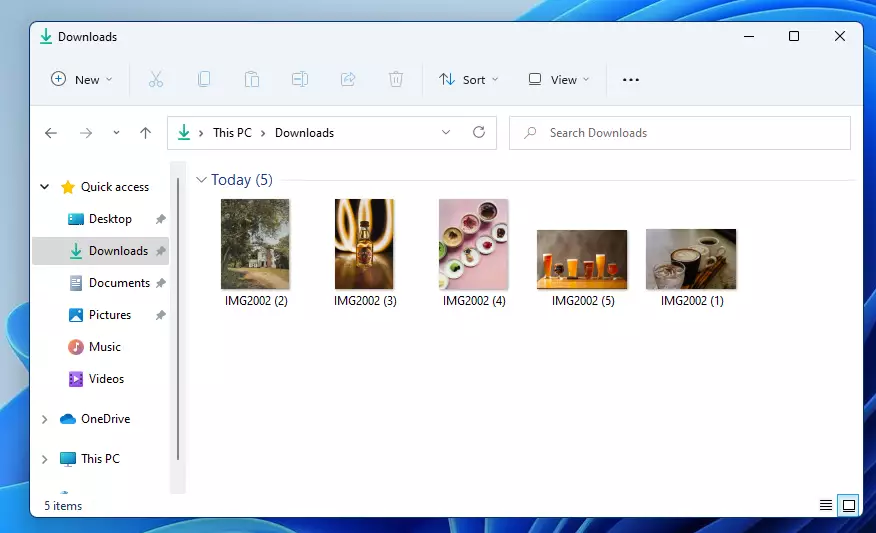
However, Windows also supports displaying thumbnail images or icons in File Explorer. When working with lots of images with thumbnail preview enabled, File Explorer makes it easy to see the actual images or photos in thumbnail sizes, and this can provide you with more details instead of a list.
By default, thumbnail preview is enabled. However, you’ll have to select a medium, large, or extra-large icon in File Explorer to preview thumbnail images. If the thumbnail preview is disabled, it will also be turned off in File Explorer.
How to enable or disable thumbnail preview in Windows 11
As mentioned above, you can turn on or off the previewing of thumbnails in Windows 11. By default, this is enabled, but if it’s disabled for some reason, here’s how to enable it.
Open File Explorer, select the ellipsis (three dots on the toolbar), and select Options.
Then ensure the check box next to “Always show icons, never thumbnail” is not checked.
Now, in File Explorer, with list view, you’ll see your images as shown below.
To preview the thumbnail in File Explorer, click View in the toolbar menu and select Large, Medium, or Small icons.
Now thumbnails are shown in preview mode.
To turn off the thumbnail preview, go to File Explorer options and click on the View tab, then check to box “Always show icons, never thumbnail.”
You may also want to read the post below if the above doesn’t work for you.
How to preview files and images with PowerToys on Windows 11
That’s it!
Conclusion:
- Enabling thumbnail previews in Windows 11 enhances your experience by displaying images in a visually appealing way.
- Access thumbnail settings easily through File Explorer options.
- You can choose between different icon sizes to best suit your viewing preferences.
- If needed, disabling thumbnail previews is just as straightforward.
- For additional functionality, consider integrating PowerToys for enhanced file previewing options.
Quick Tips
- Ensure that you haven’t inadvertently disabled thumbnail previews on Windows.
- Clearing the existing thumbnail data is an effective way to fix this issue.
- If you can’t see thumbnails for a specific file type on Windows, it might be because of the default app set for that file type.
Basic Fixes
- Restart Windows Explorer: Temporary issues with Windows Explorer can cause such problems. In most cases, you can fix the issue by restarting the Windows Explorer process.
- Run the SFC scan: Corrupted or damaged system files can also cause such anomalies. Running the SFC (System File Checker) scan can help you find and repair any problematic system files causing the issue.
Fix 1: Ensure Thumbnails Are Enabled
Step 1: Press the Windows key + S to open the search menu. Type file explorer options in the box and press Enter.
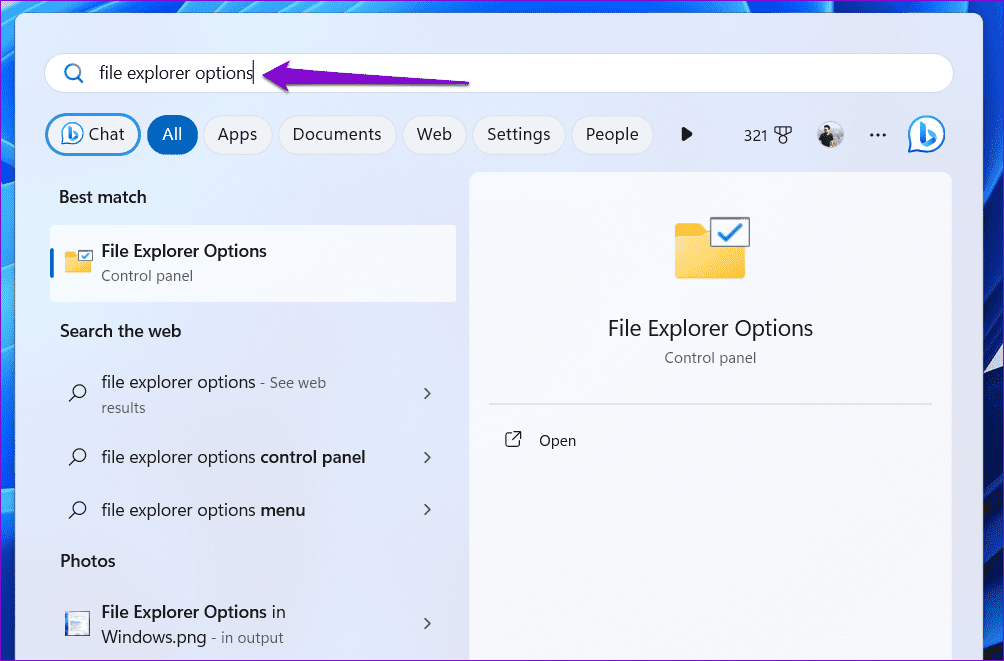
Step 2: Switch to the View tab and uncheck the Always show icons, never thumbnails box. Then, click Apply, followed by OK.

Fix 2: Clear Thumbnail Data
Step 1: Press the Windows key + I to open the Settings app and head to System > Storage.

Step 2: Click on Temporary files.

Step 3: Select Thumbnails and uncheck all the other boxes. Then, click the Remove files button at the top.

Fix 3: Uninstall and Reinstall Microsoft OneDrive
At times, Windows 11 may not display thumbnails for pictures, videos, and folders backed up to OneDrive. Several users on a Microsoft Community post reported fixing the issue almost instantly by uninstalling Microsoft OneDrive and installing it back. You can also give this a shot.
Step 1: Press the Windows key + R to open the Run dialog box. Type appwiz.cpl and press Enter.
Step 2: Select Microsoft OneDrive on the list and click Uninstall.
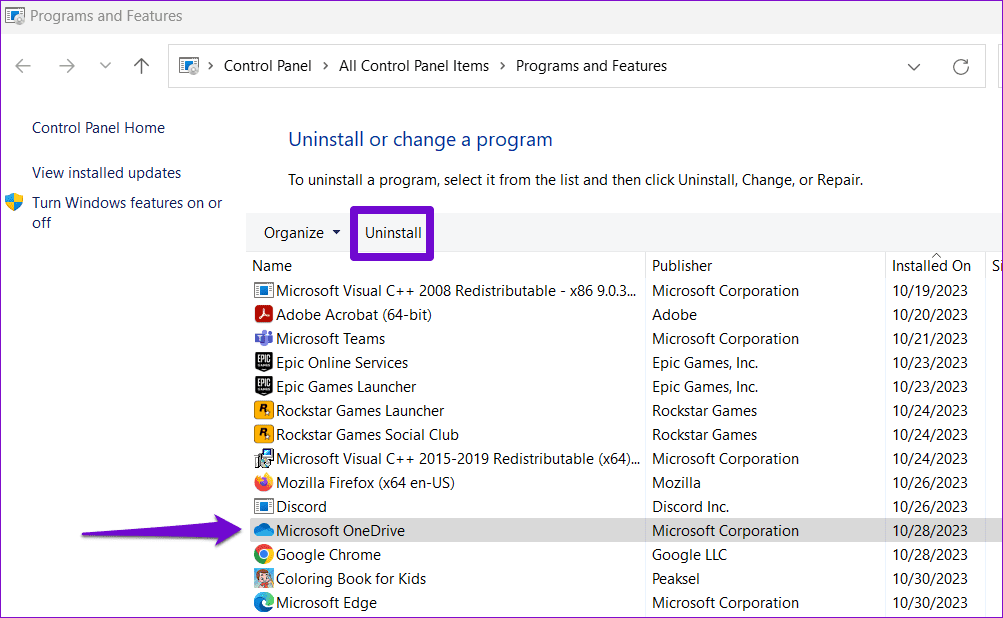
Follow the on-screen prompts to finish removing OneDrive from your PC. After that, use the following link to download and install Microsoft OneDrive again.
Fix 4: Change the Default App Type
Step 1: Right-click on the problematic file type, go to Open with, and select Choose another app.

Step 2: Select an appropriate app from the list and tick the Always use this app to open files checkbox. Then, click OK to save changes.

Fix 5: Modify Advanced System Settings
Step 1: Press the Windows key + S to access the search menu. Type view advanced system settings in the box and press Enter.

Step 2: In the System Properties window, switch to the Advanced tab and click the Settings button under Performance.

Step 3: Select the Custom option and check the boxes for Save taskbar thumbnail previews and Show thumbnails instead of icons. Then, hit Apply.

Fix 6: Restore File Explorer Options
Step 1: Press the Windows key + S to open the search menu. Type file explorer options in the box and press Enter.
Step 2: Switch to the View tab and click the Restore Defaults button.
Was this helpful?
Thanks for your feedback!
The article above may contain affiliate links which help support Guiding Tech. The content remains unbiased and authentic and will never affect our editorial integrity.
This post will help you if your Thumbnail Previews are not showing in Windows File Explorer and how you can enable or disable Thumbnails in Windows 11/10 Explorer.
Whenever you open Explorer and view images, you see the miniature of the image in its icon’s place. These are called Thumbnails. But if you see only its default icon, then this post will help you fix the issue. It may happen in Windows 11/10 or any other older version with any file, including images, video, documents, etc.
If Video or Picture Thumbnail Previews are not showing in File Explorer, then follow these methods to enable or disable Thumbnails in Windows 11/10:
- Delete Thumbnails in Disk Cleanup Utility
- Disable Always show icons
- Enable thumbnails instead of icons
- Tweak Group Policy settings
- Change this setting in your Codec Pack
- Rebuild Thumbnail Cache.
To know more about these steps, continue reading.
Files not showing thumbnails
1] Delete Thumbnails in Disk Cleanup Utility
Windows computer stores the thumbnail cache for every type of file you have on your PC. Therefore, deleting the cache using Disk Cleanup Utility might fix the issue. For that, do the following:
- Search for disk cleanup in the Taskbar search box.
- Click the respective search result.
- Select the C drive and click the OK button.
- Tick the Thumbnails checkbox and click the OK button.
- Restart your computer and check your files in File Explorer.
It should fix the issue immediately.
2] Disable Always show icons
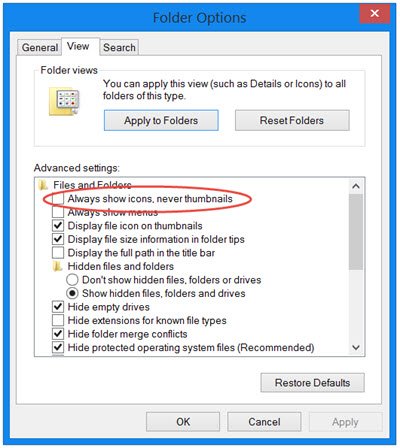
The File Explorer Options panel comes with an option that blocks Windows from showing thumbnails for all the files. If this setting is enabled, you can find the default icons instead of the file’s thumbnail. To verify or disable this option, follow these steps:
- Search for file explorer options in the Taskbar search box.
- Click on the individual search result.
- Switch to the View tab.
- Remove the tick from the Always show icons, never thumbnails checkbox.
- Click the OK button.
- Restart Windows Explorer using Task Manager.
After that, you can find all the picture thumbnails in File Explorer.
3] Enable thumbnails instead of icons
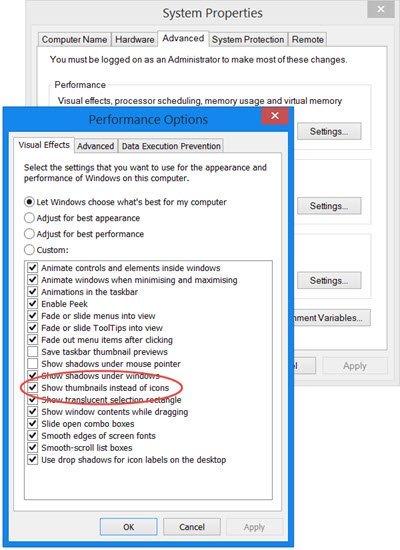
There is another setting in Windows that prevents the system from show thumbnails of your media files. To verify or turn on/off that setting, you need to follow these steps:
- Search for advanced system settings and click on the search result.
- Click the Settings button under the Performance tab.
- Tick the Show thumbnails instead of icons checkbox.
- Click the OK button.
- Restart the Windows Explorer process.
Once you have done this, you will be able to see Thumbnail Previews for images, videos, and other file types in File Explorer in Windows 11/10/8.1.
You may be required to restart Explorer.
4] Tweak Group Policy settings
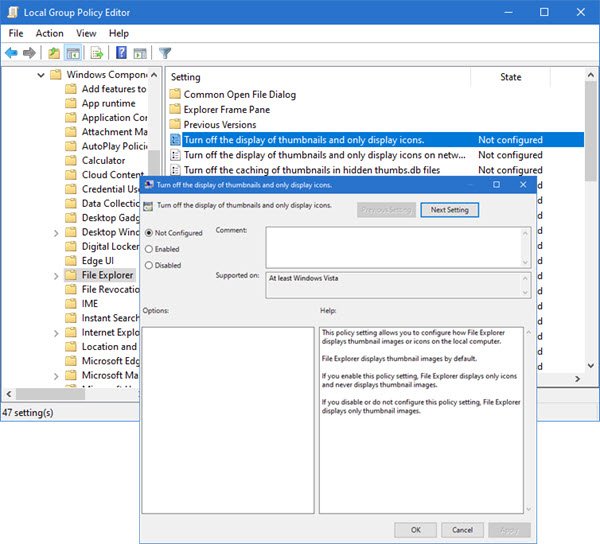
Open Group Policy Editor and navigate to the following setting:
User Configuration > Administrative Templates > Windows components > File Explorer > Turn off the display of thumbnails and only display icons.
Select Disabled and click Apply/OK
5] Change this setting in your Codec Pack
If you use the K-Lite Codec Pack on your system, you can enable thumbnails via its settings:
- Open K-Lite Codec Pack using Search
- Go to the Codec tweak tool.
- Go to Thumbnails
- Enable all formats.
6] Rebuild Thumbnail Cache
Finally, rebuild Thumbnail Cache and see if it helps. You can do this manually or use our freeware Thumbnail & Icon Cache Rebuilder. Make sure to run it as an admin.
Why is File Explorer not showing thumbnails?
At times, File Explorer might not show thumbnails due to different reasons. If a certain setting is enabled on your computer, you might get this problem. Some of the accountable settings are Always show icons, never thumbnails, and Show thumbnails instead of icons. If these settings are enabled or disabled, you might get this problem on your computer.
Why won’t my thumbnails show image?
If you have enabled Always show icons, never thumbnails, or disabled Show thumbnails instead of icons setting in your computer, your PC will not show thumbnails. Instead, it shows the default file icons accordingly. You need to follow the guide above to get rid of this problem.
On a related note, did you know that Explorer Thumbnails offer four border options, viz. No border, Straight border, Photo border, and Shadow border. See how you can change Thumbnail Preview Border in Windows.