По умолчанию, в Windows Server 2019 брандмауэр настроен на блокировку входящего трафика ICMP. Сюда входят эхо-запросы, которые используются командой ping, и это может затруднить устранение неполадок в сети. Некоторые системы мониторинга используют команду ping для отслеживания доступности серверов.
В этом руководстве рассмотрим, как включить правило, чтобы сервер стал отвечать на ping используя графический интерфейс Windows Server 2019, а также включим разрешающее правило через PowerShell и netsh.
Обычно просто отключают Windows Firewall полностью, однако это не рекомендуется делать в производственной среде, так как брандмауэр Windows хорошо справляется с обеспечением базового уровня защиты системы. Разрешим только конкретное правило, необходимое для успешного выполнения команды ping.
Разрешить проверку связи через брандмауэр Windows
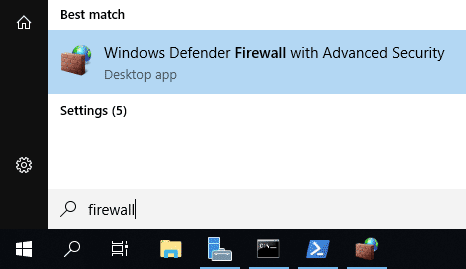
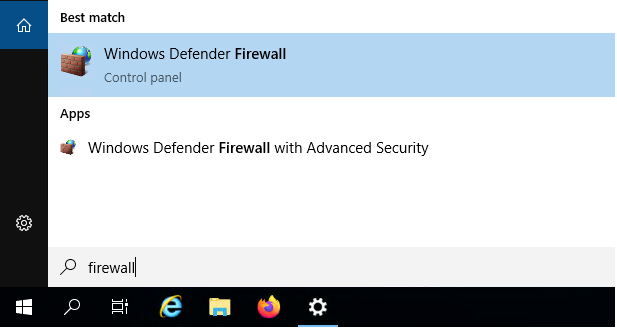
Сначала нам нужно открыть брандмауэр Windows, это можно сделать несколькими способами. Один из методов — просто нажать клавишу Windows, чтобы открыть меню «Start«, а затем начать вводить слово Firewall. Как показано ниже, брандмауэр Windows с расширенной безопасностью должен отображаться, выберите этот пункт.

Еще один быстрый способ: в PowerShell можно просто ввести «firewall» и нажать Enter. Откроется базовый интерфейс брандмауэра, а затем нажать кнопку «Advanced settings» в левой части. Откроется тот же интерфейс, что и через меню «Start«.
Следующий способ открыть Firewall — ввести в CMD такой текст: «firewall.cpl«
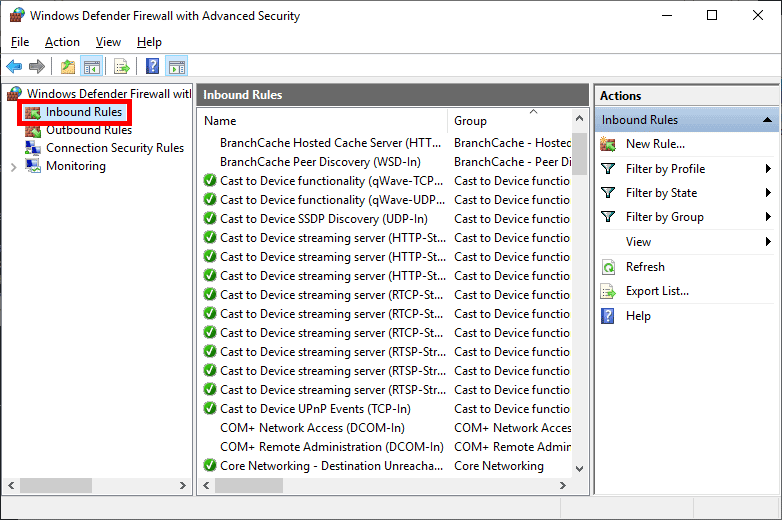
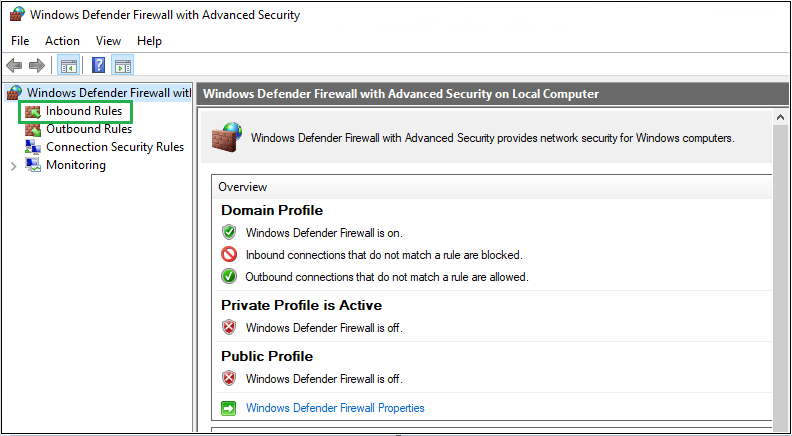
В Брандмауэре в расширенном режиме перейдите в Inboud Rules (Правила для входящих подключений).

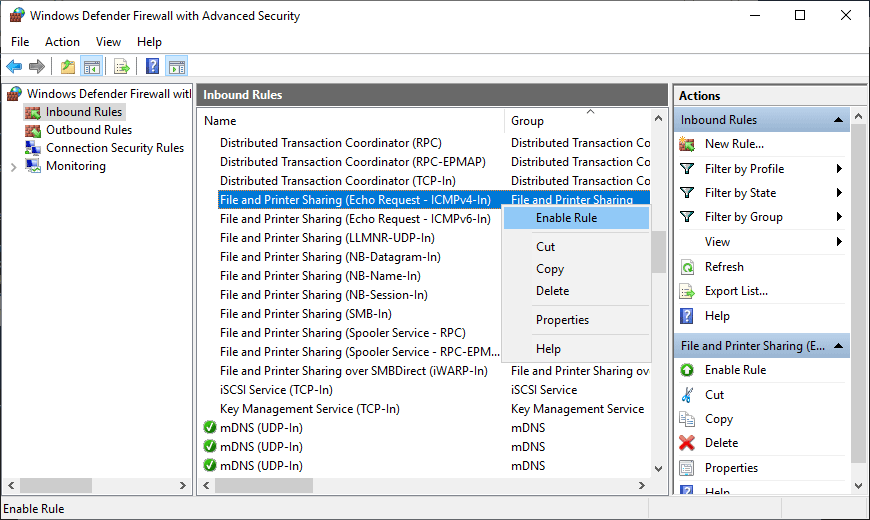
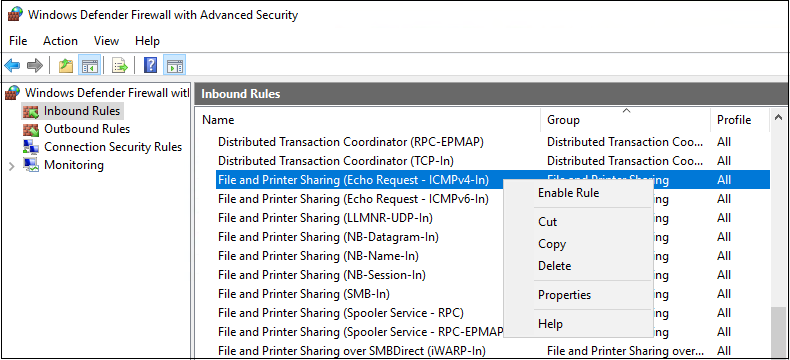
В перечне правил в Inboud Rules, найдите «File and Printer Sharing (Echo Request — ICMPv4-In)» и активируйте его.

Еще один вариант. Активируем разрешающее правило командлетом Powershell
Set-NetFirewallRule -DisplayName "File and Printer Sharing (Echo Request - ICMPv4-In)" -enabled True
Полную справку со всеми параметрами можно получить, набрав команду в PowerShell
help New-NetFirewallRule
Вариант создания правила через netsh
netsh advfirewall firewall add rule name="ICMP Allow incoming V4 echo request" protocol=icmpv4:8,any dir=in action=allow
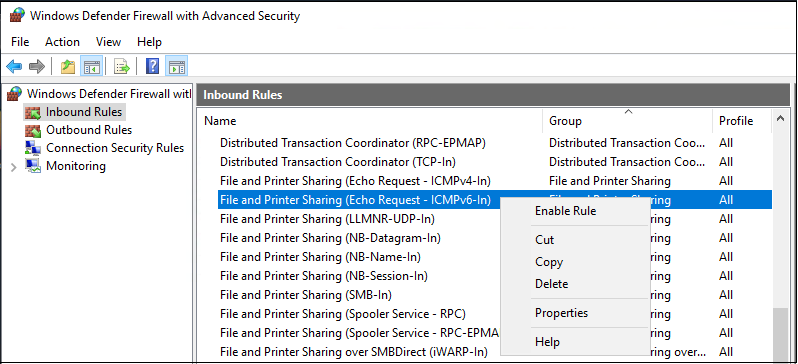
Примечание: Включение правила позволит получать ответы только на IPv4 запросы, если нужно получать ответы по IPv6, нужно разблокировать правило такое же правило, только с Echo Request — ICMPv6-In, перечисленное ниже. К тому же имеется несколько профилей: доменный, публичный, частный. Ненужные профили можно отключить в правиле, во вкладке Advanced.
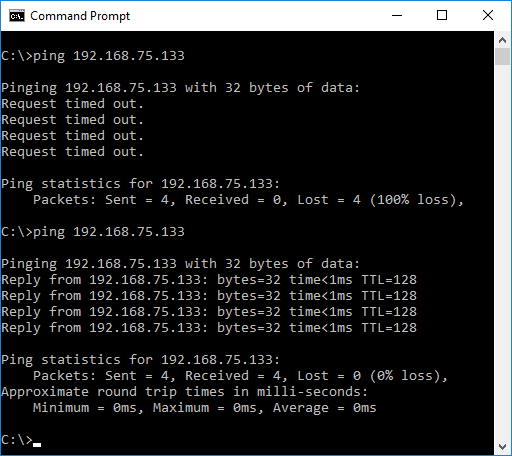
После разблокировки правила сервер должен начать отвечать на запросы ping. С хоста виртуализации или другого пк в локальной сети протестируем ping’ом Windows Server 2019 по адресу 192.168.1.11 перед включением правила, а затем снова после его включения. Ниже видно, что время ожидания первых запросов истекло, так как входящие запросы ICMP были отключены по умолчанию в Windows Server 2019. После включения правила ICMP запросы ping успешно выполняются, что подтверждает ожидаемую работу.
Пример проверки связи:
Скачать видео.
Резюме
Стандартное правило брандмауэра — блокировать ICMP запросы, в итоге сервер не отвечает на ping. Включив это правило брандмауэра, мы включили команду ping в Windows Server 2019, которая поможет нам устранить неполадки в сети.
Posted by
on December 21, 2018
By default in Windows Server 2019 the Windows Firewall is configured to drop all inbound ICMP traffic. This includes echo requests which are used by the ping command, which can make network troubleshooting difficult.
In this guide we will cover how to allow ping through Windows Firewall in Windows Server 2019.
A common response is usually to simply disable Windows Firewall entirely, however this is not recommended as the Windows Firewall does a good job at providing a basic level of system protection. We will only be allowing the specific rules required to allow ping to succeed.
Allow ping through Windows Firewall
- First we need to open Windows Firewall, this can be done a few ways. My favourite method is to simply hit the Windows key to open start, then start typing firewall. As shown below Windows Firewall with Advanced Security should show, click this.
Alternatively you can simply type ‘firewall’ and press enter in PowerShell to open the basic firewall interface, then click “Advanced settings” on the left hand side – this will open the same interface listed in the start menu.
- From the Windows Firewall with Advanced Security window that opens up, select Inbound Rules from the menu on the left.
- From the rules listed under Inbound Rules, select “File and printer Sharing (Echo Request – ICMPv4-In)” and enable the rule.
Note that this will only allow IPv4 requests in, if you need IPv6 then you will want to enable the “File and Printer Sharing (Echo Request – ICMPv6-In)” rule, listed just below.
- Once enabled the server should now respond to ping requests. From my desktop I begun to ping my Windows Server 2019 virtual machine at 192.168.75.133 before enabling the rule, and then again after enabling it. You can see below that the first requests timed out, as inbound ICMP requests were disabled by default in Windows Server 2019. After enabling the ICMP rule, the ping requests succeed, confirming that this is working as expected.
Summary
By Default Windows Firewall prevents ICMP echo requests, this results in the server not responding to ping. By enabling this firewall rule we have enabled ping in Windows Server 2019, which can help us with network troubleshooting.
В Windows Server 2016, 2019 и 2022 ICMP или Ping отключены по умолчанию, делает систему более безопасной, но иногда это приносит с собой некие сложности в мониторинге.
Поскольку команда ping говорит/показывает, что удаленный компьютер подключен к сети, то это полезная команда для системных администраторов.
Если Вам для каких-то своих целей или же для мониторинга необходимо включить ICMP пакеты, или же ping, то можно воспользоваться ниже приведенной инструкцией.
Его можно включить вручную без использования групповых политик.
Если ICMP пакеты на вашем компьютере не включены, вы получите сообщение об истечении времени ожидания.
Как включить Ping в брандмауэре Windows
Чтобы включить проверку связи в брандмауэре, выполните следующие действия:
Откройте брандмауэр, нажав Win+R и напишите команду firewall.cpl.
В открывшемся окне нажмите Advanced Settings на правой панели.
Выберите Inbound Rules на левой панели и на правой панели New Rule.
Выберите File and Printer Sharing в разделе PredefinedRules. И нажмите Next.
Выберите следующие два правила:
- Общий доступ к файлам и принтерам (Echo Request – ICMPv6-In )
- Общий доступ к файлам и принтерам (Echo Request – ICMPv4-In )
И нажмите Next.
Выберите пункт Allow the connection. Нажмите Finish .
Как включить ICMP (Ping) с командной строки или PowerShell
Для этого откройте командную строку, нажав Win+R и напишите команду cmd.
Разрешить пинг IPv4 с командной строки:
netsh advfirewall firewall add rule name="ICMP Allow Ping V4" protocol="icmpv4:8,any" dir=in action=allowРазрешить ping IPv4 с помощью PowerShell:
New-NetFirewallRule -DisplayName "ICMP Allow Ping V4" -Direction Inbound -Protocol ICMPv4 -IcmpType 8 -RemoteAddress <localsubnet> -Action AllowЕсли после тестирования и настроек необходимо отключить ICMP пакеты, то так же можем воспользоваться командной строкой для этого.
Заблокировать ping IPv4 с командной строки:
netsh advfirewall firewall add rule name="ICMP Allow Ping V4" protocol="icmpv4:8,any" dir=in action=block
Заблокировать ping IPv4 с помощью PowerShell:
New-NetFirewallRule -DisplayName "ICMP Allow Ping V4" -Direction Inbound -Protocol ICMPv4 -IcmpType 8 -RemoteAddress <localsubnet> -Action BlockТакже предлагаем рассмотреть другие полезные статьи:
- Как подключиться к серверу по FTP, SFTP и SCP
- Как установить и настроить FTP-сервер IIS на Windows Server 2019
- Как подключиться к Docker контейнеру по sFTP
Enabling Ping will make network troubleshooting easier which allows all inbound ICMP traffics and this also includes the echo requests by using this common command.
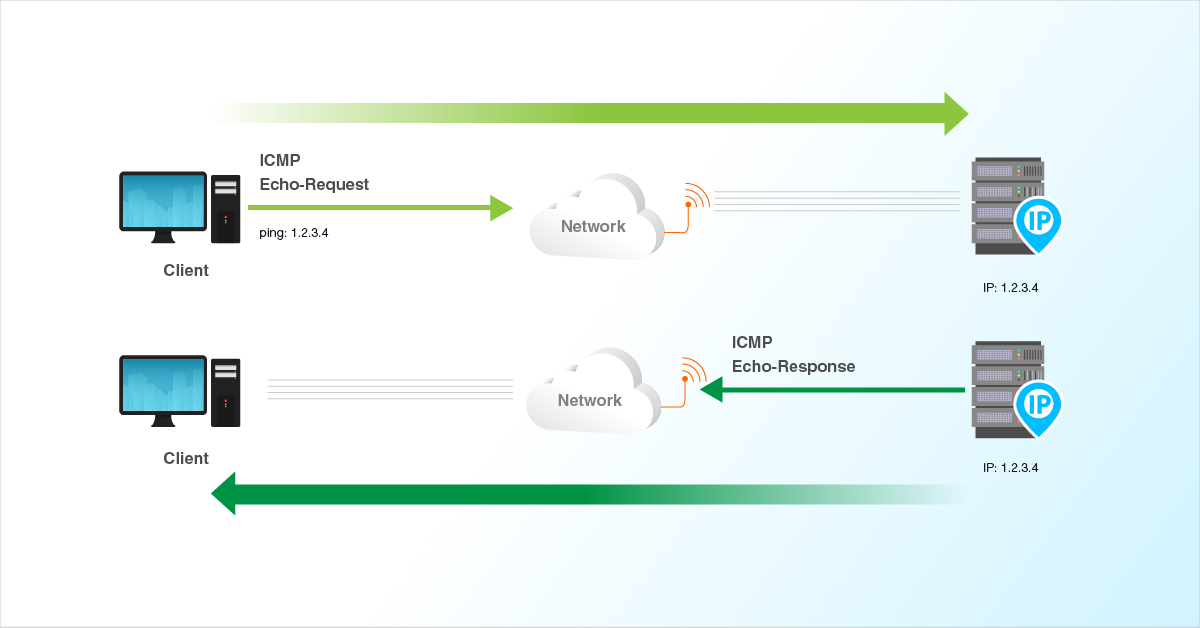
Requests will expire as shown in the image below before Ping is enabled.

This guide outlines the basic steps to enable and disable Ping from the Windows firewall on the Windows server.
Step A — Opening Windows firewall
-
To open the Windows firewall, just click on the Windows key to open
startand searchfirewall, and then click on theWindows Defender Firewall with Advanced Securitywhich is shown in the below image. -
From the menu on the left, select the
Inbound Rulesspecified in the image below.
Step B — Enabling OR Disabling the rule
-
Select
File and Printer Sharing (Echo Request – ICMPv4-In)from the rules listed underInbound Rulesand enable the rule as shown in the below image.
-
Select
File and Printer Sharing (Echo Request – ICMPv6-In)from the rules listed underInbound Rulesand enable the rule as shown in the below image.
Once the ping is enabled, the server should now respond to ping requests for both IPv4 and IPv6. That is shown in the below image.

To Disable for IPv4
-
Select
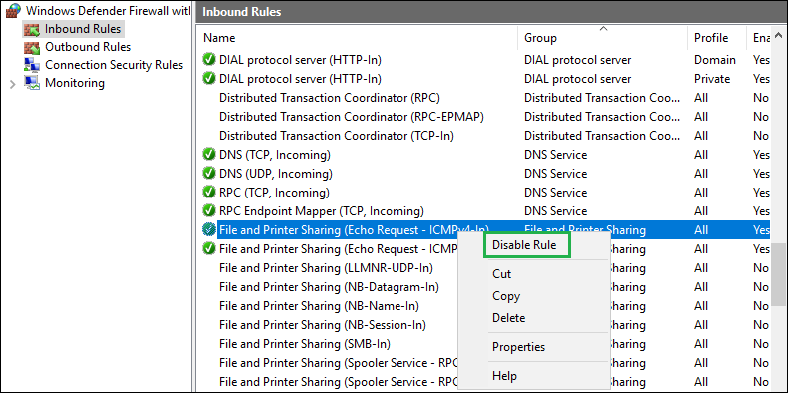
File and Printer Sharing (Echo Request – ICMPv4-In)from the rules listed under Inbound Rules and disable the rule as shown in the below image.
To Disable for IPv6
-
Select
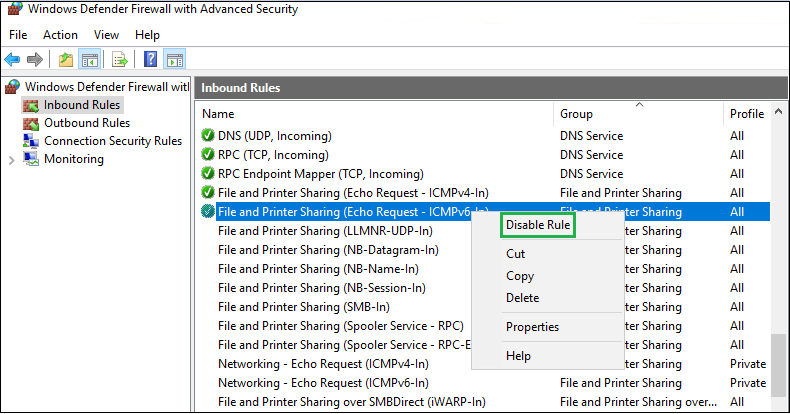
File and Printer Sharing (Echo Request – ICMPv6-In)from the rules listed under Inbound Rules and disable the rule as shown in the below image.Once the ping is disabled, the server should now respond to ping requests for both IPv4 and IPv6. That is shown in the below image.
Related Tutorials
-
Installing telnet on Linux and Windows Cloud Servers
-
How to check if TCP / UDP port is open on Linux & Windows Cloud Servers
-
Basic Firewall Information and Rule Setting
-
Setting up Windows Firewall on Windows Cloud Servers 2019
-
Firewall Configuration using Iptables on Ubuntu 14.04
-
How to enable & disable Ping (ICMP Echo Requests) from IPTables on Linux Cloud Servers
-
How to Enable & Disable Ping (ICMP Echo Requests) in Windows Server 2022 Firewall
Other Information
- How to choose a data center when deploying LayerStack Cloud Servers
This guide will teach us how to enable ping response in Windows 2019/2016 and 2012 R2 servers. Though the original post was written with the screenshots from Windows 2012 R2 server, the same steps apply to any recent Windows servers, including version 2022.
Enabling ping will help you to monitor and troubleshoot network issues on your network. The ping request will work according to your domain environment policies and settings. If it works by default, we will also show you how to disable the ping in Windows servers. We have mentioned the Powershell commands if you want to work on a remote system or Core edition of Windows OS.
Read Also: How to enable ping on Windows 10/11 client PC
1) Go to the control panel and open ‘Windows Firewall’. There are plenty of ways to reach the control panel on a Windows server.
2) Click on ‘Advanced Settings.’
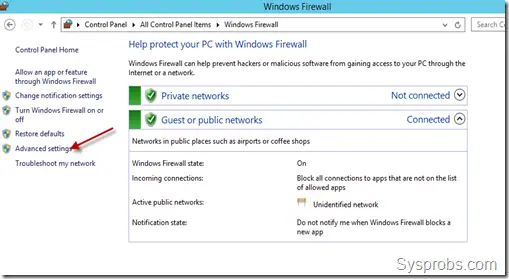
Additionally, you can search for ‘Firewall’ in Windows search to reach the advanced Firewall settings as below.
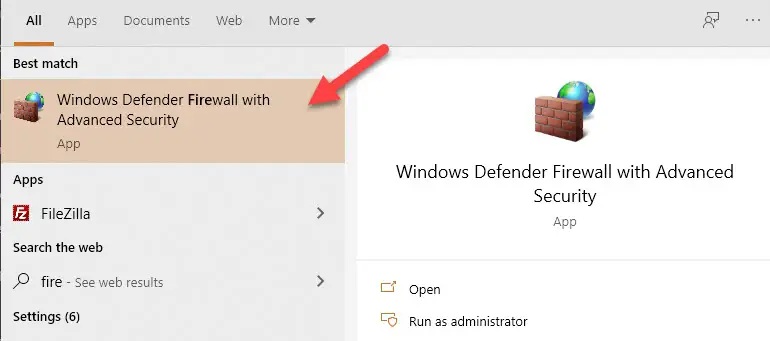
3) In the earlier Operating Systems, we need to create a firewall rule to allow ICMP echo packets. Luckily the rule is already there, and we just need to enable it.
To enable the inbound rule allowing ICMP packets, select ‘Inbound Rules.’
Locate the ‘File and Printer Sharing (Echo Request –ICMPv4-In’), right-click on it and select Enable Rule.
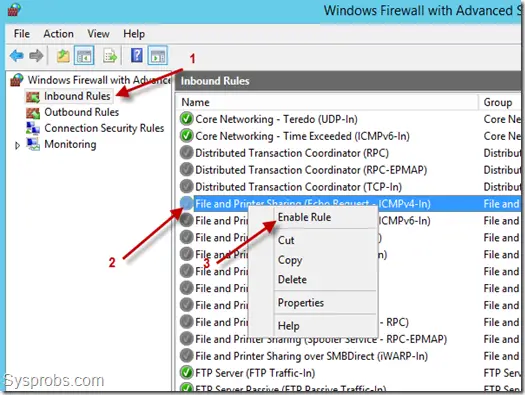
That will allow incoming ping requests and respond to them without completely disabling the Windows firewall service. As we enabled this rule only for IPv4 packets, we need to enable a separate similar rule for ICMPv6-In for the IPv6 network.
The below screenshot shows a Windows server started responding to ping requests once the above rule was enabled.
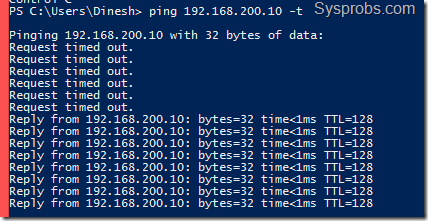
In a similar scenario, if a server is responding to ping/ICMP requests but needs to stop it for tight security, you can simply disable the same rule.
Visit the Windows firewall advances settings and disable the ‘File and Printer Sharing (Echo Request –ICMPv4-In’) rule.
Enable Ping by PowerShell Commands in Windows Servers
Geeks like command lines, especially the Windows OS admins love PowerShell. We can use the below commands to enable/disable ping on Windows Server and Client Operating Systems. Especially if you work on remote systems via PowerShell or have the Server Core OS without GUI.
Make sure to run the below commands ‘as administrator’ on the command prompt or PowerShell.
Enable IPv4 – This will create an exception in the default Windows firewall rule.
netsh advfirewall firewall add rule name="ICMP Allow incoming V4 echo request" protocol="icmpv4:8,any" dir=in action=allow
For IPv6:
netsh advfirewall firewall add rule name="ICMP Allow incoming V6 echo request" protocol="icmpv6:8,any" dir=in action=allow
To disable ping on IPv4:
netsh advfirewall firewall add rule name="ICMP Allow incoming V4 echo request" protocol=icmpv4:8,any dir=in action=block
For IPv6:
netsh advfirewall firewall add rule name="ICMP Allow incoming V6 echo request" protocol=icmpv6:8,any dir=in action=block
As ping is a useful utility to troubleshoot and find the presence of a network device, it completely depends on the network security policies of your environment to enable or disable it. We mentioned the easy steps you can do by GUI and command prompt in this guide.

