
Installation for Apache 2.x on Windows systems
This section contains notes and hints specific to Apache 2.x installs
of PHP on Microsoft Windows systems.
Note:
Please read the manual
installation steps first!
It is strongly recommended to consult the
» Apache Documentation
to get have a basic understanding of the Apache 2.x Server.
Also consider reading the
» Windows specific notes
for Apache 2.x before reading on here.
Download the most recent version of
» Apache 2.x
and a fitting PHP version. Follow the
Manual Installation Steps
and come back to go on with the integration of PHP and Apache.
There are three ways to set up PHP to work with Apache 2.x on Windows.
PHP can be run as a handler, as a CGI, or under FastCGI.
Note: Remember that when adding
path values in the Apache configuration files on Windows, all backslashes
such as c:\directory\file.ext should be converted to
forward slashes: c:/directory/file.ext. A trailing
slash may also be necessary for directories.
Installing as an Apache handler
Note:
When using the apache2handler SAPI, the Thread Safe (TS) version of
PHP must be used.
To load the PHP module for Apache 2.x, the following lines in the
Apache httpd.conf configuration file must be inserted:
Example #1 PHP and Apache 2.x as handler
# before PHP 8.0.0 the name of the module was php7_module
LoadModule php_module "c:/php/php8apache2_4.dll"
<FilesMatch \.php$>
    SetHandler application/x-httpd-php
</FilesMatch>
# configure the path to php.ini
PHPIniDir "C:/php"
Note:
The actual path to PHP must be substituted instead of
C:/php/ in the above examples.
Make sure that the file referenced in theLoadModuledirective is at
the specified location. Use php7apache2_4.dll
for PHP 7, or php8apache2_4.dll for PHP 8.
Running PHP as CGI
It is strongly recommended to consult the
» Apache CGI documentation
for a more complete understanding of running CGI on Apache.
To run PHP as CGI, the php-cgi files will need to be placed in a
directory designated as a CGI directory using the ScriptAlias directive.
A #! line will need to be placed in the PHP files,
which point to the location of the PHP binary:
Example #2 PHP and Apache 2.x as CGI
#!C:/php/php.exe
<?php
  phpinfo();
?>
Warning
A server deployed in CGI mode is open
to several possible vulnerabilities. Please read our
CGI security section to learn how to
defend yourself from such attacks.
Running PHP under FastCGI
Running PHP under FastCGI has a number of advantages over running it as a
CGI. Setting it up this way is fairly straightforward:
Obtain mod_fcgid from
» https://www.apachelounge.com.
Win32 binaries are available for download from that site.
Install the module according to the instructions that will come with it.
Configure the web server as shown below, taking care to adjust any paths
to reflect how it is installed on the system:
Example #3 Configure Apache to run PHP as FastCGI
LoadModule fcgid_module modules/mod_fcgid.so
# Where is the php.ini file?
FcgidInitialEnv PHPRC        "c:/php"
<FilesMatch \.php$>
    SetHandler fcgid-script
</FilesMatch>
FcgidWrapper "c:/php/php-cgi.exe" .php
Files with a .php extension will now be executed by the PHP FastCGI
wrapper.
Found A Problem?
wolfeh1994 at yahoo dot com 
11 years ago
Please for the love of god, download the threaded version. I spent over an hour trying to figure out why php5apache2.dll could not be found, and while desperately looking through manuals I went into the php 5 structure and found that it doesn't exist in the non-threaded version.
This really could use a mention somewhere other than the PHP 5 structure, like the paragraph to the left of the homepage which talks about which PHP version to choose, or this part of the manual which covers Apache... Anywhere but structure, seriously. I would have never guessed to look there.
a solution for simpletons like me 
13 years ago
Installing Apache and PHP on Windows 7 Home Premium on a Gateway NV75S laptop with a quad AMD A6-3400M
All I need to do with these programs is to test my website out on my laptop. I have HTML and PHP files. I do not need MySQL as I use html5 storage.
Getting and installing Apache
1  In your browser go to h t t p : / / h t t p d . a p a c h e . o r g / d o w n l o a d . c g i
   (without the spaces)
2  Click on  httpd-2.2.22-win32-x86-no_ssl.msi
   (this is a self-installing executable file without crypto ... no Secure Socket Layer)
   (2.2.22 was the latest version on April 25, 2012)
3  Click on the httpd-2.2.22-win32-x86-no_ssl.msi file after it downloads
   (single click on the file tab in Chrome or double click on the actual file in Downloads)
4  Click Next
5  Click I accept the terms in the license agreement
6  Click Next
7  Click Next
8  Type localhost in the top box
9  Type localhost in the middle box
10 Type admin@localhost.com in the bottom box
11 Click Next
12 Click Next
13 Click Next
14 Click Install and wait
15 Cick Yes to allow the program to make changes
16 Click Finish
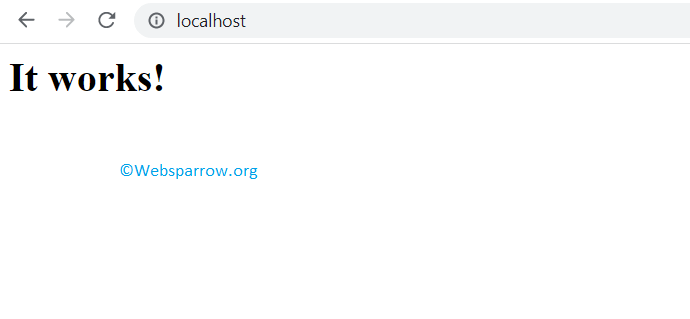
Testing Apache
1  Type localhost in your browser location box (I use Chrome) or type h t t p : / / l o c a l h o s t
   (without the spaces)
2  The message It works! should appear.
Getting and installing PHP
1  In your browser go to h t t p : / / w i n d o w s . p h p . n e t / d o w n l o a d /
   (without the spaces)
2  Click on the Installer link under PHP 5.3 (5.3.10)   VC9 x86 Thread Safe
   (Ignore the Do NOT use VC9 version with apache.org binaries comment on the side panel)
3  Click on the php-5.3.10-Win32-VC9-x86.msi file after in downloads
   (single click on the file tab in Chrome or double click on the actual file in Downloads)
4  Click Next
5  Click I accept the terms in the License Agreement
6  Click Next
7  Click Next
8  Click Apache 2.2.x Module
9  Click Next
10 Click Browse
11 Double click Apache Software Foundation
12 Double click Apache 2.2
13 Double click conf
14 Click OK
15 Click Next
16 Click Next
17 Click Install and wait
18 Cick Yes to allow the program to make changes
19 Click Finish
Testing PHP with Apache
1  Open Notepad
2  Type 'left bracket character'?php phpinfo(); ?'right bracket character'
3  Save the file to C:\Program Files (x86)\Apache Software Foundation\Apache2.2\htdocs as test.php
4  Type localhost/test.php in your browser location box (I use Chrome) or type h t t p : / / l o c a l h o s t / t e s t . p h p
5  A table with title PHP Version ... should appear
DONE
farinspace 
14 years ago
Running PHP under FastCGI:
Besides the following in your httpd.conf
    LoadModule fcgid_module modules/mod_fcgid.so
    FcgidInitialEnv PHPRC "c:/php"
    AddHandler fcgid-script .php
    FcgidWrapper "c:/php/php-cgi.exe" .php
Remember to add the following to the default <Directory "C:/apache/htdocs"> block (or virtual host blocks):
Options ExecCGI
secret at secret dot se 
18 days ago
!!!!!!!!!!!!!!!!!!!!
CRITICAL NOTE:
!!!!!!!!!!!!!!!!!!!!!!!
Just installed latest PHP on latest apache (17.04.2025)
Add this string after LoadModule, or nothing works!:
AddType application/x-httpd-php .php
a user 
9 years ago
If you are having issues getting the PHPIniDir or LoadModule directives to work and all the suggestions already given do not help, double-check if you are not using fancy quotes around your paths (‘ ’ “ ”).
This happened to me because I copied the statements from a random website. In my text editor the difference was barely noticeable, but to Apache it certainly is!
For example, this will not work:
PHPIniDir “C:/PHP7”
But this will work:
PHPIniDir "C:/PHP7"
horica78 at yahoo dot com 
11 months ago
This for the fastest architecture of Apache on Windows faster than as module for php
Enable mod_proxy and mod_proxy_fcgi in httpd.conf and run
setx PHP_FCGI_CHILDREN "15" /m
setx PHP_FCGI_MAX_REQUESTS "1000" /m
and download
RunHiddenConsole.exe  and start php with c:\hidden\RunHiddenConsole.exe C:\PHP\php-cgi.exe -b 127.0.0.1:9000 and set on VirtualHost :
<Files ~ "\.(php|phtml)$">
    SetHandler "proxy:fcgi://127.0.0.1:9000#"
    ProxyFCGIBackendType GENERIC
    ProxyFCGISetEnvIf "true" SCRIPT_FILENAME "C:%{reqenv:SCRIPT_FILENAME}"
    </Files>
retar the Apache service and have fun. Cheers from one huge fan of
Последнее обновление: 25.11.2023
Для работы с PHP нам потребуется веб-сервер. Обычно в связке с PHP применяется веб-сервер Apache. Официальный
сайт проекта — https://httpd.apache.org/. Там же можно найти всю подробную информацию о релизах, скачать исходный код.
Однако официальный сайт не предоставляет готовых сборок для ОС Windows.
Перед установкой Apache следует отметить, что если наша ОС Windows, то в системе должны быть установлен пакет для C++, который можно найти по адресу
для 64-битной и для 32-битной.
Итак, если нашей ОС является Windows, перейдем на сайт http://www.apachelounge.com/, который предоставляет дистрибутивы Apache для Windows:
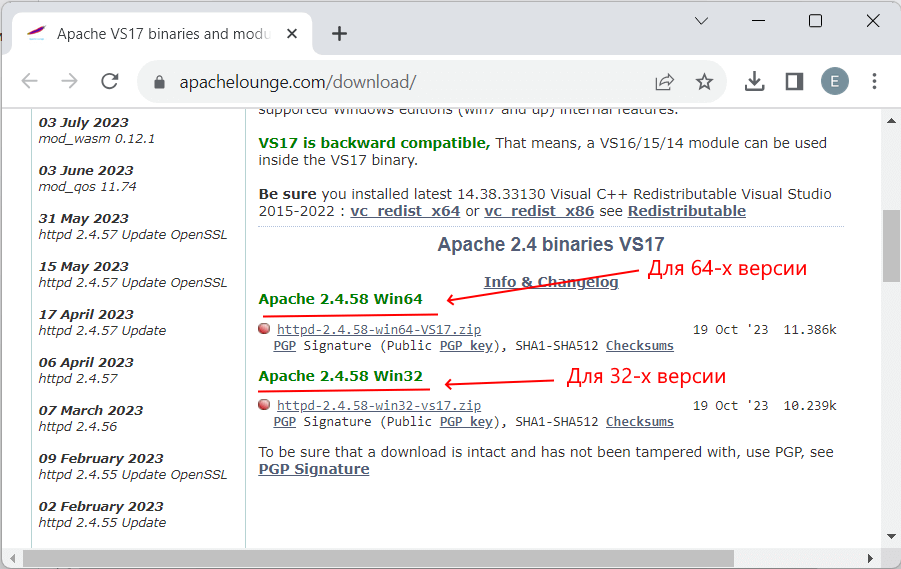
В разделе Apache 2.4 binaries VS17 выберем последнюю версию дистрибутива сервера. На странице загрузок мы можем
найти две версии пакета Apache — для 64-битных систем и для 32-битных.
После загрузки пакета Apache распакуем загруженный архив. В нем найдем папку непосредственно с файлами веб-сервера — каталог Apache24.
Переместим данный каталог на диск C, чтобы полный путь к каталогу составлял C:/Apache24.
Запуск Apache
В распакованном архиве в папке bin найдем файл httpd.exe
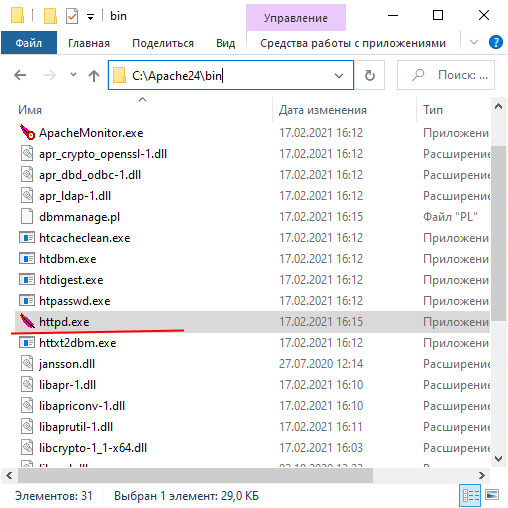
Это исполняемый файл сервера. Запустим его. Нам должна открыться следующая консоль:
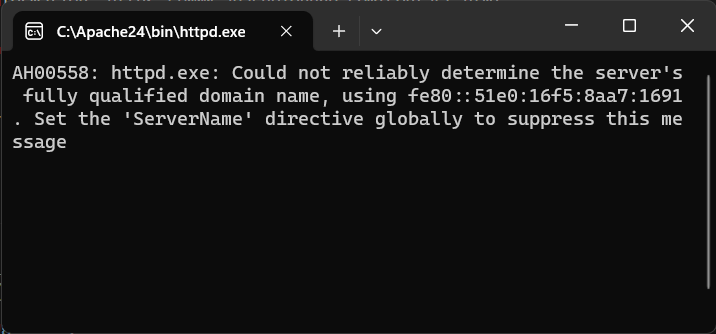
Пока работает это приложение, мы можем обращаться к серверу. Для его тестирования введем в веб-браузере адрес
http://localhost. После этого веб-браузер должен отобразить следующую страницу:

Эта страница символизирует, что наш веб-сервер работает, и мы можем с ним работать.
Конфигурация веб-сервера
Теперь проведем конфигурацию сервера, чтобы связать его с ранее установленным интерпретатором PHP.. Для этого найдем в папке веб-сервера
в каталоге conf (то есть C:\Apache24\conf ) файл httpd.conf
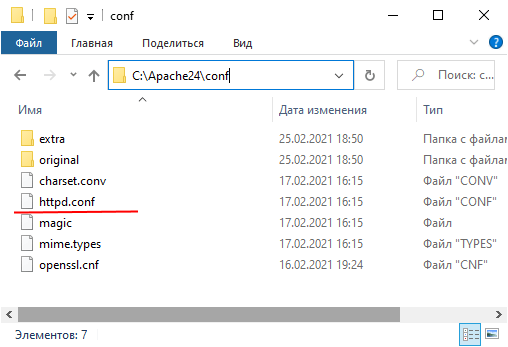
Откроем этот файл в текстовом редакторе. httpd.conf настраивает поведение веб-сервера.
Мы не будем подобно затрагивать его описания, а только лишь произведем небольшие изменения, которые потребуются нам для работы с PHP.
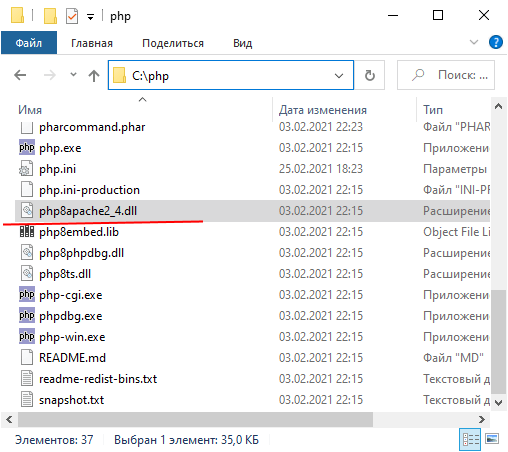
Прежде всего подключим PHP. Для этого нам надо подключить модуль php, предназначенный для работы с apache. В частности, в папке
php мы можем найти файл php8apache2_4.dll:
Для подключения php найдем в файле httpd.conf конец блока загрузки модулей LoadModule
//......................
#LoadModule vhost_alias_module modules/mod_vhost_alias.so
#LoadModule watchdog_module modules/mod_watchdog.so
#LoadModule xml2enc_module modules/mod_xml2enc.so
И в конце этого блока добавим строчки
LoadModule php_module "C:/php/php8apache2_4.dll"
PHPIniDir "C:/php"
Далее укажем место, где у нас будут храниться сайты. Для этого создадим, например, на диске С каталог localhost. Затем найдем в файле httpd.conf
строку
DocumentRoot "${SRVROOT}/htdocs"
<Directory "${SRVROOT}/htdocs">
По умолчанию в качестве хранилища документов используется каталог «c:/Apache24/htdocs». Заменим эту строку на следующую:
DocumentRoot "c:/localhost"
<Directory "c:/localhost">
Изменим пути файлам, в которые будут заноситься сведения об ошибках или посещении сайта. Для этого найдем строку
ErrorLog "logs/error.log"
И заменим ее на
ErrorLog "c:/localhost/error.log"
Далее найдем строку
CustomLog "logs/access.log" common
И заменим ее на
CustomLog "c:/localhost/access.log" common
Таким образом, файл error.log, в который записываются ошибки, и файл access.log, в который заносятся все
данные о посещении веб-сайта, будут располагаться в папке c:/localhost.
Затем найдем строчку:
#ServerName www.example.com:80
И заменим ее на
ServerName localhost
Далее найдем блок <IfModule mime_module>:
<IfModule mime_module>
    #
    # TypesConfig points to the file containing the list of mappings from
    # filename extension to MIME-type.
    #
    TypesConfig conf/mime.types
И под строкой <IfModule mime_module> добавим две строчки:
AddType application/x-httpd-php .php
AddType application/x-httpd-php-source .phps
То есть должно получиться:
<IfModule mime_module>
	AddType application/x-httpd-php .php
	AddType application/x-httpd-php-source .phps
    #
    # TypesConfig points to the file containing the list of mappings from
    # filename extension to MIME-type.
    #
    TypesConfig conf/mime.types
В данном случае мы добавили поддержку для файлов с расширением .php и .phps.
И в конце найдем блок <IfModule dir_module>:
<IfModule dir_module>
    DirectoryIndex index.html
</IfModule>
И заменим его на следующий:
<IfModule dir_module>
	DirectoryIndex index.html index.php
</IfModule>
В данном случае мы определяем файлы, которые будут выполняться при обращении к корню файла или каталога. То есть по сути определяем главные страницы
веб-сайта: index.html и index.php.
Это минимально необходимая конфигурация, которая нужна для работы с PHP.
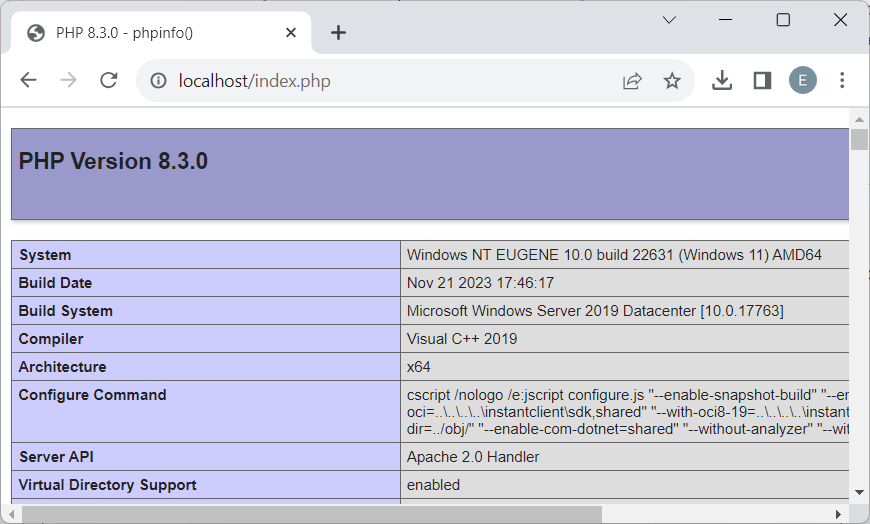
Теперь наша задача — убедиться, что php подключен и работает правильно. Для этого перейдем в папку c:/localhost, которую мы создали для хранения
файлов веб-сервера, и добавим в нее обычный текстовый файл. Переименуем его в index.php и внесем в него следующее содержание:
<?php
phpinfo();
?>
В данном случае мы создали простейший скрипт, который выводит общую информацию о PHP.
Теперь заново запустим файл httpd.exe и обратимся к этому скрипту, набрав в строке браузера
адрес http://localhost/index.php
Что тут произошло? При обращении к сайту на локальной машине в качестве адреса указывается http://localhost.
Затем указывается имя ресурса, к которому идет обращение. В данном случае в качестве ресурса используется файл
index.php. И так как в файле httpd.conf в качестве хранилища документов веб-сервера указан каталог C:\localhost, то именно в этом каталоге и будет
веб-сервер будет производить поиск нужных файлов.
И поскольку выше при конфигурировании мы указали, что в качестве главной страницы может использоваться файл index.php, то мы можем также обратиться к
этому ресурсу просто http://localhost/
Таким образом, теперь мы можем создавать свои сайты на php.
Установка веб-сервера в качестве службы
Если мы часто работаем с веб-сервером, в том числе для программиррования на PHP, то постоянно запускать таким образом сервер,
может быть утомительно. И в качестве альтернативы мы можем установить Apache в качестве службы Windows.
Для этого запустим командную строку Windows от имени администратора и установим Apache в качестве службы с помощью команды:
C:\Apache24\bin\httpd.exe -k install
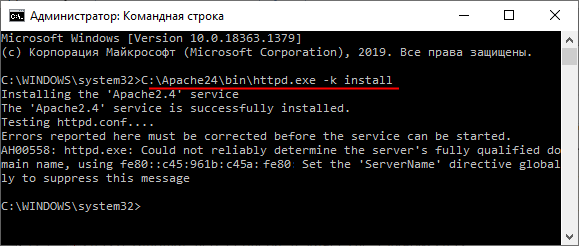
То есть в данном случае прописываем полный путь к файлу httpd.exe (C:\Apache24\bin\httpd.exe) и далее указываем команду на установку службы -k install.
Если установка завершится удачно, то в командная строка отобразит сообщение «The Apache2.4 service is successfully installed». Также будет проведено тестирование сервера.
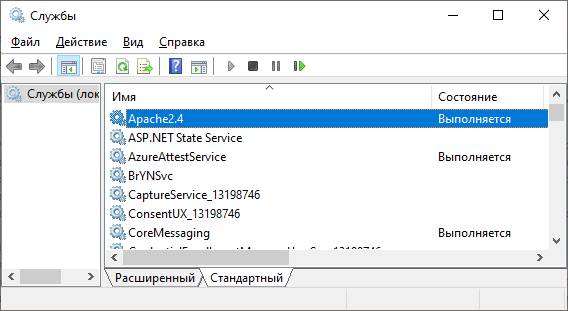
После установки службы убедимся, что она запущена
Начнём с того, что скачаем самую новую версию PHP для Windows с официального сайта: https://windows.php.net/download/
Там несколько вариантов, которые различаются:
- версией (например, 7.2, 7.1, 7.0, 5.6)
- битностью (64 и 32)
- Thread Safe или Non Thread Safe
Выбирайте самую последнюю версию, с той битностью, какая у вашего сервера. Т.е. если у вас Apache 64-битный, то PHP также должен быть 64-битным. Всегда выбирайте Thread Safe версию.
Для каждого файла имеется две ссылки:
- Zip
- Debug Pack
Выбирайте Zip, поскольку отладочный пакет только для тех, кто действительно знает, зачем он им нужен. Здесь имеется ввиду не отладка PHP-скриптов, а отладка самого интерпретатора PHP.

Настройка выполняется в два этапа:
- подключение PHP к Apache
- изменение настроек самого PHP (какие расширения включены, сколько выделено памяти PHP скриптам и т.д.)
Подключение PHP к Apache
Для подключения PHP к Apache откройте конфигурационный файл веб-сервера, который расположен по следующему пути: Apache24\conf\httpd.conf (в папке сервера, в подпапке conf, файл httpd.conf).
В этот файл добавьте три строки, две из которых нужно откорректировать:
PHPIniDir "C:/путь/до/PHP"
AddHandler application/x-httpd-php .php
LoadModule php_module "C:/путь/до/PHP/php8apache2_4.dll"
В первой строке вместо C:/путь/до/PHP напишите точный путь до папки, куда вы распаковали файлы PHP. В третьей строке C:/путь/до/PHP/php8apache2_4.dll также откорректируйте путь, указав расположение PHP папки.
К примеру, я распаковал PHP в папку C:/Server/bin/PHP, тогда мои настройки следующие:
PHPIniDir "C:/Server/bin/PHP"
AddHandler application/x-httpd-php .php
LoadModule php_module "C:/Server/bin/php/php8apache2_4.dll"

Если папка PHP находится в корне диска C, тогда эти строки должны быть такими:
PHPIniDir "C:/PHP"
AddHandler application/x-httpd-php .php
LoadModule php_module "C:/PHP/php8apache2_4.dll"
Чтобы изменения вступили в силу, перезапустите веб-сервер или компьютер.
Настройка PHP
В папке PHP найдите файл php.ini-development и переименуйте его в php.ini – это нужно сделать обязательно, иначе PHP не будет видеть сделанные настройки.
Открываем файл php.ini любым текстовым редактором, ищем строчку
; extension_dir = "ext"
и заменяем её на
extension_dir = "C:\путь\до\PHP\ext\"
Обратите внимание, что вам нужно скорректировать строку C:\путь\до\PHP\ext\, указав конкретный путь до папки, где размещены файлы PHP.
У PHP (как и у Apache) имеется много расширений. Если вы не знаете, какое расширение для чего нужно, то как минимум два варианта:
- начать изучить предназначение каждого расширения и подключить только те, которые вам действительно нужны;
- подключить самые важные расширения, чтобы любые сайты и движки работали без ошибок.
Чтобы подключить большую часть расширений, найдите группу строк:
;extension=bz2
;extension=curl
;extension=ffi
;extension=ftp
;extension=fileinfo
;extension=gd
;extension=gettext
;extension=gmp
;extension=intl
;extension=imap
;extension=ldap
;extension=mbstring
;extension=exif      ; Must be after mbstring as it depends on it
;extension=mysqli
;extension=oci8_12c  ; Use with Oracle Database 12c Instant Client
;extension=odbc
;extension=openssl
;extension=pdo_firebird
;extension=pdo_mysql
;extension=pdo_oci
;extension=pdo_odbc
;extension=pdo_pgsql
;extension=pdo_sqlite
;extension=pgsql
;extension=shmop
и замените её на:
extension=bz2
extension=curl
extension=ffi
extension=ftp
extension=fileinfo
extension=gd
extension=gettext
extension=gmp
extension=intl
extension=imap
extension=ldap
extension=mbstring
extension=exif      ; Must be after mbstring as it depends on it
extension=mysqli
;extension=oci8_12c  ; Use with Oracle Database 12c Instant Client
extension=odbc
extension=openssl
;extension=pdo_firebird
extension=pdo_mysql
;extension=pdo_oci
extension=pdo_odbc
extension=pdo_pgsql
extension=pdo_sqlite
extension=pgsql
extension=shmop
теперь раскомментируйте эту группу строк:
;extension=soap
;extension=sockets
;extension=sodium
;extension=sqlite3
;extension=tidy
;extension=xsl
должно получиться:
extension=soap
extension=sockets
extension=sodium
extension=sqlite3
extension=tidy
extension=xsl
Мы подключили самые востребованные расширения, чтобы работало как можно больше функций PHP.
Связанные статьи:
- Установка Apache, PHP, MySQL и phpMyAdmin на Windows XP (100%)
- Для чего нужен веб-сервер Apache (100%)
- Готовая сборка Apache для Windows XP (100%)
- Ошибки при настройке и установке Apache, PHP, MySQL/MariaDB, phpMyAdmin (100%)
- Как установить веб-сервер Apache с PHP, MySQL и phpMyAdmin на Windows (100%)
- Как в Apache под Windows настроить автоматическую ротацию и очистку логов (RANDOM — 65.3%)
By
Atul Rai |
Last Updated: April 2, 2022
Previous Next
In this tutorial, you will learn how to install and configure Apache 2.4 and PHP 8 on a Windows machine. We all know Apache HTTP Server is an open-source cross-platform and free webserver to run web applications and similarly PHP is a free and open-source scripting language used to develop web applications.
To run the PHP code on a Windows machine, first, you’ll need to install and configure a web server (Apache) that executes the PHP application. And on this page, you will find the step-by-step guide on “How to install Apache 2.4 and PHP 8 on a Windows Machine”.
P.S. Tested with Apache 2.4 and PHP 8.1.4 on a Windows 10 machine.
1. Prerequisites
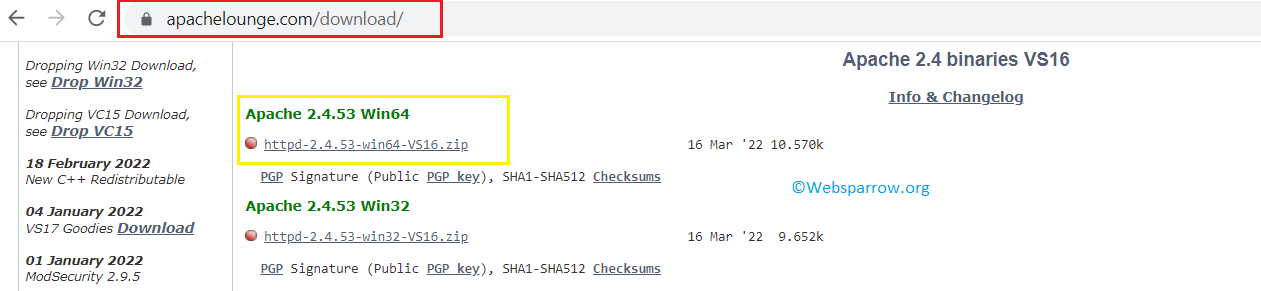
Download the Apache 2.4.x and PHP 8 from its official websites, extract the downloaded file and move it to the C drive.
1.1 Download Apache 2.4.x – Depending on your system build download the binary zip file accordingly.
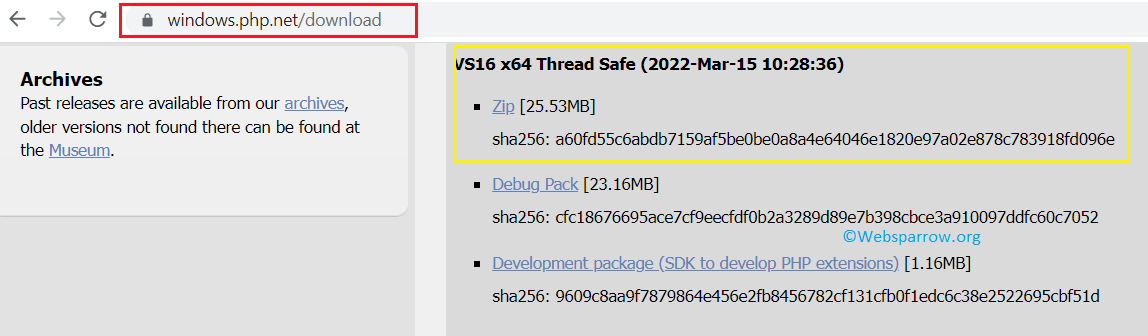
1.2 Download PHP 8 – Similarly, depending on your system build download the Thread Safe version of PHP.
Before jumping to the main configuration part, be sure you installed latest 14.31.31103.0 Visual C++ Redistributable Visual Studio 2015-2022 : vc_redist_x64 or vc_redist_x86 software.
2. Install Apache
To install the Apache HTTP Server on a local Windows machine move the downloaded and extracted Apache 2.4 binary files to the C drive and follow the below steps:
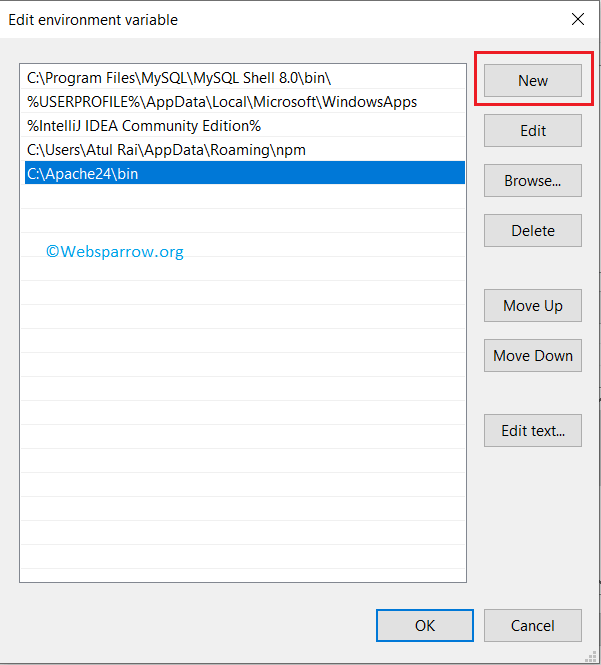
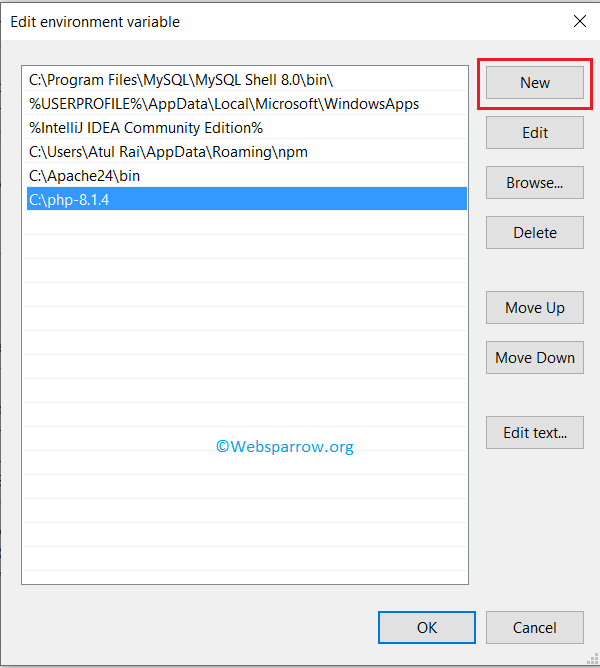
Step 2.1: Go to the Apache 2.4 bin directory path C:\Apache24\bin (it might be different in your case) and set it into your system environment variable path.
Step 2.2: Open the command prompt with admin privileges and run the httpd -k install command to install the Apache services.
C:\WINDOWS\system32>httpd -k install
Installing the 'Apache2.4' service
The 'Apache2.4' service is successfully installed.
Testing httpd.conf....
Errors reported here must be corrected before the service can be started.
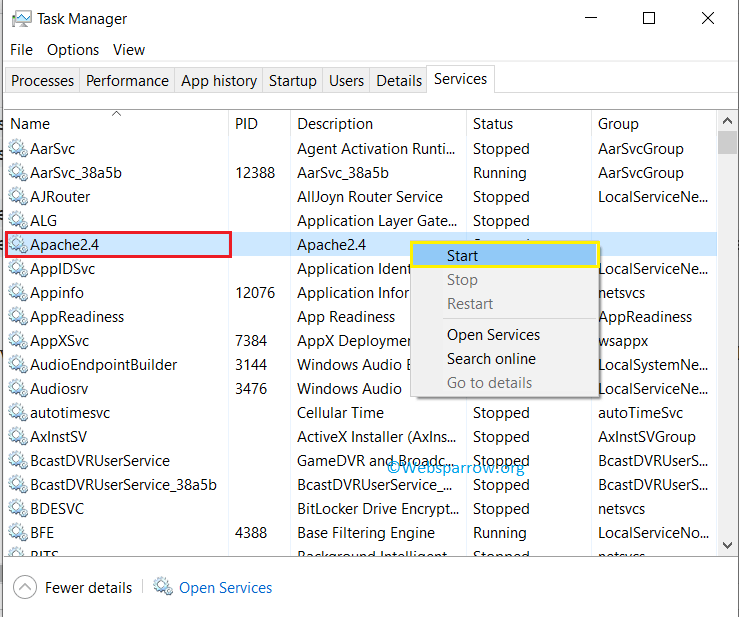
AH00558: httpd: Could not reliably determine the server's fully qualified domain name, using fe80::ccb2:109d:6198:a489. Set the 'ServerName' directive globally to suppress this messageStep 2.3: Start the Apache service with the command httpd -k start or directly through the Task Manager » Services » Search for Apache2.4 » Right-click on the service » Start.
By default, Apache HTTP Server runs on port 80, make sure no other services/servers running on this port.
Step 2.4: Open the web browser and hit the default Apache localhost URL i.e localhost or localhost:80. If everything is configured correctly, you will see the default index.html web page contents and it is located inside the C:\Apache24\htdocs directory.
3. Install PHP 8
The next step is to install PHP 8. To do that, similarly, move the downloaded and extracted PHP 8 binary files to the C drive and follow the below steps:
Step 3.1: Copy the PHP 8 home path i.e C:\php-8.1.4 and set it into your machine environment variable.
Step 3.2: Open the command prompt and type php -v to check whether the path is set correctly or not. If the PHP path is set correctly, it will print the PHP version.
C:\WINDOWS\system32>php -v
PHP 8.1.4 (cli) (built: Mar 16 2022 09:33:31) (ZTS Visual C++ 2019 x64)
Copyright (c) The PHP Group
Zend Engine v4.1.4, Copyright (c) Zend Technologies
4. Configure Apache and PHP
Now it’s time to configure Apache HTTP Server with PHP 8.
Step 4.1: Go to the C:\Apache24\conf directory, inside the conf directory edit the httpd.conf file. Go to the end of the file and add the below configuration because, in Apache, PHP is loaded as a module.
httpd.conf
# Note: Repalce php_module location with your PHP path and
# if the php8apache2_4.dll is not available,
# download the non thread safe version of PHP.
LoadModule php_module "C:\php-8.1.4\php8apache2_4.dll"
AddHandler application/x-httpd-php .php
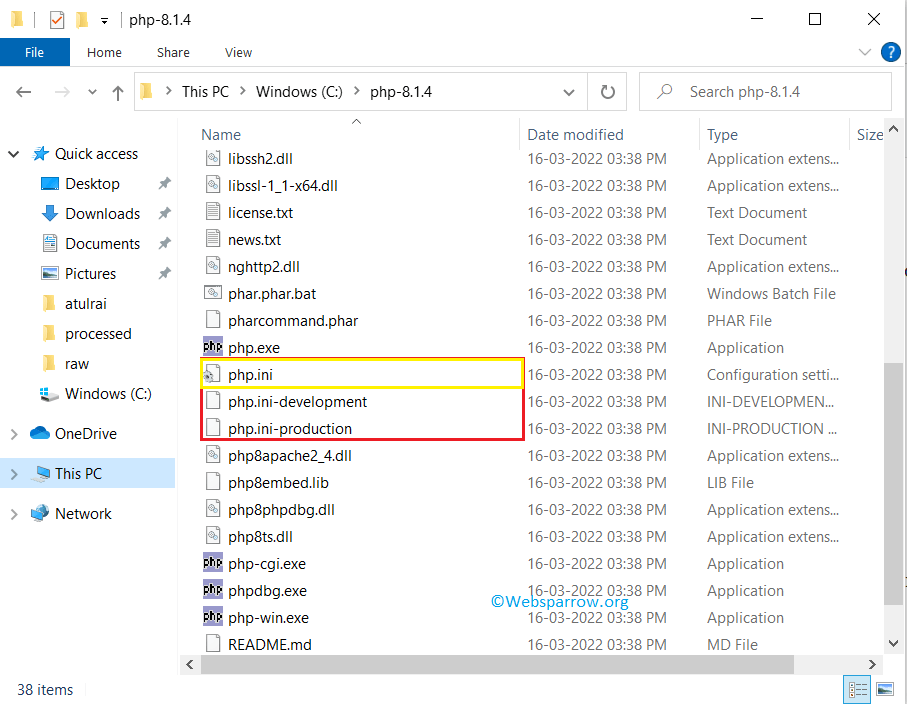
PHPIniDir "C:\php-8.1.4"Step 4.2: Go to the PHP home directory C:\php-8.1.4, and you will find two configuration files php.ini-development and php.ini-production. Create a copy of php.ini-development and rename it to php.ini
Step 4.3: Again open the httpd.conf file and search for ServerName, uncomment and edit the ServerName with localhost.
httpd.conf
# ServerName gives the name and port that the server uses to identify itself.
# This can often be determined automatically, but we recommend you specify
# it explicitly to prevent problems during startup.
#
# If your host doesn't have a registered DNS name, enter its IP address here.
#
ServerName localhost
And in the same file also search for DirectoryIndex, and append the default index.php file.
httpd.conf
# DirectoryIndex: sets the file that Apache will serve if a directory
# is requested.
#
<IfModule dir_module>
    DirectoryIndex index.html index.php
</IfModule>
Step 4.4: Open the command prompt and run the httpd -t command to validate whether everything is configured correctly, it will return Syntax OK if everything is configured correctly.
C:\WINDOWS\system32>httpd -t
Syntax OK
5. Test the configuration
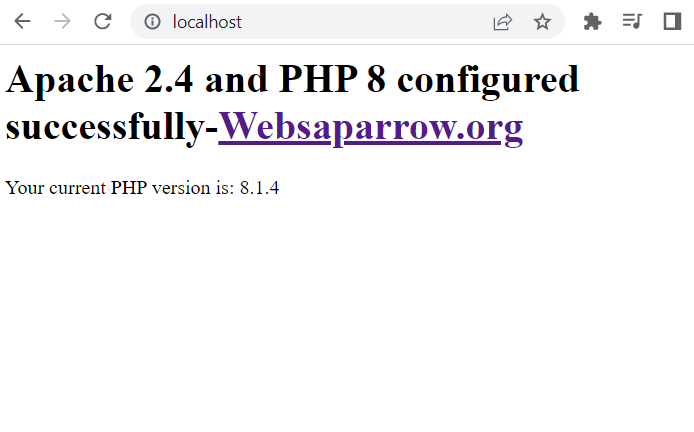
To test the Apache 2.4 and PHP 8 configuration, restart the Apache2.4 service from the Task Manager and rename the index.html file to index.php from the C:\Apache24\htdocs directory and add the below piece of code.
<?php

	echo '<h1>Apache 2.4 and PHP 8 configured successfully-<a href="https://websparrow.org">Websaparrow.org</a></h1>';
	echo ' Your current PHP version is: ' . phpversion();
	header("Refresh:10; url=https://websparrow.org");

 ?>
Open the web browser and hit the localhost in the URL bar, you will get the following details:
References
- Apache HTTP Server Version 2.4 Documentation
- PHP Installation on Windows
Основной особенностью веб-сервера Apache является расширяемость его функциональных возможностей, по средствам подключения различных дополнительных модулей. Каждый из них выполняет определенные задачи. Часть модулей разрабатывается командой Apache Software Foundation, другая часть, отдельными open source разработчиками.
Используя данный функционал, к веб-серверу Apache, возможно подключить, к примеру, поддержку различных языков программирования, таких как: PHP, PERL, Python, Ruby, ASP и др.
В одном из предыдущих материалов Установка Apache 2.4, был описан процесс установки и запуска локального веб-сервера Apache на ОС Microsoft Windows 7. Теперь подключим к нему язык программирования PHP. Какую версию PHP выбрать и где ее скачать описано в материале Что необходимо для установки веб-сервера?
Подключение PHP к Apache
Итак, имея в наличии, ранее скаченный архив с необходимой версией PHP, создадим в корне локального диска «C:\» директорию «php», и распакуем в нее содержимое архива.
Перейдем в директорию «C:\php\» и найдем 2 файла: «php.ini-development» и «php.ini-production». Эти файлы — примеры конфигурационных файлов PHP. Сделайте копию файла «php.ini-development» с именем «php.ini», в дальнейшем это будет основным конфигурационным файлом настройки PHP. Текущих настроек файла ««php.ini»» будет достаточно, для того, что бы подключить модуль PHP к веб-серверу Apache и проверить его корректную работу.
Теперь необходимо сообщить нашему веб-сервер Apache, что необходимо подключить модуль PHP.
Открываем конфигурационный файл веб-сервера «C:\Apache24\conf\httpd.conf» и раскомментируем следующие строки (данные строки отвечают за подключение необходимый модулей):
LoadModule negotiation_module modules/mod_negotiation.so
LoadModule rewrite_module modules/mod_rewrite.so
LoadModule setenvif_module modules/mod_setenvif.so
Сразу после блока с подключением модулей, добавляем в конф. файл следующие строки:
PhpIniDir "C:/php"
LoadModule php5_module "C:/php/php5apache2_4.dll"
AddHandler application/x-httpd-php .php
В первой строке указываем путь до директории с конфигурационным файлом PHP — «C:\php\php.ini».
Во второй строке говорим веб-серверу, что необходимо загружать модуль PHP, который отвечает за обработку php файлов, указывая при этом полный путь до библиотеки dll. Необходимо помнить, что имя библиотеки может отличаться от указанного.
В третей строке указываем расширение файлов, которые будут обрабатываться интерпретатором PHP.
Ниже в конфигурационном файле ищем блок:
<IfModule dir_module>
    DirectoryIndex index.html
</IfModule>
и добавляем в конце второй строки «index.php»
<IfModule dir_module>
    DirectoryIndex index.html index.php
</IfModule>
Перезагружает веб-сервер любым удобным для Вас способом (используя ApacheMonitor, сервис Службы или командную строку). Если при перезагризки веб-сервера возникли ошибки и он не запустился, проверьте все измененые Вами данные, возможно была допущена опечатка в указании путей.
Проверяем работает ли PHP
После успешного запуска веб-сервера, необходимо проверить, что PHP работает. Для этого создаем в корневой директории управления сайтами «C:\Apache24\htdocs\» файл c именем «phpinfo.php», открываем его в текстовом редакторе и добавляем следующие строки:
<?php
phpinfo();
?>
phpinfo — это системная PHP-функция, выводящая различную информацию об интерпретаторе: настройки, текущие значения системных переменных и т.д.
Открываем в браузере страницу http://localhost/phpinfo.php. Если все настроено правильно, то странице Вы увидите таблицу с версией PHP и значением переменных.
Работа с конфигурационным файлом php.ini
Открываем конфигурационный файл php «C:\php\php.ini» в текстовом редакторе.
найдем директиву
;extension_dir = "ext"
это значение указывает на директорию (каталог), в котором хранятся динамически загружаемые расширения.
раскомментируем и изменим значение директивы
extension_dir = "C:\php\ext"
Предлагаю разобраться, что нам дало выполнение данного действия и что такое динамически загружаемые расширения.
Если Вы откройте директорию «C:\php\ext», то увидите множество файлов с расширением .dll. Каждый из этих файлов и есть то самое динамически загружаемое расширение. Подключение данных расширений позволяют увеличивать функциональные возможности PHP.
Итак, путь до динамически загружаемых расширений мы указали, теперь давайте подключим наиболее важные и необходимые из них. Для это построчно раскомментируем необходимые расширения, удалив в начале каждой строки знак комментирования «;» (точка с запятой).
найдем блок Dynamic Extensions (Динамические Расширения)
;;;;;;;;;;;;;;;;;;;;;;
; Dynamic Extensions ;
;;;;;;;;;;;;;;;;;;;;;;
...
extension=php_bz2.dll
extension=php_curl.dll
extension=php_gd2.dll
extension=php_imap.dll
extension=php_mbstring.dll
extension=php_exif.dll      ; Must be after mbstring as it depends on it
extension=php_mysql.dll
extension=php_mysqli.dll
extension=php_pdo_mysql.dll
...
раскомментируем необходимые расширения
По итогам изучения данного материала мы расширили функциональные возможности веб-сервера Apache подключив к нему модуль языка программирования PHP.