
-
Home
-
News
- 2 Methods to Change Themes in Windows 11/10 Without Activation
By Amy | Follow |
Last Updated
Generally speaking, you are not allowed to personalize the computer if you don’t activate Windows 10/11. To be specific, you can’t change theme without activation in Windows 11/10. How to break that limit? Here, MiniTool Partition Wizard offers some methods to change themes in Windows 11/10 without activation.
About Changing Windows Themes
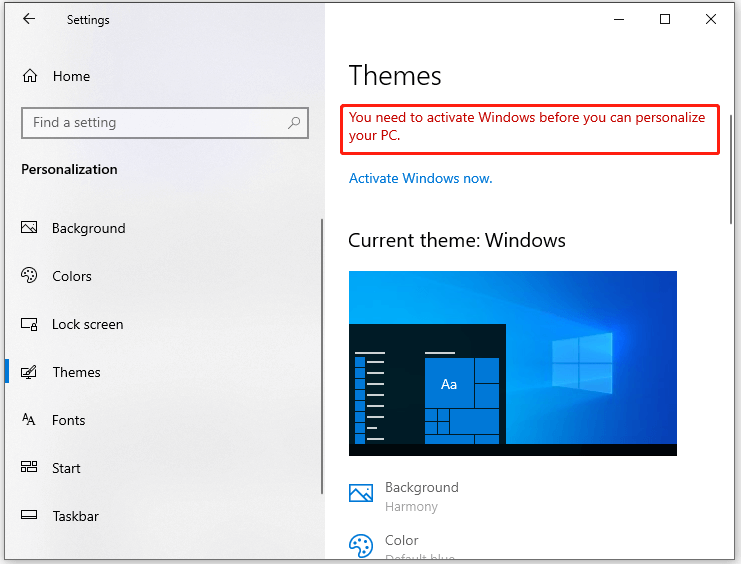
If you want to make Windows 10 look like Windows 7/macOS, you can download and install a Windows 7/macOS theme on the computer. It means that you need to change the current theme. It is easy to switch the theme, but things are different if your Windows is not activated yet.
On the Settings app of a not activated computer, you will see the message “You need to activate Windows before you can personalize your PC” and the greyed “Use Custom Theme” option. This can stop you from changing the theme.
By default, you can’t change themes in Windows 11/10 without activation. Fortunately, there’s a workaround for the problem. This post offers you two methods to change Windows 10 theme without activating Windows. Based on your preference, select a way to finish the operation.
Method 1: Use Registry Editor
How to change themes in Windows 11/10 without activation? Well, tweaking Registry Editor is an available way to change theme without activation in Windows 11/10. Here’s a step-by-step tutorial for you.
Tips:
Before you edit Registry Editor, you’d better back up Registry or make a Windows backup in case anything goes wrong. MiniTool Partition Wizard, a piece of PC cloning software, allows you to clone OS from HDD to SSD with ease. You can get it to clone Windows/hard drives/partitions and perform other operations on storage devices.
MiniTool Partition Wizard DemoClick to Download100%Clean & Safe
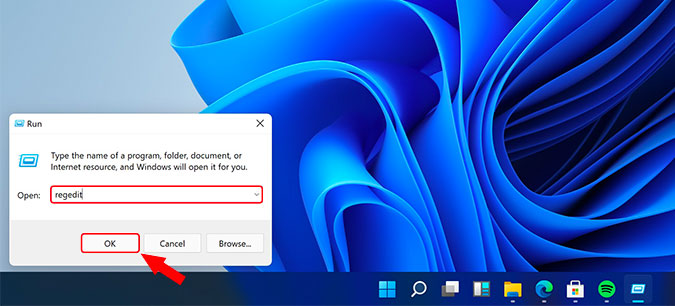
Step 1: Right-click on the Windows icon and then choose Run.
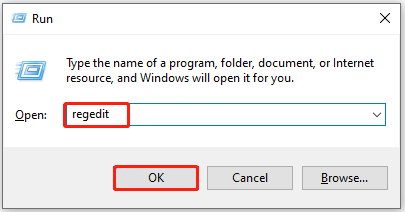
Step 2: In the Run window, type regedit and click OK to open Registry Editor.
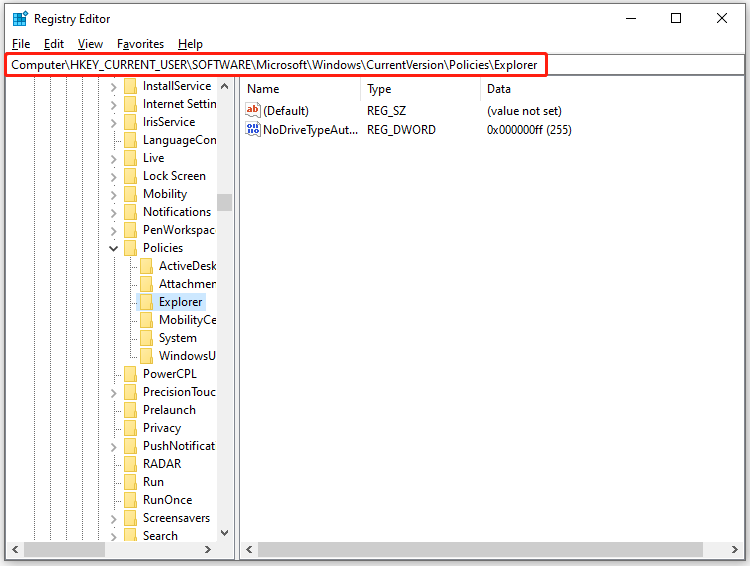
Step 3: In the Registry Editor window, navigate to Explorer by following the path below.
Computer\HKEY_CURRENT_USER\SOFTWARE\Microsoft\Windows\CurrentVersion\Policies\Explorer
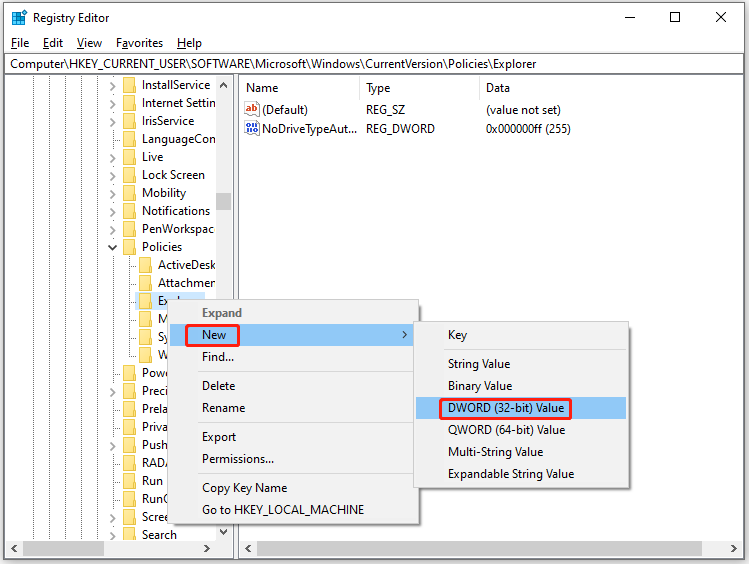
Step 4: Right-click Explorer and choose New > DWORD (32-bit) Value. Then click on the created value, press F2, and type NoThemesTab.
Step 5: Right-click the NoThemesTab value and choose Modify.
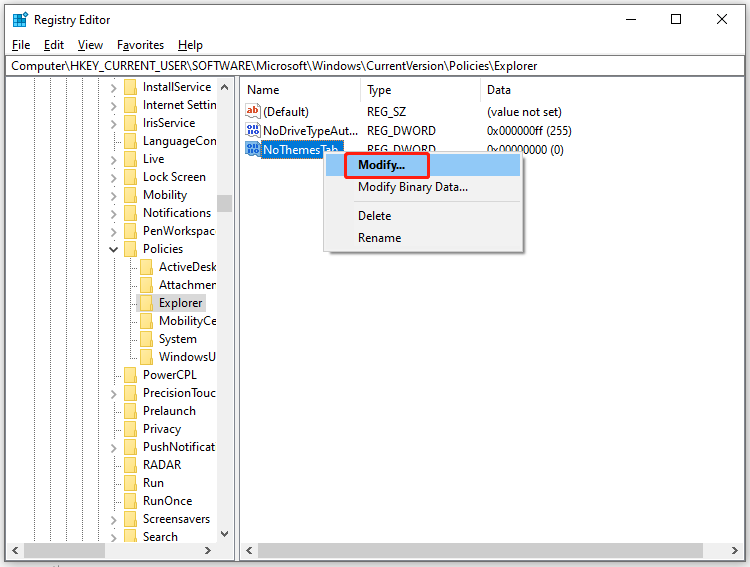
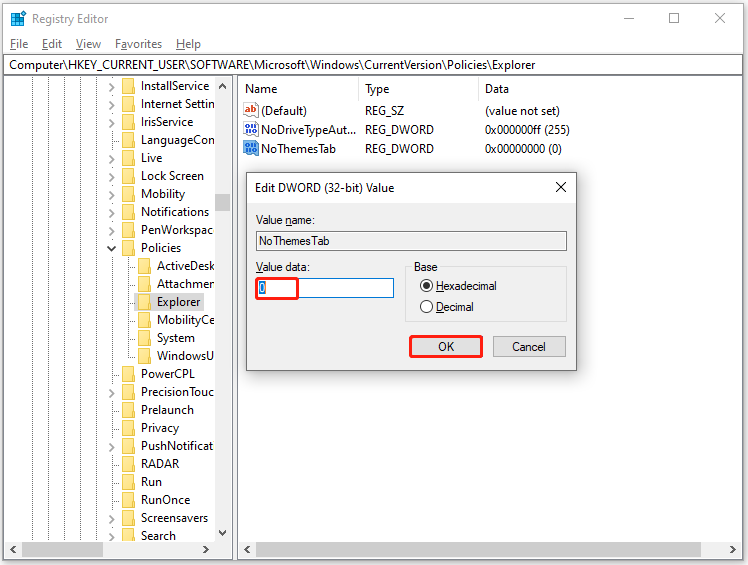
Step 6: Set the value data of NoThemesTab as 0 and click OK to save changes.
Method 2: Use Local Group Policy Editor
If you run the Windows 10/11 Pro edition, you can change themes in Windows 11/10 without activation through Local Group Policy Editor. The detailed steps are shown as follows.
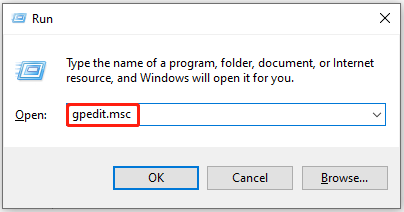
Step 1: Open the Run window, type gpedit.msc, and then press Enter.
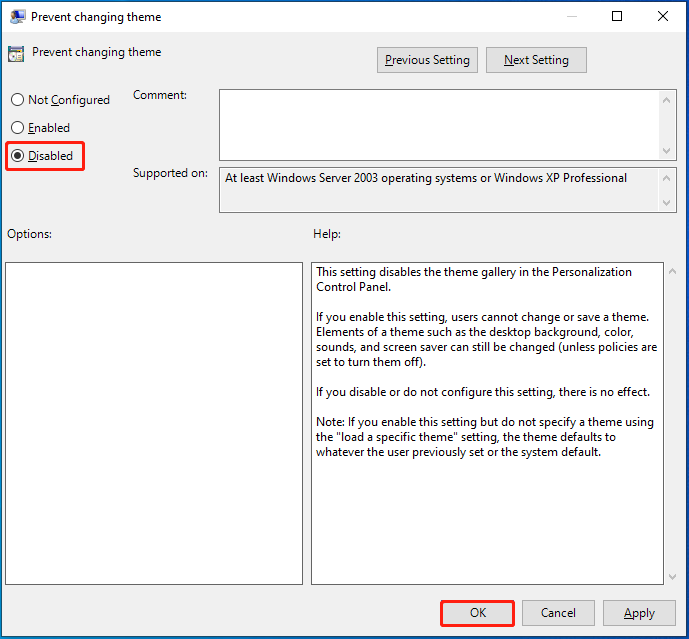
Step 2: In the left pane of the Local Group Policy Editor window, find and click User Configuration > Administrative Templates > Control Panel > Personalization. Then double-click Prevent changing theme on the right side of the window and click Edit.
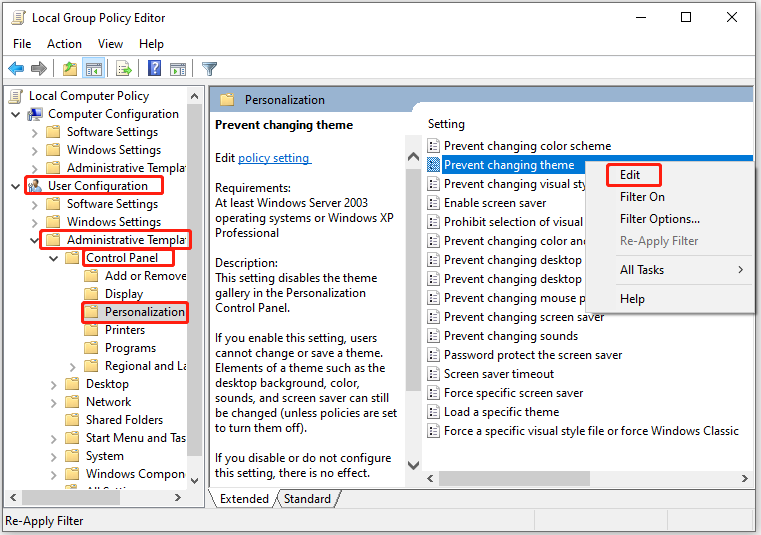
Step 3: In the pop-up window, tick the Disabled option and click OK to save changes.
After you disable “prevent changing theme”, change theme without activation in Windows 11/10 by following these steps.
Step 1: Open Settings by pressing the Windows and I keys.
Step 2: Go to Personalization and choose Themes.
Step 3: Click Get more themes in the Microsoft Store link under the Change theme section.
Step 4: Look for a desired theme in the Microsoft Store and download it.
Step 5: After downloading the theme, double-click the .themepack file to apply the theme on your computer.
This post collects 2 methods to change themes in Windows 11/10 without activation. According to your demands, simply pick one way to change Windows 10 theme without activating Windows.
About The Author
Position: Columnist
Having writing articles about computer tech for a long time, I am rather experienced especially on the aspect of computer optimization, PC enhancement, as well as tech terms explanation. The habit of looking through tech forums makes me a great computer issues collector. And then, many articles related to these issues are released, which benefit plenty of users. Professional, effective, and innovative are always the pursuit of an editing worker.
By default, when either Windows 10 or 11 is not activated, you are not allowed to make any personalization to it. If you open the Personalization tab in the Settings app, you will notice that some options have been grayed out, and an intimation stating the following:
You need to activate Windows before you can personalize your PC.

On the personalization page, the following items cannot be personalized without activating Windows:
- Change Windows theme
- Change Desktop background
- Apply Accent colors
- Enable Dark Mode (Light theme is applied by default)
- Touch keyboard
- Change Fonts
However, the following items can be personalized even when Windows is not activated:
- Lock screen
- Start Menu
- Taskbar
That said, there is a workaround you can perform that allows you to change your computer’s theme to any custom theme without having to activate the operating system. This post discusses 2 methods you can adopt to bypass this issue and then apply a custom third-party theme. Of course, the theme will need to be downloaded separately.
Note: This does not allow you to change anything else, nor can you apply other Windows themes preinstalled in the OS. You can only apply downloaded themes from .themepack packages.
Table of Contents
How to Change Theme Without Windows 11/10 Activation
-
If you are not yet looking to activate the Windows operating system, but want to change its themes, you need to perform the following tasks:
- Disable the operating system from blocking you from changing the theme.
- Apply the new theme from a third party .themepack package.
There are 2 methods to unblock Windows from preventing you from changing the themes. Pick the one that suits your preferences.
-
Using Group Policy Editor
Follow the given steps below to allow the OS to change the theme without activating it:
Note: The Home editions of Windows do not come with the Group Policy Editor preinstalled. Learn how to install it on Windows 11 or Windows 10.
-
Open the Group Policy Editor by typing in gpedit.msc in the Run Command box.

Open Group Policy Editor -
Now navigate to the following using the left pane:
User Configuration >> Administrative Templates >> Control Panel >> Personalization
-
Here, double-click on the policy “Prevent changing theme” in the right pane to open its properties.

Double-click the policy -
From the Properties window, select the Disabled radio button, then click Apply and Ok.
Select Disabled -
Now click Editor and launch the Command Prompt with administrative rights.
-
Run the following cmdlet to implement the changes.
gpupdate /force
Run cmdlet in elevated Command Prompt
You should now be able to change the themes on your Windows computer. Refer to the guide given below to download and apply a custom theme.
However, if you want to revert the settings to their default state in the future, simply return to the “Prevent changing theme” policy and select the Not Configured option.
-
-
Using Windows Registry Editor
Another method to allow the OS to change your theme without activating Windows is by manually making changes to the Windows Registry. Here is how:
Note: Misconfiguration of critical values in the system’s registry could be fatal for your operating system. Therefore, we insist that you create a system restore point before proceeding forward with the process.
-
Open the Windows Registry Editor by typing in regedit in the Run Command box.
Open Registry Editor -
Now paste the following into the address bar at the top for quick navigation:
Computer\HKEY_CURRENT_USER\SOFTWARE\Microsoft\Windows\CurrentVersion\Policies
Enter for quick navigation -
Here, right-click on the Policies key in the left pane, expand New, then click Key.
Create new Key Name this new Key “Explorer.”
-
Now right-click the Explorer key from the left pane, expand New, then click DWORD (32-bit) Value.
Create new DWORD Name this new DWORD “NoThemesTab.”
-
Leave the default value of the DWORD (which is 0) and restart the computer for the changes to take effect.
Once the computer reboots, you can now proceed to apply any custom theme downloaded from the internet.
However, if you wish to revert these changes in the future, simply delete the DWORD created in step 4 above and restart the PC.
Delete the DWORD -


How to Apply Custom Windows Themes
Once you are done with the steps above, you can now apply custom themes to your PC without having to activate the OS.
All you need to do is download the theme package which will have the extension “.themepack.” Once downloaded, apply the theme by double-clicking it.

Listed below are the websites we recommend for downloading custom theme packs:
- Microsoft Desktop Themes
- Themepack (third-party)
- Windows Themepack (third-party)
Closing Words
Personalizing your PC does not affect its performance, but you can still get it done while waiting for your Windows product license. It makes your PC more fun to use, especially if you are a gamer, or obsessed with a digital character.
Несмотря на то, что и Windows 11 и Windows 10 без особенных проблем можно пользоваться без активации, при этом есть некоторые ограничения, в частности — использование параметров персонализации. Чаще всего начинающих пользователей беспокоит невозможность изменить обои, но это легко решаемо.
В этой простой инструкции подробно о способах установить свои обои без активации, когда в параметрах персонализации сообщается «Для персонализации компьютера необходимо активировать Windows». На близкую тему: Бесплатные живые обои рабочего стола Windows 11 и Windows 10.
Установка своих обоев рабочего стола в обход параметров персонализации
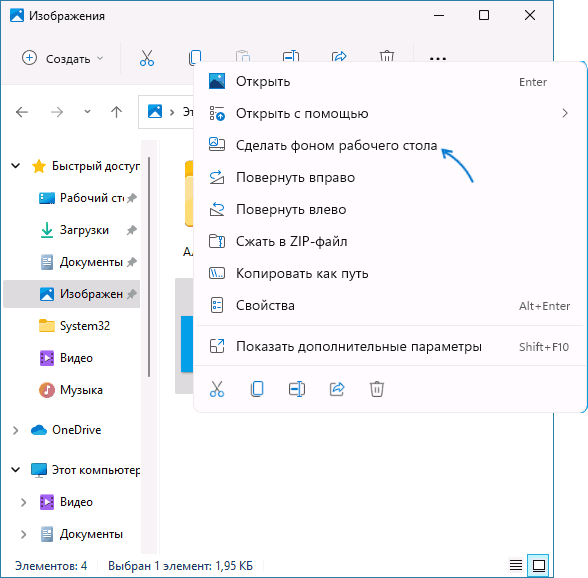
Для того, чтобы установить свои обои, не используя при этом параметры персонализации Windows 11 или Windows 10 есть несколько способов. Самый простой из них — контекстное меню проводника:
- В проводнике или на рабочем столе нажмите правой кнопкой мыши по файлу фото или другой картинки.
- Выберите пункт «Сделать фоном рабочего стола».

Обычно, другие методы изменения обоев даже не требуются, но они существуют.
Вы можете установить обои рабочего стола используя стандартные приложения Windows 11 и Windows 10 или с помощью редактора реестра и локальной групповой политики.
Изменение фона рабочего стола без активации с помощью встроенных приложений
Если открыть изображение в стандартном приложении «Фотографии», то в меню вы найдете пункт «Установить как», где можно будет установить текущую картинку в качестве обоев рабочего стола или фона экрана блокировки.

Графический редактор Paint новой версии в главном меню имеет опцию «Сделать фоном рабочего стола».

Раскрыв этот пункт, вы можете выбрать стиль заполнения: заливка, плитка или по центру и, в результате, текущий рисунок из Paint будет установлен в качестве обоев.
В редакторе реестра и редакторе локальной групповой политики
Во всех версиях Windows 11 и Windows 10 вы можете использовать редактор реестра, чтобы установить свои обои на рабочий стол:
- Нажмите правой кнопкой мыши по кнопке «Пуск», выберите пункт «Выполнить», введите regedit и нажмите Enter.
- Перейдите к разделу (папке) реестра
HKEY_CURRENT_USER\SOFTWARE\Microsoft\Windows\CurrentVersion\Policies\
- Если в этом разделе отсутствует подраздел с именем System, создайте его: правый клик по разделу Policies — Создать — Раздел и указываем имя раздела.
- Выберите раздел System. В правой панели редактора реестра нажмите правой кнопкой мыши и выберите «Создать» — «Строковый параметр». Задайте имя Wallpaper для него.
- Дважды нажмите по созданному параметру и укажите путь к файлу изображения в качестве его значения (путь можно получить, нажав правой кнопкой мыши по картинке в проводнике и выбрав пункт «Копировать как путь», но в реестре кавычки из пути потребуется убрать).


Фон будет изменен после выхода из системы и повторного входа или перезапуска проводника в диспетчере задач.
В Windows 11/10 Pro и Enterprise можно запустить редактор локальной групповой политики (Win+R — gpedit.msc), перейти в раздел «Конфигурация пользователя» — «Административные шаблоны» — «Рабочий стол» — «Рабочий стол».
В правой панели достаточно будет дважды нажать по политике с именем «Фоновые рисунки рабочего стола», установить «Включено», задать путь к файлу изображения и стиль заполнения рабочего стола.

После применения настроек и закрытия редактора локальной групповой политики может потребоваться перезапуск проводника (или выход из системы с повторным входом) для того, чтобы установленные обои начали отображаться.
Также может быть полезным: Где хранятся обои рабочего стола и экрана блокировки Windows 10 (И где в Windows 11).
Are you looking to change the look of your Windows 11 desktop, but you don’t have a Windows Activation?
Well, there are easy hacks to do that, but most users struggle to apply that. Maybe they are unsure how to do it or afraid of breaking the system. Whatever the reason, this comprehensive guide will show you how to change themes in Windows 10/11 and switch to dark mode without activating Windows. We’ll walk you through each step so that you can customize Windows desktop the way you want it.
To fix various Windows 10/11 problems, we recommend Outbyte PC Repair:
This software will repair common computer errors, protect you from file loss, malware damage, hardware failure, and optimise your computer for peak performance. In three simple steps, you can resolve PC issues and remove virus damage:
- Download Outbyte PC Repair Software
- Click Start Scan to detect Windows 10/11 issues that may be causing PC issues.
- Click Repair All to fix issues with your computer’s security and performance.
This month, Outbyte has been downloaded by 23,167 readers.
Before moving further to apply the hacks for enabling the personalization on an unactivated Windows OS, let us discuss what’s the issue and the process to apply the fix.
When you install Windows 10 or 11 on your PC or laptop, it asks for the license key during installation. However, if you don’t have a genuine Windows license key, Windows allows you to skip this step and continue with the installation.
Although Windows will be installed without activation, you will be restricted from accessing some features, including personalization. When you try to customize any personalization settings on Windows, such as changing the background, you will get the You need to activate Windows before you can personalize your PC error message.

All the personalization options will be grayed out, and you won’t be able to configure them.
On an activated Windows 10/11 OS, you can simply change the theme either by accessing Windows settings or by downloading “.deskthemepack” from third-party sources or Microsoft repository. After downloading, just double-click on the .deskthemepack, and the theme will be installed.
However, this method won’t work on unactivated Windows OS. You need to make changes in Group Policy Editor or the Registry Editor.
Change Windows 10/11 Theme Without Activating Windows using Group Policy Editor
If you are using the Pro version of Windows 10 or 11, you can easily configure the theme settings to let you change the theme without activating Windows. Here are the steps for that:
-
On the Windows search bar, type gpedit and click on Edit group policy to launch the Local Group Policy Editor.

-
Local Group Policy Editor will be launched.

-
Navigate to the following path: User Configuration > Administrative Templates > Control Panel > Personalization.
-
On the right side, under Personalization, double-click on Prevent changing theme.

-
Next, click on the Disabled option and choose Apply & OK to disable Prevent changing the theme.


After applying the above steps, close the Group Policy Editor and restart your system. You will now be able to change the theme on your Windows 10/11 system without activating it.
Change Windows 10/11 Theme Without Activating Windows using Registry Editor
If you are working on Windows 10/11 Home edition, you won’t have access to Group Policy Editor.
Don’t worry; you can still change the theme on your system without activating Windows by applying a simple Registry hack.
Here are the instructions for that:
- On the Windows search bar, type Registry Editor and click on its icon to launch it.

- Copy & paste or navigate to the following path on the Registry editor window: HKEY_CURRENT_USER\SOFTWARE\Microsoft\Windows\CurrentVersion\Policies\Explorer

- Right-click on the Explorer and select New -> DWORD (32-bit) Value.

- Name the value as NoThemesTab.

- Double click on the NoThemesTab and ensure that the Value data is set to 0.


That’s it. Restart your system to make the changes effective.
Apply the Theme on Unactivated Windows System
After modifying the Group Policy Editor or Registry Editor to configure the Windows theme settings to allow you to change the theme, it is time to download and apply the theme you like.
- Navigate to the Microsoft Desktop Theme catalog.
- Switch to the Windows version you want a theme for and expand the category of choice to download the theme.

- Click on the theme of your choice to download it.

- After the download is completed, click on it to install.


How to Switch Dark Mode without Activation in Windows 10/11?
One of the popular options in the Windows 10/11 personalization is to switch to Light or Dark Mode. By default, Windows is configured as the Light mode, and you can switch to the Dark mode pretty easily from Personalization settings. However, if your Windows is not activated, you won’t be able to switch between light and dark modes from the Settings.
If you want to switch to dark mode without activation in Windows 10/11, you can do that using a registry hack. Follow these steps:
- On the Windows search bar, type Registry Editor and click on its icon to launch it.
- Copy & paste or navigate to the following path on the Registry editor window: HKEY_CURRENT_USER\Software\Microsoft\Windows\CurrentVersion\Themes\Personalize

- To switch the App mode to dark, look for the AppsUseLightTheme DWORD and double-click to open it.

- Set the Value data to 0 to enable the dark mode on apps.

- Now, to switch the system theme to dark mode, look for the SystemUsesLightTheme DWORD and double-click to open it.

- Set the Value data to 0 to enable the dark mode on Windows.


That’s it. If you want to switch back to the light mode, modify the Value data of both the DWORDs to 1.
Final Words
Windows personalization is a great way to make your system look attractive and different. But if you are using the unlicensed Windows version, it becomes difficult to provide a different look to your system. In this post, we have explained how to change the theme and apply other personalization without activating the Windows using Group Policy Editor or Registry Editor. Hopefully, by following the detailed instructions in the post, you are able to customize your PC with ease.
I am using the unlicensed Windows version. Can I still use themes?
You can change the theme on your system without activating Windows by applying a simple Registry hack, as mentioned in this post.
How do I switch between light and dark modes without activation in Windows?
You can switch to dark mode without activation in Windows by following the steps mentioned in this post. Just make sure that you set the Value data of both DWORDs to 0 when making changes.
Can I use personalization without activating Windows?
Yes, you can change the theme and other personalization settings without activating Windows. However, some features might be restricted, i.e., you might not be able to change the wallpaper or lock screen.
How do I activate Windows?
You can purchase a valid product key from Microsoft and enter it into your system to activate Windows. Once activated, you will have access to all features of the Operating System.
Peter is an Electrical Engineer whose primary interest is tinkering with his computer. He is passionate about Windows 10 Platform and enjoys writing tips and tutorials about it.
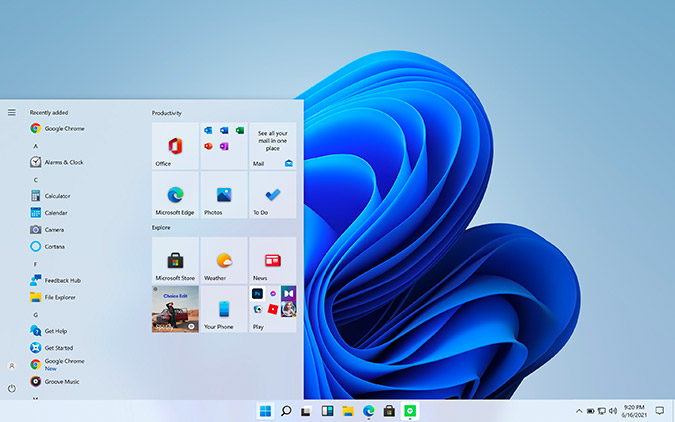
So now that you have installed Windows 11 on your system, it’s time to check out the new themes. However, surprise, surprise! The new Windows 11 OS will not activate with your old Windows 10 key, at least not just yet. And without activating Windows 11, themes, customization, and Taskbar settings will be disabled by default.

But, there’s a way to bypass all of this. Here are steps to change themes, wallpapers, and even the Start Menu position without activating Windows 11.
How to Activate Dark Mode in Window 11
You can try systemwide dark mode by editing the registry keys using Registry Editor. To do that, follow these steps.
1. To open Registry Editor, press Win+R, type regedit on the run menu and hit Enter.

2. Inside Registry Editor, copy and paste the folder path below and press Enter.
HKEY_CURRENT_USER\Software\Microsoft\Windows\CurrentVersion\Themes\Personalize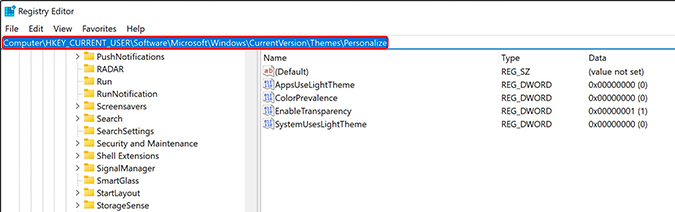
3. In the Personalize folder, we need to change the below two keys. We need to set their values to 0. In case you want to switch back to Light mode, change the value of both these keys back to 1. Double-click to open the file and in the Value field, enter 0 (zero).
AppUseLightTheme
SystemUseLightTheme
As soon as you change the keys’ values, your system and other Windows apps will change to Dark Theme instantly. No need to reboot Windows 11 computer.
How to Try New Windows 11 Wallpaper
Just like dark mode, Windows 11 won’t allow you to change the background wallpaper either without activating the OS. However, you can do that manually.
Copy and paste the folder path below in Windows 11 File Explorer. You will find default wallpapers at the below folder location:
C:\Windows\Web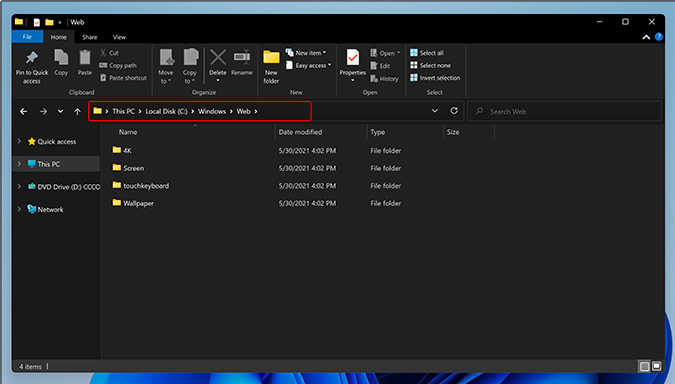
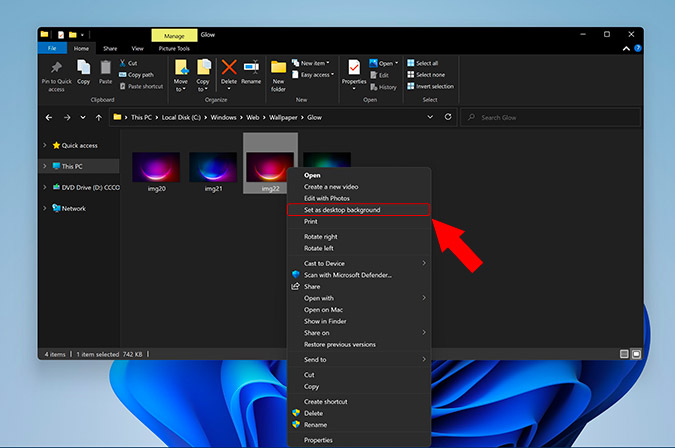
Here, you’ll find several new Windows 11 wallpapers inside subfolders. Just right-click on any wallpaper you want to apply and select Set as Desktop Background.
This way, you can try all the new Windows 11 wallpapers. Windows 10 users can find and download Windows 11 wallpapers to enjoy a new look while waiting for the official release.
Move Start Menu to Left Like in Windows 10
In Windows 11, the entire Start Menu and Taskbar icons have been moved to the center. It is much more macOS-esque. So, if you are not a fan of this, you would want to crawl back to the old Windows 10 look.
Again, we have to head over to the Registry Editor to revert this look.
1. Hit Win+R and type regedit. Next, hit Enter.
2. In the Registry Editor, copy and paste the following folder structure and press Enter.
HKEY_CURRENT_USER\Software\Microsoft\Windows\CurrentVersion\Explorer\Advanced
3. In the Advanced folder, right-click anywhere in the right window-pane and select New > DWORD (32-bit) value to create a new key.

4. Rename the newly created Key as Start_ShowClassicMode.
5. Double-click to open the key and change the Value to 1. This will change your Start Menu style back to how it was in Windows 10. In case you want to revert to the new Windows 11 Start Menu look, change the value of Start_ShowClassicMode key to back to 0. Alternatively, you can also delete the key to reset the Start menu.

6. Finally, restart your system for the changes to take effect. Upon restart, you would see that Start Menu icon is still at the center but when you open it, Start menu launches in the left side of the window.
This is the old Windows 10 style Start menu. There’s no way to change the position of the Start menu and other Taskbar icons right now. You will have to do it through System Settings which requires an active Windows license.
Conclusion: Windows 11 Themes
The Windows 11 circulating on the web right now is a developer version. The stable version of Windows 11 will release on 24th June 2021. When it launches, you’ll get a free upgrade from Windows 10 to Windows 11, hopefully. For all the Windows 7 users out there, chances are Microsoft will let you upgrade to Windows 11 for free too.
Also Read: Best Windows 11 Features That You Should Know About
Pratik
Pratik works as an In-house writer and video host at TechWiser. Former Programmer, Current writer. Loves tech in any form, quite optimistic about AI, data science and IoT. Talks extremely less but you betcha can geek out over anything on Twitter.