
В Windows 11, как и в предыдущих версиях системы, по умолчанию не отображаются две разновидности файлов и папок: скрытые и системные. При желании можно включить их показ или, наоборот, скрыть их, если их отображение мешает работе.
В этой пошаговой инструкции подробно о том, как показать скрытые и системные файлы и папки или, наоборот, отключить их отображение в Windows 11 различными способами.
Простое включение или отключение показа скрытых файлов и папок в проводнике
Первый и самый быстрый способ включить или отключить отображение скрытых файлов и папок (системные при этом показываться не будут) — использовать меню в Проводнике Windows 11.
Шаги будут следующими:
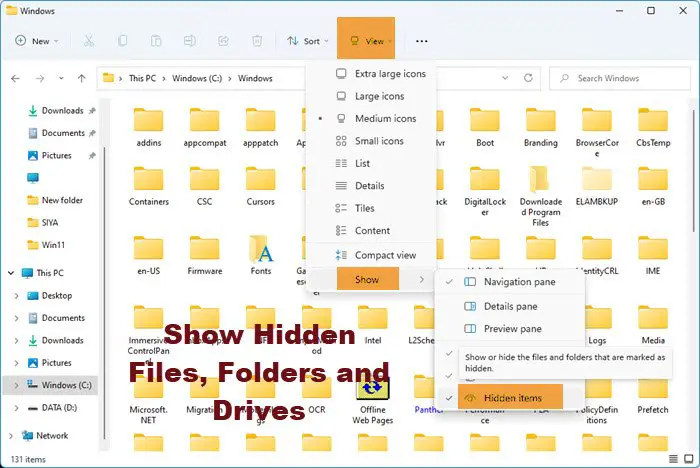
- В проводнике в строке заголовка нажмите по кнопке «Просмотреть».
- Раскройте пункт «Показать» (если пункт не отображается, нажмите по многоточию в строке заголовка справа) и выберите «Скрытые элементы».

- Сразу после этого скрытые файлы и папки начнут отображаться.

Как было отмечено, это не повлияет на показ системных элементов — для их отображения потребуется использовать параметры проводника.
Как скрыть или показать системные и скрытые элементы в параметрах проводника Windows 11
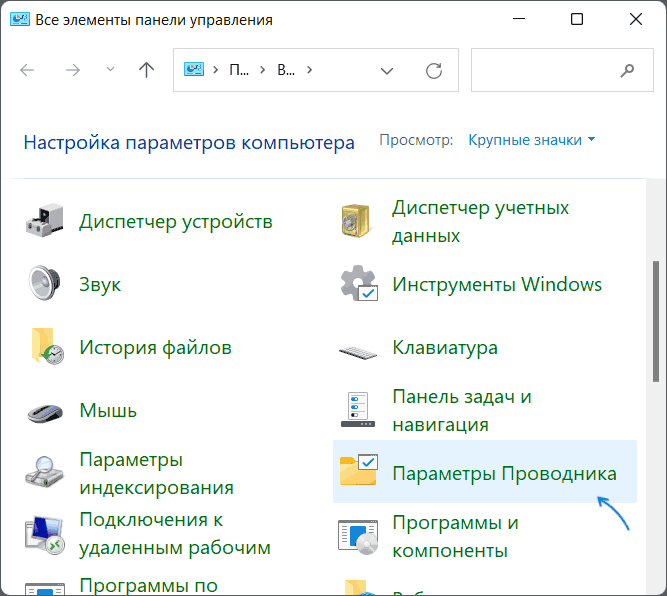
Основной способ настройки параметров отображения скрытых и системных элементов — использование пункта «Параметры проводника» в Панели управления. Открыть его можно следующими способами:
- Открыть Панель управления Windows 11 и, когда в поле «Просмотр» установлено «Значки», найти пункт «Параметры проводника».

- Нажать клавиши Win+R на клавиатуре (или нажать правой кнопкой мыши по кнопке «Пуск» и выбрать пункт «Выполнить»), ввести control folders и нажать Enter.
- Открыть проводник, нажать по троеточию в строке заголовка и открыть пункт «Параметры».
Для управления параметрами показа скрытых и системных файлов и папок в открывшемся окне параметров проводника:
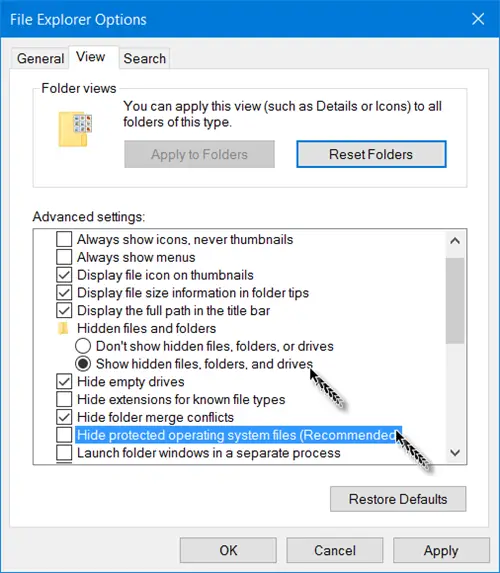
- Перейдите на вкладку «Вид».
- Найдите пункт «Скрывать защищенные системные файлы», включите или отключите его в зависимости от задачи.
- В разделе «Скрытые файлы и папки» включите или отключите показ скрытых элементов.


После применения параметров, скрытые и системные файлы и папки будут отображаться в соответствии со сделанными настройками.
Параметры разработчика
И ещё одна возможность — использовать параметры для разработчиков в Windows 11:
- Откройте Параметры — Система, а затем пункт «Для разработчиков».
- В разделе «Проводник» включите (или отключите) опцию «Отображение скрытых и системных файлов».


Готово, изменения вступят в силу незамедлительно.
Как открыть доступ к скрытым папкам в Windows
Статья обновлена: 13 июля 2022
ID: 3580
В некоторых случаях вам могут понадобиться файлы и папки, которые по соображениям безопасности могут быть скрыты от просмотра. Проверьте, включен ли на вашем компьютере режим отображения скрытых файлов и папок.
Windows 11
Windows 10
Windows 8, 8.1
Windows 7
Windows Vista
Windows XP
Спасибо за ваш отзыв, вы помогаете нам становиться лучше!
Спасибо за ваш отзыв, вы помогаете нам становиться лучше!
В этой статье представлено краткое руководство по обнаружению папок, которые не отображаются по умолчанию. Кроме того, в операционных системах Windows 10 и Windows 11 есть возможность скрывать отдельные папки. Расскажем, как это сделать.
Как отобразить скрытые папки в Windows 10
Справочно
С помощью этой инструкции можно найти в том числе скрытые файлы и диски.
Во всех примерах будем отображать скрытую «Папку 2».

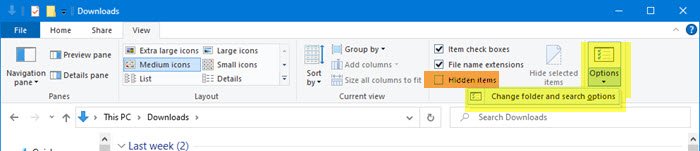
- Чтобы отобразить скрытые папки, откройте «Проводник» Windows (значок с изображением папки). На верхней панели выберите «Вид» (1), затем «Параметры» (2) и в выпадающем меню нажмите «Изменить параметры папок и поиска» (3).
- В открывшемся окне перейдите на вкладку «Вид» (1), пролистайте вниз списка, выберите «Показывать скрытые файлы, папки и диски» (2) и примените изменения, нажав «ОК» (3).
- После выполнения всех этих шагов вы увидите, что «Папка 2» теперь отображается в «Проводнике» и у нее прозрачный значок.


Как получить доступ к скрытым папкам в Windows 11
- Чтобы отобразить скрытые папки, откройте «Проводник» Windows.
- В верхней части экрана выберите пункт меню «Просмотреть» (1), затем «Показать» (2) и нажмите «Скрытые элементы» (3).
-
Вы увидите, что «Папка 2» теперь отображается в «Проводнике» и у нее прозрачный значок, как в предыдущем примере.


Как скрыть папки в Windows 10 и Windows 11
- Нажмите правой кнопкой мыши на папку (1), затем выберите «Свойства» (2).
- Во вкладке «Общие» поставьте галочку на пункте «Скрытый» (1) и нажмите «ОК» (2).
- Если в папке есть другие файлы или папки, то появится окно с выбором, что именно нужно скрыть (1). Выберите нужный пункт и нажмите «ОК» (2).
- После выполнения всех этих шагов «Папка 2» станет скрытой.

In this post, we will see how to show Hidden Files, Folders & Drives along with Protected operating system files in Windows 11/10/8/7, via File Explorer Options in the Control Panel or by using the Command Prompt and PowerShell.
On most days, you would not want to be bothered by the hidden Windows files on your computer. After all, the last thing that an average Windows user needs is some more data to deal with. On some rare instances though, or if you know what you’re getting yourself into, you may need access to these hidden files to make changes to Windows apps or system settings. These hidden files aren’t readily viewable when you open their parent folder(s) in the File Explorer. Ee will walk you through the steps needed to be taken to show hidden files and folders using the Explorer Options, Windows Command Prompt and the PowerShell, two of the strongest methods for the purpose.
Show Hidden Files & Folders in Windows 11/10 via Explorer Options
You will have to open the Control Panel and then select the File Explorer Options in Windows 11/10. File Explorer Options is referred to as Folder Options in Windows 8.1/7.
To show Hidden Files, Folders & Drives on your Windows 11/10 computer:
- Open File Explorer Options
- Click on the View tab
- Locate Hidden Files & Folders
- Select the Show Hidden Files, Folders and Drives option
- Click on Apply and Exit.
You can also open File Explorer Options in Windows 11 as follows:
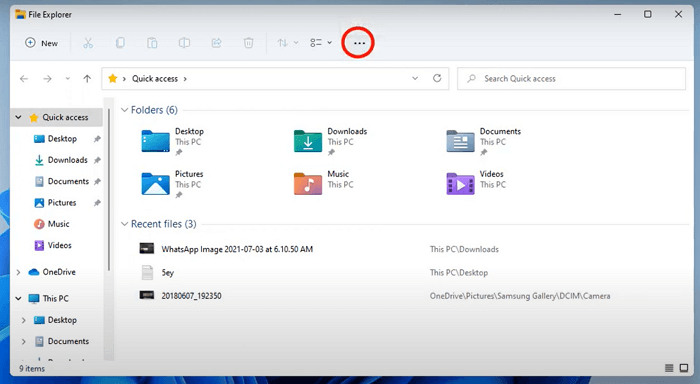
1] Launch File Explorer on Windows 11.
2] Click on the three horizontal dots and select Option. This will open the Folder Options window.

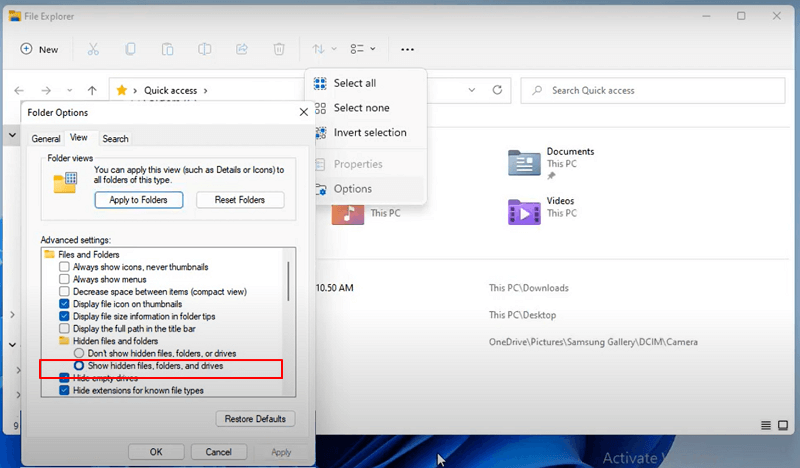
3] In the Folder Options window, click on the View tab and select the radio button that says Show hidden files, folders, and drives.

4] Click Apply and then OK.
Alternative method via Explorer Menu bar
In Windows 11, you can open Explorer > View > Show > Select Hidden items.
In Windows 10, open Explorer, select the View tab and toggle the Hidden items checkbox to short or hide files and folders.
For your information, you can also access the Change folder and search options box from here.
Unhide Protected operating system files
If you wish to unhide and show the Protected operating system files, you need to also uncheck the Hide protected operating system files (Recommended) setting in File Explorer Options, and click Apply.
Show hidden files using Command prompt
The process here is pretty simple. Here are the steps you have to follow:
Open the start command and search for Command Prompt. Select to run it as administrator.
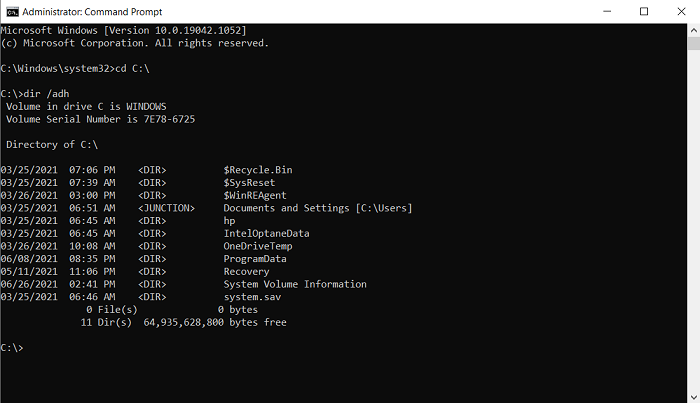
Make a note of the folder in which you want to look for hidden files. For the purposes of this article, we will be using the C:/ drive. Access your drive by using the change directory command cd. Our first command line will look something like
cd C:\
Now, type out the following command line which will show you all the hidden files in the location that you’ve chose
dir /adh
This will show to you all the hidden files, in this case, in the C:/ drive. There are some other keywords that you can use with the dir command if there is some specific information you are looking for. They’re all to be used in a similar manner:
- /a – this will show you only the hidden folders.
- /a:d – this will show you all the directories.
- /a:h – this will show only the hidden files.
- /adh – (The one we’ve used) Gives you all the above information combined.
Let’s now talk about PowerShell and how this process can be replicated there.
Show hidden files using PowerShell
- Open the Start Menu and search for PowerShell, run it as administrator. (You can do the same via the Power User Menu too.)
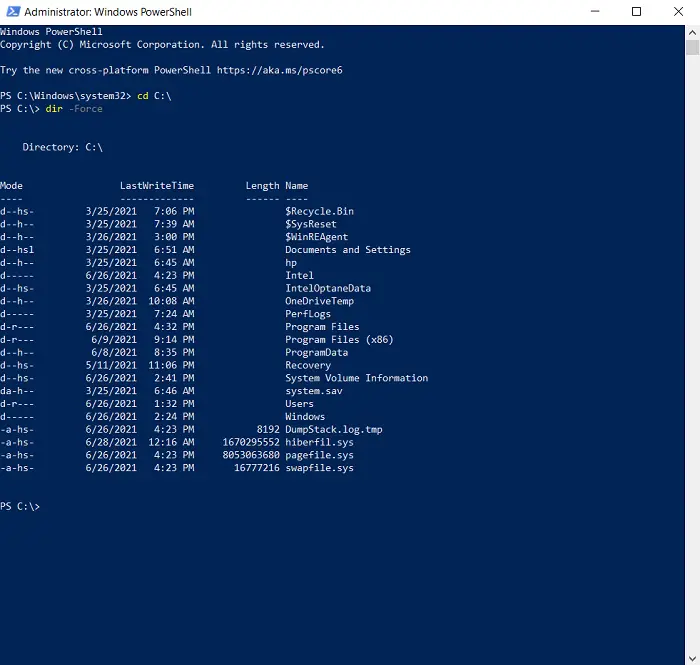
- The process here is quite similar. Access the location of your choice with the change directory keyword cd. It is used the same way as it was in the Command Prompt.
- Once you’re into the location, type the following command line which will display to you all the hidden files inside it.
dir -Force
- You can browse through the hidden files in a folder inside the drive’s root folder by adding that folder’s name to the cd command. Eg., cd C:\Program Files.
- Once you’re inside this particular folder, type/copy the following command and press enter:
Get-ChildItem -Filter *.* -Recurse -Force -ErrorAction SilentlyContinue | where { $_.Attributes -match “Hidden”}
There is a strong chance that the above command line may return a very high number of hidden files and folders, making it impossible for you to actually read through them.
In that case, you can copy the resultant output and have it saved in a text document by modifying the command line. Simply add a >log.txt to the end of the above Get-ChildItem command and all the data will be saved to a text file named log.txt.
TIP: There is another way! You can use attrib.exe to change File Attributes, and/or show the hidden files.
This post will show you how to make a File or Folder Hidden or Read Only.
If you wish to, you can also list all the hidden files & folders on your Windows computer.
BONUS TIP:
- If you find that the Show Hidden Files, Folders and Drives option is missing, then this registry tweak is sure to help you.
- Alternatively, you could use our freeware FixWin to fix this problem. You will find the fix under its Explorer section.
Windows 11 Hidden Files Not Showing, Why?
Windows 11 users may encounter a situation where files are either hidden or not showing. Several reasons can cause this.
- Files are hidden because of the shortcut virus.
- Windows Defender is blocking access to certain folders.
- Windows 11 hides some system files and folders on its own.
- Certain files may have their «hidden» attribute enabled in Windows File Explorer.
Do you need to show hidden files and folders in Windows 11? Don’t worry. You’re not alone. As more users turn to Windows 11 for their needs, the demand to show hidden folder contents is growing. If you’re trying to open a hidden file but can’t find it on your computer, there are a few simple ways to help you locate them quickly and easily. This blog post will explore three methods of revealing and accessing those sneaky, tucked-away files in Windows 11.
Method 1. Show Hidden Files in Windows 11 with File Explorer
Showing hidden files in Windows 11 with File Explorer is a simple task that does not require a computer specialist. You can watch this video to show hidden files in Windows 11 or follow the step-by-step guide.
- 0:12 Introduction
- 0:17 Show hidden files in Windows 11 with File Explorer
Step 1. Open File Explorer.
Step 2. Press the three dots on the top.
Step 3. Go to «Options > View > Hidden files and folders».
Step 4. Select «Show hidden files, folders, and drives» to view hidden files in Windows 11.
Method 2. Show Hidden Files in Windows 11 with CMD Alternative
Another way to show hidden files in Windows 11 is by using EaseUS CleanGenius.
Manual execution of the command line is suitable for computer professionals, since incorrect commands can do more harm than good. Therefore, for security and usability, we strongly recommend you try an automatic command line alternative — EaseUS CleanGenius. It is a practical tool that enables you to check and fix file system errors, enable/disable write protection and update your system with one-click instead of typing intricate command lines.
Follow the simple steps below to show hidden files with this 1-click-fix software.
Step 1. DOWNLOAD EaseUS CleanGenius for Free.
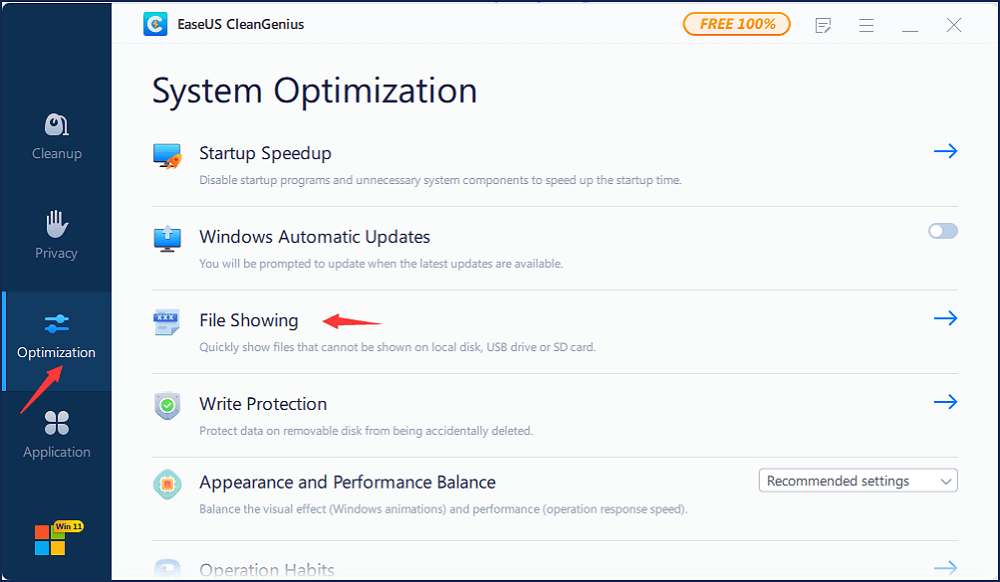
Step 2. Start EaseUS CleanGenius, choose «Optimization» on the left panel. Next, click «File Showing» on the right panel.
Step 3. Select the hard drive and click «Execute».
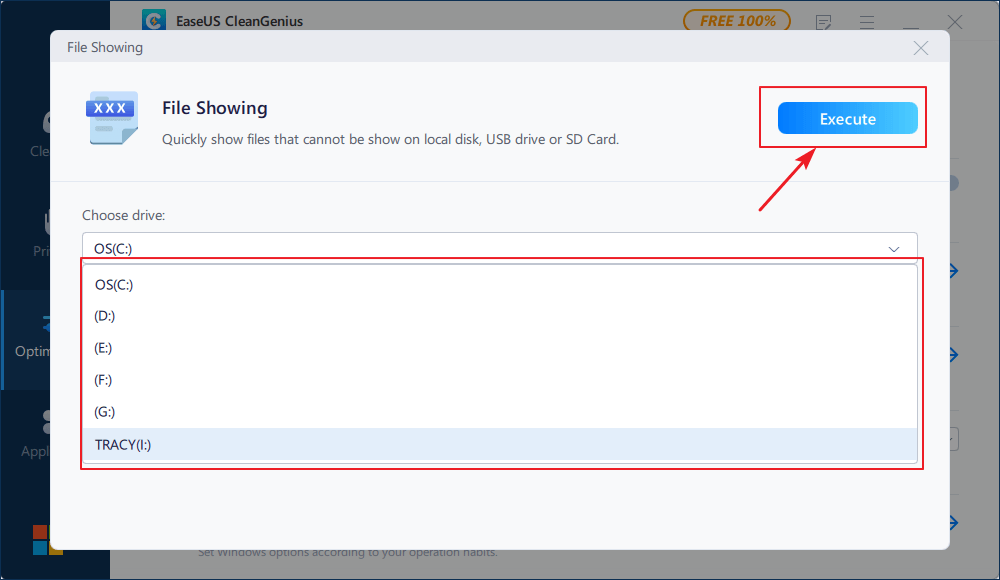
Step 4. After the operation completes, click the here link to check the hidden files.

Method 3. Show Hidden Files with Data Recovery Software
If you still can’t show hidden files in Windows 11, ask data recovery software for help. EaseUS Data Recovery Wizard is an excellent and user-friendly tool to quickly retrieve lost data or show hidden files in Windows 11. Its easy-to-use interface makes it a great choice for experienced and novice users.
- With it, restoring lost data is extremely fast, as it eliminates the need to manually locate, scan, and find each file — saving time that can be spent elsewhere on other tasks.
- Furthermore, this hard drive recovery software is highly efficient in showing hidden files that may have been accidentally deleted or corrupted due to many causes.
- Its unsurpassed technology enables users to recover lost files or data within minutes swiftly. Download this data recovery tool and show hidden files with it.
When the files cannot be displayed normally, it is usually because of a virus attack that deleted or hid them. Here are the recovery steps applied in this case:
Step 1. Select the virus infected drive to scan
Run EaseUS virus file recovery software on your Windows PC. Select the disk attacked by the virus to scan for lost or hidden files. Note that:
- If it’s an HDD where files were hidden or deleted by virus, it’s better to install the software on a different volume or an external USB drive to avoid data overwriting.
- If the infected device is an external hard drive, flash drive or memory card, it doesn’t matter to install the software on the local drive of the computer.

Step 2. Check all scanned results
EaseUS Data Recovery Wizard will immediately start a scan process to find your deleted or hidden files on the virus infected hard drive. To quickly locate the wanted files, you can use the Filter or search box feature to display only the pictures, videos, documents, emails, etc.

Step 3. Preview and recover deleted/hidden files
When the process finishes, you can preview the scanned files. Select the files you want and click the «Recover» button. You should save restored files to another secure location or Cloud drive, not where they were lost.

Conclusion
You can try the solutions above whenever you want to show hidden files in Windows 11. The first method is the most effective, which helps show hidden files with simple clicks. If you lost files or files missing in Windows 11, run EaseUS data recovery software to scan and restore missing data.
Show Hidden Files in Windows 11 FAQs
You can get additional help if you read the questions and answers below.
1. How can I find my hidden file on a USB?
Follow the steps below to show hidden files on USB:
Step 1. In Windows 10/8/7, press Windows + E to bring up Windows Explorer.
Step 2. In the Folder Options or File Explorer Options window, click the View tab. Under Hidden files and folders, click the Show hidden files, folders, and drives option.
2. How can I find hidden files in Windows 10?
Here are the steps to unhide files in Windows 10:
Step 1. Go to the Start menu search bar, type control panel, and hit Enter.
Step 2. In the Control Panel, select Appearance and Personalization > File Explorer Options.
Step 3. Click the View tab and select the Hidden files and folders option.
Step 4. Then, click on the Show hidden files, folders, and drives option.
3. How do I hide files and folders in Windows 11?
To hides files in Windows 11:
Head to any folder in the File Explorer and click on the More button (three dots) on the top.
Select Options from the context menu. Head over to the View tab in the Folder Options dialog.
Click the Don’t show hidden files, folders, or drives option and click Apply > OK to save the changes.
4. How to fix Windows 10 show hidden files not working?
You can follow these solutions to fix Windows 10 show hidden files not working:
- Run SFC
- Adjust Registry
- Recover Hiden Files…