
Opening NTFS drives on Windows 7 is a common need for many users. NTFS, or New Technology File System, is a file system used by Windows operating systems to organize and store data on hard drives. While Windows 7 can natively read and write data on NTFS drives, there are instances where users encounter difficulties accessing or opening NTFS drives. This blog post aims to provide an in-depth guide on how to open NTFS drives on Windows 7, exploring different methods and troubleshooting tips.
Video Tutorial:
What’s Needed
Before we dive into the methods, it is important to ensure that you have the necessary equipment and software for opening NTFS drives on Windows 7. Here’s what you’ll need:
1. Microsoft Windows 7 operating system installed on your computer.
2. An NTFS drive that you want to open. This can be an internal hard drive, external hard drive, or USB flash drive.
3. A working USB port or appropriate connection for your external NTFS drive.
What Requires Your Focus?
When it comes to opening NTFS drives on Windows 7, there are a few key areas that require your attention. These include:
1. Checking the drive’s connectivity: Ensure that the NTFS drive is properly connected to your computer and recognized by the operating system.
2. Drive permissions and security settings: Verify that you have the necessary permissions and security settings to access the NTFS drive.
3. File system compatibility: Make sure that the NTFS drive is formatted with the NTFS file system, as Windows 7 may have compatibility issues with other file systems.
Method 1. How to Open NTFS Drive via File Explorer
Opening an NTFS drive through File Explorer is a straightforward method. Here’s how to do it:
1. Connect the NTFS drive to your Windows 7 computer using the appropriate connection.
2. Open File Explorer by pressing the Windows key + E or by clicking the File Explorer icon on the taskbar.
3. In the left-hand navigation pane of File Explorer, you should see the connected NTFS drive listed under «This PC» or «Computer.» Click on the drive to open it.
Pros:
1. Easy and straightforward process to open NTFS drives.
2. Allows easy navigation and access to files and folders within the drive.
3. Provides a familiar interface for Windows 7 users.
Cons:
1. May not be effective if there are connectivity issues with the drive.
2. Permissions and security settings may still limit access to certain files or folders within the drive.
3. Does not provide advanced options for managing NTFS drives.
Method 2. How to Open NTFS Drive Using Disk Management
If an NTFS drive is not being recognized or assigned a drive letter in File Explorer, using Disk Management can help resolve the issue. Follow these steps:
1. Press the Windows key + R to open the Run dialog box.
2. Type «diskmgmt.msc» (without quotes) and press Enter to open Disk Management.
3. In Disk Management, locate the NTFS drive. It should be listed as «Disk X» with a size and status.
4. Right-click on the NTFS drive and select «Change Drive Letter and Paths…«
5. Click «Add» and choose a drive letter from the drop-down menu. Click «OK» to save the changes.
6. The NTFS drive should now be accessible through File Explorer.
Pros:
1. Allows you to manually assign a drive letter to the NTFS drive, ensuring recognition by the operating system.
2. Provides a workaround for cases where File Explorer fails to recognize the NTFS drive.
3. Can help troubleshoot drive connectivity and recognition issues.
Cons:
1. Requires a basic understanding of Disk Management and drive partitioning.
2. May not resolve permission or security settings issues preventing access to the NTFS drive.
3. Can potentially cause data loss if not used carefully.
Method 3. How to Open NTFS Drive Using Command Prompt
Command Prompt offers a command-line interface for managing various aspects of your computer, including opening NTFS drives. Here’s how to do it:
1. Press the Windows key + R to open the Run dialog box.
2. Type «cmd» (without quotes) and press Enter to open Command Prompt.
3. In Command Prompt, type «diskpart» to launch the DiskPart utility.
4. Type «list volume» to view all the volumes, including the NTFS drive. Note the volume number associated with the NTFS drive.
5. Type «select volume X» (replace X with the volume number of the NTFS drive) and press Enter.
6. Type «assign letter=Y» (replace Y with the desired drive letter) and press Enter.
7. The NTFS drive should now be assigned the specified drive letter and accessible.
Pros:
1. Provides a command-line method to open NTFS drives that may not be recognized through traditional methods.
2. Offers advanced options for managing and troubleshooting drive-related issues.
3. Can be useful for automation or more advanced tasks involving NTFS drives.
Cons:
1. Requires familiarity with Command Prompt and DiskPart commands.
2. Commands must be entered accurately to avoid potential data loss or drive corruption.
3. Does not address permissions or security settings issues that may hinder access to the NTFS drive.
Method 4. How to Open NTFS Drive Using Third-Party Software
If the previous methods fail to open your NTFS drive or you need additional functionality, third-party software can be a viable option. Here’s a general guide:
1. Research and select a trusted third-party software that specializes in opening and managing NTFS drives.
2. Download and install the selected software following the provided instructions.
3. Launch the software and follow its user interface to open the NTFS drive.
Pros:
1. Offers enhanced features and functionality not available through native Windows tools.
2. Can provide solutions for complex NTFS drive issues that other methods cannot resolve.
3. Provides a convenient and consolidated interface for managing NTFS drives.
Cons:
1. Requires additional time and effort to research, download, and install the third-party software.
2. Some third-party software may come at a cost or offer limited functionality in free versions.
3. Potential compatibility issues or security risks associated with third-party software.
Why Can’t I Open My NTFS Drive?
There can be several reasons why you may be unable to open your NTFS drive on Windows 7. Here are a few common reasons and their potential fixes:
1. Drive Connectivity Issues:
– Ensure that the NTFS drive is properly connected to your computer.
– Try using a different USB port or cable to rule out physical connection issues.
– Test the drive on another computer to check if the problem persists.
2. Drive Permission Issues:
– Right-click on the NTFS drive in File Explorer and select «Properties.«
– Go to the «Security» tab and verify that your user account has the necessary permissions to access the drive.
– If needed, adjust the permissions or take ownership of the drive.
3. Drive Corruption or File System Errors:
– Run the built-in Windows Error Checking tool to scan and fix any issues with the NTFS drive.
– Open Command Prompt and type «chkdsk /f X:» (replace X with the drive letter of the NTFS drive) to initiate the scan and repair process.
– Allow the process to complete and restart your computer if prompted.
Implications and Recommendations
Here are some recommendations to enhance your experience with opening NTFS drives on Windows 7:
1. Regularly update your operating system and drivers to ensure optimal compatibility and security.
2. Back up important data stored on NTFS drives to prevent loss in case of drive failure or corruption.
3. Use caution when handling advanced methods such as Command Prompt or third-party software, as improper usage can lead to data loss or system instability.
5 FAQs about Opening NTFS Drives on Windows 7
Q1: Can I open an NTFS drive on Windows 7 without assigning it a drive letter?
A1: No, assigning a drive letter to the NTFS drive is necessary for Windows 7 to recognize and open it through traditional methods.
Q2: Why is my NTFS drive showing up as RAW format?
A2: If your NTFS drive is shown as RAW format, it may indicate file system corruption. Running disk repair tools or seeking professional help is recommended.
Q3: Is it possible to format an NTFS drive without losing data?
A3: Formatting an NTFS drive typically erases all data. To format a drive without data loss, consider making a backup and restoring it after formatting.
Q4: How can I recover data from an inaccessible NTFS drive on Windows 7?
A4: Data recovery software can help retrieve files from inaccessible NTFS drives. Ensure not to write new data to the drive to maximize chances of recovery.
Q5: Can I convert an NTFS drive to a different file system?
A5: While it is technically possible to convert an NTFS drive to a different file system, it often involves data loss or complex procedures. Back up your data before attempting such a conversion.
Final Words
Opening NTFS drives on Windows 7 can be a straightforward process, but it may require troubleshooting and advanced methods in certain cases. By following the methods outlined in this blog post and understanding the potential reasons for difficulties, you can successfully open and access your NTFS drives on Windows 7. Remember to handle your drives with care, maintain backups, and stay updated with the latest software and security measures to ensure a smooth experience.
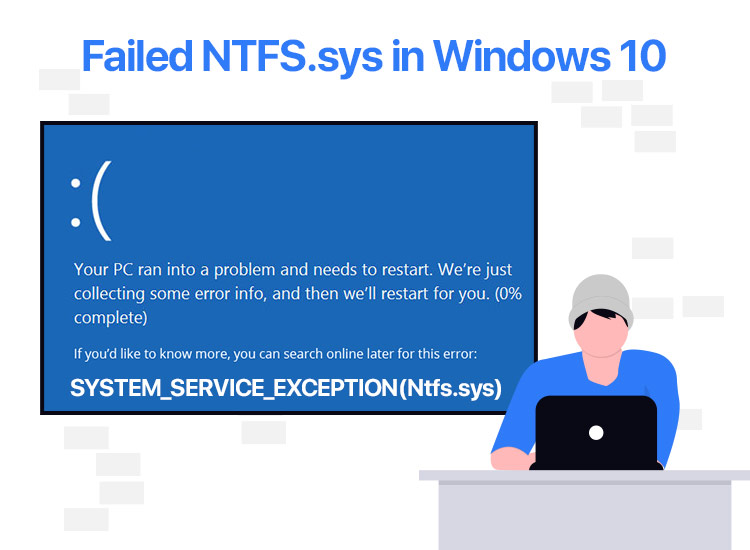
If you are also getting the NTFS.sys failed error code on your screen, you can take the help of the most effective solutions offered in this guide to fix the issue with ease.
The Blue Screen of Death (BSOD) is one of the most annoying and troubling issues of all time. The error is a nightmare for Windows users as it takes up the system and prevents it from starting the system. The chances of BSOD fixing itself are quite low. Hence, the error may not go away and may reappear on the screen repeatedly until you do something about it.
NTFS.sys Failed is a blue screen error of this type. The New Technology File System, or NTFS, is the main file management system that is widely used in Windows NT operating systems and Windows Servers. The NTFS.sys blue screen error is quite complicated and reappears on the system repeatedly. If this error persists, it can cause system crashes and may even result in data loss.
In this guide, we will have a look at some of the best solutions to fix the NTFS.sys Failed error. Let’s have a look at the same right below.
Solutions to Fix the System Service Exception NTFS.sys in Windows 10
The following sections of this guide will look at some of the best solutions to fix the NTFS.sys failed error on Windows. All the solutions offered below will help you get rid of this issue without facing any complications. Start with the first one below and try all the solutions until this issue is fixed.
Solution 1: Enable Safe Mode to Fix the NTFS.sys Error
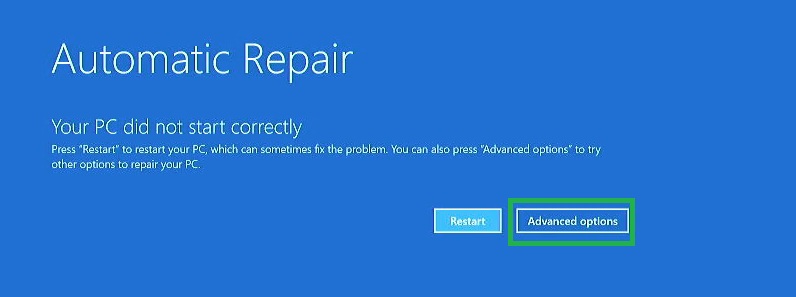
One of the best fixes to get rid of NTFS.sys failed error is to enable the Safe Mode in Windows. You will need to use the Windows Recovery Environment (WinRE) to enable safe mode. The procedure to use the environment is quite easy and is described right below for your ease:
- Restart the system if it is stuck on the Blue Screen of Death page.
- Restart the system at least three times so that the system can automatically enter the Windows Recovery Environment (WinRE).
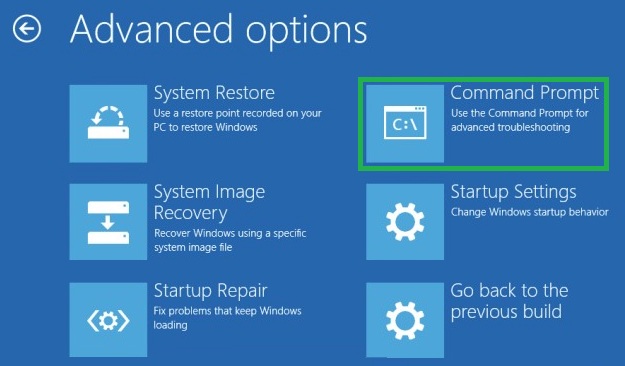
- When the WinRe setup appears, click on the Advanced Options button.
- Now, the system will ask you to pick an option from the list. Click on the Troubleshoot button to proceed.
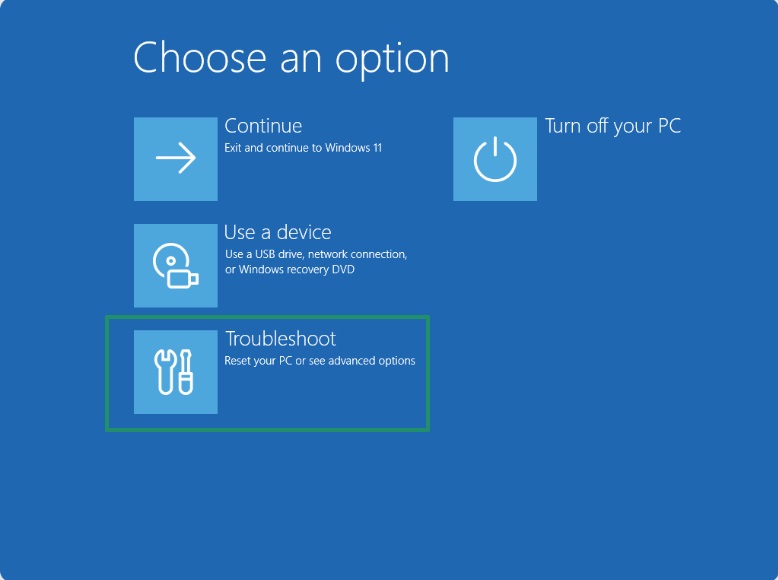
- Again, proceed with the Advanced Options button to initiate the process.
- When all the options appear, click on the Startup Settings button.
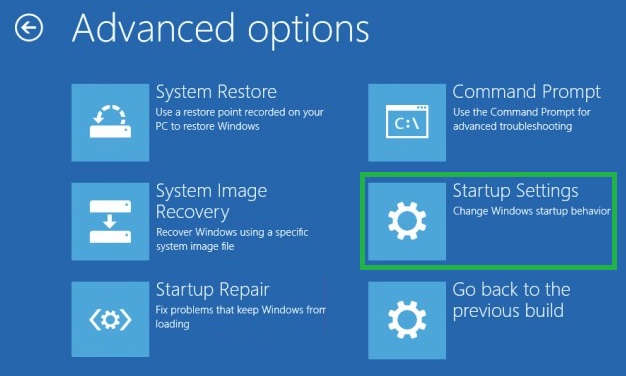
- Finally, click on the Restart button present at the bottom of the screen to restart the system.
Also know: How to Fix Windows Modules Installer Worker Using High CPU
Solution 2: Use the SFC Scan
Here’s the next solution that can help you fix the NTFS.sys failed error with ease. You can run the SFC scan to figure out the faulty system files that may be interfering with the performance of the system and thus, showing the BSOD error. The System File Checker scan will eliminate and fix all the troublesome files. Follow the steps offered below to proceed:
- Restart the system if it is stuck on the Blue Screen of Death page.
- Restart the system at least three times so that the system can automatically enter the Windows Recovery Environment (WinRE).
- When the WinRe setup appears, click on the Advanced Options button.
- Now, the system will ask you to pick an option from the list. Click on the Troubleshoot button to proceed.
- Again, proceed with the Advanced Options button to initiate the process.
- When all the options appear, click on the Command Prompt button.
- When the tool appears, type the following command and press the Enter key.
sfc /scannow
Wait for the scan to complete. The scan will automatically get rid of the faulty files or fix them as required. Now, restart the system to see if the NTFS.sys error still appears on your Windows. If it does, you can follow the next solution.
Solution 3: Use the Check Disk Scan
Here’s the last solution that can help you fix the NTFS.sys failed error on Windows 11/10. Just like the SFC scan, you can also use the chkdsk scan to see if there are any issues with the disk. The process to use the check disk scan is quite simple and provided right below:
- Restart the system if it is stuck on the Blue Screen of Death page.
- Restart the system at least three times so that the system can automatically enter the Windows Recovery Environment (WinRE).
- When the WinRe setup appears, click on the Advanced Options button.
- Now, the system will ask you to pick an option from the list. Click on the Troubleshoot button to proceed.
- Again, proceed with the Advanced Options button to initiate the process.
- When all the options appear, click on the Command Prompt button.
- When the tool appears, type the following command and press the Enter key.
chkdsk f: /f
Also know: How to Fix Windows Could Not Automatically Detect This Network’s Proxy Settings Error
NTFS.sys Blue Screen Error: Fixed
In the previous sections of this write-up, we had a look at some of the best methods to fix the NTFS.sys failed error. If you have any questions related to the guide, you can ask your questions in the comments section below.
-
Home
-
Partition Manager
- How to Configure NTFS Permissions on Windows 10/11? [2 Methods]
By Ariel | Follow |
Last Updated
Do you know what NTFS permissions are? A lot of users are confused about how to configure NTFS permissions on Windows 10/11. In this post, MiniTool summarizes 2 available ways to set NTFS permissions.
What Are NTFS Permissions
NTFS permissions are a set of permissions used to protect your files and folders stored on the partition with NTFS file system. These permissions can determine who can access certain files/folders such as user profiles. They can be assigned to groups or individual users. There are different types of NTFS permissions for files and folders which you can configure for.
- Full control: If you select this option, a user or group has all available permissions for files and folders, including add, modify, move, and delete. Besides, you can change NTFS permission for all files and subdirectories.
- Modify: This permission means that a user or group can modify a file or the contents in a folder.
- Read & execute: It allows a user or group to view and run executable files in a folder.
- List folder contents: It is an NTFS folder permission that determines if a user or group can list the content of a folder.
- Read: It means that a user or group can read the data in a file or folder but can’t read an executable file or open the folder where the files are stored if only assigning this permission.
- Write: It means that a user or group can change the content in a file, create files/folders, or write data and attributes for a folder.
Now, you should have an overall understanding of the NTFS permissions. Let’s see how to configure NTFS permissions.
How to Configure NTFS Permissions on Windows 10/11
How to set NTFS permissions on Windows 10/11? You can choose one from the following 2 simple methods.
Before You Do
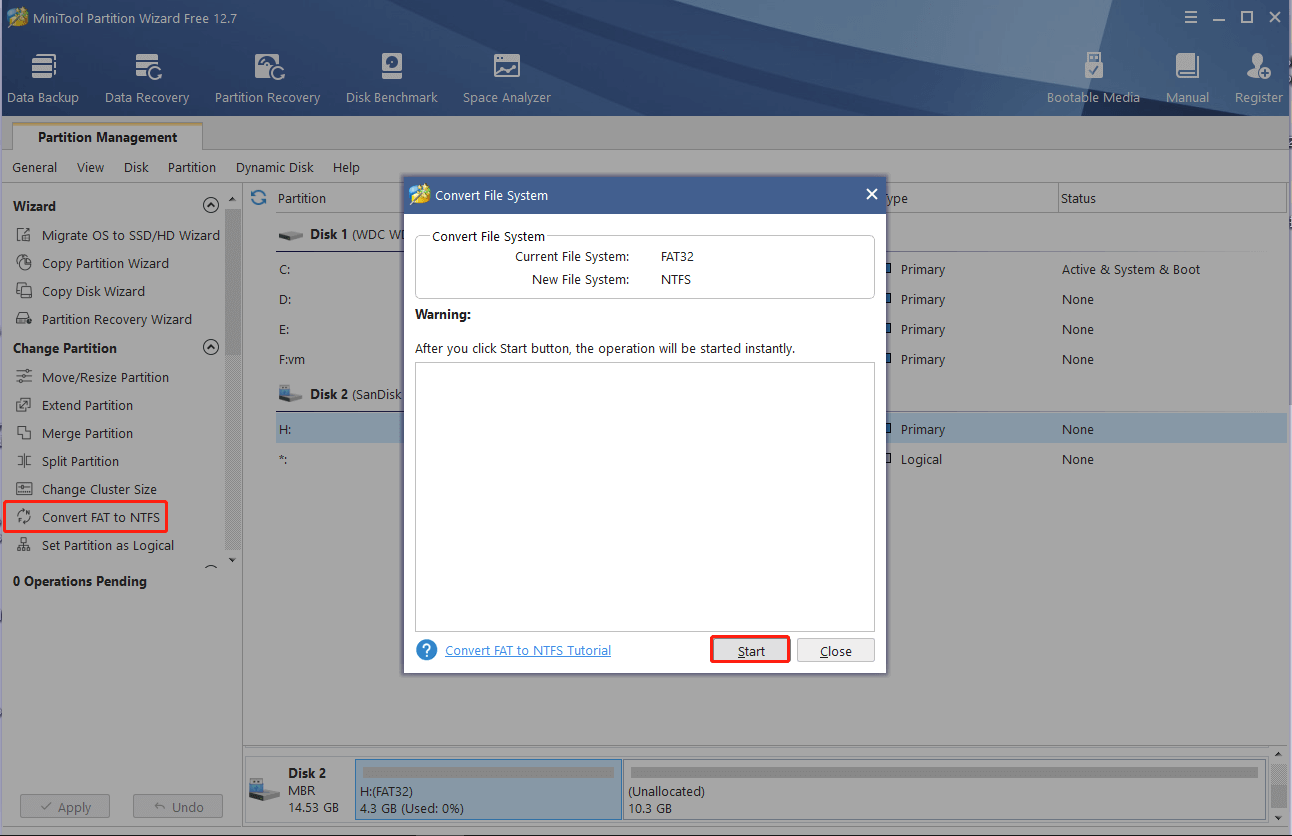
As you know, the NTFS permissions are only available for NTFS partitions, If you are using a FAT32 file system, you can’t configure NTFS permissions for a folder/file on that partition. In this case, you need to convert FAT32 to NTFS first.
How to convert FAT to NTFS without data loss? MiniTool Partition Wizard can do that easily. It is a professional and trustworthy partition manager that can convert MBR to GPT without data loss, convert dynamic disk to basic disk, format partition to NTFS/exFAT/Ext4/FAT32, and more.
MiniTool Partition Wizard FreeClick to Download100%Clean & Safe
Way 1. Set NTFS permissions in File Explorer
The first and most common way on how to set NTFS permissions for a folder is to use Windows File Explorer. Here are detailed steps:
Step 1. Press Win + E keys to open the File Explorer, and then right-click the directory that you want to set NTFS permissions Windows 10/11 for and select Properties.
Step 2. In the Properties window, navigate to the Security tab and click on Edit to change NTFS permissions.
Step 3. Select your desired group or user names from the list, and then tick the checkbox of Allow or Deny next to the Permissions that you want to set, and click on Apply and then OK to save the change.
Tips:
If you want to add a new user or group, you can click on Add and enter the desired name, and follow the on-screen prompts to complete the process.
Way 2. Set NTFS permissions PowerShell
Another advanced way is to let PowerShell set NTFS permissions. To do this work, you can follow the detailed steps below:
Step 1. Type powershell in the Search box, and then right-click Windows PowerShell from the top result and select Run as administrator.
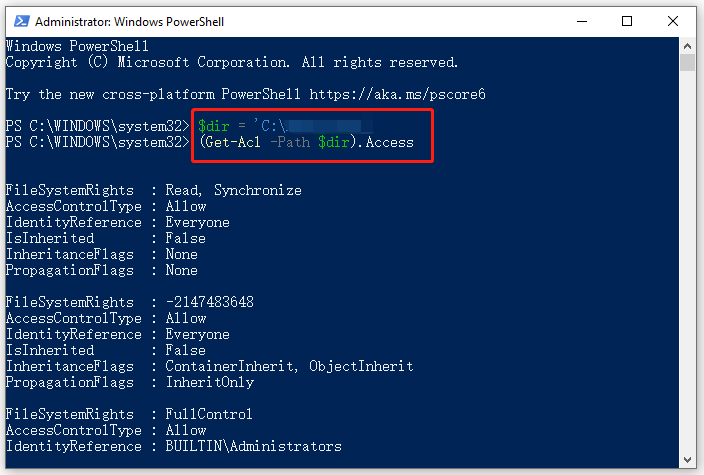
Step 2. In the elevated PowerShell window, type the following commands and hit Enter after each one to assign the path to your desired directory and view its permissions.
Note:
Here you need to replace the path with your actual directory. Also, you can run the (Get-Acl -Path $dir).Access | Format-Table -AutoSize command to view permissions in a more readable format.
$dir = ‘C:Pathtodirectory’
(Get-Acl -Path $dir).Access
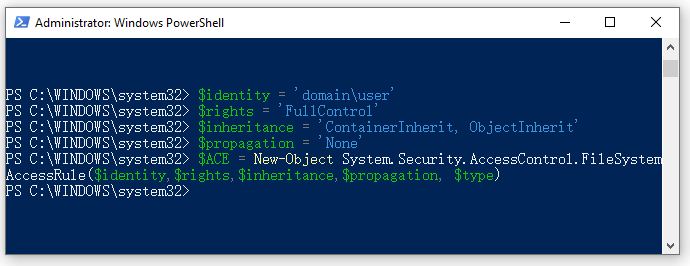
Step 3. Run the following commands in order and hit Enter after each one to create variables for permissions.
$identity = ‘domainuser’
$rights = ‘FullControl’
$inheritance = ‘ContainerInherit, ObjectInherit’
$propagation = ‘None’
$type = ‘Allow’
Step 4. Run the following command to combine all variables into a single object.
$ACE = New-Object System.Security.AccessControl.FileSystemAccessRule($identity,$rights,$inheritance,$propagation, $type)
Step 5. Run the following command to get access rights from the selected directory and store them in a variable.
$Acl = Get-Acl -Path $dir
Step 6. Type the following commands and hit Enter after each one to add the access rule and set the rule.
$Acl.AddAccessRule($ACE)
Set-Acl -Path $dir -AclObject $Acl
Now, you should set NTFS permissions PowerShell completely. If you want to remove NTFS permissions using PowerShell someday, you can run the following commands.
$Acl = Get-Acl -Path $dir
$Ace = $Acl.Access | Where-Object {($_.IdentityReference -eq ‘domainuser’) -and -not ($_.IsInherited)}
$Acl.RemoveAccessRule($Ace)
Set-Acl -Path $dir -AclObject $Acl
About The Author
Position: Columnist
Ariel has been working as a highly professional computer-relevant technology editor at MiniTool for many years. She has a strong passion for researching all knowledge related to the computer’s disk, partition, and Windows OS. Up till now, she has finished thousands of articles covering a broad range of topics and helped lots of users fix various problems. She focuses on the fields of disk management, OS backup, and PDF editing and provides her readers with insightful and informative content.
The failed Ntfs.sys will generate different error codes, so the fixes are different. Here’s a quick view of all errors and solutions:
| Workable Solutions | Step-by-step Troubleshooting |
|---|---|
| Fix Error Code 1. NTFS_File_SYSTEM (Ntfs.sys) |
Method 1. Fix disk corruptions with Windows built-in Chkdsk utility. Enter «Safe Mode with Command Prompt». Open «This PC», right-click the problematic drive…Full steps Method 2. Update outdated drivers that cause failed Ntfs.sys problem. Right-click on «This PC» and go to «Manage» > «Device Manager»…Full steps |
| Error Code 2. SYSTEM_SERVICE_EXCEPTION (Ntfs.sys) |
Method 1. Update Windows. Enter safe mode, click «Start» and type update. Choose «Check for updates»…Full steps Method 2. Run system file checker tool: DISM and SFC scan. In safe mode, click «Start» and type cmd…Full steps Method 3. Check the RAM. Faulty RAM stick installation or incorrect RAM setup may induce an Ntfs.sys…Full steps |
What Is NTFS.sys
Ntfs.sys is located in C:\Windows\System32\drivers folder. Ntfs.sys indicates either the system file that is essential in running Windows or the hardware driver that allows the Windows operating system to read and write to NTFS drives. Thus, if you get a BSOD with the stop code: NTFS_File_SYSTEM (Ntfs.sys), that means there is something wrong with the hardware driver. If you receive the error code: SYSTEM_SERVICE_EXCEPTION (Ntfs.sys), you probably get a corrupted system file.
What Caused Failed NTFS.sys
Every error has its causes. The culprit for NTFS_File_SYSTEM (Ntfs.sys) is likely to be disk corruption, be it NTFS file system corruption or disk errors like bad sectors. Besides, corrupted hard drive drivers can also result in a failed Ntfs.sys. And the SYSTEM_SERVICE_EXCEPTION (Ntfs.sys) may be induced by antivirus software that is conflicted with the system, corrupted or outdated driver, or problematic RAM sticks.
Specify the error message on your computer screen and carry out the corresponding fixes to remove the Ntfs.sys error.
How to Recover Files Lost Due to NTFS.sys Error
Before you fix the missing or corrupt NTFS.sys file in Windows XP/7/8/10, export your data first. Usually, computer data files may possibly lose after such an NTFS.sys error and EaseUS Data Recovery Wizard software can take good care of it.
- Support deleted file recovery, formatting, hard drive corruption, virus attack, system crash under different situations.
- Restore data after formatting, emptying recycle bin, virus attack, system crash, and more.
- Support over 1000 types of files like DOC/DOCX, XLS/XLSX, PPT/PPTX, AIF/AIFF, MP3, JPG/JPEG, AVI, MOV, MP4, and more.
Download EaseUS Data Recovery Wizard to restore whatever disappeared on your computer, HDD or external SD card, USB flash drive, etc. That’s how you’re guaranteed an effective and safe fix for missing or corrupt NTFS.sys files without losing data.
Step 1. Launch EaseUS file recovery software on your Windows computer. Choose the exact location where you lost the files and click the «Search for Lost Data» button.

Step 2. The software will immediately start scanning the drive, and the deleted files will be displayed soon. If you find the files you need during the scan, you can stop the scan. In order to find the target file quickly, you can use the file format filter or search in the search box.

Step 3. Select files, such as Word, Excel, PDF, photos, videos, or emails and click the «Recover» button. You can browse for a different location or Cloud drive to keep the recovered files.

Error Code 1. NTFS_File_SYSTEM (Ntfs.sys)
As mentioned, the main culprit for a failed Ntfs.sys in such a situation is a file system error, bad sectors, or outdated device drivers. Given that, the solutions to this issue are quite clear: fix disk corruptions and update the device driver.
Since there are multiple disks and drivers on a computer, you first need to specify the drive(or device) or driver that is causing the problem using the Event Viewer. To check it, you need to enter Safe Mode.
Step 1. Hold down the power button for 10s to shut down the computer.
Step 2. Press the power button to start the computer. Once you see the first sign of Windows has started, e.g., the logo of the manufacturer, hold down the power button for 10s again to turn off the device.
Step 3. Press the power button to start the computer. Once Windows restarts, hold down the power button for 10s to turn off the computer.
Step 4. Press the power button to start the computer, and don’t interrupt it this time. Then you will see your computer in WinRE.
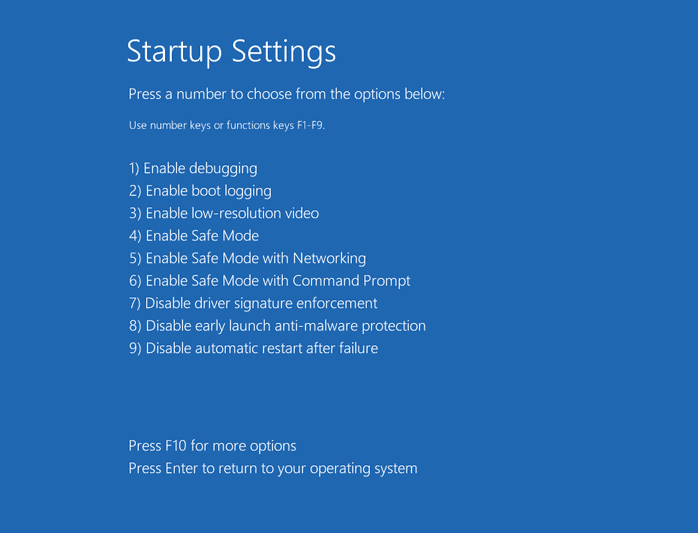
Step 5. On the «Choose an option» screen, choose «Troubleshoot» > «Advanced options» > «Startup Settings» > «Restart».
Step 6. After the restart, you will see a list of options, as shown in the image below. Select «5» or press «F5» to enable Safe Mode with Networking.
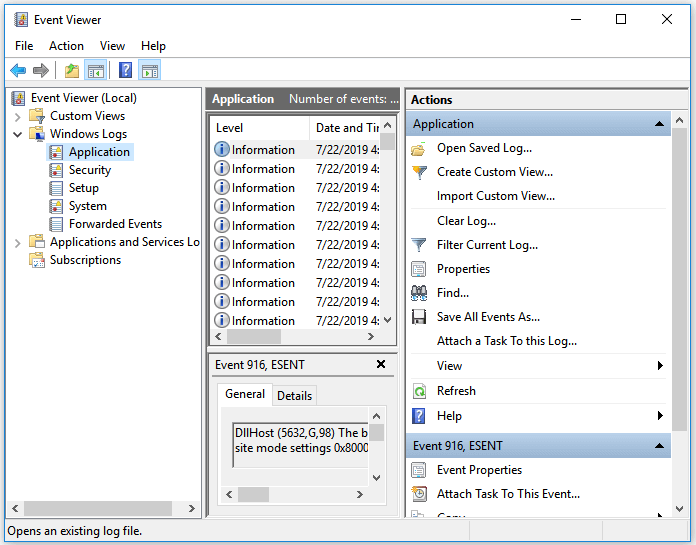
Now you need to check Event Viewer:
Step 1. Click «Start» and enter the event viewer.
Step 2. Right-click «Event Viewer» and choose «Run as administrator».
Step 3. Expand «Windows Logs» and choose «System».
Step 4. Check the errors that coincided with the blue screen and fix the error according to the information.
Method 1. Fix Disk Corruptions
The Windows built-in Chkdsk utility can fix disk errors like file system errors and bad sectors. Thus, you can solve the disk corruption with the command-line tool. If you don’t want to use command lines, applying the disk checking feature has the same effect.
Step 1. Enter «Safe Mode with Command Prompt» using the way introduced above.
Step 2. Open «This PC», right-click the problematic drive, and choose «Properties».
Step 3. Go to the «Tools» tab, click «Check».
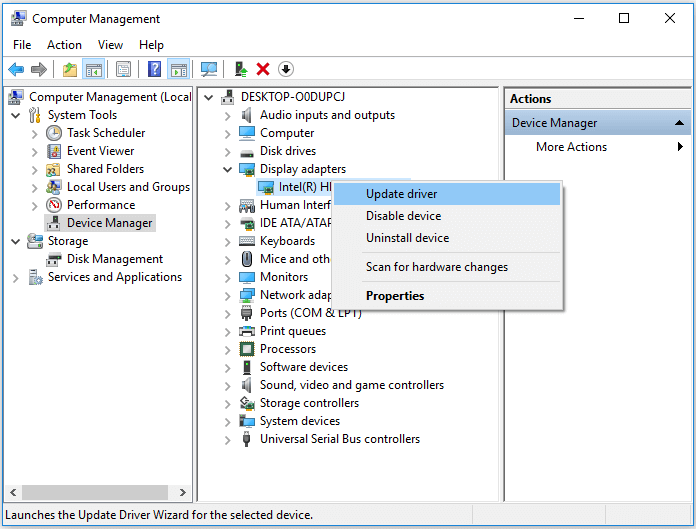
Method 2. Update Device Driver
An outdated or corrupted driver is the cause of the failed Ntfs.sys in most cases. If you figure out the faulty driver via Event Viewer, go to Safe Mode with Networking to update the corresponding driver.
Step 1. Right-click on «This PC» and go to «Manage» > «Device Manager».
Step 2. Expand «Display adapters», right-click on the graphics card driver, and choose «Update driver».
According to Microsoft, there are other tips worth trying to fix the blue screen of death caused by the Ntfs.sys error.
- Disable any virus scanners, backup programs, or disk defragment tools.
- Run hardware diagnostics provided by the manufacturer.
- Ensure there is enough space on the system drive. If not, you can extend the system drive to make Windows run properly.
Error Code 2. SYSTEM_SERVICE_EXCEPTION (Ntfs.sys)
Based on the possible reasons that lead to the Ntfs.sys error, in addition to updating the driver using the way introduced above, here are other solutions you can apply.
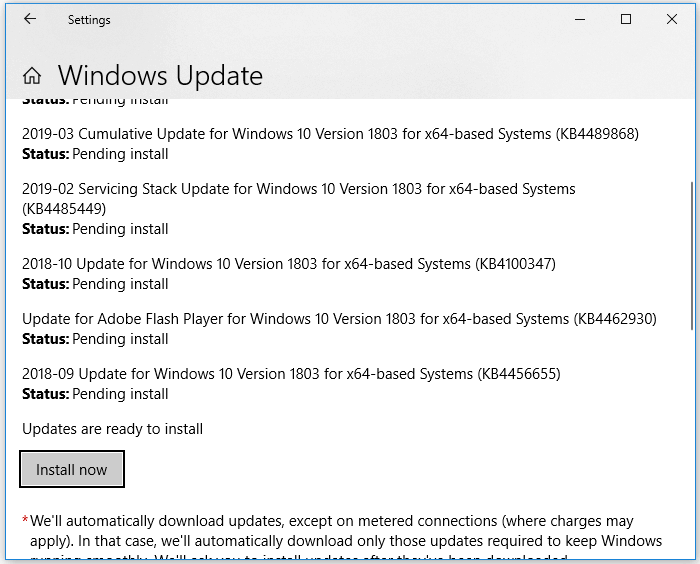
Method 1. Update Windows
Updating Windows can not only fix some known bugs or problems but also update necessary drivers.
Step 1. Enter safe mode following the steps provided.
Step 2. Click «Start» and type update.
Step 3. Choose «Check for updates».
Step 4. Windows will show you the new updates available. Click «Install now» to update your Windows. (Make sure you install all the updates available.)
Method 2. Run System File Checker Tools
System File Checker tool is a built-in utility in Windows that can check and repair missing or corrupted system files. It will repair the failed Ntfs.sys file automatically. Follow the steps introduced in the last part to enter Safe Mode with Command Prompt and then:
Step 1. In safe mode, click «Start» and type cmd.
Step 2. Right-click «Command Prompt» and choose «Run as administrator».
Step 3. If you are using Windows 10, you should first run DISM.exe: DISM.exe /Online /Cleanup-image /Restorehealth to make a Windows image to protect your data:
Step 4. When the DISM command has been completed, type the following command: sfc /scannow to start scanning and repairing your system files.
Method 3. Check the RAM
Faulty RAM stick installation or incorrect RAM setup may also induce an Ntfs.sys error. First, you need to check the hardware. To do so, turn off your computer and reconnect the RAM sticks. You can troubleshoot the problematic RAM stick by removing all of them and trying to power on each stick one by one.
If there is nothing wrong with the hardware, you need to check the timings and frequencies of the RAM. You can get the recommended values from the manufacturer and apply third-party tools to check the actual values of the RAM sticks. If they don’t match, you can enter BIOS to adjust the RAM values to the recommended ones.
Tips and Notifications
- You can also apply the driver installation disc to update the corresponding hardware driver.
- Both updating driver and running System File Checker tool can be applied to both of the situations.
- Disable antivirus or similar software is only helpful in Windows 10.
The Bottom Line
Ntfs.sys is a system file that enables the communication between the operating system and the hardware. Therefore, it’s necessary for Windows to run smoothly. When Ntfs.sys fails, you may get a blue screen of death. To fix it, the most effective way is to update the faulty driver. If that doesn’t help, use the other ways detailed to have a try. I hope one of them will help you solve the Ntfs.sys error.
Содержание
- Исправить ошибку NTFS_FILE_SYSTEM в Windows 10
- Как исправить ошибку NTFS_FILE_SYSTEM
- 1. Проверка диска
- 2. Восстановить системные файлы
- 3. Удалит устройство
- Что такое файловая система NTFS – важные функции и преимущества
- Как проверить диск на использование NTFS
- Через утилиту управления дисками
- Откройте проводник Windows
- Используйте командную строку
- Особенности файловой системы NTFS
- Альтернативы NTFS
- Обзор файловой системы NTFS NTFS overview
- повышенная надежность; Increased reliability
- Повышенная безопасность Increased security
- Поддержка больших томов Support for large volumes
- Требования к форматированию для больших файлов Formatting requirements for large files
- Максимальная длина имени файла и пути к файлу Maximum file name and path
- Динамическое выделение емкости Flexible allocation of capacity
Исправить ошибку NTFS_FILE_SYSTEM в Windows 10
Ваш ПК или ноутбук работает вяло, или медленно реагирует на ввод с клавиатуры, а потом выдает ошибку на синем экране NTFS_FILE_SYSTEM. Также может быть код ошибки 0x00000024, который указывает на проблему с файлом ntfs.sys. Сам файл ntfs.sys отвечает за чтение и запись данных на диск.
Обычно эта ошибка связана, когда вы установили новое оборудование (драйвер), повреждением секторов на SSD или HDD дискt, отсутствует или поврежден системный файл. Давайте разберем, как исправить ошибку NTFS_FILE_SYSTEM на синем экране (BSOD) в Windows 10.
Как исправить ошибку NTFS_FILE_SYSTEM
Если вы не можете попасть в дополнительные параметры загрузки при включении ПК, то рекомендую создать установочную флешку с Windows 10, чтобы использовать восстановление и командную строку. После загрузки с установочной флешки Windows 10, дойдите до пункта установки и нажмите снизу ссылку «Восстановление системы«.
Далее Вы попадете в меню дополнительных опций. Нажмите «Поиск и устранение неисправностей» > «Дополнительные параметры» и «Восстановление при загрузке«. Если это не помогло, то запустите командную строку и следуйте указания ниже.
1. Проверка диска
Запустите командную строку от имени администратора, если загрузились с рабочего стола, но лучше запустите её через дополнительные параметры при включении ПК. В окно CMD введите следующую команду, которая исправит ошибки на диске:
2. Восстановить системные файлы
Поврежденные системные файлы могут выдавать любые сообщения об ошибках и NTFS_FILE_SYSTEM не исключение. Запустите командную строку и введите ниже команды по очереди, чтобы исправить системные файлы:
- sfc /scannow
- DISM /ONLINE /CLEANUP-IMAGE /RESTOREHEALTH
3. Удалит устройство
Если вы установили недавно какое-либо устройство, то нужно удалить его драйвер. Обычно ошибка NTFS_FILE_SYSTEM бывает из-за установки второго HDD или SSD. Тогда в этом случае, нужно удалить и обновить драйвер SATA/IDE.
Что такое файловая система NTFS – важные функции и преимущества
NTFS, аббревиатура от New Technology File System, является файловой системой, впервые представленной Microsoft в 1993 году с выпуском Windows NT 3.1. NTFS является основной файловой системой, используемой компанией Microsoft в производимых Windows 10, Windows 8, Windows 7, Windows Vista, Windows XP, Windows 2000 и Windows NT.
Линейка операционных систем Windows Server также часто использует NTFS. Эта файловая система также поддерживается в других операционных системах, таких как Linux и BSD. macOS поддерживает NTFS только для чтения.
Как проверить диск на использование NTFS
Есть несколько способов, чтобы проверить, отформатирован ли жесткий диск в формат файловой системой NTFS, или он использует другую файловую систему.
Через утилиту управления дисками
Первый и, возможно, самый простой способ получить статус одного или нескольких дисков – это использовать «Управление дисками». Чтобы открыть её, нажмите комбинацию клавиш Win + X и в открывшемся меню выберите Управление дисками.
Файловая система будет указана прямо в этом же окне, наряду с томом и другими сведениями о диске.
Откройте проводник Windows
Другой способ проверить, отформатирован ли диск в файловой системе NTFS, – щелкнуть правой кнопкой мыши или удерживать пальцем соответствующий диск, прямо из проводника Windows.
Затем выберите Свойства из выпадающего меню. Прочтите, что находится рядом с Файловой системой на вкладке Общие. Если диск NTFS, то будет указано Файловая система: NTFS.
Используйте командную строку
Ещё один способ узнать, какая файловая система используется жестким диском, использовать интерфейс командной строки.
Откройте командную строку (в некоторых версиях Windows это может быть командная строка с повышенными правами) и введите команду, чтобы отобразить различные сведения о диске C: , включая его файловую систему:
Команда fsutil fsinfo volumeinfo C: / findstr «System» может быть использован, чтобы обрезать результаты.
Чтобы проверить другой жесткий диск, используйте букву тома этого диска вместо C:
Если вы не знаете букву диска, вы можете получить экранную распечатку с использованием команды fsutil fsinfo drives.
Особенности файловой системы NTFS
- Теоретически, NTFS может поддерживать жесткие диски до 16 EB. Размер отдельного файла ограничен чуть менее 256 ТБ, по крайней мере, в Windows 8 и Windows 10, а также в некоторых более новых версиях Windows Server.
- NTFS поддерживает квоты использования диска. Квоты использования диска устанавливаются администратором для ограничения объема дискового пространства, которое может занимать пользователь. Они используются, в основном, для контроля количества общего дискового пространства, которое кто-то может использовать на сетевом диске.
- Атрибуты файлов, ранее невидимые в операционных системах Windows, такие как атрибут сжатия и индексирования, доступны для дисков в формате NTFS.
- Шифрованная файловая система (EFS) – это ещё одна функция, поддерживаемая NTFS. EFS обеспечивает шифрование на уровне файлов, это означает, что отдельные файлы и папки могут быть зашифрованы. Это другая функция, в отличие от полного шифрования диска, которое представляет собой шифрование всего диска.
- NTFS – это файловая система с журналирование, это означает, что она имеет способ записи системных изменений в журнал до того, как изменения будут фактически произведены. Это позволяет файловой системе вернуться к предыдущим, хорошо работающим условиям в случае сбоя, поскольку новые изменения ещё не приняты.
- Служба теневого копирования томов (VSS) – это функция NTFS, которая может использоваться службами онлайн-резервного копирования и другими программными средствами для резервного копирования файлов, и даже сама Windows может использовать эту службу для хранения резервных копий ваших файлов.
- Другая функция, представленная в этой файловой системе, называется транзакционная NTFS. Эта функция позволяет разработчикам программного обеспечения создавать приложения, которые либо полностью работают, либо полностью терпят неудачу. Программы, использующие транзакционную NTFS, не будут частично работать при ошибках в коде.
NTFS включает и другие функции, такие как жесткие ссылки, разреженные файлы и точки повторной обработки.
Альтернативы NTFS
Файловая система FAT была основной файловой системой в старых операционных системах Microsoft и, по большей части, NTFS её заменила. Однако, все версии Windows по-прежнему поддерживают FAT, и обычно можно найти диски, отформатированные с использованием её вместо NTFS.
ExFAT является новой файловой системой, она предназначена для использования, где NTFS работает недостаточно хорошо или несовместима, как на флэш-накопителях.
Обзор файловой системы NTFS NTFS overview
Применяется к: Windows 10, Windows Server 2019, Windows Server 2016, Windows Server 2012 R2, Windows Server 2012, Windows Server 2008 R2, Windows Server 2008 Applies to: Windows 10, Windows Server 2019, Windows Server 2016, Windows Server 2012 R2, Windows Server 2012, Windows Server 2008 R2, Windows Server 2008
NTFS — основная файловая система в последних версиях Windows и Windows Server — предоставляет полный набор возможностей, включая дескрипторы безопасности, шифрование, дисковые квоты и расширенные метаданные. Ее можно использовать с общими томами кластера (CSV) для предоставления томов непрерывной доступности, доступ к которым можно осуществлять одновременно с нескольких узлов отказоустойчивого кластера. NTFS—the primary file system for recent versions of Windows and Windows Server—provides a full set of features including security descriptors, encryption, disk quotas, and rich metadata, and can be used with Cluster Shared Volumes (CSV) to provide continuously available volumes that can be accessed simultaneously from multiple nodes of a failover cluster.
Дополнительные сведения о функциях см. в этом разделе далее в этой статье. For additional feature information, see the Additional information section of this topic. См. сведения о новой системе Resilient File System (ReFS). To learn about the newer Resilient File System (ReFS), see Resilient File System (ReFS) overview.
повышенная надежность; Increased reliability
NTFS использует файл журнала и сведения о контрольных точках для восстановления согласованности файловой системы при перезагрузке компьютера после сбоя системы. NTFS uses its log file and checkpoint information to restore the consistency of the file system when the computer is restarted after a system failure. После ошибки поврежденного сектора NTFS динамически изменяет конфигурацию кластера, содержащего поврежденный сектор, выделяет новый кластер для данных, отмечает исходный кластер как поврежденный и больше не использует старый кластер. After a bad-sector error, NTFS dynamically remaps the cluster that contains the bad sector, allocates a new cluster for the data, marks the original cluster as bad, and no longer uses the old cluster. Например, после сбоя сервера NTFS может восстановить данные путем воспроизведения файлов журнала. For example, after a server crash, NTFS can recover data by replaying its log files.
NTFS непрерывно отслеживает и исправляет временные проблемы повреждения в фоновом режиме, не переводя том в автономный режим (эта функция, введенная в Windows Server 2008, известна как NTFS с самовосстановлением). NTFS continuously monitors and corrects transient corruption issues in the background without taking the volume offline (this feature is known as self-healing NTFS, introduced in Windows Server 2008). При значительных проблемах с повреждением программа Chkdsk в Windows Server 2012 и более поздних версиях сканирует и анализирует диск, пока том подключен, ограничивая время автономной работы временем, необходимым для восстановления целостности данных в томе. For larger corruption issues, the Chkdsk utility, in Windows Server 2012 and later, scans and analyzes the drive while the volume is online, limiting time offline to the time required to restore data consistency on the volume. Когда NTFS используется с CSV, простои не требуются. When NTFS is used with Cluster Shared Volumes, no downtime is required. Дополнительные сведения см. в статье NTFS Health and Chkdsk (Работоспособность NTFS и Chkdsk). For more information, see NTFS Health and Chkdsk.
Повышенная безопасность Increased security
Безопасность на основе списка управления доступом (ACL) для файлов и папок. NTFS позволяет устанавливать разрешения для файла или папки, указывать группы и пользователей, чей доступ требуется ограничить или разрешить, и выбрать тип доступа. Access Control List (ACL)-based security for files and folders—NTFS allows you to set permissions on a file or folder, specify the groups and users whose access you want to restrict or allow, and select access type.
Поддержка шифрования диска BitLocker. Шифрование диска BitLocker обеспечивает дополнительную безопасность важных системных сведений и других данных, хранящихся на томах NTFS. Support for BitLocker Drive Encryption—BitLocker Drive Encryption provides additional security for critical system information and other data stored on NTFS volumes. Начиная с Windows Server 2012 R2 и Windows 8.1, BitLocker поддерживает шифрование устройств на компьютерах с архитектурой x86 и x64 с доверенным платформенным модулем, который поддерживает режим ожидания с подключением (ранее доступный только на устройствах Windows RT). Beginning in Windows Server 2012 R2 and Windows 8.1, BitLocker provides support for device encryption on x86 and x64-based computers with a Trusted Platform Module (TPM) that supports connected stand-by (previously available only on Windows RT devices). Шифрование устройств помогает защитить данные на компьютерах под управлением Windows и помогает предотвратить доступ пользователей-злоумышленников к системным файлам, которые они используют для обнаружения пароля, или к диску путем физического удаления его с компьютера и установки в другой компьютер. Device encryption helps protect data on Windows-based computers, and it helps block malicious users from accessing the system files they rely on to discover the user’s password, or from accessing a drive by physically removing it from the PC and installing it on a different one. Дополнительные сведения см. в статье What’s New in BitLocker (Новые возможности BitLocker). For more information, see What’s new in BitLocker.
Поддержка больших томов Support for large volumes
NTFS может поддерживать тома размером до 8 ПБ в версии Windows Server 2019 и выше и Windows 10 версии 1709 и выше (более ранние версии поддерживают до 256 ТБ). NTFS can support volumes as large as 8 petabytes on Windows Server 2019 and newer and Windows 10, version 1709 and newer (older versions support up to 256 TB). Поддерживаемые размеры томов зависят от размера кластеров и их количества. Supported volume sizes are affected by the cluster size and the number of clusters. Для кластеров (2 32 –1) (максимальное число кластеров, поддерживаемое NTFS) поддерживаются следующие размеры томов и файлов. With (2 32 – 1) clusters (the maximum number of clusters that NTFS supports), the following volume and file sizes are supported.
| Размер кластера Cluster size | Самый крупный том и файл Largest volume and file |
|---|---|
| 4 КБ (размер по умолчанию) 4 KB (default size) | 16 ТБ 16 TB |
| 8 КБ 8 KB | 32 ТБ 32 TB |
| 16 КБ 16 KB | 64 ТБ 64 TB |
| 32 КБ 32 KB | 128 ТБ 128 TB |
| 64 КБ (предыдущий максимальный размер) 64 KB (earlier max) | 256 ТБ 256 TB |
| 128 КБ 128 KB | 512 ТБ 512 TB |
| 256 KB 256 KB | 1 ПБ 1 PB |
| 512 КБ 512 KB | 2 ПБ 2 PB |
| 1024 КБ 1024 KB | 4 ПБ 4 PB |
| 2048 КБ (максимальный размер) 2048 KB (max size) | 8 ПБ 8 PB |
Обратите внимание, что при попытке подключить том с размером кластера, который превышает поддерживаемый максимум используемой версии Windows, вы получите ошибку STATUS_UNRECOGNIZED_VOLUME. Note that if you try to mount a volume with a cluster size larger than the supported maximum of the version of Windows you’re using, you get the error STATUS_UNRECOGNIZED_VOLUME.
Службы и приложения могут накладывать дополнительные ограничения на размер файлов и томов. Services and apps might impose additional limits on file and volume sizes. Например, ограничение размера тома составляет 64 ТБ, если вы используете функцию предыдущих версий или приложение резервного копирования, которое использует моментальные снимки службы теневого копирования томов (и не используете сеть SAN или RAID). For example, the volume size limit is 64 TB if you’re using the Previous Versions feature or a backup app that makes use of Volume Shadow Copy Service (VSS) snapshots (and you’re not using a SAN or RAID enclosure). Тем не менее, может потребоваться использовать тома меньшего размера в зависимости от рабочей нагрузки и производительности хранилища. However, you might need to use smaller volume sizes depending on your workload and the performance of your storage.
Требования к форматированию для больших файлов Formatting requirements for large files
Есть новые рекомендации по форматированию томов в отношении правильного расширения больших файлов VHDX. To allow proper extension of large .vhdx files, there are new recommendations for formatting volumes. В ходе форматирования томов, которые будут использоваться при дедупликации данных, или при размещении очень больших файлов, таких как файлы VHDX размером больше 1 ТБ, используйте в Windows PowerShell командлет Format-Volume со следующими параметрами. When formatting volumes that will be used with Data Deduplication or will host very large files, such as .vhdx files larger than 1 TB, use the Format-Volume cmdlet in Windows PowerShell with the following parameters.
| Параметр Parameter | Описание Description |
|---|---|
| -AllocationUnitSize 64KB -AllocationUnitSize 64KB | Задает размер единицы распределения NTFS 64 КБ. Sets a 64 KB NTFS allocation unit size. |
| -UseLargeFRS -UseLargeFRS | Включает поддержку сегментов записей больших файлов (FRS). Enables support for large file record segments (FRS). Это необходимо для увеличения количества экстентов, допустимых для каждого файла в томе. This is needed to increase the number of extents allowed per file on the volume. Для больших записей FRS ограничение увеличивается с примерно 1 500 000 до 6 000 000 экстентов. For large FRS records, the limit increases from about 1.5 million extents to about 6 million extents. |
Например, следующий командлет форматирует диск D как том NTFS с включенными FRS и размером единицы распределения 64 КБ. For example, the following cmdlet formats drive D as an NTFS volume, with FRS enabled and an allocation unit size of 64 KB.
Можно также использовать команду format. You also can use the format command. В системной командной строке введите следующую команду, где /L форматирует большой том FRS, а /A:64k задает размер единицы распределения 64 КБ: At a system command prompt, enter the following command, where /L formats a large FRS volume and /A:64k sets a 64 KB allocation unit size:
Максимальная длина имени файла и пути к файлу Maximum file name and path
NTFS поддерживает длинные имена файлов и пути увеличенной длины со следующими максимальными значениями: NTFS supports long file names and extended-length paths, with the following maximum values:
Поддержка длинных имен файлов с обратной совместимостью. NTFS допускает длинные имена файлов, сохраняя псевдоним 8.3 на диске (в кодировке Юникод), чтобы обеспечить совместимость с файловыми системами, которые накладывают ограничение 8.3 на имена и расширения файлов. Support for long file names, with backward compatibility—NTFS allows long file names, storing an 8.3 alias on disk (in Unicode) to provide compatibility with file systems that impose an 8.3 limit on file names and extensions. При необходимости (по соображениям производительности) можно выборочно отключить именование 8.3 на отдельных томах NTFS в Windows Server 2008 R2, Windows 8 и более поздних версиях операционной системы Windows. If needed (for performance reasons), you can selectively disable 8.3 aliasing on individual NTFS volumes in Windows Server 2008 R2, Windows 8, and more recent versions of the Windows operating system. В Windows Server 2008 R2 и более поздних версий короткие имена по умолчанию отключены при форматировании тома с помощью операционной системы. In Windows Server 2008 R2 and later systems, short names are disabled by default when a volume is formatted using the operating system. Для совместимости приложений на системном томе все еще включены короткие имена. For application compatibility, short names still are enabled on the system volume.
Поддержка путей увеличенной длины. Многие функции API Windows поддерживают версии Юникода, позволяющие использовать расширенный путь длиной приблизительно 32 767 символов, а не ограниченный по длине в 260 символов, что определяется параметром MAX_PATH. Support for extended-length paths—Many Windows API functions have Unicode versions that allow an extended-length path of approximately 32,767 characters—beyond the 260-character path limit defined by the MAX_PATH setting. Подробные требования к именам файлов и формату путей, а также рекомендации по реализации путей увеличенной длины см. в статье Naming Files, Paths, and Namespaces (Имена файлов, пути и пространства имен). For detailed file name and path format requirements, and guidance for implementing extended-length paths, see Naming Files, Paths, and Namespaces.
Кластерное хранилище. При использовании в отказоустойчивых кластерах NTFS поддерживает постоянно доступные тома, к которым могут одновременно обращаться несколько узлов кластера при использовании совместно с файловой системой CSV. Clustered storage—When used in failover clusters, NTFS supports continuously available volumes that can be accessed by multiple cluster nodes simultaneously when used in conjunction with the Cluster Shared Volumes (CSV) file system. Дополнительные сведения см. в статье Use Cluster Shared Volumes in a Failover Cluster (Использование общих томов кластера в отказоустойчивом кластере). For more information, see Use Cluster Shared Volumes in a Failover Cluster.
Динамическое выделение емкости Flexible allocation of capacity
Если пространство тома ограничено, NTFS предоставляет следующие возможности для работы с емкостью хранилища сервера: If the space on a volume is limited, NTFS provides the following ways to work with the storage capacity of a server:
- применение дисковых квот для отслеживания и контроля использования дискового пространства в томах NTFS для отдельных пользователей; Use disk quotas to track and control disk space usage on NTFS volumes for individual users.
- сжатие файловой системы, чтобы максимально увеличить объем хранимых данных; Use file system compression to maximize the amount of data that can be stored.
- увеличение размера тома NTFS возможно путем добавления нераспределенного пространства с того же или с другого диска; Increase the size of an NTFS volume by adding unallocated space from the same disk or from a different disk.
- подключение тома к любой пустой папке на локальном томе NTFS, если использованы все буквы диска или необходимо создать дополнительное пространство, доступное из существующей папки. Mount a volume at any empty folder on a local NTFS volume if you run out of drive letters or need to create additional space that is accessible from an existing folder.