
Все способы:
- Включаем TouchPad на ноутбуке с Windows 10
- Способ 1: Использование сочетаний клавиш
- Способ 2: Настройка TouchPad
- Способ 3: Включение TouchPad в BIOS
- Способ 4: Переустановка драйверов
- Вопросы и ответы: 8
TouchPad — очень полезное устройство, довольно компактное и удобное в использовании. Но иногда пользователи ноутбука могут столкнуться с такой проблемой, как выключенный тачпад. Причины этой проблемы могут быть разными — возможно, устройство просто отключено или проблема заключается в драйверах.
Включаем TouchPad на ноутбуке с Windows 10
Причина неработоспособности тачпада может заключаться в проблемах с драйверами, проникновении в систему вредоносного ПО, неправильной настройке устройства. Тачпад также может быть случайно отключен сочетаниями клавиш. Далее будут описаны все методы исправления данной проблемы.
Способ 1: Использование сочетаний клавиш
Причина неработоспособности тачпада может быть в невнимательности пользователя. Возможно, вы случайно выключили тачпад, зажав специальную комбинацию клавиш.
| Производитель | Горячие клавиши |
|---|---|
| Asus | Fn+F9 или Fn+F7 |
| Lenovo | Fn+F8 или Fn+F5 |
| НР | Отдельная кнопка или двойной тап в левом углу тачпада |
| Acer | Fn+F7 |
| Dell | Fn+F5 |
| Sony | Fn+F1 |
| Toshiba | Fn+F5 |
| Samsung | Fn+F5 |
Помните, что в разных моделях могут быть разные комбинации.
Способ 2: Настройка TouchPad
Возможно, параметры тачпада настроены так, что при подключении мыши устройство отключается.
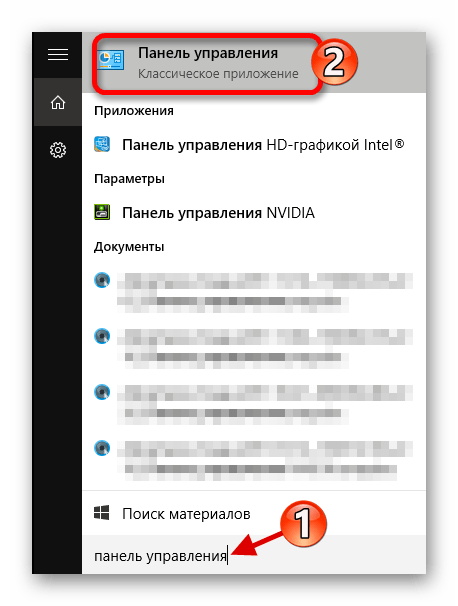
- Зажмите Win+S и введите «Панель управления».
- Выберите нужный результат из списка.
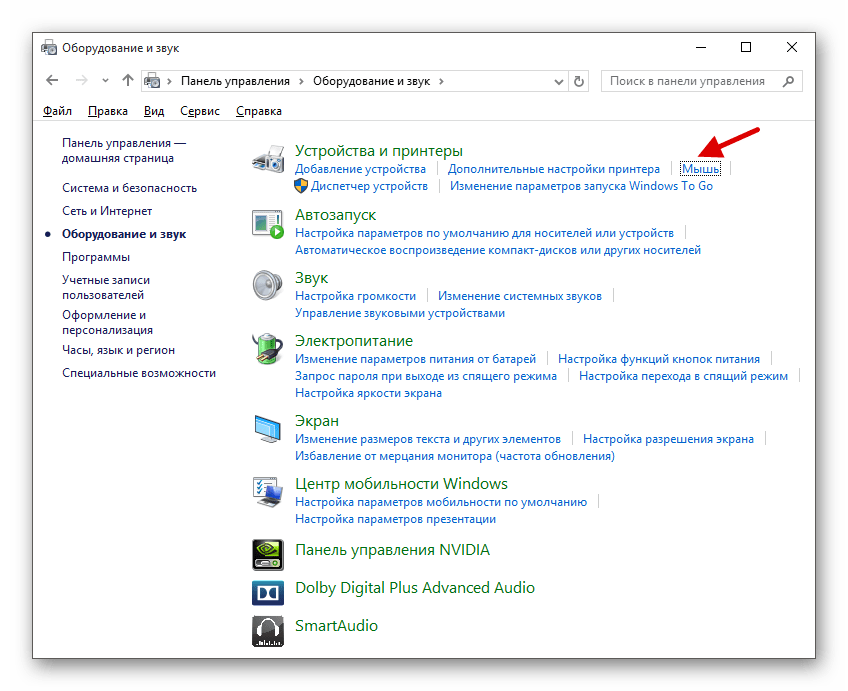
- Перейдите к разделу «Оборудование и звук».
- В разделе «Устройства и принтер» найдите «Мышь».
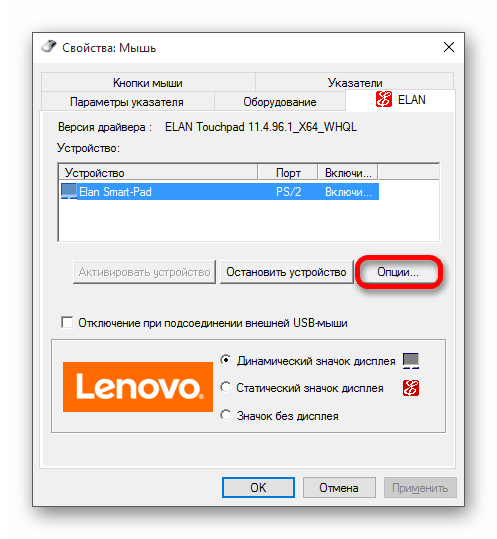
- Перейдите во вкладку «ELAN» или «ClicPad» (название зависит от вашего устройства). Раздел также может называться «Параметры устройства».
- Активируйте устройство и отключите деактивацию тачпада при подключении мышки.

Если вы захотите настроить тачпад под себя, то перейдите в «Опции…».


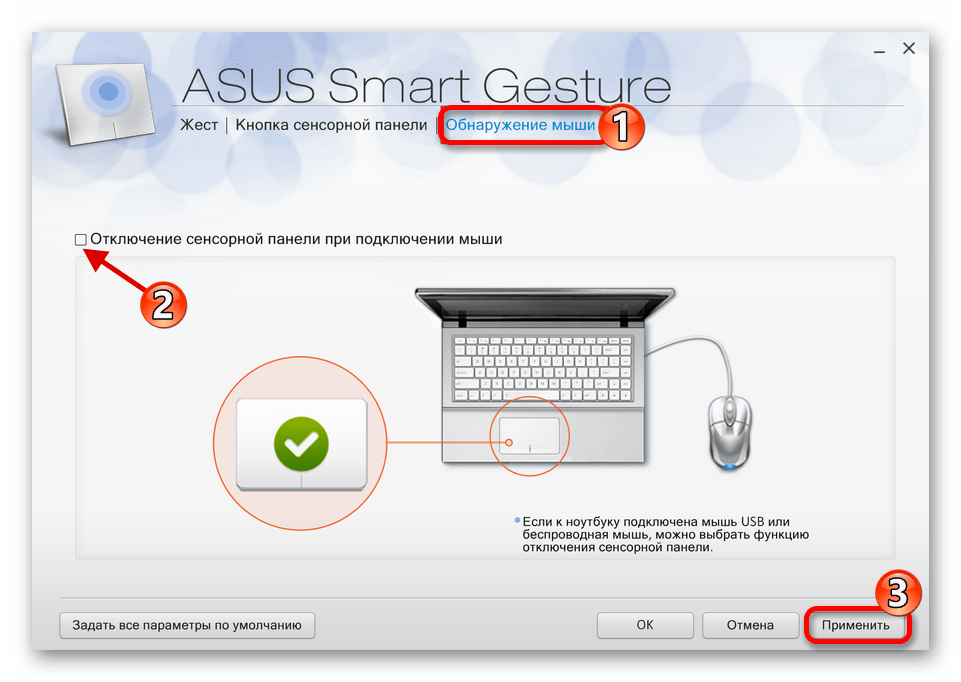
Часто производители ноутбуков делают специальные программы для тачпадов. Поэтому лучше настраивать устройство с помощью такого ПО. Например, в ASUS есть Smart Gesture.
- Найдите и запустите на «Панели задач» ASUS Smart Gesture.
- Перейдите к «Обнаружение мыши» и уберите галочку напротив «Отключение сенсорной…».
- Примените параметры.
Аналогичные действия потребуется выполнить и на ноутбуке любого другого производителя, используя предустановленный клиент для настройки тачпада.
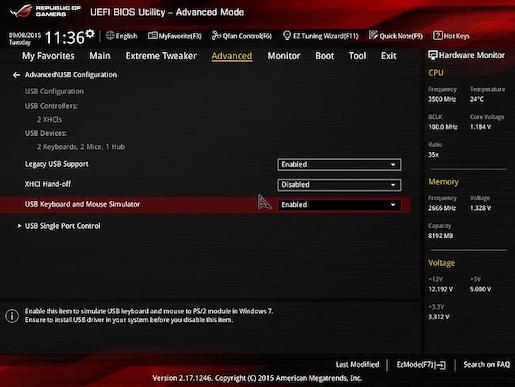
Способ 3: Включение TouchPad в BIOS
Если предыдущие методы не помогли, тогда стоит проверить настройки БИОС. Возможно, тачпад отключен там.
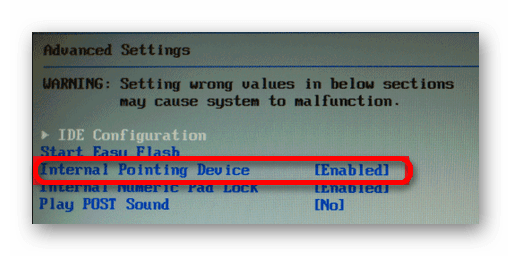
- Войдите в BIOS. На разных ноутбуках разных производителей для этих целей могут быть предназначены разные комбинации или даже отдельные кнопки.
- Перейдите во вкладку «Advanced».
- Найдите «Internal Pointing Device». Путь тоже может отличаться и зависит от версии БИОС. Если напротив него стоит «Disabled», тогда нужно его включить. Используйте клавиши, чтобы изменить значение на «Enabled».
- Сохраните и выйдите, выбрав соответствующий пункт в меню BIOS.
Способ 4: Переустановка драйверов
Часто переустановка драйверов помогает решить проблему.
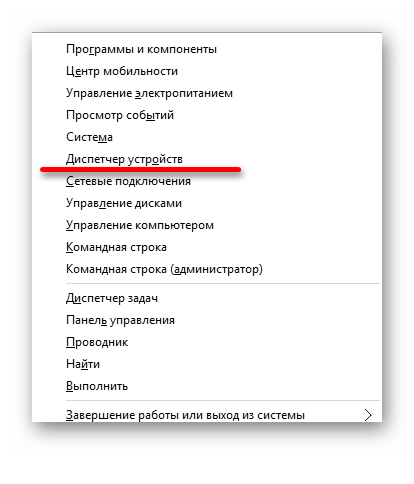
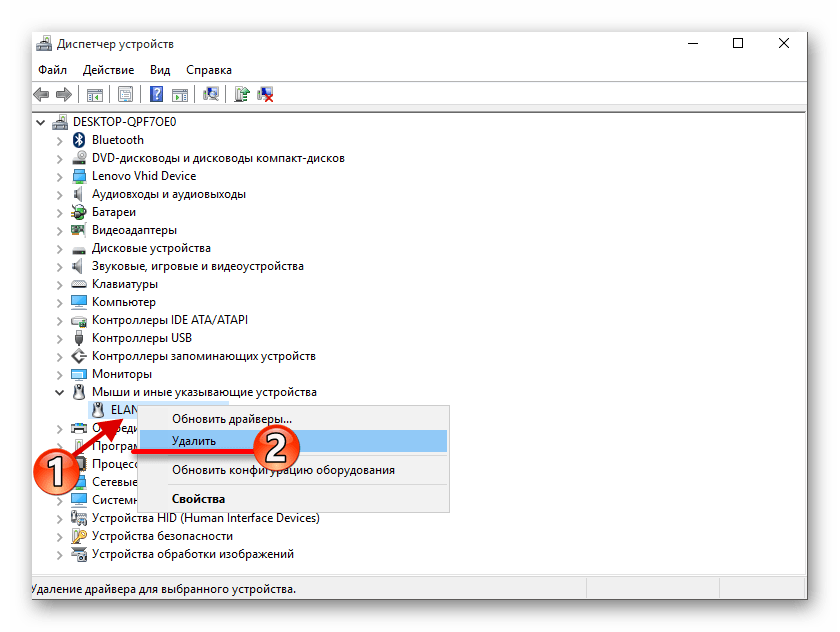
- Зажмите Win+X и откройте «Диспетчер устройств».
- Разверните пункт «Мыши и иные указывающие устройства» и кликните правой кнопкой мыши на нужном оборудовании.
- В списке найдите «Удалить».
- В верхней панели откройте «Действие» — «Обновить конфигурацию…».

Вы также можете просто обновить драйвера. Это можно сделать стандартными средствами, вручную или с помощью специального программного обеспечения.
Подробнее:
Как обновить драйвера на компьютере с помощью DriverPack Solution
Лучшие программы для установки драйверов
Установка драйверов стандартными средствами Windows
Тачпад довольно легко включить специальным сочетанием клавиш. Если он настроен неправильно или драйвера перестали корректно работать, вы всегда можете решить проблему с помощью стандартных инструментов Виндовс 10. Если ни один из способов не помог, стоит проверить ноутбук на наличие вирусного ПО. Также не исключено, что сам тачпад физически вышел из строя. В таком случае нужно отнести ноутбук в ремонт.
Читайте также: Проверка компьютера на наличие вирусов без антивируса
Наша группа в TelegramПолезные советы и помощь
Jun. 23, 2022 / Updated by
Helia to
Windows 10
Most of the Windows 10 users use their mice or keyboards with the USB ports. Sometimes the computer may run into an issue that mouse stops working on Windows 10 but only works in BIOS.
«My mouse suddenly doesn’t work in the Windows 10 home screen, but it works perfectly fine when I am in the BIOS.»
«Keyboard and mouse works in BIOS but stops working on a startup. Any solutions for this?»
«When I turn the computer on the mouse works fine in BIOS but as soon as I try to load Windows 10 it stops working.»
These are part of the users’ reports on the Internet. After loading Windows 10, users can see the home screen normally but there’s no mouse cursor on the screen or they fail to click on the mouse to activate anything. In fact, such USB mouse malfunction can occur in various Windows systems, like Windows 10, Windows 7, Windows XP, etc.
Luckily, we’ve got some viable solutions for you to fix the bug «mouse not working after loading Windows 10 but only working in BIOS».
Top 3 Ways Solve Mouse Not Working on Windows 10 but Working in BIOS
You can follow the steps in each method to fix the mouse not working in Windows 10 issue. Note: For convenience, you can use a PS/2 mouse on your desktop computer or use the touchpad on your laptop to make changes on Windows 10.
Way 1. Test Your USB Mouse on Other PCs
The conflict between the USB mouse driver and a certain computer program can cause that you fail to use your mouse on the home screen of Windows 10.
Test the mouse on another computer.
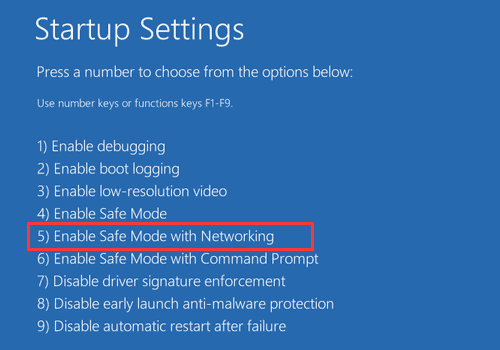
This helps to make sure whether the «mouse not working on Windows 10 but only working in BIOS» issue is caused by this. If the mouse is working on other computers, there may be problems with your USB mouse driver or recently installed programs. You can go into the Safe Mode to fix the problem.
Boot into Safe Mode to solve the problem.
After you enter the Safe Mode, perform a Windows 10 clean boot to figure out the culprits that cause the «USB mouse not working on Windows 10 but only working in BIOS» problem. Once you find out the faulty application or software, uninstall it and restart the computer to see if the mouse functions again.
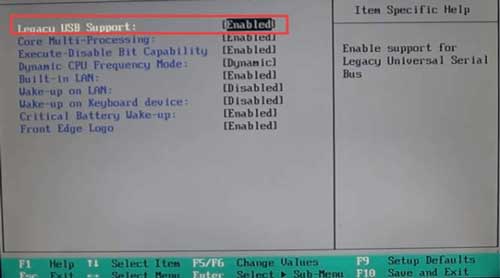
Go to BIOS to Enable the USB Legacy Support
This feature allows users to use USB mouse during the system startup. You can enable it by
1. Turn on the computer and Enter the BIOS via pressing the functions key(s) once you see the PC brand logo screen.
2. Use the arrow keys and the Enter key to find out the USB Legacy Support feature. Enable the feature.
3. Press F10 to save the changes and then boot into Windows 10.
Way 2. Fix USB Mouse Not Working Error by Using PS/2 Port Mouse to Repair the Faulty Mouse Driver
If you’re using a desktop or if there are PS/2 ports on your laptop, you can temporarily use a PS/2 mouse to fix the issue.
1. Plug the PS/2 mouse into the port on the motherboard on your computer.
2. Go to the Device Manager and expand the entry Mice and other pointing devices or Human Interface Devices or Universal Serial Bus controllers.
3. Find your USB mouse device and right-click to select Uninstall device.
4. Go to your mouse brand website to download the best-matched USB mouse driver. (Or you can use one-click driver solutions, like Driver Talent, to download drivers and save some time.)
5. Install the mouse driver and reinstall the computer.
After that, test if your USB mouse has been brought back on track.
See Also:
-
Easy Way to Download Logitech Mouse Driver on Windows 10, 8.1, 8, 7, XP, Vista
-
HID-compliant Mouse Drivers for Windows 10, 8.1, 8, 7, Vista, XP
-
Acer Mouse Drivers Download and Update on Windows 10, 8.1, 8, 7, Vista, XP
-
Microsoft Arc Mouse Drivers for Windows 10, 8.1, 8, 7, Vista, XP
Way 3. Fix USB Mouse Not Working in Windows 10 but Working in BIOS by Installing Correct Motherboard Driver
Faulty motherboard driver can also cause that the USB mouse stops working properly on Windows 10 but only works in BIOS. In this case, you need to install correct motherboard driver to fix the issue.
If you have the motherboard driver CD-ROM, you can reinstall the motherboard driver and then update it to the version compatible with your current Windows 10 version. But actually, most of the computers have not carried a CD-ROM drive now. In this case, you can do the following:
1. Download proper motherboard driver from another computer and transfer it to a USB drive.
2. Follow the tutorial on Microsoft website to create a USB bootable drive. Make sure the driver files are stored on the same USB drive.
3. Enter the BIOS and change the Boot Device Priority to USB Flash.
4. Boot into Windows PE and install the motherboard driver.
5. Restart the computer and boot into Windows 10. Try your USB mouse to see if the problem still persists.
See Also:Fix Mouse/Keyboard Not Working after Windows 10 Update on Feb. 2018
How to Quickly Install the Compatible USB Mouse Driver/Motherboard Driver for Windows 10
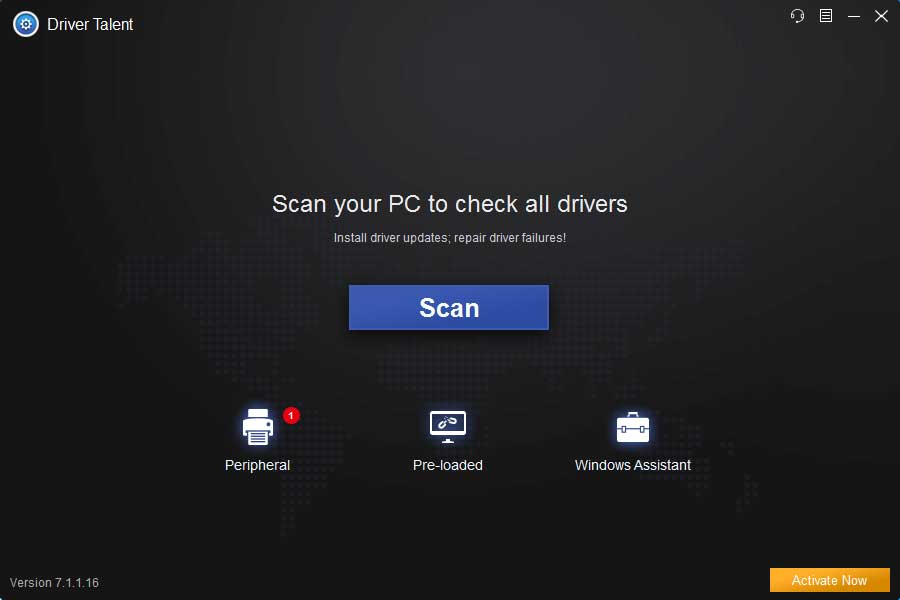
If you want to save your time and get rid of the time-consuming driver download process above, you can use a one-click driver download and install utility, Driver Talent, to help to fix the USB mouse driver or motherboard driver issues quickly. Received good reviews on both Engadget and SafeTricks, Driver Talent is a safe utility to offer official or WHQL drivers for PC brands, like Asus, HP, Dell, Acer, Lenovo, Samsung, Microsoft, MSI, etc.
Download Now
Download it and transfer the .exe file to your USB drive. Then you can launch it to start a fast drivers download. This saves you a lot of time and energy. See Tip 3 for more details.
1. Launch Driver Talent on your Windows 10. Click the Scan button to check those outdated, broken, missing or incompatible drivers.
2. Click the Repair button or the Update button to start downloading proper drivers for your Windows 10. You can also select the driver version as required. It will install the driver once the download process finishes.
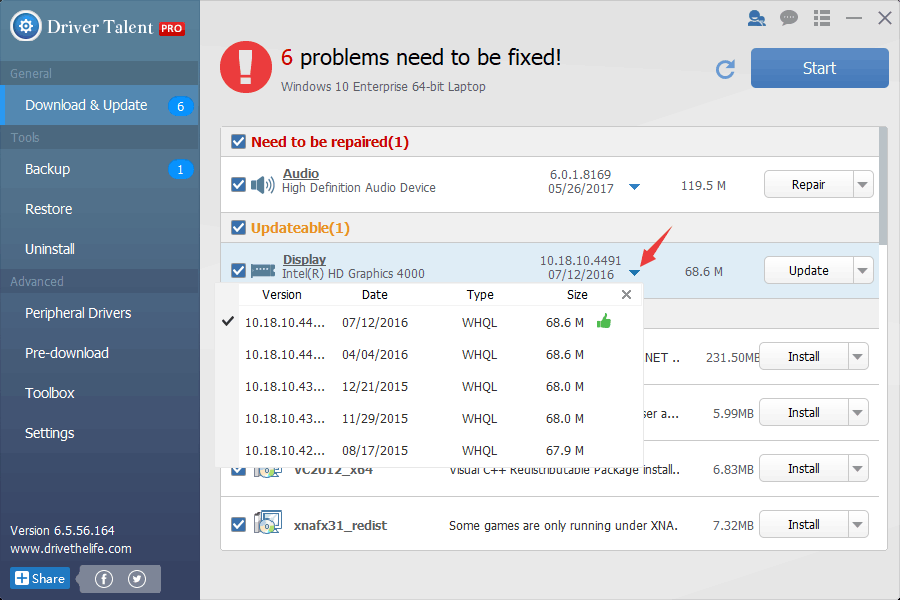
3. Restart the computer to make the driver changes take effect.
Note: It is better to create a system restore point and backup the drivers on Windows 10 so that you can quickly restore the system and the drivers once the computer runs into other issues.
That’s it. Hope at least some of these methods are helpful for you. If you come across other Windows 10-related issues after the latest Windows 10 update, you can visit Windows 10 section on this site. Do comment below sharing your thoughts and experiences about how you fix the «mouse only working in BIOS but not working on Windows 10» problem. Many thanks.
Other Mouse-related Issues and Solutions:
-
Fix Bluetooth/Wireless Mouse Lag Issue on Windows 10
-
Fix: Windows 10 Mouse Lagging/Freezing/Stuttering
-
Fix Mouse Cursor Disappears after Windows 10 Creators Update
-
How to Fix «Mouse Moving on Its Own» in Windows 10
-
Fix HID-compliant Mouse Not Working on Windows 10
-
4 Fixes for Mouse Double Clicking Issue in Windows 10
-
How to Fix Middle Mouse Button Not Working on Windows 10
Recommended Download
|
ExplorerMax |
Driver Talent for Network Card | |||
| Smart and advanced file explorer tool for Windows platforms | Download & Install Network Drivers without Internet Connection | |||
|
30-day Free Trial |
Free Download |
To use any version of Windows, you must have a functioning keyboard and mouse. Without these peripherals, you can do anything. How are you going to enter folders? How are you going to type? Most importantly, how will you play games?
Many Windows users have complained that their keyboards and mice work in the BIOS menu but not in Windows.
So, you might ask, Why are my keyboard and mouse working in the BIOS menu but not on Windows?
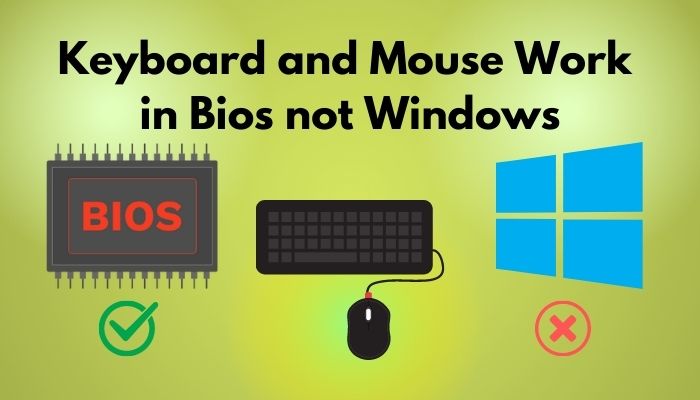
Your keyboard and mouse are working in the Bios menu but not on Windo2ws because the drivers for your keyboard and mouse could be corrupted. Corrupted system files can also make your keyboard and mouse not to work properly. Installing a new Windows update can also result in many issues to occur.
If you are frustrated, I can understand. It must be very annoying that you are not able to use your keyboard and mouse.
That is why I have conducted extensive research and have written the best ways you can fix this problem. Please read the full post for more details.
I have written the fixes to the keyboard and mouse not working on the Windows issue below in this post. All the methods have been tested, so there is no reason to doubt whether the procedures are legit or not.
The steps in each process are very straightforward, so there is no reason for you to worry, even if you do not have much experience with Windows.
Here are the methods to fix keyboard and mouse not working on Windows:
This is the most effective fix that I have found after conducting thorough research. In this process, you are going to enter the BIOS menu of your respective motherboard and enable some USB options.
As different motherboard manufacturers have different BIOS firmware, you need to check how you can enter the BIOS menu of your specific motherboard.
For example, the way to enter the BIOS menu of GIGABYTE motherboard differs from an ASUS motherboard.
So check the internet to enter the BIOS menu for your motherboard and follow the simple steps given below after entering the BIOS menu.
Also, don’t forget to check out our experts tested the best Aura Sync Compatible RGB Keyboards.
Here are the steps to use the BIOS menu to fix the keyboard not working on Windows issue:
- Enter the BIOS menu.
- Navigate and enter the USB options.
- Enable the USB keyboard and mouse simulator or any other option that sounds similar.

- Restart your PC and check whether the problem got resolved.
If this process did not fix the problem on your system, do not be sad as other fantastic and easy-to-follow methods are given below, so please go through them.
Here’s a complete guide on how to fix Keyboard not working in BIOS.
2. Disconnect your System
A quick and easy fix to this problem is to power cycle your system. You can do this by disconnecting your PC from the power supply by removing the power cable connected to your system.
In this process, all you are going to do is, turn off your system, disconnect the power cable from your system, wait food 10 seconds at least and then reconnect your system to the power source again.
After that, you will turn on your system to check whether your mouse and keyboard are working or not.
The simple steps to this process are given below, so keep calm and go through them.
Here are the steps to power cycle your system to fix the keyboard not working on Windows:
- Turn off your system.
- Disconnect the power cable from your system.
- Wait for 20 seconds.
- Reconnect the power cable and turn on your system.
- Check whether your keyboard and mouse are working or not.
If this process did not fix the problem on your system, do not be sad as other fantastic and easy-to-follow methods are given below, so please go through them.
3. Use another USB port
Although it might seem like a very simple fix as all you are doing is disconnecting your keyboard and mouse from their USB ports and using the other USB ports available on your system.
This method is excellent as even if it does not fix the problem, it confirms that the issue is not occurring for any minor reasons.
The simple steps in this process are given below, so keep your cool and go through them.
Here are the steps to use another USB to fix the keyboard not working on Windows:
- Turn on your system.
- Disconnect your keyboard and mouse.
- Reconnect your keyboard and mouse to other USB ports present on your system.
- Check whether your keyboard and mouse are working or not.
If this process did not fix the problem on your system, do not be sad as other fantastic and easy-to-follow methods are given below, so please go through them.
Check out our post on will motherboard boot without CMOS battery.
4. Update device drivers
Every peripheral connected to your PC is required to have its respective drivers installed on your system.
Having outdated or corrupted drivers will result in your peripherals, in this case, it is your keyboard and mouse.
Here are the steps to reinstall drivers to fix the keyboard not working on the Windows issue:
If this process did not fix the problem on your system, do not be sad as other fantastic and easy-to-follow methods are given below, so please go through them.
5. Update your Windows OS
Having an outdated version of Windows increases your chances of facing unnecessary problems. It is a great habit to make sure you have the latest version of Windows installed on your system.
The great thing is that it is very easy to update Windows and the steps to do that are given below. Do not be worried as the steps are very straightforward, so keep calm and go through the steps.
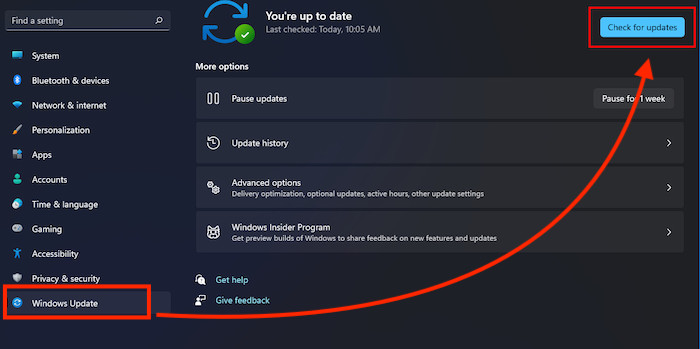
Here are the steps to update Windows to fix the keyboard not working on Windows:
- Go to Settings from the Start button.
- Enter Windows Update at the left menu pane.
- Click on the Check for Updates

- Install all the available updates.
- Restart your system.
- Check whether the problem persists after your system boots up.
6. Reinstall device drivers
Reinstalling device drivers is a great way to fix problems regarding any device, not only keyboards and mice. So follow the straightforward steps below and you will be good to go.
Here are the steps to reinstall drivers to fix keyboard not working on Windows issue:
Conclusion
I hope you could fix the keyboard and mouse not working on the Windows issue. I have tried my best to provide you with the latest and best methods to fix this annoying problem.
Hopefully, you will never face a problem like this in the future. I hope you have a very smooth experience in using Windows.
Even if you do face a problem like this in the future, if you have read the post, you know some fixes to similar problems and you can use the knowledge to fix them.
I wish you luck in whatever you do in the future. Take care and stay safe!
Компьютер или ноутбук не видит мышь
Иногда пользователь Windows 10, 8 или Windows 7 может столкнуться с тем, что его компьютер (или ноутбук) не видит мышь — это может происходить после обновлений системы, изменения конфигурации оборудования, а иногда и вовсе без каких-то явных предшествующих действий.
В этой инструкции подробно о том, почему не работает мышь на компьютере с Windows и что делать, чтобы это исправить. Возможно, во время каких-то описываемых в руководстве действий вам пригодится руководство Как управлять мышью с клавиатуры.
Основные причины, по которым не работает мышь в Windows
Для начала о тех факторах, которые наиболее часто оказываются причиной того, что не работает мышь в Windows 10: они сравнительно просты в распознавании и исправлении.
Основными причинами, из-за которых компьютер или ноутбук не видит мышь бывают (далее все они будут подробно рассмотрены)
- После обновления системы (особенно Windows 8 и Windows 10) — проблемы с работой драйверов USB контроллеров, управлением электропитанием.
- Если это новая мышь — проблемы с самой мышью, расположением приемника (для беспроводной мыши), её подключением, разъемом на компьютере или ноутбуке.
- Если мышь не новая — случайно вынутый кабель/приемник (проверьте, если ещё не сделали) севшая батарея, испорченный разъем или кабель мыши (повреждения внутренних контактов), подключение через USB-хаб или порты на передней панели компьютера.
- Если на компьютере менялась или ремонтировалась материнская плата — отключенные разъемы USB в BIOS, неисправность разъемов, отсутствие их подключения к материнской плате (для USB разъемов на корпусе).
- Если у вас какая-то особенная, жутко навороченная мышь, в теории она может требовать специальных драйверов от производителя (хотя, как правило, базовые функции работают и без них).
- Если речь идет о полностью рабочей Bluetooth мыши и ноутбуке — иногда причиной оказывается случайное нажатие клавиш Fn+режим_полета на клавиатуре, включение режима «В самолете» (в области уведомлений) в Windows 10 и 8, отключающее Wi-Fi и Bluetooth. Подробнее — не работает Bluetooth на ноутбуке.
Возможно, уже один из этих вариантов поможет вам разобраться, в чем причина проблемы и исправить ситуацию. Если же нет — пробуем другие методы.
Что делать, если мышь не работает или компьютер её не видит
А теперь о том, что конкретно делать, если не работает мышь в Windows (речь пойдет о проводных и беспроводных мышках, но не о Bluetooth устройствах — для последних убедитесь, что модуль Bluetooth включен, батарея «целая» и при необходимости попробуйте заново выполнить сопряжение устройств — удалить мышь и присоединиться к ней снова).
Для начала очень простые и быстрые способы, позволяющие выяснить, дело в самой мыши или в системе:
- Если есть сомнения в работоспособности самой мыши (или её кабеле) — попробуйте проверить её на другом компьютере или ноутбуке (даже если ещё вчера она работала). При этом важный момент: светящийся сенсор мыши не говорит о её работоспособности и о том, что с кабелем/разъемом всё в порядке. Если у вас UEFI (BIOS) поддерживает управление, попробуйте зайти в БИОС и проверить, а работает ли мышь там. Если да, то с ней всё в порядке — проблемы на уровне системы или драйверов.
- Если мышь подключена через USB-хаб, к разъему на передней панели ПК или к разъему USB 3.0 (обычно синего цвета), попробуйте подключить её к задней панели компьютера, в идеале — к одному из первых портов USB 2.0 (обычно самые верхние). Аналогично на ноутбуке — если подключена к USB 3.0, попробуйте подключить к USB 2.0.
- Если перед появлением проблемы вы подключили внешний жесткий диск, принтер или еще что-то по USB, попробуйте отключить это устройство (физически), а затем перезагрузить компьютер.
- Загляните в диспетчер устройств Windows (запустить с клавиатуры можно так: нажать клавиши Win+R, ввести devmgmt.msc и нажать Enter, для перемещения по устройствам можно один раз нажать Tab, затем использовать стрелки вниз и вверх, стрелка вправо, чтобы открыть раздел). Посмотрите, есть ли там мышь в разделе «Мыши и иные указывающие устройства» или «Устройства HID», не указаны ли какие-то ошибки для неё. Исчезает ли мышь из диспетчера устройств при физическом её отключении от компьютера? (некоторые беспроводные клавиатуры могут определяться как клавиатура и мышь, также как мышь может определяться тачпад — как у меня на скриншоте две мыши, одна из которых на самом деле клавиатура). Если не исчезает или не видна вовсе, то дело, вероятно, в разъеме (неработающем или отключенном) или кабеле мыши.

- Также в диспетчере устройств можно попробовать удалить мышь (клавишей Delete), а затем в меню (для перехода в меню нажмите Alt) выбрать «Действие» — «Обновить конфигурацию оборудования», иногда это срабатывает.
- Если проблема возникла с беспроводной мышью, а её приемник подключен к компьютеру на задней панели, проверьте, а начинает ли она работать, если поднести её поближе (так, чтобы была прямая видимость) к приемнику: достаточно часто бывает так, что дело в плохом приеме сигнала (в этом случае еще один признак — мышь то работает, то нет — пропускает щелчки, движения).
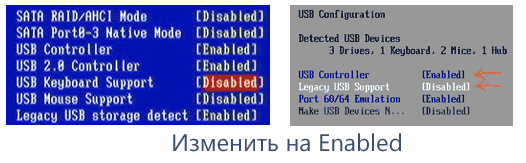
- Проверьте, есть ли опции включения/отключения USB разъемов в БИОС, особенно если менялась материнская плата, сбрасывался БИОС и т.п. Подробнее на тему (правда, писалось в контексте клавиатуры) — в инструкции Не работает клавиатура при загрузке компьютера (посмотрите раздел про поддержку USB в БИОС).


Это основные методы, которые могут помочь, когда дело не в Windows. Однако, нередко бывает так, что причина именно в неправильной работе ОС или же драйверов, часто встречается и после обновлений Windows 10 или 8.
В этих случаях могут помочь такие методы:
- Для Windows 10 и 8 (8.1) попробуйте отключить быстрый запуск, а затем выполнить перезагрузку (именно перезагрузку, а не завершение работы и включение) компьютера — это может помочь.
- Проделайте шаги из инструкции Сбой запроса дескриптора устройства (код 43), даже если у вас нет таких кодов и неизвестных устройств в диспетчере, ошибок с кодом или сообщений «USB-устройство не опознано» — они всё равно могут оказаться результативными.
Если ни один из методов не помог — опишите подробно ситуацию, постараюсь помочь. Если же, наоборот, сработало что-то другое, не описанное в статье, буду рад, если поделитесь в комментариях.