

Все владельцы геймпадов DUALSHOCK 4, использующие эти замечательные контроллеры совместно с персональным компьютером, знакомы с приложением DS4Windows, которое является сильно переработанной версией утилиты ds4tools. Проблема тут в том, что автор DS4Windows (Jays2Kings) давно забросил разработку приложения, но большинство пользователей, не углубляясь в вопрос, вбивают в гугл: «Скачать DS4Windows», попадают на сайт программы и качают устаревшую версию. На самом деле, поддержка и разработка приложения активно продолжается, но уже другим энтузиастом Ryochan7. Им, со времени выхода последней версии DS4Windows от Jays2Kings, сделано немало изменений. Самым значимым является тот факт, что приложение сменило старый враппер ScpVBus на более новый и продвинутый ViGEmBus. К слову, этот же враппер использует, находящаяся в стадии вечного бета теста, утилита SC Controller, предназначенная для полноценной работы Steam Controller в отвязке от Steam. Для версии от Ryochan7, постоянно вносятся улучшения и исправления. В отличие от старой DS4Windows, в новой поддерживается не только проводное и Bluetooth сопряжение, но и подключение через родной беспроводной адаптер от Sony:

Кроме этого в приложении реализована поддержка некоторых сторонних PS4-совместимых геймпадов, например Hori Fighting Commander и Nacon Revolution Unlimited Pro. Возможно есть и другие, но я не нашёл списка совместимости.
Вернёмся к работе с DS4Windows. Первым делом скачиваем архив с актуальной версией программы. Извлекаем папку с приложением в любое место на вашем жёстком диске, желательно не в системную папку, в этом случае вам постоянно придётся запускать утилиту от администратора:

При первом запуске нам предлагается выбрать место сохранения файлов конфигурации:

Я настоятельно советую выбирать вариант Program Folder. В таком случае все настройки будут храниться в папке с программой, что позволит вам не заниматься настройкой «с нуля», каждый раз, когда вы переустановите Windows или при других форс-мажорных обстоятельствах. Такой себе вариант Portable. Достаточно просто периодически бэкапить папку с программой, целиком.
В следующем окне выбираем Step 1, для установки ViGEmBus драйвера (если он у вас не был установлен до этого):

Сам драйвер можно скачать и установить заранее:

Если у вас на ПК всё ещё стоит ОС Windows 7, дополнительно нажмите на кнопку Step 2 и установите XInput драйвер. Для Windows 10 этого делать не нужно, можно сразу нажимать на «Finished»:

Для перестраховки заглянем в диспетчер устройств и убедимся, что ViGEmBus драйвер на месте:

Всё. Приложение установлено, драйвер встал корректно и при первом запуске DS4Windows в системе появляется дополнительный XBox 360 контроллер:

Но! Сам DUALSHOCK 4 никуда не исчез из игровых устройств и остался видимым для системы. Такой «двойной расклад» может привести к проблемам с нормальной инициализацией геймпада в играх. На этот случай в приложении есть чудесный чекбокс, который называется: «Hide DS4 Controller«. При включении этого режима в системе остаётся только эмулируемый контроллер:

Далее по списку во вкладке «Settings» идут чекбоксы:
- Swipe Touchpad to Switch Profiles. Этот флажок включает\отключает возможность переключения свайпом двумя пальцами созданных вами профилей;
- Run as Startup добавляет приложение в автозагрузку;
- Show Notification предлагает выбрать варианты уведомлений в сайдбаре Windows;
- Disconnect from BT when stopping отключает геймпад при выходе из приложения;
- Flash Lightbar at High Latency позволяет выставить задержку в миллисекундах, по достижению которой световая панель геймпада начнёт моргать красным цветом;
- Start Minimized запуск приложения в свёрнутом состоянии;
- Minimize to Taskbar\Close Minimize сворачивать окно приложение в трей (окно не висит в панели задач);
- Quick Charge эта функция позволяет на лету заряжать геймпад не отрываясь от игрового процесса. Избавляет от эффекта двойного подключения, когда система видит ваш геймпад и по проводу, и по беспроводу;
- White DS4Windows включает белый цвет иконки приложения в трее;
- Check for DS4Windows Update at Startup проверка обновлений при запуске приложения (можно выбрать интервал проверки обновлений);
- UDP Server этот чекбокс нужен для подключения гироскопа в эмулятор CEMU;
- Use language pack выбор языка локализации. Есть и русский, но я привык к дефолтному, английскому, языку приложения;
- Use custom Steam Folder сюда можно прописать путь до основной папки Steam, если он установлена не в дефолтную директорию.
Вкладка «Auto Profiles» позволяет добавлять пути до папок и отдельных игр\приложений к которым будут автоматически применяться созданные вами профили:

На вкладке «Controllers» можно посмотреть статус вашего геймпада и заряд аккумулятора. Помимо этого, можно быстро включить доступный профиль и выбрать цвет подсветки:

И наконец вкладка «Profile». На этой вкладке вы можете: создать, отредактировать, удалить, скопировать, импортировать и экспортировать ваши профили:

Давайте рассмотрим возможности профайлера подробнее. Настроек огромное количество. Я не буду расписывать всё, просто пробегусь по самым значимым возможностям. На вкладке «Other» наибольший интерес представляет меню «Controller», тут можно выбрать, какой контроллер будет эмулироваться в систему: XBox 360 или проводной DUALSHOCK 4 v1. С первым вариантом всё понятно. Зачем нужен второй? Вариант с эмуляцией DUALSHOCK 4 v1 нужен для тех ПК-игр, которые нативно поддерживают DUALSHOCK 4, но только при подключении по проводу и\или только первую ревизию:


Вкладка Gyro позволяет выбрать варианты эмуляции для управления гироскопом и назначить направления осей стиков, на которые вы примените действия сенсора:

Вкладка Lightbar управляет настройкой подсветки. Кроме статического цвета профиля, можно назначить эффект радуги для процесса зарядки, изменение цвета лайтбара в зависимости от уровня заряда и световую сигнализацию для низкого заряда батареи:

Вкладка Axis Config предназначена для тонкой настройки осей:

Для любой кнопки, курка и направления стика можно назначить или записать макрос, например комбинацию кнопок клавиатуры, кликов мыши или управление курсором мыши:

Важно, что прямо «из коробки» с помощью тачпанели геймпада можно управлять курсором мыши. Включение и отключение осуществляется комбинацией PS + тап по тачпанели. По-умолчанию эта функция включена, но можно поставить галку «Start with Slide/Scroll Off» и функция будет включаться только после активации вышеуказанной комбинацией. Прочие настройки подбираются индивидуально. Вот мои:

На вкладке Special Action доступны специальные возможности, их можно назначить на сочетания кнопок геймпада:


Вкладка Controller Reading предназначена для проверки работы элементов управления, а также проверки задержки связи в миллисекундах:

Вроде всё. Вот вам моя уже сконфигурированная версия DS4Windows. В ней создано три профиля:
- Зелёная подсветка — стандартный XBox 360 controller;
- Жёлтая подсветка — проводной DUALSHOCK 4 v1;
- Синяя подсветка — профиль для управления ПК с дивана (геймпад скрыт от системы).
Управление курсором на тачпанели в положении OFF для всех профилей, кроме синего. Для переключения используйте комбинацию PS + тап по тачпанели.
Варианты Special Action видны на этом скриншоте:

Например, комбинацией PS + левый стик вверх\вниз можно управлять системной громкостью, а комбинация PS + L3 отключает системный звук. Комбинация OPTION + PS показывает заряд аккумулятора. Остальное можно удалить, там специфические настройки.
Всем Ку!
Telegram-канал @overclockers_news — теперь в новом формате. Подписывайся, чтобы быть в курсе всех новостей!
This repository was archived by the owner on Oct 24, 2021. It is now read-only.
Version 1.4.52
Added support for New DS4 Controller (thanks andersfischernielsen)
Fixed sensitivity for sticks, causing crashes when trying to edit a profile
Typo fixes (thanks josevill)
Updates to German, Polish, Nederlands and more translations
Version 1.4.5
Added support for the New DS4 USB Adapter (Thanks to boganhobo and Chamilsaan)
Implemented teokp’s amazing fix for hide ds4 not working on the anniversary update of Windows 10: when a controller fails to enter exclusive mode, DS4Windows will ask for admin privileges to fix the issue.
Now (near)unlimited Special Actions can be made from the previous limit of 50
Special Action Xbox Game DVR is now no longer limited to Windows 10, renamed multi action button: Assign a macro to single tap, double tap, and holding down a button
Added option for White DS4Windows Icon in the notification tray (While not merged from, thanks to tehmantra)
Added option to temporarily turn off DS4Windows when using a certain program (togglable in the Auto Profiles Tab) (Same case as above but thanks to dedChar to bring to light)
Fixed Options crashes in certain locales where decimal points are represented with commas, such as German (Thanks to kiliansch)
Added/Updated translations for many languages, now including Japanese, Slovenian, Hungarian, Greek, Finnish, Czech, Indonesian, and Ukrainian
Version 1.4.401
Fixes for inverting the sticks
Updated French, German, Russian, and Vietnamese translations, and added more credits
DS4Updater 1.1.401
Added backup method of updating should anything happen with Github
Version 1.4.4
Revised shift modifier: each button/control has their own independent shift trigger instead of one universal one
Select an action window: this window now highlights what said control is currently set to.
Removed unused images, making the exe a meg smaller
Completely revised how the code for custom mapping works
Updated all translations, added partial Dutch/Nederlands Support
Version 1.4.321
Changed the Rainbow button to an actual button
For using the sixaxis as a mouse, changed none to Always on, also better movement for the gyro when the sensitivity is lowered
Updated Hebrew, Chinese (Traditional), Itilian, Chinese (Simplified)
Version 1.4.32
Added Sensitivity settings for both sticks, triggers, and the gyro
Fixed the select an action window popping up after closing the profile settings or in another tab
Fixed the lightbar button on the main tab being so long, along with some other random ui fixes
Fixed many issues with making a new profile
When useing a custom color the light now fades out based on the current profile settings (ie. when the battery is low)
Added Hebrew and Vietnamese translations
Updated Chinese (T), Russian, German, Polish
DS4Updater 1.1.32
Fixes for when users want to skip downloading their native language
Version 1.4.311
Fixed the profile settings at regular DPI
Version 1.4.31
Revised the Profile settings UI to fit all the settings on the screen.
Fixed not being able to have a negative scroll value for the touchpad
Less lag when opening/reopening profile settings
Added Arabic Translation (Thanks K.F), updated French, Polish, and Portuguese translations
Version 1.4.3
Complete rehaul of the profile settings, bigger workspace to edit controls, and all the settings are on the side now
Added option to change the lightbar color, regardless of the profile’s lightbar setting (useful for using one profile on the same controller). to change click the colored button beside edit in the main tab
Can now set the Gyro as an 1:1 absolute mouse, in this mode the mouse now moves as the controller is moved
Removed the experimental exclusive connection button if on the newest Windows 10 build (1511/TH2)
Finally updated all the translations and added some new ones (such as Chinese and Polish, the translations sheets have been merged to one so it’s easier for me to update
DS4Updater 1.1.3
Fixes
Version 1.4.27
Version 1.4.27
- (Windows 10) Thanks to another workaround found, it has been added to DS4Windows, there is a button on the main tab, to connect your controller exclusively, this will temporarily kill explorer (The taskbar) and bring it back once a controller is connected
- Macros: When recording with a delay, you can now add rumble and changing the lightbar color during the macro, you can use the touchpad zones to add rumble or lightbar options. To change how much rumble happens or the lightbar color, just double click the item in the list
DS4Updater 1.1.27
- Updates are now downloaded from Github
- UI fixes, with clearer errors and «Open DS4» changed to say «Open DS4W»
- If you choose to open DS4W after an update, DS4Windows will update the updater, so you won’t see the command prompt window if you choose this route.
No Audio on PC – Mic Not Working with DS4Windows
Before we proceed to the issues and the fixes, it is essential to know about the gamepads that support audio input/output on PC. Check the list below.
- Dual Shock 4 (version 2 only) connected using USB.
- Dual Shock 4 connected using a Sony Wireless Adapter.
- Dual Sense connected using USB.
- Certain copy-cats of DS4 use USB but not all.
You can download the latest version of DS4Windows that got updated today from below link.
DS4Windows – #1✔️ Use PS5/PS4 Controller on Windows PC
Issue 1 > Normal Audio Not Working When DS4 Plugged In
Certain users of DS4Windows have reported that when they have their Dual Shock 4 gamepad connected to DS4Windows, they do not hear any audio even after connecting a headset to the controller.
Fix 1: Use Dinput Only
Edit the profile that is active on DS4Windows and checkmark the option of Use Dinput only.
Fix 2: Select Normal Speakers from the Taskbar
If you are using a DS4 Controller from 2016, follow the below steps to fix the issue.
- Tap on the volume icon on the taskbar.

- Simply select the normal speakers from the drop-down menu.

In DS4 Controllers from 2016, when connecting via USB, Windows, by default, switches the audio to the headphone jack of the controller and this needs to be manually changed to normal speakers from the taskbar.
Issue 2 > Audio Jack of DS4 Controller Not Working
This issue is opposite to the above issue. In this case, users have reported that when using DS4Windows and having an earphone plugged into the headphone jack of the controller; they cannot hear any audio, however, it works normally without the DS4Windows app.
Fix 1: Lower the Rumble
In this case, you can try lowering the Rumble/Vibration setting to 0 and then check. Most users have reported getting the audio back when they set down the Rumble/Vibration to 0.

Fix 2: Make sure you select the Correct Device for Output
Final Words – Unable to Hear Audio or Mic Not Working with DS4Windows
We hope now you can hear the audio while using the DS4 or Dual Sense controller with DS4Windows. However, if still your headsets or normal speakers are not working when connected to DS4Windows, leave us a note in the comments below. We will help you get your audio back.
Leave a Comment
General info
Jays2Kings’ DS4Windows IS NOT SUPPORTED!
If you just search «DS4Windows» on Google/Bing/whatever the first result will probably be the obsolete Jays2Kings’ version
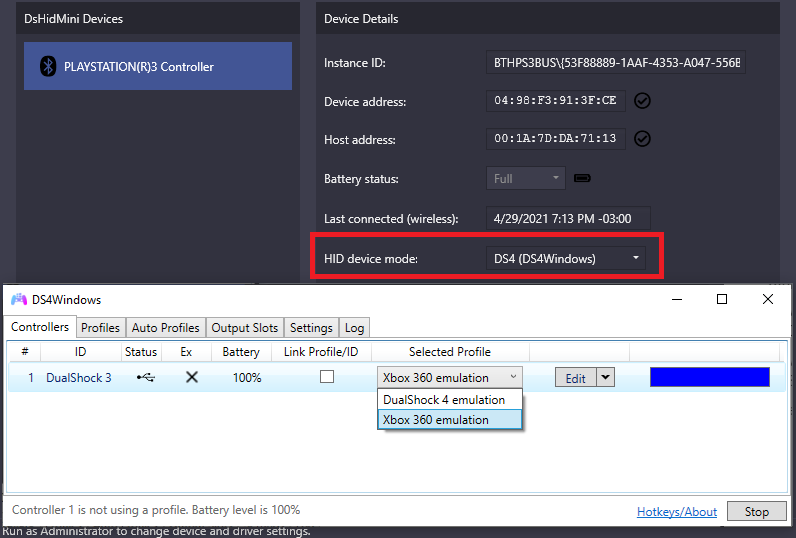
In DS4Windows HID Device Mode, the controller appears as a custom device that can only be detected by Ryochan7’s DS4Windows, allowing the user to then emulate a DualShock 4 or Xbox 360 (XInput) controller as well as make use of most of its features.
What worksWhat does NOT work
- Xbox 360 (XInput) / DualShock 4 emulation according to the selected profile settings in DS4Windows
- Rumble works as normal
- DS4’s Touchpad Button can be used by remapping a button to it (e.g.: use Select as the TP button instead of Share)
- DS3’s LEDs can be controlled by setting the correct Light Bar colors (more on that on a later section)
- DS4Windows’s
Flash Lightbar at High Latencyfunction makes the LEDs flash accordingly - Basically every other DS4Windows function that is not related to the Light Bar or motion works as intended
- DS3 controllers are always recognized as if they were connected by USB. As such, DS4Windows Bluetooth functions like auto-disconnect on idle and disconnect on button combo are not supported. This is a limitation on DsHidMini side and can’t be fixed by DS4Windows. The built-in equivalent functions of DsHidMini should be used instead
- Motion/UDP server is not supported and will remain so until someone manages to translate the motion info from the DS3 to the DS4 motion standard
- Settings that make the Light Bar color flash, pulse or change randomly (rainbow mode) are not supported
- Specific DS4 Touchpad movements are not supported, only the Touchpad Button (another button needs to be remapped to it)
Using the controller with DS4Windows
- To start, the controller must be in
DS4Windowsmode - Download the latest Ryochan7’s DS4Windows release package according to your system architecture
- Extract the package to an easily accessible folder
- Run DS4Windows.exe
- Install the ViGEmBus Driver if asked to
After that, the controller should be properly recognized by DS4Windows. If it’s not, verify again if it is in «DS4Windows mode».
From here, DS4Windows can be used mostly as usual. XInput and DS4 emulation, as well other functions, can then be set-up in the profiles settings according to the user needs. Besides that:
- Keep in mind:
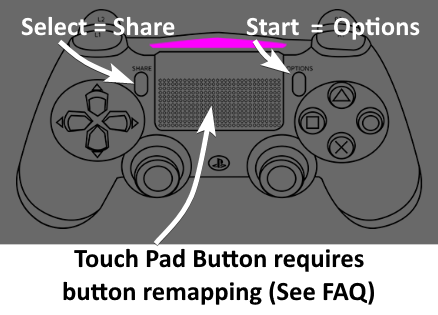
SelectandStartbuttons are recognized as theShareandOptionsbuttons in DS4Windows
- In case you need, there are more detailed instructions on how to change to DS4 emulation in the FAQ
- If you want your controller’s LEDs to represent the current battery level, check the Simple Led Control -> Example 2 in the Light Bar color to LEDs translation SECTION
- Read the full Light Bar translation section if you want to check all possible types of LED control that are possible via DS4Windows settings
- It’s recommended you have a quick look at the Frequently Asked Questions section, read at least the title of the topics
Light Bar color to LEDs translation
Optional section
Read this section if you want to control your controller’s LEDs to show the current battery or selected profile
By setting the correct Light Bar color values in the profile settings it is possible to control the LEDs on the DS3, which can be useful to:
- Make the controller’s LEDs represent the current battery level
- Represent the current selected profile as a specific LED
- Indicate the battery level by using Special Actions in the profile’s settings
Beware that functions in DS4Windows that make the Light Bar flash, pulse or randomize the colors (rainbow mode) are not supported and can make the LEDs change to an undesired state, though the Flash Light Bar at High Latency function do is supported and will make the LEDs flash at a high frequency.
There are 2 modes of Light Bar to LED control: Simple and Complete. To learn how to use them and see easy to follow examples expand the following item:
Modes of Light Bar Translation (click to expand)
Simple LED controlComplete LED control
- Simple to set-up
- Check the examples in the end of this section!
- Good to represent which profile is active (see example 1)
- Necessary when making DS4Windows show the controller’s battery level and for battery related
Special Actions(see examples 2 and 3 respectively)
FORMS OF ACTIVATION:
| Simple LED control mode | How to activate | Description |
|---|---|---|
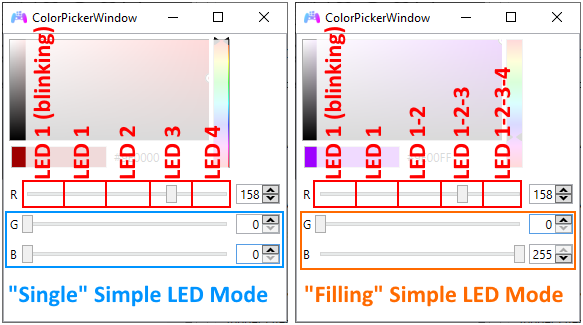
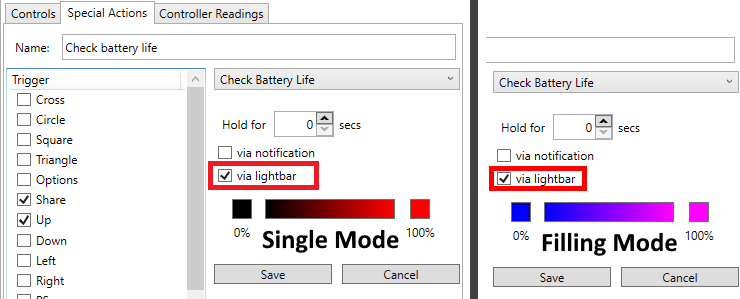
| Single mode | Green and Blue = 0 | Only the chosen LED is ON |
| Filling Mode | Green = 0, Blue = 255 | The chosen LED and the ones before it are ON |
When this form of translation is active, the Red color value will be translated to the LEDs state according to the following table:
| RED value (Dec) | LED state |
|---|---|
| 0 — 64 | Blinking LED 1 |
| 65 — 94 | LED 1 |
| 95 — 148 | LED 2 |
| 149 — 201 | LED 3 |
| 202 — 255 | LED 4 |
Example 1: Setting up a profile to be represented as LED 3 only (single mode)
Example 2: Setting up a profile to reflect the controller’s battery level

Example 3: Setting up a Special Action to make the LEDs reflect the controller’s battery level
- «Harder» to set-up (not really)
- Allows any combination of LEDs on
- Useful if the user wants to differentiate between more than 4 profiles
HOW TO ACTIVATE: Green and Blue = 255
When this form of translation is active, the Red color value from 0 to 15 will be translated to the LEDs state according to the following table:
| LED 4 | LED 3 | LED 2 | LED 1 | RED value (Dec) |
|---|---|---|---|---|
| 0 | ||||
| ON | 1 | |||
| ON | 2 | |||
| ON | ON | 3 | ||
| ON | 4 | |||
| ON | ON | 5 | ||
| ON | ON | 6 | ||
| ON | ON | ON | 7 | |
| ON | 8 | |||
| ON | ON | 9 | ||
| ON | ON | 10 | ||
| ON | ON | ON | 11 | |
| ON | ON | 12 | ||
| ON | ON | ON | 13 | |
| ON | ON | ON | 14 | |
| ON | ON | ON | ON | 15 |
e.g.: Setting up a profile to be represented as LEDs 4 and 2.
Frequently Asked Questions
How do I change between XInput and DS4 emulation?
The controller that DS4Windows emulates is dependent on the current selected profile. By default, the profile that comes with DS4Windows called… Default… is set to emulate a Xbox 360 controller. You can create new profiles with different settings to best fit your use case, though this section will focus solely on creating a profile with DS4 emulation:
- Go to the Profiles tab
- Click on the «New» button to create a new profile
- When asked if a preset is to be used, choose «yes»
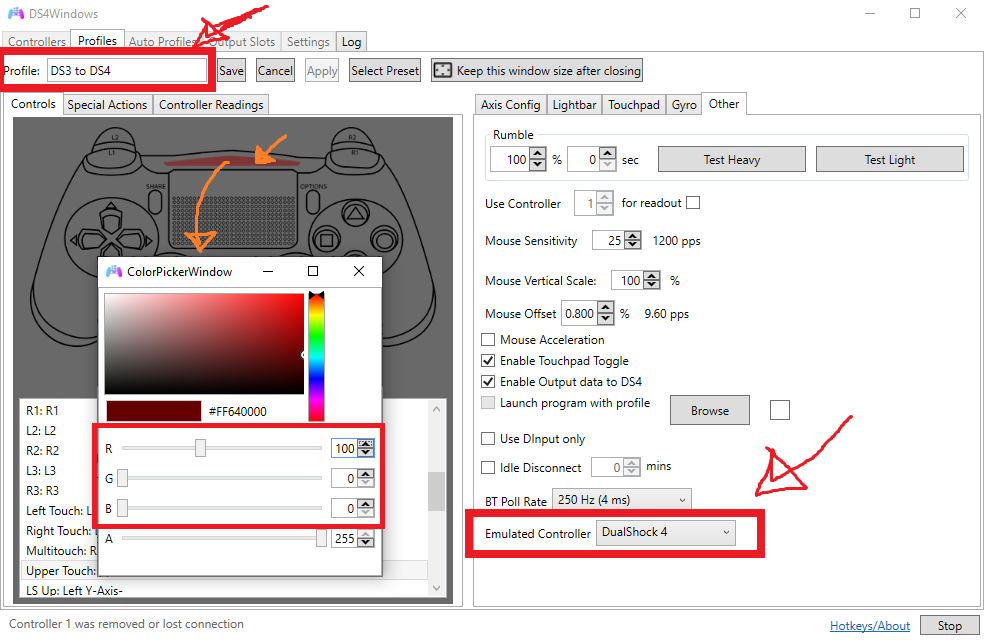
- Select
Gamepadand thenDualShock 4at the Output Controller - Adjust the Light Bar color to what you desire accordingly to the Light Bar to LEDs translation section (in the example below the profile will be represented by LED 2)
- Give a name to your profile (e.g.: DS3 to DS4)
- Save the profile
- Back in the Controllers tab, click on the Selected profile box and change from default to the profile you just created
And done, now you can switch between XInput/DS4 emulation by changing between profiles.
Keep in mind that some games that support DS4 controllers use the Touch Pad for options/to open the map/etc. In this case, you’ll need to remap a button as the Touch Pad button on a new profile to use it.
Do I need to use HidHide or the «hide ds4 controllers» option to hide my DS3 controller in order to prevent the «double controller» issue?
No need to. The «real» part of the DS3 controller in DsHidMini’s DS4Windows Mode can only be recognized by DS4Windows and is therefore already immune to the «double controller» or «double input» issue. Games will only be able to detect the DS3’s emulated/virtual Xbox 360/DS4 counterpart.
Select button is not recognized in some games when emulating a DS4 / How do I use the Touch Pad button?
A DS3 controller has 13 buttons while a real DS4 controller has 14, this extra button being the Touch Pad button which can’t be mapped directly to the DS3 by DsHidMini.
Some games that support DS4 controllers use the Touch Pad for options, opening the map, etc. To work around this, the user needs to remap an existing button to the TP one.
Usually, games that use the TP button don’t use the Share button (the default Select), so the usual bet is to remap it to the TP, though any other one can be chosen. So, after creating a profile with DS4 emulation:
- Duplicate your DS4 profile, choose a different name to it
- Edit the new profile
- On the left side, in the DualShock 4 picture, click on the button you want to remap
- On the new window that appears, select the middle of the Touch Pad
- Save your profile and switch to it
If a game uses both the Share and TP buttons, you can have a profile with Share as it is and the PS button remapped to the TP. Or, if you want more advanced solutions, you can use special actions in the profile settings so you can switch between different profiles by button combinations mid-game.
Steam/Some emulator or app doesn’t detect my controller when emulating a DS4, only when emulating a Xbox 360
Steam and some other apps/emulators (Yuzu/CEMU) will fully ignore DS4 controllers, real or virtual, if they detect that DS4Windows is running. This happens as their own means of preventing the «double controller» issue, which is not a problem for DS3 controllers being used with DS4Windows.
To workaround this detection and make those apps stop ignoring the DS4 controller, DS4Windows needs to be running under a custom «.exe» name.
Some remarks regarding Steam
- Regarding most Steam games, 99% of the games that support DS4 controllers should detect the emulated one as normal regardless if Steam itself is not
- If using a custom «.exe» name it’s also recommended to DISABLE Steam’s «Playstation Configuration Support«, in its controller settings, so Steam doesn’t remap your controller again along DS4Windows
- A custom «.exe» name must be used with DS4W for the emulated DS4 to interact with Steam’s Big Picture Mode
- But the «Playstation Configuration Support» option doesn’t need to be enabled for this
‘X’ game does not detect my emulated DS4 / my game is not showing PS button icons
- First, double check if the game actually supports DS4 controllers and has native PS icons when played with a DualShock 4. There is no direct way to check this besides just testing, Googling around and looking at forums
- If the game does not support DualShock 4/PS icons then that’s in no way related to us and we can’t do anything about it
- If you are 100% sure the game supports PS button icons/DualShock 4, then it may be detecting that DS4Windows is running and then ignoring DS4 controllers (super rare case, only 1 game is known to do it). Check the topic above on how to solve this
- If the game still doesn’t recognize the emulated DualShock 4 then we have no idea what’s going on and you are welcome on reaching us through the proper means
How do I do ‘X’ thing on DS4Windows?
DS4Windows is a really amazing tool that can do lots of things, but the purpose of this guide isn’t covering DS4Windows in itself, it’s to give users the minimum necessary to have XInput/DS4 emulation and to cover DsHidMini related functions, like Light Bar color to LEDs translation. Because the other things it can do are not related to DsHidMini then it’s recommended that you look in its wiki or google around for online tutorials.
Обычно при запуске ноутбука микрофон работает и готов к использованию. В некоторых случаях этого может не быть. В данной статье будет описан способ включения микрофона на Windows 10.
Включаем микрофон на ноутбуке с Windows 10
Очень редко устройство приходится включать вручную. Это можно сделать встроенными средствами операционной системы. Ничего сложного в данном методе нет, поэтому с задачей справится каждый.
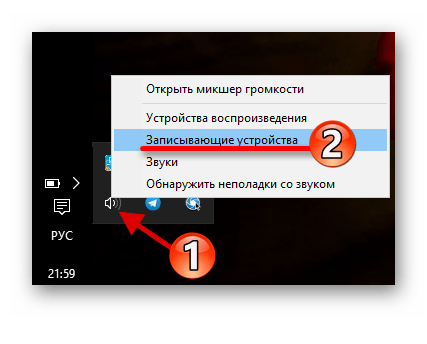
- В трее найдите иконку динамиков.
- Нажмите на нее правой кнопкой мыши и откройте пункт «Записывающие устройства».
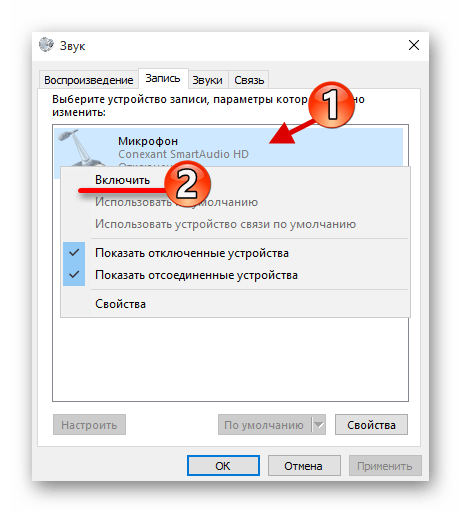
- Вызовите контекстное меню на оборудовании и выберите «Включить».
Есть и другой вариант включения микрофона.
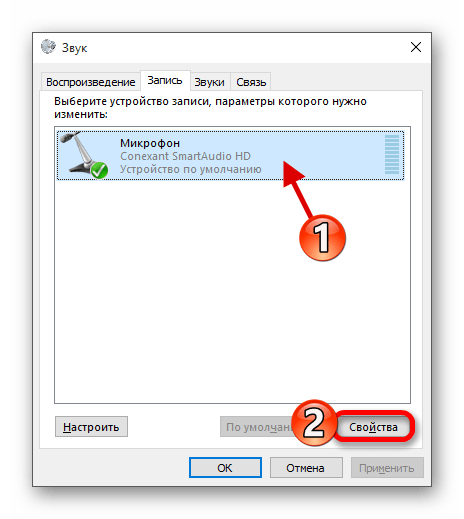
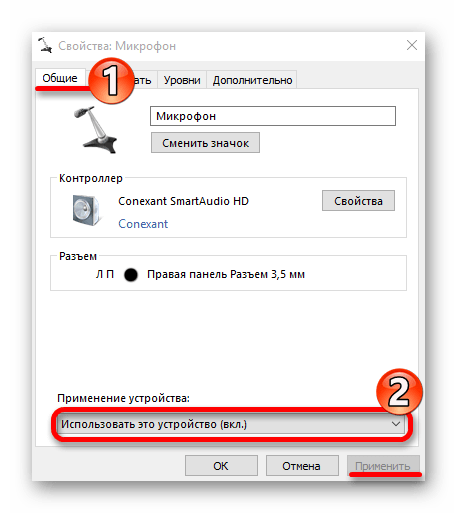
- В том же разделе можно выделить устройство и перейти в «Свойства».
- Во вкладке «Общие» найдите «Применение устройства».
- Выставьте нужные параметры — «Использовать это устройство (вкл.)».
- Примените настройки.
Теперь вы знаете, как включить микрофон в ноутбуке на Виндовс 10. Как видите, в этом нет ничего сложного. На нашем сайте также есть статьи о том, как настроить звукозаписывающее оборудование и устранить возможные проблемы в его работе.
Читайте также: Устранение проблемы неработоспособности микрофона в Windows 10
Наша группа в TelegramПолезные советы и помощь