
Совет включить схему электропитания «Максимальная производительность» можно встретить не только в контексте повышения производительности ноутбука или ПК, но и для решения проблем с отключением каких-либо устройств и иногда это действительно помогает.
В этой простой инструкции о том, как включить эту схему электропитания и как добавить «Максимальная производительность» в список доступных схем электропитания Windows 11 или Windows 10, если она в нём отсутствует.
Включение или добавление схемы электропитания «Максимальная производительность»
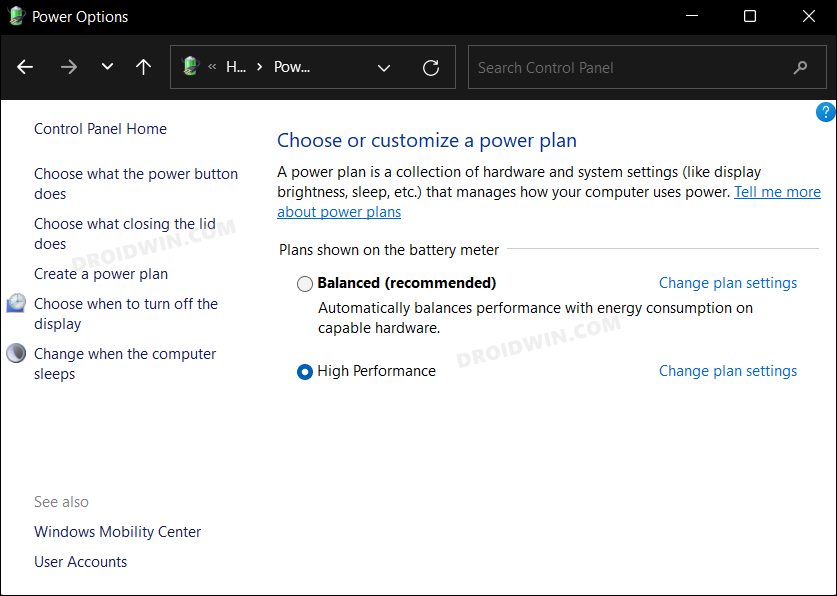
Базовые шаги для того, чтобы включить схему электропитания «Максимальная производительность», при условии, что она доступна для выбора, следующий:
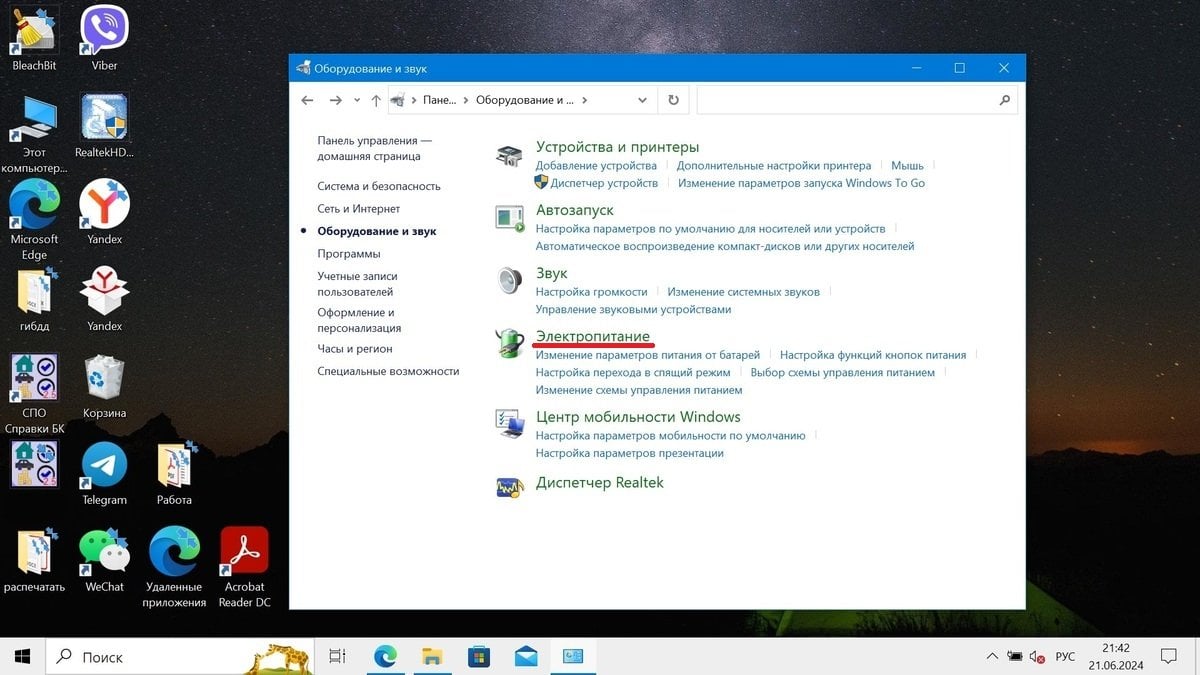
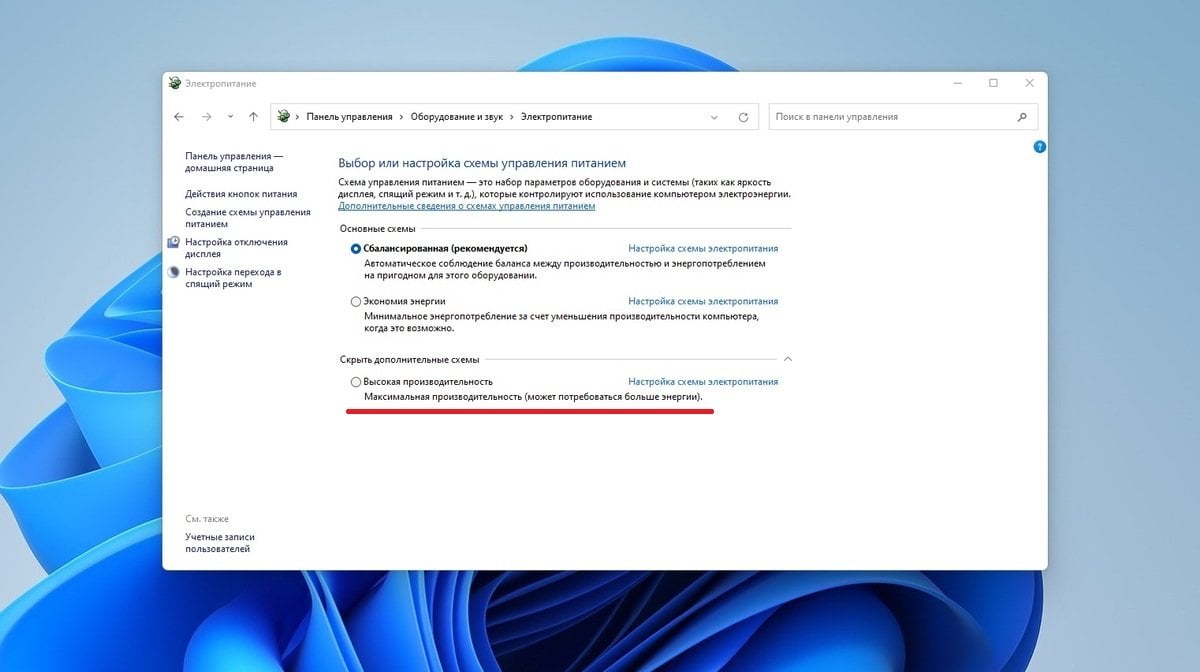
- Откройте панель управления и перейдите в пункт «Электропитание», либо нажмите клавиши Win+R на клавиатуре, введите powercfg.cpl и нажмите Enter.
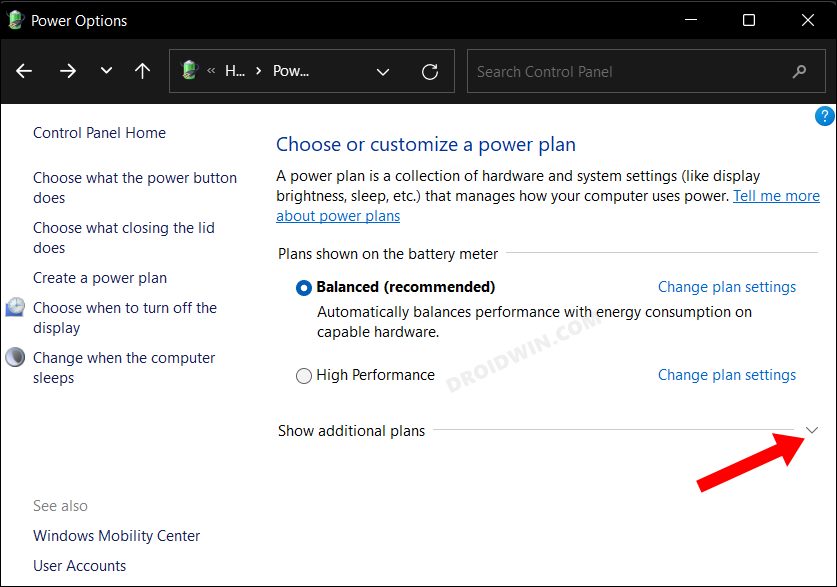
- Нажмите по «Показать дополнительные схемы».

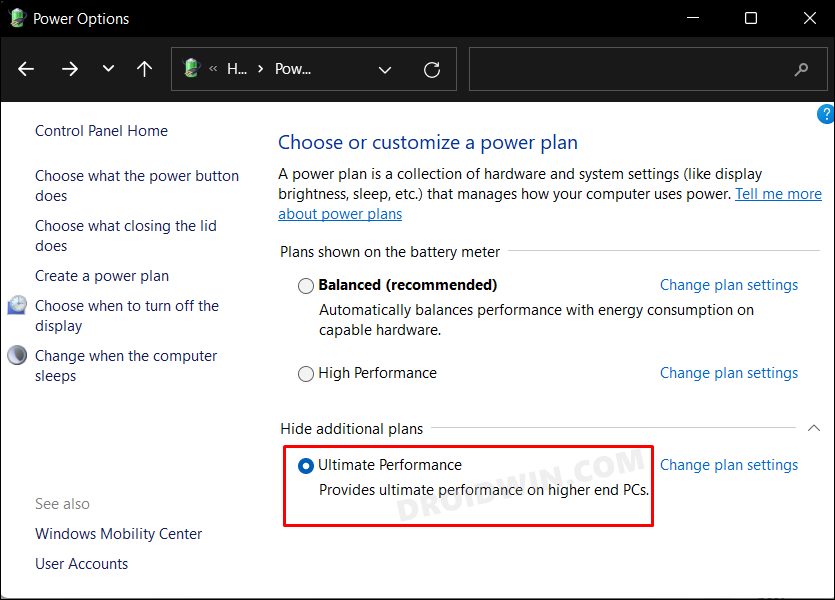
- Если в списке доступен вариант «Максимальная производительность» — просто выберите его. Если его нет — решение далее в статье.

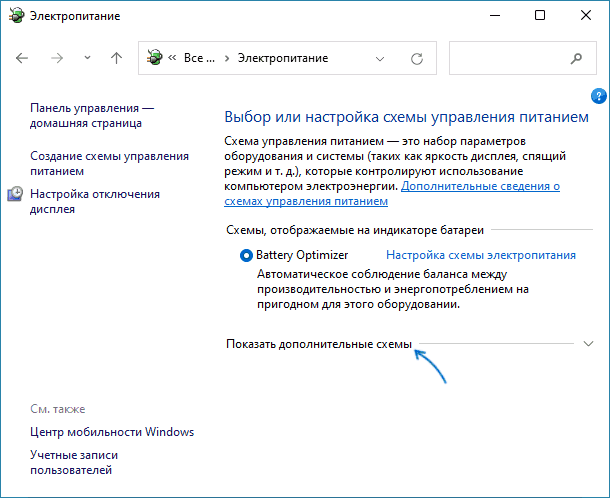

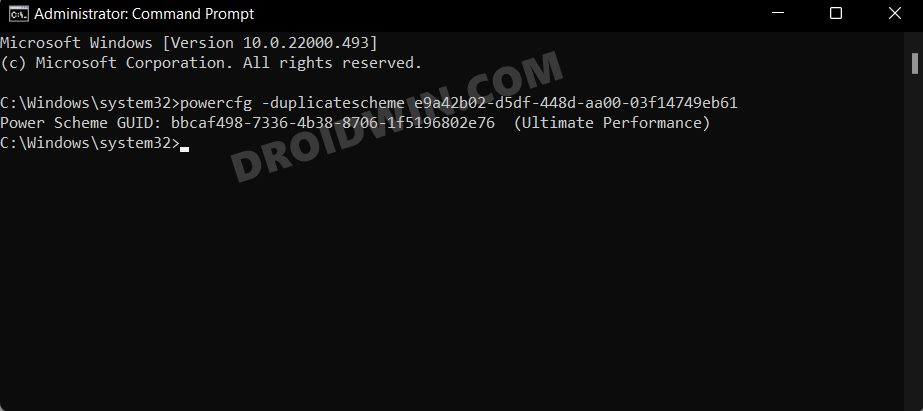
Однако, как можно видеть на скриншоте выше, пункт «Максимальная производительность» может отсутствовать в списке схем электропитания. В этом случае его можно добавить. Для этого:
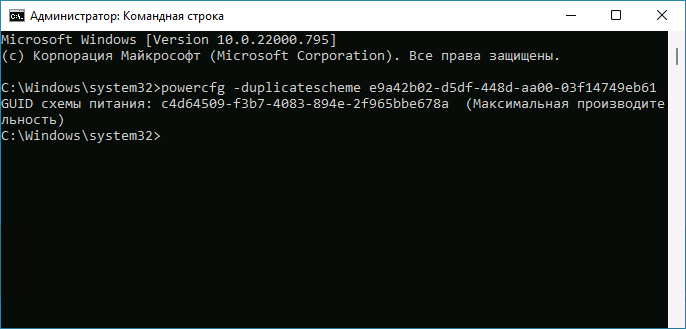
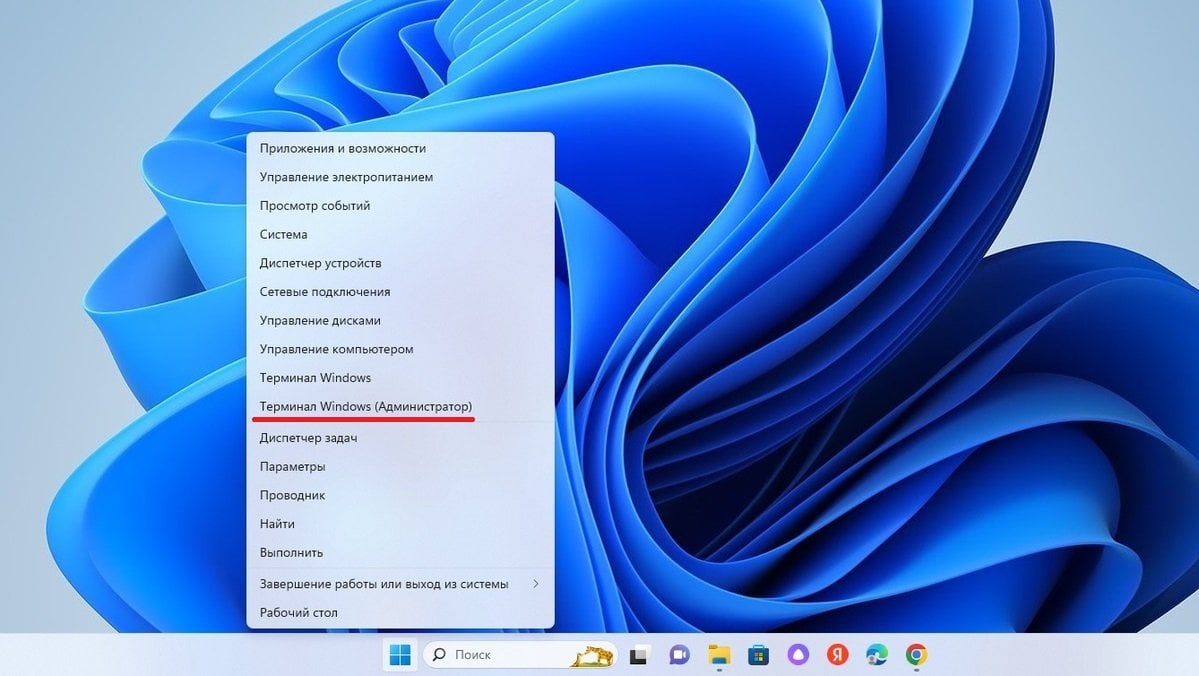
- Запустите командную строку от имени администратора. PowerShell или «Терминал Windows» также подойдет, в Windows 10 и Windows 11 их можно запустить из меню по правому клику на кнопке «Пуск».
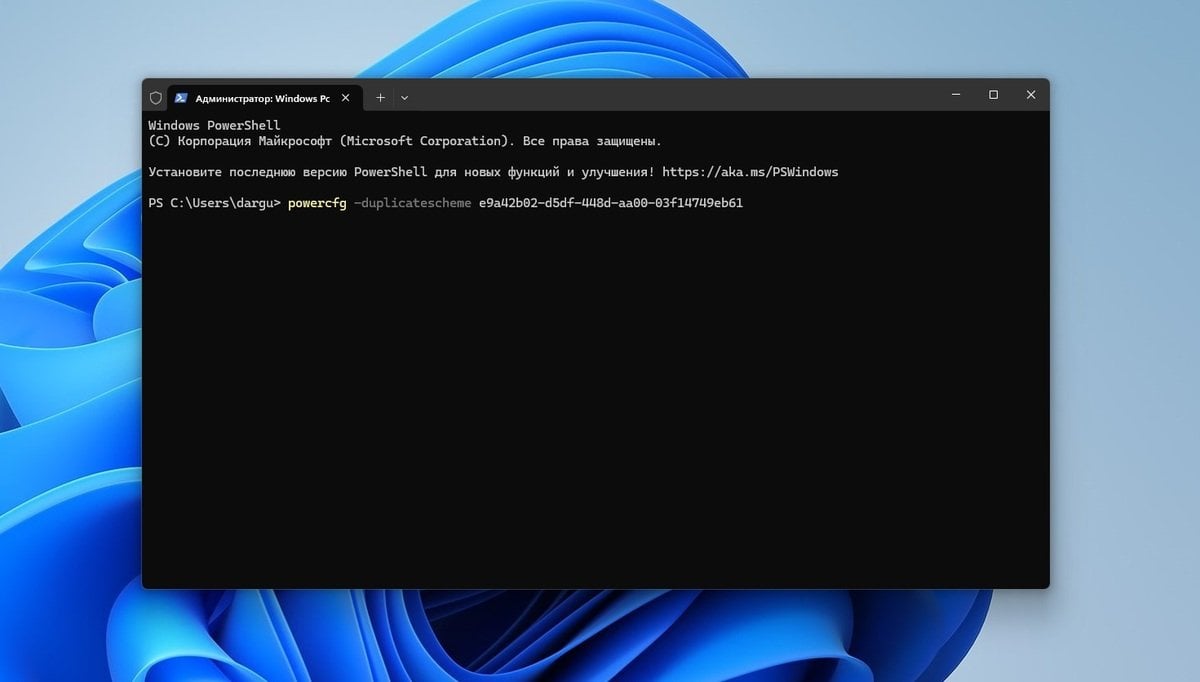
- Введите команду
powercfg -duplicatescheme e9a42b02-d5df-448d-aa00-03f14749eb61
и нажмите Enter.

- После успешного выполнения команды, закройте командную строку.
- Снова зайдите в параметры электропитания и выберите пункт «Максимальная производительность», теперь он должен быть в списке.


Кстати, возможно вам окажутся интересными способы удобного переключения схем электропитания на ноутбуке.
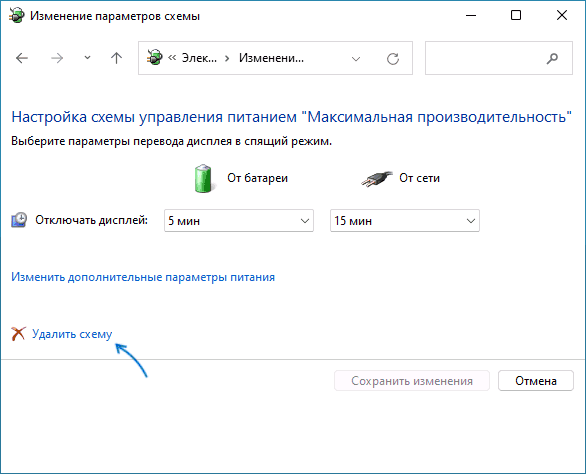
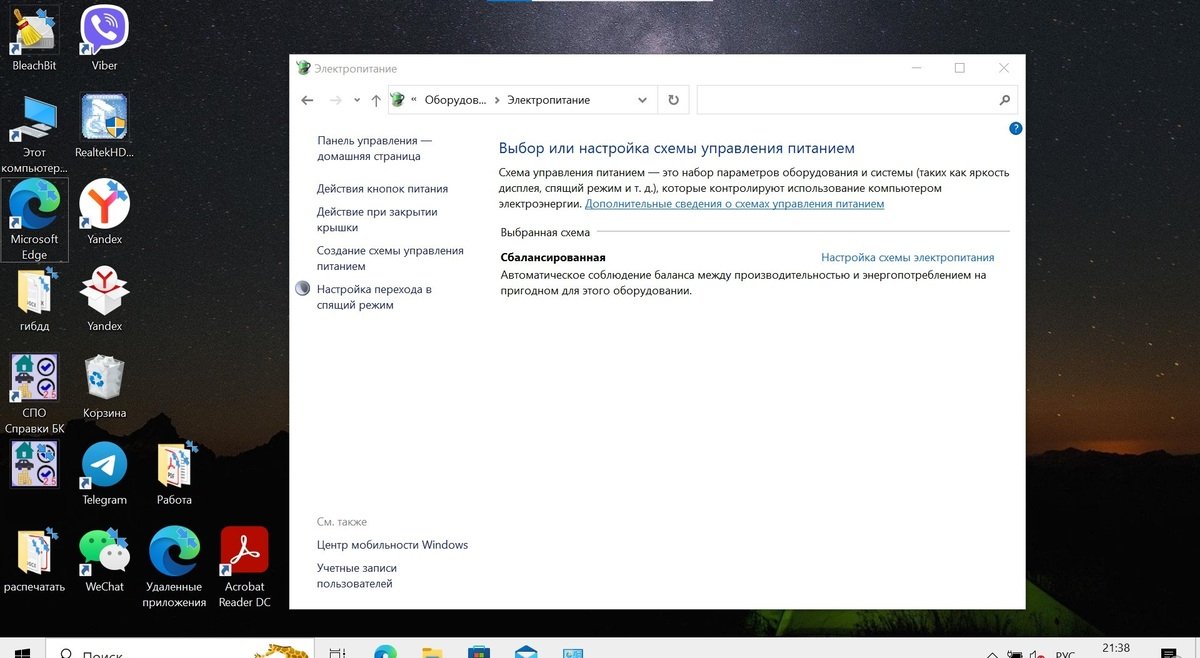
Если в дальнейшем вам потребуется удалить эту или любую другую схему электропитания, зайдите в окно «Электропитание» и нажмите «Настройка схемы электропитания» справа от схемы, которую нужно удалить.
В следующем окне останется выбрать «Удалить схему».
Если у вас остаются вопросы на тему схем электропитания в Windows — задавайте их в комментариях, постараемся разобраться.
24 января 2025 г. 13:11
3886
Содержание:
- Включение схемы электропитания
- Добавление схемы, если она отсутствует
- Удаление схемы электропитания
Режим максимальной производительности Windows 11 способен значительно увеличить эффективность ноутбука или компьютера, а также быть полезным для устранения неполадок с отключением устройств. Если вы заметили, что ваше устройство не использует свой потенциал на 100%, это может стать простым решением. Если вы хотите установить Windows 11, вы можете скачать её у нас, чтобы гарантировать безопасность и стабильность системы. Для пользователей, которым требуется лицензионная версия Windows 11, а значит безопасная и стабильная, мы предлагаем приобрести ключ активации, чтобы воспользоваться всеми возможностями системы. Давайте подробно рассмотрим, как включить режим максимальной производительности в Windows 11 и добавить его в перечень доступных планов, если он отсутствует.
Включение схемы электропитания
Если схема доступна, чтобы включить максимальную производительность Windows 11, действуйте следующим образом:
1. Запустите меню управления (в строке поиска введите название).
2. Перейдите в раздел питания. Либо используйте комбинацию клавиш Win+R, введите строку powercfg.cpl и подтвердите, нажав Энтер.
3. Кликните на опцию для показа всех доступных вариантов.
4. Нажмите на план «Наивысшая производительность».
Теперь ваше устройство будет функционировать с максимальной продуктивностью. Если данный план отсутствует, его можно добавить вручную.
Добавление схемы, если она отсутствует
Если требуется настройка Виндовс 11 на максимальную производительность, а пункт не отображается в перечне, выполните простые действия:
- Откройте консоль, запустив её от имени администратора. Для этого щёлкните правой кнопкой мыши по иконке «Старт» и выберите соответствующий вариант.
- Впишите следующую строку: powercfg -duplicatescheme e9a42b02-d5df-448d-aa00-03f14749eb61.
- Подтвердите выполнение команды нажатием Enter. Это добавит план в систему.
Теперь в разделе настроек энергопитания появится вариант, который вы сможете активировать. Это позволит максимально задействовать возможности устройства.
Удаление схемы электропитания
Если вы захотите удалить ненужную схему, выполните такие действия:
- Откройте категорию «Питание» через меню управления.
Выберите план, который необходимо убрать, и нажмите «Параметры плана энергоснабжения». - В открывшемся окне выберите «Удалить схему».
После удаления схема исчезнет из списка доступных. Вы всегда сможете добавить её заново, следуя вышеописанным инструкциям.
Возможно, многие не в курсе того, что ОС от Microsoft может работать в нескольких режимах производительности. И при запуске игр или ресурсоемких приложений желательно «выкрутить» все на максимум. Рассказываем, как это делается в Windows 10 и 11.
Следует помнить, что на Windows 10 режим доступен далеко не на всех версиях ОС. Для его подключения нужно совершить следующие шаги:
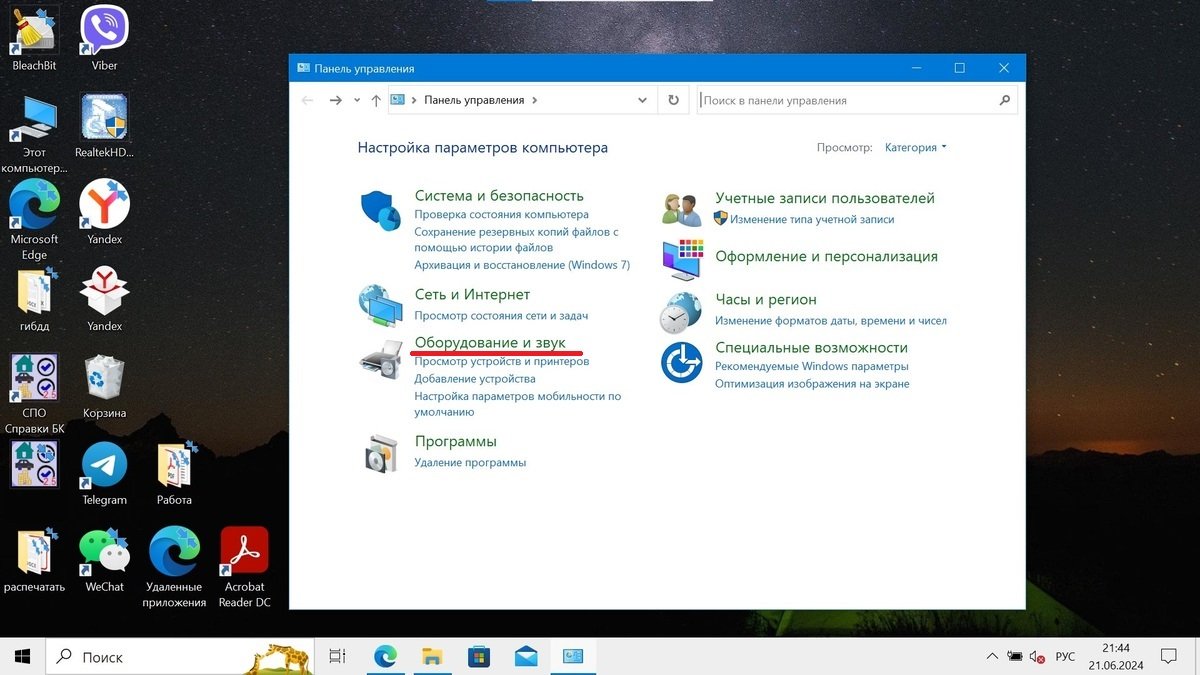
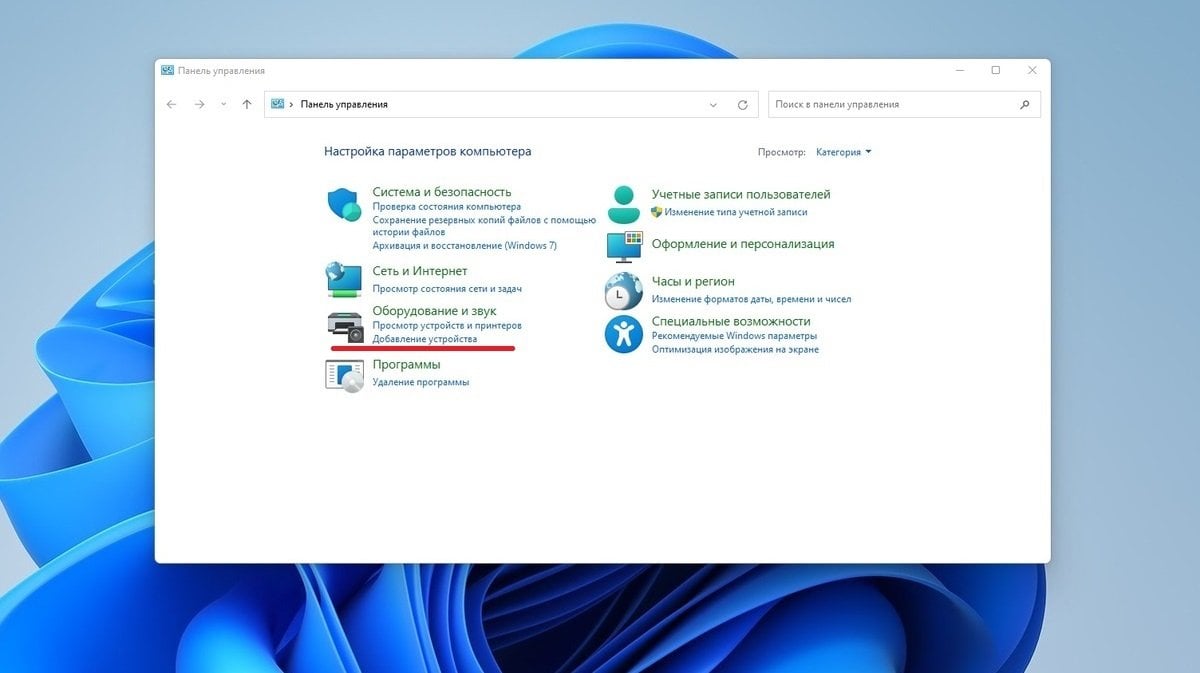
- В поисковой строке рядом со значком «Пуск» наберите и откройте «Панель управления»;
Источник: CQ / Включение «Максимальной производительности»
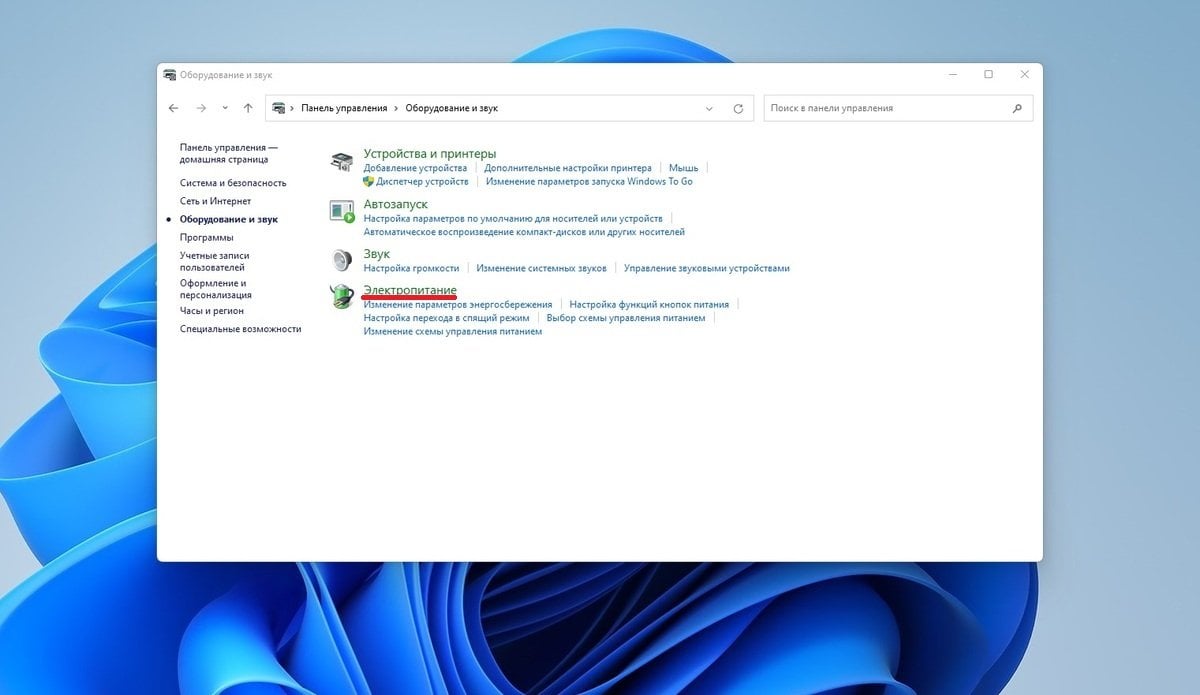
- Перейдите сначала во вкладку «Оборудование и звук», а после в «Электропитание»;
Источник: CQ / Включение «Максимальной производительности»
- Пролистайте ниже до «Дополнительных схем» и выберите там пункт «Максимальная производительность».
Источник: CQ / Включение «Максимальной производительности»
На ноутбуке данная кнопка может не отображаться, если устройство работает не от сети.
Как включить режим «Максимальная производительность» на Windows 11
Порядок действий для Windows 11 полностью идентичен.
- Через поиск найдите и откройте «Панель управления»;
Источник: CQ / Включение «Максимальной производительности»
- Во вкладке «Оборудование и звук» кликните по пункту «Электропитание»;
Источник: CQ / Включение «Максимальной производительности»
- Вновь пролистайте до «Дополнительных схем» и укажите «Высокая производительность».
Источник: CQ / Включение «Максимальной производительности»
Что делать, если режим «Максимальная производительность» недоступен
В некоторых случаях пункта «Максимальная производительность» может не оказаться на нужном месте. В этом случае необходимо:
- Кликните правую кнопку мыши на значке «Пуск» и выберите «Windows PowerShell (Администратор)» на Windows 10 или «Терминал Windows (Администратор)» на Windows 11;
Источник: CQ / Включение «Максимальной производительности»
- Когда командная строка откроется, введите powercfg -duplicatescheme e9a42b02-d5df-448d-aa00-03f14749eb61 и нажмите Enter;
Источник: CQ / Включение «Максимальной производительности»
После этого остается только перезагрузить компьютер и повторить описанный выше алгоритм действий.
Видеоинструкция
Заглавное фото: https://www.livescience.com/
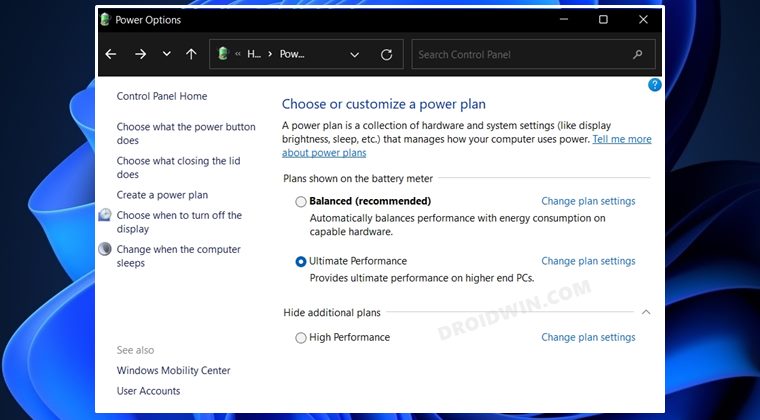
The Ultimate Performance Power Plan, also known as Ultimate Performance mode, is a power-to-performance configuration in Windows that allows you to push your hardware to its limits. It is designed for high-end PCs that can hold up their end, while Windows keeps running them at maximum capacity.
Initially introduced in Windows 10 Professional for Workstations, the Ultimate Performance Power Plan was then introduced with Windows 10 April 2018 update. This feature is by default built into Windows, but has not been made available for devices with a battery (i.e. laptops). This is because the power consumption would be much greater and may not be worth the enhanced performance gains.
This article illustrates how to enable the feature on a Windows 11 or 10 PC, even if it is disabled for your device.
Table of Contents
What is Ultimate Performance Mode in Windows
Windows usually comes with 3 power modes: Balanced, Best Performance, and Best Power Efficiency. Ultimate Performance is a fourth power plan, which is a step further than “Best Performance.”
Ultimate Performance configures certain parameters of your computer that push the hardware to consume more power to achieve greater performance gains. The following changes are made to your computer:
- Hard disks are always running.
- Java timer frequency is adjusted for maximum throughput.
- Wireless adapter is configured to ensure maximum performance.
- Hibernation and Sleep mode is turned off.
- Processor’s maximum capacity is configured to 100%.
- Video playback quality is optimized.
What Ultimate Performance does is minimize the micro-latencies, which is the time it takes for your system to find out that the hardware needs more power and the time that power is provided. This time is very small (in milliseconds), but may make a significant difference in performing time-critical tasks.
If you want to boost your system’s hardware, let us show you how.
How to Enable Ultimate Performance Mode
Enabling the Ultimate Performance plan can be simple, provided you have the option visible in the Control Panel. Regardless, only a few additional steps need to be taken if the device isn’t available to add or enable it (in the case of a battery-powered PC).
Conventionally, perform the steps below to enable the Ultimate Performance Power Plan:
- Type in powercfg.cpl in Run to open the Power Options in the Control Panel.
- Now click Show additional plans to expand it.

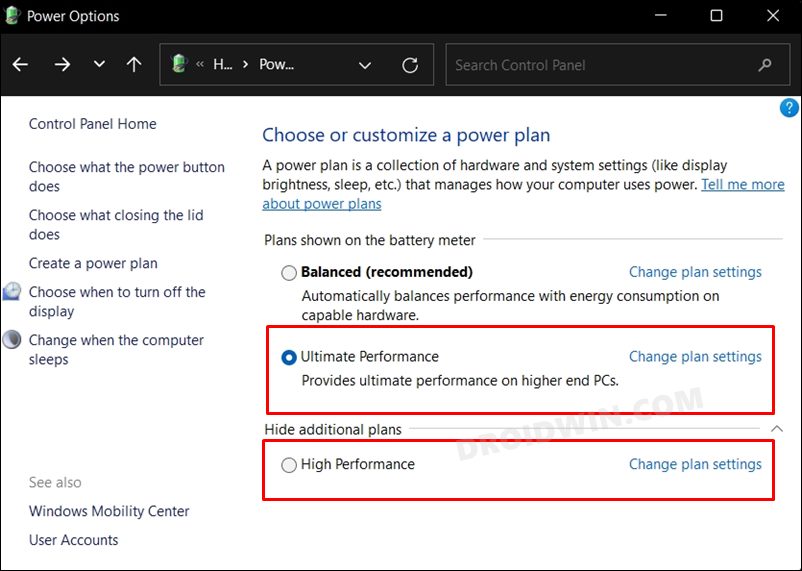
- Here, you shall see the “Ultimate Performance” plan. If it is grayed out, click “Change settings that are currently unavailable.”

- Now click Ultimate Performance to select it.


Ultimate Performance mode will now be enabled. However, if you do not see the option, launch either the Command Prompt or Windows PowerShell and paste the following command:
powercfg -duplicatescheme e9a42b02-d5df-448d-aa00-03f14749eb61

After performing this task, you can select Ultimate Performance from the Power Options page in the Control Panel as discussed above.
Note: Windows 11 lets you manage your power plans through the Settings app. This can be managed from Settings app >> System >> Power and Battery >> Power Mode. However, while the Ultimate Performance mode is selected, Windows 11 disables managing your power plans from the app. This can only be changed from the Control Panel.

How to Disable Ultimate Performance Mode
In case you need to disable the Ultimate Performance power plan, you can simply select another power plan from the Power Options page in the Control Panel (Run >> powercfg.cpl).
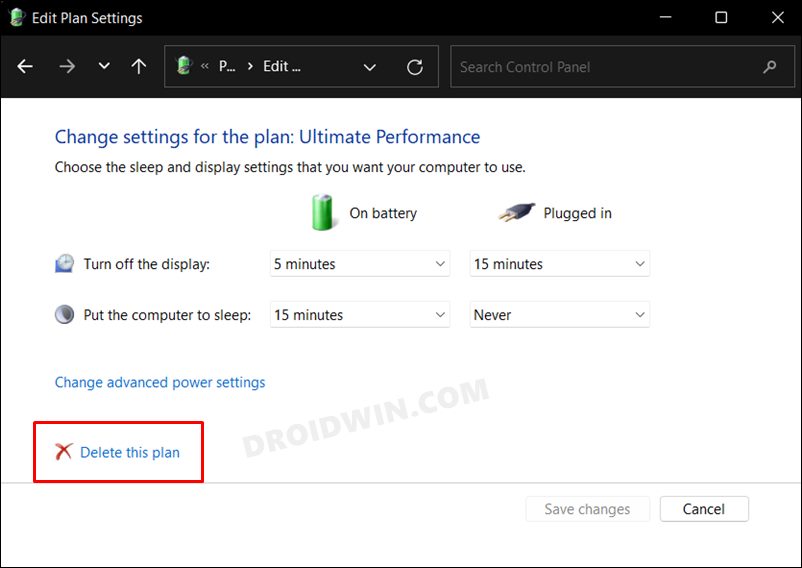
However, if you want to remove the option entirely, perform these steps:
- Type in powercfg.cpl in Run to open the Power Options in the Control Panel.
- Click “Change settings that are currently unavailable.”
- Now select another power plan from the list (making Ultimate Performance available for changes), and then click Change plan settings in front of Ultimate Performance.
- On the next page, click Delete this plan.
- When asked for a confirmation, click Ok.


The Ultimate Performance Power Plan will now no longer exist on your computer.
Continuously running your PC on the Ultimate Performance power plan also has its downsides. So how would you know whether it is right for you?
Should You Enable Ultimate Performance Mode
The Ultimate Performance mode consumes a lot of energy, which eventually adds to your power consumption and thus, the electricity costs. Therefore, you must remember that using this power plan will cost you.
Considering that if you see negligible performance gains on your PC after enabling the Ultimate Performance mode, it may not be worth the cost.
With these considerations, it can be concluded that you should only enable the Ultimate Performance power plan if you see a significant performance difference, and you are ready to bear the overhead costs. Of course, we suggest that it should only be enabled when doing heavy tasks on your PC and then switched back to your usual power plan.
Closing Words
We do not recommend the Ultimate Performance Power Plan all the time, especially on battery-operated devices (laptops). This is because laptops have two main advantages over desktop computers: portability and backup power.
With Ultimate Performance always selected, it is bound to drain your battery much faster than your PC, reducing your backup timing and possibly reducing the productivity you were hoping for.
In this guide, we will show you the steps to enable High and Ultimate Performance Power Plans on your Windows 11 PC. Windows OS comes with three built-in power plans- Balanced, Power Saving, and High Performance (and an Ultimate Mode for Workstations). As is evident by their names, Balanced Mode maintains an equilibrium between the preservation of battery juice and the performance domain.
On the other hand, Power Saving gives more weightage to the conservation of battery whereas High Performance would try and improve the overall performance of your system. By default, Windows settles with the Balanced Mode and that is more than sufficient for the everyday usage of your PC. However, if you are mostly inclined towards resource-intensive tasks, then a ‘balanced’ approach might not be sufficient.
Instead, you might need a tad extra power for your CPU, and for that, a High Performance plan might be the perfect one. However, you might not be able to access the said plan as Windows has hidden it from its OS. With that said, there does exist a nifty method through which you could easily enable the High and Ultimate Performance Power Plans on your Windows 11 PC. And in this guide, we will show you how to do just that. Follow along.
Table of Contents
There exists three different methods through which you could carry out the said task and we have listed all of them below. You may try out the one that is in sync with your requirement.
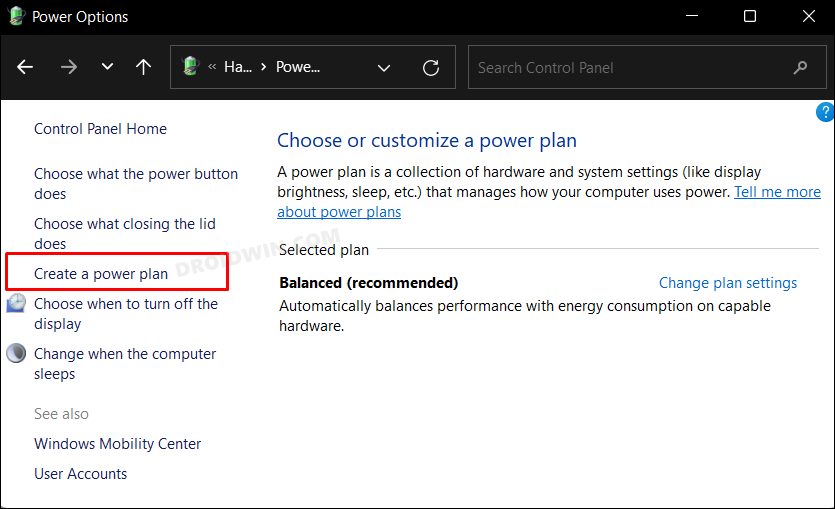
Method 1: Via Control Panel
- Open Control Panel from the Start Menu and go to Hardware and Sound > Power Options.
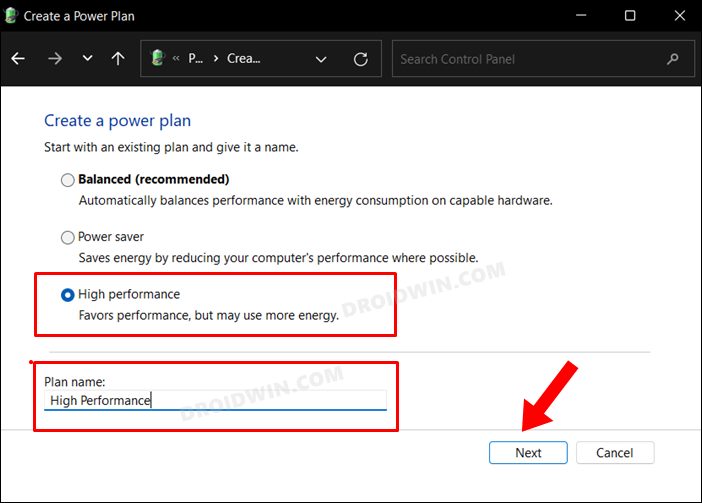
- Then click on Create a Power Plan from the left menu bar.

- You should now see the High Performance Mode, select it. Then give it a name and click Next.

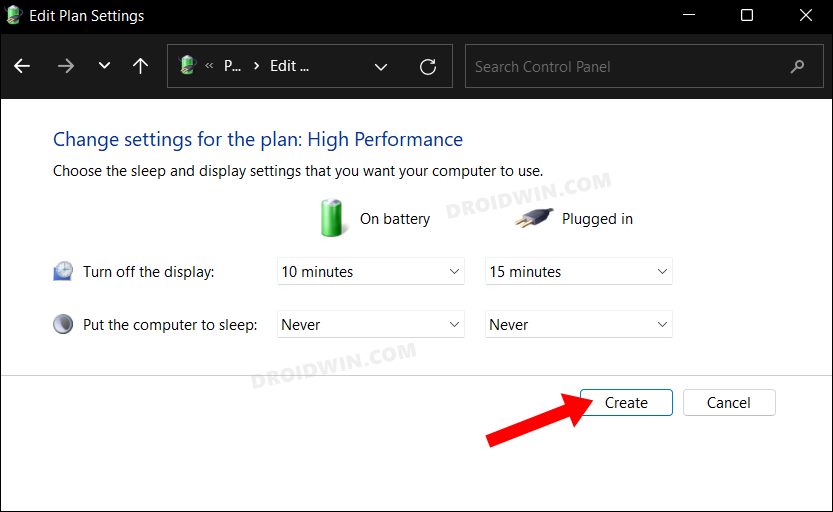
- Now tweak the Display and Sleep settings as per your requirements and click Create. That’s it.

- The High Performance Power Plan will now be created and subsequently enabled on your Windows 11 PC.

Method 2: Via Command Prompt
- Head over to the Start menu, search CMD, and launch it as an administrator.
- Then copy-paste the below command in the CMD window and hit Enter:
powercfg -duplicatescheme 8c5e7fda-e8bf-4a96-9a85-a6e23a8c635c
- Next up, search ‘Choose a power plan’ from the Start Menu.
- You should now see the High Performance Power Plan on your Windows 11 PC.
Method 3: Via Command Prompt (Again!)
- Head over to the Start menu, search CMD, and launch it as an administrator.
- Then copy-paste the below command in the CMD window and hit Enter:
powercfg /s SCHEME_MIN
- Next up, search ‘Choose a power plan’ from the Start Menu.
- You should now see the High Performance Power Plan on your Windows 11 PC.
That’s it. These were the three different methods to enable the High Performance Power Plan in Windows 11. If you have any queries concerning the aforementioned steps, do let us know in the comments. We will get back to you with a solution at the earliest.
How to Enable Ultimate Performance in Windows 11
Is the High Performance Mode still not able to meet your graphics-intensive requirements? Well then, it’s time to take it a notch higher and enable the Ultimate Performance Power Plan on your Windows 11 PC. However, do keep in mind that it would end up draining your laptop’s battery at a much higher rate. So if that’s well and good, then let’s get started.
- Head over to the Start menu, search CMD, and launch it as an administrator.
- Then copy-paste the below command in the CMD window and hit Enter:
powercfg -duplicatescheme e9a42b02-d5df-448d-aa00-03f14749eb61

- Next up, search ‘Choose a power plan’ from the Start Menu.
- Now expand the Show additional plans section.

- You should see the Ultimate Performance Power Plan. Select it and it would be enabled right away on your Windows 11 PC.

How to Delete High and Ultimate Power Plans
If at any point in time, you wish to delete these manually created power profiles, then you could easily do so via the below-given instructions:
- Open Control Panel from the Start Menu
- Then go to Hardware and Sound > Power Options.
- Click on Change Plan Settings next to the plan that you wish to delete.

- Finally, click on Delete this plan. That’s it.


So with this, we round off the guide on how you could enable High and Ultimate Performance Power Plans on your Windows 11 PC. Likewise, we have also listed the steps to delete these plans. If you have any queries concerning the aforementioned steps, do let us know in the comments. We will get back to you with a solution at the earliest.
- Windows 11 Stuck in Bootloop/Cannot Boot to OS: How to Fix
- How to Uninstall Apps using Command Prompt (CMD) or Powershell in Windows 11
- How to boot Windows 11 to Safe Mode when it cannot boot to OS
- Game crashing on 12th Gen Intel Core Processor on Windows 10/11: Fix