
As a computer user, you might have encountered different situations that demanded you to re-access CMD or Command Prompt on Windows 10 logon screen. If you are new to this, then you must be thinking that it is very difficult, and maybe impossible. But the truth is, it’s possible, and there are several ways and methods available to open CMD on Windows 10 logon screen. In this article, we will take you through the step-by-step guide on how to achieve this.
Video Tutorial:
The Challenge of Opening CMD on Windows 10 Logon Screen
Opening CMD or Command Prompt on Windows 10 logon screen is not an easy task. The reason is that Windows 10 default settings don’t allow any clicks or keyboard shortcuts to open CMD on the logon screen. You can only log in using your credentials or switch to another user or administrator account. Therefore, you need to prepare before accessing CMD on the logon screen.
Things You Should Prepare for
Before you start accessing CMD on the Windows 10 logon screen, here are the things you need to prepare in advance:
- A Windows 10 DVD or bootable USB drive
- Basic knowledge of Windows 10 Command Prompt
- Basic knowledge of BIOS settings and boot order
- A Password Reset Disk, if you have forgotten the login password
Method 1: Via Ease of Access
This method involves using the Ease of Access feature on the Windows 10 login screen. Here is how to do it:
1. On the Windows 10 login screen, click on the Ease of Access icon located at the bottom right corner.
2. A menu with several quick options will appear. Choose the «On-Screen Keyboard» or «OSK.«
3. When the on-screen keyboard appears, press and hold the «Shift» key for five to six seconds.
4. A Command Prompt window will open.
Pros:
– This method is easy to use.
– No additional software is required.
Cons:
– This method is only available for Windows 10 versions before v1803.
– This method doesn’t work if you have enabled Secure Boot on your PC.
Method 2: Via Windows 10 Bootable Disc or USB Drive
This method involves booting your computer from a Windows 10 bootable disc or USB drive to access the Command Prompt. Here is how to do it:
1. Insert your Windows 10 bootable USB drive or disc into your computer and reboot it.
2. Press the appropriate key to enter the BIOS setting. It’s usually F1, F2, F10, F12 or Esc. Check your computer manufacturer’s website for more specific instructions.
3. Once the BIOS settings menu opens, change the boot order to boot from your Windows 10 bootable USB drive or disc.
4. Save the changes and exit the BIOS menu.
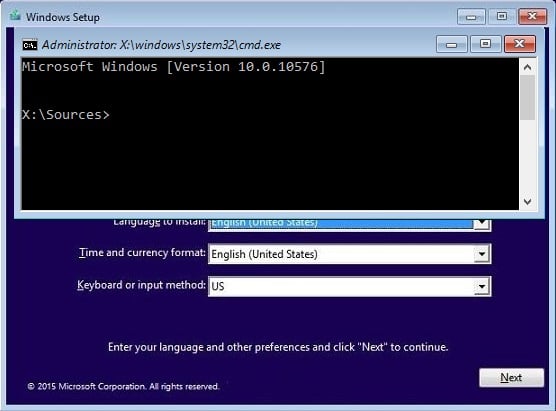
5. Wait for the Windows 10 setup files to load.
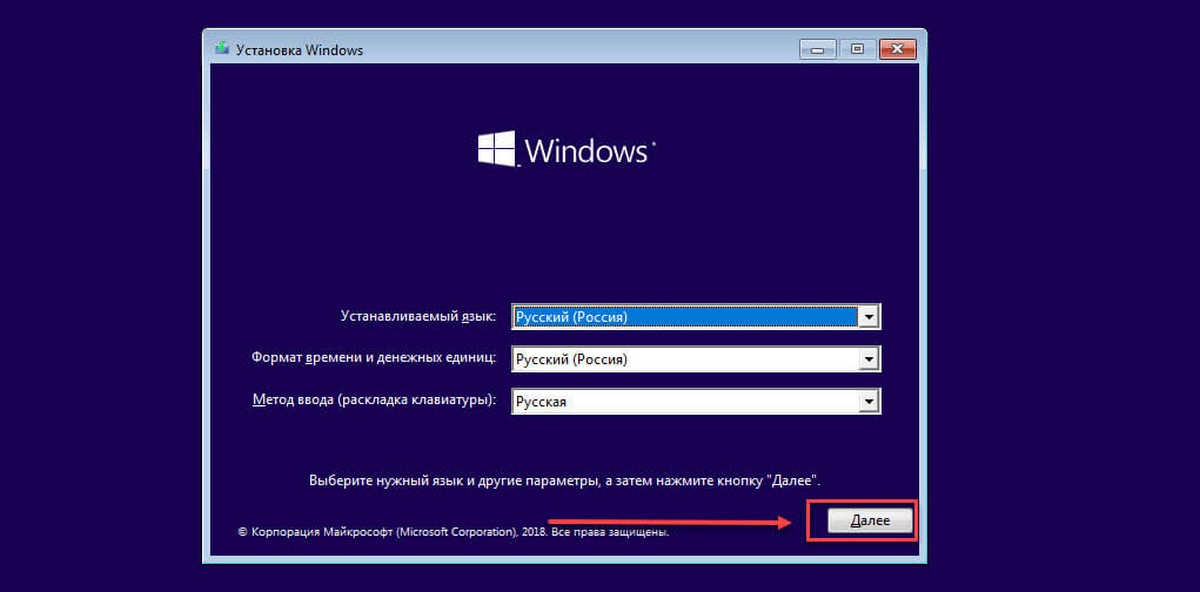
6. When the setup screen appears, choose your language and other preferences.
7. Click on “Repair your computer.”
8. Select “Troubleshoot.”
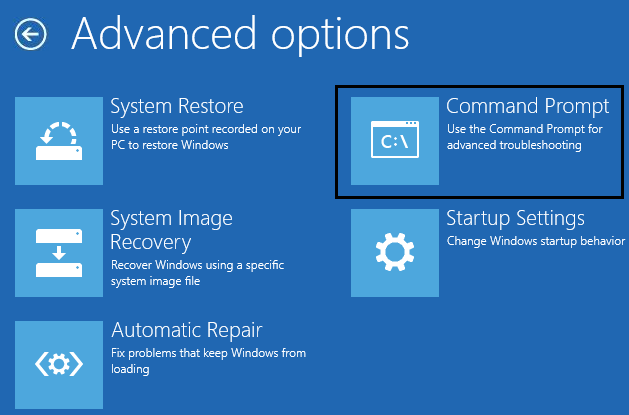
9. Click on “Advanced Options.”
10. Choose «Command Prompt.«
Pros:
– This method works on all versions of Windows 10.
– It allows you to use Command Prompt with elevated privileges.
Cons:
– Some users might not have the technical know-how to create a bootable disc or USB drive.
Method 3: Via Windows Password Reset Disk
This method involves using a Password Reset Disk or USB drive to access Command Prompt. If you have forgotten your login password, this is the way to go. Here is how to do it:
1. Insert the Password Reset Disk or USB drive into your computer and reboot it.
2. On the login screen, click on the «Reset Password» icon.
3. Follow the prompts to create a new password.
4. Once you have changed your password, click on the «Continue» button to get back to the login screen.
5. Click on the Ease of Access icon.
6. Choose «Command Prompt» from the menu.
Pros:
– This method allows you to reset your password if you have forgotten it.
– It’s a safe and secure way to access Command Prompt.
Cons:
– You need to create a password reset disk or USB drive in advance.
Method 4: Via Windows 10 Installation Media
This method involves using the Windows 10 installation media to access Command Prompt. Here is how to do it:
1. Insert your Windows 10 installation media into your computer and reboot it.
2. Follow steps 2-6 of «Method 2: Via Windows 10 Bootable Disc or USB Drive.«
3. Choose «Command Prompt» from the Advanced Options menu.
Pros:
– This method works on all versions of Windows 10.
– It’s similar to using a bootable USB drive or disc.
Cons:
– You need to have the Windows 10 installation media in advance.
Why Can’t I Access CMD on Windows 10 Logon Screen
Here are some reasons why you can’t access CMD on Windows 10 logon screen:
1. Windows 10 default settings don’t allow any clicks or keyboard shortcuts to open CMD on the logon screen.
2. If you have enabled Secure Boot on your PC, it blocks any attempts to access CMD on the logon screen.
3. If you have forgotten your login password, you can’t access CMD on the logon screen.
Fixes:
1. Use any of the methods listed above to access CMD on Windows 10 logon screen.
2. Disable Secure Boot on your PC.
3. Create a Password Reset Disk or USB drive in advance.
Additional Tips
Here are some additional tips you can use to make it easier to access CMD on Windows 10 logon screen:
1. Create a Password Reset Disk or USB drive in advance.
2. Always keep a Windows 10 installation media on hand.
3. Familiarize yourself with BIOS settings and boot order.
5 FAQ’s about Opening CMD on Windows 10 Logon Screen
Q1: How do I create a Windows 10 Password Reset Disk?
A: Follow these simple steps:
1. Insert a USB drive into your computer.
2. Search for «Password Reset Disk» in the Windows 10 search bar.
3. Click on «Create a password reset disk.«
4. Follow the prompts to create a password reset disk.
Q2: How do I disable Secure Boot on my PC?
A: Here is how to do it:
1. Reboot your computer.
2. Press the appropriate key to enter the BIOS settings.
3. Look for the «Secure Boot» option.
4. Change the settings to «Disabled.«
5. Save the changes and exit the BIOS menu.
Q3: Can I use a different bootable disk other than Windows 10?
A: Yes, you can use any bootable disc or USB drive that contains a CMD line.
Q4: Can I access CMD on Windows 10 logon screen without any additional tools?
A: No, you need additional tools to access CMD on Windows 10 logon screen.
Q5: Is it safe to access CMD on Windows 10 logon screen?
A: Yes, it’s safe to access CMD on Windows 10 logon screen if you know what you are doing.
In Conclusion
Opening CMD on Windows 10 logon screen may seem difficult, but if you follow the methods and tips provided in this article, it’s easy to achieve. Knowing how to access CMD on Windows 10 logon screen can come in handy in many situations, including when you have forgotten your login password or need to fix some system errors. Remember to always prepare in advance before accessing CMD on Windows 10 logon screen.
How to Open Command Prompt at Boot in Windows 10: Command Prompt is one of the essential features of Windows, which is used for typing computer commands and is a command-line interpreter on Windows. Command Prompt is also known as cmd.exe or cmd which interacts with the user through a command-line interface. Well, it’s a powerful tool which users can use to do almost anything they can do with the GUI but instead with commands.
Now Command Prompt is also important because when Windows fails to start, the cmd is used for maintenance & recovery. But again if Windows fails to start then how you are going to access Command Prompt? Well, in this guide you will exactly see how to start Command Prompt at boot in Windows 10. There are mainly two methods where the first one involves the Windows installation disk to access Command Prompt whereas the other one uses Advanced Startup Options. Anyway without wasting any time let’s see How to Open Command Prompt at Boot in Windows 10 with the help of the below-listed tutorial.
Table of Contents
Method 1: Open Command Prompt at Boot Using Windows Installation Media
1.Insert the Windows 10 installation disc or recovery media into CD/DVD Drive.
Note: If you don’t have an installation disc then make a bootable USB disk.
2.Enter BIOS then make sure to set the first boot priority as CD/DVD ROM or USB.
3.Exit saving changes from the BIOS which will restart your PC.
4.When prompted to Press any key to boot from CD or DVD, press any key to continue.

5.Now on Windows Setup Screen (where it asks you to select Language, time and currency format, etc) press the Shift + F10 keys on your keyboard to open Command Prompt.

Method 2: Open Command Prompt at Boot in Windows 10
1.Insert the Windows 10 bootable installation DVD or Recovery Disc and restart your PC.
2.When prompted to Press any key to boot from CD or DVD, press any key to continue.
3.Select your language preferences, and click Next. Click Repair your computer in the bottom-left.

4.On choose an option screen, click Troubleshoot.

5.On Troubleshoot screen, click Advanced option.

6.Finally, on the Advanced options screen, click Command Prompt.
Method 3: Open Command Prompt at Boot Using Advanced Startup Options
1.Make sure to hold the power button for few seconds while Windows is booting in order to interrupt it. Just make sure it doesn’t get past the boot screen or else you need to again start the process.
2.Follow this 3 consecutive times as when Windows 10 fails to boot consecutively three times, the fourth time it enters Automatic Repair mode by default.
3.When the PC starts 4th time it will prepare Automatic Repair and will give you the option to either Restart or Advanced options.
4.Click on Advanced options and you would again be taken to Choose an option screen.
5.Again follow this hierarchy Troubleshoot -> Advanced options
6.From Advanced options screen click on Command Prompt.
Method 4: Open Command Prompt at Boot in Windows 10 Using Settings
If you’re able to access Windows then you could start your PC into Advanced Startup Options.
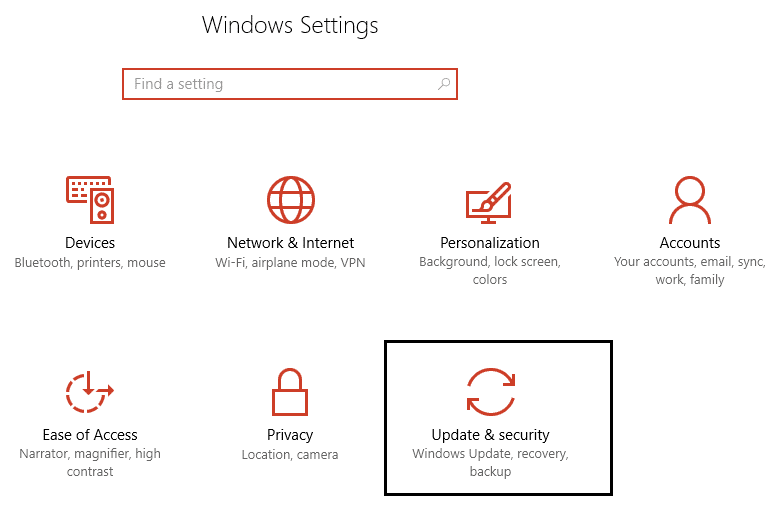
1.Press Windows Key + I then click on Update & Security.
2.From the left-hand menu click on Recovery.
3.Now under Advanced Startup click on Restart now.
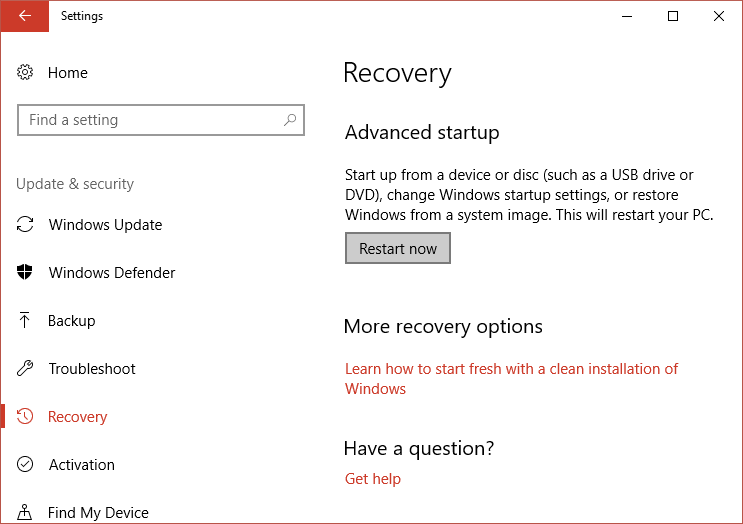
4.Once the PC restart, it will automatically boot to Advanced Startup Options.
5.Now click Troubleshoot > Advanced Options and from Advanced Options screen click on Command Prompt.
Recommended:
- Change Default Action when you close your Laptop Lid
- 4 Ways to Change Date and Time in Windows 10
- Prevent Changing Color and Appearance in Windows 10
- Synchronize Windows 10 Clock with an Internet Time Server
That’s it you have successfully learned How to Open Command Prompt at Boot in Windows 10 but if you still have queries regarding this post then feel free to ask them in the comment’s section.
Существует два способа получения доступа к командной строке, если Windows 10 не может правильно загрузится. Вы можете получить его из меню «Поиск и устранение неисправностей» или получить доступ к командной строке с помощью установочного носителя / среды восстановления. Второй способ следует использовать, когда вы вообще не видите загрузчик Windows 10.
С помощью меню Windows 10 «Поиск и устранение неисправностей».
Этот способ предполагает, что при нажатии кнопки питания вы видите логотип Windows 10 и загрузочную анимацию на экране. Система застряла в циклической перезагрузке.
Шаг 1: Нажмите кнопку питания вашего устройства с Windows 10, чтобы включить его.
Шаг 2: Подождите, пока появится логотип Windows 10. Нажмите и удерживайте кнопку питания, чтобы заставить систему выключится.
Шаг 3: Включите компьютер снова.
Шаг 4: Повторите шаги 1-3, пока не увидите «Дополнительные параметры запуска Windows 10». Обычно для этого требуется 3 принудительных отключения.

Шаг 5: Кликните на плитку «Поиск и устранение неисправностей» и перейдите «Дополнительные параметры» → «Командная строка».


С помощью Установочного носителя с Windows 10 / Восстановление системы.
У вас должен быть под рукой установочный носитель Windows 10. Неважно, с какой версией.
Шаг 1: Включите систему и загрузитесь в BIOS.
Шаг 2: Установите первым загрузочное устройство, на котором находится установочный носитель, например, USB.
Шаг 3: Выключите ваше устройство.
Шаг 4: Подключите установочный носитель (обычно USB) к вашей системе.
Шаг 5: Включите ПК.
Шаг 6: В диалоговом окне установки Windows 10 с предложением выбрать язык, нажмите сочетание клавиш Shift + F10 если командная строка открылась отлично, если нет, нажмите кнопку «Далее» и продолжайте.
Шаг 7: Нажмите «Восстановление системы».

Шаг 8: Далее в окне «Выбор действия» нажмите плитки «Поиск и устранение неисправностей» → «Командная строка».

Рекомендуем: Как вернуть Windows 10 к заводским настройкам.
Как восстановить основную загрузочную запись MBR в Windows 10.
Забыл пароль Windows 10. Как войти в систему.
Как загрузиться в безопасный режим в Windows 10.
Как использовать средство Media Creation Tool для создания носителя с Windows 10 и обновления.
Во времена красочных интерфейсов Windows 10 и Windows 7 многие пользователи напрочь забыли о том, что такое командная строка. А, между тем, при знании определенных команд она действительно может стать вашим другом, избавляя вас от необходимости рыскать по интерфейсу операционной системы в поисках нужной вам опции.
В свое время мы уже писали о самых важных консольных командах. Теперь же разберемся в том, как открыть командную строку.
Самый быстрый способ запуска командной строки
Самый удобный и быстрый способ запуска командной строки может показаться неочевидным многим пользователям. Тем не менее, на любых курсах компьютерной грамотности, коих сейчас великое множество, вам расскажут именно о нем.
Командная строка — это обычная программа в Windows. Как и у любой программы, у нее есть свой исполняемый файл, который находится в папке C:\Windows\System32 у 32-битной версии операционной системы и C:\Windows\SysWOW64 — у 64-битной. Поэтому для ее запуска нам достаточно найти cmd.exe и просто запустить его. Причем вы можете использовать обычный двойной клик, или нажать по файлу правой кнопкой мыши и выбрать «Запуск от имени администратора» для его запуска с правами администратора.
Конечно, каждый раз заходить в папку SysWOW64 или System32 и искать в огромном списке файлов нужный нам экзешник — очень трудоемкая задача. Ккак открыть командную строку в Windows 10 более простым способом? Выход из ситуации уже давно придуман. Причем даже не один.
Вы можете один раз найти cmd.exe, щелкнуть по нему правой кнопкой мышки и создать ярлык cmd.exe на рабочем столе. После этого для вызова командной строки будет достаточно двойного клика по находящемуся в непосредственной близости от вас ярлыку.
Можно поступить и еще проще. Запустите окно «Выполнить» сочетанием клавиш Win+R, вбейте в появившееся окно команду «cmd» и… все. Наслаждайтесь работой с командной строкой.
Командная строка через поиск Windows
Этот способ запуска командной строки по своей простоте вполне может посоперничать с предыдущим. Судите сами, получить доступ к командной строке можно через обычный поиск в Windows 10.
Просто нажмите левой кнопкой мыши на «Пуск» и начните набирать текст «командная строка». Уже на третьей букве вы увидите соответствующий пункт меню. Ну а дальше вы можете запустить ее обычным способом или щелкнуть правой кнопкой мыши и выбрать пункт «Запуск от имени администратора».
Кстати, этот же способ подходит и для запуска любых других системных или пользовательских программ в операционной системе. И, на наш взгляд, это очень удобно.
Командная строка через меню «Пуск»
Как открыть командную строку в Windows 7 или ранних сборках Windows 10? В старых версиях Windows все было достаточно просто. Пользователям всего лишь нужно было щелкнуть по пуску правой кнопкой мышки. Открывалось контекстное меню и там можно было выбрать пункт «Командная строка». Еще один способ открыть это контекстное меню — нажать сочетание клавиш Win+X. Но в свежих сборках Windows 10 этот пункт уже не найти — ему на смену пришел PowerShell.
Впрочем, вернуть командную строку на прежнее место достаточно просто. Найдите в поиске Windows «Параметры панели задач» и переведите в положение «Выкл» ползунок под пунктом «Заменить командную строку оболочкой Windows PowerShell в меню, которое появляется при щелчке правой кнопкой мыши по кнопке «Пуск» или при нажатии клавиш Windows+X».
Для запуска командной строки непосредственно через «Пуск», откройте его и пролистайте до того, как увидите строку «Служебные». Кликните по ней один раз и в раскрывшемся списке выберите «Командная строка».
Командная строка через диспетчер задач
Диспетчер задач — это куда более разноплановое приложение, чем считают многие пользователи. С его помощью не только можно «убить» зависший процесс, посмотреть нагрузку на компоненты системы или отредактировать автозагрузку, но и создать любую нужную вам задачу.
Этой функцией диспетчера задач мы и воспользуемся. Нажмем сочетание клавиш Ctrl+Alt+Del и выберем в появившемся меню пункт «Диспетчер задач. После этого кликните «Файл» -> «Запустить новую задачу», наберите в появившемся окне «cmd» и нажмите Enter.
Как открыть командную строку от имени администратора в этом случае? Просто поставьте галку в чекбоксе напротив пункта «Создать задачу с правами администратора».
Выводы
В сегодняшней статье мы рассмотрели несколько способов того, как запустить командную строку. Выбирайте тот, который покажется вам максимально удобным, но мы советуем запускать ее самым быстрым способом — через окно выполнить. Его единственный недостаток — невозможность запустит командную строку от имени администратора. Но в большинстве случаев этого и не надо.
Читайте также
- Как поставить апостроф на клавиатуре и даже без нее? 3 простых способа
- Как перезагрузить ноутбук с помощью клавиатуры
Редактор направлений «Компьютерное железо» и «Технологии»
Last Updated :
10 Feb, 2025
The Command Prompt is a powerful tool in Windows for executing commands, troubleshooting issues, and automating tasks. Whether you’re using Windows 11, 10, 8, or 7, this guide covers all the methods to open Command Prompt quickly and efficiently.

8 Proven Methods to run the Command Prompt (cmd) in Windows Any Version
Command prompt is widely used not only to navigate, open or close a folder , it’s essential to troubleshoot windows problem as well. So lets understand top 10 methods to open Windows command line seamlessly.
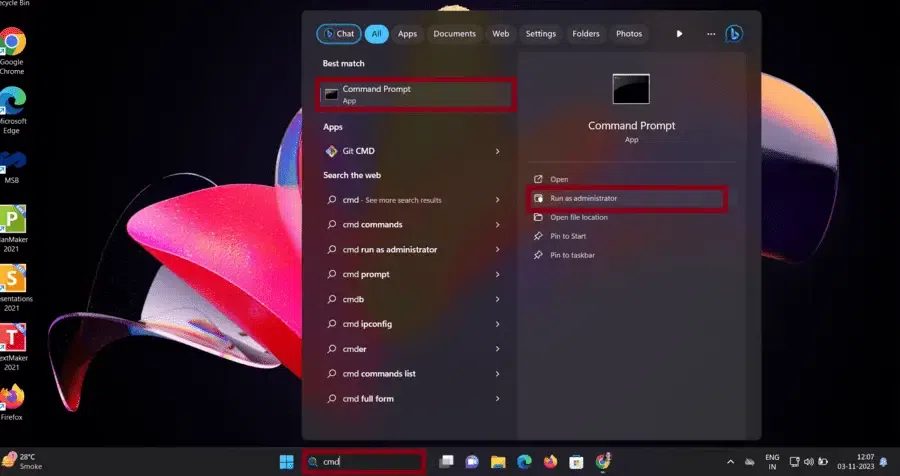
Method 1: Using the Start Menu Search
- Windows 11/10/8:
- Click the Start button (Windows logo).
- Type
cmdorCommand Prompt. - Press Enter or click Open.
- Windows 7:
- Click the Start button.
- Go to All Programs > Accessories > Command Prompt.
Method 2: Using the Run Dialog Box
- Press
Win + Rto open the Run dialog. - Type
cmdand press Enter.
Method 3: Using Task Manager
- Press
Ctrl + Shift + Escto open Task Manager. - Go to File > Run New Task.
- Type
cmdand click OK.
Method 4: Using File Explorer
- Open File Explorer (
Win + E). - Type
cmdin the address bar and press Enter.
Method 5: Using Power User Menu (Windows 11/10/8)
- Press
Win + Xto open the Power User Menu. - Select Command Prompt or Command Prompt (Admin).
Method 6: Using Search Bar (Windows 11/10)
- Click the Search icon (magnifying glass) or press
Win + S. - Type
cmdand press Enter.
Method 7: Using Desktop Shortcut
- Create a Shortcut:
- Right-click on the desktop.
- Select New > Shortcut.
- Type
cmd.exeand click Next. - Name the shortcut (e.g., Command Prompt) and click Finish.
- Double-click the shortcut to open Command Prompt.
Method 8: Using Command Prompt in Safe Mode
- Restart your PC and press
F8(Windows 7) orShift + F8(Windows 10/11) during boot. - Select Safe Mode with Command Prompt.
Access Command Prompt as Administrator — 2 Easy Steps
Commands like ip.config, scf, powercfg, chkdsk etc. requires Administrator Permission to succesfully run in Command Prompt. In such cases you need to run Command Prompt on an Administrative mode to get the privilege to run those command line prompt, follow the below steps:
Step 1: Open CMD and select ‘Run as Admin’
Type cmd in search bar. Right-Click on Command Prompt and select Run as administrator option or Use the Power User Menu (Win + X) and select Command Prompt (Admin).
Step 2: Enter Admin Username and Password
Also, you will see a pop up window of » User Account Control » to allow this app make changes in your device, To continue, enter an admin username and password. Click Yes to proceed.
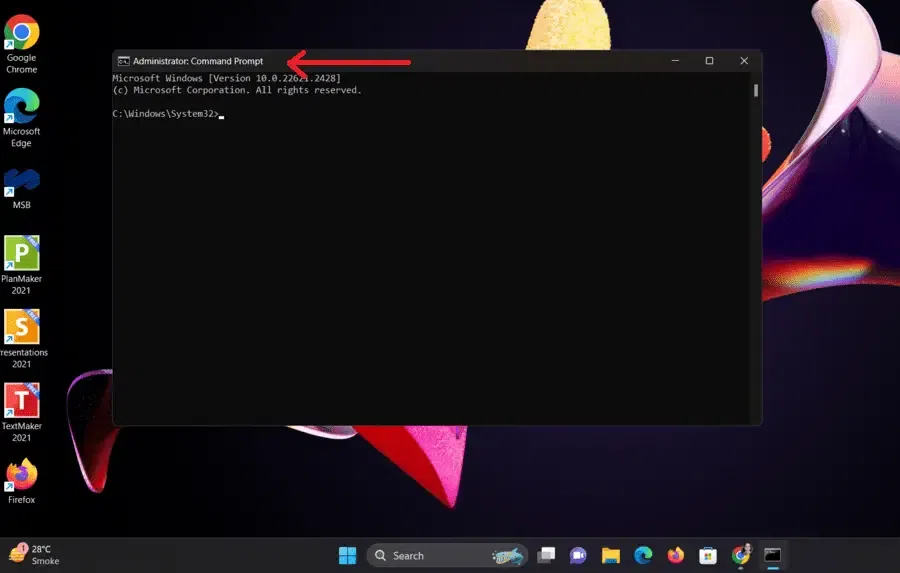
Note: You will notice Administrator : command Prompt written in Cmd window, indicating that you are using cmd as an Administrator.
Effective Use of Command Prompt
You can run some of the basic commands to test the command prompt:
- To check the IP address: ipconfig
- To test the Internet Connection: ping google.com
- To check for Disk Errors: chkdsk
- To scan and repair any system files: sfc /scannow
Common Error & Fixes While Opening of Command Prompt
There are certain issues and errors that might occur while trying to access the command prompt, here are some of the most common error that might occur and how to get rid of them:
1. CMD Not Opening
- Open the task manager and navigate to File > Run New Task > type «cmd» and hit the enter button.
- Alternatively, you can open the Windows PowerShell as admin and run the SFC Scan following this command: sfc /scannow
- Check for malware using Windows Defender or Malwarebye
2. Access Denied
You can try these methods if you’re unable to open CMD as an admin
- Make a right-click on the Command Prompt > Run as administrator
- Enable the hidden admin account using:
- net user administrator /active:yes
3. CMD Closes Immediately
- Restart your PC in the Safe Mode (Shift + Restart > Troubleshoot > Advanced options > CMD
- Scan for Malware
- If you’re using a batch file, add @echo off and pause before running
4. «Not Recognized as a Command» Error
Open System Properties using sysdm.cpl > Environment Variables > Find path > Click Edit > Add
C:\Windows\System32
5. «System Cannot Find the Path Specified»
Check if the folder exists by running:
cd C:\Users\THIS PC\Documents
Reset Path Variables in Environment Variables.
6. CMD Opens in the Wrong Directory
Make a right click on the CMD > Properties > Change Start In: to %GFGPROFILE%
These simple steps will fix most Command Prompt issues in Windows 11, 10, 8, and 7.
Conclusion
By following these fixes, you can resolve most Command Prompt errors and ensure smooth access in Windows 11, 10, 8, and 7. Whether it’s cmd not opening, access denied, closing instantly, or showing errors, these solutions will help you troubleshoot efficiently.
Still facing issues? Try creating a new user profile or resetting Windows settings as a last resort.