
If you ever need to troubleshoot your Windows 10 computer from the BIOS, accessing the Command Prompt (CMD) can be incredibly useful. This quick guide will show you how to open CMD in BIOS on a Windows 10 system through some easy-to-follow steps.
Let’s dive into the steps for opening Command Prompt (CMD) while your system is in BIOS mode. This will allow you to run various commands before Windows even starts.
Step 1: Turn Off Your Computer
Turn off your computer completely.
To turn off your computer completely, make sure all your work is saved, and then go to the Start menu and select «Shut Down» or press and hold the power button until the computer turns off.
Step 2: Power On and Enter BIOS
Press the power button to turn on your computer and immediately start pressing the BIOS key (usually F2, DEL, or ESC).
The BIOS key varies among manufacturers, so consult your computer’s manual if you’re not sure which key to press. You need to press the key repeatedly to ensure you enter the BIOS menu.
Step 3: Navigate to the Boot Menu
Once in the BIOS, use the arrow keys to navigate to the Boot Menu.
The Boot Menu will allow you to change the boot order and preferences. You need to be here to set it up so that you can access CMD.
Step 4: Enable Boot from USB or CD/DVD
Find the option to boot from a USB drive or CD/DVD and enable it.
Enabling this option will let you boot from an external drive where you can have a Windows installation or recovery media that includes CMD.
Step 5: Save Changes and Exit BIOS
Press the key to save changes (usually F10) and exit the BIOS.
Saving the changes will apply the new boot order, and your computer will restart. Ensure you have your USB or CD/DVD drive connected with the Windows installation or recovery media.
Step 6: Boot from External Media
Follow the prompts to boot from your USB or CD/DVD drive.
Your computer will now boot from the external media. You may need to press a key to confirm this. Once booted, you will see options to install or repair Windows.
Step 7: Select Repair Your Computer
Choose the «Repair your computer» option from the installation screen.
Choosing this option will lead you to the Advanced Troubleshooting options where you can access CMD.
Step 8: Open Command Prompt
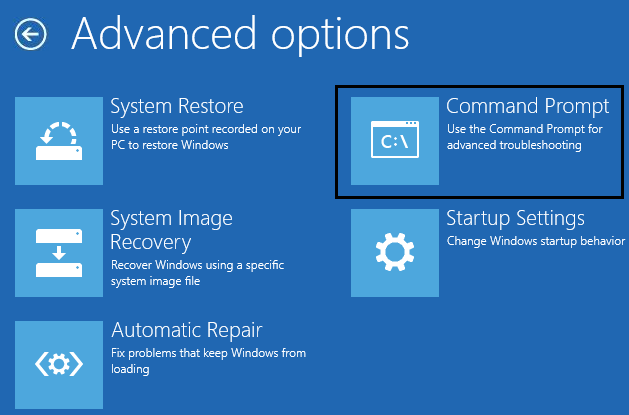
Navigate to Troubleshoot > Advanced Options > Command Prompt.
This will open CMD, allowing you to run commands for troubleshooting and maintaining your Windows 10 installation.
After you complete these steps, your computer will boot into a Command Prompt environment, allowing you to execute commands for troubleshooting and maintenance.
Tips for How to Open CMD in BIOS Windows 10
- Know Your BIOS Key: Different manufacturers use different keys to enter the BIOS. Common keys include F2, DEL, and ESC.
- Have a Bootable Media Ready: Ensure you have a USB drive or CD/DVD with Windows installation or recovery media before starting.
- Backup Important Data: Before making changes in BIOS or running commands, back up any important data.
- Be Cautious in BIOS: Changing BIOS settings can affect your system’s performance or even render it unbootable, so proceed with caution.
- Follow Instructions Carefully: Small mistakes in BIOS or CMD can lead to major issues, so double-check each step.
Frequently Asked Questions
Can I access CMD directly from BIOS without external media?
No, BIOS does not have a built-in command prompt. You need external media like a USB drive with Windows recovery tools.
What if I don’t know the BIOS key for my computer?
Check your computer’s manual or look online for the specific key for your manufacturer.
What commands can I run in CMD from BIOS?
You can run various troubleshooting commands like sfc /scannow, chkdsk, and bootrec.
Do I need to change BIOS settings back after accessing CMD?
If you changed the boot order, it’s a good idea to restore it to its original settings to ensure proper booting.
Is it safe to use CMD in BIOS mode?
Yes, as long as you follow the steps carefully and know the commands you’re running.
Summary
- Turn off your computer.
- Power on and enter BIOS.
- Navigate to the Boot Menu.
- Enable boot from USB or CD/DVD.
- Save changes and exit BIOS.
- Boot from external media.
- Select Repair Your Computer.
- Open Command Prompt.
Conclusion
Opening CMD in BIOS on Windows 10 can be a lifesaver when your system has issues that prevent it from booting properly. By following the steps outlined above, you can access CMD and run essential troubleshooting commands. Remember to take precautions, such as backing up important data and following instructions closely.
For further reading, consider exploring Microsoft’s official documentation on troubleshooting Windows boot issues. Don’t forget, the more familiar you are with BIOS and CMD, the better equipped you’ll be to handle any unexpected computer troubles. If you have any questions or run into issues, feel free to refer back to this guide or leave a comment below for additional help.
Matt Jacobs has been working as an IT consultant for small businesses since receiving his Master’s degree in 2003. While he still does some consulting work, his primary focus now is on creating technology support content for SupportYourTech.com.
His work can be found on many websites and focuses on topics such as Microsoft Office, Apple devices, Android devices, Photoshop, and more.
Все способы:
- Этап 1: Подготовка загрузочного носителя
- Этап 2: Установка приоритета в BIOS
- Этап 3: Запуск «Командной строки»
- Вопросы и ответы: 2
Запустить консоль прямо в BIOS не представляется возможным. Это меню можно использовать лишь для загрузки с внешнего накопителя, через который уже и будет открыта «Командная строка».
Этап 1: Подготовка загрузочного носителя
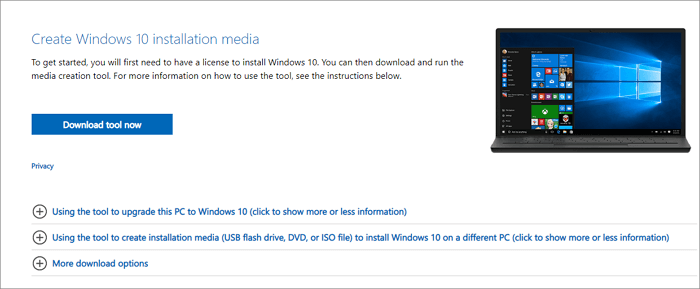
Чтобы запустить «Командную строку» из меню БИОС, вам потребуется загрузочная флешка или DVD-диск с установщиком Windows. Создать его можно при помощи бесплатной утилиты от Microsoft, разработанной для установки фирменных операционных систем. Если же у вас имеется физический накопитель с ОС, шедший в комплекте с компьютером, – данный этап можно пропустить.
Скачать Media Creation Tool
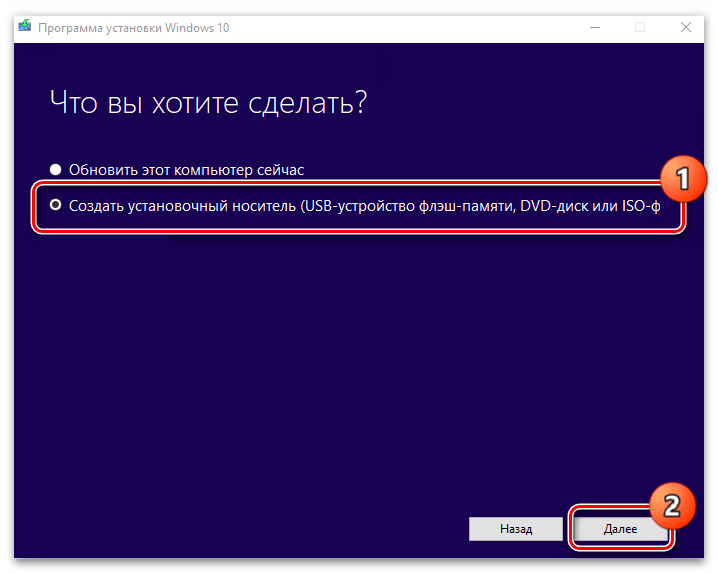
В Media Creation Tool на одном из экранов вам нужно отметить флажком пункт создания установочного носителя, нажать кнопку «Далее», а затем следовать указанным в мастере программы инструкциям.
Подробнее: Инструкция по созданию загрузочной флешки
Этап 2: Установка приоритета в BIOS
Когда загрузочная флешка или диск готовы, можно переходить непосредственно в меню БИОС. Здесь вы должны выбрать установочный носитель для запуска «Командной строки». Осуществляется это следующим образом:
- Перезагрузите компьютер и войдите в БИОС.
Подробнее: Как попасть в BIOS на компьютере / на ноутбуке
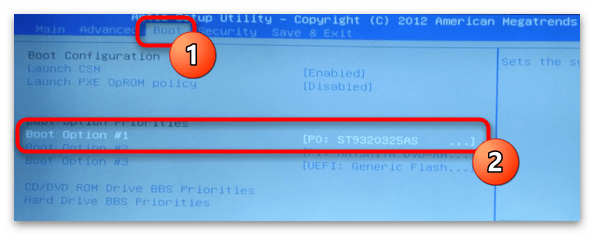
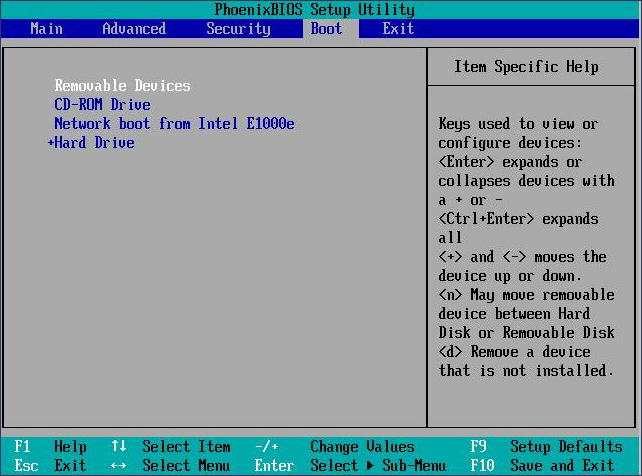
- На вкладке «Boot» или её альтернативе под вашу модификацию интерфейса отыщите параметр «Boot Option 1» и выберите его при помощи клавиши «Enter».
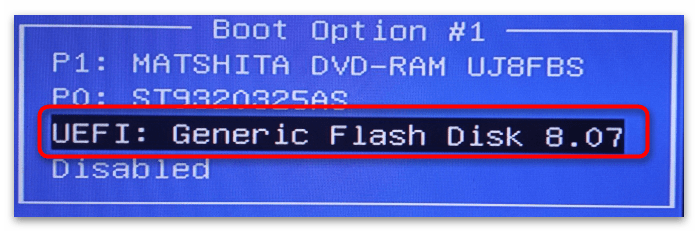
- В открывшемся меню первой опции загрузки выберите носитель с установщиком Windows. Это может быть USB-устройство, либо CD/DVD.
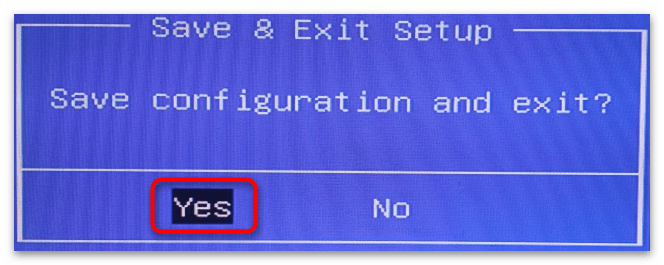
- Теперь нажмите клавишу «F10» у себя на клавиатуре и подтвердите намерение сохранить сделанные изменения.
На разных устройствах процедура смены приоритета загрузки может отличаться, поэтому если предложенная инструкция вам не подходит, рекомендуем ознакомиться с полноценной инструкцией.
Подробнее: Изменение приоритета загрузки в BIOS
Этап 3: Запуск «Командной строки»
Третьим шагом производится непосредственный переход в «Командную строку». Осуществить это можно через интерфейс самого установщика. Дождитесь, пока откроется меню программы, и выполните следующие действия:
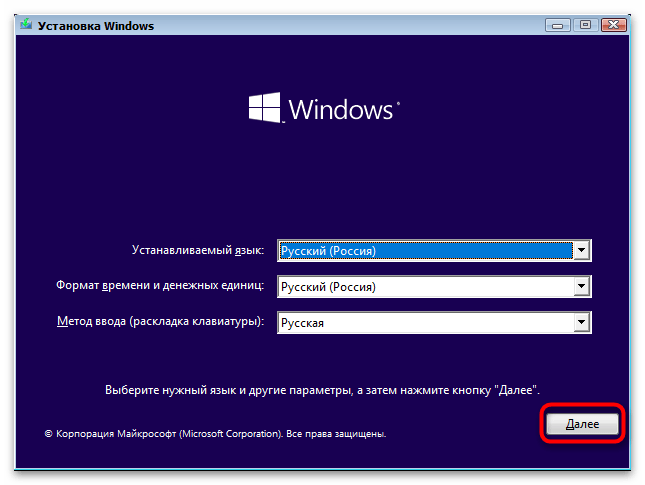
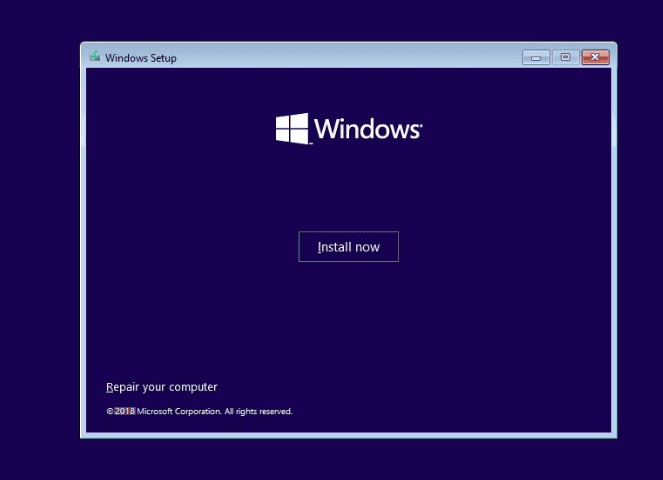
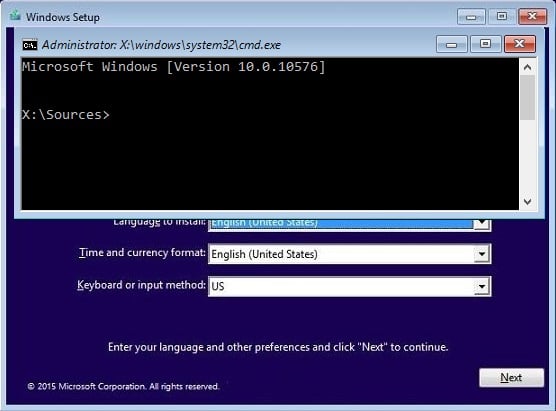
- После начала загрузки компьютера с внешнего устройства отобразится установочное окно. Выберите язык интерфейса и раскладку клавиатуры, затем щёлкните кнопку «Далее».
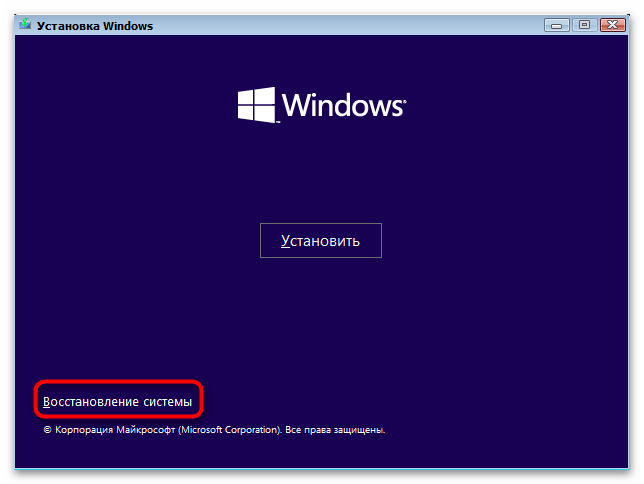
- В нижнем левом углу на открывшейся форме вам потребуется нажать на надпись «Восстановление системы».
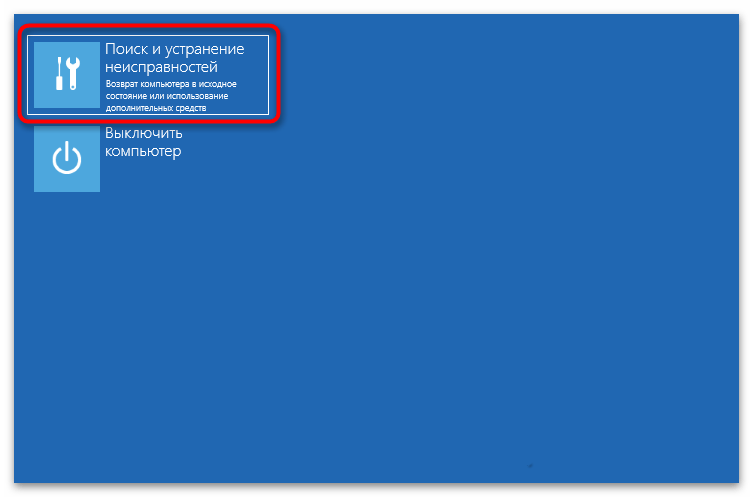
- Откроется экран восстановления. Здесь перейдите в «Поиск и устранение неисправностей».
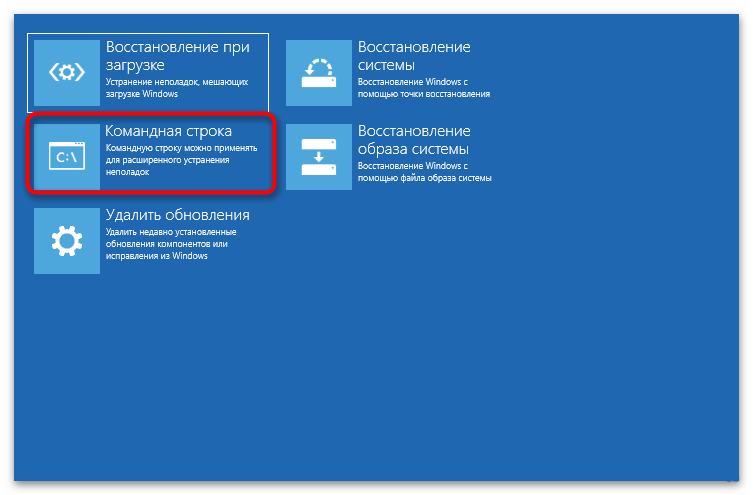
- В появившемся списке инструментов как раз и будет нужная нам «Командная строка».
- Когда вы её выберете, в виде окна запустится необходимая вам утилита.
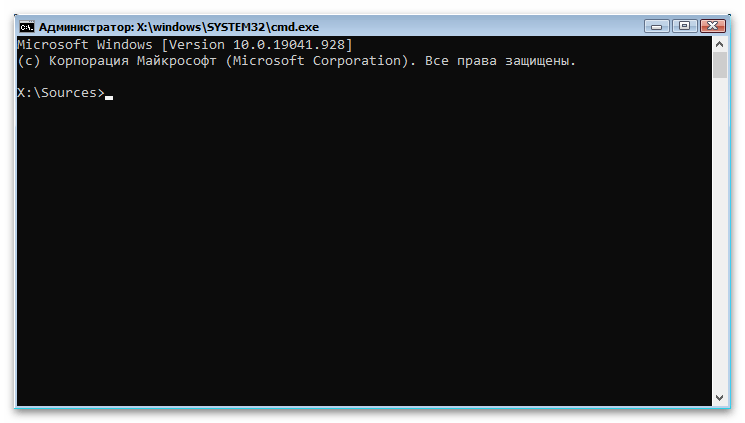
Кстати, гораздо проще запустить консоль можно так: когда увидите установочное окно, вместо выбора языка интерфейса и раскладки клавиатуры просто нажмите Shift + F10.
Наша группа в TelegramПолезные советы и помощь
Overview — How to Boot to Command Prompt in Windows 10
A Command Prompt is an entry point for typing computer commands. By typing commands at the window, you can perform tasks on your computer without using the Windows graphical interface. In fact, there are two ways to open Command Prompt in Windows 10. Check the table below to get quick navigation.
| Workable Solutions | Step-by-step Troubleshooting |
|---|---|
| 1-Windows 10 Can’t Boot |
Fix 1. Boot to Windows 10 Command Prompt with Installation Media…Full steps Fix 2. Boot to Command Prompt Windows 10 from Advanced Startup Options…Full steps |
| 2-Windows 10 Can Boot |
Fix 1. Start Command Prompt Using Search…Full steps Fix 2. Open/Boot Windows 10 Command Prompt from the Settings…Full steps |
Part 1. How to Open Command Prompt If Windows 10 Can’t Boot
If you can’t boot into Windows 10 and repair the errors, you’ll need to create an installation media or turn off the PC three times. Read on to get the detailed information.
Way 1. Boot to Windows 10 Command Prompt with Installation Media
If your computer fails to boot, you can open Command Prompt with Windows 10 Installation Media. With the help of a Windows 10 Media Creation Tool, you can enter BIOS even if your Windows 10 can’t start.
Step 1. Create Windows 10 Installation Media
Requirements:
- A PC with a stable internet connection for the download.
- A USB flash drive with at least 8 GB of space or a blank DVD.
- When burning a DVD from an ISO file, if you’re told the disc image file is too large, you’ll need to use dual-layer (DL) DVD media.
Steps: Follow this guide to make a Windows 11/10 media creation tool.
Step 2. Boot into the BIOS in Windows 10
- Insert the installation media into your Windows 10 PC and boot the PC from it.
- Press F2, Del, Esc, or other required keys to enter BIOS.
- Access the «Boot» pane and move your USB drive to the top of the boot list.
Step 4. Boot to Windows 10 Setup Interface
- Press F10 to save your settings and exit the BIOS.
- Set the language, time, and keyboard, then click «Next».
- Click «Repair your computer» at the bottom left.
Step 5. Boot to Command Prompt in Windows 10
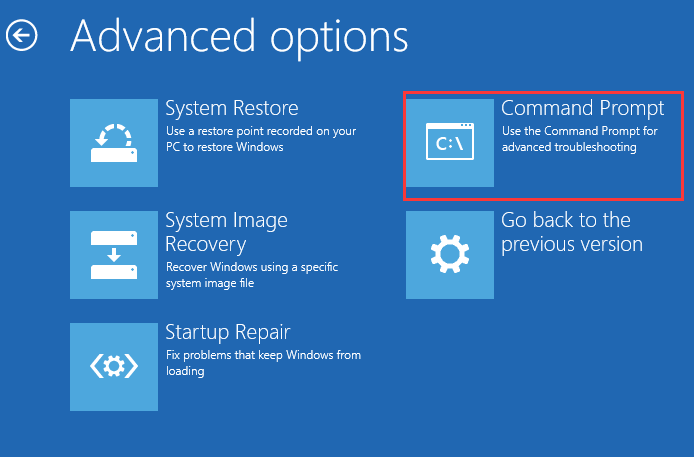
- Click «Troubleshoot > Advanced Options > Command Prompt»
Then, you will enter the Command Prompt to repair Windows 10 with command lines.
To repair Windows 10 with SFC:
- On the command window, type D: and press Enter to go to the C: drive of your computer.
- Tip
- Because your computer is started with bootable media, the System Reserved partition of your hard drive is temporarily marked as C: and therefore the C: drive that you see from within Windows 10 is marked as D: drive. This is a temporary modification.
- Type sfc /scannow and press Enter.
If you want to fix Windows 10 boot problems like repair MBR, type the commands below:
- bootrec /fixmbr
- bootrec /fixboot
- bootrec /rebuildbcd
Way 2. Boot to Command Prompt in Windows 10 from Advanced Startup Options
What if you start your PC, but you get a blue screen or the desktop is blank? You can fix your problem and open Command Prompt in Advanced Startup Options. Here are the steps:
Step 1. Enter the Windows 10 recovery environment.
Turn your computer on and off three times. While booting, make sure you turn off the computer when you see the Windows logo. After the third time, Windows 10 will boot into the diagnostics mode.
Step 2. Click «Advanced options > Troubleshoot > Advanced options > Command Prompt» when the recovery screen appears.
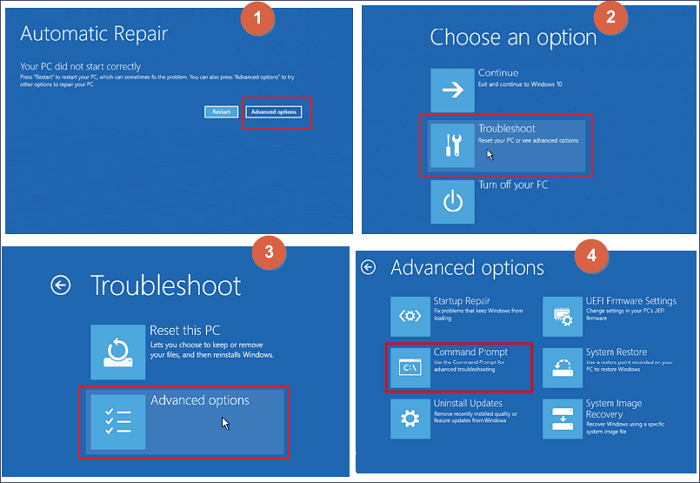
Then, the Command Prompt is immediately loaded, and you can start using it for whatever you need.
Part 2. How to Start Command Prompt If Windows 10 Can Boot
Things could be easier if your Windows computers or laptops are running well. You can search for Command Prompt or enter Command Prompt from Settings. Here are the steps in detail.
Fix 1. Start Command Prompt Using Search
This solution is the most recommended one for its easiness.
Step 1. Go to Start and type cmd into the search box.
Step 2. From the list, right-click Command Prompt and choose «Run as administrator».
You should enter into the Command Prompt window now.
Fix 2. Start Windows 10 Command Prompt from Settings
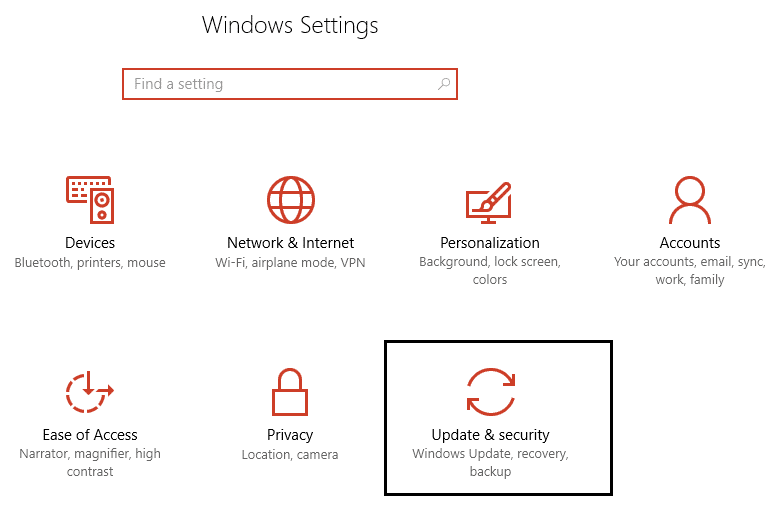
Step 1. Click «Start > Settings» to open the «Settings» Window. Next click «Update & Security», and choose «Recovery».
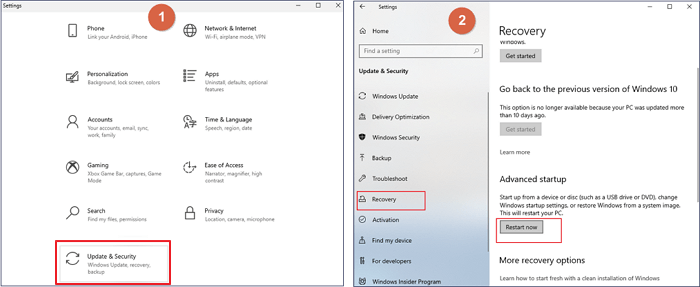
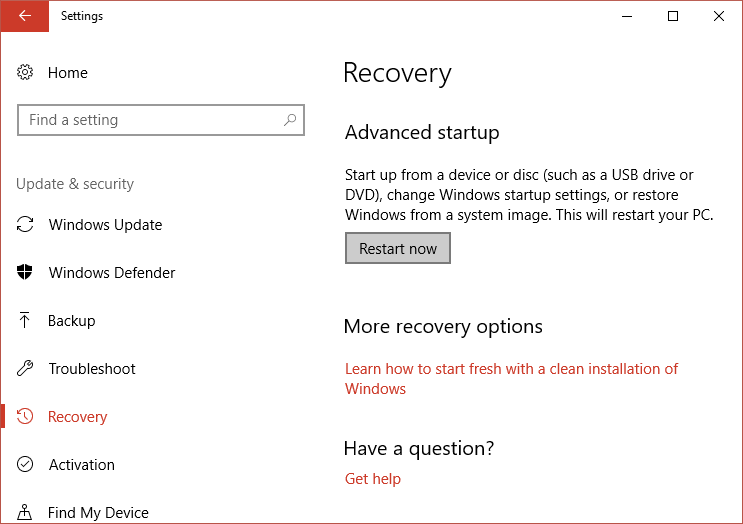
Step 2. Click «Restart now» under Advanced startup, and your Windows 10 computer will restart now.
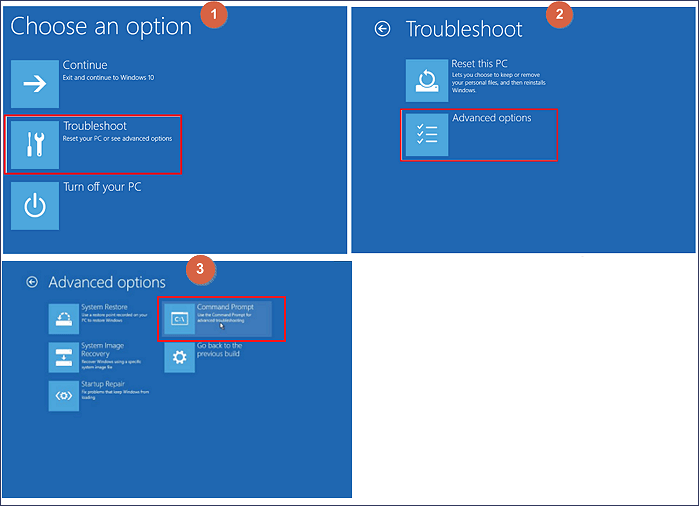
Step 3. When you see the «Choose an option» screen, click «Troubleshoot > Advanced options».
Step 4. Click «Command Prompt». You should enter into the Command Prompt window now.
Extra Tip: How to Recover Command Prompt Deleted Files
When you use some cleanup commands like a clean command or format command, you lost data on your drive. These command lines delete files permanently without backup. What can you do to get back Command Prompt deleted files? The answer is using the best data recovery software — EaseUS Data Recovery Wizard. This EaseUS Data Recovery Wizard can recover formatted hard drive, using Command Prompt, or pressing Shift-Delete.
Download this all-in-one data recovery software and restore lost data from your PC or laptop.
Step 1. Run EaseUS Data Recovery Wizard. Choose the drive where you lost files and start scanning by clicking «Search for Lost Data». This software allows you to recover lost data from all devices, including HDD, SSD, USB drive, SD card, pen drive, camera, etc.

Step 2. Browse the full scan results. You can choose the file type you need by clicking on the file type filter. EaseUS data recovery software supports 1000+ file types like photos, videos, documents, emails, audio files, and many more.

Step 3. Select the files you want to preview. Click «Recover» and set a storage location or Cloud drive to save the recovered data.

Conclusion
This post has provided you with 4 ways to boot Windows 10 from Command Prompt. If your PC cannot boot, refer to Part 1. If your computer can start normally, refer to Part 2. Besides, If you have data loss problems, turn to EaseUS EaseUS Data Recovery Wizard for help.
How to Open Command Prompt at Boot in Windows 10: Command Prompt is one of the essential features of Windows, which is used for typing computer commands and is a command-line interpreter on Windows. Command Prompt is also known as cmd.exe or cmd which interacts with the user through a command-line interface. Well, it’s a powerful tool which users can use to do almost anything they can do with the GUI but instead with commands.
Now Command Prompt is also important because when Windows fails to start, the cmd is used for maintenance & recovery. But again if Windows fails to start then how you are going to access Command Prompt? Well, in this guide you will exactly see how to start Command Prompt at boot in Windows 10. There are mainly two methods where the first one involves the Windows installation disk to access Command Prompt whereas the other one uses Advanced Startup Options. Anyway without wasting any time let’s see How to Open Command Prompt at Boot in Windows 10 with the help of the below-listed tutorial.
Table of Contents
Method 1: Open Command Prompt at Boot Using Windows Installation Media
1.Insert the Windows 10 installation disc or recovery media into CD/DVD Drive.
Note: If you don’t have an installation disc then make a bootable USB disk.
2.Enter BIOS then make sure to set the first boot priority as CD/DVD ROM or USB.
3.Exit saving changes from the BIOS which will restart your PC.
4.When prompted to Press any key to boot from CD or DVD, press any key to continue.

5.Now on Windows Setup Screen (where it asks you to select Language, time and currency format, etc) press the Shift + F10 keys on your keyboard to open Command Prompt.

Method 2: Open Command Prompt at Boot in Windows 10
1.Insert the Windows 10 bootable installation DVD or Recovery Disc and restart your PC.
2.When prompted to Press any key to boot from CD or DVD, press any key to continue.
3.Select your language preferences, and click Next. Click Repair your computer in the bottom-left.

4.On choose an option screen, click Troubleshoot.

5.On Troubleshoot screen, click Advanced option.

6.Finally, on the Advanced options screen, click Command Prompt.
Method 3: Open Command Prompt at Boot Using Advanced Startup Options
1.Make sure to hold the power button for few seconds while Windows is booting in order to interrupt it. Just make sure it doesn’t get past the boot screen or else you need to again start the process.
2.Follow this 3 consecutive times as when Windows 10 fails to boot consecutively three times, the fourth time it enters Automatic Repair mode by default.
3.When the PC starts 4th time it will prepare Automatic Repair and will give you the option to either Restart or Advanced options.
4.Click on Advanced options and you would again be taken to Choose an option screen.
5.Again follow this hierarchy Troubleshoot -> Advanced options
6.From Advanced options screen click on Command Prompt.
Method 4: Open Command Prompt at Boot in Windows 10 Using Settings
If you’re able to access Windows then you could start your PC into Advanced Startup Options.
1.Press Windows Key + I then click on Update & Security.
2.From the left-hand menu click on Recovery.
3.Now under Advanced Startup click on Restart now.
4.Once the PC restart, it will automatically boot to Advanced Startup Options.
5.Now click Troubleshoot > Advanced Options and from Advanced Options screen click on Command Prompt.
Recommended:
- Change Default Action when you close your Laptop Lid
- 4 Ways to Change Date and Time in Windows 10
- Prevent Changing Color and Appearance in Windows 10
- Synchronize Windows 10 Clock with an Internet Time Server
That’s it you have successfully learned How to Open Command Prompt at Boot in Windows 10 but if you still have queries regarding this post then feel free to ask them in the comment’s section.
Биос – это специальная программная часть компьютера, которая отвечает за его базовые функции. В том числе, биос контролирует взаимодействие операционной системы с аппаратной частью устройства. Командная строка – это мощный инструмент в Windows 10, с помощью которого можно выполнять различные операции с операционной системой и настраивать ее работу под свои нужды.

В данной статье я покажу вам, как включить командную строку через биос в Windows 10 и расскажу о нескольких полезных командах, которые помогут вам получить больше контроля над вашей операционной системой.
Как включить командную строку через биос в Windows 10
1. Включите компьютер и нажмите клавишу Del, F2, F10 или другую клавишу, которая позволяет войти в биос. Обычно информация о том, как войти в биос, отображается на экране при запуске компьютера.
2. В биосе найдите раздел Boot или Advanced BIOS Features. В этом разделе вы должны найти опцию «Boot Menu». Перейдите в эту опцию и настройте загрузку с «Command Prompt».
3. После того, как вы настроили загрузку с «Command Prompt», сохраните изменения в биосе и перезагрузите компьютер. После перезагрузки компьютера должна открыться командная строка.
Полезные команды для работы в командной строке
1. ipconfig – эта команда позволяет узнать информацию о сетевых соединениях вашего компьютера, такую как IP-адрес и подсеть.
2. netstat – с помощью этой команды можно узнать информацию о сетевых подключениях вашего компьютера, такую как активные соединения, открытые порты и т.д.
3. tasklist – данная команда позволяет просмотреть список всех запущенных процессов на вашем компьютере. Это может быть полезно, если вы хотите узнать, какие программы занимают больше памяти или процессорного времени.
4. chkdsk – с помощью этой команды можно проверить и восстановить целостность файловой системы вашего компьютера.
Итог

Теперь, благодаря настройкам в биосе, вы знаете, как включить командную строку через биос в Windows 10. Командная строка – это удобный инструмент для выполнения различных операций и настройки операционной системы под свои нужды. Уверен, что полезные команды, которые я вам показал, помогут вам получить больше контроля над вашим компьютером и упростить вашу работу с операционной системой.
Как включить командную строку через биос в Windows 10
Всем привет! Сегодня я расскажу вам о том, как включить командную строку через биос в Windows 10. Это может быть полезным при настройке системы, устранении неполадок или выполнении некоторых особых задач. Чтобы извлечь максимум из этого ресурса и повысить эффективность работы с вашей операционной системой, давайте рассмотрим несколько простых шагов.
Шаг 1: Перезагрузите компьютер и войдите в биос
Перед тем, как мы начнем, убедитесь, что вы сохранили все важные данные, так как вам придется перезагрузить компьютер. После сохранения данных перезагрузите систему и нажмите нужную комбинацию клавиш, чтобы войти в биос. Эта комбинация может различаться в зависимости от производителя вашего компьютера. Обычно это клавиша Delete, F2 или F10. Если вы не знаете точную комбинацию, попытайтесь найти информацию в сопроводительной документации к вашему устройству или в Интернете.
Шаг 2: Найдите раздел «Boot» (Загрузка)
После успешного входа в биос вы должны увидеть различные разделы, навигацию по которым можно выполнить с помощью стрелок на клавиатуре. Ваша цель — найти раздел с названием «Boot» или «Загрузка». Обычно он расположен в верхней части списка. Если вы не можете найти этот раздел, обратитесь к руководству пользователя для получения дополнительной информации.
Шаг 3: Измените порядок загрузки

Как только вы попали в раздел «Boot», вам потребуется изменить порядок загрузки устройств. Чтобы включить командную строку через биос, установите вашу операционную систему в качестве первого загружаемого устройства. В большинстве случаев это будет ваш жесткий диск. Выберите соответствующий пункт меню и переместите его на первое место в списке. Затем сохраните изменения и выйдите из биоса.
Шаг 4: Перезагрузите компьютер
Теперь, когда вы внесли нужные изменения в биос, сохраните настройки и перезагрузите компьютер. После перезагрузки вы должны увидеть командную строку в качестве первого интерфейса после загрузки операционной системы. Это означает, что вы успешно включили командную строку через биос!
Итог

Теперь вы знаете, как включить командную строку через биос в Windows 10. Этот простой процесс позволит вам раскрыть все возможности командной строки и выполнить различные операции на вашей операционной системе. Не забывайте, что использование командной строки требует особой осторожности, поэтому будьте внимательны и вводите команды действительно только в тех случаях, когда вы уверены в их последствиях.
- Перезагрузите компьютер и войдите в биос
- Найдите раздел «Boot» (Загрузка)
- Измените порядок загрузки
- Перезагрузите компьютер
Командная строка — мощный инструмент, который может помочь вам выполнить даже самые сложные задачи в Windows 10. Используйте ее с умом и не бойтесь экспериментировать! Удачи вам в освоении командной строки!
Как включить командную строку через биос виндовс 10
В наше время знание командной строки может оказаться крайне полезным навыком для пользователя операционной системы Windows 10. Хотя интерфейс с графической оболочкой предоставляет удобную навигацию и выполнение задач, командная строка может быть более эффективным и быстрым инструментом, особенно для опытных пользователей. Но как включить командную строку через биос в Windows 10 и начать использовать этот мощный инструмент? В этой статье мы рассмотрим все необходимые шаги и различные способы включения командной строки через биос в Windows 10.
Шаг 1: Запуск меню «Восстановление»

Первым шагом для включения командной строки через биос в Windows 10 является запуск меню «Восстановление». Для этого необходимо выполнить следующие действия:
- Перезагрузите компьютер и нажмите клавишу F10 (или другую указанную на экране) для входа в биос.
- Найдите и выберите «Параметры загрузки» в меню биос.
- Выберите опцию «Восстановление» или «Диагностика» в меню «Параметры загрузки».
- Далее выберите «Дополнительные параметры» и найдите «Командная строка».
- Нажмите на «Командная строка», чтобы открыть ее.
Теперь у вас есть доступ к командной строке через биос в Windows 10.
Шаг 2: Использование командной строки
Как только вы включите командную строку через биос в Windows 10, вы можете начать использовать все ее возможности. Командная строка позволяет выполнять различные операции и задачи, используя команды, которые вводятся в нее. Ниже приведены некоторые полезные команды, которые могут пригодиться:
dir— показывает содержимое текущего каталога.cd— позволяет перейти в указанный каталог.mkdir— создает новый каталог.copy— копирует файлы.del— удаляет файлы.
Это только небольшой пример команд, доступных в командной строке. Вы можете изучить и использовать различные команды, чтобы эффективно выполнять свои задачи.
Общий итог

Включение командной строки через биос в Windows 10 может предоставить вам удобный и мощный инструмент для выполнения различных задач. Она позволяет управлять файлами и каталогами, выполнять различные операции и многое другое. В этой статье мы рассмотрели основные шаги для включения командной строки через биос и некоторые полезные команды, которые могут помочь вам достичь ваших целей.
Надеемся, что эта информация была полезной и поможет вам получить больше контроля над вашей операционной системой Windows 10. Не бойтесь экспериментировать и изучать новые команды, так как только практика поможет вам стать опытным пользователем командной строки.