Все способы:
- Способ 1: Обновление ПО
- Способ 2: Сброс параметров и переустановка
- Способ 3: Работа с реестром
- Вопросы и ответы: 1
Способ 1: Обновление ПО
Любое программное обеспечение может перестать запускаться, если его версия устарела. «Почта и Календарь» – стандартное приложение Microsoft, поэтому устанавливается и обновляется оно в фирменном магазине компании.
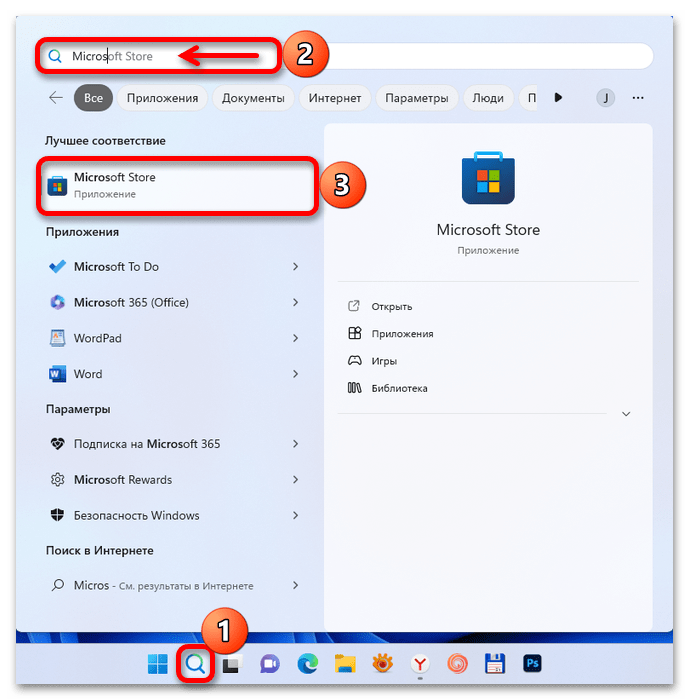
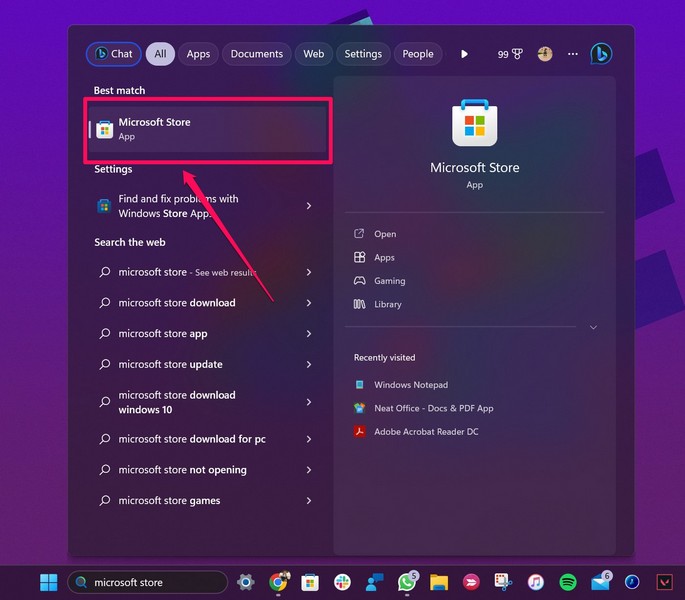
- В поиске Windows 11 вводим Microsoft Store и открываем магазин.
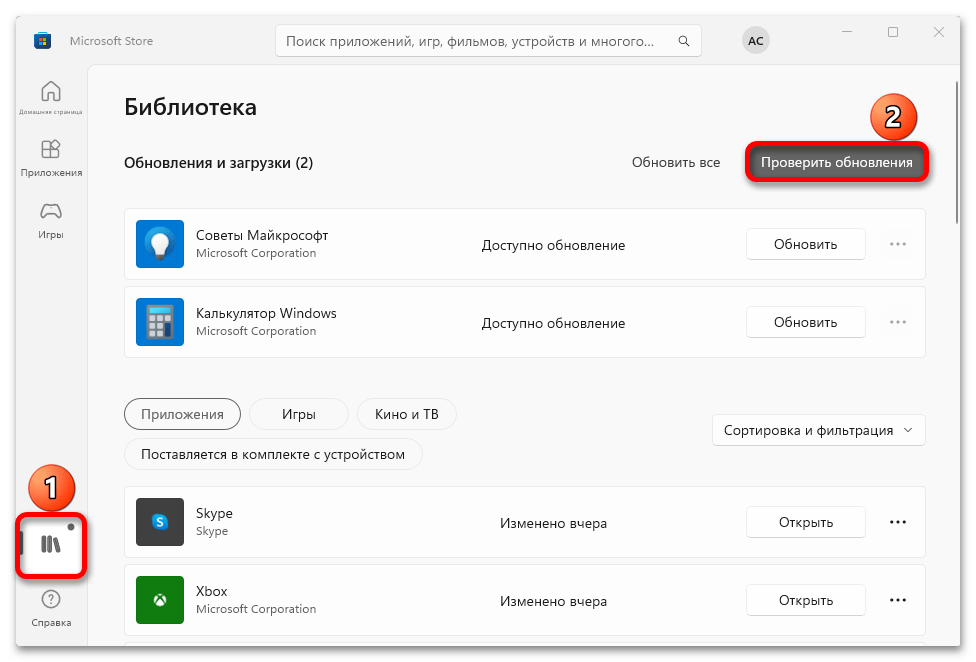
- Переходим в библиотеку и жмем «Проверить обновления».
- Если будут найдены апдейты, нажимаем кнопку «Обновить» справа и ждем завершения процесса.
- В нашем случае в списке на обновление приложения не было, но какие-то изменения оно только что получило, а значит, просто пробуем его запустить.


Способ 2: Сброс параметров и переустановка
Обратите внимание! Тем, кто активно пользуется календарем, следует знать, что некоторые действия, описанные ниже, подразумевают удаление всех связанных с приложением данных.
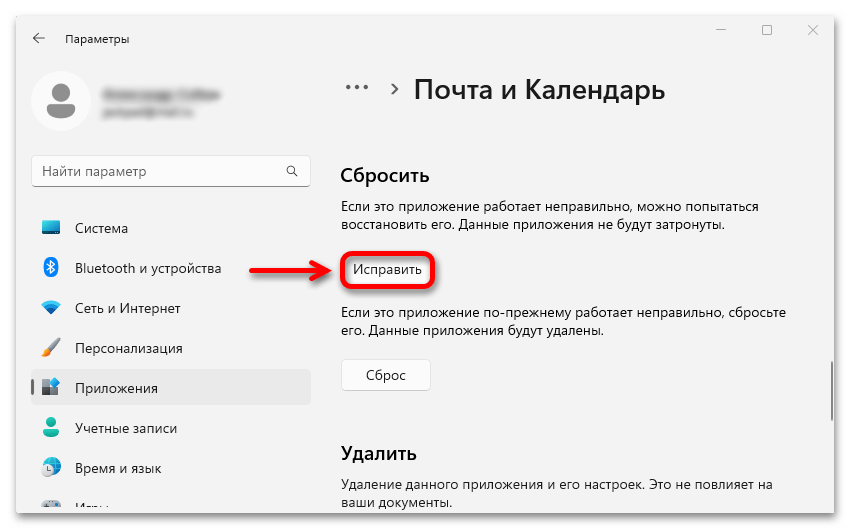
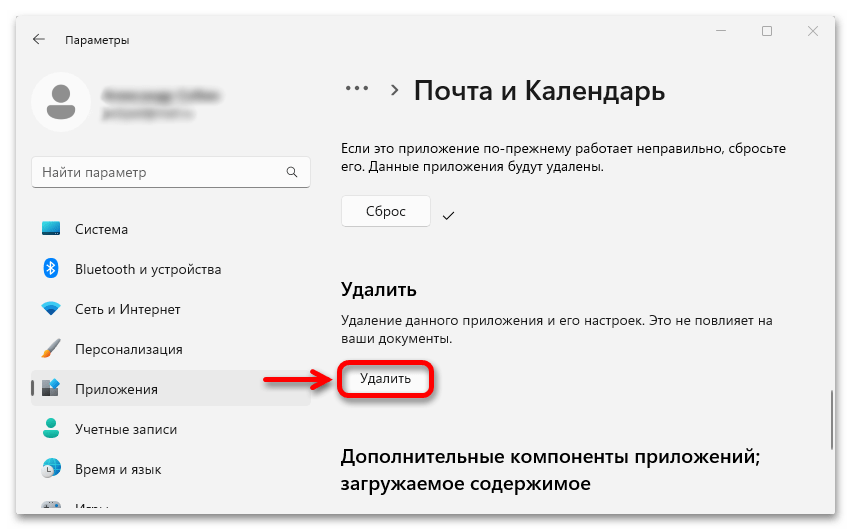
- Вызываем меню «Пуск» и открываем системные параметры.
- В разделе «Приложения» переходим к списку установленного ПО.
- Находим «Почта и Календарь», кликаем иконку с тремя точками справа и открываем дополнительные параметры.
- В первую очередь пробуем исправить софт, и если эта опция нам поможет, проблема решится без последствий.
- При отсутствии положительно результата сбрасываем приложение, но учитываем, что после этого все данные будут удалены.
- В крайнем случае можно попробовать восстановить работоспособность календаря путем его переустановки. Для этого на той же странице нажимаем «Удалить»

и подтверждаем действие.
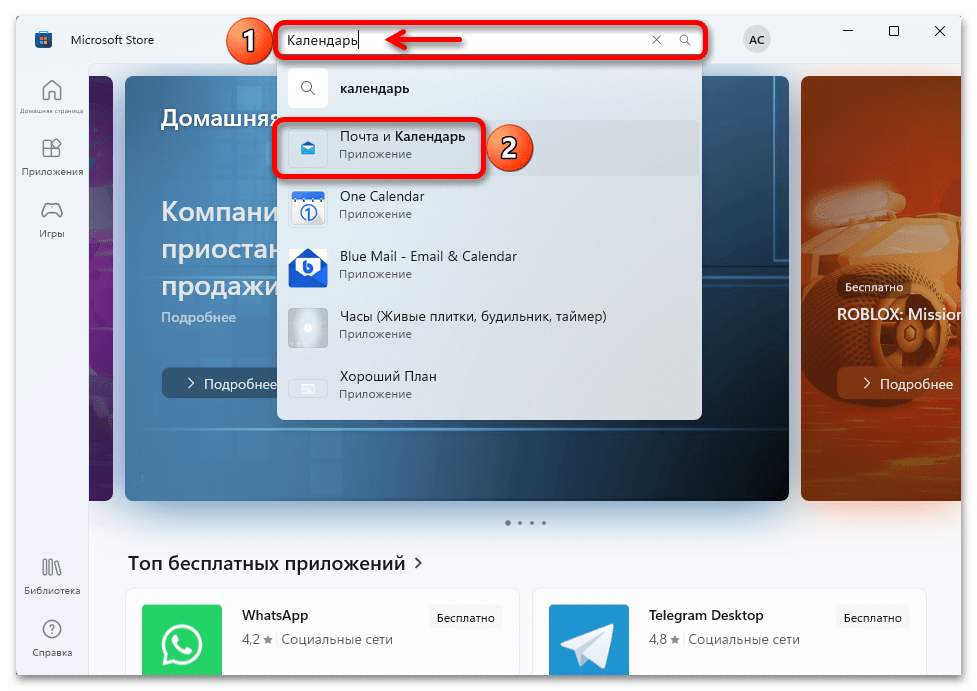
- Теперь открываем Microsoft Store, как мы это делали в первом способе, с помощью функции поиска находим нужный софт, переходим на его страницу

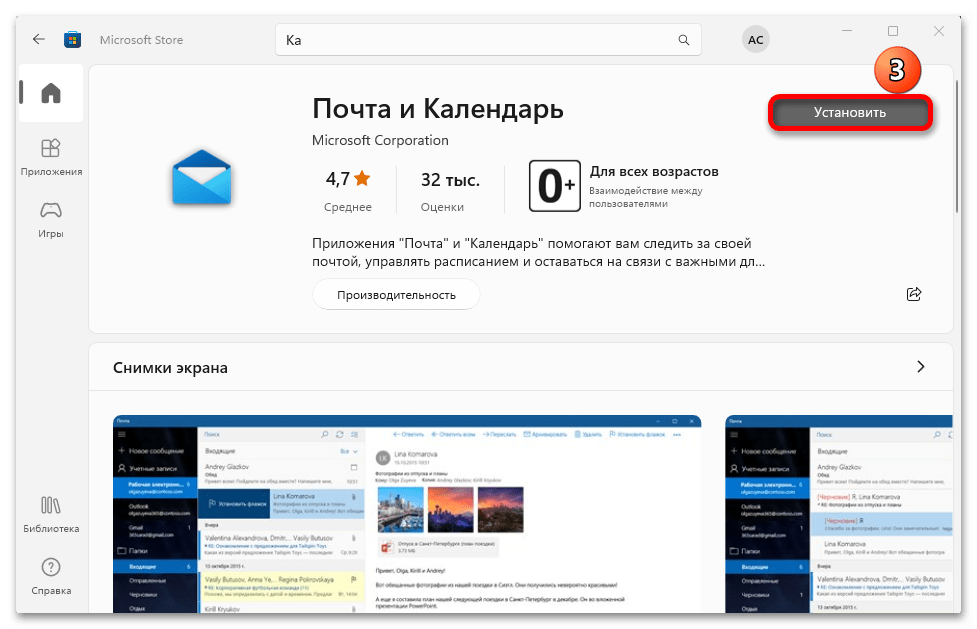
и устанавливаем.


Способ 3: Работа с реестром
Теперь рассмотрим ситуацию, когда область календаря не появляется при нажатии на блок с датой и временем, расположенный справа на «Панели задач». Работать будем с реестром, и пусть изменение и создание параметров в этой области ОС всегда сопряжено с рисками, судя по комментариям в сети, этот способ помог многим пользователям.
- Сочетанием клавиш «Windows+R» вызываем оснастку «Выполнить», вводим команду
regeditи нажимаем «OK».
Читайте также: Запуск «Редактора реестра» в Windows 11
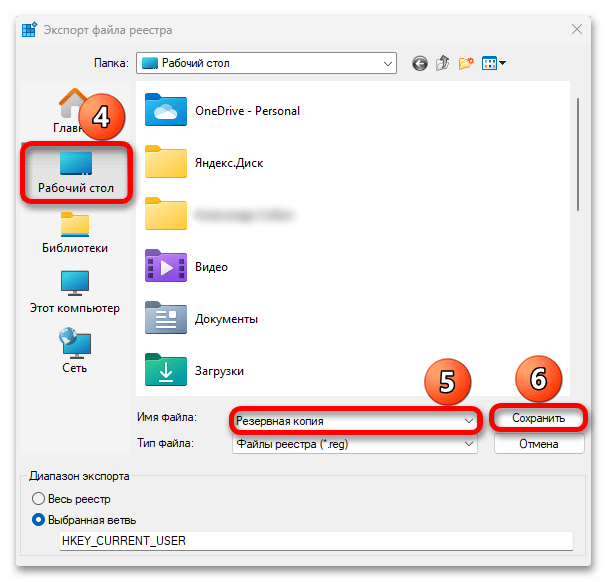
- В первую очередь сохраним раздел, в котором будем менять параметры, чтобы потом можно было откатиться к исходным значениям, если что-то пойдет не так. Выделяем «HKEY_CURRENT_USER», открываем вкладку «Файл»,

жмем «Экспорт»,
выбираем любое место для резервной копии, например Рабочий стол, вводим название и сохраняем ее.

Когда нужно будет восстановить этот раздел, во вкладке «Файл» нажимаем «Импорт»,

находим в памяти компьютера РК и загружаем ее.
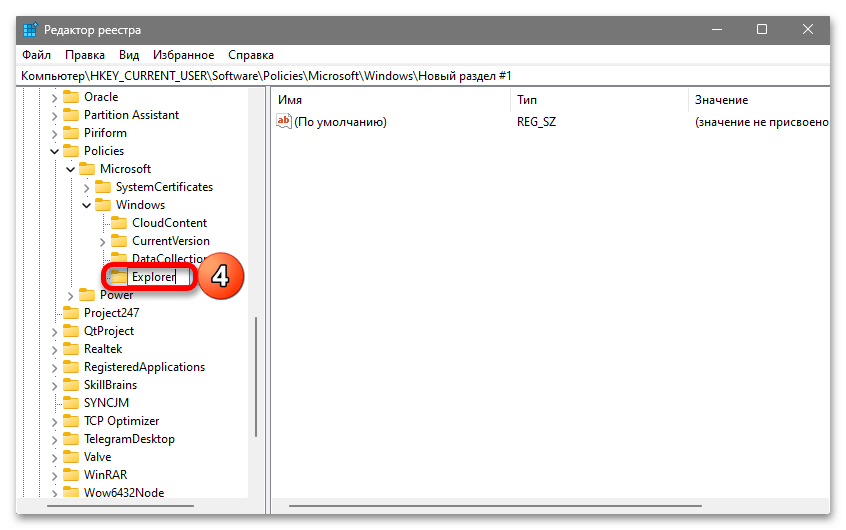
- Переходим по следующему пути:
HKEY_CURRENT_USER\Software\Policies\Microsoft\Windows - Нас интересует папка «Explorer». Если ее нет, кликаем правой кнопкой мышки по каталогу «Windows», создаем новый раздел

и называем его «Explorer».
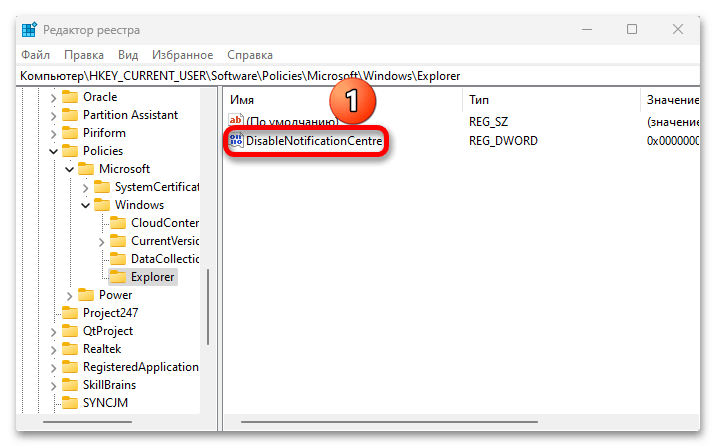
- Выделяем новый каталог, затем в правой части «Редактора» кликаем по пустой области правой кнопкой мышки, создаем параметр DWORD (32 бита)

и называем его – DisableNotificationCentre.
- Дважды жмем по нему

и проверяем его значение. Если стоит единица, меняем на «0», сохраняем изменения, перезагружаем компьютер и пробуем открыть панель календаря.


Кроме того, может неправильно работать сама «Панель задач», из которой область календаря запускается. На нашем сайте опубликована статья с возможными вариантами ее ремонта. Там, среди прочего, есть и универсальные способы — удаление вредоносного ПО, обновление операционной системы, проверка целостности и восстановление системных файлов, которые также могут помочь восстановить работоспособность приложения «Почта и Календарь».
Подробнее: Восстановление работы панели задач в Windows 11
Наша группа в TelegramПолезные советы и помощь
A good Calendar app can help you keep track of important life events and milestones to celebrate them or prepare to face them in the future. However, the quest to find a good calendar app on Windows 11 PCs and laptops can be difficult as there are not many options that can satisfy users. Well, let us point you to one of the better calendar apps that you can use on your Windows 11 device: the Outlook Calendar app for Windows. It is usually already installed when you first use a Windows 11 PC or laptop as it is the default Calendar app for Windows.
The Calendar app on Windows 11 is one of the most underrated apps that comes with a ton of great features, including a simple user interface (UI), an event scheduler, and many other handy features to keep you on track. So, in this comprehensive guide, we will discuss everything about the Outlook Calendar app on Windows 11 and how you can use it on your PC or laptop. So, grab a cup of hot coffee and dive into it right away!
Here’s How to Use the Calendar App on Windows 11 PCs and Laptops
The Calendar app on Windows 11 PCs and laptops is a part of the new Outlook app and is integrated into the same along with Microsoft Teams, To Do, People, and other MS Office apps. It serves as the default calendar application on Windows 11 devices and generally comes installed as part of the Windows 11 suite.
The Calendar app offers an easy-to-use layout and comes with various featured baked into it. It has an event reminder and event scheduler, various layouts to customize the view, and the ability to add and use multiple calendars from external sources. In fact, users can even add a dedicated calendar to track the matches of their favorite sports teams on their Windows 11 PC or laptop.
One of the best things about the Calendar app on Windows 11 is that it is connected to the Microsoft Exchange servers and uses Microsoft’s cloud services to sync calendar events. This basically means that when users create and add events to the Microsoft Calendar app on their Windows 11 PCs or laptops, they are synced across all their devices that are logged in with the same Microsoft account.
So, if you want to learn how to use the Calendar app on your Windows 11 PC or laptop to its full potential, continue reading this article!
Install the Mail and Calendar App on Windows 11
Now, if you cannot find the Calendar app on your Windows 11 PC or laptop for some reason, you might need to download and install it. As the Calendar app is a system application, it is available to download on the Microsoft Store and you can do install it very easily on your desktop or laptop.
If you already have the Calendar app installed on your device (Use Windows + S to search for it), you can skip this part. If it is not, simply follow the steps right below to download and install the Mail and Calendar app on your Windows 11 device:
1. Launch the Microsoft Store on your Windows 11 PC or laptop.
2. Use the above search bar to find the Calendar app.
3. On the search results page, click on the Mail and Calendar application to open the listing.
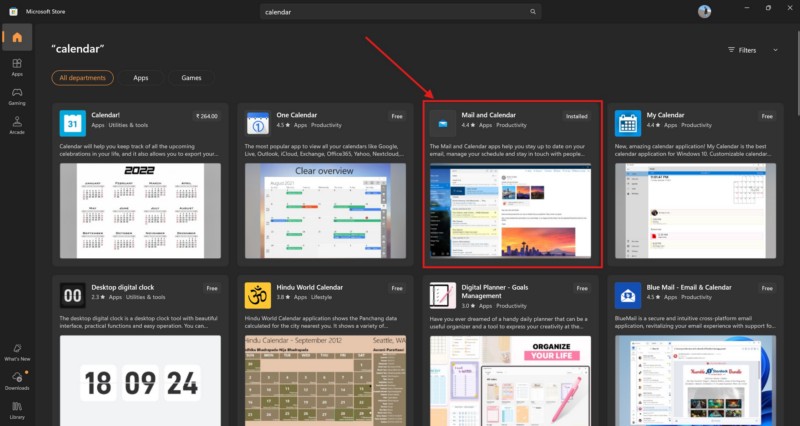
4. On the following page, click the Install button to download and install the same on your Windows 11 device.
Once you have installed the Calendar app on your Windows 11 PC or laptop, you should be able to find it with a simple Window search on your device.
Set Up the Calendar App on Windows 11
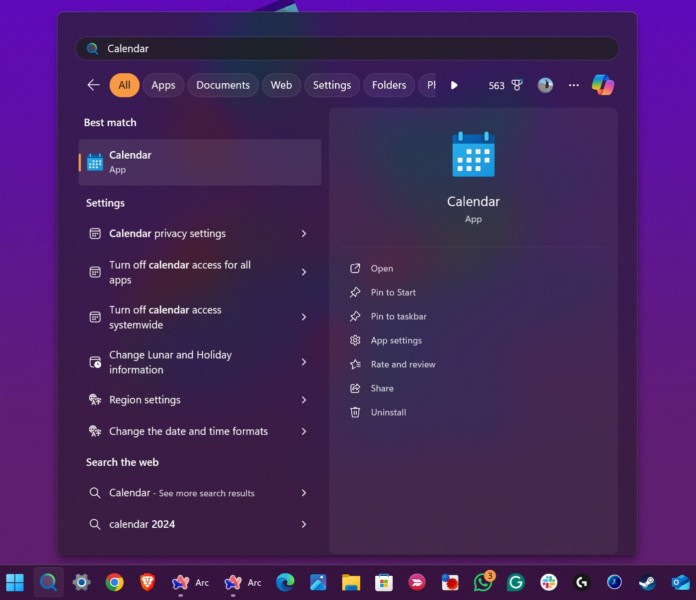
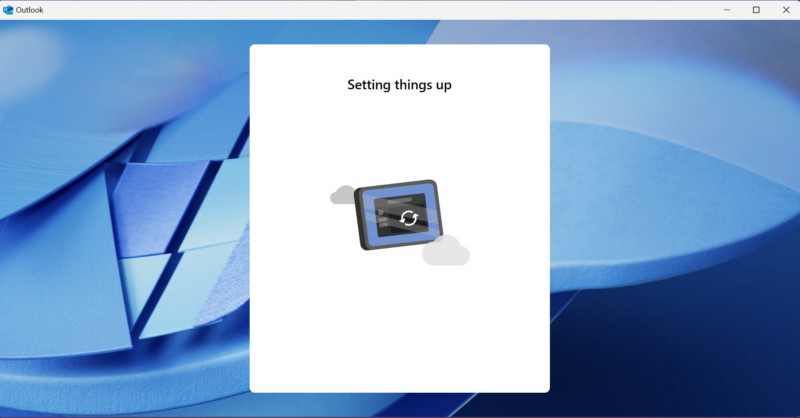
Once you download and install the Microsoft Mail and Calendar app on your Windows 11 PC or laptop, the next step is to set up the Calendar. For this, use Windows + S to open Windows search and search for the Calendar app using the search bar. On the search results page, click the Calendar app icon to launch the same on your device.
From thereon, the process is automatic as the Calendar app will automatically use your Microsoft account to sign in. The process might take a few minutes. So, wait for the Calendar app to sign into your Outlook account and open up on your Windows 11 PC or laptop.
Use the Calendar App on Windows 11
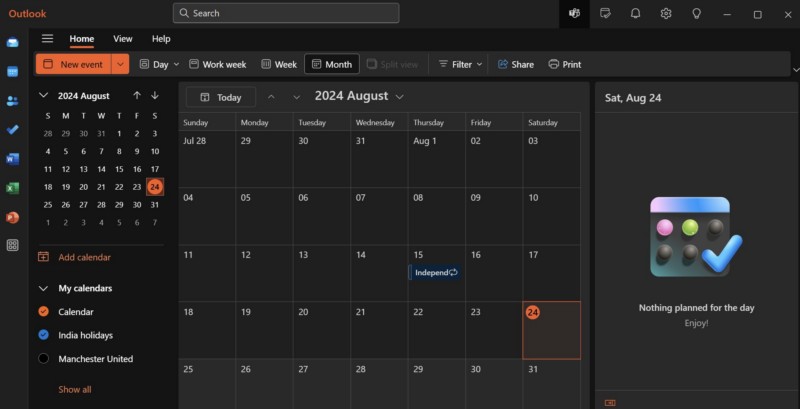
Now, when the Calendar app opens on your Windows 11 PC or laptop, you will see a month-view of the current month along with the current date highlighted on the right pane and on the middle portion. You will also find various menus, buttons, and options spread throughout the user interface to personalize the app according to your preference, view calendar events, and create new ones.
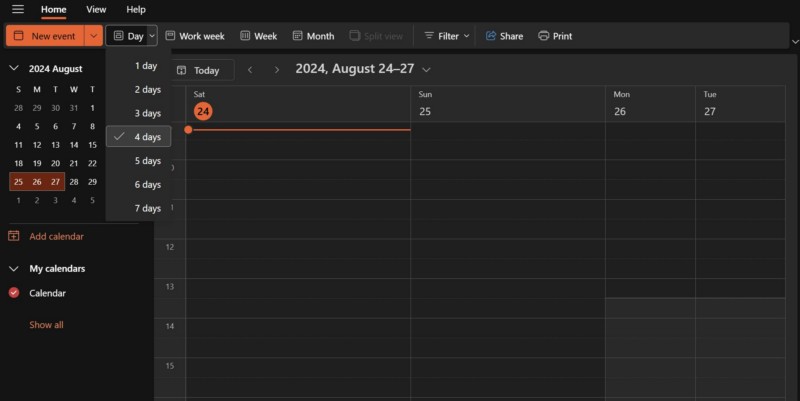
Change Calendar View
The default view of the Calendar app on Windows 11 is set to the Month option. However, you can change this layout to a day-wise view, a week-wise view, or a work week-wise view. You will find all these viewing options at the top ribbon menu as shown in the screenshot below.
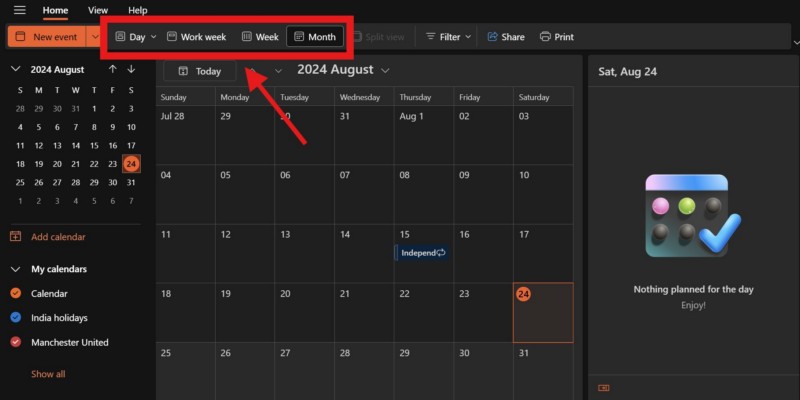
Now, the Week view in the Calendar app on Windows 11 shows the current week, including the weekends. The Work week view, on the other hand, shows the current week, excluding the weekends. So, if you want to view your work-week schedules and events, you can switch to the Work week view from the above ribbon menu.
For the Day view option, you can click the down-arrow right next to it to open a drop-down menu and select the number of days that you want to view at a time. The options range from 1 to 7. So, if you select 4 days, the Calendar app will show the events for the next 4 days, including the current day.
Navigate the Calendar App
Coming to the navigation system in the Calendar app on Windows 11, it is fairly simple. The app provides the navigation buttons and menus at the top of the current calendar view.
So, if you are in the Month-view, you can simply click the [Year] [Month] button at the top to open a drop-down box. From here, you can use the up or down arrow buttons to change the [Year] and click any of the month to directly open it within the Calendar app on your Windows 11 PC or laptop.
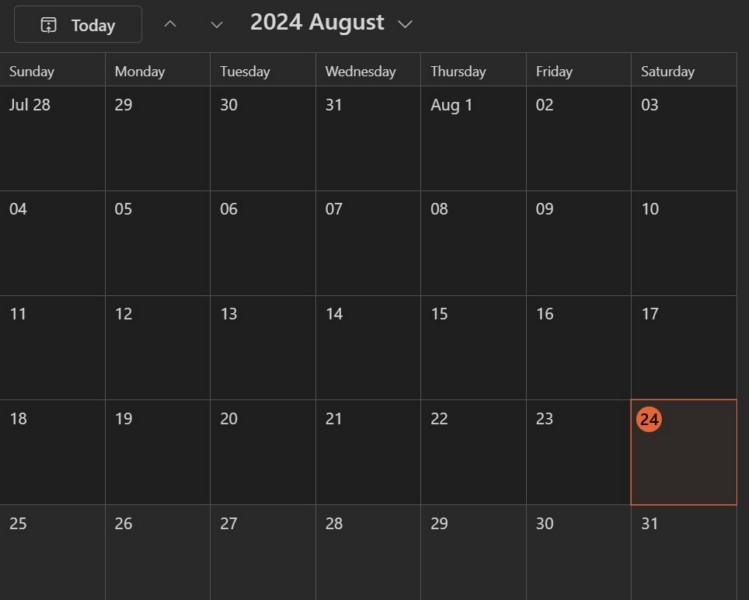
When you want to return to the current date and month in the Calendar app, simply click the Today button directly open the current month and date without needing to use the [Year] [Month] navigation box.
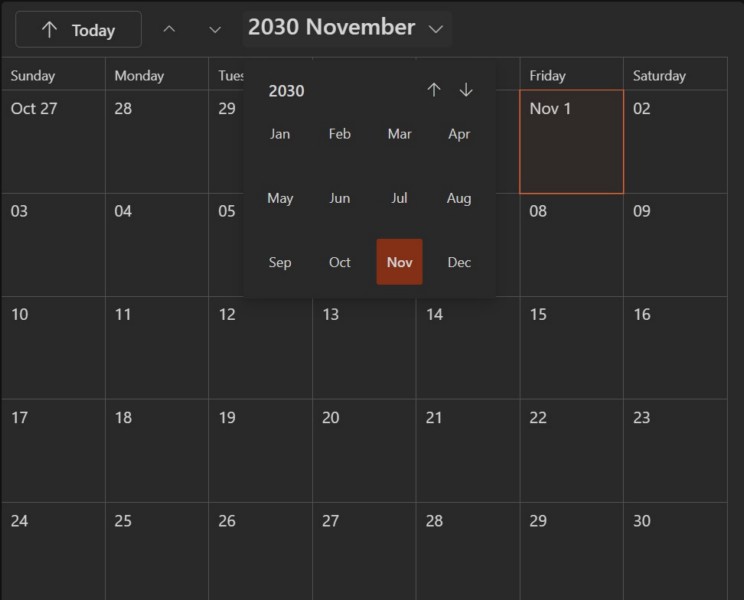
When you are in the Week, Work week, or Day view, you can use the same process to navigate to a specific date in a month within the Calendar app. However, it is worth noting that the UI for each of the viewing layouts will be slightly different.
Add New Calendars in Calendar App
Adding new calendars to the Calendar app on Windows 11 PCs and laptops is also an easy process if you look around the app UI for a few minutes. You will find a dedicated Add calendar button on the right pane of the app UI that you can click to initiate the process.
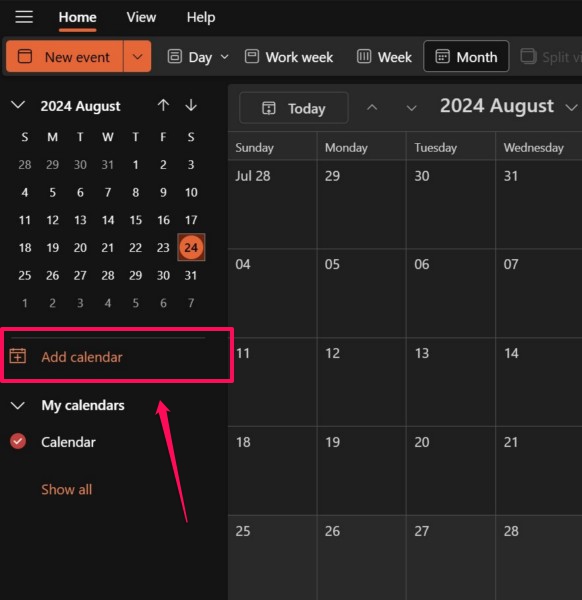
Once you initiate the process, a new Add calendar window will open up with various options. Here, you will get a few recommendations according to your Microsoft account preferences.
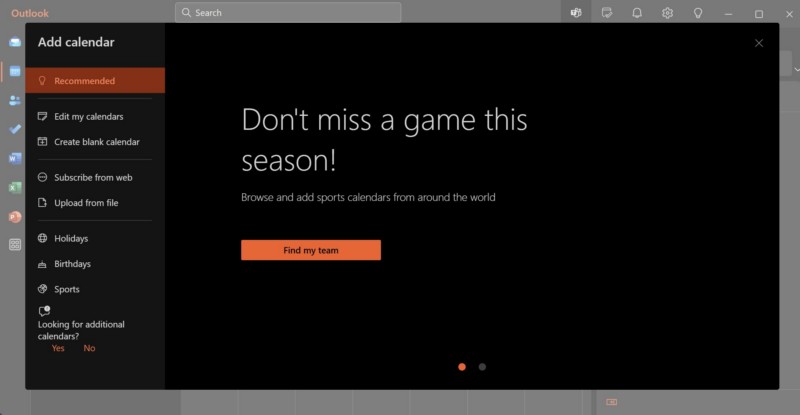
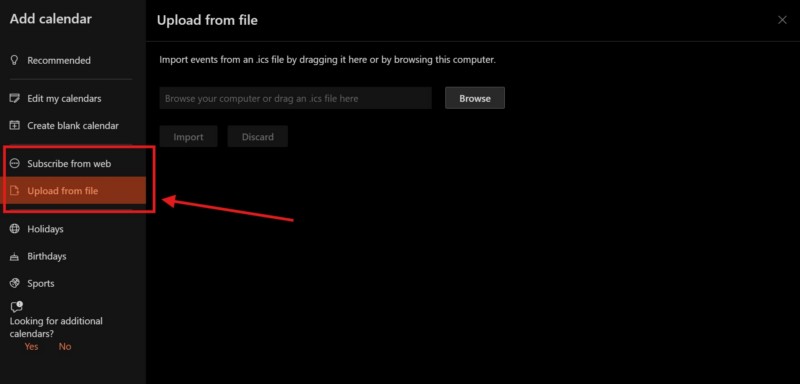
However, you can use the right pane to navigate through all the available calendar options that you can add to the Calendar app on your Windows 11 PC or laptop. For instance, you can use the Subscribe from web option to add a shared calendar from a web source or use the Upload from file option to add a new calendar with a .ics file from your device.
Besides that, you can also add calendars for Holidays, Birthdays, and Sports events from their dedicated sections on the right pane. So, we were not joking when we mentioned that you can add a dedicated calendar to track the schedule of your favorite sports team as you easily add an official schedule-calendar of any sports team from the Sports option.
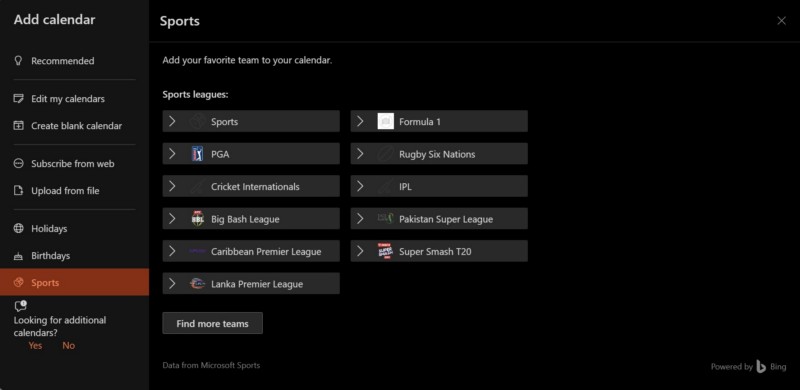
Pro-tip: If you cannot find your team on the initial list, click the Find more teams button to get an extensive list of leagues and teams (national and international).
Once you add new calendars to the Calendar app on your Windows 11 PC or laptop, you can find them under the My calendars section on the right pane. From here, you can even enable or disable individual calendars to show/hide their data within the Calendar app.
Edit and Remove Existing Calendars in Calendar App
After adding new calendars to the Calendar app on your Windows 11 PC or laptop, you can edit them according to your preference and also remove them if you want. However, it is worth noting that although you will be able to remove the calendars that you added from external sources, your primary calendar, which is linked to your Microsoft account, cannot be removed.
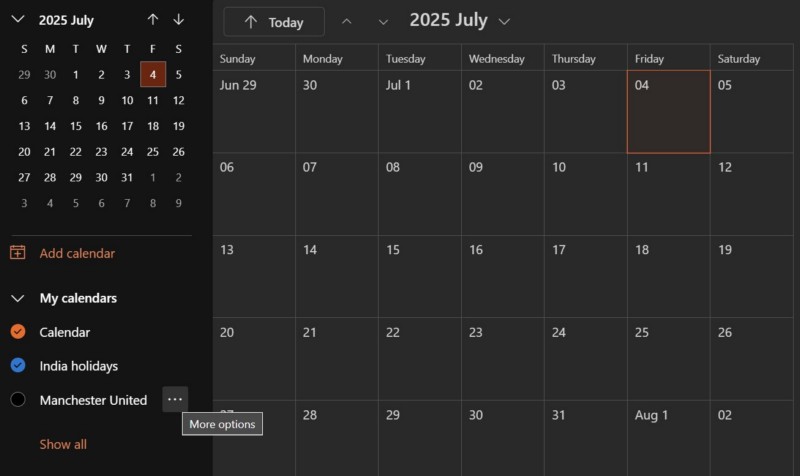
With that being said, you can edit certain elements of your calendars in the Calendar app on Windows 11 by taking the mouse cursor over a calendar under the My calendars section and click the three-dot button for it. From the following context menu, you can rename the calendar, change the color that represents it, and change the charm of it.
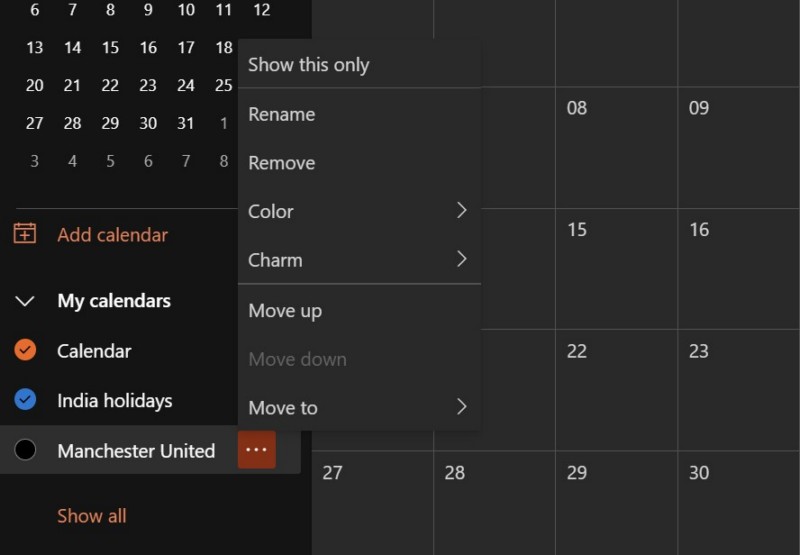
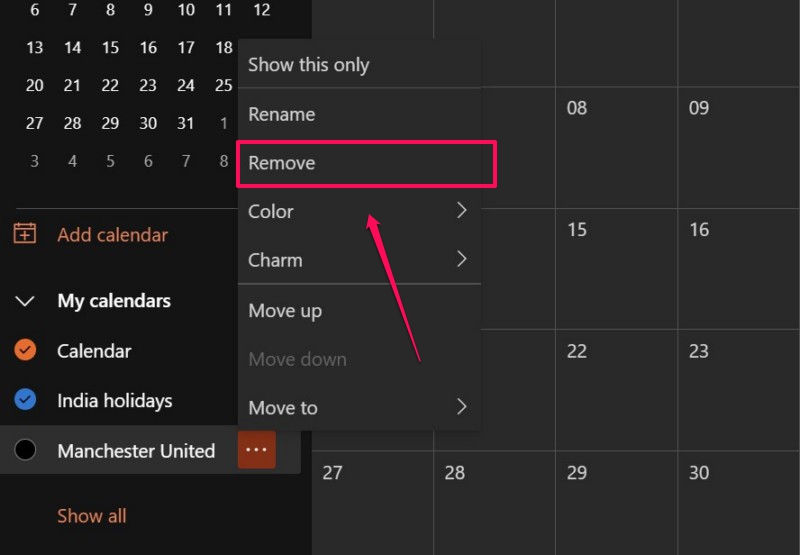
If you want to remove the selected calendar from your My calendars list and delete its data from the Calendar app on your Windows 11 PC or laptop, you can click the Remove button on the context menu.
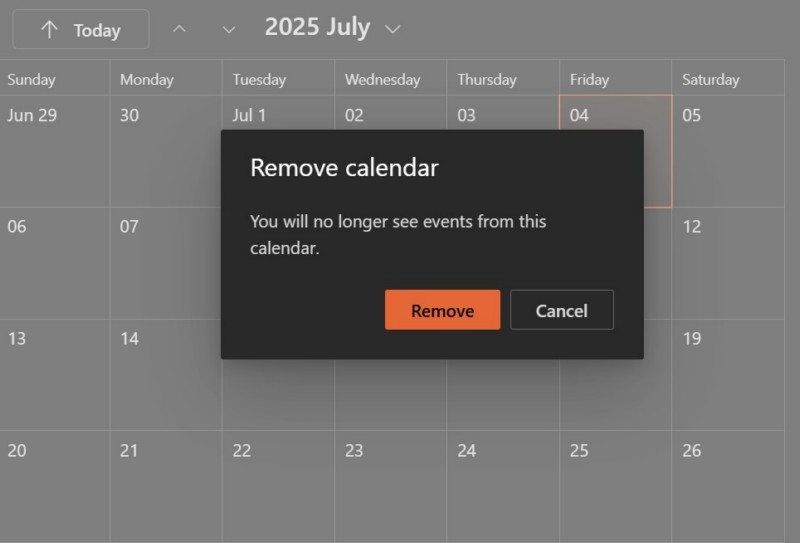
Click the Remove button on the following prompt to confirm your action and remove the selected calendar.
Create New Event in Calendar App
If you like to keep your calendar organized and updated, creating new events can be an important task in the Calendar app on Windows 11. Thankfully, the process to create new events in the Calendar app is as simple as a Sunday morning.
So, to start creating a new event, follow the steps right below:
1. Open the Calendar app on your Windows 11 PC or laptop and navigate to the date for which you want to create a new event in the Calendar app. If you want to create new event for the current date, ignore the latter part of the initial sentence.
2. Now, if you want to create a quick event, simply left-click on the selected date to open an overlay UI. Here, you can set a time-frame for the event, set it as a repeating/non-repeating event, add a location, and a description. Once you are done, click the Save button to create the new event on the selected date.
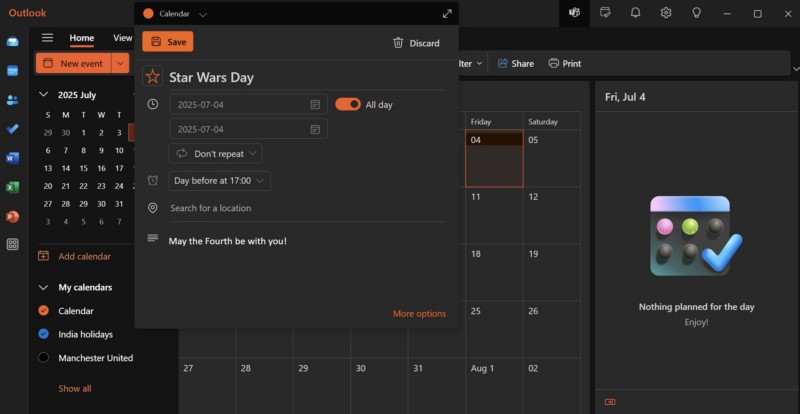
3. Alternatively, you can click the dedicated New event button at the top right corner to open a New event window with numerous other options. So, go through all the customization options and set them according to your preference. After you are satisfied, click the Save button to create the new event.
This way, you can easily create new events for any date within the Calendar app on your Windows 11 PC or laptop.
FAQs
Can I use Google Calendar on Windows 11?
Although there is no app for the Google Calendar app for Windows 11, you can add your Google account to the Calendar app on your Windows 11 PC or laptop to sync your Google Calendar data and view the events within the Calendar or Outlook app.
How to add a calendar widget in Windows 11?
To add a calendar widget on your Windows 11 PC or laptop, open the Widgets board, click the + button above, select the Outlook Calendar on the right pane, and click the Pin button for it to add it to the Widgets board.
How to open Windows Calendar on Windows 11?
The Calendar app on Windows 11 is a part of the Outlook app suite and is installed as Mail and Calendar on PCs and laptops. Users can simply use the Windows search feature to find the Calendar app on their PCs or laptops and click on its app icon to open it.
Wrapping Up
This is how you can use some of the basic functions and features of the Calendar app on your Windows 11 PC or laptop. The Calendar app for Windows 11 is one of the best productivity apps out there, offering easy-to-use features, a simplified layout, and the ability to view events from multiple calendars on desktops or laptops. So, if you find this comprehensive guide useful, be sure to let us know in the comments below. You can also share it with fellow Windows 11 users in your community and friend circle to help them organize their life.
Feel free to subscribe to our website and YouTube channel to get updates about all our latest posts and videos. As always, thank you for reading this article till the very end, and we will see you again in our next guide.
Several of you complain about a weird problem with Calendar in Windows 11. You might have noticed that Calender appears after clicking on the Notification icon on the extreme right of taskbar. Unfortunately, for a lot of users, this does not happen. Calendar missing or not showing from Taskbar on clicking is the issue that you might also be facing. We have some solutions that may help the feature to reappear in the Notification area.
Calendar missing or not showing from Taskbar in Windows 11/10 might occur because of its hidden behavior, Windows Explorer crash, incorrect Settings, bugs in Windows update, or corrupted accounts. Obviously repairing these components may solve the problem and allow you to experience the normal behavior of calendar. See: Fix Calendar Crashing and not opening Error in Windows 11 22H2. Now try the solutions one by one:
Calendar missing from Taskbar
Here is how to fix Calendar missing from Taskbar in Windows 11 or 10:
Open Calendar using arrow icon Notification area
Calender flyout, when opened from taskbar, includes a tiny arrow icon that allows you to shrink and expand the area. Sometimes, this icon is mistakenly activated to fold the part. As a result, the Calendar becomes missing and hidden upon opening Notification flyout. So, follow the steps to unfold it:
- Click on the Notifications icon from taskbar.
- Then click on Up arrow located on the left of date.
Create a new User account
Corrupted user account might be the root cause behind the calendar missing from taskbar issue on Windows 11 or 10. Creating a new local account and making it administrator might solve the issue, therefore, move forward with the steps:
- Press Windows + I to open the Settings app.
- Click on Accounts.
- Select Other users from the right panel.
- Then, click on Add account.
- Click on the link – I don’t have this person’s sign-in information.
- On the next window, click on Add a user without a Microsoft account.
- Enter a User name and password twice.
- Answer the 3 security questions there.
- Click on Next.
- A new account will be added; click on this to expand.
- Select Change account type.
- Now, select Administrator from the drop-down.
- Restart the system and check if the Calendar is visible.
Restart the Windows Explorer
Windows Explorer crash is an old issue that causes various problems and users encounter this oftentimes. Try to restart the explorer and see if the issue is fixed:
- Press Ctrl + Shift + Esc.
- When Task Manager opens, find Windows Explorer in the Processes list.
- Right-click on “Windows Explorer” and select Restart.
- Then open the Calendar flyout and see if it appears.
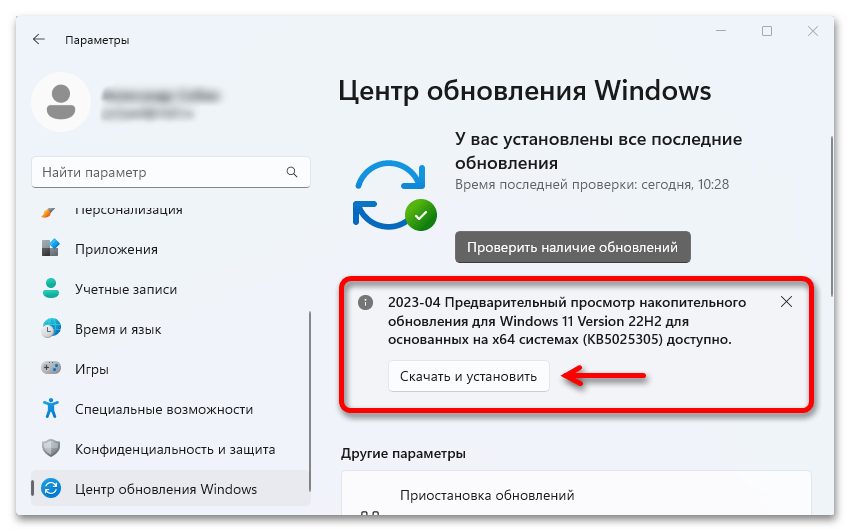
Install pending Windows update
If the calendar disappearing issue still occurs the Windows update bugs might be a culprit and to rescue this you will have to install the next update that brings a bug fix for it. Windows 11 and other versions get patches on scheduled basis so there is a chance of fixing the problem when a new update is installed:
- Click on Start and type updates.
- Press Enter to launch the concerned Settings page.
- Click on Check for updates.
- Allow the system to scan and download the patches if found and after completion, restart your computer.
Re-register Store apps using Windows PowerShell
Unregistered Microsoft Store Apps can cause Calendar missing from Taskbar in Windows 11 or other version. Sometimes the registrations of the applications are corrupted due to conflicts with third-party programs or buggy Windows updates. Therefore, re-register them using following guide:
- Click on Windows Search and type PowerShell.
- Select Run as administrator.
- A User account control popup will appear; click on OK.
- On the Elevated Windows PowerShell paste the following cmdlet and press Enter:
Get-AppxPackage Microsoft.Windows.ShellExperienceHost | foreach {Add-AppxPackage -register "$($_. InstallLocation)\appxmanifest.xml" -DisableDevelopmentMode}- Now, run the below command in the same way:
Get-AppXPackage | Foreach {Add-AppxPackage -DisableDevelopmentMode -Register "$($_. InstallLocation)\AppXManifest.xml"}- Reboot your system and see if the issue is solved. Note that remove the external devices except the mouse and keyboard.
Uninstall the third-party programs
Suspicious or less trustworthy third-party programs may cause the calendar issue to occur. So, remove them if you have installed this type of software:
- Press the Windows and R keys and type appwiz.cpl.
- Click on OK.
- On Programs and Features Window, find the third-party program and select it.
- Click on Uninstall.
- Follow the onscreen instructions until the software is removed.
- Repeat the same procedure if more program of this type is installed.
- Restart the computer.
Methods:
Open Calendar using arrow icon Notification area
Create a new User account
Restart the Windows Explorer
Install pending Windows update
Re-register Store apps using Windows PowerShell
Uninstall the third-party programs
That’s all!!
Windows 11 has brought about a slew of new features, improvements in design, and more streamlined functionality aimed at enhancing user productivity. Among these features is the ability to display a calendar directly on your desktop, allowing you to stay organized and keep track of your appointments and events at a glance. This article will detail various methods for displaying a calendar on your Windows 11 desktop, covering built-in options, third-party applications, and tips for maximizing your calendar experience.
Understanding Windows 11 Calendar App
Before diving into methods for displaying a calendar, it’s important to understand the built-in Windows 11 Calendar app. This app integrates seamlessly with other Microsoft applications and services, such as Outlook, Office 365, and Microsoft Teams. You can view, create, and edit calendar events, sync multiple calendars, and manage your schedule all from a single interface.
Accessing the Windows 11 Calendar App
- Start Menu: Click on the Start button in the taskbar or press the Windows key on your keyboard. Type «Calendar» in the search box, and select the Calendar app from the results.
- Taskbar: You can pin the Calendar app to your taskbar for quicker access. Right-click on the Calendar app and select «Pin to taskbar.»
- Widgets Panel: Windows 11 features a Widgets panel that can be accessed by clicking on the Widgets icon located in the taskbar. The Calendar widget shows an overview of your upcoming events and can be customized for quick access.
Methods to Display Calendar on Desktop
There are several ways to display a calendar on your Windows 11 desktop. Some users prefer lightweight calendar applications that occupy minimal screen real estate, while others may opt for a full-screen experience with additional functionalities. Below are various methods to achieve a calendar display on your desktop.
Method 1: Using the Calendar Widget
The built-in Calendar Widget in Windows 11 provides a fast and easy way to view your calendar without cluttering your desktop. Follow these steps to enable it:
- Open Widgets Panel: Click on the Widgets icon on your taskbar.
- Add Calendar Widget: If you don’t see the Calendar, select the «Add Widgets» option (a plus sign) to introduce new widgets.
- Customize Widget: Click on the calendar widget to customize it, allowing you to select what accounts to display, such as Outlook, Google, etc.
- Rearrange Widgets: You can drag and rearrange the widgets within the panel to keep your calendar view accessibility as per your preference.
Method 2: Pinning Calendar App to Desktop
While Windows 11 does not natively support pinning applications directly to the desktop in the same way it does with the taskbar, you can create a shortcut to the Calendar app that appears on your desktop, making it easy to access.
- Locate Calendar App: Open the Start Menu and find the Calendar app.
- Create Shortcut: Right-click on the Calendar app, hover over «More,» and select «Open file location.» This will open the folder containing the app’s shortcut.
- Copy to Desktop: Right-click the Calendar app shortcut in the folder, choose «Copy,» and then right-click on your desktop and choose «Paste.»
- Access Calendar Quickly: Now, you can access your Calendar app directly from your desktop anytime.
Method 3: Using Third-Party Calendar Applications
If you need additional features that are not present in the built-in Calendar app, third-party applications can be a viable solution. Here are some popular options:
-
Rainlendar: A feature-rich desktop calendar application that allows for extensive customization. You can add various skins and easily manage tasks, events, and reminders.
- Installation: Download it from the official website, following the installation instructions. After installing, you can customize its appearance and functionality from the settings panel.
- Features: Rainlendar can show holidays, anniversaries, to-do lists, and synchs with Google Calendar.
-
Microsoft To Do: This is primarily a task management app, but it can integrate with your calendar to show tasks along with your scheduled events.
- Access and Use: Available through the Microsoft Store, after installation, sync your tasks and calendar events and configure notifications for reminders.
-
Desk Calendar: This is a simple yet customizable calendar app that allows you to see the calendar days on your desktop.
- Installation Instructions: Download from third-party platforms, follow the installation process, and then configure the calendar style and layout according to your preference.
Method 4: Using a Desktop Gadget
For users who remember Windows Vista or Windows 7, desktop gadgets were a popular feature. Although native support for desktop gadgets isn’t available in Windows 11, you can use third-party applications to achieve similar functionality.
-
8GadgetPack: This software reintroduces gadgets to Windows 11, including calendar gadgets.
- Download and Install: Go to the official website, download the pack, and install it.
- Add Calendar Gadget: After installation, right-click on the desktop, select “Gadgets,” and choose your preferred calendar gadget to display on the desktop.
-
Desktop Gadgets by AddGadgets: Another alternative that aims to keep the traditional look and feel of desktop gadgets.
- Installation: Download from the website, follow the installation process, then drag and drop the calendar gadget onto your desktop.
Customizing Your Calendar Display
Once you have a calendar displayed on your desktop, you might want to customize its look and functionality to suit your needs. Here are several tips on how to do that effectively:
Color-Coding Events
Most calendar applications allow you to color-code events based on their type (work, personal, birthdays, etc.). This visual distinction can make it easier to prioritize your tasks at a glance.
- Setting Up Colors: In apps like Google Calendar or Outlook, you can create color categories for different event types which will show up on your desktop calendar as well.
Syncing Multiple Calendars
Integrate your work, personal, and other calendars into one view. This will help avoid scheduling conflicts and keeping you organized.
- Adding Accounts: In the Windows Calendar app, go to Settings > Manage Accounts, and add other accounts (like Google Calendar or Outlook) to have them sync together.
Setting Up Reminders and Notifications
Configure reminders to ensure you don’t miss important events. Most calendar tools come with built-in reminder settings.
- Notifications: Go to settings within your calendar application and enable notifications for upcoming appointments, tasks, or events so you can receive alerts before they occur.
Maximizing Your Calendar Experience
Here are some additional tips to enhance your calendar experience on Windows 11:
-
Keyboard Shortcuts: Familiarize yourself with keyboard shortcuts for quicker navigation within your calendar app.
- Common shortcuts like
Ctrl + Nfor a new event orCtrl + Gfor a «Go to Date» command can save time.
- Common shortcuts like
-
Using Task View: Windows 11 offers a task view where you can see all open windows and desktops. Use this to quickly reference your calendar while working on other tasks, minimizing distractions.
-
Regularly Update Your Calendar: Make it a habit to update your calendar regularly. Adding tasks and events as they come up will prevent overcrowding and promote better time management.
-
Integration with Other Apps: Utilize integration features with Microsoft Teams, OneNote, or even Trello, where you can link tasks and events back to your calendar for better tracking.
-
Utilizing the Search Functionality: Most calendar applications have robust search features for quickly locating dates, events, or appointments.
Conclusion
Displaying a calendar directly on your Windows 11 desktop helps streamline your workflow and enhances productivity. Whether you prefer utilizing the built-in Calendar app, desktop widgets, gadgets, or third-party applications, there are multiple options available to cater to your needs. Customizing the calendar’s display, syncing with multiple accounts, setting up reminders, and integrating with other applications not only enrich your user experience but also help you stay organized and on top of your commitments. By following the actionable methods shared in this guide, you can effectively harness the capabilities of the calendar on your Windows 11 desktop and transform your daily planning and productivity.
В Windows 11 есть собственное встроенное приложение календаря, которое помогает планировать задачи, встречи, напоминания и другие события. Календарь Windows также позволяет нам синхронизироваться с нашими учетными записями, такими как Google, Microsoft, iCloud и т.д., и просматривать несколько календарей одновременно в одном месте.
Приложение «Календарь» работает в автономном режиме, поэтому нам не нужно подключаться к сети Интернет каждый раз, когда мы хотим проверить свое расписание.
В этой статье мы рассмотрим, как создать новое событие, управлять расписанием, настроить и синхронизировать календарь.
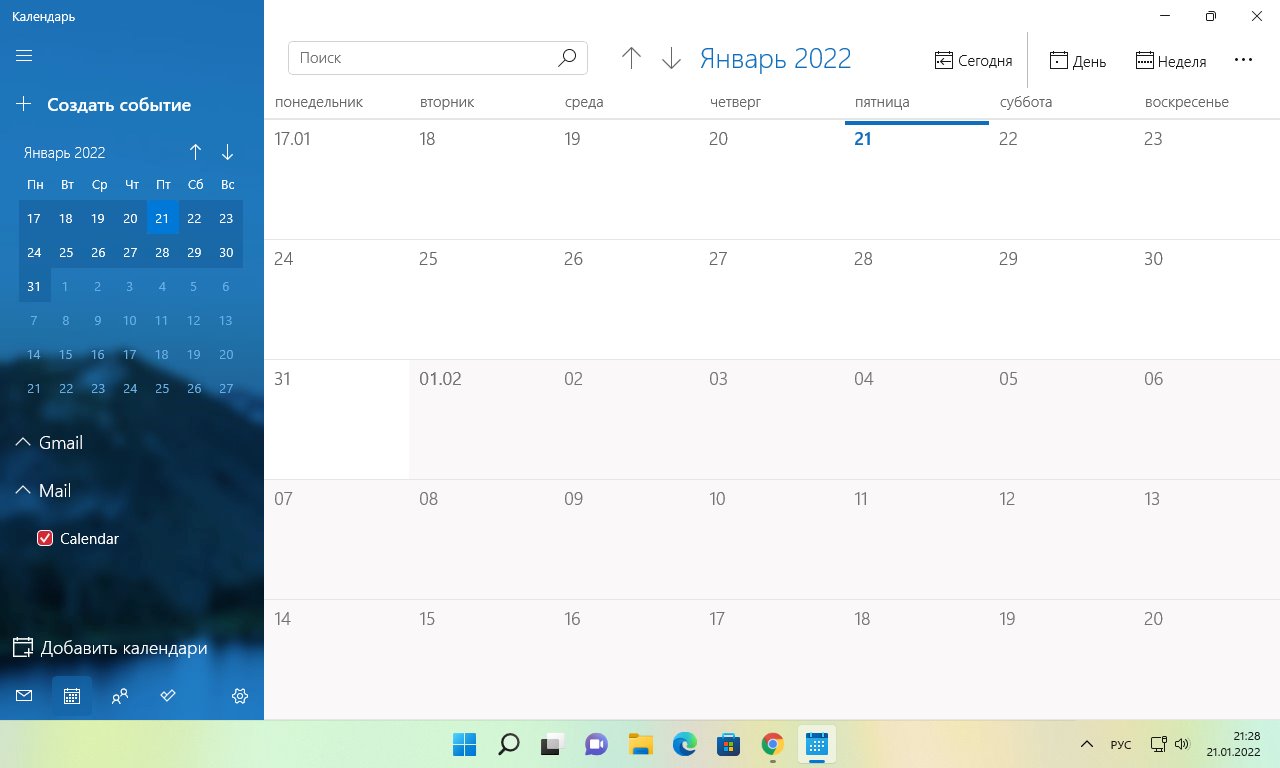
Для быстрого просмотра календаря, просто щелкаем значок времени и даты в правом углу панели задач. К сожалению, во всплывающем окне календаря нельзя просматривать события (Microsoft убрала эту возможность в Windows 11), здесь мы можем увидеть только даты и дни.

Чтобы просматривать и управлять событиями, необходимо использовать встроенное приложение «Календарь». Для этого открываем меню «Пуск» и нажимаем на значок «Календарь» в разделе «Закрепленные».
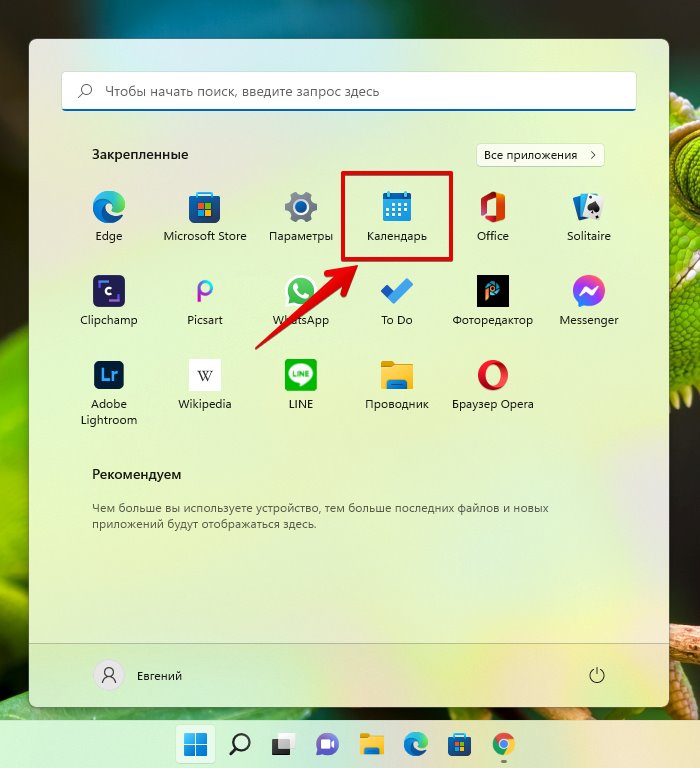
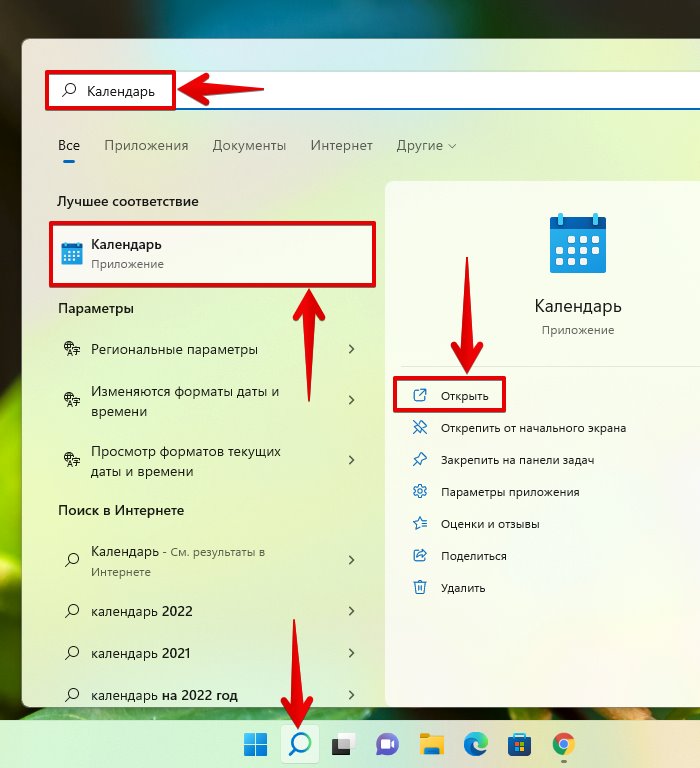
Конечно, существует и альтернативный способ, если приложение отсутствует в меню «Пуск» — открываем календарь через поиск Windows 11. Для этого нажимаем клавиши «Win+S» на клавиатуре (или щелкаем по значку лупы на панели задач) и в появившемся меню поиска вводим поисковый запрос «Календарь», затем нажимаем на приложение в разделе «Лучшее соответствие», либо нажимаем по ссылке «Открыть» в правой части меню поиска.
Если мы планируем часто использовать приложение «Календарь», то можно закрепить его на панель задач, для этого щелкаем в правой части меню поиска по ссылке «Закрепить на панели задач».
Итак, запустив приложение Календарь, можно просматривать различные события, а так же переключаться между другими календарями.
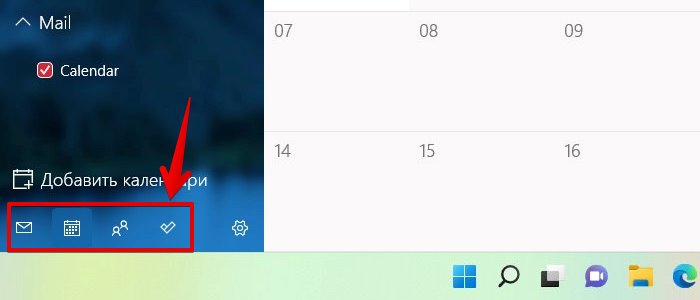
В нижней левой части приложения «Календарь» доступны кнопки для переключения между приложениями «Календарь», «Почта», «Люди» и «Задачи».
Как добавить и удалить учетную запись в приложении «Календарь» Windows 11
Добавление учетной записи в приложение календаря позволит нам синхронизировать календарь на всех устройствах, подключенных к одной и той же учетной записи, управлять расписаниями на нескольких устройствах и делиться своим расписанием с другими пользователями. С помощью приложения «Календарь» мы можем синхронизировать такие сервисы, как Outlook.com, Microsoft 365, Google, Yahoo, iCloud и другие.
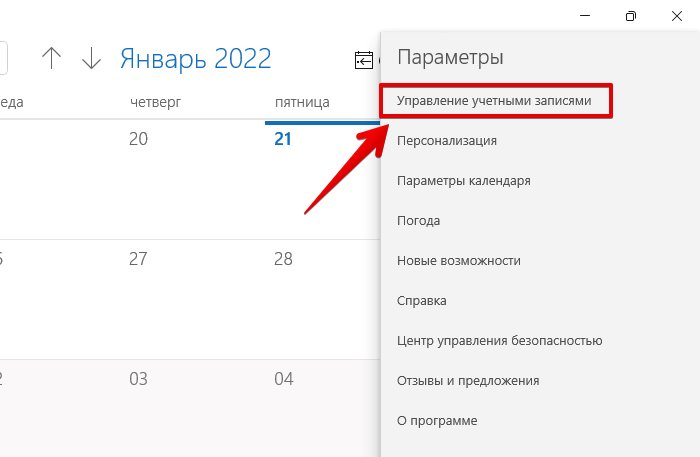
В приложении «Календарь» нажимаем на кнопку «Настройки» в левом нижнем углу.

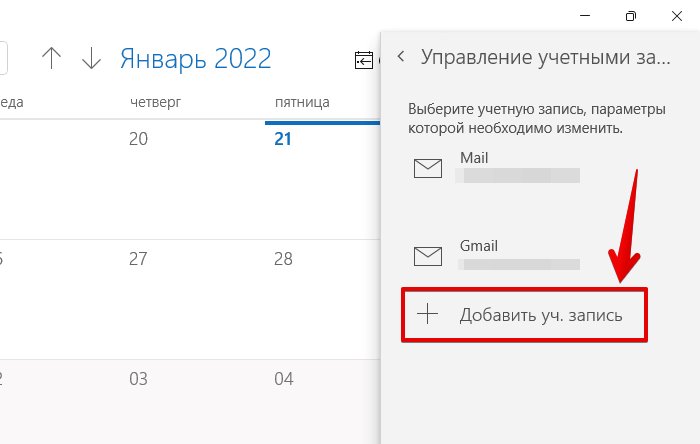
Затем, в появившемся меню выбираем пункт «Управление учетными записями».
И щелкаем по кнопке «+ Добавить уч. запись».
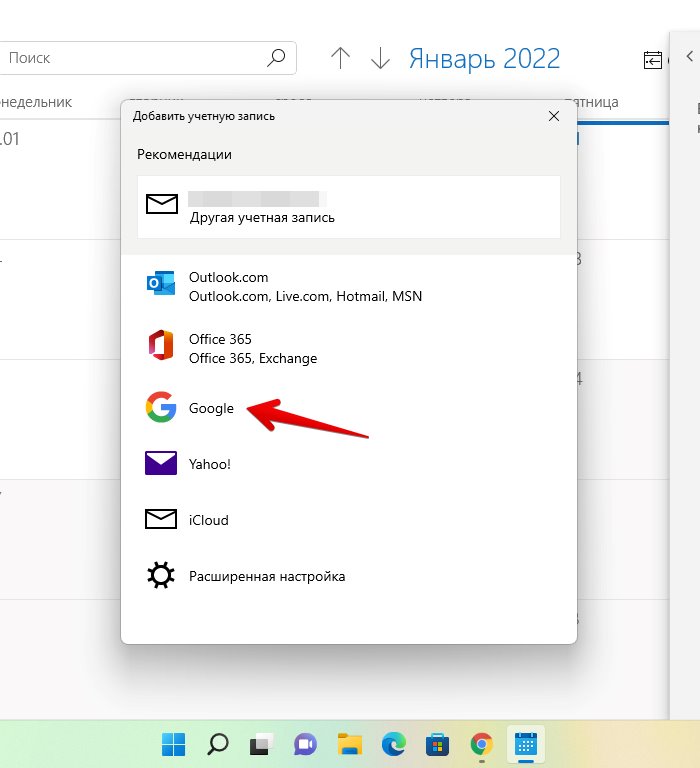
Появится диалоговое окно «Добавить учетную запись» со списком сервисов, которые мы можем добавить в приложение «Календарь». Теперь нажимаем на учетную запись сервиса, который мы хотим добавить.
В примере мы будем использовать учетную запись «Google», выбираем соответствующий вариант.
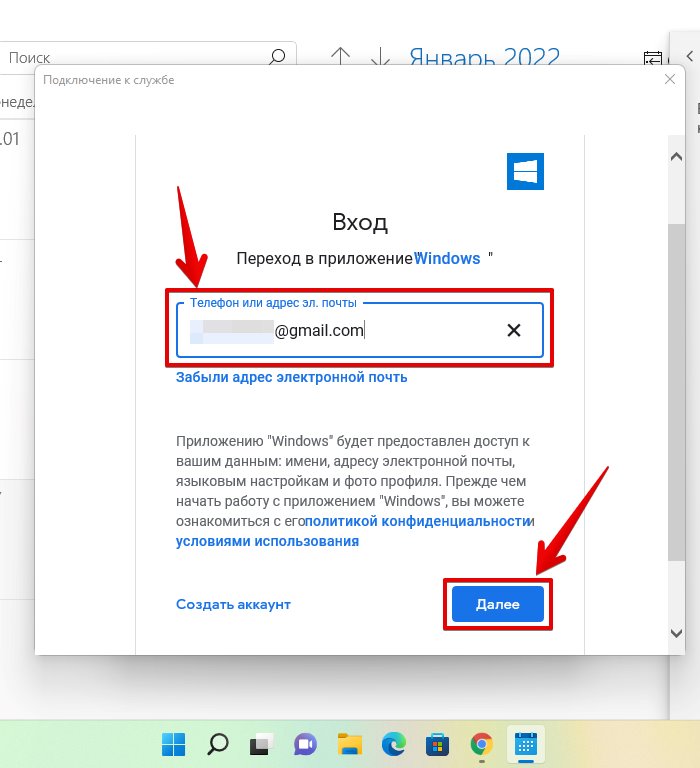
В следующем окне вводим свой адрес электронной почты и нажимаем «Далее».
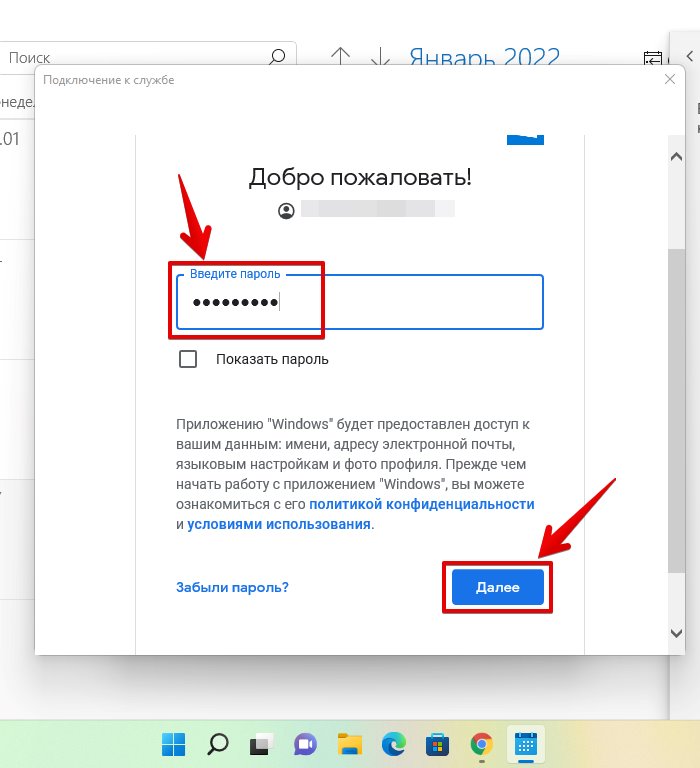
Затем вводим пароль от учетной записи и нажимаем кнопку «Далее».
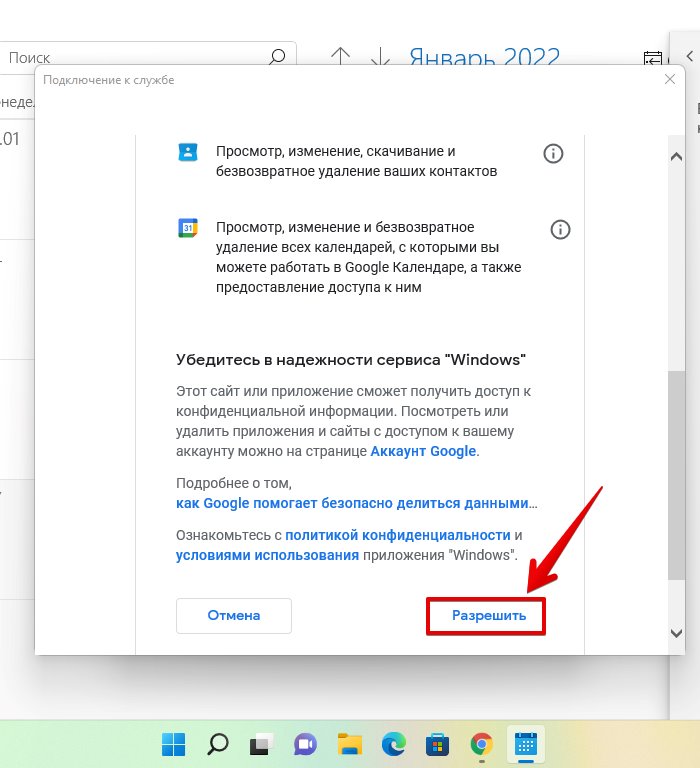
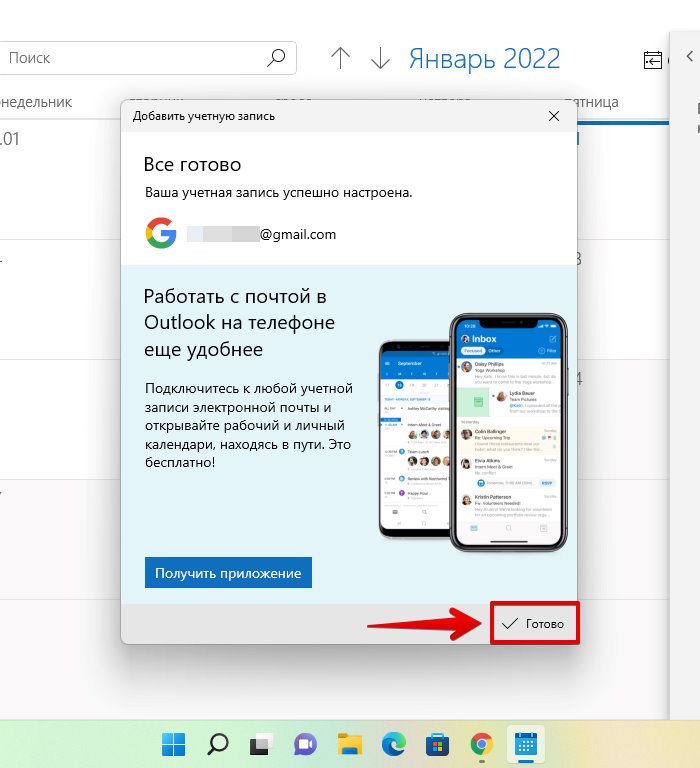
На следующем экране Windows 11 запросит у нас доступ к электронной почте, контактам и календарю. Прокручиваем страницу вниз и нажимаем «Разрешить», чтобы добавить учетную запись.
Теперь мы увидим сообщение «Ваша учетная запись успешно настроена», чтобы завершить настройку, щелкаем кнопку «Готово» в правой нижней части окна.
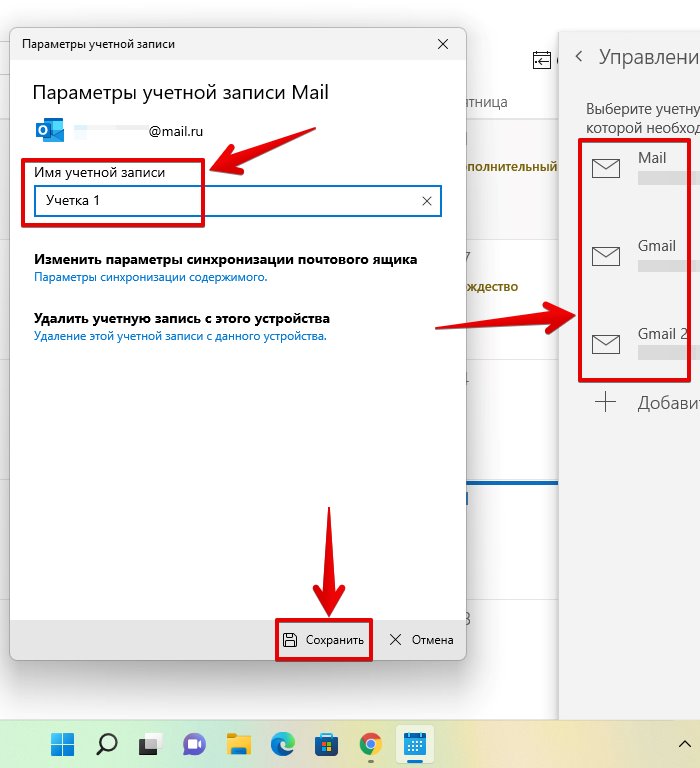
После добавления учетной записи, она будет отображаться в левой части меню, а так же в разделе управления учетными записями.

Если у нас подключено несколько учетных записей и чтобы не запутаться в них, можно переименовать каждую. Для этого нажимаем кнопку «Настройки» и щелкаем по пункту «Управление учетными записями» в появившемся меню справа. Далее щелкаем по учетной записи, которую хотим переименовать и в появившемся окне «Параметры учетной записи» вводим новое имя в поле «Имя учетной записи», после чего нажимаем на кнопку «Сохранить».
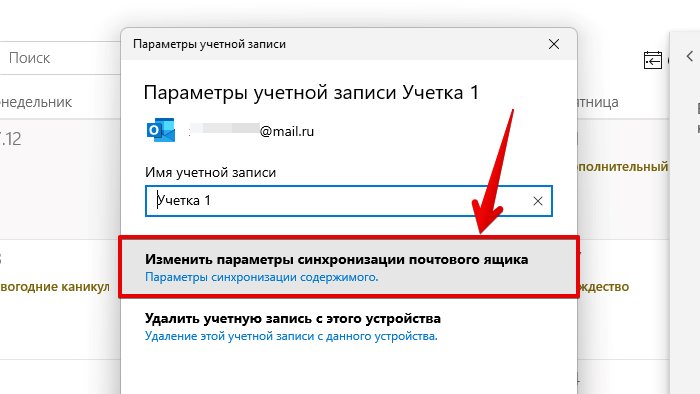
Чтобы изменить настройки синхронизации учетной записи, снова переходим в окно «Параметры учетной записи» и нажимаем на пункт на «Изменить параметры синхронизации почтового ящика».
Здесь мы можете изменить различные настройки синхронизации для учетной записи. В раскрывающемся списке «Скачивать новые содержимое» мы можем изменить частоту загрузки новых данных.
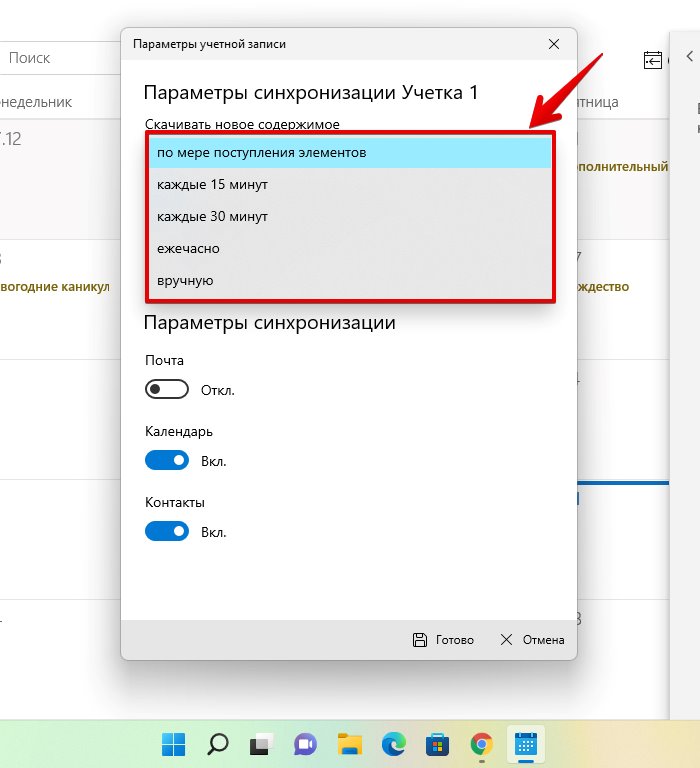
Так же можно выбрать период скачивания почты, а в разделе «Параметры синхронизации» мы можем включить или отключить синхронизацию электронной почты, календаря и контактов.
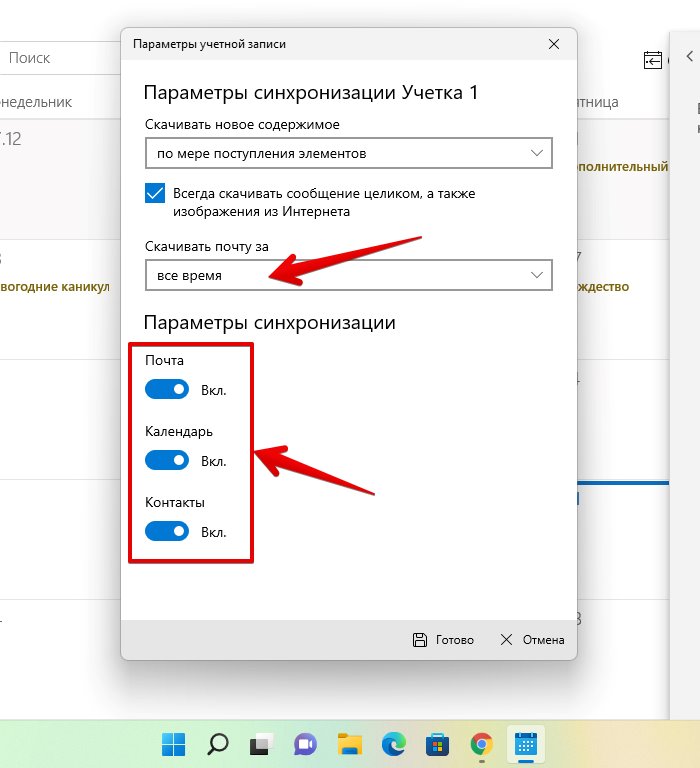
Для сохранения внесенных изменений нажимаем кнопку «Готово».
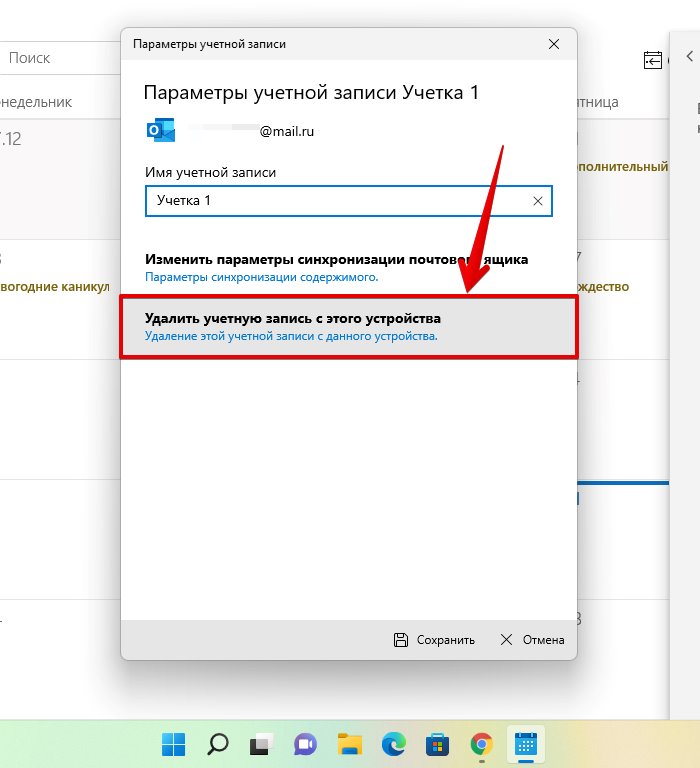
Для удаления учетной записи из приложения Календарь переходим обратно в окно «Параметры учетной записи», предварительно кликнув по УЗ, которую хотим удалить и щелкаем по пункту «Удалить учетную запись с этого устройства».
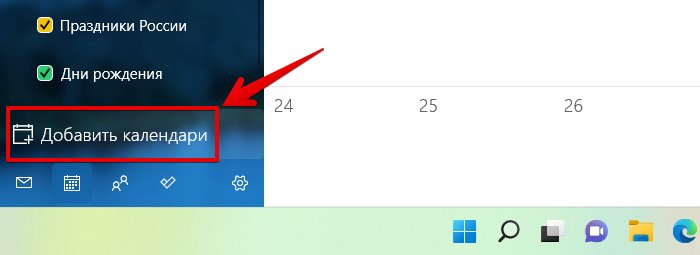
Управление дополнительными календарями
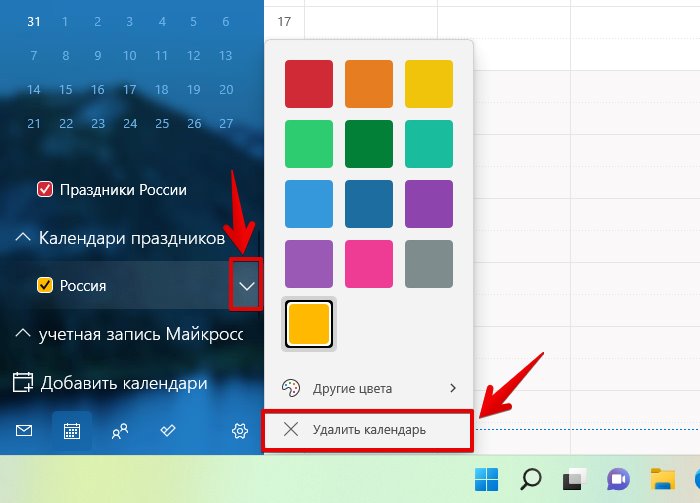
Мы также можем добавить дополнительные календари в каждую учетную запись. Для этого кликаем по кнопке «Добавить календари» в левой нижней части окна.
Появится окно, в котором слева будет доступен список различных календарей (в данном примере доступен только один календарь — Календарь праздников), а в правой части подкатегории этих календарей. Щелкаем по любому календарю, чтобы его добавить.
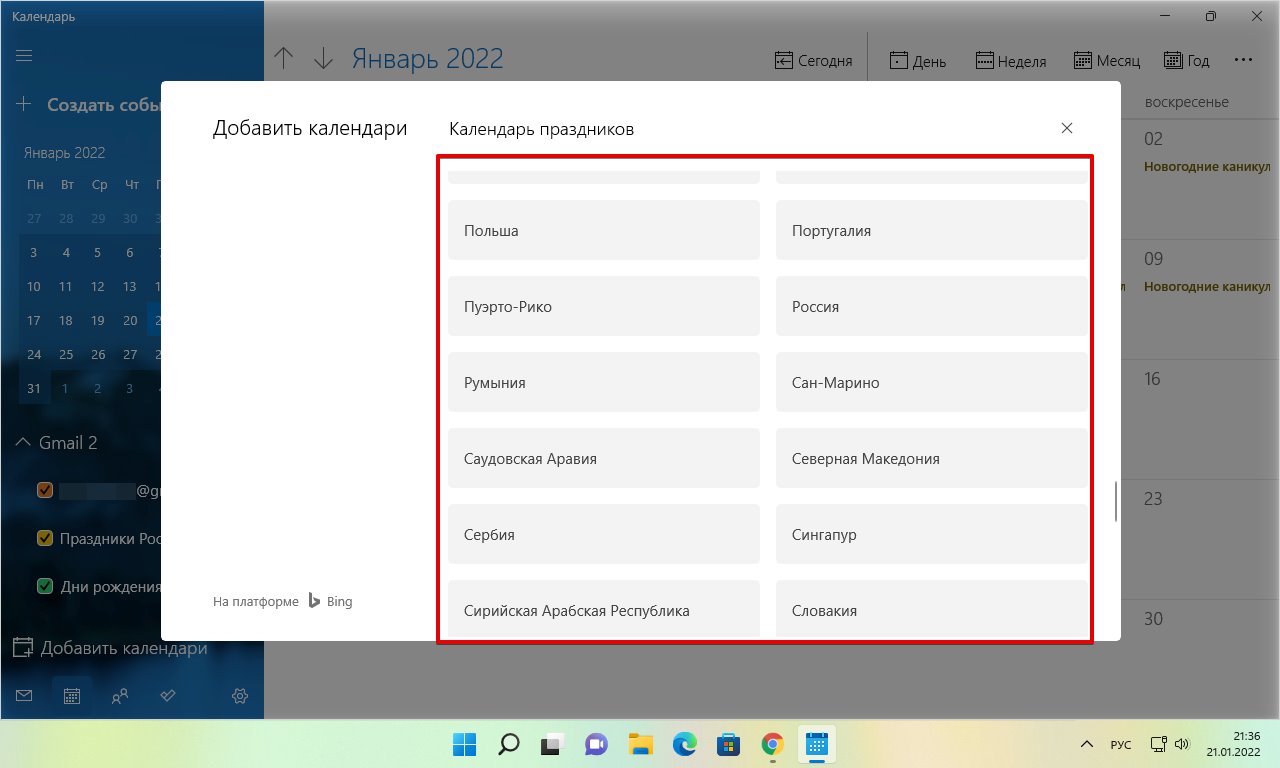
Добавленный календарь теперь доступен в левой части окна. Можно снять флажок, чтобы скрыть все его события.

А для удаления дополнительного календаря, щелкаем по кнопке со стрелкой, чтобы отобразить дополнительное меню, в котором выбираем пункт «Удалить календарь».
Как настроить внешний вид календаря в Windows 11
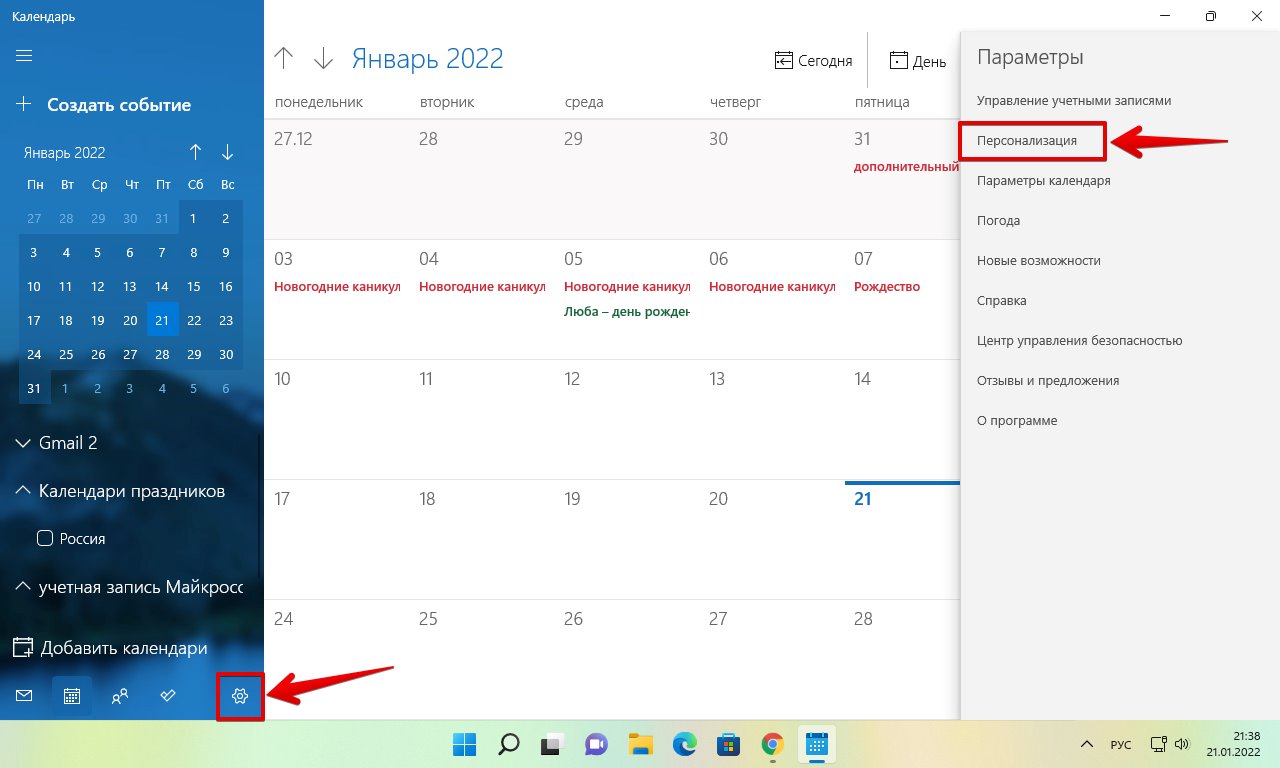
В приложении Календарь можно настроить фоновое изображение, а также установить светлые или темные цвета интерфейса. Чтобы персонализировать приложение «Календарь», выполняем следующие действия. Щелкаем по кнопке «Настройки» и выбираем пункт «Персонализация» в меню справа.
В разделе «Цвета» можно выбрать цвет интерфейса, щелкнув по соответствующей кнопке.
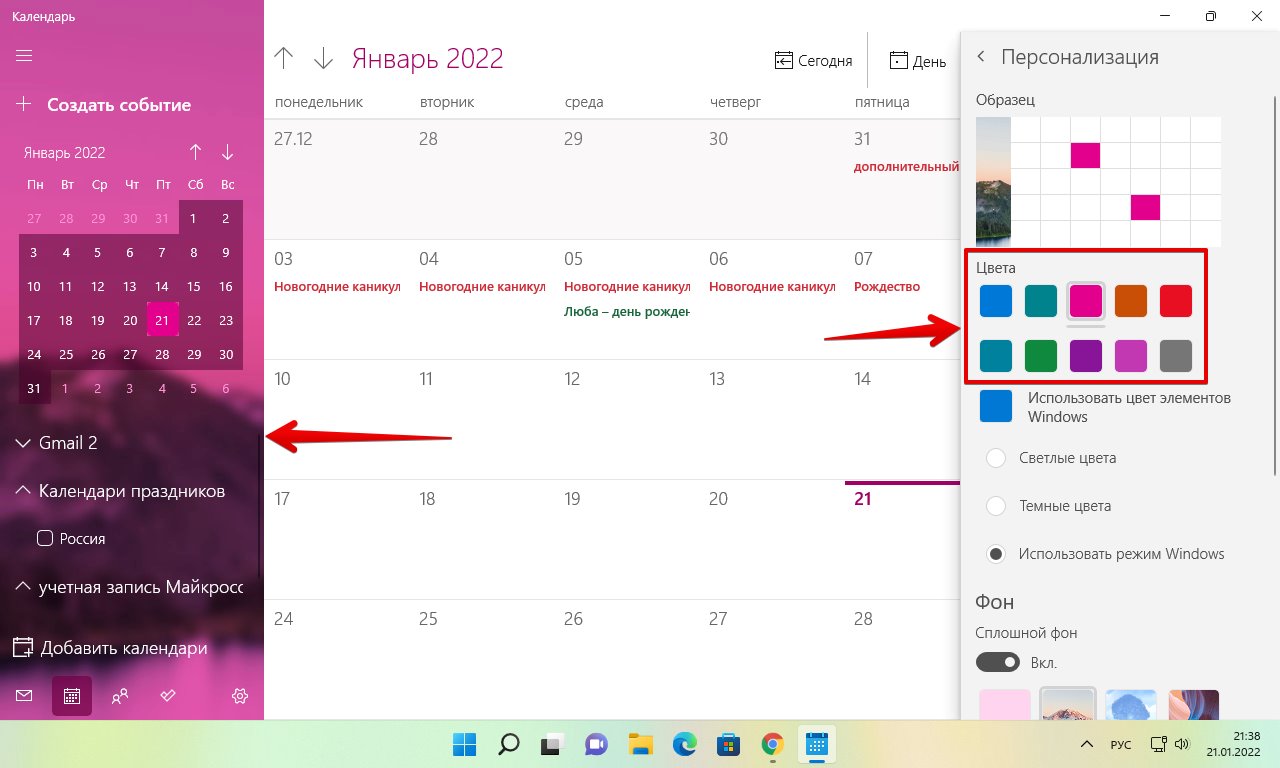
Если необходимо изменить цветовую схему всего календаря, используем один из следующих режимов:
- Светлые цвета
- Темные цвета
- Использовать режим Windows
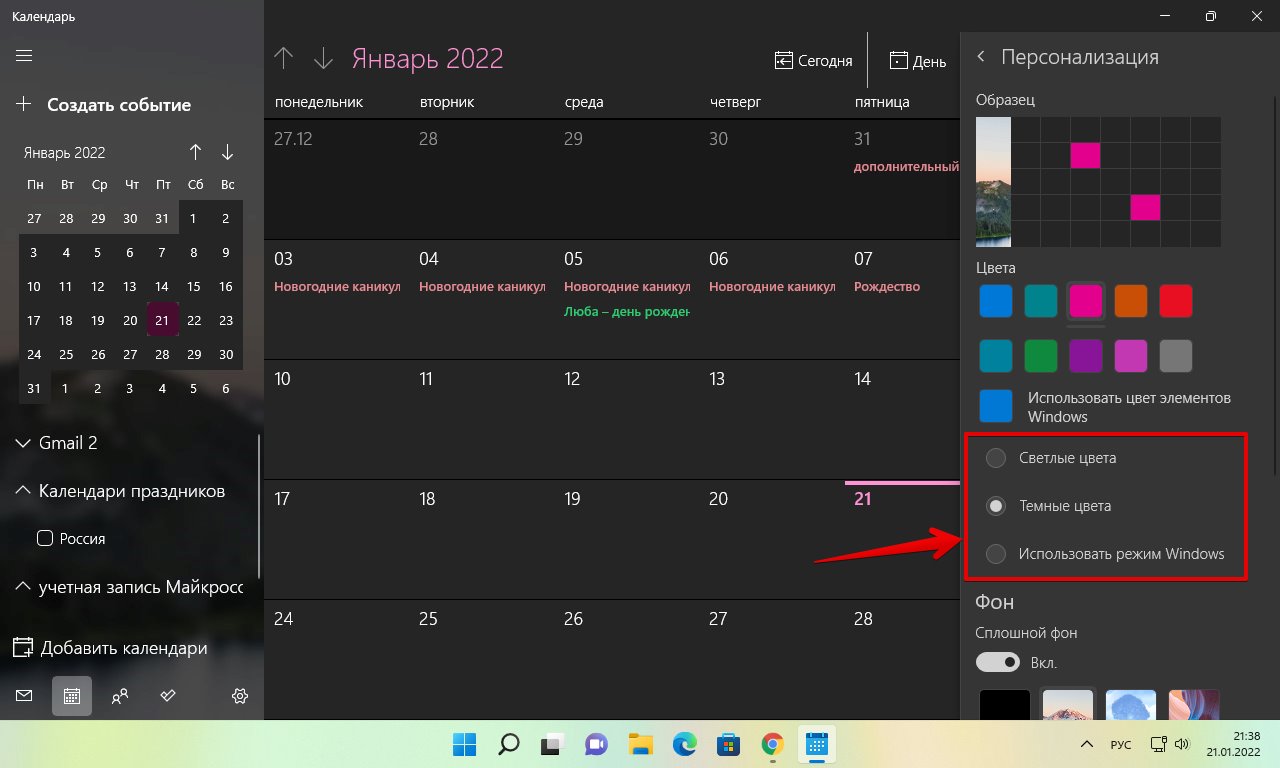
Если мы хотим изменить фон календаря, выбираем один из предустановленных фонов в разделе «Фон». Если необходимо использовать свой собственный фон для календаря, нажимаем кнопку «Обзор» и выбираем изображение с нашего ПК.

Как изменить цвет всплывающего окна календаря на панели задач
Если необходимо изменить цвет всплывающего окна календаря на панели задач, нам необходимо изменить цветовые настройки в приложении «Параметры» Windows 11.
Открываем приложение «Параметры» (клавиши «Win+I») и переходим в раздел «Персонализация» на левой панели. Затем открываем параметры «Цвета» на правой панели.
Затем находим параметр «Выберите режим» и устанавливаем значение «Темный».
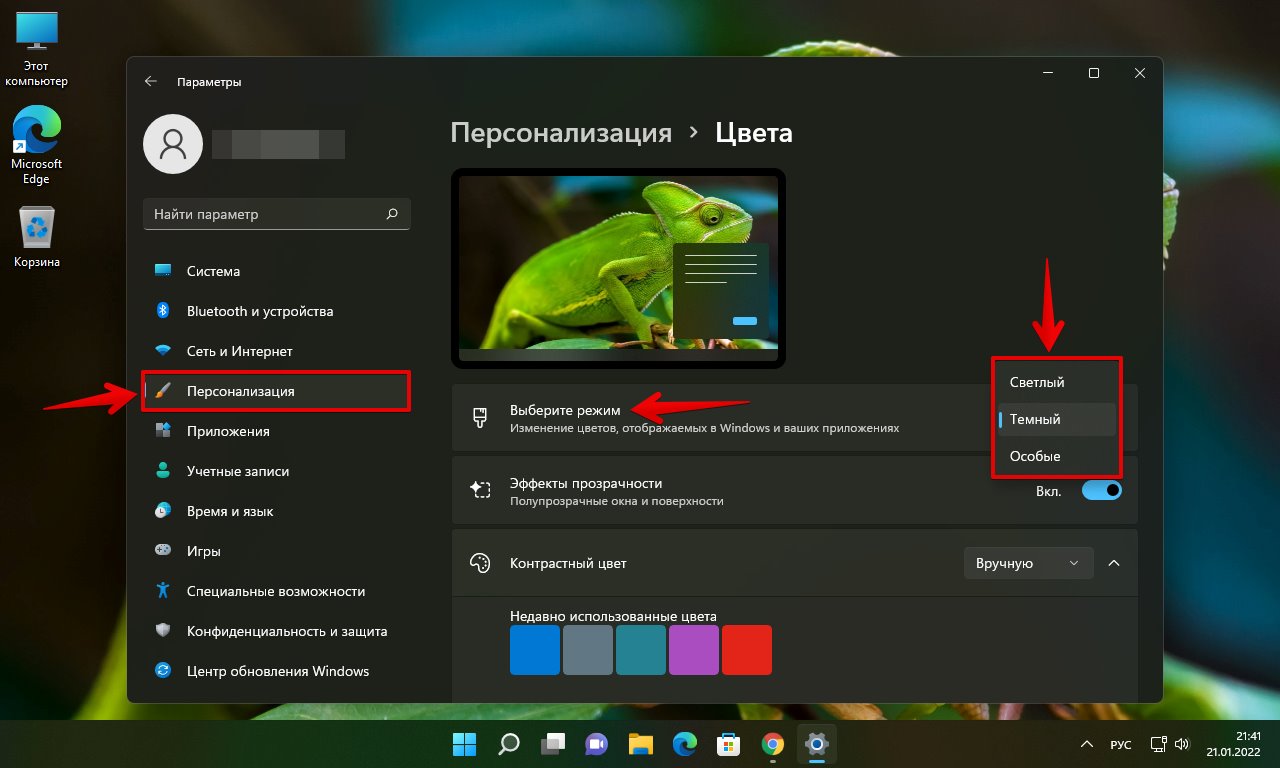
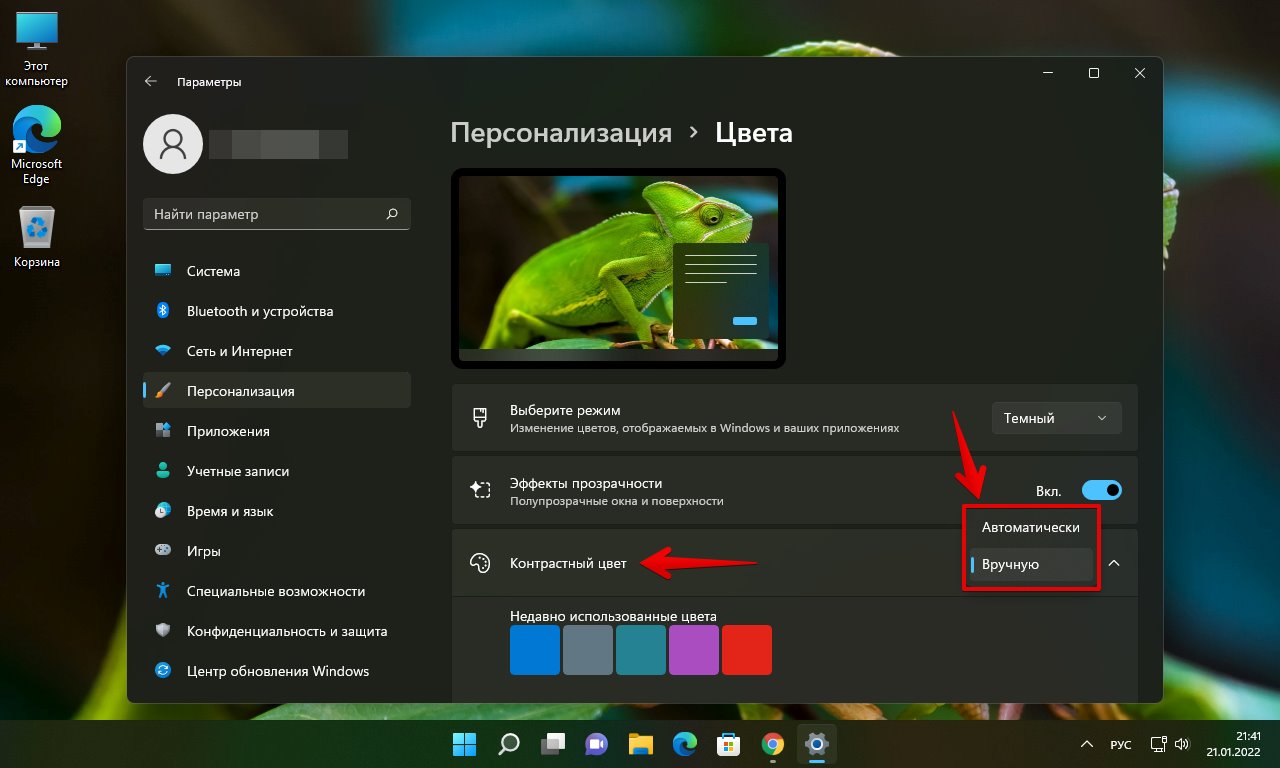
Далее находим параметр «Контрастный цвет» и устанавливаем значение «Вручную».
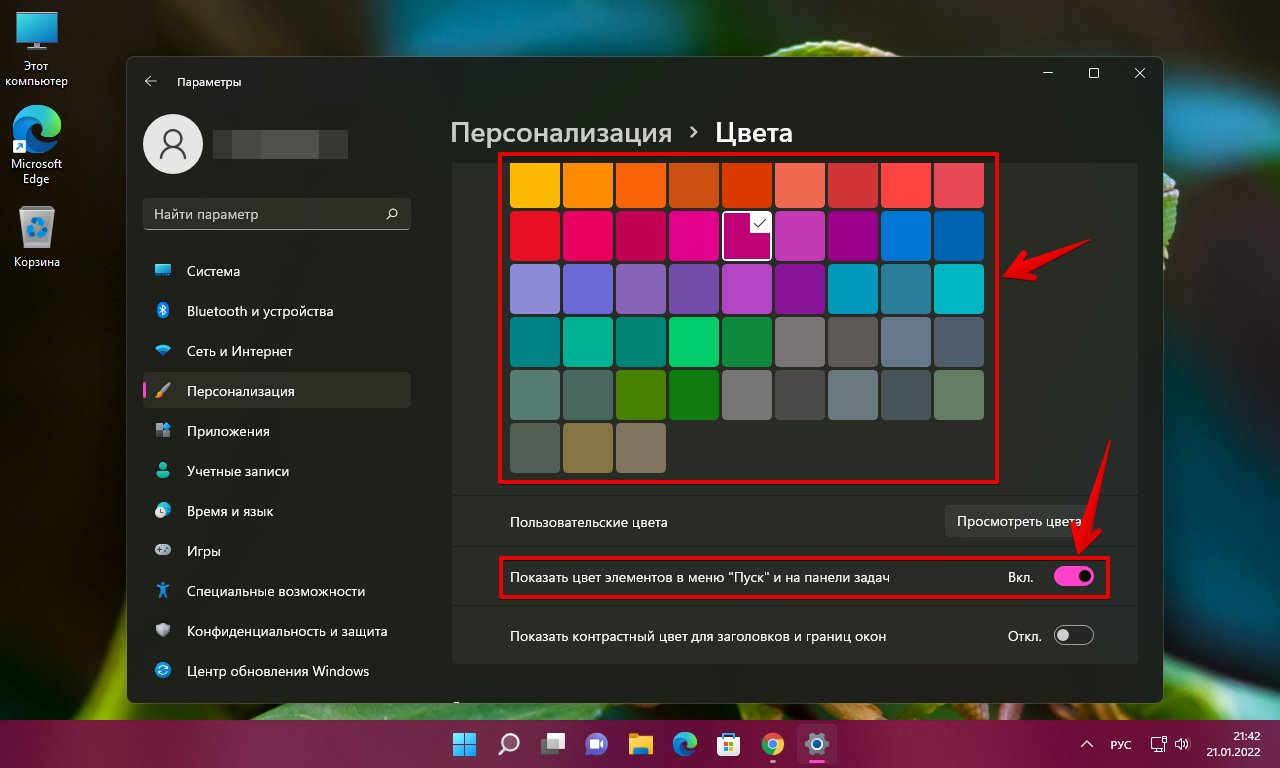
Теперь выбираем желаемый цвет и устанавливаем флажок у параметра «Показать цвет элементов в меню Пуск и на панели задач».
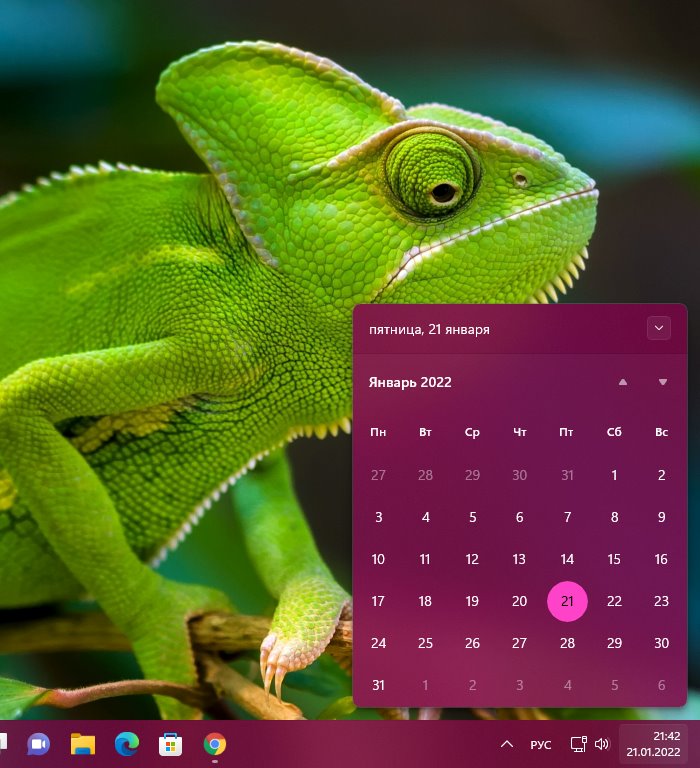
Открываем календарь на панели задач и видим, что он теперь окрашен в установленный нами цвет.
Как изменить вид календаря Windows 11
По умолчанию, когда мы открываем приложение «Календарь», оно показывает текущий месяц. Но можно установить различные отображения для календаря. Например, можно настроить просмотр событий за сегодня, за 3 дня, за неделю, за месяц или за год.
Если необходимо просмотреть события за 3 дня, нажимаем кнопку «День» на панели инструментов сверху и в выпадающем списке выбираем вариант «3 дня».
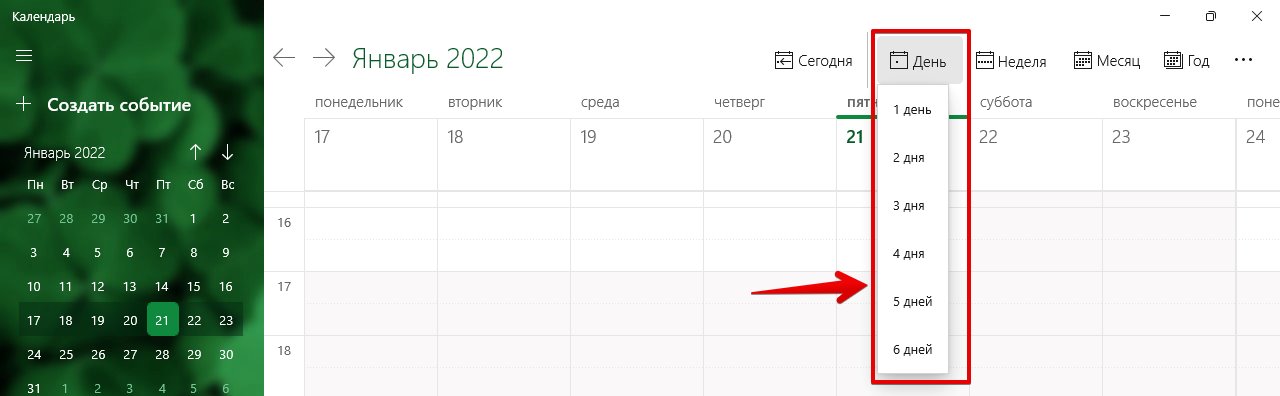
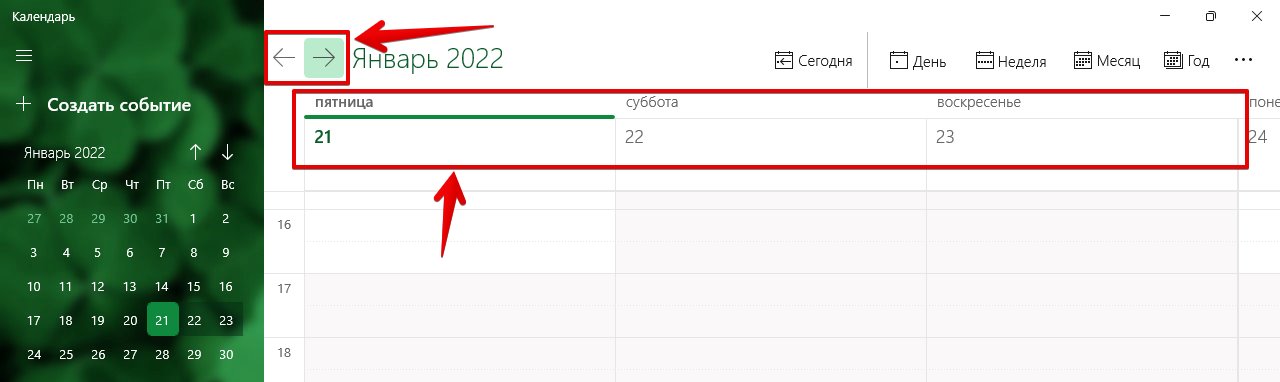
Календарь покажет нам все события за 3 дня, как показано ниже на скриншоте. Чтобы увидеть следующие или предыдущие 3 дня, нажимаем кнопки со стрелками.
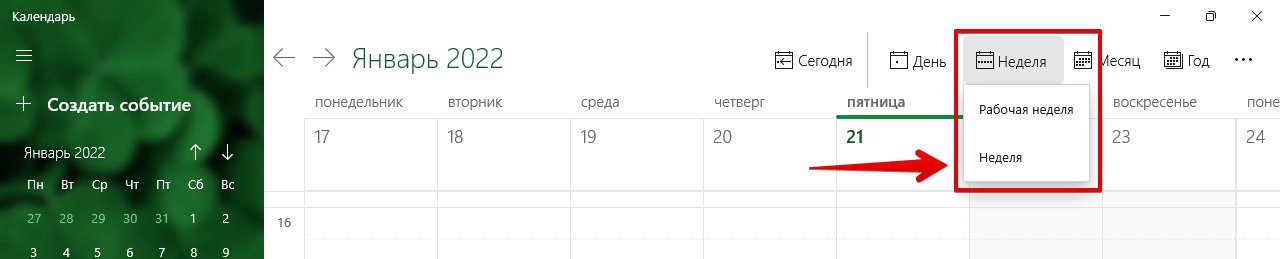
Щелкнув по кнопке «Неделя» можно увидеть события в календаре за всю неделю. Также доступны дополнительные параметры:
- Рабочая неделя
- Неделя
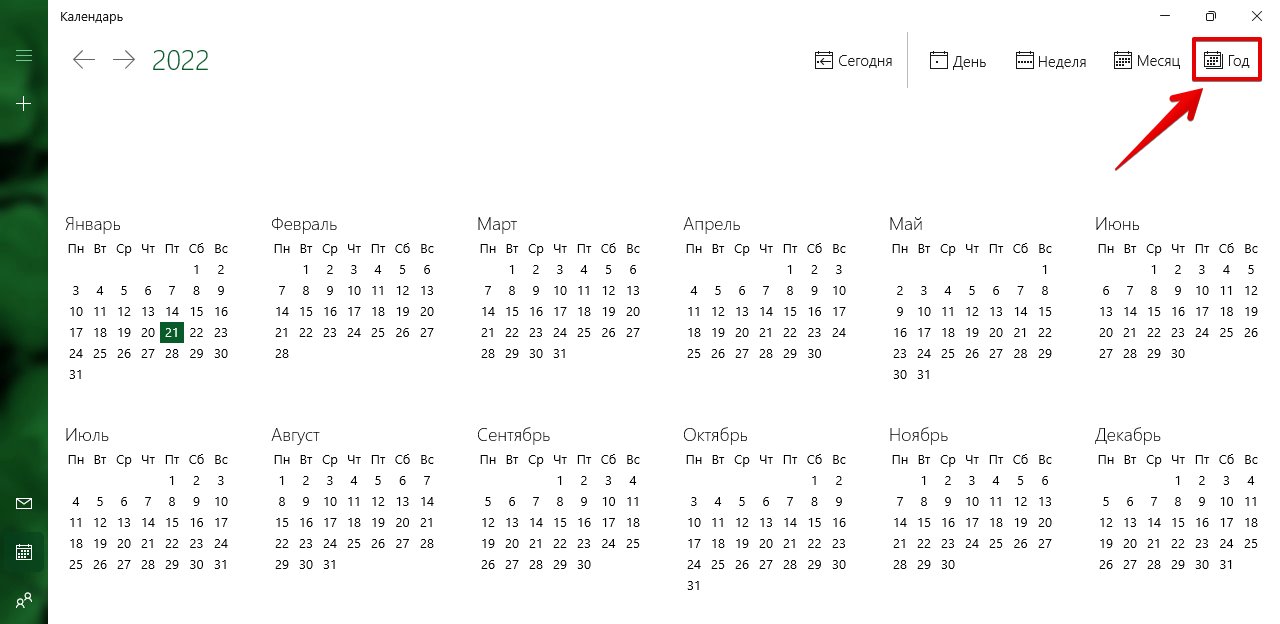
Для того, чтобы быстро найти определенный месяц или день, можно нажать на кнопку «Год», чтобы отобразить весь год в календаре.
Как добавлять события в календарь Windows 11
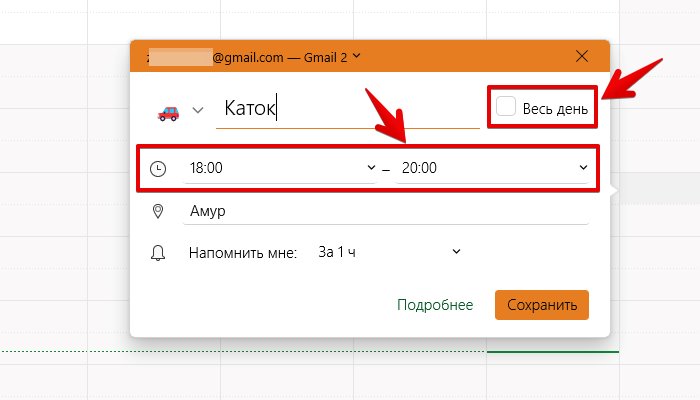
Щелкаем по любой ячейки календаря, чтобы добавить событие. Появится окно добавления события, в котором можно редактировать такие значения как:
- Название события
- Иконка события
- Время начала и окончания события
- Место события
- Напоминание
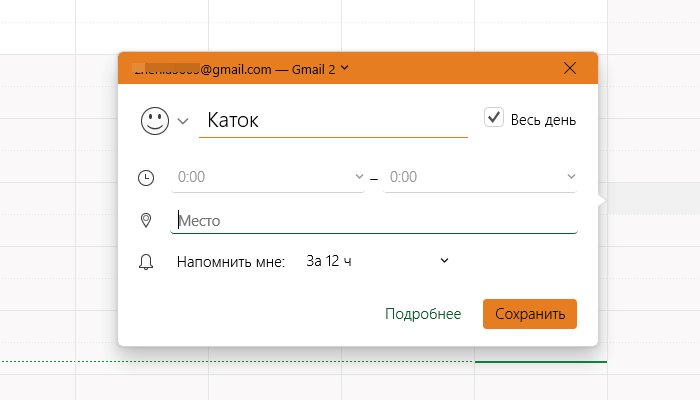
Слева от поля «Название события» доступна кнопка иконка, щелкнув по которой появится всплывающее меню с различными иконками.
Убрав флажок у параметра «Весь день» станут доступны поля начала и окончания события.
Для сохранения созданного события в календаре нажимаем кнопку «Сохранить».
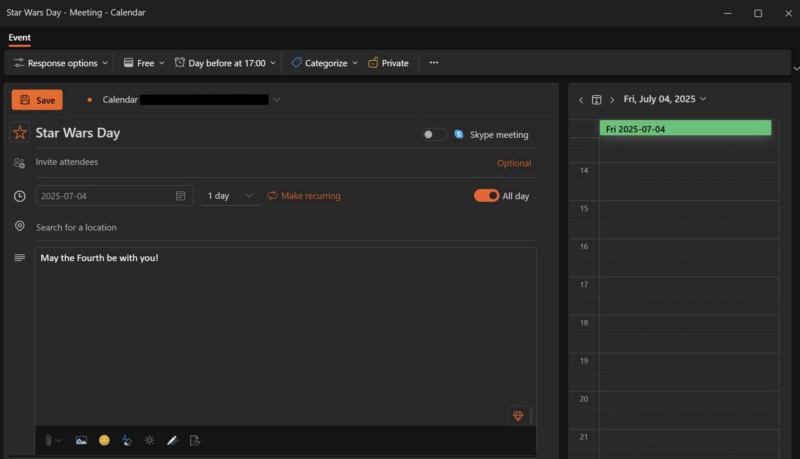
Как создать подробное событие в календаре
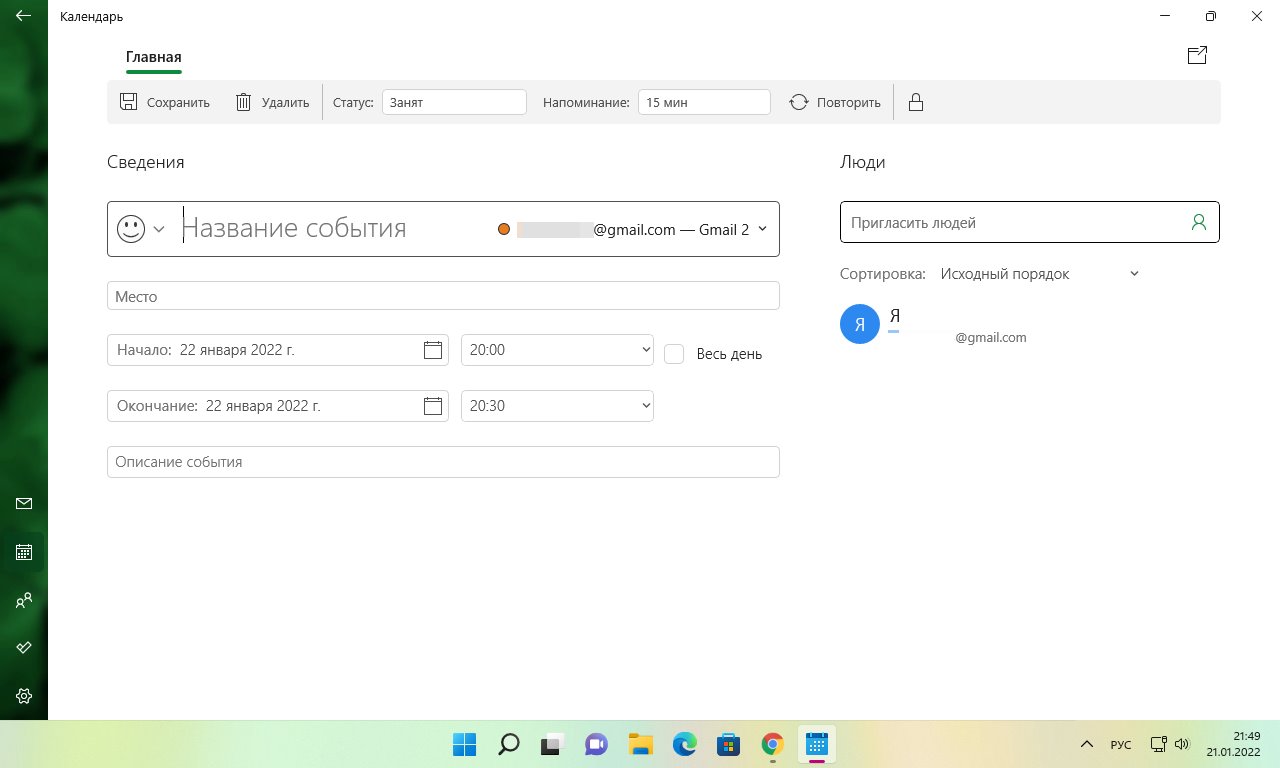
Также в календаре можно создать событие с расширенными настройками. Для этого щелкаем по кнопке «Подробнее» в окне быстрого создания события.

После этого мы окажемся в новом окне. Здесь доступны дополнительные настройки — можно указать описание события с возможностью форматирования текста, а так же назначить группу пользователей, у которых событие станет доступно в календаре.
Как синхронизировать события в приложении «Календарь»
Если новые события не приходят в календарь, необходимо его синхронизировать. Сначала откроем приложение «Календарь» и нажмем кнопку меню с тремя точками в правом верхнем углу. Затем выберем опцию «Синхронизировать».
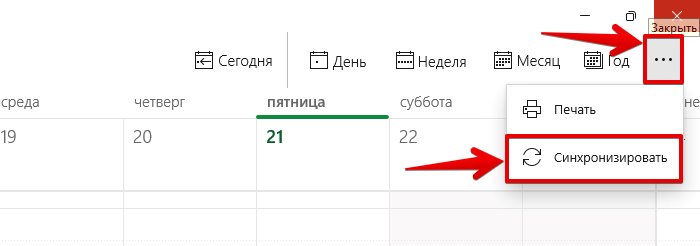
Это синхронизирует события со всех наших устройств и облака.
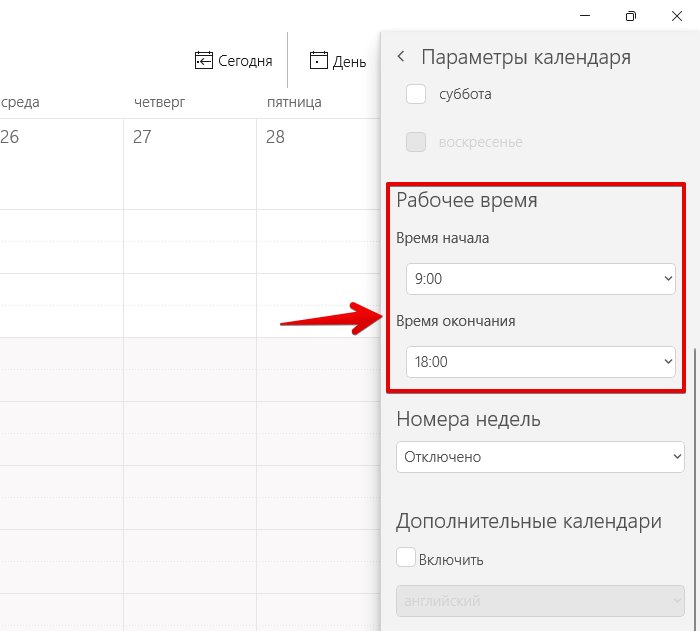
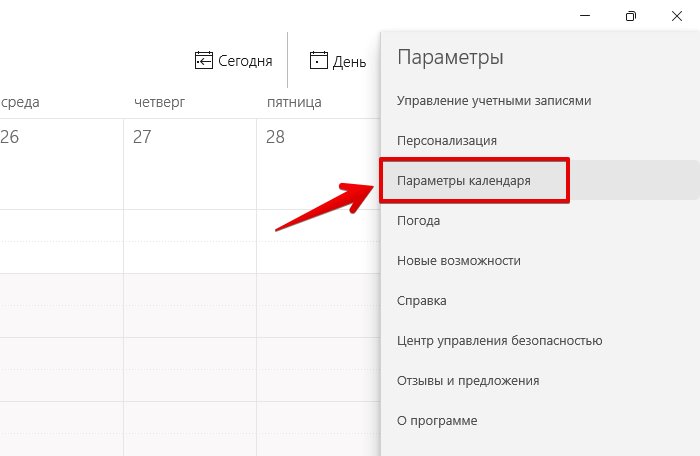
Как настроить параметры календаря в Windows 11
Приложение «Календарь» в Windows 11 позволяет изменять различные настройки, такие как первый день недели, дни рабочей недели, рабочее время и так далее.
Чтобы получить доступ к настройкам, щелкаем по кнопке «Настройки», а затем выбираем пункт «Параметры календаря».
В разделе «Неделя» доступна настройка «Первый день недели«, щелкаем по раскрывающемуся списку, чтобы выбрать день недели.
Ниже доступна настройка «Дни рабочей недели«. Здесь все просто, отмечаем флажком те дни недели, которые являются рабочими.
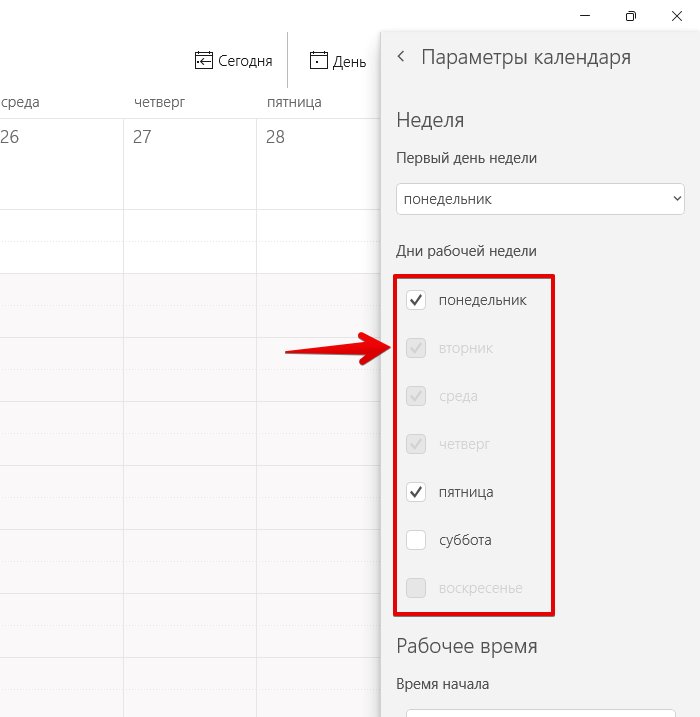
В разделе «Рабочее время» доступно два параметра — «Время начала» и «Время окончания«. Задаем параметры, щелкнув по раскрывающемуся списку.