3 марта 2025 г. 10:30
1763
Содержание:
- Что такое расширение файла и зачем его менять
- Как включить отображение расширений в Windows 11
- Как изменить расширение файла вручную
- Как изменить расширение сразу у нескольких файлов
- Как изменить формат файла в Windows 11
- Вывод
Иногда возникает необходимость изменить расширение файла, например, при работе с документами, изображениями или видео. Это может понадобиться, если файл был сохранён в неправильном формате, неправильно скачался или просто необходимо изменить его для удобства. В этой статье подробно разберём, как поменять расширение файла в Windows 11.
Что такое расширение файла и зачем его менять
Расширение файла — это часть имени файла после точки, например:
- .txt — текстовый файл;
- .jpg — изображение;
- .mp4 — видеофайл;
- .exe — исполняемый файл
Расширение помогает Windows 11 понимать, какой программой открывать файл. Например, файл .docx автоматически откроется в Microsoft Word, а .mp3 — в медиаплеере. Если расширение у файла отсутствует или указано неверно, система не сможет открыть его или запустит неправильную программу.
Как включить отображение расширений в Windows 11
Перед тем как изменить расширение файла в Windows 11, нужно убедиться, что система отображает их в проводнике. Для этого:
- Откройте «Проводник» — нажмите Win + E.
- Перейдите в папку с нужными файлами.
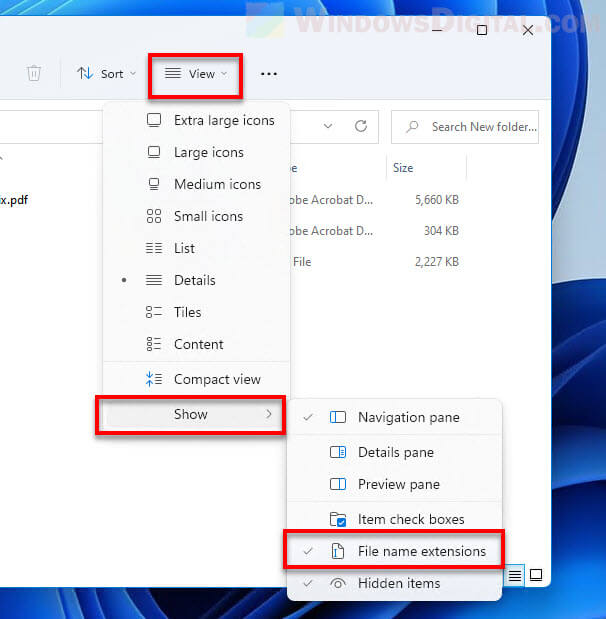
- В верхнем меню нажмите «Просмотреть» → «Показать».
- Поставьте галочку «Расширения имён файлов».
После этого в названиях файлов начнут отображаться их расширения, и вы сможете их изменять.
Как изменить расширение файла вручную
Изменение расширения — самый быстрый способ исправить его без использования дополнительных программ:
Выделите файл в проводнике, который хотите изменить.
Щёлкните по его имени правой кнопкой и выберите «Переименовать».
Измените расширение после точки, например .jpg→.png.
Нажмите Enter, а затем подтвердите изменение.
Файл сменит расширение, но его формат останется прежним. Например, если вы просто переименуете .txt в .jpg, это не сделает его изображением.
Как изменить расширение сразу у нескольких файлов
Если у вас много файлов с одинаковым расширением, можно изменить их одним действием с помощью командной строки:
- Откройте папку с файлами в «Проводнике».
- Щёлкните по адресной строке, введите cmd и нажмите Enter.
- В открывшемся окне введите команду для замены расширений: **ren .txt .docx
- Нажмите Enter, и все файлы .txt в папке будут автоматически переименованы в .docx.
Этот метод удобен, если нужно переименовать десятки или сотни файлов сразу.
Как изменить формат файла в Windows 11
Простая смена расширения не меняет формат файла. Например, если изменить .mp4 на .mp3, видео не превратится в аудиофайл. Чтобы изменить формат, потребуется конвертация с помощью специальных программ:
- Видео: VLC Media Player, HandBrake.
- Изображения: Paint, Photoshop, XnConvert.
- Документы: Microsoft Word, который есть в составе пакетов Microsoft Office, PDF-конвертеры.
Используйте эти инструменты, если вам нужно действительно изменить содержимое файла, а не просто его расширение.
Вывод
Изменение расширения файла в Windows 11 — это простой процесс, который можно сделать вручную или через командную строку. Однако само расширение не меняет формат файла, поэтому если нужно реально изменить тип данных, потребуется программа-конвертер. Теперь вы знаете, как правильно редактировать расширения, не повредив файлы. А если вам необходимо активировать вашу Windows 11, быстро и дешево можно приобрести лицензионный ключ ЗДЕСЬ.
В Windows 11 по умолчанию расширения зарегистрированных типов файлов не показываются — для кого-то это может быть удобно, но иногда полезно видеть конкретное расширение: например, так меньше вероятность запустить вредоносный exe файл с иконкой как у файла фото или документа.
В этой пошаговой инструкции для начинающих подробно описаны три способа включить показ расширений файлов в проводнике Windows 11. На близкую тему: Как показать или скрыть скрытые и системные файлы Windows 11.
Меню Проводника
Самый быстрый способ включить отображение расширений — использовать соответствующую опцию в меню нового Проводника.
Шаги будут следующими:
- Откройте проводник. В верхней строчке нажмите кнопку «Просмотреть». Если такой кнопки нет, нажмите по трём точкам, а затем — «Просмотреть».
- Перейдите в раздел «Показать»
- Отметьте пункт «Расширения имен файлов».
С этого момента расширения файлов начнут показываться в Проводнике и на рабочем столе.
В параметрах проводника
Второй способ — использовать элемент панели управления «Параметры проводника» для включения отображения расширений. Открыть его можно одним из следующих способов:
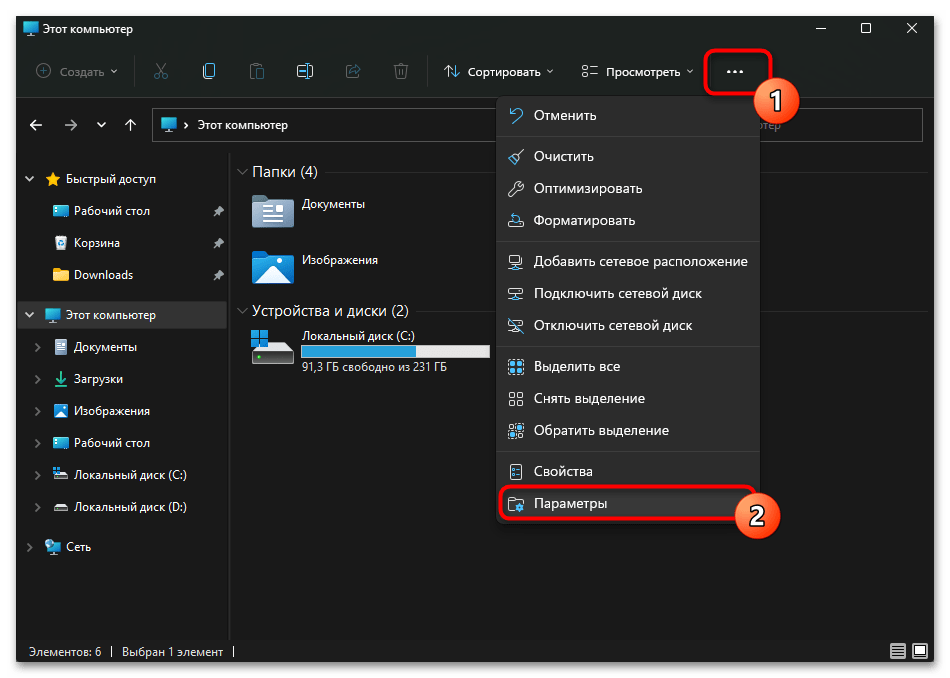
- Открыть меню Проводника и выбрать пункт «Параметры».
- Открыть панель управления и открыть пункт «Параметры проводника»
- Нажать клавиши Win+R на клавиатуре, ввести control folders и нажать Enter.
В открывшихся параметрах проводника:
- Перейдите на вкладку «Вид».
- Снимите отметку с пункта «Скрывать расширения для зарегистрированных типов файлов».
- Примените настройки.
После выполненных действий расширения начнут показываться, во всяком случае для тех файлов, которые его имеют (вам могут встретиться и файлы без расширения).
Параметры разработчика
И ещё одна возможность: включить показ расширений файлов можно в Параметрах, для этого используйте следующие шаги:
- Откройте Параметры — Система — Для разработчиков.
- Раскройте раздел «Проводник» и включите пункт «Отображение расширений файлов».
При этом сам режим разработчика включать не обязательно, чтобы указанная опция работала.
(Image credit: Mauro Huculak)
On Windows 11, you can change the format of virtually any file, but the operating system doesn’t make it easy for most users. As such, in this guide, I will explain how to complete this configuration.
Unlike Linux, where the extension is part of the filename and doesn’t really mean anything, on Windows, the extension indicates the type of format the file uses. For instance, «.txt» indicates a plain text file, while «.docx» indicates a Microsoft Word document.
It’s important to note that even though you can change file formats (or extensions), you can only do this on compatible or similar formats. For instance, you can change from «.bat» and «.txt,» but you can’t change a «.docx» document to «.txt» file.
Technically, you can, but when opening the document with a text editor, the application won’t be able to decode the file, and everything will look scrambled.
If you must change the format of a file that you know is compatible, you can complete this process in at least three ways using File Explorer, Command Prompt, or a specific application.
In this how-to guide, I will outline the different ways to change the format of a file on Windows 11.
Important: It’s recommended to make a copy of the file before trying to modify its format, in case something goes wrong, and you want the original file back. Also, consider that this guide focuses on changing common text, image, and document formats. In many situations, you will need specialized software to make the conversation, and in other scenarios, you won’t even be able to change the format.
All the latest news, reviews, and guides for Windows and Xbox diehards.
How to change the format of a file from File Explorer
Using File Explorer is a quick way to change the file type (or extension), but it’s not an optional option. The best method is to use the «Save as» option from a compatible application. (See the next set of instructions.)
To quickly change a file format on Windows 11, use these steps:
- Open File Explorer.
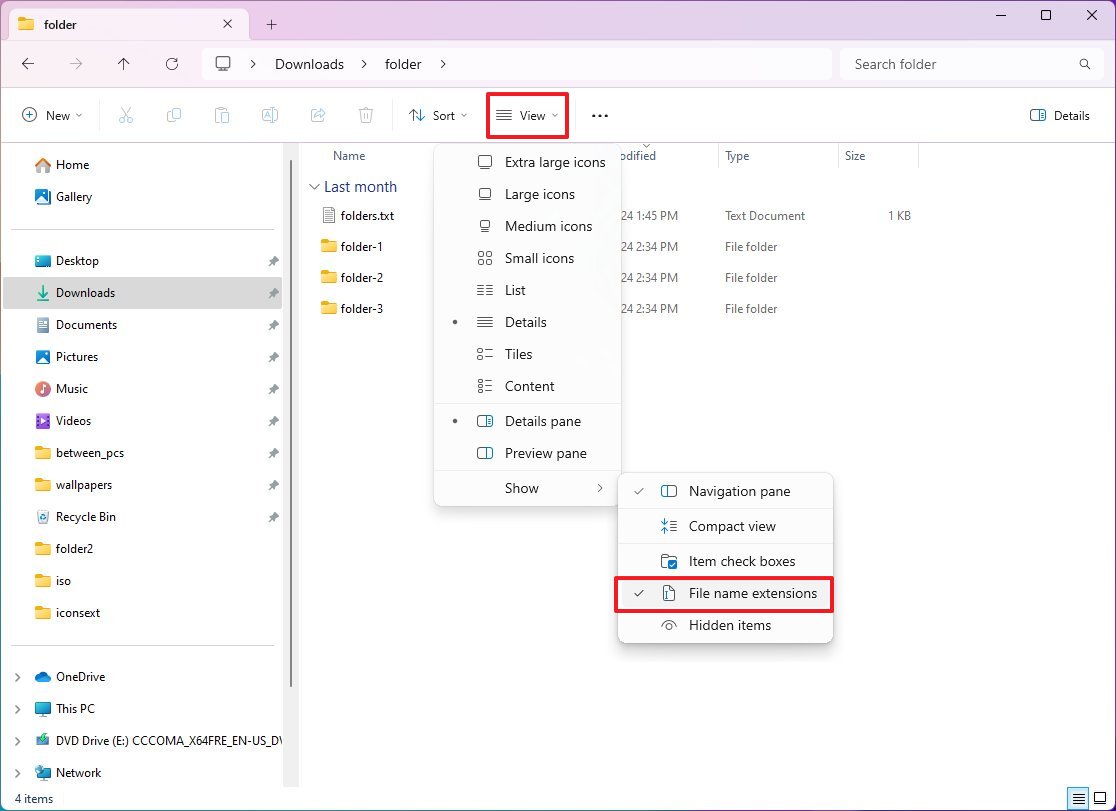
- Click on the View menu, choose Show, and check the «File name extensions» option.
- Right-click the file and select the Rename option.
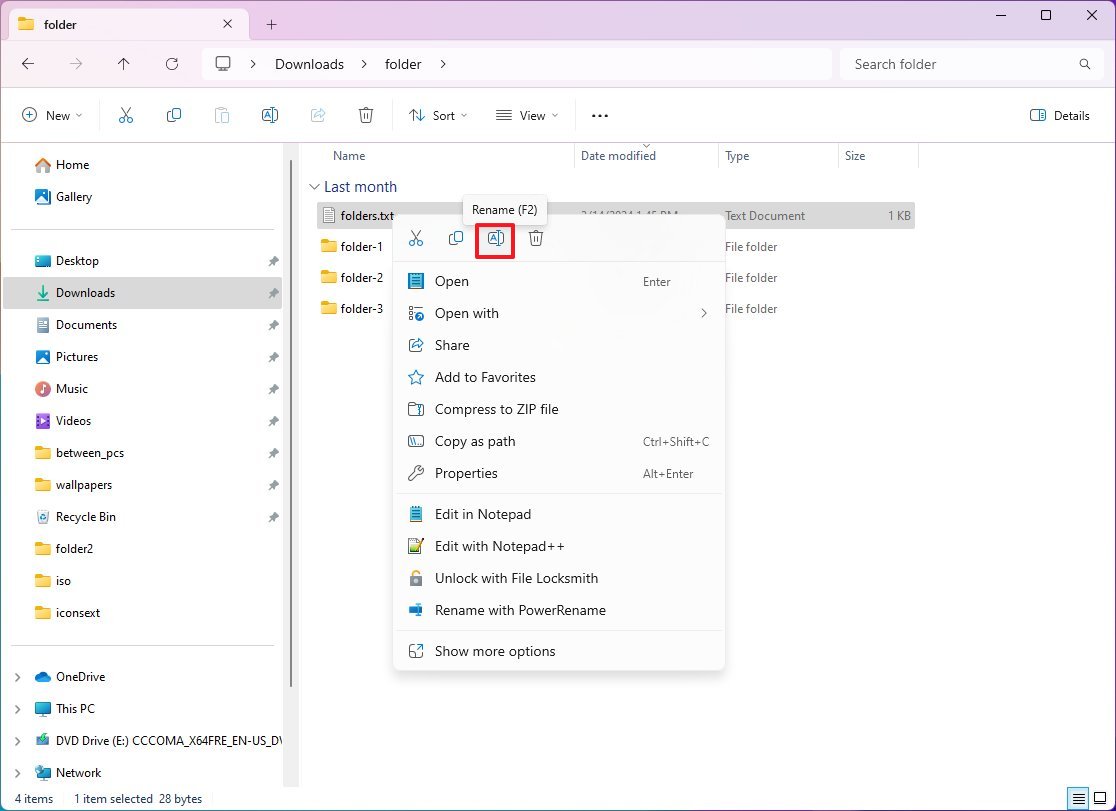
- Quick tip: You can also select the file and press the «F2» key to rename it.
- Change the format by specifying another extension. For example, check myscript.txt and myscript.bat to convert the file into an executable script.
Once you complete the steps, the file will change its format to the extension you specified.
How to change the format of a file from a compatible app
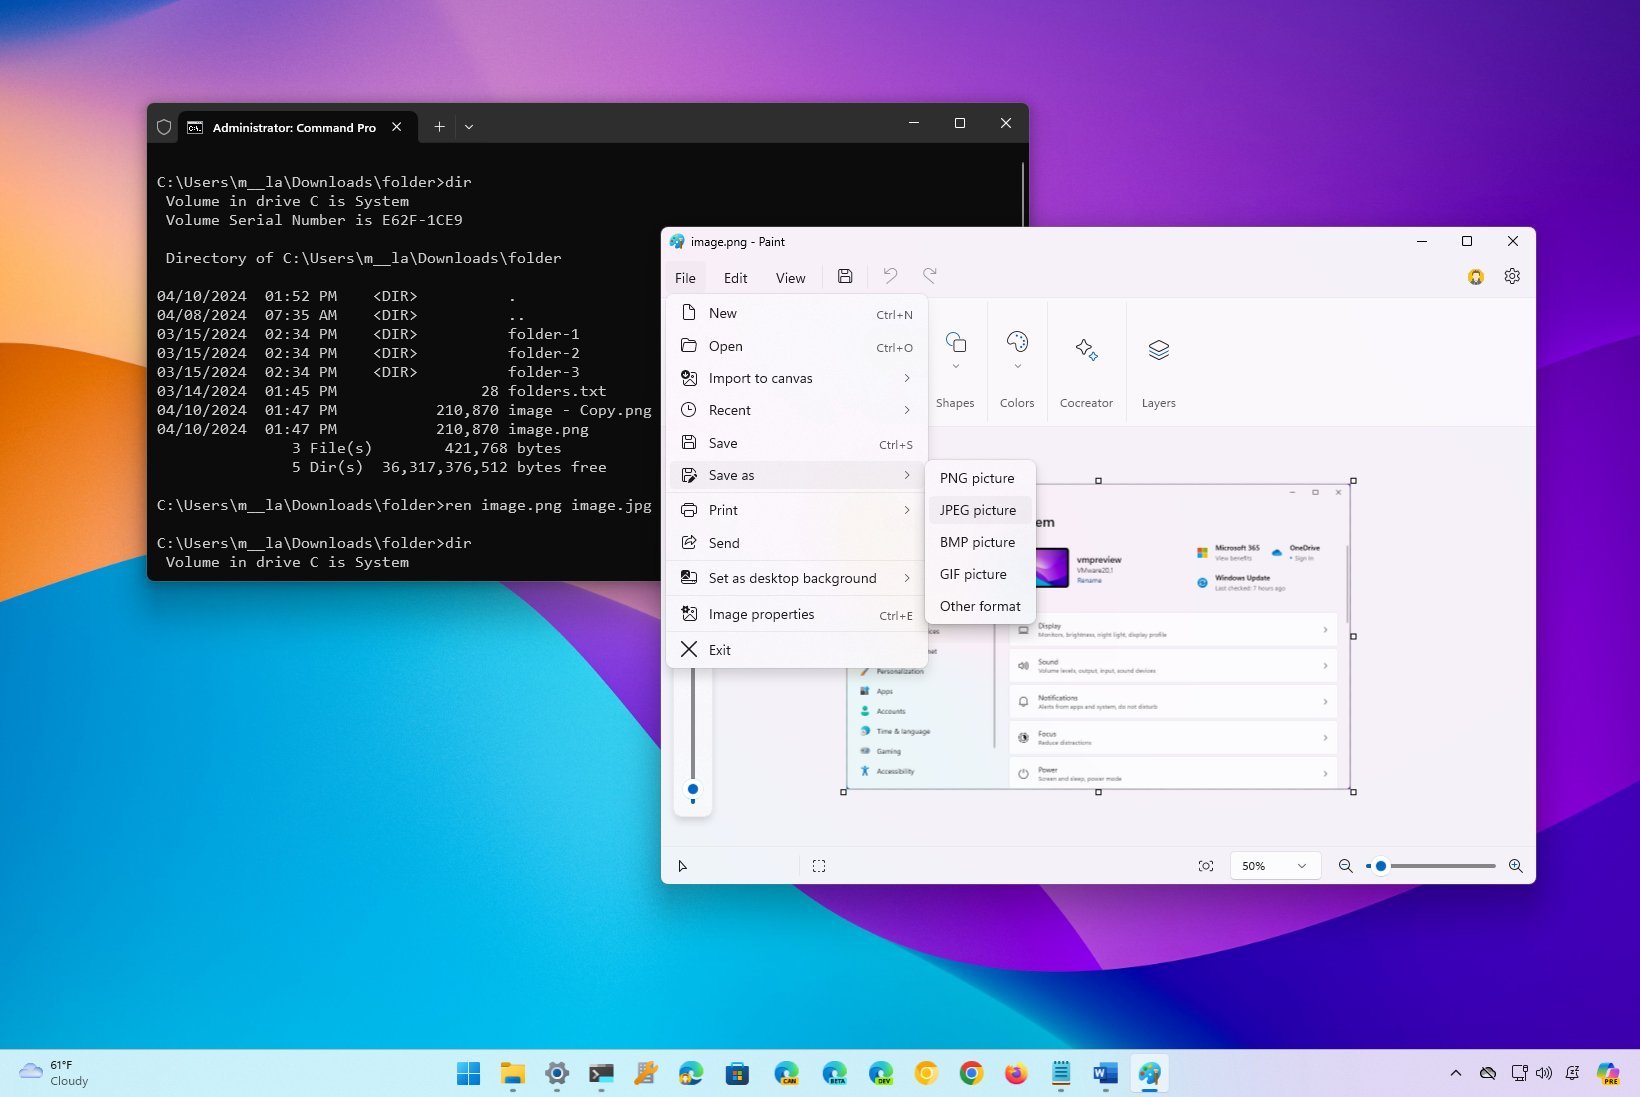
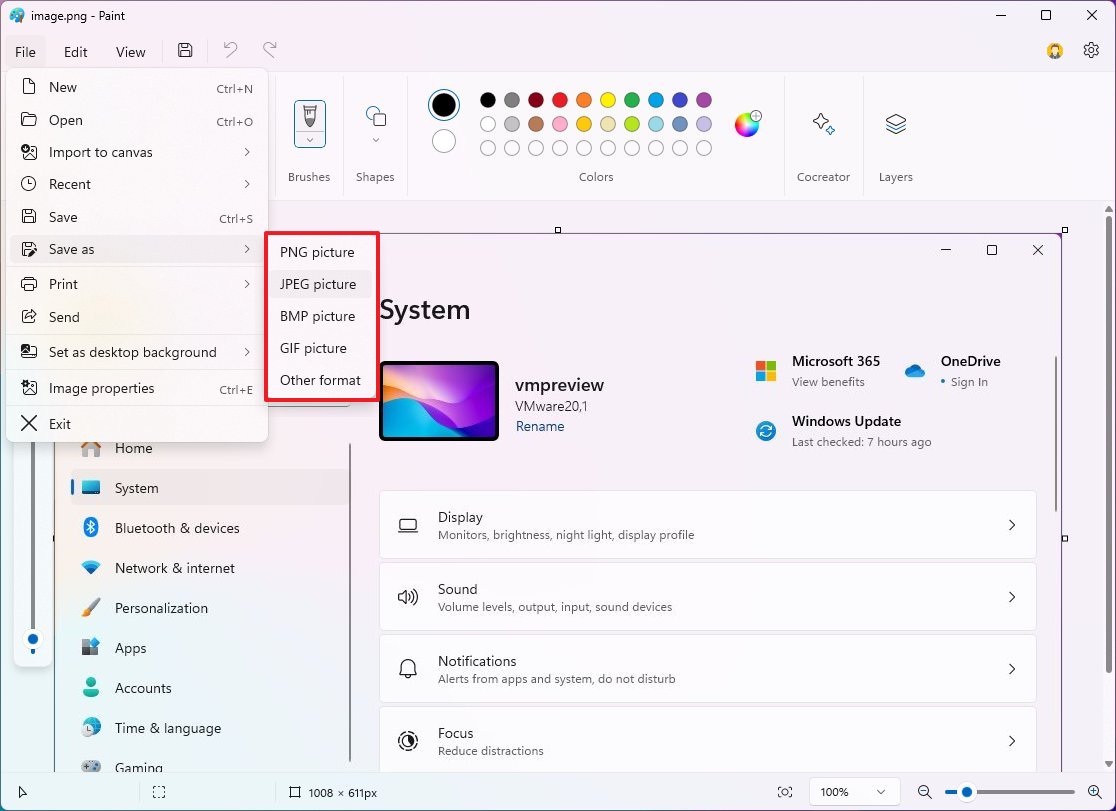
The best way to change the file format is to use a compatible application. For example, if you have a «.png» file, you can open it with the Paint app and save it in another format, such as «.jpg.» In this particular case, you will lose the transparency effect from the previous format.
To change an image file to a different format through the Paint app, use these steps:
- Open Paint.
- Click on File and choose the Open option.
- Select the image.
- Click the Open button.
- Click on File, choose Save as, and select the new format, such as PNG, JPEG, BMP, or GIF.
- Confirm a new name.
- Click the Save button.
After you complete the steps, you will end up with a different file format, which may or may not include the same features and elements from the original file type.
The above instructions are one example. You can do the same with different applications. For example, if you use Microsoft Word, the File menu will allow you to save the document as a «.docx,» «.doc,» «.xml,» or «.txt» file – to name a few.
The key is to open the file with a compatible application and then use that experience to save or convert the file to another type.
How to change the format of a file from Command Prompt
To change the file type from Command Prompt, use these steps:
- Open Start.
- Search for Command Prompt and click the top result to open the app.
- Type the following command example to navigate to the folder with the files to rename, and press Enter: cd c:\PATH\TO\FILES
For instance, this example opens the «rename» folder inside «Pictures»: cd %USERPROFILE%\Downloads\folder
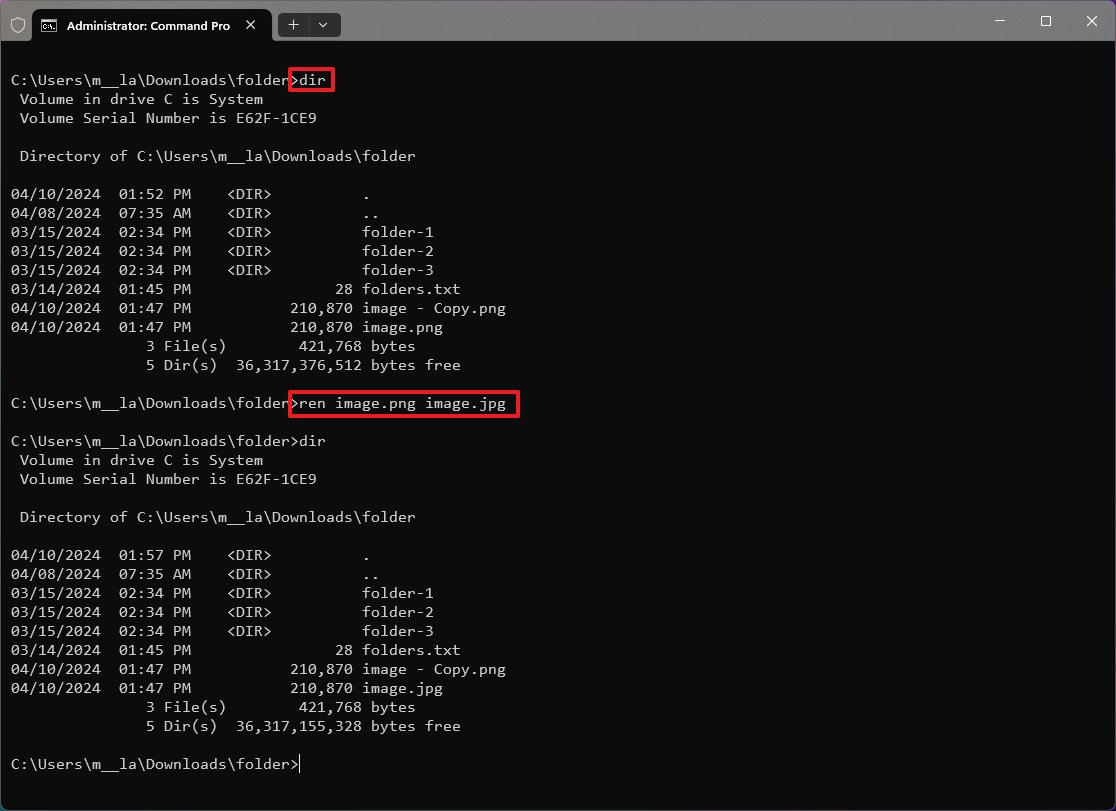
- Type the following command to view the files in the location and press Enter: dir
- Type the following command to rename the file and press Enter: ren «FILENAME.OLD-EXTENSION» «FILENAME.NEW-EXTENSION»
In the command, replace «FILENAME.OLD-EXTENSION» and «FILENAME.NEW-EXTENSION» with the old and new file extensions. The quotation marks are only necessary if the title includes spaces. For instance, this command renames the file to «image.jpg»: ren image.png image.jpg
- Repeat step 5 to change the name of the remaining files.
After you complete these steps, Command Prompt will rename the extension to change the format.
You can also check my other comprehensive guide to renaming files with Command Prompt.
More resources
For more helpful articles, coverage, and answers to common questions about Windows 10 and Windows 11, visit the following resources:
- Windows 11 on Windows Central — All you need to know
- Windows 10 on Windows Central — All you need to know
Mauro Huculak has been a Windows How-To Expert contributor for WindowsCentral.com for nearly a decade and has over 15 years of experience writing comprehensive guides. He also has an IT background and has achieved different professional certifications from Microsoft, Cisco, VMware, and CompTIA. He has been recognized as a Microsoft MVP for many years.
Способ 1: Раздел меню «Проводника»
В Windows 11 появилось быстрое включение и отключение отображения расширений, что очень удобно для тех, кто постоянно работает с большими объемами файлов.
Для этого откройте любую папку в «Проводнике» и кликните по кнопке с названием «Посмотреть». Из выпадающего меню наведите курсор на строчку «Показать» для отображения дополнительного меню. В нем уже выберите пункт «Расширения имен файлов».
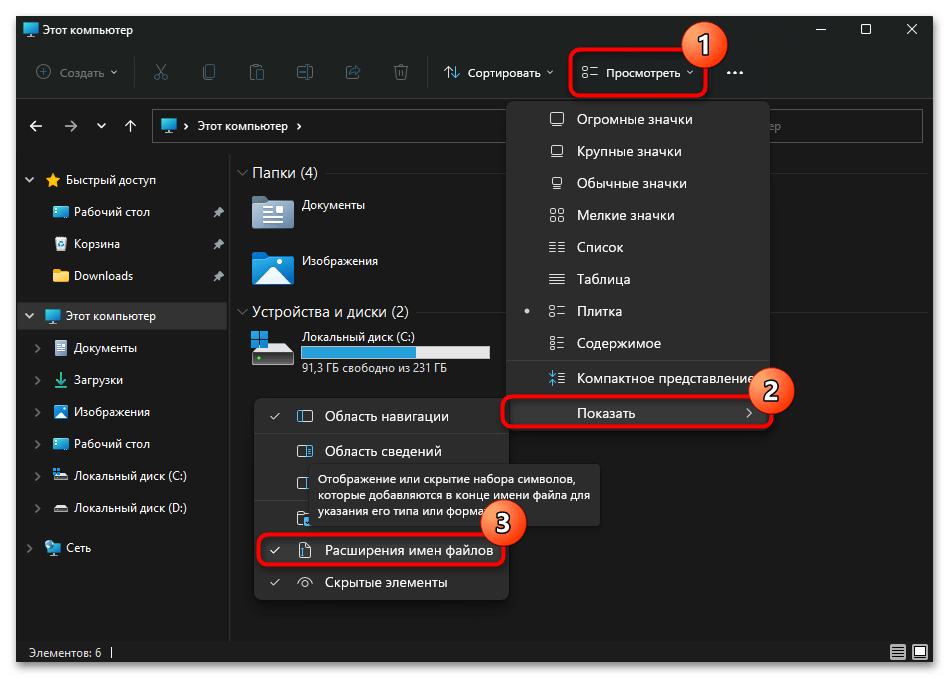
В будущем можете легко переключаться между значениями этого параметра. Галочка стоит — расширения отображаются, и наоборот.
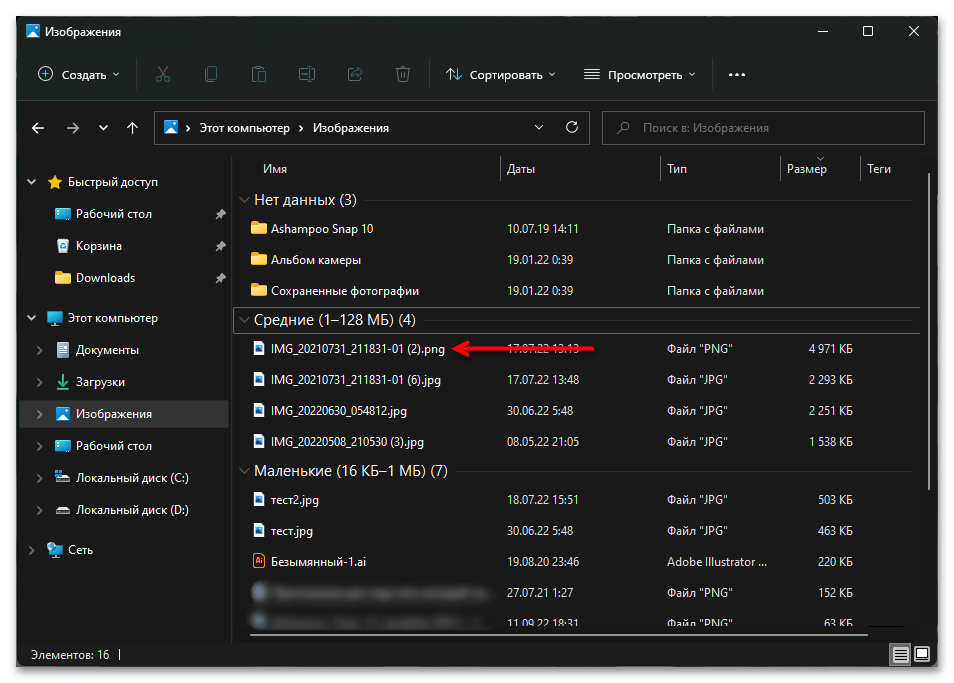
Можете перейти в любую папку, где есть файлы, и посмотреть, появились ли расширения в конце их названий.
Способ 2: «Параметры папок»
Классический для всех Windows метод включения расширений заключается в вызове окна «Параметры папок».
- Откройте любую папку «Проводника» и кликните по кнопке с тремя точками. Из выпадающего меню щелкните по строке «Параметры».
- Появится новое окно, в котором переключитесь на вкладку «Вид», прокрутите список дополнительных параметров в самый низ и уберите галочку с пункта «Скрывать расширения для зарегистрированных типов файлов». Примените изменения кнопкой «ОК».

Результат будет тем же, что и в предыдущем способе.
Наша группа в TelegramПолезные советы и помощь
File extension is the group of letters after a period at the end of a file name, indicating the format of the file. For example, .TXT, .JPG, .PNG, .DOCX, .ZIP, .RAR, .MP4, .AVI, etc. are all common file extensions in computing. In this guide, you will learn how to show file extensions for all file types in Windows 11 (hidden by default) and how to change or remove the file extension of a file.
Also see: How to Change Default App For File Extension in Windows 11
Will changing the file extension of a file changes its file format?
The format of a file cannot be changed by simply changing its file extension (without properly converting it). The format of a file will retain even after its extension is changed or removed. In some cases, changing the file extension of a file forcefully and incorrectly may corrupt or break the file, making it unreadable and unusable.
Why would you want to change or remove file extension of a file?
This guide is for users who know that a file has incorrect file extension or the file extension is missing. If you were asked to change or remove the file extension of a file but you couldn’t see the file extension at the end of the file’s name, follow the instructions below to allow Windows 11 to display file name extensions for all files, so that you can make changes to the file extension of any file.
Another common reason users would want to remove the file extension of a file is to hide the file type of the file to prevent anyone else from knowing what the file is and how to open the file. If a file doesn’t have a file extension when it’s supposed to have one, Windows wouldn’t know what app it should open the file in, thus showing the “how do you want to open this file” pop up. A file without a file extension will also appear as a white icon instead.
Change or remove file extension in Windows 11
To be able to add, change or remove file extension of a file in Windows 11, first you need to be able to see the file extension in the file name. Since file extension is hidden by default in Windows 11, you need to enable it through File Explorer folder options to allow Windows to display the file extension for each file. Here’s how to do it.
- In Windows 11, open This PC or File Explorer.
- On the toolbar, click View and hover your mouse cursor over Show. Then, click File name extensions to enable it. If the option is enabled, it will have a tick next to it.
After enabling the show file name extensions option, Windows will start showing the file extension for each individual file. You can now figure out the file type of each file and edit the file extension of any file.
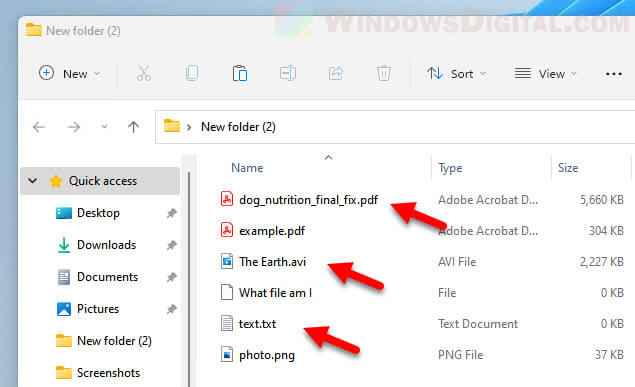
If you want to revert the change and hide the file extensions for all files, simply repeat the steps above and click the “File name extensions” option again to remove the tick next to it.
How to change file extension of a file in Windows 11
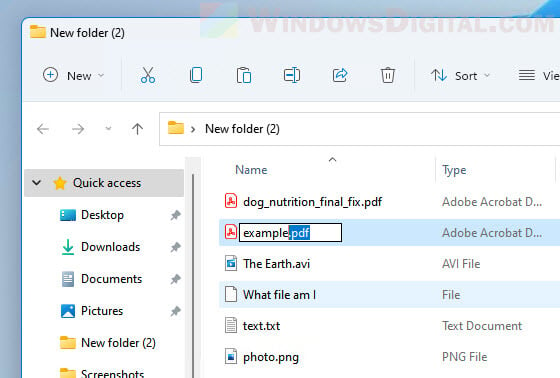
To change the file extension of a file, simply right-click the file and select Rename, or alternatively, select the file and press F2. Then, change the letters after the period in the filename to the file extension you want to change the file to.
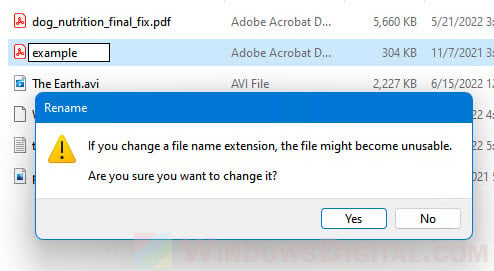
Windows will then prompt you a warning telling you that the file might become unusable if you change its file name extension. Click Yes to confirm the change.
Remove the file extension of a file
To remove the file extension of a file, right-click the file and select Rename. In the file name, delete the letters after the period and the period itself. When Windows prompt for confirmation, select Yes to confirm the change.
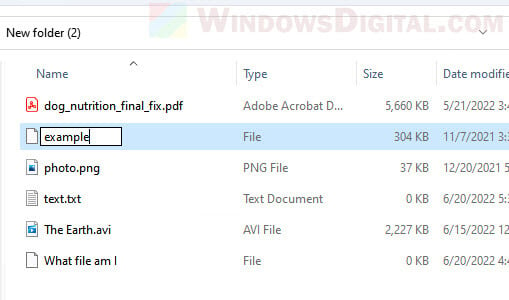
The icon of the file with removed file extension will turn into a white icon and have the type of file changed to just “File”. Windows will no longer know what file type the file is and how to open the file. Depending on the file, you may still be able to run the file in the reader or player app that used to open it without having any file extension.
You can add the file extension back to the file by simply renaming it again and adding the period and extension to the end of the filename.
Should I keep the “show file name extensions” option enabled?
For security reason, we would recommend to keep the option enabled so that you know the file type of a file before opening it. In fact, users should enable show file name extensions as soon as they start using Windows. Microsoft should allow file name extension to be displayed by default so that users can identify if a file is the file format they want to open before opening it.
This is because hackers can exploit this and fake a file since users couldn’t see the file extensions. For example, if an image file you download from the Internet supposed to be in image file format but turns out to be a .bat script file, since you can’t see the file extension, you may risk getting your computer infected by unknowingly opening the malicious file.


