-
Home
-
News
- Fix: Windows Shell Experience Host Suspended On Windows 10
By Sarah |
Last Updated
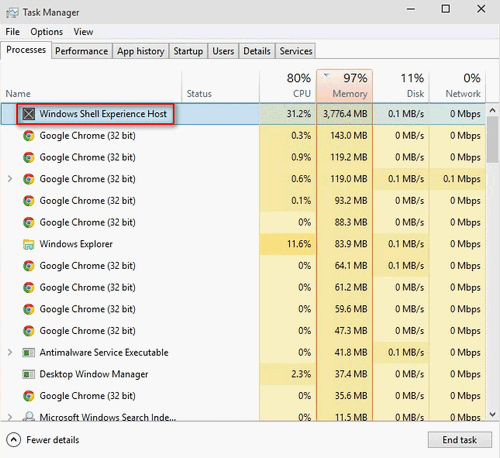
As an official apart of Windows operating system, the Windows Shell Experience Host is always running in the background of your PC. If you open the Task Manager, you can see it. However, most people reported a problem about this process: they find Windows Shell Experience Host suspended and use too much of the CPU and memory.
Windows Shell Experience Host Is Suspended
What Is Windows Shell Experience Host
Considering that many of the ordinary Windows users don’t even know the existence of Windows Shell Experience Host, I’d like to introduce it in brief firstly. Windows Shell Experience Host, also known as ShellExperienceHost.exe, is actually an organic component of a Windows operating system. Though it is not shown to you while working, you can go to find it manually in Task Manager.
The main function of Windows Shell Experience Host is:
- It is in charge of the present of universal apps in a windowed interface.
- It offers the Universal App integration in Windows Explorer (Windows Shell).
- It deals with some graphical elements of the interface, such as taskbar transparency, start menu, and new visuals for notification area (like calendar).
In short, the Windows Shell Experience Host serves as a kind of visual manager on your PC since it was first introduced with Windows 10. However, some users reported the error: Windows Shell Experience Host suspended (the host takes too much CPU and memory), so they desperately need a solution to fix it. (Go to the home page to get some applications in order to protect your system and data before fixing Windows Shell Experience Host error).
Solved – Windows Script Host Error On Windows 10.
How to Fix When You Find ShellExperienceHost.exe Suspended
After finding the Windows Shell Experience Host not responding, some users would ask whether they can disable it or not. In fact, Microsoft doesn’t allow them to do so since it will block the necessary visuals in Windows 10.
Now, I will introduce 3 effective ways to deal with Windows Shell Experience Host stopped working.
Way 1: update system and software.
Firstly, make sure your operating system is updated to the latest version:
- Click on the Windows logo button in the lower left corner.
- Click on the Settings icon (look like a gear) from the left sidebar.
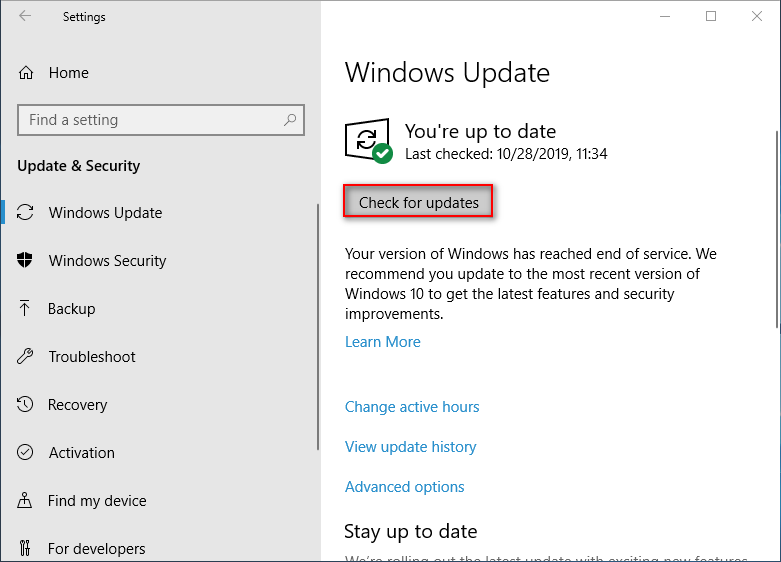
- Select Update & Security from the pop-up Settings window.
- Click on the Check for updates button to make sure there is no new update available.
- Please agree to update to the latest version if your system is not.
After that, you also need to update your BIOS, Graphics Software, and Power Management Drivers (some users said they have fixed the Windows Shell Experience Host not running problem by updating these things).
Way 2: disable slideshow and automatic color change.
Firstly, select picture to replace slideshow.
- Repeat step 1 and step 2 to open Settings app.
- Select Personalization.
- Make sure Background is chosen in left sidebar.
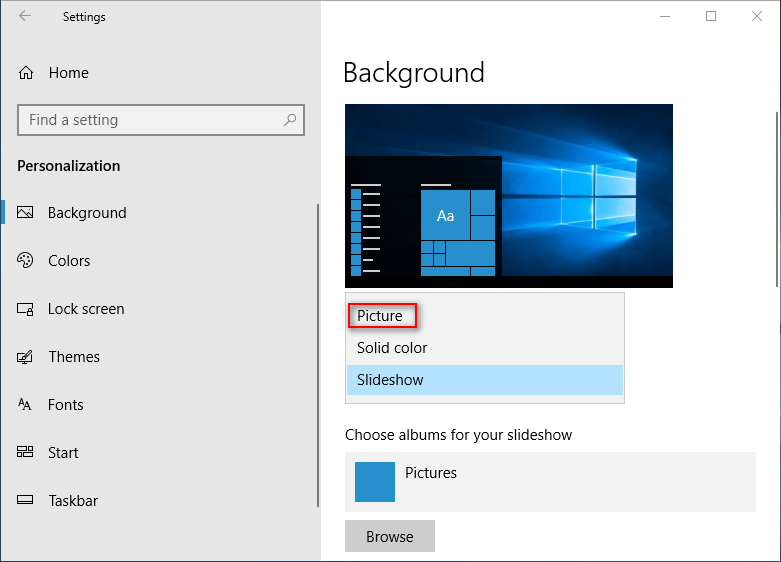
- Look for the Background section in the right pane and click on the arrow under it.
- Choose Picture from the drop-down list.
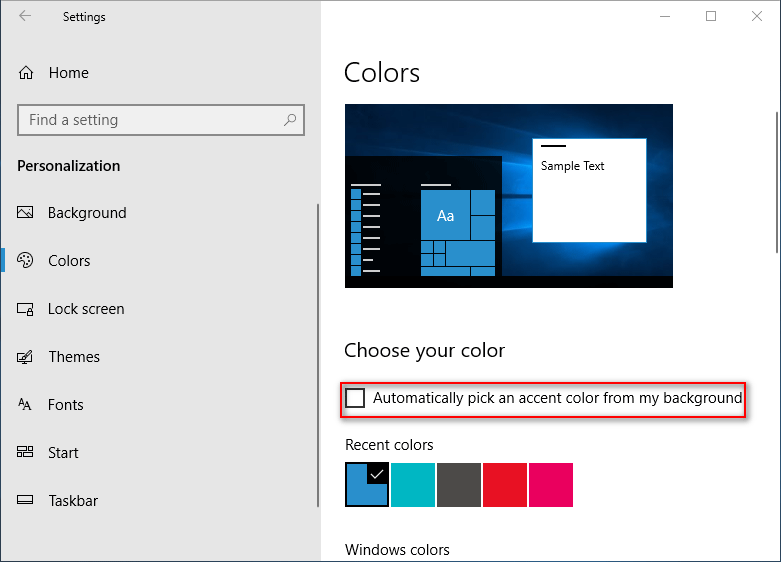
Secondly, uncheck automatic color changing option.
- Open Settings and select Personalization.
- Select Colors in the left sidebar.
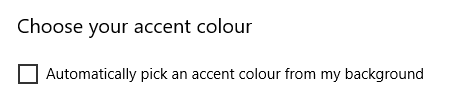
- Look for the Choose your color section in the right pane.
- Uncheck Automatically pick an accent color from my background.
Click here to know how to change Windows 10 desktop background.
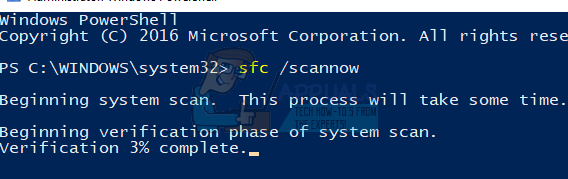
Way 3: run System File Checker.
- Right click on the Windows logo button.
- Choose Windows PowerShell (Admin).
- Click Yes in the User Account Control window.
- Type sfc /scannow and press Enter.
- Wait for the command to complete (it may take some time).

If above methods failed, there are also other solutions to Windows Shell Experience Host high CPU usage.
- Re-register your Start menu.
- Try Clean Boot.
- Run System Maintenance Troubleshooter.
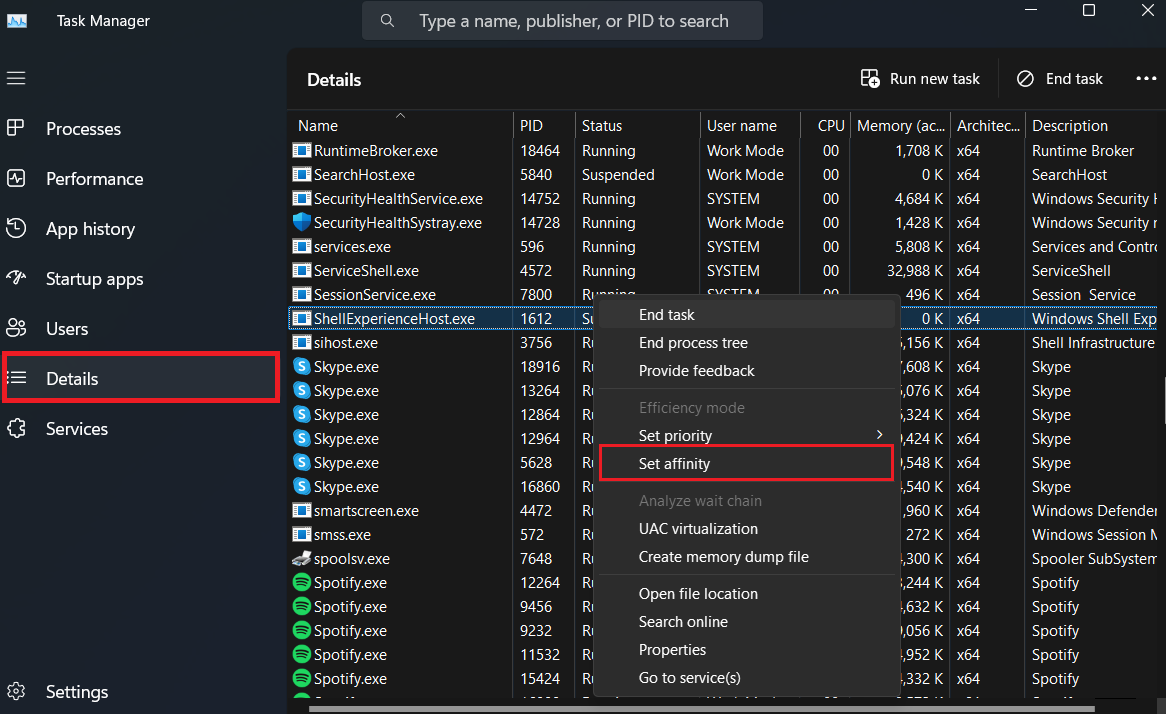
- Set affinity to limit CPU.
- Troubleshoot Windows Registry.
- Crete a new account.
Many users have fixed the error Windows Shell Experience Host suspended by using above solutions.
About The Author
Position: Columnist
Sarah has been working as an editor at MiniTool since she graduated from university. Sarah aims at helping users with their computer problems such as disk errors and data loss. She feels a sense of accomplishment to see that users get their issues fixed relying on her articles. Besides, she likes to make friends and listen to music after work.
,
If you are a Windows 10/11 user and you cannot open the Start menu or the Cortana search bar and the Windows Troubleshooter displays the error «Microsoft.Windows.ShellExperienceHost and Microsoft.Windows.Cortana applications need to be installed correctly«, continue below to fix the problem.
Problems with the Start menu and search function in Windows 10/11 can be caused by various reasons, such as corrupted system files, faulty Windows updates, outdated drivers, malware, etc. But don’t worry, in this guide you will find step-by-step instructions to fix the «Microsoft.Windows.ShellExperienceHost» and «Microsoft.Windows.Cortana» applications need to be installed correctly» issue.
This is a comprehensive guide to fix the»Start Menu not working» & «Search not working» problems in Windows 10.
How to fix: «ShellExperienceHost» and «Cortana» applications need to be installed correctly» on Windows 10.
Method 1: Restart Windows Explorer.
One of the simplest solutions to fix the mentioned error is to restart Windows Explorer. Restarting Windows Explorer will refresh the desktop and taskbar, including the Start menu and Cortana search bar.
1. Press Ctrl + Shift + Esc on your keyboard to open the Task Manager.
2. Find and select the «Windows Explorer» process under the «Processes» tab in the Task Manager window and click the Restart button on the bottom right.

3. After you click «Restart», your taskbar and desktop icons will disappear for a few seconds and then reappear. When this happens, check to see if the problem has been resolved.
Method 2: Install Pending Windows Updates.
The «ShellExperienceHost» & «Cortana application» errors may occur if important Windows updates are missing. So, check for missing Updates and if any found install them.
1. Press the Windows + R keys to open the Run dialog box.
2. Type ms-settings:windowsupdate in the run command box and press Enter.

3. Click Check for updates and if any updates found click Install to install them.

Method 3. Run CTF Loader (ctfmon.exe).
The CTF Loader (ctfmon.exe), is a legitimate Windows process (ctfmon.exe), which controls the User Input and the Language bar. In some cases, the ‘ctfmon.exe’ process may not function properly and must be started again. To restart, the CTF Loader (ctfmon.exe) process:
1. Simultaneously press the Windows + R keys to open run command box.
2. In run command box, copy paste the below command and press Enter:
- C:\Windows\system32\ctfmon.exe
3. Now try to see if the Start menu and the Search is working.
Method 4: Repair Windows with DISK & SFC commands.
Since many Windows errors are most often caused by corrupted system files, try to see if the problem is solved by fixing them.
1. Press the Windows + R keys to open the Run dialog box
2. In the run command box, type: cmd and press Ctrl + Shift + Enter to open Command Prompt as Administrator.
3. At the command prompt window, type the following command & press Enter:
- Dism.exe /Online /Cleanup-Image /Restorehealth

4. Be patient until DISM repairs component store. When the operation is completed, (you should be informed that the component store corruption was repaired), give this command and press Enter:
- SFC /SCANNOW

5. When SFC scan is completed, restart your computer.
6. After restart check if the problem is fixed.
Method 5. Check if the Problem persists in Safe Mode.
Safe mode boots Windows in its most minimal configuration, with a limited selection of files and drivers. Starting Windows in safe mode is not the solution to the problem, but it will help you determine if the problem is caused by bugs in the operating system or by some other third-party program or device driver.
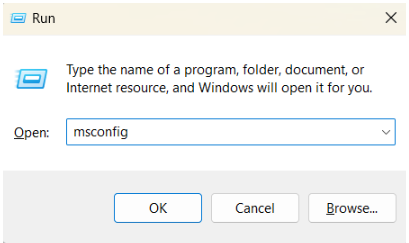
1. Press the Windows + R keys to open the Run dialog box
2. In the run command box, type: msconfig and press Enter to open the System Configuration utility.

3. Go to the Boot tab, tick the Safe boot checkbox and click Apply and OK.

4. Finally click the Restart button to restart your PC in Safe Mode.
5. When windows enters safe mode, check if the Start menu and the Cortana Search are working. Now according the result, proceed as follows:
-
If the error does not occur in safe mode, usually means that the default Windows settings and basic device drivers are not causing the problem. At such a case proceed to Method-6 below to re-install the Graphics drivers.
-
If the error also occurs in safe mode, then proceed to Method-7 to disable the third-party startup programs.
Method 6: Reinstall Graphics Driver.
Drivers are software components that allow hardware components to communicate with the operating system. When a driver becomes outdated or corrupted, it can interfere with the proper functioning of the ShellExperienceHost and Cortana applications, leading to problems.
1. Right-click on the Start menu and select Device Manager.

2. Expand the Display adapters section.
3. Right-click on your display adapter and select Uninstall Device.

4. At next window, choose to Delete the driver software for this device and click Uninstall.
5. Wait a few seconds and then restart your PC.
6. After restart, Windows will automatically re-install the graphics driver from the Windows Update servers.
* Note: To make sure the driver installation is complete, go to again Device Manager and check that your display adapter model is listed there. If not, check and install all available Windows updates or install the latest graphics driver from the GPU manufacturer’s support site.
7. If the problem persists after reinstalling the graphics drivers, proceed to next methods.
Method 7. Disable Third-Party Startup Programs.
Many times, a non-Microsoft program launched at Windows startup can cause the Start menu not to work. So, proceed and disable any third-party startup programs as instructed below, and see if this fixes the issue.
1. Press Ctrl + Shift + Esc on your keyboard to open the Task Manager.
2. At Startup tab, select and Disable any third-party (non-Microsoft) programs that are running at Windows startup (e.g. iTunes, Dropbox, uTorrent, etc.)*

3. When done, restart your PC.
4. Finally, if after rebooting the problem is resolved, then turn on the disabled programs one-by one-to find the culprit.
Method 8. Disable Third-party services.
Sometimes the reported problem may occur because of a third-party service. To see if this happens:
1. Press the Windows + R keys to open the Run dialog box.
2. In the run command box, type: msconfig and press Enter to open the System Configuration utility.

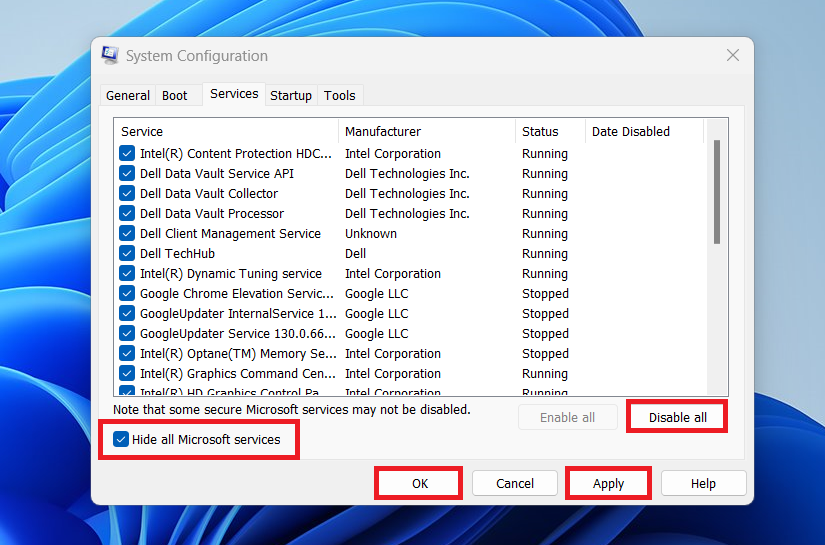
3. In the System Configuration utility, select the Services tab and…
a. Check the Hide all Microsoft services box.
b. Click the Disable all button to disable all the non-Microsoft Services.
c. Click Apply > OK and then click Restart to reboot your PC.

4. If the problem is resolved after disabling the third-party services, follow the same steps as above and enable again one-by-one the disabled services and restart your pc, until you find which one is causing the problem.
* Note: If the problem persists, enable all the disabled services (using the same steps) and continue to the next method.
Method 9. Uninstall Dropbox.
Dropbox is a cloud storage and file syncing service that can cause conflicts with the «ShellExperienceHost» and Cortana apps, and many users have reported that removing Dropbox is the solution to the problem.
1. Press the Windows + R keys to open the Run dialog box.
2. Type appwiz.cpl in the Run dialog box and press Enter to open Programs and Features in Control Panel.

3. In the Programs and Features select the «Dropbox» (if installed) and then right-click on it and select Uninstall from the context menu.

4. When the uninstall is completed, restart your PC and check if the problem persists. If the issue is resolved, go ahead and install the latest version of Dropbox if you need it.
Method 10. Scan for Viruses & Malware.
Viruses or malicious programs can cause your PC to work abnormally. So,use this Malware Scan and Removal Guide to check and remove viruses or/and malicious programs that may be running on your computer.*
* Important: In some cases a third-party antivirus program can cause the start menu and the search bar to crash or freeze. At such a case, I suggest to temporarily uninstall the AV program and then to check if the issue is fixed. If yes, then install your AV program again or find another AV program to protect your PC. *
* Note: If you have installed Spybot AV then probably this is causing the problem.
Method 11. Re-install Windows.ShellExperienceHost & Windows.Cortana
The «Microsoft.Windows.ShellExperienceHost» and «Microsoft.Windows.Cortana» applications need to be installed correctly error can occur due to issues with their installation or registration on your system.
1. Simultaneously press the Windows + R keys to open run command box.
2. Type powershell and then press CTRL + SHIFT + ENTER to open PowerShell as Administrator.
3. Inside the Administrator PowerShell window, (copy &) paste the following command but DO NOT press Enter yet.
- Get-AppxPackage Microsoft.Windows.ShellExperienceHost | Foreach{Add-AppxPackage -DisableDevelopmentMode -Register «$($_.InstallLocation)\AppXManifest.xml»}
4. Then press Ctrl+ALT+DEL and open Task Manager.
5. (Now you have to be fast …)…
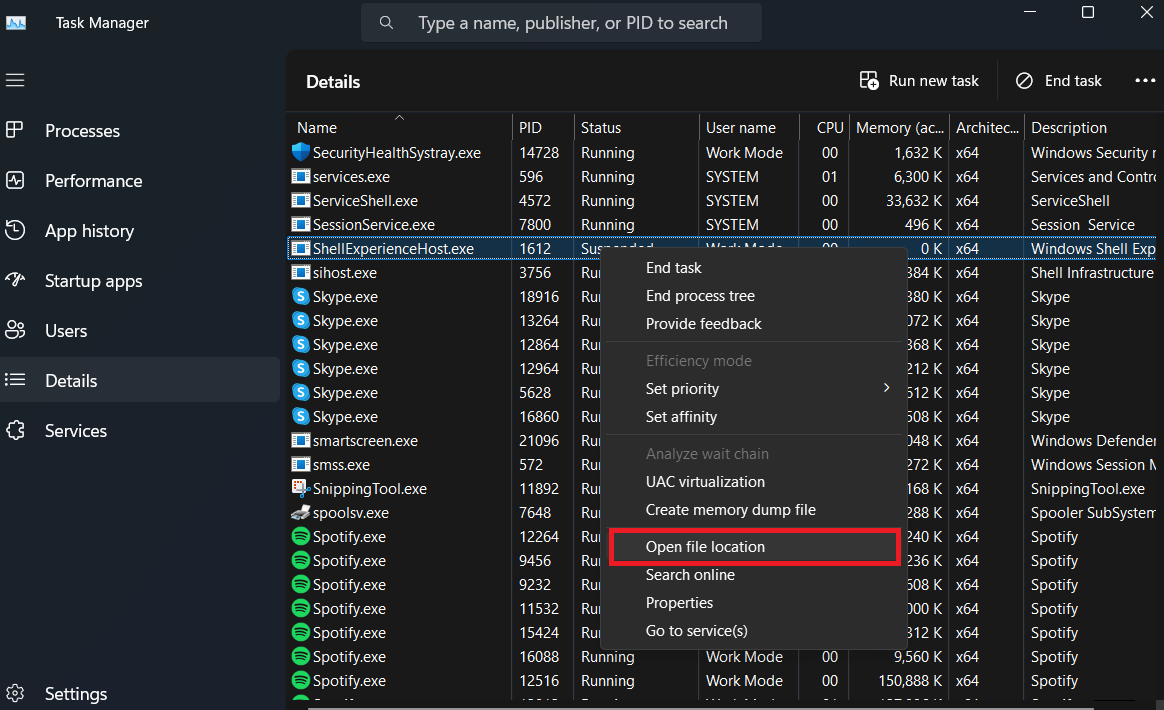
1. At the Processes tab, right-click at Windows Shell Experience Host and click End Task.
2. Then, click immediately at the PowerShell window and press Enter.

6. When done, copy-paste the following command in PowerShell to re-install the Cortana app.
- Get-AppxPackage Microsoft.Windows.Cortana | Foreach {Add-AppxPackage -DisableDevelopmentMode -Register «$($_.InstallLocation)\AppXManifest.xml»}

Method 12. Re-install all Modern Apps on your account:.
1. Simultaneously press the Windows + R keys to open run command box.
2. Type powershell and then press CTRL + SHIFT + ENTER to open PowerShell as Administrator.
3. Inside the Administrator PowerShell window, (copy &) paste the the following command & press Enter:
Get-AppXPackage | Foreach {Add-AppxPackage -DisableDevelopmentMode -Register «$($_.InstallLocation)\AppXManifest.xml»}

4. When the deployment operation process is completed, ignore any errors and close the PowerShell window.
5. Reboot your computer and then check if the start menu and the Cortana search is working.
Method 13. Reinstall System Apps, Cortana & ShellExperienceHost for all Users.
1. Open PowerShell as Administrator and give the following three (3) commands in order:
- Get-AppXPackage -AllUsers |Where-Object {$_.InstallLocation -like «*SystemApps*»} | Foreach {Add-AppxPackage -DisableDevelopmentMode -Register «$($_.InstallLocation)\AppXManifest.xml»}
- Get-AppXPackage -AllUsers |Where-Object {$_.InstallLocation -like «*Cortana*»} | Foreach {Add-AppxPackage -DisableDevelopmentMode -Register «$($_.InstallLocation)\AppXManifest.xml»}
- Get-AppXPackage -AllUsers |Where-Object {$_.InstallLocation -like «*ShellExperienceHost*»} | Foreach {Add-AppxPackage -DisableDevelopmentMode -Register «$($_.InstallLocation)\AppXManifest.xml»}

5. Reboot your computer and then check if the problem is resolved.
Method 14: Create a New User Account
Creating a new user account can help you determine if the problem is caused by a corrupted user profile or not. Simply put, if the error does not occur in the new user account, then this indicates that your user profile is corrupted. Otherwise, If the error still appears in the new profile, then the problem is in the operating system.
1. Press the Windows + I keys on your keyboard to open the Settings app. Then click on Accounts.

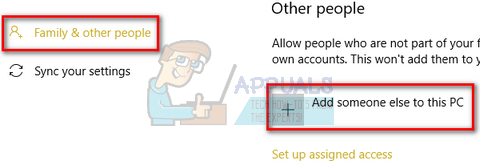
2. Select Family & other users on the left pane and then click Add someone else to this PC on the right.

3. Now, click I don’t have this person’s sign-in information to add a new local account.

4. Then click Add a user without a Microsoft account and follow the on-screen instructions to create the new account.

5. After account creation, right-click on the Start menu and select Shut down or sign-out > Sign-out. (or restart your PC and select the new account at the login screen)
6. After you have logged in to the new account, check if the problem persists and if so, login back in to your regular account and continue with the next method.* If not, transfer all files and settings from your regular account to the new one.
* Suggestion: If you have reached this point and the problem has not been fixed I would suggest you to preform a Windows 10 Repair/Upgrade rather than wasting more time trying the following methods.
Method 15. Disable Windows Push Notification Service «WpnUserService»
The «WpnUserService» (Windows Push Notification Services) is a Windows service that enables third-party developers to send notifications updates to their own apps.
Disabling this service can prevent the system from sending or receiving push notifications on the notification center, but it can correct the «Microsoft.Windows.ShellExperienceHost» and «Microsoft.Windows.Cortana» applications need to be installed correctly» error.
1. Press the Windows + R keys to open the Run dialog box.
2. In the run command box, type: regedit and press Enter.

3. From the left pane navigate to this key:
- HKEY_LOCAL_MACHINE\SYSTEM\CurrentControlSet\Services\WpnUserService.

4. At the right-pane, right-click on Start key and select Modify.

5. Change the value from 2 to 4 and click OK.
6. Then close the editor and restart your computer to see if the Start menu works properly. If not, follow the same steps to change the «Start» value back to «2» and then continue to next method.
Method 16. Reset DCOM Permissions.
DCOM (Distributed Component Object Model) is a Microsoft software component that allows COM objects to communicate with each other over the network.
If the DCOM permissions are corrupted, or incorrectly modified after installing an application or Windows update, this may result in the Start menu and Cortana search not working. To restore DCOM permissions, proceed as follows:
1. Open the Registry Editor and navigate to the following location:
- HKEY_LOCAL_MACHINE\SOFTWARE\Microsoft\Ole
2. At the right pane, delete the following REG_BINARY values (if exist):
-
- DefaultAccessPermission
- DefaultLaunchPermission
- MachineAccessRestriction
- MachineLaunchRestriction

3. Close the Registry Editor, restart your PC and check if the problem is resolved.
Method 17. Changes Permissions on «HKEY_CLASSES_ROOT» key.
Some users reported that after giving READ permissions to «ALL APPLICATION PACKAGES» on the «HKEY_CLASSES_ROOT» registry key, the problem is solved.
1. Open the Registry Editor.
2. Right-click on HKEY_CLASSES_ROOT and select Permissions.

2. Now check if ALL APPLICATION PACKAGES exist under «Group or Usernames» and have Read permissions (as in the screenshot below). If not, continue to next step, otherwise skip to next method.*
* Note: If ALL APPLICATION PACKAGES are present but without Read permissions, check the corresponding box (Read), click OK and then close Registry Editor and check if the problem is resolved.

3. If ALL APPLICATION PACKAGES missing under «Group or Usernames», click the Add button.

4. Type «ALL APPLICATION PACKAGES» under the objects name box and click Check Names and then OK.

6. Now select the ALL APPLICATION PACKAGES and click the Read permission checkbox (as in the above below). Then click OK, exit from Registry Editor and check if the problem is resolved.
Method 18. Delete the «Search» registry key-folder.
Another solution that can fix the Start menu and Search issues on Windows 10, is to delete all the current search settings. To do that:
1. Open the Registry Editor and navigate to the following location:
- HKEY_CURRENT_USER\SOFTWARE\Microsoft\Windows\CurrentVersion\Search
2. On the left pane, right-click on the Search folder and choose Delete. Click Yes to confirm your decision.

3. Close the Registry Editor, restart your PC and check if the problem is resolved.
Method 19. Repair Windows 10 with an in-place Upgrade.
The final method that usually works, to fix Windows 10 problems, is to perform a Windows 10 Repair-Upgrade, by using the detailed instructions on this article: How to repair Windows 10.
That’s it! Which method worked for you?
Let me know if this guide has helped you by leaving your comment about your experience. Please like and share this guide to help others.
If this article was useful for you, please consider supporting us by making a donation. Even $1 can a make a huge difference for us in our effort to continue to help others while keeping this site free:
- Author
- Recent Posts
Konstantinos is the founder and administrator of Wintips.org. Since 1995 he works and provides IT support as a computer and network expert to individuals and large companies. He is specialized in solving problems related to Windows or other Microsoft products (Windows Server, Office, Microsoft 365, etc.).
Windows Shell Experience Host is an official part of the Windows operating system. It is responsible for displaying all the universal applications in a windows interface. It also has the task to handle several graphical elements of the interface such as the taskbar transparency, the Start-Menu, the clock etc.
This process is one of the essential components of the Graphic User Interface of Windows and it is directly related to utilities such as the Start-Menu etc. Many users seem to have the problem where this application crashes and an error message comes forward. There are several methods to solve this issue. Start with the first and work your way down.
Solution 1: Updating your System Software
Many users reported that they solved their problem by updating their system software. The latest updates of Windows try to utilize your computer to the fullest by having increased features and user ease of access. For this purpose to be achieved, it is recommended that you have the latest version of all your system software. Furthermore, it is possible that the software is conflicting with the application, thus, causing the problem.
- Update your BIOS
- Chipset
- Power Management Drivers
- Graphics Software
- Windows Update
Each of these utilities are listed because users reported that updating these solved the problem for them. Make sure to update them accordingly before moving on to the technical solutions. Especially graphic software is known to cause problem with the service.
Solution 2: Running System File Checker
System File Checker (SFC) is a utility present in Microsoft Windows which allows the users to scan their computers for corrupt files in their operating system. This tool has been there in Microsoft Windows since windows 98. It is a very useful tool for diagnosing the problem and checking if any problem is due to corrupt files in windows.
We can try running SFC and see if our problem gets solved. You will get one of the three responses when running SFC.
- Windows didn’t find any integrity violations
- Windows Resource Protection found corrupt files and repaired them
- Windows Resource Protection found corrupt files but was unable to fix some (or all) of them
- Press Windows + R to launch the Run application. Type “taskmgr” in the dialogue box and hit Enter to launch your computer’s task manager.
- Now click on File option present at the top left side of the window and select “Run new task” from the list of options available.
- Now type “powershell” in the dialogue box and check the option underneath which states “Create this task with administrative privileges”.
- Once in the Windows Powershell, type “sfc /scannow” and hit Enter. This process may take some time as your entire Windows files are being scanned by the computer and being checked for corrupt phases.
- If you encounter an error where Windows states that it found some error but was unable to fix them, you should type “DISM /Online /Cleanup-Image /RestoreHealth” in the powershell. This will download the corrupt files from the Windows update servers and replace the corrupt ones. Do note that this process can also consume some time according to your internet connection. Don’t cancel in any stage and let it run.
If an error was detected and was fixed using the above methods, restart your computer and check if the taskbar started working normally.
Solution 3: Re-registering the Start-Menu
We can also try re-registering the start menu from an application package present in your Windows Operating System. This will re-register all the default application on your computer.
- Press Windows + S to launch the search bar. Type “PowerShell” in the dialogue box, right-click on the application which comes forth and select “Run as administrator”.
- Once in PowerShell, execute the following command by copy/pasting it and pressing Enter.
Get-AppXPackage | Foreach {Add-AppxPackage -DisableDevelopmentMode -Register “$($_.InstallLocation)\AppXManifest.xml”}

- Restart your computer and check if the problem at hand got solved.
Solution 4: Making a New Account
You can ask the administrator to make you a new account or if you access to the administrative account, you make a new one yourself. We can guide you on how to make a new account so all the account settings in the new will be the same as your current account. This way you won’t feel any difference and also fix the problem.
Note: If you have another account/accounts present on your computer, copy their data to a storage device and delete their accounts (if the problem is occurring in all the accounts). If the problem lies with just one account, don’t delete them and proceed with the following method.
- First to boot your computer in safe mode.
- Open an administrator account. Type Settings in the start menu dialogue box and click on Accounts.
- Now click “Family and other users” options present at the left side of the window.
- Once inside select the menu, select “Add someone else to this PC”.
- Now Windows will guide you through its wizard on how to create a new account. When the new window comes forth, click “I don’t have this person’s sign-in information”.
- Now select the option “Add a user without Microsoft”. Windows will now prompt you to make a new Microsoft account and display a window like this.
- Enter all the details and chose an easy password which you can remember.
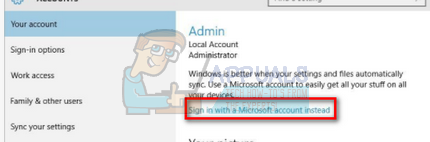
- Now navigate to Settings > Accounts > Your Account.
- At the space beneath your account picture, you will see an option which says “Sign in with local account instead”.
- Enter your current password when the prompt comes and click on Next.
- Now enter username and password for your local account and click on “Sign out and finish”.
- Now you can easily switch to a new local account, and move all your personal files to it without any barriers.
- After switching to the local account, check if the problem still persists. If it doesn’t and everything is going smooth, proceed with the instructions.
- Now navigate to Settings > Accounts > Your Account and select the option “Sign in with a Microsoft Account instead”.
- Enter your username and password and click Sign in.
- Now you can safely delete your old account and continue using this one.
Kevin Arrows
Kevin Arrows is a highly experienced and knowledgeable technology specialist with over a decade of industry experience. He holds a Microsoft Certified Technology Specialist (MCTS) certification and has a deep passion for staying up-to-date on the latest tech developments. Kevin has written extensively on a wide range of tech-related topics, showcasing his expertise and knowledge in areas such as software development, cybersecurity, and cloud computing. His contributions to the tech field have been widely recognized and respected by his peers, and he is highly regarded for his ability to explain complex technical concepts in a clear and concise manner.
Sometimes, when we open the Windows Task Manager & we find the
message like Windows shell experience host suspended.
But, How to fix the shell experience host suspended issue? First, let’s understand what the Windows shell experience host is?
& Why does shellexperiencehost.exe crash?
NOTE: The above article is updated till January 2025, so all
9 methods are working fine for Windows 10 & 11!
Windows shell experience host is also called ShellExperienceHost.
It is a software program that runs in the background and controls all
tasks along with taskbar functions like
Start, Search, Notification Center, & other Graphical tools on
Windows, etc.
It is Microsoft Windows’s system in-built process that is required and
must be running all the time to provide a Graphical view of the All
Universal Windows app.
Why shellexperiencehost.exe is failing & crashing?
There are multiple reasons why the Windows Shell experience host AKA shellexperiencehost.exe is crashing. Below are probable reasons for its failing situation:
1. Balanced or Battery saver Power Plan
You could have seen the message in Task Manager when you hover over the Windows Shell Experience host Background process — «This UWP process group is suspending process to improve system performance».
Because your Power plan is set either to Balanced or Battery saver. You need to change it to High performance.
It’s just closing the Shell Experience Host process to save the power. You don’t need to worry about this. It’s quite normal behavior of Windows OS.
2. Corrupted Windows or other files
It’s the primary reason for failing the ShellExperienceHost if the Power plan and all are fine.
If any of
the Shell Experience Host-related apps or features interact with these
corrupted files, it gonna be creating issues with the Shell Experience
Host.
Sometimes, due to a corrupted Hard Drive can also create this
issue.
3. Third-party application conflicts
After installing buggy or incompatible(not made for your PC or PC
architecture) software or Windows applications, it gets conflicted with
Windows features like Start, Search, Notification Center, & other
Graphical tools, if that application is also using or dealing with these
features.
These apps & features are controlled by ShellExperienceHost. So, it
also gets affected.
4. Windows Updates
Always keep in mind that Windows or any other Operating system is not
stable. It always brings bugs, errors, vulnerabilities, loopholes.
Such buggy apps and features themself create a mess within Windows apps.
That not only creates issues in the Windows Shell experience host but in
others too.
5. Virus Attack
Windows shell experience host has some vulnerabilities. New viruses,
Trojans, and malware can attack using these loopholes.
There is the possibility that your PC is affected by a Virus
attack.
6. Windows desktop home background picture & accent color
Maybe your Current desktop screen background picture & accent color
are using too much CPU and impacting the Shell Experience host.
When I had the ShellExperienceHost suspension issue, this was the
reason for me.
7. High CPU Usage
It’s also one of the reasons for the Misbehaving of the Windows shell
experience host. Just try to reduce the Windows CPU load by closing some
unnecessary applications.
If that’s not working, then try some steps that you’ll find at the end of
this tutorial.
Impacts of ShellExperienceHost suspension
Due to the «Windows shell experience host suspended«, we can’t use any of Microsoft’s UWP applications.
Some desktop applications will work (or partially work), but UWP-based
apps like Microsoft Edge, Modern File Manager, Windows settings, and
others can’t work anymore.
Sometimes, the entire Taskbar gets frozen and we are not able to see
Taskbar features like Wifi, battery status, speaker & so on.
That problem was noticed by Windows users after the arrival of Windows
10. Because Microsoft introduced the Windows Shell experience host program
in it.
Then how do we solve the Windows shell experience host suspended or stopped working issue?
Don’t worry, because it’s a common behavior in Windows sometimes. So, let’s
start with the steps to fix the issue.
How to fix «Windows shell experience host suspended or stopped running
or not working»?
Here I have given proven 8 methods that will definitely work
on Windows shell experience host not responding issues.
FIX 1: Check for Windows updates & Keep your Windows up to
date
Updating the Operating system and other software is the first priority
in such conditions. Sometimes updates fix these issues.
- Open your Windows settings and search for ‘Check for update‘ or ‘Windows Update‘.
-
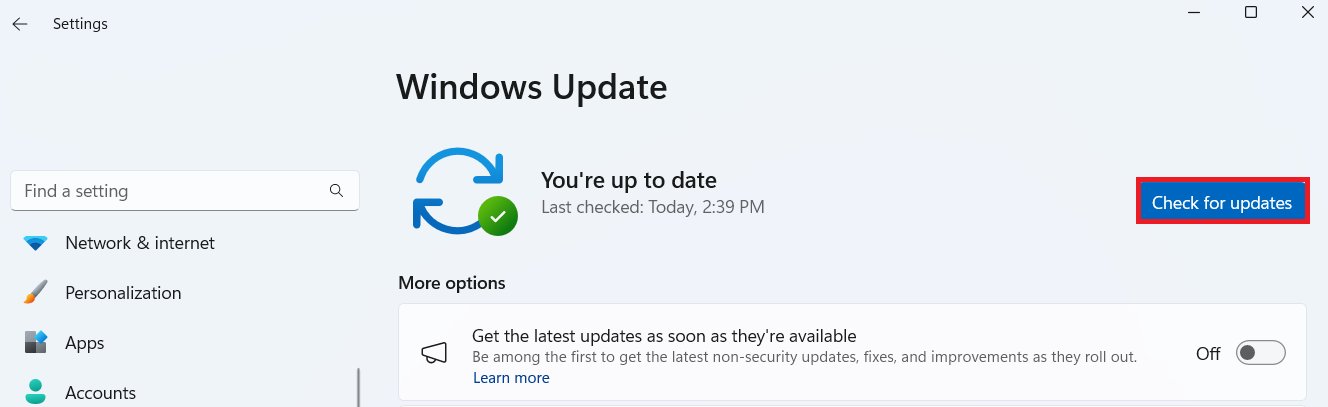
Now press on the Check for Update button, Now
it will fetch the update if available - You will receive a Windows update(as shown in the picture)
-
Just download and install it. See if it solves your issue or
not.
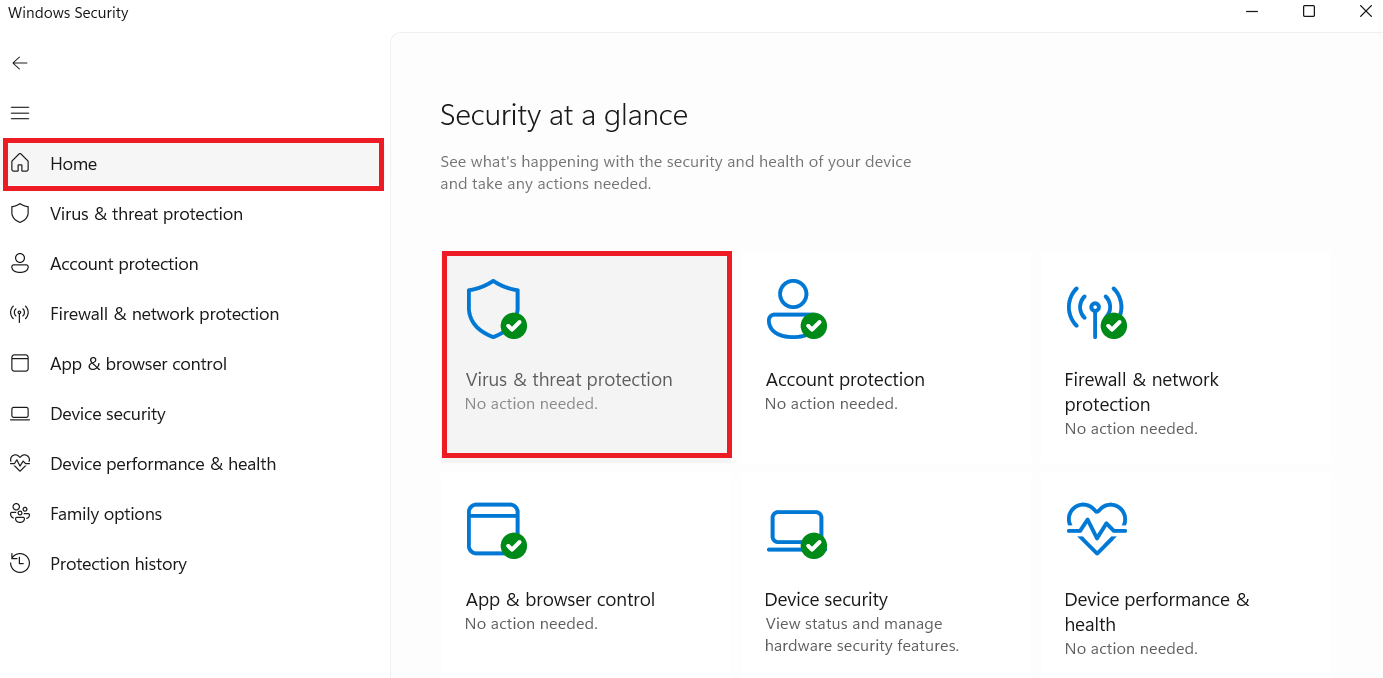
FIX 2: Perform an Antivirus scan
Keep your antivirus up to date or upgrade your Windows to the latest
version.
The latest version of Windows provides more stable virus protection
with fewer vulnerabilities. You can also use any other paid antivirus to
check for viruses and malware.
Do a full system scan on your PC. It will scan the entire PC and find
if any virus or trojan is present or not. If the antivirus finds any
malware, it will remove the infected file from your system.
FIX 3: Uninstall or disable recently installed Apps(3rd party)
Consider that the issue you are facing right now is happening because
of a recently installed 3rd-party app.
Self-analyze what applications you’ve manually installed within the
last 7 days or from when you’re facing the ShellExperienceHost suspended issue.
Uninstall it and reboot your device. Now, check whether the issue is
resolved or not.
If the installed application is critical to you or has data saved
within its storage, you can simply disable it and then repeat the same
process.
FIX 4: Disable background slideshow & automatic accent color
Disabling the background & automatic accent color can fix the shell
experience host problem.
I Personally fixed these issues by disabling the background slideshow
& automatic accent color settings.
Using fixed background wallpaper and accent color will solve Windows shell experience not responding issues.
Using fixed background wallpaper and the accent color is also a good practice
that lowers CPU usage and power consumption.
- Open your Windows settings and search for ‘personalization‘ in which you can find background & colors
- Switch the background from Slideshow to picture. Browse and set the picture you want
- Uncheck automatically pick an accent color from my background option from choose your accent color section
- That’s it! you have done with both settings
FIX 5: Perform system file checker scan
Running system file checker scan checks for corrupted files in every
system folder. So, performing a file checking scan will also check the
Windows shell experience host folder and corrupted file if
exists!
-
Open the search bar and search for Powershell. Run it
as an administrator - Then type sfc /scannow & press Enter
- Now, wait until it completely checks all folders
FIX 6: Perform SFC with DISM Commands
You have tried SFC Command but still not working? you can put DISM
Commands that may fix Windows Shell experience host suspended
error.
Sometimes, the error may be because of the Bad sectors in Hard
drives. In such conditions first, we need to Fix all of those
BAD SECTOR errors from Hard drives.
And here DISM tool helps to fix those errors.
- Open search and type CMD or Powershell.
- Run CMD or Powershell as Administrator.
- SFC/scannow and Enter. Now, wait until it ends.
- Now, type DISM /Online /Cleanup-Image /ScanHealth wait a few minutes, and type DISM /Online /Cleanup-Image /Restorehealth.
- Now after it completes scanning, restart your PC or Laptop.
FIX 7: Reset the Windows start menu
Resetting the start menu may also fix your issue because the start menu is controlled by the Windows shell experience host. Just apply the script which will reset the start menu.
-
Open the search bar and search for Powershell. Run it
as an administrator - Now put the following code in Powershell
Get-AppxPackage Microsoft.Windows.ShellExperienceHost | Foreach

            {Add-AppxPackage -DisableDevelopmentMode -Register

            “$($_.InstallLocation)\AppXManifest.xml”}
FIX 8: Create a new user profile
If nothing works, you can create a new user profile that might solve
your Windows shell experience host problem.
-
Open the search bar and search for Accounts. Then
select Family & Other Users.

- Now click on Add someone else to the PC
- Then click on I don’t have this person’s sign-in information
- Now click on Add a user without a Microsoft account

- Then add your details, password, and other stuff
Now sign out of the current account and log in to the newly created one!
How to fix «Windows shell experience host high CPU»?
If you facing any issue related to the shell experience host has high CPU usage and is eating a high amount of CPU & disk usage.
Here you can follow methods to resolve the High CPU usage
problem.
Sometimes, the Shell experience host high CPU usage may become a reason for the Windows shell experience host suspended.
Trying to fix one issue may solve both issues.
1. First search and open CMD (Command prompt) as
Administrator. Now type the following command on CMD
>net user administrator /active:yes
2. Now search & open System Configuration, Switch to
the Boot tab and tick Safe boot, and proceed. It will
restart your PC/laptop/computer & boot in safe boot mode

3. Now just sign out of that account and switch to an administrator
account in safe boot mode
4. Follow the path(as shown in the picture) and enable Show Hidden files/folders

5. Now open the file manager and open the folder from the
path
C:\Users\[your_pc_name]\AppData\Local\Packages.
6. Search for the folder name Microsoft.Windows.ShellExperienceHost_cw5n1h2txyewy and rename it and add the .BAK file
extension
7. Search & open System Configuration, Switch to the Boot tab, and untick Safe Boot and Apply to proceed
Now sign out from an Administrator account and sign in to your
account.
Done!
FAQs:
Why Windows Shell experience host is taking too much memory?
: It’s one of the heaviest & important Processes within the Windows
ecosystem.
It handles all the tasks of the Taskbar like notification center, Start
menu, Cortana search, and other Taskbar & Toolbar settings.
Can I disable the Windows Shell experience, host?
: No! You can’t disable the Windows shell experience host program or
process. It’s a mandatory process needed to run the Taskbar & its features.
If you disable the Windows shell experience host, it will close the
entire taskbar and we’ll not be able to use it.
Is Windows shell a Virus?
: No. Windows shell is not a Virus. Windows shell AKA Windows shell experience host is a program
that helps in keeping the taskbar running to do necessary tasks.
However, virus programs can have the same names as a Windows shell or any other name.
Conclusion
Windows is a more stable OS but, still has some bugs and issues.
Windows Shell experience host issue is one of them. But, we have
done an analysis of the root cause and suggested you best
methods.
All the mentioned methods are proven and personally tested. It will
definitely help to fix the issue on the Windows shell experience host suspended or not responding & the high CPU usage issue is also
fixed.
If you have any queries regarding this article guide, feel free to ask
in the comments. I will definitely help you to solve your problem.
Table of contents
- What Is the Windows Shell Experience Host?
- How to Fix the Windows Shell Experience Host High CPU Usage
- Method 1: Update your operating system
- Method 2: Turn off automated accent colors
- Method 3: Disable slideshow background
- Method 4: Disable transparency effects
- Method 5: Check if the Shell Experience Host is malware
- Method 6: Run an SFC scan
- Method 7: Set a CPU usage limit for ShellExperienceHost.exe
- Method 8: Delete recently installed applications
- Method 9: Boot Windows in a clean environment
- Causes of the High Windows Shell Experience Host CPU Usage
- The Windows Shell Experience Host High CPU Usage: Fixed
- FAQ
If you experience the high Windows Shell Experience Host CPU usag e occasionally, it’s usually not a big deal if it resolves quickly. However, if it starts affecting your system’s performance, triggers crashes, or makes Windows nearly unusable, you need to fix it right away. Of course, regardless of the severity, you need to get to the bottom of it before it gets worse. If your memory usage is high because of the W indows Shell Experience Ho st, I have the right solution for you. Let’s begin.
What Is the Windows Shell Experience Host?
The Windows Shell Experience Host, also known as ShellExperienceHost.exe, is the Windows component responsible for the window display feature of universal Windows applications.
It is the component of the Windows shell (basically, the graphical user interface on Windows) that specifically handles universal apps.
The Windows Shell Experience Host process handles universal app interface behavior concerning elements like the taskbar, Start menu transparency, calendar, clock, background behavior, etc.
Important
Normally, you won’t even notice that the Windows Shell Experience Host exists.
This is because it is not designed to be noticed. It typically consumes little to no CPU resources. In fact, it usually doesn’t use anywhere near the amount of processor resources reported by annoyed users.
How to Fix the Windows Shell Experience Host High CPU Usage
If you are having a “Windows Shell Experience Host suspended” issue, use the methods discussed below to resolve the problem:
Method 1: Update your operating system
Being on the latest version of Windows can help solve many bugs and glitches in earlier versions.
So, make sure that you have installed all available OS updates. Some minor updates contain bug fixes and patches for system errors.
Here’s how to check for updates for your OS:
Windows 10
- Right-click the Start menu icon and select Settings to launch the Settings app.
- On the main Settings screen, select Update & Security .
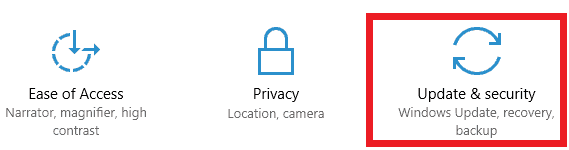
- Switch to the Windows Update tab on the Update & Security screen and click the Check for updates button.
- The OS will check the Windows Update servers and download any available updates.
- After downloading the updates, you can reboot your system to start installing them or schedule the reboot for later.
With the latest OS installed, ShellExperienceHost.ex e and other system processes should no longer use more than the expected CPU percentage. Windows 11
- Open the Settings window and select Windows Update.
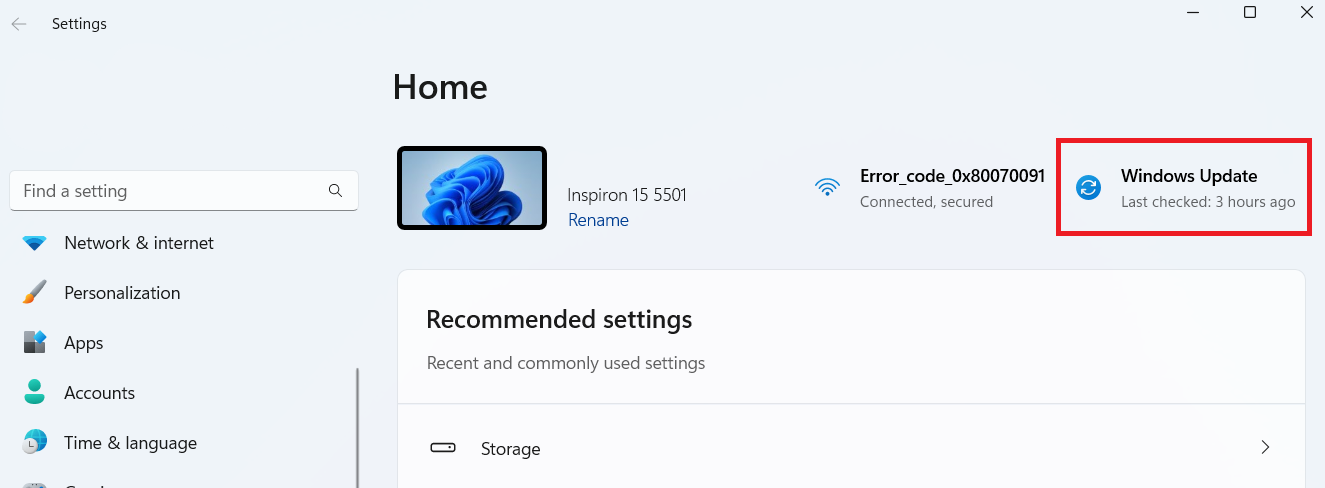
- Click on Check for updates to install any available updates.
Related: Timeline of All Windows OS Versions: From Start to Now
Method 2: Turn off automated accent colors
The Shell Experience Host process makes visual changes to your desktop and its background. The more changes are made on the desktop, like creating custom themes , the more work the process has to do and the more CPU it uses. This may be the cause of the S hell Experience Host’s high CPU usa ge on PCs whose desktop background is a slideshow.
In addition, your PC picks a new accent color by default to match the new background image. And that makes the process even more complicated.
Try turning off automatic accent colors to lessen the CPU consumption. Here’s how to do it:
- Press
Windows + Ito open the Settings window. - On the main Settings screen, select Personalization .
- Then, switch to the Colors tab.
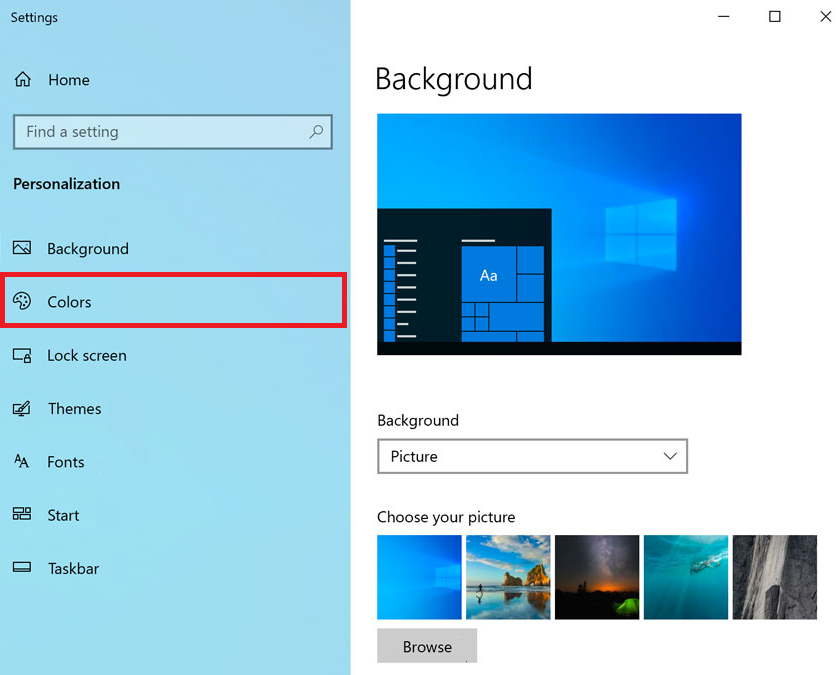
- Scroll down the Colors tab to the Choose your accent color section.
- Untick the Automatically pick an accent color from my background checkbox.
- Exit the Settings app and check the CPU usage of ShellExperienceHost.exe in Task Manager after a few minutes.
- Your issue has been fixed if the Shell Experience Host process now uses a moderate to low CPU percentage.
However, if the CPU usage by S hellExperienceHost.exe keeps jumping, try the next solution.
Method 3: Disable slideshow background
If turning off automatic accent colors doesn’t help, changing your background style altogether may yield a better result.
You can switch the slideshow style to a solid color or choose a static picture instead. Since either alternative is fixed, the W indows Shell Experience Hos t will have less work to do, and this can stop the 100% CPU usage .
Follow the steps below for Windows 11:
Note
Windows 10 also has a similar process to turn off your slideshow background.
- Launch your Settings app by pressing
Windows + I. - On the main Settings screen, select Personalization , and click on Background .
- Click on Picture or downward arrow to expand the options and select Solid color or Picture .
Check the process in Task Manager after a few minutes. If the Shell Experience Hos t process now uses a moderate to low CPU percentage, the problem has been fixed.
Method 4: Disable transparency effects
Another reason you could be experiencing too much CPU usage on the Windows Input Experience is the transparency effects. Try turning it off to see if that fixes the problem:
Windows 10
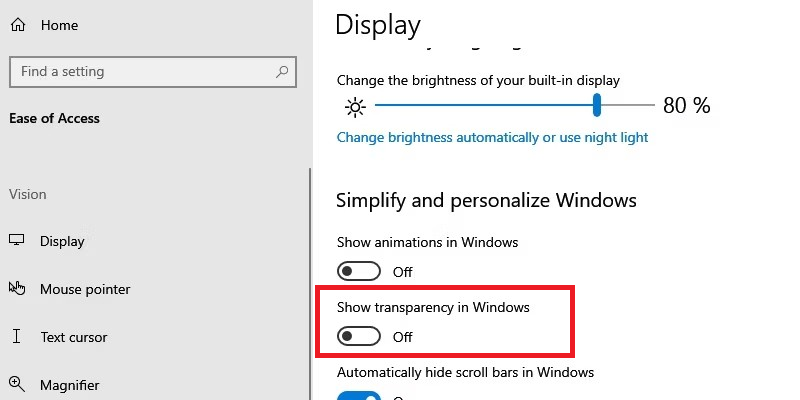
- Open the Settings window and head to System .
- Select Ease of Access and select Display .
- There, you should see a Show transparency in Windows toggle.
- Turn it off if it’s on.
Windows 11
- Press
Windows + Ion your keyboard to open the Settings app. - Scroll down and select Accessibility .
- Then, choose Visual effects .
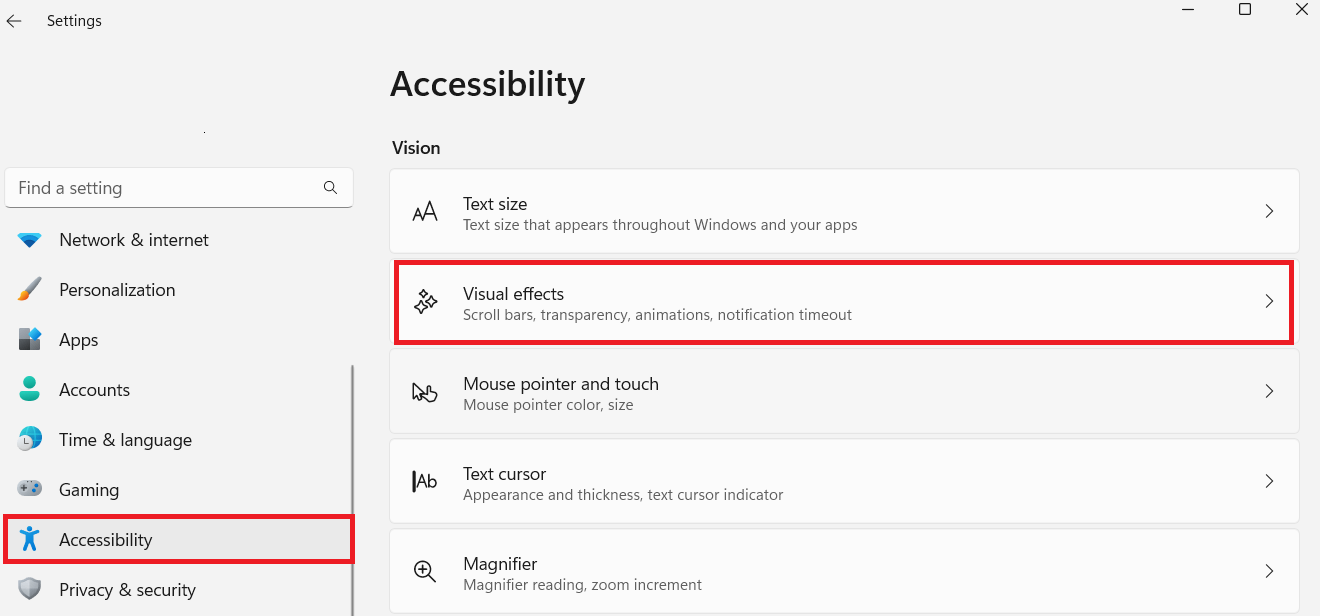
- Toggle the On/Off button beside Transparency effects to disable it.