
В параметрах графики Windows 11 и Windows 10 (начиная с обновления в мае 2020) присутствует функция «Планирование графического процессора с аппаратным ускорением», призванная снизить задержки в играх и других графически интенсивных приложениях.
В этом материале о том, что делает функция планирования GPU, включать ли её и как включить планирование графического процессора с аппаратным ускорением.
Что делает функция и стоит ли включать её
Планирование графического процессора с аппаратным ускорением призвано снять часть нагрузки с центрального процессора, что, в некоторых случаях, может улучшить общую производительность в играх, а главное — снизить инпут-лаг (задержку при вводе).
Стандартно (без использования функции) планирование команд и их отправка для GPU (видеокарты) выполняется процессором с помощью планировщика WDDM, при этом команды отправляются не по одной, а пакетами (буферизация кадров). Это позволяет улучшить частоту кадров, но может приводить к задержкам ввода в играх: то есть отклик на действие пользователя происходит при отправке следующего пакета.
Планирование графического процессора с аппаратным ускорением снимает часть выполняемых процессором задач и передает их на обработку планировщику видеокарты. В случае, если узкое место вашего компьютера — это процессор, либо какие-то из игр нагружают его на 100%, включение рассматриваемой функции может быть полезным: но для каждого конкретного случая изменения будут заметными. Это лучше проверить самостоятельно, результат может отличаться в зависимости от игры и конкретной системы: например, тесты показывают, что результат тем лучше, чем мощнее используемая видеокарта.
Эффект от включения функции может проявиться не только в снижении инпут-лага и производительности в играх: в некоторых случаях этого можно и не наблюдать, но получить снижение нагрузки на процессор и его температуры в играх.
Как включить планирование графического процессора с аппаратным ускорением в Windows 11 и Windows 10
Для того, чтобы функция была доступна для включения, должны выполняться следующие условия:
- Установлена Windows 11 или Windows 10 с обновлением компонентов от мая 2020 года.
- Компьютер оборудован видеокартой NVIDIA GeForce 10-й или более новой серии, AMD Radeon RX 5600 или более новой.
- Установлены драйверы видеокарты, желательно — новые.
Параметры
Для того, чтобы включить планирование графического процессора с аппаратным ускорением в Параметрах, достаточно выполнить следующие шаги:
- Нажмите правой кнопкой мыши по рабочему столу и выберите пункт «Параметры экрана».
- В Windows 11 нажмите «Графика» в разделе «Сопутствующие параметры», а в Windows 10 — «Настройки графики» ниже раздела «Несколько дисплеев».

- В Windows 11 дополнительно перейдите в раздел «Изменение стандартных параметров».
- Включите опцию «Планирование графического процессора с аппаратным ускорением».


Если переключатель для включения функции отсутствует, это может говорить о том, что на компьютере отсутствует подходящее оборудование с её поддержкой, либо не установлены актуальные драйверы дискретной видеокарты NVIDIA или AMD.
Редактор реестра
Ещё одна возможность включить функцию — реестр Windows:
- Нажмите клавиши Win+R на клавиатуре, введите regedit и нажмите Enter.
- В открывшемся редакторе реестра перейдите к разделу
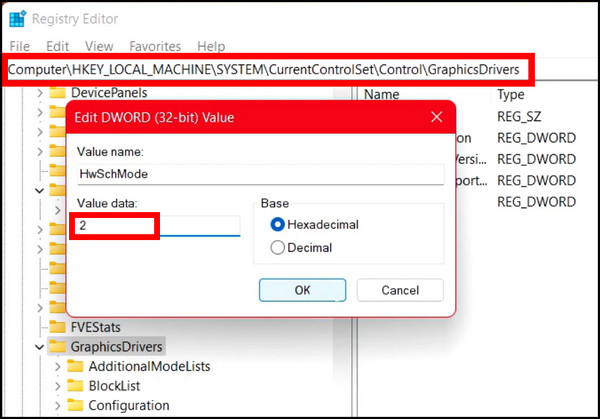
HKEY_LOCAL_MACHINE\SYSTEM\CurrentControlSet\Control\GraphicsDrivers
- Нажмите правой кнопкой мыши в правой панели редактора реестра и создайте новый параметр DWORD (32-бит) с именем HwSchMode
- Дважды нажмите по параметру и задайте значение 2 для него, сохраните изменения.
- Закройте редактор реестра и перезагрузите компьютер.
Подводя итог: если вы не знаете, стоит ли включать планирование GPU с аппаратным ускорением в Windows, лучший способ определить это — попробовать включить и посмотреть, как изменится отзывчивость игры на ввод, а также нагрузка на процессор и его температура. Если окажется, что выгоды от включения заметны, стоит оставить функцию включенной. Кроме этого, следует учитывать, что в разных играх результат может отличаться.
Что такое HAGS или аппаратный планировщик графического процессора?
HAGS это аппаратный планировщик графического процессора с аппаратным ускорением в Windows 10 и 11 — это новая системная функция, добавленная начиная с Windows 10 версии 2004 позволяющая видеокарте самостоятельно управлять распределением своей видеопамяти.
Функция доступна только для определенных видеокарт и требует последних версий драйверов (например, текущая серия Nvidia RTX 4000 и видеокарты серии RTX 3000, RTX 2000, GTX 1000). Статья создана при поддержке сайта mighty-handful.ru, prostrimer.ru, prostreamer.ru и групп VK OBS Studio | PROстример | Проф. стример, PROstrimer, время на создание статьи — бесценно.
HAGS и проблемы с OBS Studio
В настоящее время ресурсу PROstrimer известно, что «HAGS» вызывает проблемы с захватом в OBS Studio и производительности в играх, например, такой как Overwolf. Это новая и экспериментальная функция, и в настоящее время рекомендуется её отключить.
Так же известно, что «HAGS» используется в видеокартах Nvidia RTX 4000 серии для работы DLSS 3+ известные проблемы с захватом в OBS Studio, могут наблюдаться следующие проблемы:
- Зависание программы.
- Падение битрейта до 0.
- Падение битрейта до 0 с последующим зависанием программы.
- Невозможность записи видеофайла свыше 50 кадров в секунду.
Проблемы в играх:
- Страдает производительность в игре и ухудшается инпут.
Информация! Статья содержит обобщённые правила по устранение пропуска кадров кодирования в программе OBS Studio, которые получены в ходе настроек и решений проблем во время трансляций., подробнее:
«OBS Studio. Пропуск кадров кодирование»
Как отключить HAGS в Windows 10 — 11
Чтобы отключить планировщик графического процессора с аппаратным ускорением, выполните следующие действия. В операционной системе Windows 10 выберите «Все параметры» → «Система» → «Дисплей» → прокрутите вниз до раздела «Настройки графики» → Установите для параметра «Планирование графического процессора с аппаратным ускорением» → установите значение «Откл» и перезагрузите ПК.
В Windows 11 перейдите в «Параметры» → «Дисплей» → прокрутите вниз до раздела «Графика» → «Изменить стандартные параметры графики» → «Планирование графического процессора с аппаратным ускорением» → установите значение «Откл» и перезагрузите ПК.
Дополнительно
DMCA ID 276, Авторство
Вкладка содержит ссылки на файлы для спорного контента. Файлы не предназначены для скачивания и просмотра.
Для создания некоторых статей нанимались копирайтеры, некоторые статьи могут оказаться совершенно некомпетентными, но они дорабатываются и обновляются лично автором сайта и приводятся в надлежащий вид, в рамках свободного от основной работы время. (Более для написания статей копирайтеров нанимать не планируем)
- drive google:
- web archive:
- vk.com:
Quick Links
-
What Is Hardware-Accelerated GPU Scheduling?
-
Should You Enable Hardware-Accelerated GPU Scheduling?
-
What You’ll Need to Make This Feature Work
-
Turn On Hardware-Accelerated GPU Scheduling in Windows 10
-
Enable Hardware-Accelerated GPU Scheduling in Windows 11
Summary
- Hardware-Accelerated Scheduling reduces the load on your CPU and can improve your PC’s performance.
- To enable it on Windows 10, head into Settings > System > Display > Graphics Settings and toggle on «Hardware-Accelerated GPU Scheduling.»
- On Windows 11, navigate to Settings > System > Display > Graphics > Change Default Graphics Settings and enable «Hardware-Accelerated GPU Scheduling.»
Windows 10 and Windows 11 come with an advanced setting, called Hardware-Accelerated GPU Scheduling, which can boost gaming and video performance using your PC’s GPU. We’ll show you how to enable the feature and thereby potentially get a performance increase.
What Is Hardware-Accelerated GPU Scheduling?
Usually, your computer’s processor offloads some visual and graphics-intensive data to the GPU to render so that games, multimedia, and other apps run smoothly. The CPU gathers the frame data, assigns commands, and prioritizes them one by one so that the GPU can render the frame.
With the Hardware-Accelerated GPU Scheduling feature, the GPU’s scheduling processor and memory (VRAM) take over the same work and runs it in batches to render the frames. This allows your GPU to reduce the load on your CPU and improve latency, potentially making your PC run better.
Should You Enable Hardware-Accelerated GPU Scheduling?
If you have a supported graphics card, it’s a good idea to enable GPU scheduling as it helps improve your computer’s overall performance. You’ll likely see performance improvements when you’re running resource-intensive tasks, such as video editing or gaming.
The only reason you shouldn’t use this feature is if you experience any issues after enabling it. If your apps suddenly stop working or you have graphics-related problems after turning it on, then GPU scheduling is best left disabled. Fortunately, disabling the feature after testing it is as easy as turning it on.
What You’ll Need to Make This Feature Work
Though this feature debuted with Windows 10 May 2020 Update, it still comes disabled in Windows 10 and Windows 11. Also, your computer needs to have an NVIDIA (GTX 10-series and later) or AMD (5600 series or later) graphics card with the latest graphics driver.
Unfortunately, there is not yet any specific hardware combination (CPU and GPU) known to eke out the best performance using the feature. So, your mileage may vary depending on the CPU, GPU, and graphics drivers on your PC.
Here’s how you can enable it on your Windows 10 and 11 PC. It’s a good idea to update the graphics drivers on your PC before you begin.
Turn On Hardware-Accelerated GPU Scheduling in Windows 10
There are two ways to enable Hardware-Accelerated GPU Scheduling on Windows 10: use the Settings app or the Registry Editor. Both accomplish the same thing, though the Settings app is much easier.
Using Settings
Start by launching the Settings app on your PC. You can do this by pressing Windows+i.
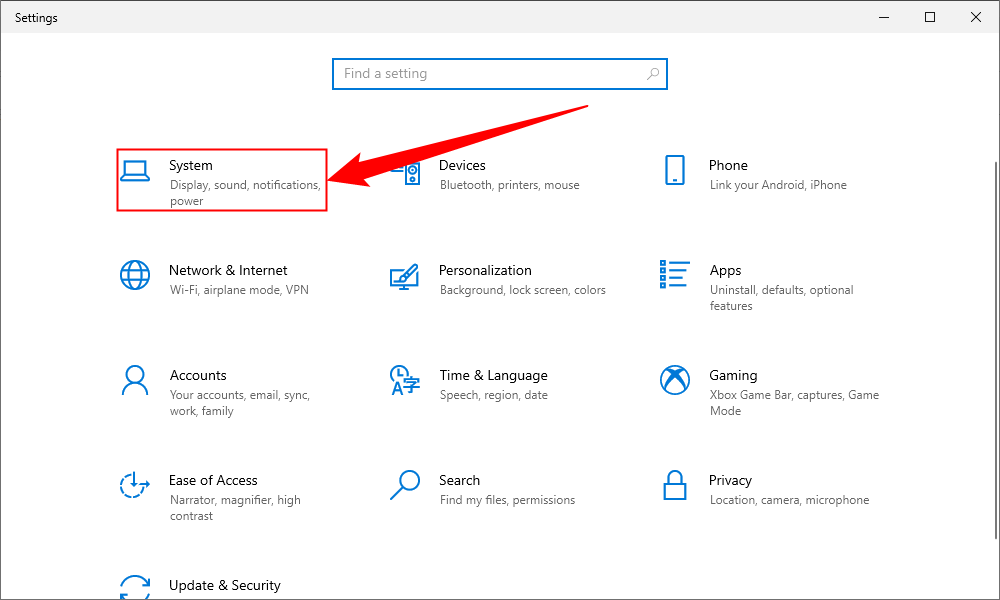
In Settings, select «System.»
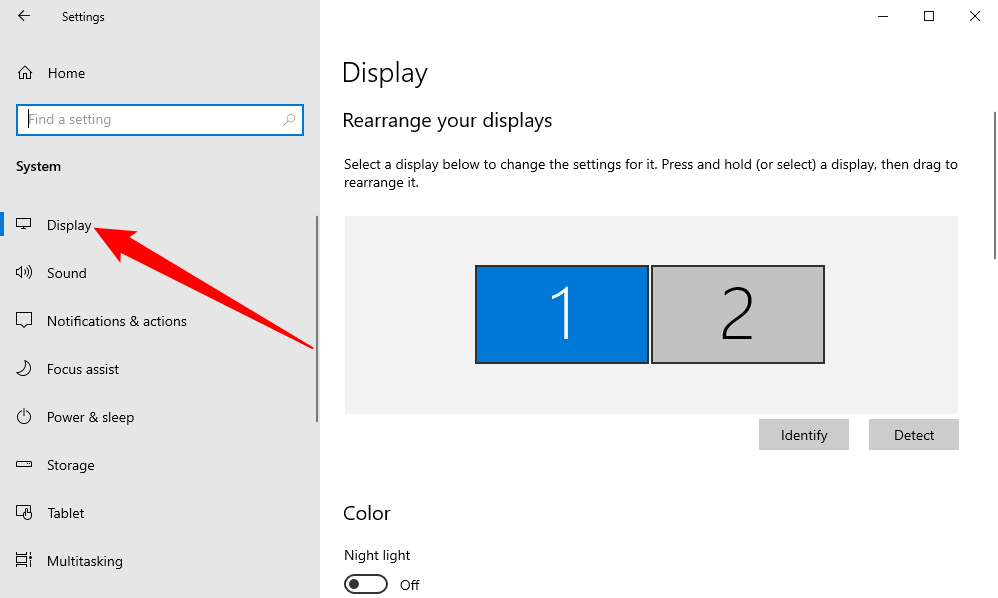
In the sidebar on the left, click «Display.»
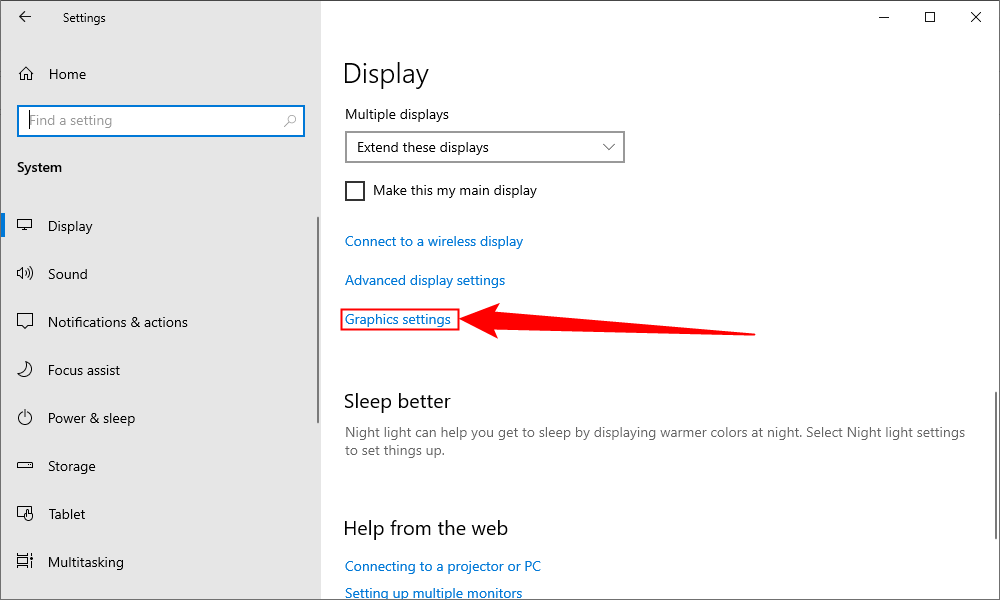
On the right pane, at the bottom, choose «Graphics Settings.»
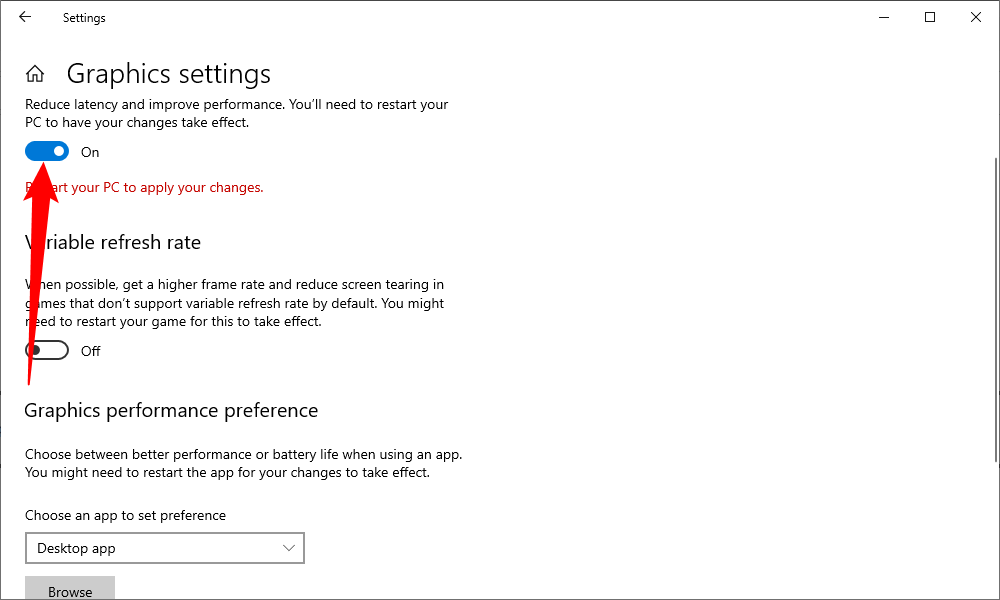
On the following screen, toggle on the «Hardware-Accelerated GPU Scheduling» option.
To disable the feature in the future, simply toggle off the «Hardware-Accelerated GPU Scheduling» option again.
Close the Settings app and reboot your PC to bring your changes into effect.
Using the Registry Editor
To enable Hardware-Accelerated GPU Scheduling via the Registry Editor, open the Run box by pressing Windows+R, then type the following and press Enter:
regedit
In the User Account Control prompt that opens, select «Yes,» since it’s necessary to make changes to the registry.
When the Registry Editor opens, in the path box at the top, type the following and press Enter:
Computer\HKEY_LOCAL_MACHINE\SYSTEM\CurrentControlSet\Control\GraphicsDrivers
In the pane on the right, double-click «HwSchMode.»
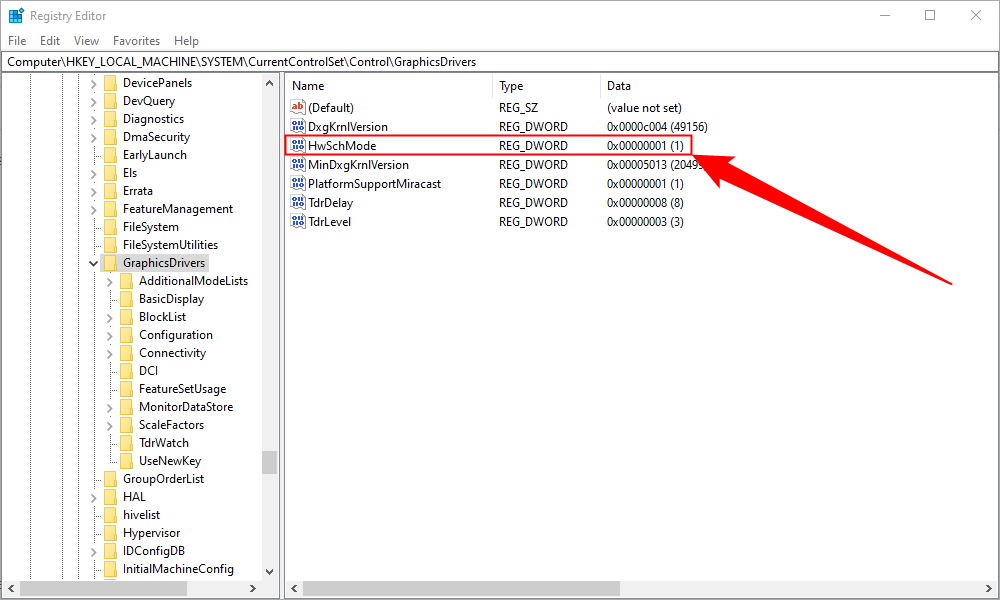
On the entry edit box, select the «Value Data» field and enter 2. In the «Base» section, choose «Hexadecimal.» Then, select «OK.»

In the future, to disable the feature, enter 1 in the «Value Data» field, choose «Hexadecimal,» and select «OK.»
Close Registry Editor, restart your PC, and you have Hardware-Accelerated GPU Scheduling enabled on your computer. Enjoy!
Enable Hardware-Accelerated GPU Scheduling in Windows 11
To enable the GPU scheduling in Windows 11, press Windows+i to open the Settings app. Go to the «System» section, then select the «Display» option from the right-hand side.

From the «Related Settings» section, select «Graphics.»
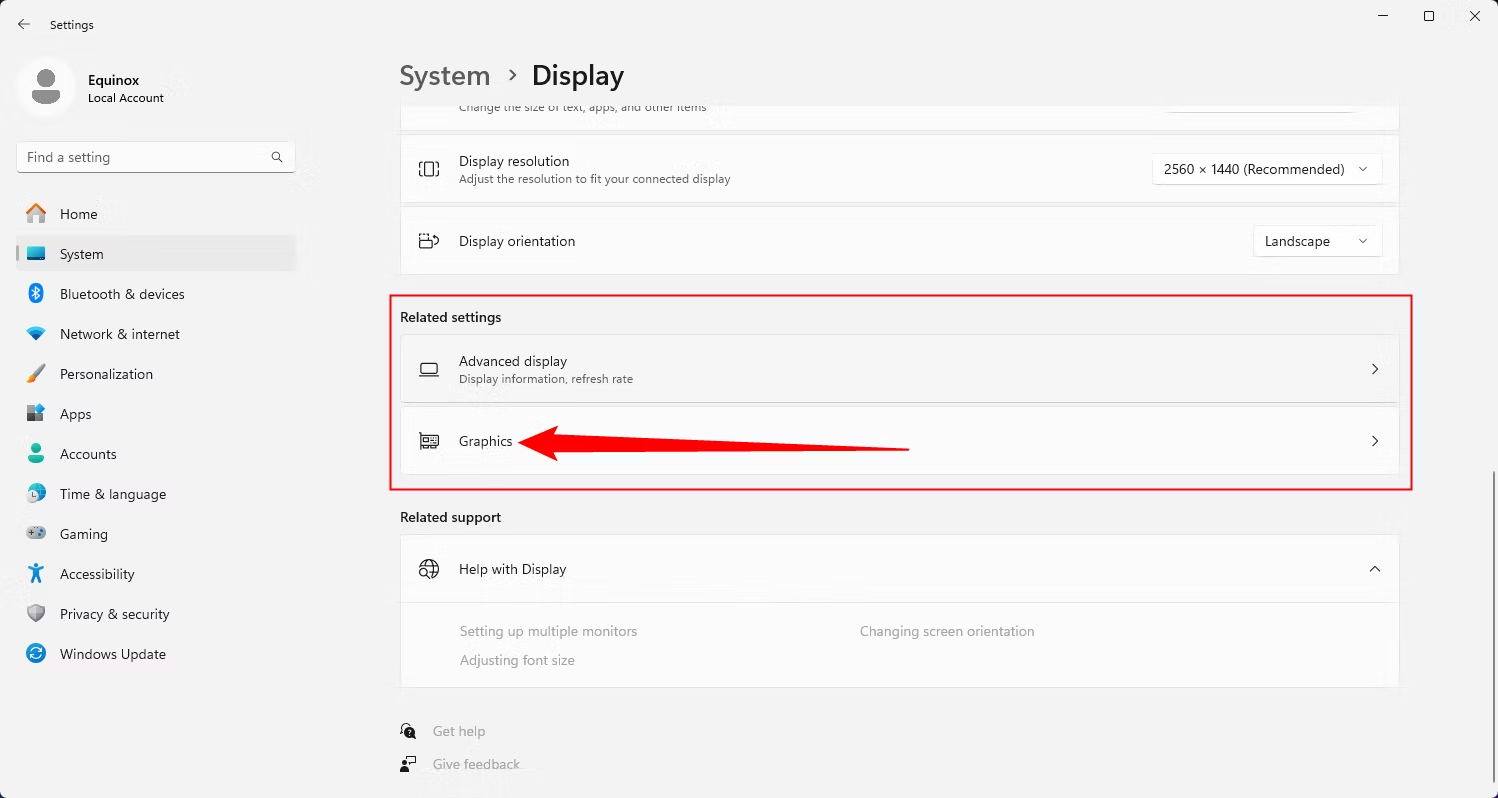
Choose «Change Default Graphics Settings.»
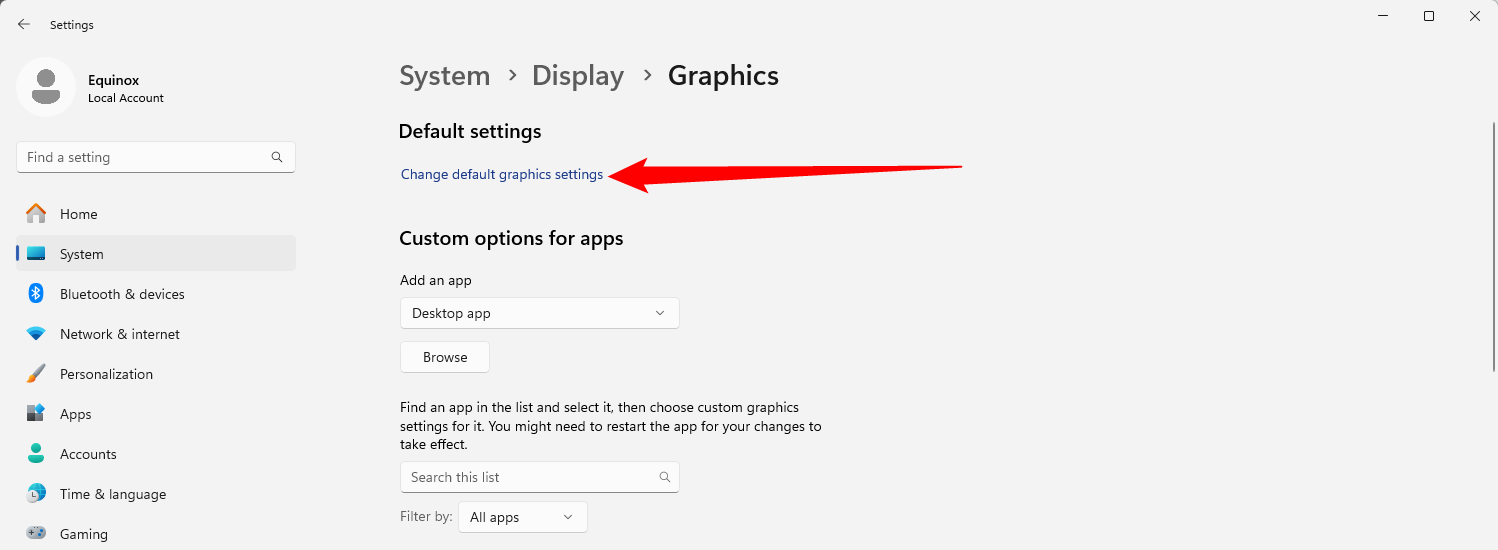
Then, toggle on the switch under «Hardware-Accelerated GPU Scheduling» and select «Yes» from the User Access Control prompt that shows up.
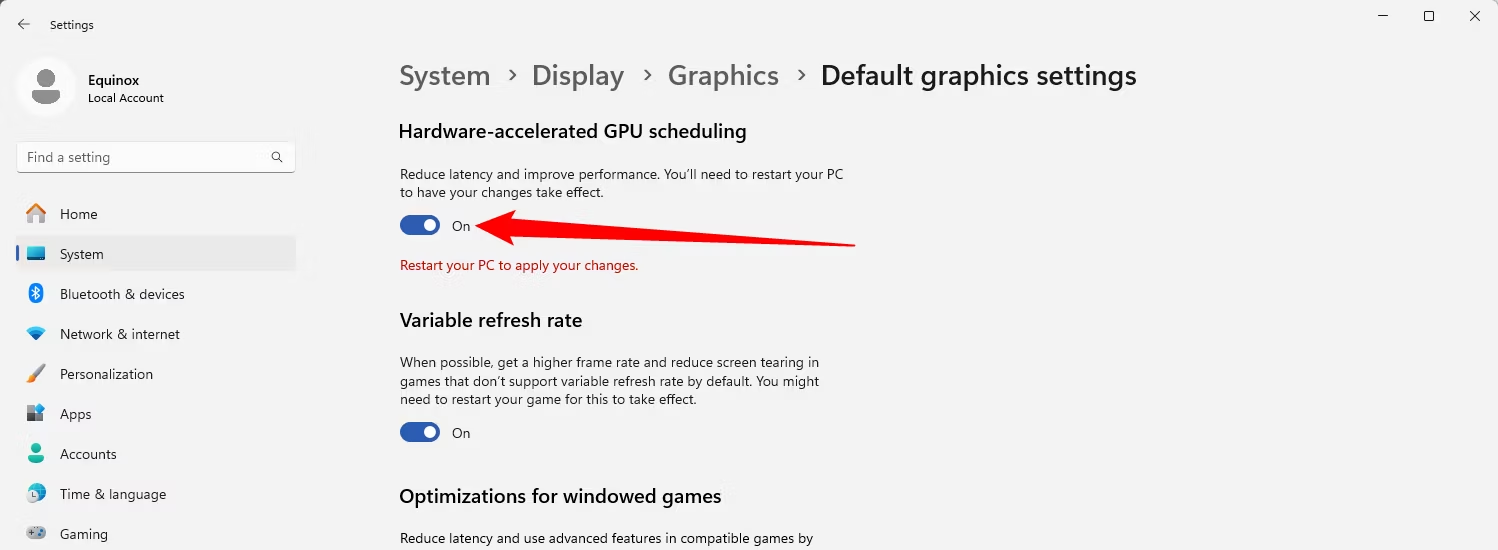
If you decide you want to disable GPU scheduling later, simply toggle off the «Hardware-Accelerated GPU Scheduling» option.
After that, you can close the «Settings» app and restart your PC to apply the change.
Microsoft states that you may not witness any significant changes immediately. However, if this feature hinders your PC’s performance instead of improving, you can disable it.
That’s it! You can check if it improves the games and apps experience on your Windows 11 PC.
Hardware Accelerated GPU Scheduling or HAGS is a relatively new feature introduced in Windows. It is something that will make your games perform better with future GPU driver updates and optimizations made by game developers.
You can easily enable it from the settings on both Windows 10 and 11. In case you didn’t know, I will show you how you can enable this.
So, let’s take a look.
Introduced with Windows 10 version 2004, HAGS aims to cut down CPU workload by offloading the frame generation instructions to the GPU.
Typically the graphics card is responsible for generating the graphical elements of games and applications. But the processor sends the instruction to the GPU about what frame to generate and when.
A batch exists where all the instructions are present and are sent to the graphics card. With longer batches, that’s when you experience latency.
With HAGS, the frame scheduling is handed over directly to the graphics card. That way, the instructions do not need to travel an extra path from the CPU to the GPU. It should decrease the overall latency and improve your gaming experience.
Using this feature, Microsoft wants to change how future games communicate with the GPU. Right now you won’t see massive gains in games, but that will change in the future with game updates.
Read more on can a brand new GPU Artifacting.
How to Enable Hardware Accelerated GPU Scheduling
To enable hardware-accelerated GPU scheduling, go to the Graphics option inside the Windows Settings and toggle it on. Alternatively, you can change a registry entry to do that too.
Let’s look at how you can do this.
Here are the methods to enable Hardware Accelerated GPU Scheduling:
1. Use Windows Settings
The Display Settings on Windows has a dedicated option where you can turn the hardware-based GPU scheduler on or off. This is especially helpful in cases where you experience frame drops in games and want to go back to the original settings. Just turn the toggle on or off and you wouldn’t even need a restart.
This option is present on both Windows 10 and 11.
On Windows 10
Now Windows will use the GPU for scheduling the graphics-heavy tasks. Let’s look at where you can enable this on Windows 11.
Go through our epic guide on how much does Overclocking increase FPS?
On Windows 11
This will change the default scheduler for graphics workloads now.
Do check our latest post on the GPU Artifacting More and More but Temperatures Not Increasing
2. Use Registry Editor
Like many other settings, you can enable the hardware-based GPU scheduler from the Registry editor too. If you have past experience dabbling with registry settings, this should not be hard for you.
But if you are not comfortable using this route, the earlier method will be much easier for you.
These steps will enable Hardware Accelerated GPU Scheduling using the Registry Editor:
- Press Win + R, type regedit, and press Ok.
- Now navigate to Computer > HKEY_LOCAL_MACHINE > SYSTEM > CurrentControlSet > Control > GraphicsDrivers.
- Double Click on HwSchMode and set the Value to 2. Ensure the Base is set to Hexadecimal.
- Press Ok to close the dialog box and exit the Registry Editor.

Your computer has successfully switched the default graphics scheduler.
Follow our guide to Disable Integrated Graphics.
Frequently Asked Questions
Should I enable hardware-accelerated GPU scheduling?
Hardware-based GPU acceleration aims to reduce CPU utilization and reduce latency in gaming. This is a mixed bag when it comes to improvements in gaming right now, but expect this feature to improve your frame rates in the future.
How do I enable hardware-accelerated GPU scheduling?
Open Settings and go into System > Display > Graphics > Change default graphics settings. Here, turn on the toggle next to GPU scheduling.
Conclusion
Some users have reported improved frame times while others reported decreased FPS with hardware-accelerated GPU scheduling. The older games particularly do not seem to play nice with this feature.
However, this is a bleeding-edge functionality right now, which means video drivers and game optimizations are required to utilize it completely. And if you are someone who installs nightly builds and beta GPU drivers, you can go ahead and enable it.
That’s all for today. See you in some other Windows guides.
Steven Arends
Steven Arends is a computer science graduate and tech enthusiast with over 10 years of experience in the field. He has a vast collection of computer hardware and loves exploring the latest advancements. As a contributing author to 10Scopes, Steven shares his expertise to make the world of technology more accessible and easier to understand for all readers.
In the realm of modern computing, the pursuit of enhanced performance and smoother experience is a constant journey for users. One significant innovation, particularly for gamers and professionals using resource-intensive applications, is Hardware Accelerated GPU Scheduling. Introduced in Windows 10 and further advanced in Windows 11, this feature allows the operating system to offload some of the GPU’s scheduling responsibilities to the hardware itself. This results in reduced latency, improved frame rates, and an overall more responsive system. If you’re looking to enable this feature on your machine, you’re in the right place. This article provides a detailed, step-by-step guide on how to enable Hardware Accelerated GPU Scheduling, along with insights into what it is and its benefits.
Understanding Hardware Accelerated GPU Scheduling
Before diving into the steps, it’s essential to understand what Hardware Accelerated GPU Scheduling (HAGS) is and why it matters. In traditional setups, the CPU handles all the scheduling of GPU tasks. This means the CPU must allocate resources, manage workloads, and queue tasks for the GPU. With HAGS, Windows can offload some of these responsibilities to the GPU itself.
Benefits of HAGS
-
Improved Performance: By allowing the GPU to manage its scheduling, tasks can be executed more efficiently, leading to enhanced performance, particularly in graphics-intensive applications.
-
Lower Latency: HAGS reduces the time it takes for the CPU to communicate with the GPU, meaning there’s less waiting time for tasks to be processed.
-
Better Resource Management: By leveraging the GPU’s hardware scheduler, the system can better distribute tasks, especially under heavy workloads like gaming or video editing.
-
Greater Stability: Offloading scheduling duties can lead to fewer stutters and performance hitches during demanding tasks.
Pre-requisites for Enabling Hardware Accelerated GPU Scheduling
Before enabling this feature, ensure the following prerequisites are met:
-
Compatible GPU: The feature is available for NVIDIA RTX and AMD Radeon graphics cards supporting Hardware-Based Scheduling. Check if your GPU supports this feature.
-
Updated Drivers: Make sure your GPU drivers are up to date. Manufacturers often release updates that optimize and improve the functionality of newly introduced features.
-
Operating System: You need to be running on Windows 10 (version 2004 or later) or Windows 11 to access HAGS.
-
DirectX 12: The application or game you are running must support DirectX 12 to take advantage of Hardware Accelerated GPU Scheduling.
Now that you’re aware of the prerequisites, let’s take a closer look at the steps involved in enabling this feature in both Windows 10 and Windows 11.
How to Enable Hardware Accelerated GPU Scheduling in Windows 10
Step 1: Accessing Graphics Settings
-
Open Settings: Click on the Start Menu in the lower-left corner of your screen, then click on the gear icon to open the Settings app.
-
Navigate to System: In the Settings window, click on the «System» option. This is usually the first category featured.
-
Go to Display: On the left-hand sidebar, click on the “Display” option.
Step 2: Advanced Graphics Settings
-
Scroll Down: Scroll down until you find the option labeled “Graphics settings.” Click on it.
-
Toggle Hardware-Accelerated GPU Scheduling: You will see a toggle switch for «Hardware-accelerated GPU scheduling.» Turn this switch to the «On» position.
-
Restart: A prompt may appear indicating that you need to restart your PC for changes to take effect. Save any work and restart your computer.
Step 3: Verifying the Change
-
Return to Graphics Settings: After your computer restarts, reopen the Graphics settings in the Display menu.
-
Check the Toggle: Ensure that the toggle for Hardware-accelerated GPU scheduling is still in the «On» position.
How to Enable Hardware Accelerated GPU Scheduling in Windows 11
Step 1: Accessing Windows Settings
-
Open Settings: Click on the Start Menu, then select “Settings” directly from the options.
-
Go to System: In the Settings window, click on “System” located on the left sidebar.
Step 2: Display Settings
-
Select Display: From the System options, click on “Display.”
-
Advanced Display Settings: Scroll down and look for “Advanced display” settings. Click on that to proceed.
Step 3: Graphics Settings
-
Click on Graphics: In the Advanced display settings, look for “Graphics” and click on it to access the related options.
-
Turn on Hardware Accelerated GPU Scheduling: You should find the “Hardware-accelerated GPU scheduling” option here. Toggle this setting to «On.»
-
Restart Your PC: Like in Windows 10, you might need to restart your PC for the changes to take effect. Make sure to save any open work.
Step 4: Confirm the Setting
- Revisit Graphics Settings: Once your PC has rebooted, return to the Graphics settings to confirm that the feature is activated.
Troubleshooting Common Issues
While enabling Hardware Accelerated GPU Scheduling is generally a straightforward process, users may encounter some issues. Here are some common problems and solutions:
-
Feature Not Available: If you do not see the option to enable HAGS, check your GPU’s specifications to confirm that it supports this feature. Update to the latest drivers from your graphics card manufacturer’s website.
-
Toggle Not Responding: In some rare cases, the toggle may appear grayed out. This can be due to administrative permissions. Ensure you’re logged in as an administrator to make the necessary changes.
-
Performance Issues After Enabling: After enabling HAGS, if you experience performance issues like stuttering or crashes, consider disabling the feature. Not all systems benefit equally from HAGS, and performance can vary depending on the application and GPU.
-
Driver Conflicts: If problems persist, it may be due to conflicts with outdated drivers. Reverting back to a previous driver version or re-installing your current graphics driver could resolve these conflicts.
-
Compatibility Issues: Not all games and applications support HAGS. Verify whether the specific software you are using is compatible with Hardware Accelerated GPU Scheduling.
Testing Performance Improvements
After enabling Hardware Accelerated GPU Scheduling, it’s good practice to assess any performance improvements. Here are a few methods to test whether HAGS has positively affected your gaming or application experience:
-
Benchmarking Software: Use tools like 3DMark, Heaven Benchmark, or UserBenchmark to run tests before and after enabling HAGS. Carefully compare frame rates, scores, and overall performance metrics.
-
Frame Rate Monitoring: Tools such as MSI Afterburner or GeForce Experience provide real-time frame rate monitoring while you play games. Look for changes in consistency and maximum FPS.
-
Real-World Testing: Simply using your applications or games can provide insight. Pay attention to any changes in responsiveness, load times, and visual stuttering.
-
Community Feedback: Engage with user communities or forums centered around gaming or your specific applications to see if others have reported performance improvements with HAGS.
Conclusion
Enabling Hardware Accelerated GPU Scheduling in Windows 10 and 11 can lead to tangible improvements in your system’s performance, particularly for graphics-intensive tasks. By following the steps outlined above, users can easily activate this feature and unlock its potential benefits. As technology continues to evolve, features like HAGS represent key advancements in optimizing how our systems manage resources and execute tasks.
As you embrace this feature, keep in mind that its effectiveness can depend on various factors, including hardware specifications and the workload being executed. Always monitor your system’s performance post-activation and be prepared to make adjustments based on your specific needs.
By staying informed and proactive in your system management, you can ensure that your computing experience remains as efficient and enjoyable as possible. Happy computing!